tire Lexus GX460 2017 User Guide
[x] Cancel search | Manufacturer: LEXUS, Model Year: 2017, Model line: GX460, Model: Lexus GX460 2017Pages: 644, PDF Size: 20.93 MB
Page 166 of 644
164
GX 460 _O M_ OM6 0F 6 8U _(U )4-1. Before driving
NOTICE
■When driving the vehicle
●Do not depress the accelerator and brake pedals at the same time during driving, as
this may restrain the engine output.
●Do not use the accelerator pedal or depress the accelerator and brake pedals at the
same time to hold the vehicle on a hill.
■When parking the vehicle
Always set the parking brake, and shift the shift lever to P. Failure to do so may cause
the vehicle to move or the vehicle may accelerate suddenly if the accelerator pedal is
accidentally depressed.
■Avoiding damage to vehicle parts
●Do not turn the steering wheel fully in either direction and hold it there for an
extended period of time.
Doing so may damage the power steering pump.
●When driving over bumps in
the road, drive as slowly as possible to avoid damaging
the wheels, underside of the vehicle, etc.
■If you get a flat tire while driving
A flat or damaged tire may cause the follo wing situations. Hold the steering wheel
firmly and gradually depress the brake pedal to slow down the vehicle.
●It may be difficult to control your vehicle.
●The vehicle will make abnormal sounds or vibrations.
●The vehicle will lean abnormally.
Information on what to do in case of a flat tire. ( →P. 5 4 2 )
■When encountering flooded roads
Do not drive on a road that has flooded after heavy rain etc. Doing so may cause the
following serious damage to the vehicle:
●Engine stalling
●Short in electrical components
●Engine damage caused by water immersion
In the event that you drive on a flooded road and the vehicle is flooded, be sure to have
your Lexus dealer check the following:
●Brake function
●Changes in quantity and quality of oil and fluid used for the engine, transmission,
transfer, differentials, etc.
●Lubricant condition for the propeller shaft, bearings and suspension joints (where
possible), and the function of all joints, bearings, etc.
GX460_OM_OM60F68U_(U).book Page 164 Wednesday, June 8, 2016 6:37 PM
Page 171 of 644
169
GX 460 _O M_ OM6 0F 6 8U _(U )4-1. Before driving
4
Driving
Vehicle load limits
◆Total load capacity (vehicle capacity weight):
→P. 5 7 0
Total load capacity means the combined weight of occupants, cargo and lug-
gage.
◆Seating capacity
7-passenger models: 7 occupants (Front 2, Rear 5)
6-passenger models: 6 occupants (Front 2, Rear 4)
Seating capacity means the maximum number of occupants whose estimated
average weight is 150 lb. (68 kg) per person.
◆TWR (Trailer Weight Rating): →P. 1 74 , 5 7 0
TWR means the maximum gross trailer weight (trailer weight plus its cargo
weight) that your vehicle is able to tow.
◆Cargo capacity
Cargo capacity may increase or decrease depending on the weight and the
number of occupants.
■Total load capacity and seating capacity
These details are also described on the tire and loading information label. (→P. 484)
Vehicle load limits include total load capacity, seating capacity, TWR (Trailer
Weight Rating) and cargo capacity.
CAUTION
■Overloading the vehicle
Do not overload the vehicle.
It may not only cause damage to the tires, but also degrade steering and braking ability,
resulting in an accident.
GX460_OM_OM60F68U_(U).book Page 169 Wednesday, June 8, 2016 6:37 PM
Page 182 of 644
180
GX 460 _O M_ OM6 0F 6 8U _(U )4-1. Before driving
Your vehicle will handle differently when towing a trailer. Help to avoid an acci-
dent, death or serious injury, keep the following in mind when towing:
●Speed limits for towing a trailer vary by state or province. Do not exceed the
posted towing speed limit.
●Lexus recommends that the vehicle-trailer speed limit is 65 mph (104 km/h)
on a flat, straight, dry road. Do not exceed this limit, the posted towing speed
limit or the speed limit for your trailer as set forth in your trailer owner’s man-
ual, whichever is lowest. Instability of the towing vehicle-trailer combination
(trailer sway) increases as speed increases. Exceeding speed limits may cause
loss of control.
●Before starting out, check the trailer lights, tires and the vehicle-trailer con-
nections. Recheck after driving a short distance.
●Practice turning, stopping and reversing with the trailer attached in an area
away from traffic until you become accustomed to the feel of the vehicle-
trailer combination.
●Reversing with a trailer attached is difficult and requires practice. Grip the
bottom of the steering wheel and move your hand to the left to move the
trailer to the left. Move your hand to the right to move the trailer to the right.
(This is generally opposite to reversing without a trailer attached.) Avoid sharp
or prolonged turning. Have
someone guide you when reversing to reduce the
risk of an accident.
●As stopping distance is increased when towing a trailer, vehicle-to-vehicle dis-
tance should be increased. For each 10 mph (16 km/h) of speed, allow at least
one vehicle and trailer length.
●Avoid sudden braking as you may skid, resulting in the trailer jackknifing and
loss of vehicle control. This is especially true on wet or slippery surfaces.
Trailer towing tips
GX460_OM_OM60F68U_(U).book Page 180 Wednesday, June 8, 2016 6:37 PM
Page 185 of 644
GX 460 _O M_ OM6 0F 6 8U _(U )
1834-1. Before driving
4
Driving
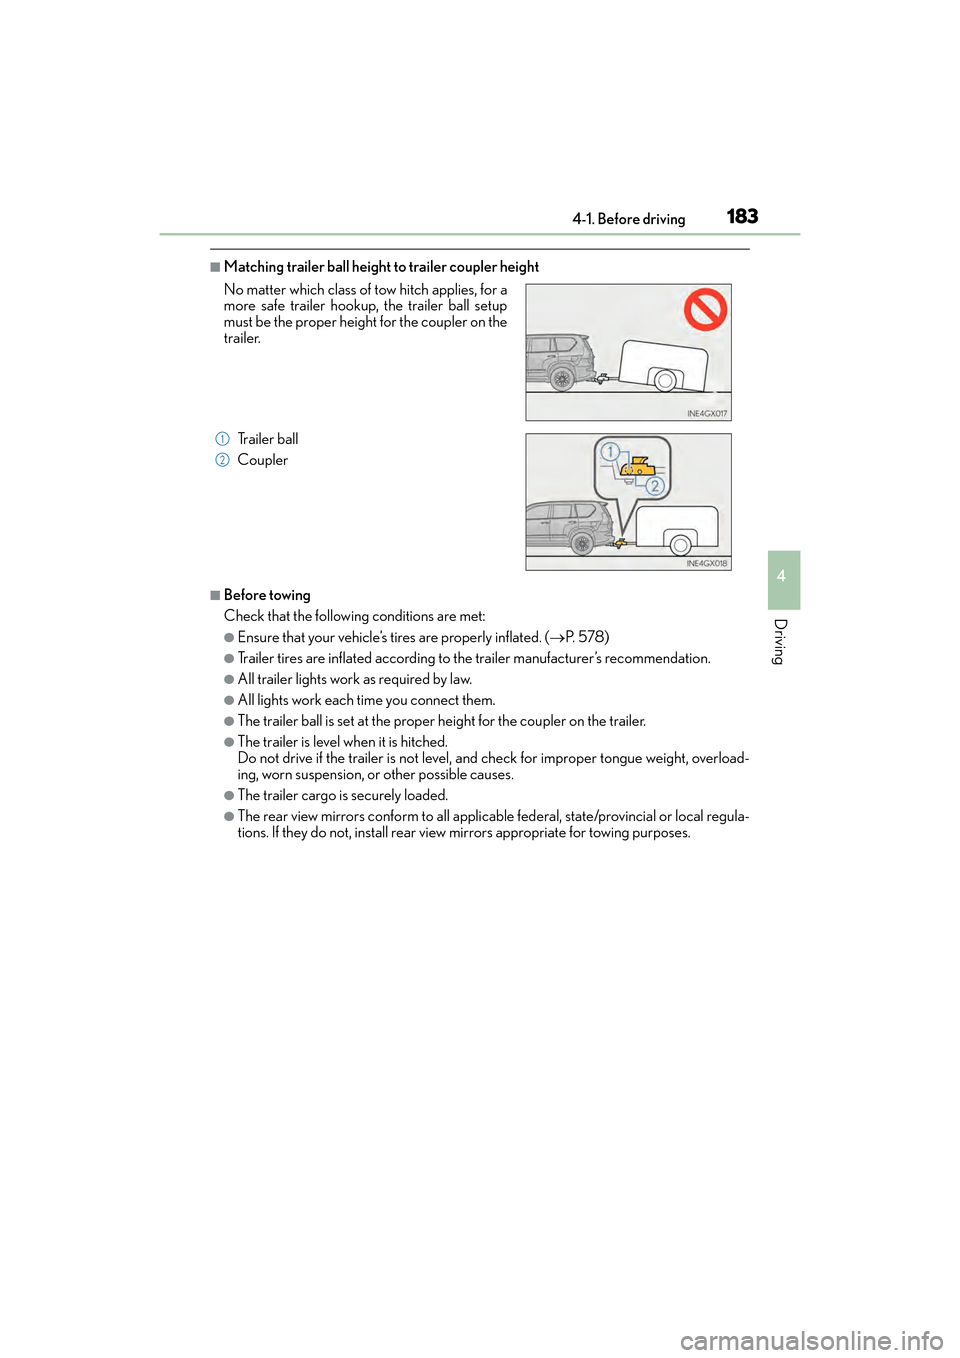
■Matching trailer ball height to trailer coupler height
■Before towing
Check that the following conditions are met:
●Ensure that your vehicle’s tires are properly inflated. (→P. 5 7 8 )
●Trailer tires are inflated according to the trailer manufacturer’s recommendation.
●All trailer lights work as required by law.
●All lights work each time you connect them.
●The trailer ball is set at the proper height for the coupler on the trailer.
●The trailer is level when it is hitched.
Do not drive if the trailer is not level, and check for improper tongue weight, overload-
ing, worn suspension, or other possible causes.
●The trailer cargo is securely loaded.
●The rear view mirrors conform to all applicable federal, state/provincial or local regula-
tions. If they do not, install rear view mirrors appropriate for towing purposes.
No matter which class of tow hitch applies, for a
more safe trailer hookup, the trailer ball setup
must be the proper height for the coupler on the
trailer.
Trailer ball
Coupler
1
2
GX460_OM_OM60F68U_(U).book Page 183 Wednesday, June 8, 2016 6:37 PM
Page 187 of 644
GX 460 _O M_ OM6 0F 6 8U _(U )
1854-1. Before driving
4
Driving
●After the trailer swaying has stopped:
• Stop in a safe place. Get all occupants out of the vehicle.
• Check the tires of the vehicle and the trailer.
• Check the load in the trailer.Make sure the load has not shifted.
Make sure the tongue weight is appropriate, if possible.
• Check the load in the vehicle. Make sure the vehicle is not overloaded after occupants get in.
If you cannot find any problems, the speed at which trailer swaying occurred is beyond
the limit of your particular vehicle-trailer combination.
Drive at a lower speed to prev ent instability. Remember that swaying of the towing vehi-
cle-trailer increases as speed increases.
CAUTION
■Trailer towing precautions
●To tow a trailer safely, use extreme care and drive the vehicle in accordance with the
trailer’s characteristics and operating conditions. Failure to do so could cause an acci-
dent resulting in death or se rious injury. Vehicle stability and braking performance are
affected by trailer stability, brake setting and performance, and the hitch. Your vehicle
will handle differently when towing a trailer.
●Set the vehicle height to the LO mode and turn off the rear height control air suspen-
sion when you connect a trailer, otherwise the vehicle height may change due to the
automatic leveling function, and you may catch part of your body in the vehicle,
resulting in an accident.
GX460_OM_OM60F68U_(U).book Page 185 Wednesday, June 8, 2016 6:37 PM
Page 193 of 644
GX 460 _O M_ OM6 0F 6 8U _(U )
1914-2. Driving procedures
4
Driving
If the engine is stopped with the shift lever in a position other than P, the engine
switch will not be turned off but instead be turned to ACCESSORY mode. Per-
form the following procedure to turn the switch off:
Check that the parking brake is set.
Shift the shift lever to P.
Check that the indicator on the engine switch is illuminated in amber and then
press the engine switch once.
Check that the indicator on the engine switch is off.
■Auto power off function
When the shift lever is in P, if the vehicl e is left in ACCESSORY or IGNITION ON mode
with the engine not running for more than 20 minutes (ACCESSORY mode) or one
hour (IGNITION ON mode), the engine switch will automatically turn off. However, this
function cannot entirely prevent battery discharge. Do not leave the vehicle with the
engine switch in ACCESSORY or IGNITION ON mode for long periods of time when
the engine is not running.
■Electronic key battery depletion
→ P. 9 6
■Conditions affecting operation
→P. 117
■Note for the entry function
→P. 118
■If the engine does not start
The engine immobilizer system may not have been deactivated. ( →P. 7 2 )
Contact your Lexus dealer.
■Steering lock
After turning the engine switch off and opening and closing the doors, the steering wheel
will be locked due to the steering lock func tion. Operating the engine switch again auto-
matically cancels the steering lock.
When stopping the engine with the sh ift lever in a position other than P
1
2
3
4
GX460_OM_OM60F68U_(U).book Page 191 Wednesday, June 8, 2016 6:37 PM
Page 210 of 644

208
GX 460 _O M_ OM6 0F 6 8U _(U )4-3. Operating the lights and wipers
●In the situations below, the system may not be able to correctly detect the surrounding
brightness levels, and may flash or expose nearby pedestrians to the high beam. There-
fore, you should consider turning the high be
am on or off manually rather than relying
on the Automatic High Beam system.
• In bad weather (rain, snow, fog, sandstorms etc.)
• The windshield is obscured by fog, mist, ice, dirt etc.
• The windshield is cracked or damaged.
• The inside rear view mirror or camera sensor is deformed or dirty.
• The camera sensor temperature is extremely high.
• Surrounding brightness levels are equal to those of headlights, tail lights or fog lights.
• Vehicles ahead have headlights that are either switched off, dirty, are changing color, or are not aimed properly.
• When driving through an area of interm ittently changing brightness and darkness
• When frequently and repeated ly driving ascending/descending roads, or roads with
rough, bumpy or uneven surfaces (such as stone-paved roads, gravel tracks etc.)
• When frequently and repeatedly taking curves or driving on a winding road
• There is a highly reflective object ahead of the vehicle, such as a sign or a mirror.
• The back of a vehicle ahead is highly reflective, such as a container on a truck.
• The vehicle’s headlights are damaged or dirty.
• The vehicle is listing or tilting, due to a flat tire, a trailer being towed etc.
• The Automatic High Beam indicator is flashing.
• The high beam and low beam are repeatedly being switched between in an abnor- mal manner.
• The driver believes that the high beam may be causing problems or distress to other
drivers or pedestrians nearby.
■If the Automatic High Beam indicator flashes...
It may indicate a malfunction in the system. Contact your Lexus dealer.
■Temporary lowering sensor sensitivity
The sensitivity of the sensor can be temporarily lowered.
To lower the sensitivity, push and hold the “AUTO” button on the inside rear view mirror
for 15 to 20 seconds, and release. The indicator light on the inside rear view mirror will
flash to indicate that the sensitivity has been lowered.
When the engine switch is turned off, the sens itivity will be returned to its normal level.
■Customization that can be configured at your Lexus dealer
The Automatic High Beam can be turned off.
GX460_OM_OM60F68U_(U).book Page 208 Wednesday, June 8, 2016 6:37 PM
Page 243 of 644

GX 460 _O M_ OM6 0F 6 8U _(U )
2414-5. Using the driving support systems
4
Driving
■Conditions in which the function may not operate correctly
In the following conditions, th e camera sensor may be unable to recognize lane markers
causing the lane departure warning function to operate incorrectly. However, this does
not indicate a malfunction.
●When driving through an area with no lane markers, such as a tollbooth, a crossing or
before a ticket checkpoint
●When driving on a sharp curve
●When lane markers are extremely narrow or extremely wide
●When the vehicle leans to one side an unusual amount due to a heavy load or improper
tire inflation pressure
●When the following distance between your vehicle and the vehicle ahead is extremely
short
●When the lane markers are yellow (These ma y be more difficult for the system to rec-
ognize compared to white markers.)
●When the lane markers are broken, “Botts’ dots”, “Raised pavement marker” or stones
●When the lane markers are on a curb etc.
●When lane markers are obscured or partially obscured by sand, dirt, etc.
●When there are shadows on the road running parallel with lane markers, or if a shadow
covers the lane markers
●When driving on a particularly bright road surface, such as concrete
●When driving on a road surface that is bright due to reflected light
●When driving in a location where the light leve l changes rapidly, such as the entrance to
or exit from a tunnel
●When sunlight or the headlight s of oncoming vehicles are shining directly into the cam-
era lens
●When driving on roads that are branching or merging
●When driving on a road surface that is wet du e to rain, previous rainfall, standing water,
etc.
●When the vehicle experiences strong up-and-down motion such as when driving on an
extremely rough road or on a seam in the pavement
●When headlight brightness at nighttime is reduced due to dirt on the lenses, or when
the headlights are misaligned
●When driving on winding roads or roads that are uneven
●When driving on rough or unpaved roads
■When changing the tires
Depending on the tires used, such as snow tire, etc., sufficient performance may not be
maintainable.
■Warning messages and buzzers for LDA system
Warning messages and buzzers are used to indicate a system malfunction or to inform
the driver of the need for caution while driving. ( →P. 5 3 1 , 5 3 2 )
GX460_OM_OM60F68U_(U).book Page 241 Wednesday, June 8, 2016 6:37 PM
Page 244 of 644
242
GX 460 _O M_ OM6 0F 6 8U _(U )4-5. Using the driving support systems
CAUTION
■Before using the LDA system
Do not rely solely on the LDA system. The LDA system does not drive the vehicle auto-
matically, nor does it reduce the amount of care you need to take. As such, the driver
must always assume full responsibility fo
r understanding his/her surroundings, for
operating the steering wheel to correct th e driving line, and for driving safely.
Inappropriate or negligent driving could lead to an accident.
■To avoid operating the LDA by mistake
Switch the LDA system off using the “LDA” switch when not in use.
■Situations unsuitable for LDA system
Do not use LDA system in any of the following situations.
Otherwise, the system may not function correctly and could result in an accident.
●When driving with tire chains, a spare tire, or similar equipment
●When driving with non-standard parts or aftermarket equipment installed (including
modified tires and suspensions, etc.).
●When there are objects or structures along the roadside that might be misinterpreted
as lane markers (such as guardrails, curb, reflector posts, etc.)
●When driving on snowy roads
●When pavement lane markers are difficult to see due to rain, snow, fog, sand, dirt, etc.
●When there are visible lines on the pavement from road repairs, or if the remains of
old lane markers are still visible on the road
●When driving in a lane other than the driving or passing lanes on a freeway or high-
way.
●When driving on a road with lane closures due to maintenance, or when driving in a
temporary lane
GX460_OM_OM60F68U_(U).book Page 242 Wednesday, June 8, 2016 6:37 PM
Page 262 of 644

260
GX 460 _O M_ OM6 0F 6 8U _(U )4-5. Using the driving support systems
■If you notice any symptoms
If you notice any of the following symp
toms, refer to the likely cause and the
solution, and re-check.
If the symptom is not resolved by the solution, have the vehicle inspected by
your Lexus dealer.
Things you should know
Likely causeSolution
�‰ The image is difficult to see
• The vehicle is in a dark area
• The temperature around the lens is
either high or low
• The outside temperature is low
• There are water droplets on the cam- era
• It is raining or humid
• Foreign matter (mud etc.) is adhering to the camera
• There are scratches on the camera
• Sunlight or headlights are shining directly into the camera
• The vehicle is under fluorescent lights, sodium lights, mercury lights etc.
If this happens due to these causes, it
does not indicate a malfunction.
Back up while visually checking the vehi-
cle’s surroundings. (Use the monitor
again once conditions have been
improved.)
The image on the rear view monitor sys-
tem screen can be adjusted, refer to the
“MULTIMEDIA OWNER’S MANUAL”
or “NAVIGATION SYSTEM OWNER’S
MANUAL”.
�‰ The image is blurry
Dirt or foreign matter (such as water
droplets, snow, mud etc.) is adhering to
the camera.Flush the camera with a large quantity of
water and wipe the camera lens clean
with a soft and wet cloth.
�‰The image is out of alignment
The camera or surrounding area has
received a strong impact.Have the vehicle inspected by your Lexus
dealer.
�‰The fixed guide lines are very far out of alignment
The camera position is out of alignment.Have the vehicle inspected by your Lexus
dealer.
• The vehicle is tilted (there is a heavy
load on the vehicle, tire pressure is low
due to a tire puncture, etc.)
• The vehicle is used on an incline.If this happens due to these causes, it
does not indicate a malfunction.
Back up while visually checking the vehi-
cle’s surroundings.
GX460_OM_OM60F68U_(U).book Page 260 Wednesday, June 8, 2016 6:37 PM