headlight Lexus GX460 2020 / LEXUS 2020 GX460 (OM60R27U) Owner's Guide
[x] Cancel search | Manufacturer: LEXUS, Model Year: 2020, Model line: GX460, Model: Lexus GX460 2020Pages: 620, PDF Size: 12.41 MB
Page 448 of 620
448
GX460_OM_OM60R27U_(U)6-3. Do-it-yourself maintenance
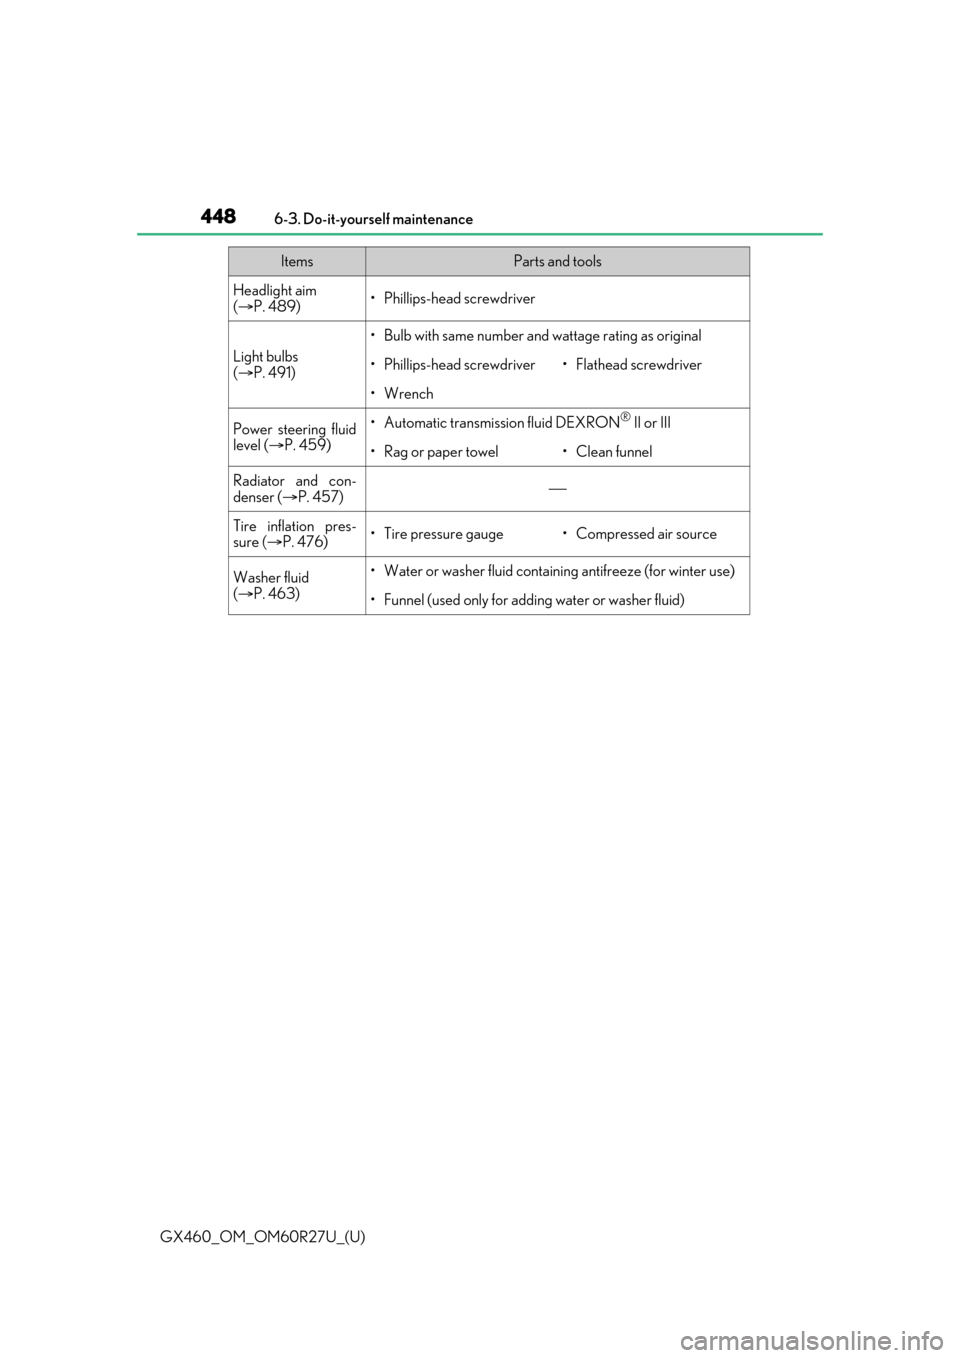
Headlight aim
(
P. 489)• Phillips-head screwdriver
Light bulbs
( P. 491)
• Bulb with same number and wattage rating as original
• Phillips-head screwdriver•Flathead sc rewdriver
•Wrench
Power steering fluid
level (P. 459)• Automatic transmission fluid DEXRON® II or III
• Rag or paper towel•Clean funnel
Radiator and con-
denser ( P. 457)
Tire inflation pres-
sure (P. 476)• Tire pressure gauge• Compressed air source
Washer fluid
( P. 463)• Water or washer fluid containing antifreeze (for winter use)
• Funnel (used only for adding water or washer fluid)
ItemsParts and tools
Page 489 of 620
489
GX460_OM_OM60R27U_(U)6-3. Do-it-yourself maintenance
6
Maintenance and care
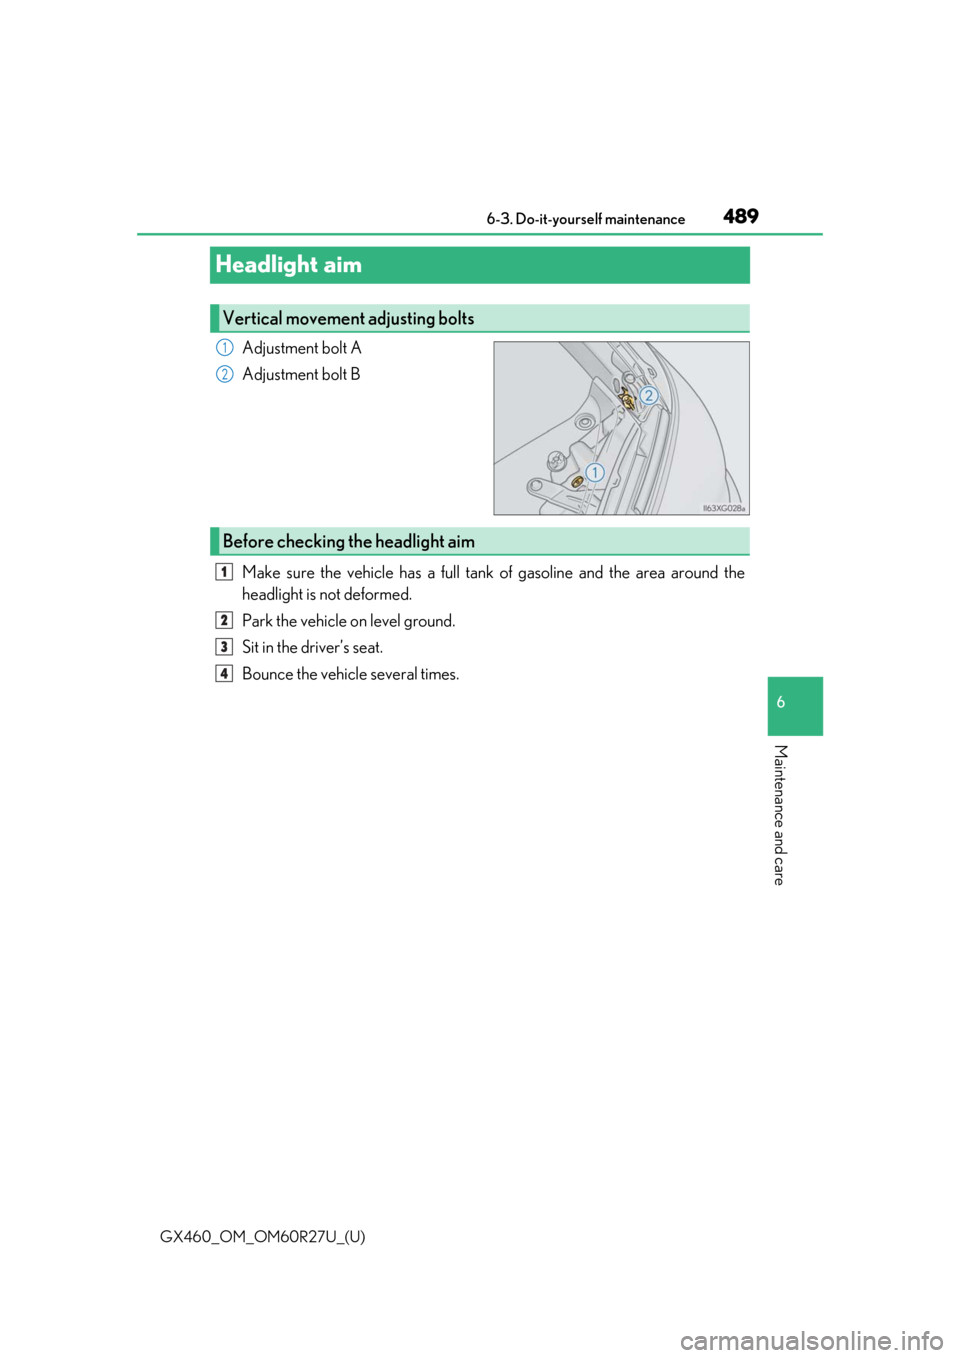
Headlight aim
Adjustment bolt A
Adjustment bolt B
Make sure the vehicle has a full tank of gasoline and the area around the
headlight is not deformed.
Park the vehicle on level ground.
Sit in the driver’s seat.
Bounce the vehicle several times.
Vertical movement adjusting bolts
1
2
Before checking the headlight aim
1
2
3
4
Page 490 of 620
490
GX460_OM_OM60R27U_(U)6-3. Do-it-yourself maintenance
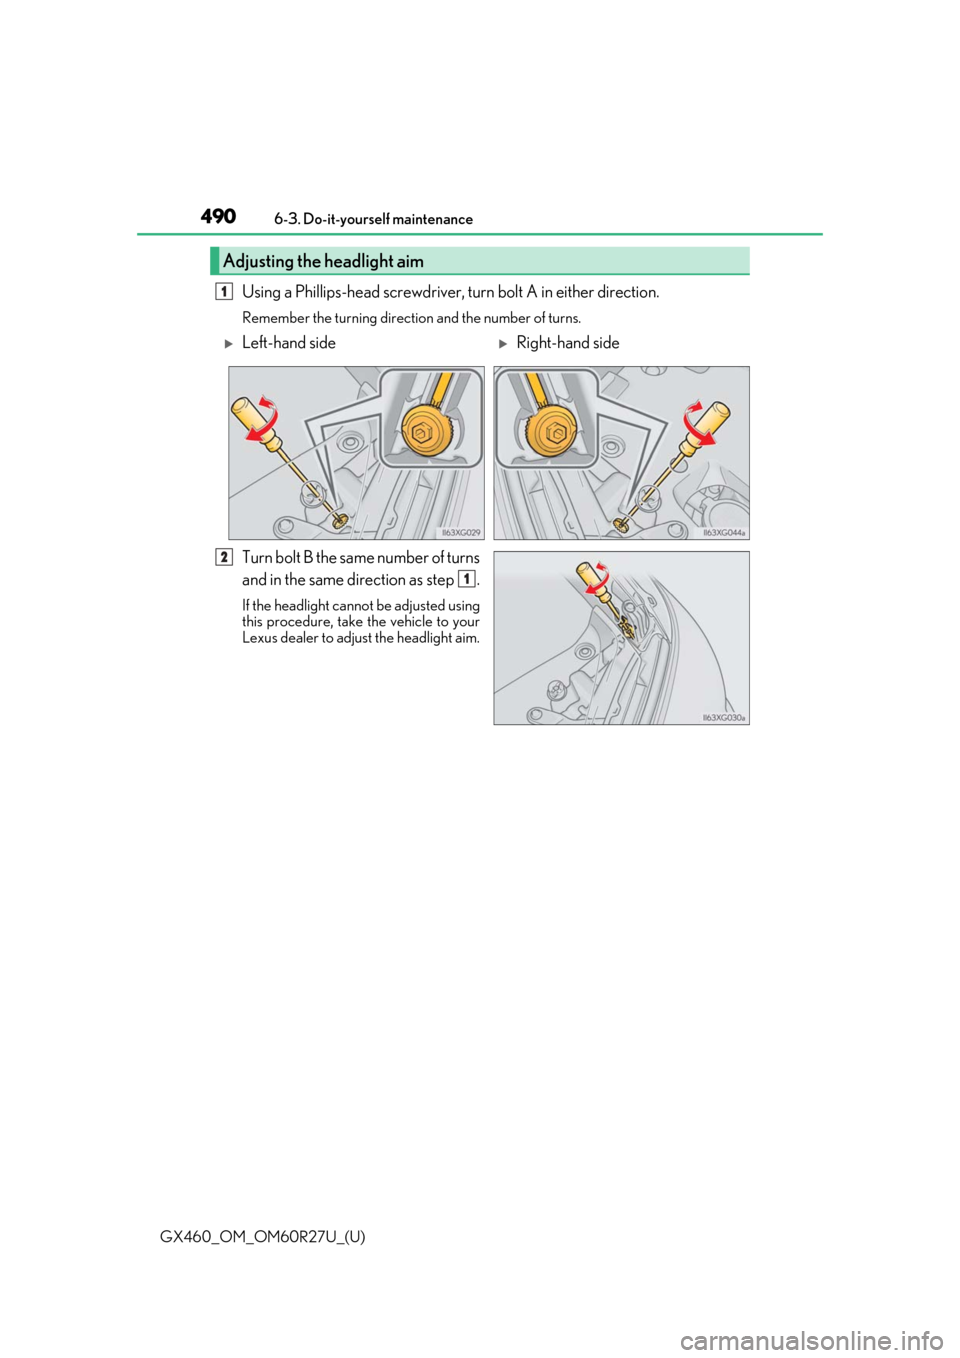
Using a Phillips-head screwdriver, turn bolt A in either direction.
Remember the turning directio
n and the number of turns.
Turn bolt B the same number of turns
and in the same direction as step .
If the headlight cannot be adjusted using
this procedure, take the vehicle to your
Lexus dealer to adjust the headlight aim.
Adjusting the headlight aim
1
Left-hand sideRight-hand side
2
1
Page 497 of 620
GX460_OM_OM60R27U_(U)
4976-3. Do-it-yourself maintenance
6
Maintenance and care
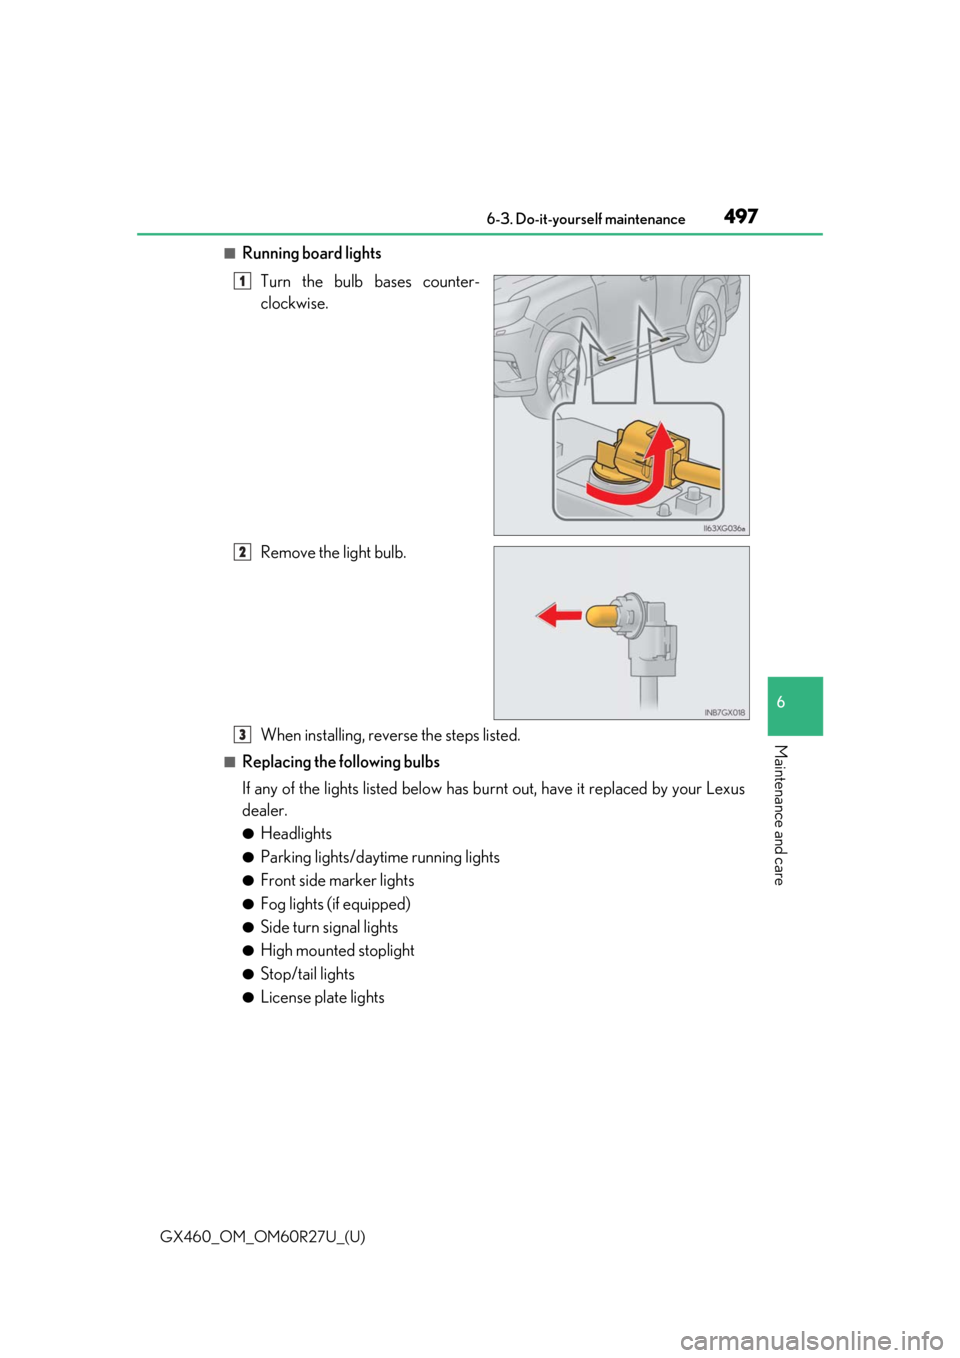
■Running board lightsTurn the bulb bases counter-
clockwise.
Remove the light bulb.
When installing, reverse the steps listed.
■Replacing the following bulbs
If any of the lights listed below has burnt out, have it replaced by your Lexus
dealer.
●Headlights
●Parking lights/daytime running lights
●Front side marker lights
●Fog lights (if equipped)
●Side turn signal lights
●High mounted stoplight
●Stop/tail lights
●License plate lights
1
2
3
Page 498 of 620
498
GX460_OM_OM60R27U_(U)6-3. Do-it-yourself maintenance
■LED lights
The headlights, parking lights/daytime running
lights, front side marker lights, fog lights,
side turn signal lights, high mounted stoplig ht, stop/tail lights and license plate lights con-
sist of a number of LEDs. If any of the LEDs burn out, take your vehicle to your Lexus
dealer to have the light replaced.
■Condensation build-up on the inside of the lens
Temporary condensation build-up on the inside of the headlight lens does not indicate a
malfunction. Contact your Lexus dealer for mo re information in the following situations:
●Large drops of water are built up on the inside of the lens.
●Water has built up inside the headlight.
WARNING
■Replacing light bulbs
●Turn off the headlights. Do not attempt to replace the bulb immediately after turning
off the headlights.
The bulbs become very hot and may cause burns.
●Do not touch the glass portion of the light bu lb with bare hands. When it is unavoid-
able to hold the glass portion, use and hold with a clean dry cloth to avoid getting
moisture and oils on the bulb.
Also, if the bulb is sc ratched or dropped, it may blow out or crack.
●Fully install light bulbs and any parts used to secure them. Failure to do so may result
in heat damage, fire, or water entering th e headlight unit. This may damage the head-
lights or cause condensation to build up on the lens.
●Do not attempt to repair or disassemble light bulbs, connectors, electric circuits or
component parts.
Doing so may result in death or se rious injury due to electric shock.
■To prevent damage or fire
●Make sure bulbs are fully seated and locked.
●Check the wattage of the bulb before installing to prevent heat damage.
Page 521 of 620
5217-2. Steps to take in an emergency
GX460_OM_OM60R27U_(U)
7
When trouble arises
■Warning messages
The warning messages explained below may di ffer from the actual messages according
to operation conditions an d vehicle specifications.
■Warning buzzer
In some cases, the buzzer ma y not be heard due to being in a noisy location or audio
sound.
■If “ENGINE OIL LOW”/“Engine Oil Level Low Add or Replace” is shown
The engine oil level is low. Check the level of the engine oil, and add if necessary.
This message may appear if the vehicle is stopped on a slope. Move the vehicle to a level
surface and check to see if the message disappears.
■If “AUTO POWER OFF TO CONSERVE BATTE RY”/“Auto power off to conserve bat-
tery” is shown
Power was turned off due to the automatic power off function. Next time when starting
the engine, increase the engine speed slightly and maintain that level for approximately 5
minutes to recharge the battery.
■If “ENGINE OIL PRES SURE LOW”/“Oil Pressure Low Stop in a Safe Place See
Owner’s Manual” is shown
Indicates abnormal engine oil pressure.
Immediately stop the vehicle in a safe place and contact your Lexus dealer. Continuing to
drive the vehicle may be dangerous.
■If “HIGH TRANSMISSION FLUID TEMPERAT URE”/“High Transmission Fluid Temp
See Owner’s Manual” is shown.
It indicates that the automatic transmission fluid temperature is too high.
Immediately stop the vehicle in a safe place, shift the shift lever to P and wait until the
warning message disappear. If the warning message disappears, you may start the vehi-
cle again. If the warning message does not disappear, contact your Lexus dealer.
■If “Check Transmissi on System” is shown.
The automatic transmission system is malfunctioning.
Have the vehicle inspected by your Lexus dealer.
■If “ACCELERATOR AND BRAKE PEDA LS DEPRESSED SIMULTANEOUSLY”/
“Accelerator and Brake Pedals Pressed Simultaneously” is shown on the multi-informa-
tion display
The accelerator and brake pedal are being depressed simultaneously. ( P. 165)
Release the accelerator pedal and depress the brake pedal.
■If “HEADLIGHT SYSTEM MALFUNCTION VISIT YOUR DEALER”/“Headlight Sys-
tem Malfunction Visit Your Dealer” is displayed
The following systems may be malfunctioning. Have the vehicle inspected by your Lexus
dealer immediately.
●The LED headlight system
●The automatic headlight leveling system
●Automatic High Beam
Page 538 of 620
538
GX460_OM_OM60R27U_(U)7-2. Steps to take in an emergency
If the engine will not start
One of the following may be the cause of the problem:
●There may not be sufficient fuel in the vehicle’s tank.
Refuel the vehicle.
●The engine may be flooded.
Try to restart the engine again follo
wing correct starting procedures.
( P. 196)
●There may be a malfunction in th e engine immobilizer system. (P. 76)
One of the following may be the cause of the problem:
●The battery may be discharged. ( P. 543)
●The battery terminal connections may be loose or corroded.
The engine starting system may be malfun ctioning due to an electrical problem
such as an open circuit or a blown fuse. However, an interim measure is available
to start the engine. ( P. 539)
If the engine will not start even though correct starting procedures are being
followed ( P. 196), consider each of the following points:
The engine will not start even when the starter motor operates nor-
mally.
The starter motor turns over slowly , the interior lights and headlights
are dim, or the horn does not sound or sounds at a low volume.
The starter motor does not turn over.
Page 539 of 620
5397-2. Steps to take in an emergency
GX460_OM_OM60R27U_(U)
7
When trouble arises
One of the following may be the cause of the problem:
●One or both of the battery terminals may be disconnected.
●The battery may be discharged. ( P. 543)
●There may be a malfunction in the steering lock system.
Contact your Lexus dealer if the problem cannot be repaired, or if repair procedures
are unknown.
When the engine does not start, the follo wing steps can be used as an interim
measure to start the engine if the engine switch is functioning normally.
Set the parking brake.
Shift the shift lever to P.
Turn the engine switch to the ACCESSORY mode.
Press and hold the engine switch for about 15 seconds while depressing the
brake pedal firmly.
Even if the engine can be started using the above steps, the system may be mal-
functioning. Have the vehicle in spected by your Lexus dealer.
The starter motor does not turn over, the interior lights and headlights
do not turn on, or the horn does not sound.
Emergency start function
1
2
3
4
Page 544 of 620
5447-2. Steps to take in an emergency
GX460_OM_OM60R27U_(U)
Start the engine of the second vehicle. Increase the engine speed slightly and
maintain at that level for approximatel y 5 minutes to recharge the battery of
your vehicle.
Open and close any of the doors of your vehicle with the engine switch off.
Maintain the engine speed of the second vehicle and start the engine of your
vehicle by turning the engine switch to IGNITION ON mode.
Once your vehicle’s engine has started, remove the jumper cables in the exact
reverse order in which they were connected.
Once the engine starts, have the vehicle checked at your Lexus dealer as soon
as possible.
■Starting the engine when the battery is discharged
The engine cannot be started by push-starting.
■To prevent battery discharge
●Turn off the headlights and the audio system while the engine is off.
●Turn off any unnecessary electrical components when the vehicle is running at a low
speed for an extended period , such as in heavy traffic.
■Charging the battery
The electricity stored in the battery will disc harge gradually even when the vehicle is not
in use, due to natural discharge and the draini ng effects of certain electrical appliances. If
the vehicle is left for a long time, the battery may discharge, and the engine may be
unable to start. (The battery recharges automatically during driving.)
■When recharging or replacing the battery
●In some cases, it may not be possible to un lock the doors using the smart access system
with push-button start when the battery is discharged. Use the wireless remote control
or the mechanical key to lock or unlock the doors.
●The engine may not start on the first attempt after the battery has recharged but will
start normally after the second attempt. This is not a malfunction.
●The engine switch mode is memorized by the vehicle. When the battery is recon-
nected, the system will return to the mode it was in before the battery was discharged.
Before disconnecting the battery, turn the engine switch off. If you are unsure what
mode the engine switch was in before the battery discharged, be especially careful
when reconnecting the battery.
4
5
6
7
Page 587 of 620
587
GX460_OM_OM60R27U_(U)
9For owners
Reporting safety defects for U.S. owners.................................... 588
Seat belt instructions for Canadian owners
(in French) ..............................................589
SRS airbag instructions for Canadian owners
(in French) ............................................... 591
Headlight aim instructions for Canadian owners
(in French) ..............................................599