fuel Lexus GX470 2007 Using other driving systems /
[x] Cancel search | Manufacturer: LEXUS, Model Year: 2007, Model line: GX470, Model: Lexus GX470 2007Pages: 436, PDF Size: 11.52 MB
Page 109 of 436

89
2-1. Driving procedures
2
When driving
■Breaking in your new Lexus
To extend the life of the vehicle, the following precautions are recommended to
observe:
●For the first 200 miles (300 km):
Avoid sudden stops.
●For the first 500 miles (800 km):
Do not tow a trailer.
●For the first 600 miles (1000 km):
• Do not drive at extremely high speeds.
• Avoid sudden acceleration.
• Do not drive continuously in the low gears.
• Do not drive at a constant speed for extended periods.
■Operating your vehicle in a foreign country
Comply with the relevant vehicle registration laws and confirm the availability of the
correct fuel. (P. 3 8 0 )
Page 119 of 436

99
2-1. Driving procedures
2
When driving
■Shift position uses
*: To improve fuel consumption and reduce noises, set the shift lever in the
“D” position for normal driving.
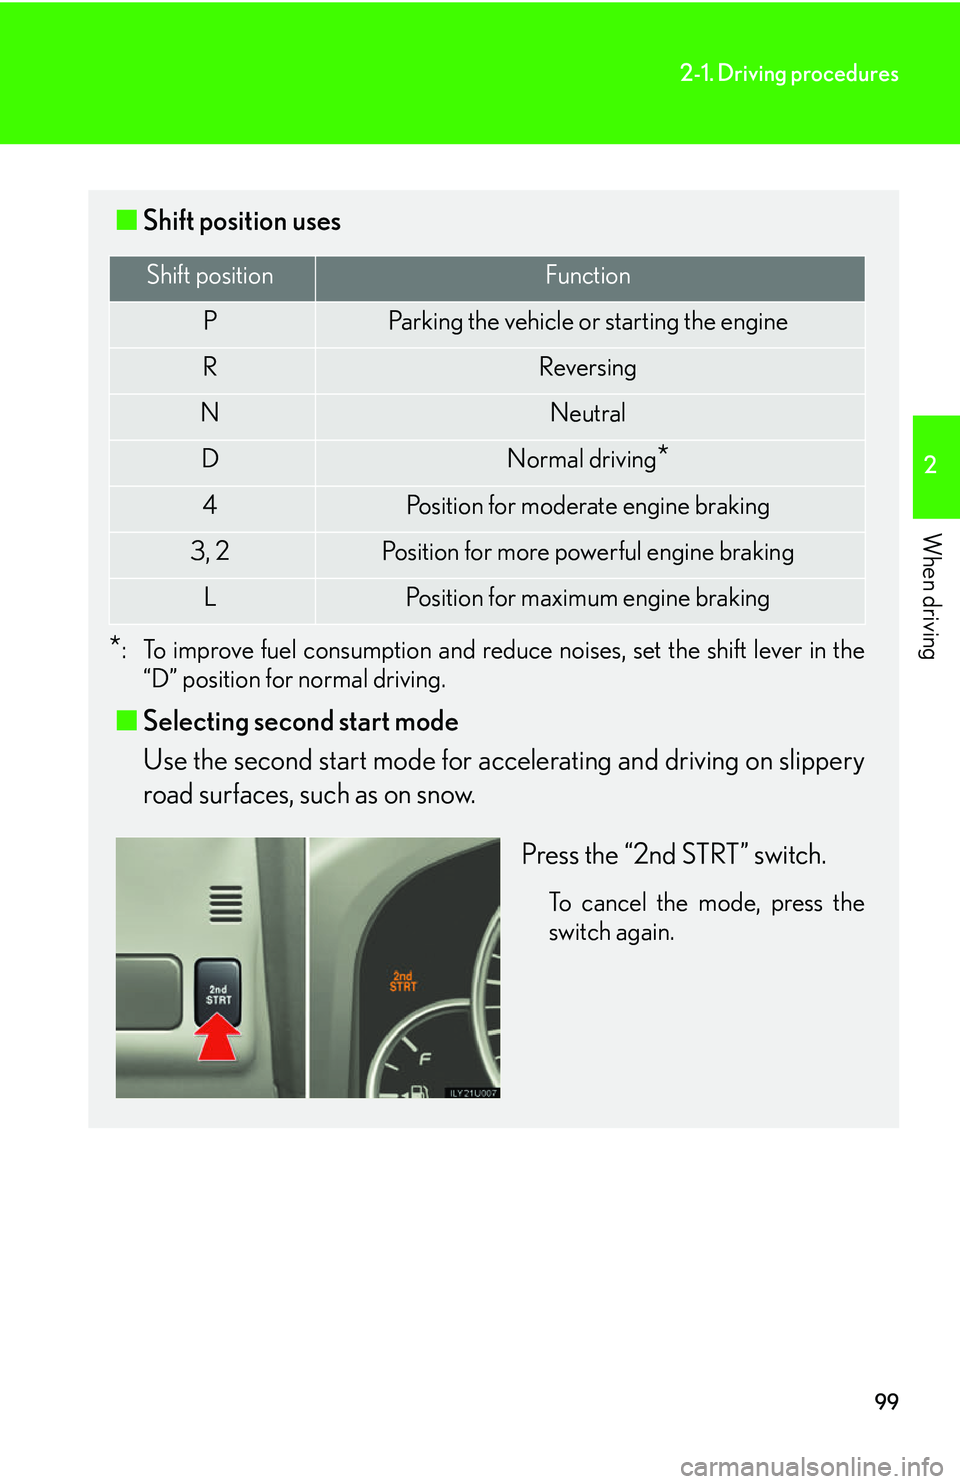
■ Selecting second start mode
Use the second start mode for a ccelerating and driving on slippery
road surfaces, such as on snow.
Press the “2nd STRT” switch.
To cancel the mode, press the
switch again.
Shift positionFunction
PParking the vehicle or starting the engine
RReversing
NNeutral
DNormal driving*
4Position for moderate engine braking
3, 2Position for more powerful engine braking
LPosition for maximum engine braking
Page 123 of 436

103
2
When driving
2-2. Instrument cluster
Gauges and meters
The units used on the speedometer may differ depending on the target
region.
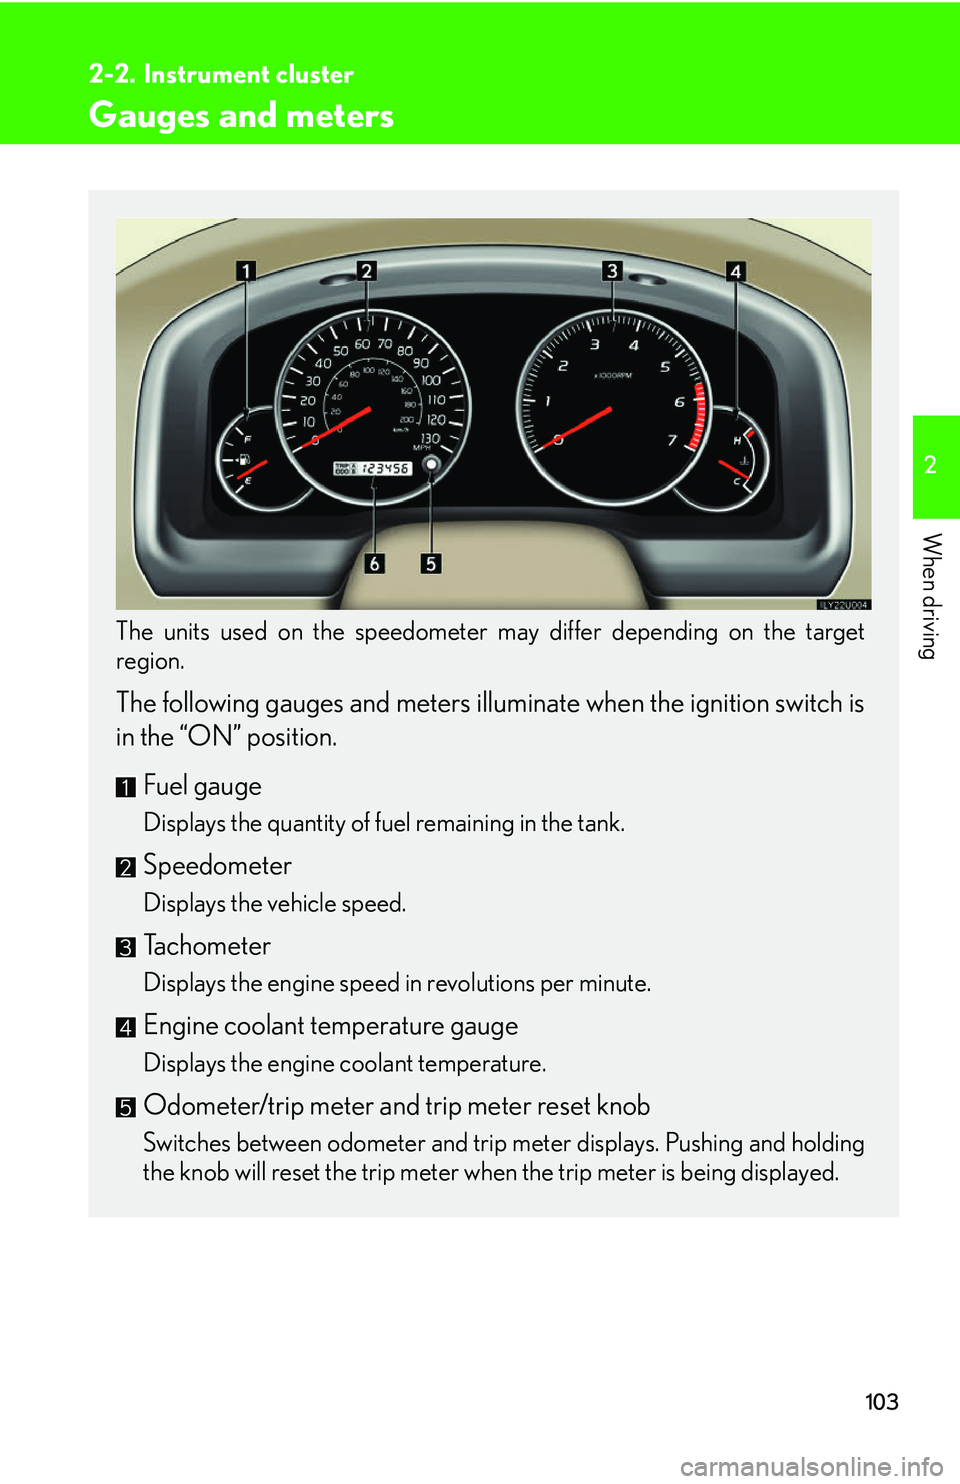
The following gauges and meters illuminate when the ignition switch is
in the “ON” position.
Fuel gauge
Displays the quantity of fuel remaining in the tank.
Speedometer
Displays the vehicle speed.
Tachometer
Displays the engine speed in revolutions per minute.
Engine coolant temperature gauge
Displays the engine coolant temperature.
Odometer/trip meter and trip meter reset knob
Switches between odometer and trip meter displays. Pushing and holding
the knob will reset the trip meter when the trip meter is being displayed.
Page 128 of 436

108
2-2. Instrument cluster
Trip information display
Display light controlPush and hold the “MOD E” button until “ILL” appears on the display.
Push “ ▲” or “▼ ” to adjust the brightness.
You can adjust the brightness to 3 levels (when the tail lights are off) or 6 lev-
els (when the tail lights are on).
The trip information display presents the driver with a variety of driving-
related data.
Trip information display
•Clock(P. 235)
• Outside temperature display
( P. 2 3 6 )
• Average fuel consumption
• Current fuel consumption
• Driving range
• Average vehicle speed
• Barometer
• Altimeter
• Driving time
Display items can be switched
by pushing the “MODE” button.
Page 129 of 436

109
2-2. Instrument cluster
2
When driving
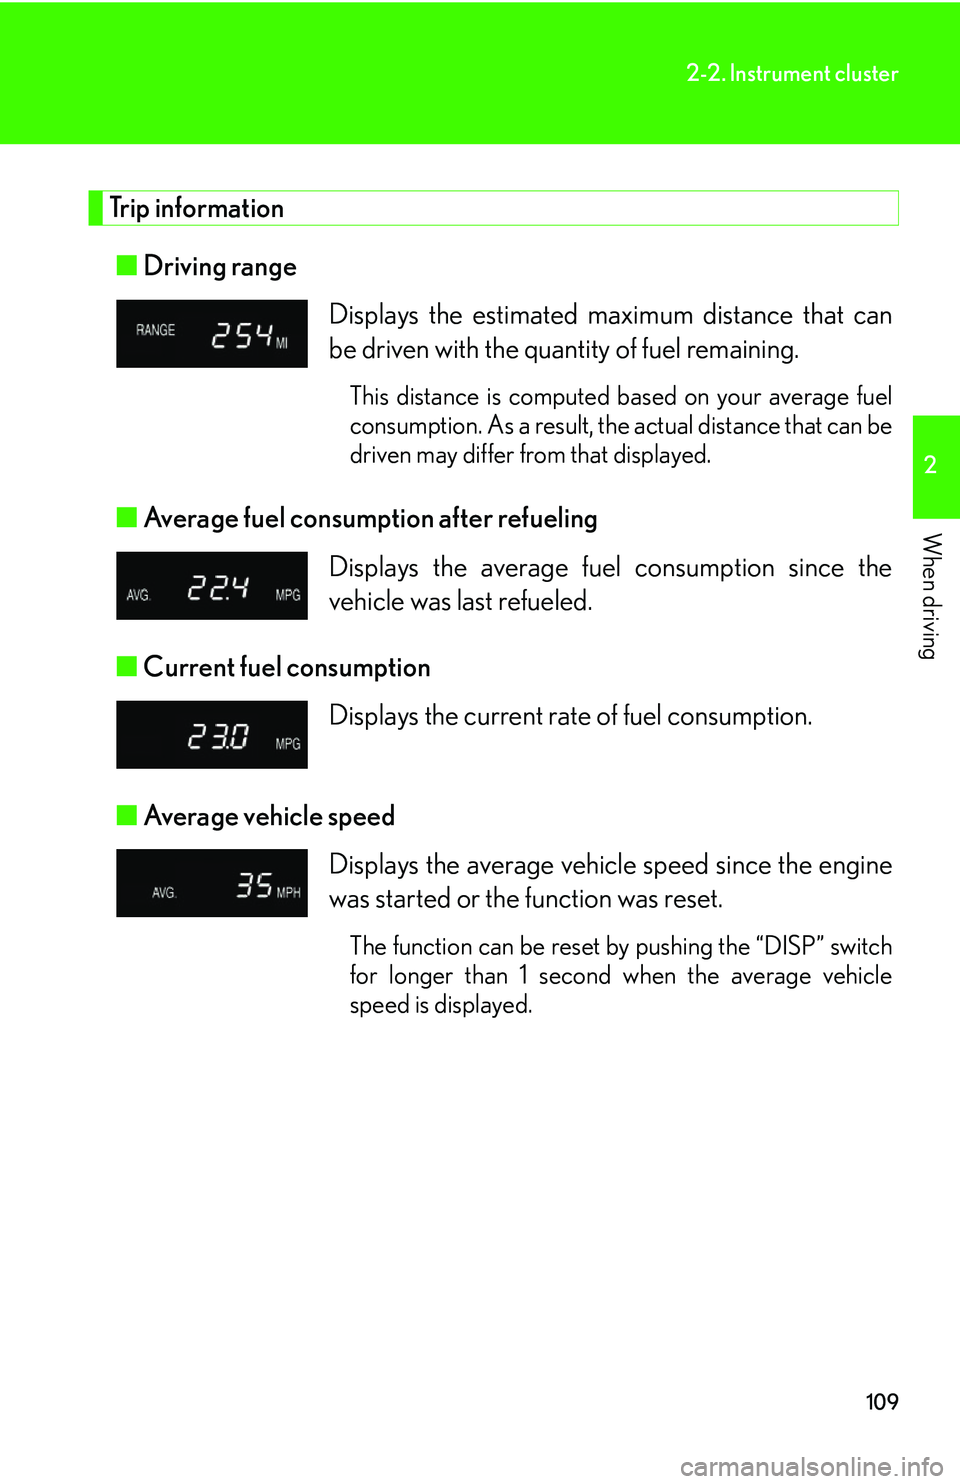
Trip information■ Driving range
■ Average fuel consumption after refueling
■ Current fuel consumption
■ Average vehicle speed Displays the estimated maximum distance that can
be driven with the quantity of fuel remaining.
This distance is computed based on your average fuel
consumption. As a result, the actual distance that can be
driven may differ from that displayed.
Displays the average fuel
consumption since the
vehicle was last refueled.
Displays the current rate of fuel consumption.
Displays the average vehicle speed since the engine
was started or the function was reset.
The function can be reset by pushing the “DISP” switch
for longer than 1 second when the average vehicle
speed is displayed.
Page 130 of 436

110
2-2. Instrument cluster
■Barometer
■ Altimeter
■ Current fuel consumption
Displays the atmospheric pressure in the vehicle.
The displayed atmospheric pressure ranges from 17.8
IN.HG (600 hPa) up to 31.0 IN.HG (1050 hPa).
Displays the approximate altitude.
The displayed altitude ranges from -1500 ft. (-500 m)
up to 13000 ft. (4000 m).
Displays the elapsed time after the engine starts.
When the engine is started, driving time is counted
from 0:00.
Up to 19:59 (19 hours, 59 minutes) can be displayed.
■Altimeter mode
The indicated altitude of a single position may deviate according to the atmospheric
pressure and temperature.
While the altitude mode is displayed, push the “ ▲” or “▼ ” button to increase/
decrease the altitude by 50 ft. (or 10 m).
To reset the adjusted altitude, push and hold the “RESET” button for more than 1
second.
CAUTION
■Caution while driving
Do not adjust the display.
Doing so may cause the driver to mishandle the vehicle and an accident, resulting in
death or serious injury.
Page 160 of 436

140
2-5. Driving information
Cargo and luggage
Capacity and distributionCargo capacity depends on the to tal weight of the occupants.
(Cargo capacity) = (Total load capa city) — (Total weight of occupants)
Steps for Determining Correct Load Limit—
(1) Locate the statement “The combined weight of occupants and cargo should never exceed XXX kg or XXX lbs.” on your vehicle’s
placard.
(2) Determine the combined weight of the driver and passengers that
will be riding in your vehicle.
(3) Subtract the combined weight of the driver and passengers from
XXX kg or XXX lbs.
(4) The resulting figure equals the av ailable amount of cargo and lug-
gage load capacity.
For example, if the “XXX” amount equals 1400 lbs. and there will be
five 150 lb passengers in your vehi cle, the amount of available cargo
and luggage load capacity is 650 lbs. (1400 - 750 (5 150) = 650
lbs.)
Take notice of the following information about storage precautions, cargo
capacity and load.
● Stow cargo and luggage in the luggage compartment whenever
possible. Be sure all items are secured in place.
● Be careful to keep the vehicle level. Placing the weight as far for-
ward as possible helps maintain vehicle balance.
● For better fuel economy, do not carry unnecessary weight.
Page 170 of 436

150
2-5. Driving information
Trailer towing
Your vehicle is designed primarily as a passenger-and-load carrying vehi-
cle. Towing a trailer will have an adverse effect on handling, performance,
braking, durability, and fuel consumpt ion. For your safety and the safety of
others, do not overload the vehicle or trailer.
Lexus warranties do not apply to damage or malfunction caused by towing
a trailer for commercial purposes.
■ Weight limits
Confirm that the total trailer weight , gross vehicle weight, gross axle
weight and trailer tongue lo ad are all within the limits.
■ Gross vehicle weight
The gross vehicle weight must no t exceed the Gross Vehicle Weight
Rating (GVWR) indicated on the Certification Label. The gross
vehicle weight is the sum weight of the unloaded vehicle, driver, pas-
sengers, luggage, hitch and trail er tongue load. Also included is the
weight of any special equipment installed on your vehicle.
■ Gross axle weight
The load on either the front or rear axle resulting from distribution of
the gross vehicle weight on both axles must not exceed the Gross
Axle Weight Rating (GAWR) lis ted on the Certification Label.
Certification Label
Page 292 of 436

272
4-1. Maintenance and care
Cleaning and protecting the vehicle exterior
■Automatic car washes
●Fold the mirrors back before washing the vehicle.
●Brushes used in automatic car washes may scratch the vehicle surface and
harm your vehicle’s paint.
■High pressure automatic car washes
Do not allow the nozzles of the car wash to come within close proximity of the win-
dows. Before entering an automatic car wash, check that the fuel filler door is
closed.
■Aluminum wheels
Remove any dirt immediately by using a neutral detergent. Do not use hard brushes
or abrasive cleaners. Do not use strong or harsh chemical cleaners. Use the same
mild detergent and wax as used on the paint.
■Bumpers and side moldings
Do not scrub with abrasive cleaners.
Perform the following to protect the vehicle and maintain it in prime condi-
tion.
● Working from top to bottom, liber ally apply water to the vehicle
body, wheel wells and underside of the vehicle to remove any dirt
and dust.
Wash the vehicle body using a sponge or soft cloth, such as a chamois.
● For hard-to-remove marks, use car wash soap and rinse thor-
oughly with water.
● Wipe away any water.
● If water no longer beads on clea n paint, apply wax when the vehi-
cle body is cool.
Page 298 of 436

278
4-2. Maintenance
■Allow inspection and repairs to be performed by a Lexus dealer
●Lexus technicians are well-trained speciali sts and are kept up to date with the
latest service information. They are well informed about the operations of all
systems on your vehicle.
●Keep a copy of the repair order. It proves that the maintenance that has been
performed is under warranty coverage. If any problem should arise while your
vehicle is under warranty, your Lexus de aler will promptly take care of it.
CAUTION
■Hazardous materials
●Engine exhaust, some of its constituents, and a wide variety of automobile com-
ponents contain or emit chemicals known to the State of California to cause can-
cer and birth defects and other reproductive harm. Work in a well ventilated area.
●Oils, fuels and fluids contained in vehicles as well as waste produced by compo-
nent wear contain or emit chemicals known to the State of California to cause
cancer and birth defects or other reproductive harm. Avoid exposure and wash
any affected area immediately.
●Battery posts, terminals and related accessories contain lead and lead com-
pounds which are known to cause brain damage. Wash your hands after han-
dling. (P. 2 9 9 )
●Used engine oil contains chemicals that have been shown to cause cancer in lab-
oratory animals. Avoid prolonged and repeated contact. Always protect your
skin by washing thorough ly with soap and water.