ECU Lexus GX470 2007 Using other driving systems /
[x] Cancel search | Manufacturer: LEXUS, Model Year: 2007, Model line: GX470, Model: Lexus GX470 2007Pages: 436, PDF Size: 11.52 MB
Page 126 of 436

106
2-2. Instrument cluster
■Indicators
The indicators inform the driver of th e operating state of the vehi-
cle’s various systems.
Turn signal indicator
( P. 1 0 1 )“RSCA OFF” indicator
(P. 6 8 )
Headlight high beam indi-
cator ( P. 111)Downhill assist control
system indicator
( P. 1 3 0 )
(U.S.A.)
Headlight indicator
( P. 111)
(U.S.A.)
Engine oil replacement
reminder light ( P. 3 5 0 )
(Canada)
Tail light indicator
( P. 111) Slip indicator
(P. 1 3 3 )
Security indicator
(P. 4 9 ) “VSC OFF” indicator
(P. 121)
Shift position indicators
(P. 99)Center differential lock
indicator ( P. 121)
Height control indicator
( P. 1 2 3 ) “AIRBAG ON” indicator
( P. 6 9 )
Automatic transmission
second start indicator
( P. 99)“AIRBAG OFF” indicator
( P. 6 9 )
Cruise control indicator
( P. 118)
*
*
*
*
*
*
*
Page 160 of 436

140
2-5. Driving information
Cargo and luggage
Capacity and distributionCargo capacity depends on the to tal weight of the occupants.
(Cargo capacity) = (Total load capa city) — (Total weight of occupants)
Steps for Determining Correct Load Limit—
(1) Locate the statement “The combined weight of occupants and cargo should never exceed XXX kg or XXX lbs.” on your vehicle’s
placard.
(2) Determine the combined weight of the driver and passengers that
will be riding in your vehicle.
(3) Subtract the combined weight of the driver and passengers from
XXX kg or XXX lbs.
(4) The resulting figure equals the av ailable amount of cargo and lug-
gage load capacity.
For example, if the “XXX” amount equals 1400 lbs. and there will be
five 150 lb passengers in your vehi cle, the amount of available cargo
and luggage load capacity is 650 lbs. (1400 - 750 (5 150) = 650
lbs.)
Take notice of the following information about storage precautions, cargo
capacity and load.
● Stow cargo and luggage in the luggage compartment whenever
possible. Be sure all items are secured in place.
● Be careful to keep the vehicle level. Placing the weight as far for-
ward as possible helps maintain vehicle balance.
● For better fuel economy, do not carry unnecessary weight.
Page 163 of 436

143
2-5. Driving information
2
When driving
CAUTION
■Storage precautions
●Do not place anything on the luggage cover, and do not stack anything in the lug-
gage compartment higher than the seatbacks.
Such items may be thrown about and possibly injure people in the vehicle during
sudden braking or in an accident.
●Do not drive with objects on top of the instrument panel.
They may interfere with the driver’s field of view or move during sharp accelera-
tion or turning, thus impairing the driver ’s control of the vehicle. In an accident
they may injure the vehicle occupants.
●Secure all items in the occupant compartment, as they may shift and injure some-
one during an accident or sudden braking.
●Never allow anyone to ride in the luggage compartment. It is not designed for
passengers. They should ride in their seat s with their seat belts properly fastened.
Otherwise, they are much more likely to suffer serious bodily injury, in the event
of sudden braking or a collision.
■Weight of the load
●Improper loading may cause deterioration of steering or braking control result-
ing in an accident which may cause death or serious injury.
●Do not exceed the maximum axle weight ra ting or the total vehicle weight rating.
●Even if the total load of occupant's weight and the cargo load is less than the total
load capacity, do not apply the load unevenly. Improper loading may cause dete-
rioration of steering or braking control which may cause death or serious injury.
Page 174 of 436

154
2-5. Driving information
■Before towing
Check that the following conditions are met:
●The vehicle’s tires are properly inflated. (P. 3 8 5 )
●Trailer tires are inflated according to the trailer manufacturer’s recommenda-
tion.
●All trailer lights work.
●All lights work each time you connect them.
●The trailer ball is set up at the proper height for the coupler on the trailer.
●The vehicle remains level when a loaded or unloaded trailer is hitched. Do not
drive if the vehicle is not level, and check for improper tongue load, overloading,
worn suspension, or other possible causes.
●The trailer cargo is securely loaded.
●The rear view mirrors conform to all applicable federal, state/provincial or local
regulations. If they do not, install rear view mirrors appropriate for towing pur-
poses.
■Break-in schedule
Lexus recommends that you do not use a new vehicle or a vehicle with any new
power train components (engine, transmission, differential, wheel bearings, etc.) to
tow a trailer for the first 500 miles (800 km) of driving.
■Maintenance
●If you tow a trailer, your vehicle will require more frequent maintenance due to
the additional load. (See “Warranty and Services Guide/Owner’s Manual Sup-
plement/Scheduled Maintenance”.)
●Retighten the fixing bolts of the towing ball and bracket after approximately
600 miles (1000 km) of trailer towing.
Page 175 of 436

155
2-5. Driving information
2
When driving
CAUTION
■To avoid accident or injury
●The total trailer weight (trailer weight plus the weight of cargo) must not exceed
6500 lb. (2948 kg).
●If a trailer and cargo weight over 2000 lb. (907 kg), use a sway control device
with sufficient capacity.
●The gross combined weight (sum of your vehicle weight plus its load and the total
trailer weight) must not exceed 12000 lb. (5443 kg).
●Do not exceed the trailer hitch assembly weight, gross vehicle weight, gross axle
weight and trailer tongue load capacities.
●Never load more weight in the back than in the front of the trailer. About 60% of
the load should be in the front half of the trailer, and the remaining 40% in the
rear.
●Set the vehicle height to the “LO” mode and turn off the rear height control air
suspension to prevent the vehicle he ight from automatically changing.
●The tow hitch receiver installed on your vehicle must never be used on another
vehicle
■Hitches
●If you wish to install a trailer hitch, contact your Lexus dealer.
●Use only a hitch that conforms to the total trailer weight requirement.
●Follow the directions supplied by the hitch manufacturer.
●Lubricate the hitch ball with a light coat of grease.
●Remove the trailer hitch whenever you are not towing a trailer. After removing
the hitch, seal any mounting hole in the vehicle body to prevent entry of any sub-
stances into the vehicle.
■When towing a trailer
●If the total trailer weight exceeds 1000 lb . (453 kg), trailer brakes are required.
●Never tap into your vehicle’s hydraulic system, as this will lower the vehicle’s brak-
ing effectiveness.
●Never tow a trailer without using a safety chain securely attached to both the
trailer and the vehicle. If damage occurs to the coupling unit or hitch ball, there is
danger of the trailer wandering into another lane.
Page 199 of 436

179
3-2. Using the audio system
3
Interior features
■If the satellite radio does not operate normally
If a problem occurs with the XM
® tuner, a message will appear on the screen. Refer
to the table below to identify the problem, and take the suggested corrective action.
ANTENNA
The XM® antenna is not connected. Check whether
the XM® antenna cable is attached securely.
There is a short-circuit in the antenna or the surround-
ing antenna cable. See a Lexus certified dealer.
UPDATING
You have not subscribed to XM® satellite radio. The
radio is being updated with the latest encryption code.
Contact XM
® satellite radio for subscription informa-
tion. When a contract is canceled, you can choose
“CH000” and all free-to-air channels.
The premium channel you selected is not authorized.
Wait for about 2 seconds until the radio returns to the
previous channel or “CH001”. If it does not change
automatically, select another channel. If you want to lis-
ten to the premium channel, contact XM
® satellite
radio.
NO SIGNAL
The XM® signal is too weak at the current location.
Wait until your vehicle reaches a location with a stron-
ger signal.
LOADIN GThe unit is acquiring audio or program information.
Wait until the unit has received the information.
OFF AIRThe channel you selected is not broadcasting any pro-
gramming. Select another channel.
-----
There is no song/program title or artist name/feature
associated with the channel at that time. No action
needed.
Page 264 of 436

244
3-6. Other interior features
Floor mats
CAUTION
■When inserting the floor mat
Make sure the floor mat is properly placed on the vehicle carpet. If the floor mat
slips and interferes with the movement of the pedals during driving, it may cause an
accident.
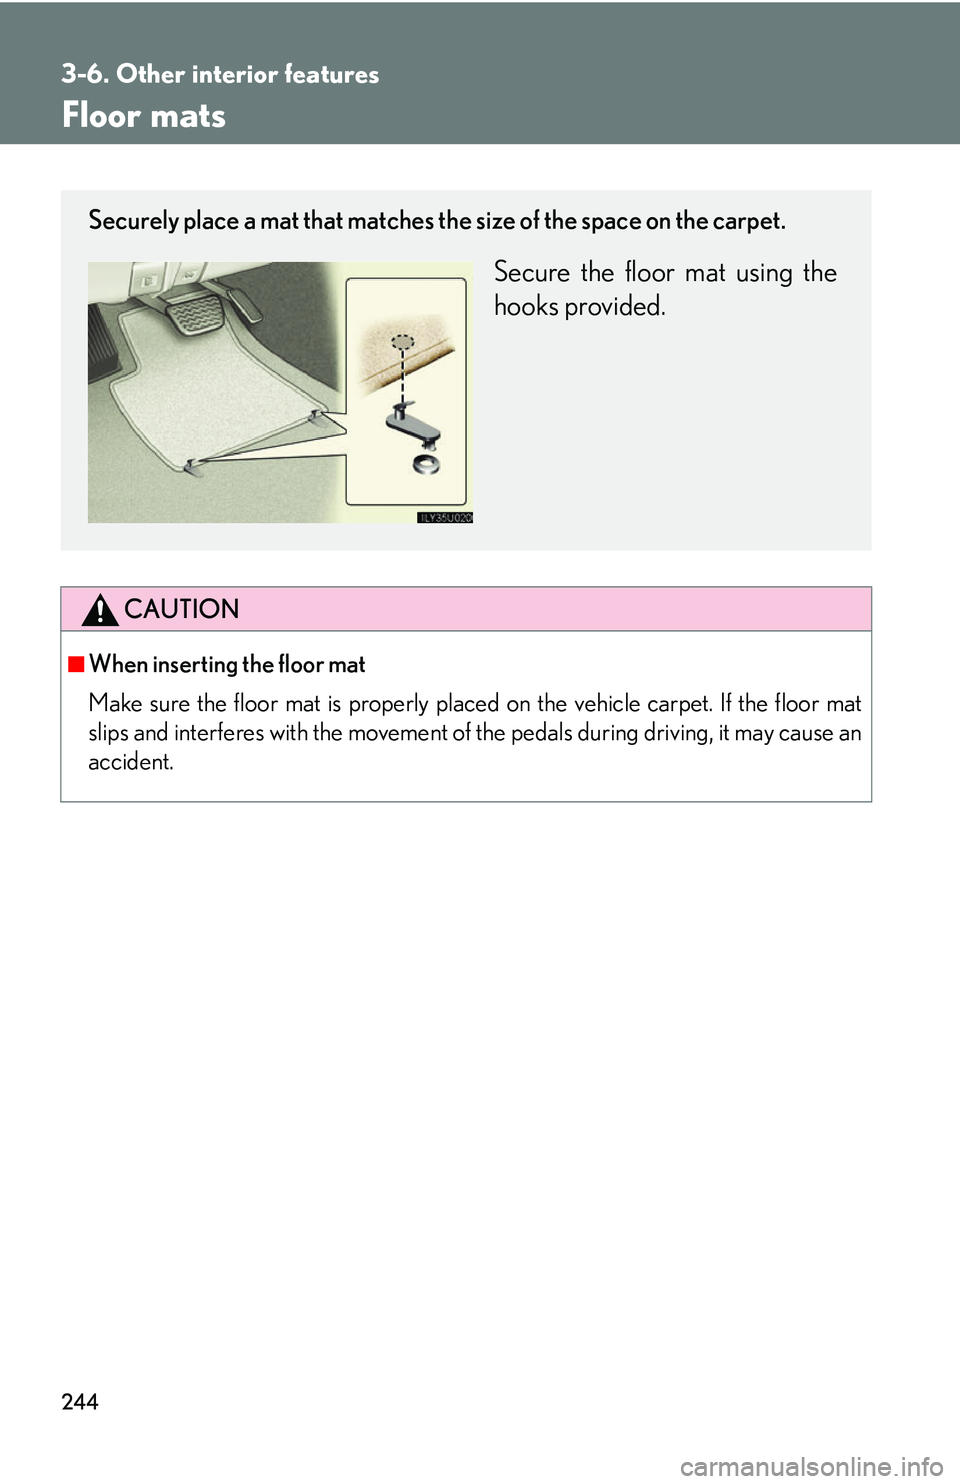
Securely place a mat that matches the size of the space on the carpet.
Secure the floor mat using the
hooks provided.
Page 265 of 436

245
3-6. Other interior features
3
Interior features
Luggage compartment features
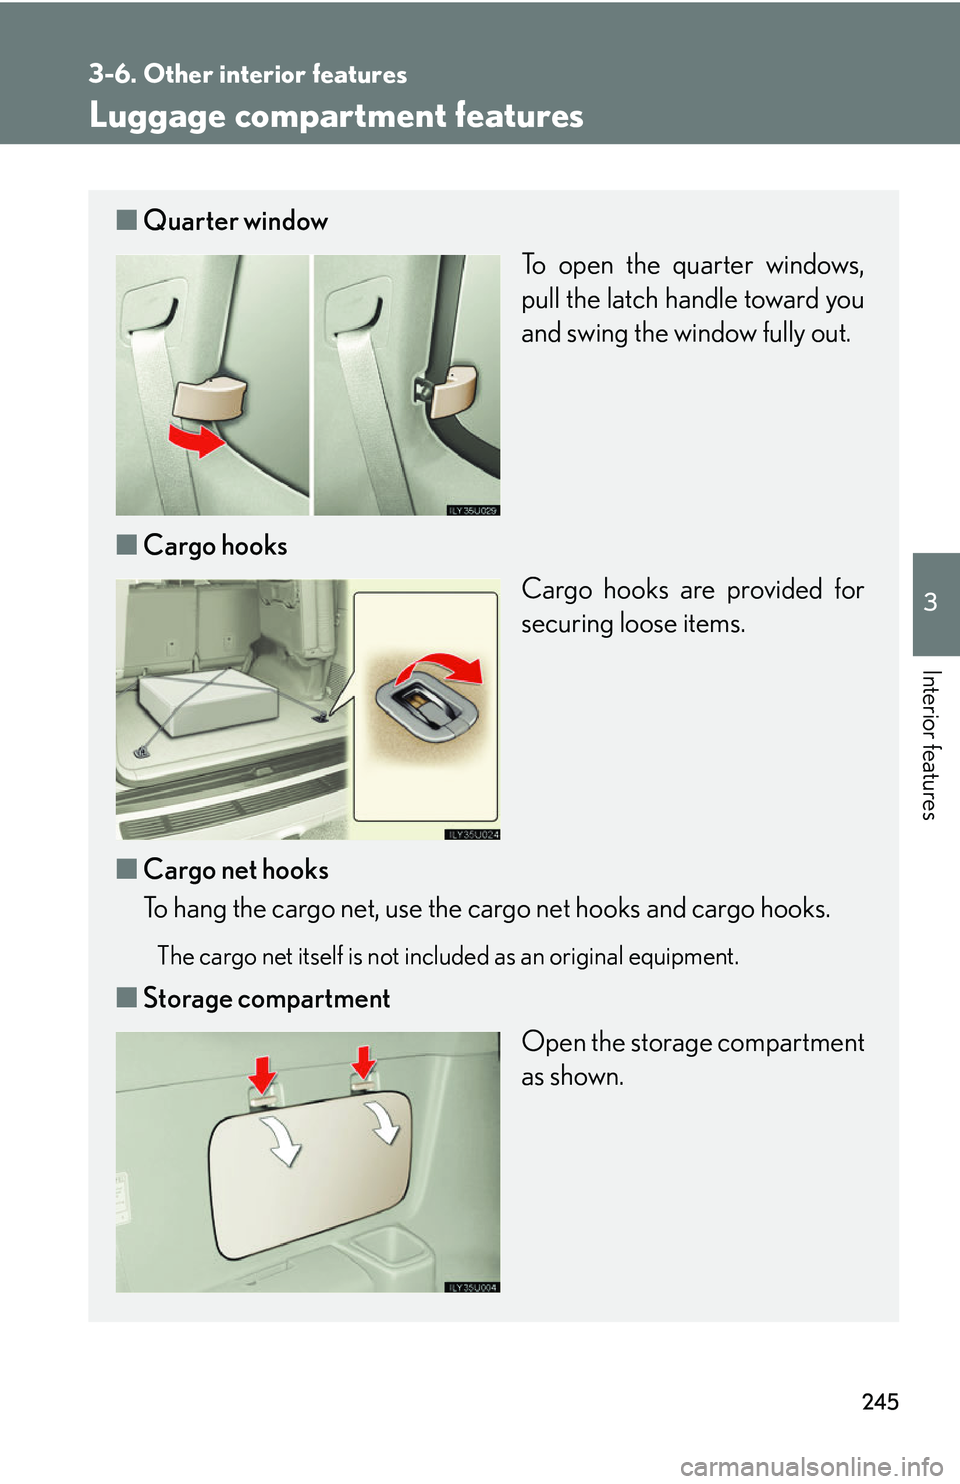
■Quarter window
To open the quarter windows,
pull the latch handle toward you
and swing the window fully out.
■ Cargo hooks
Cargo hooks are provided for
securing loose items.
■ Cargo net hooks
To hang the cargo net, use the cargo net hooks and cargo hooks.
The cargo net itself is not included as an original equipment.
■Storage compartment
Open the storage compartment
as shown.
Page 268 of 436

248
3-6. Other interior features
Garage door opener
The garage door opener (HomeLink Universal Transceiver) is manufactured
under license from HomeLink.
Programming the HomeLink (for U.S.A. owners)
The HomeLink
compatible transceiver in your vehicle has 3 buttons
which can be programmed to operate 3 different devices. Refer to the
programming method below appropriate for the device.
Indicator
Buttons
■ Programming the HomeLink
Point the remote control for the
device 1 to 3 in. (25 to 75 mm)
from the HomeLink
control but-
tons.
Keep the indicator light on the
HomeLink in view while pro-
gramming.
The garage door opener can be pr ogrammed to operate garage doors,
gates, entry doors, door locks, home lighting systems, and security systems,
and other devices.
STEP1
Page 271 of 436

251
3-6. Other interior features
3
Interior features
Test the operation of the HomeLink by pressing the newly pro-
grammed button. Check to see if the gate/device operates cor-
rectly.
Repeat the steps above to program another device for each of
the remaining HomeLink
buttons.
■ Programming other devices
To program other devices such as home security systems, home door
locks or lighting, contact your auth orized Lexus dealer for assistance.
■ Reprogramming a button
The individual HomeLink
buttons cannot be erased but can be
reprogrammed. To reprogram a button, follow the “Basic program-
ming” instructions.
Operating the HomeLink
Press the appropriate HomeLink button. The HomeLink indicator
light on the HomeLink transceiver should turn on.
The HomeLink continues to send a signal fo r up to 20 seconds as long as
the button is pressed.
Erasing the entire HomeLink memory (all three programs)
Press and hold down the 2 outside
buttons for 20 seconds until the
indicator light flashes.
If you sell your vehicle, be sure to
erase the programs stored in the
HomeLink
memory.
STEP5
STEP6