lock Lexus GX470 2007 Using other driving systems /
[x] Cancel search | Manufacturer: LEXUS, Model Year: 2007, Model line: GX470, Model: Lexus GX470 2007Pages: 436, PDF Size: 11.52 MB
Page 36 of 436

16
1-3. Adjustable components
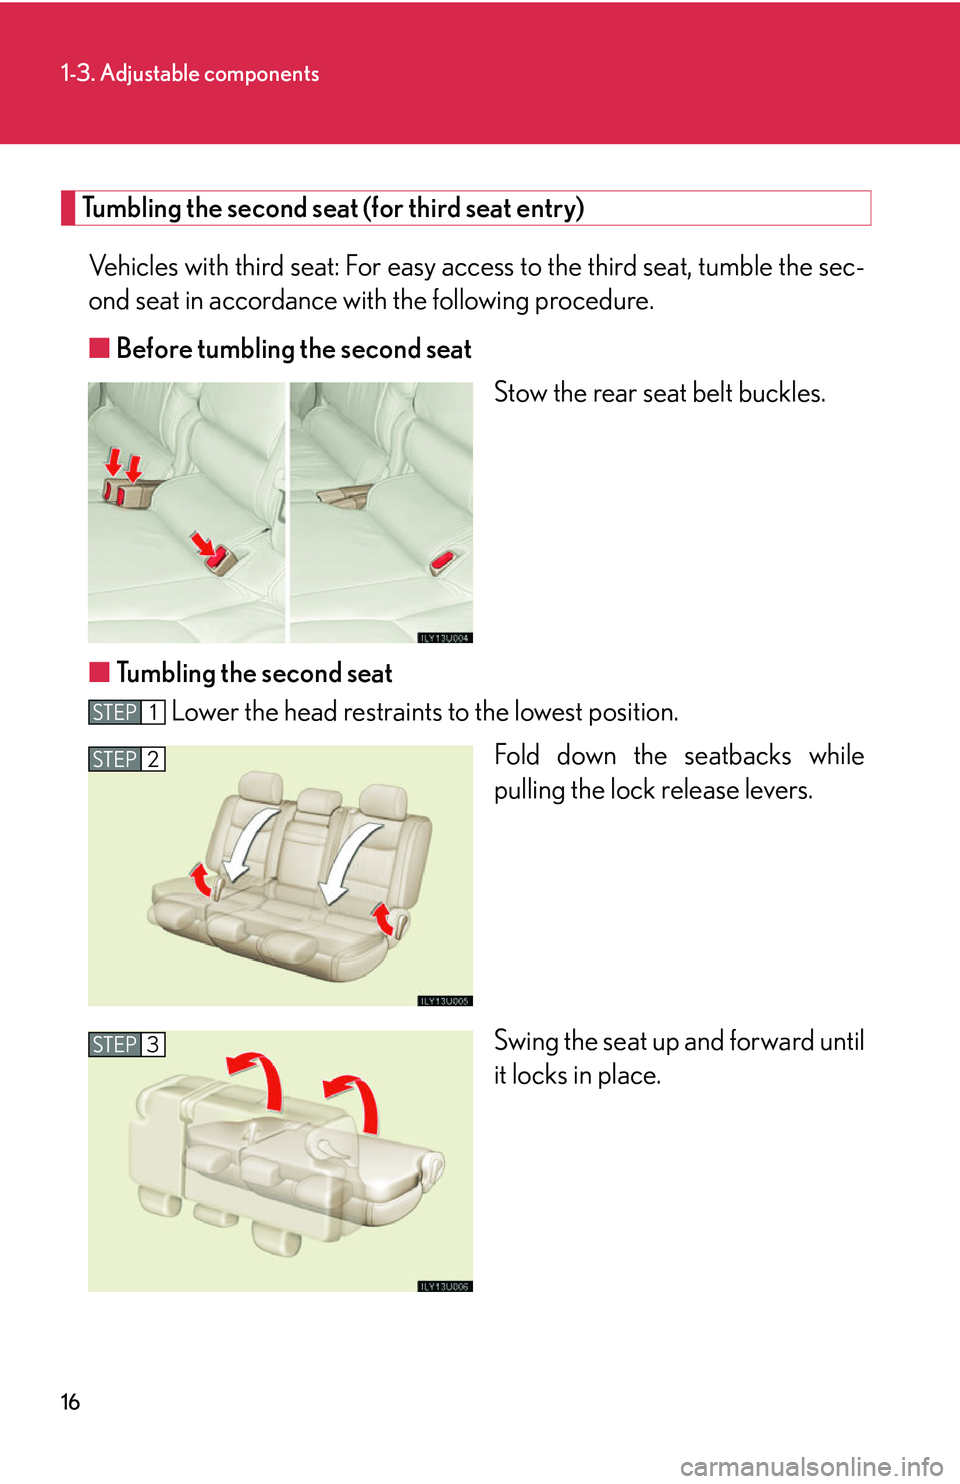
Tumbling the second seat (for third seat entry)Vehicles with third seat: For easy acc ess to the third seat, tumble the sec-
ond seat in accordance with the following procedure.
■ Before tumbling the second seat
Stow the rear seat belt buckles.
■ Tumbling the second seat
Lower the head restraints to the lowest position.
Fold down the seatbacks while
pulling the lock release levers.
Swing the seat up and forward until
it locks in place.
STEP1
STEP2
STEP3
Page 37 of 436

17
1-3. Adjustable components
1
Before driving
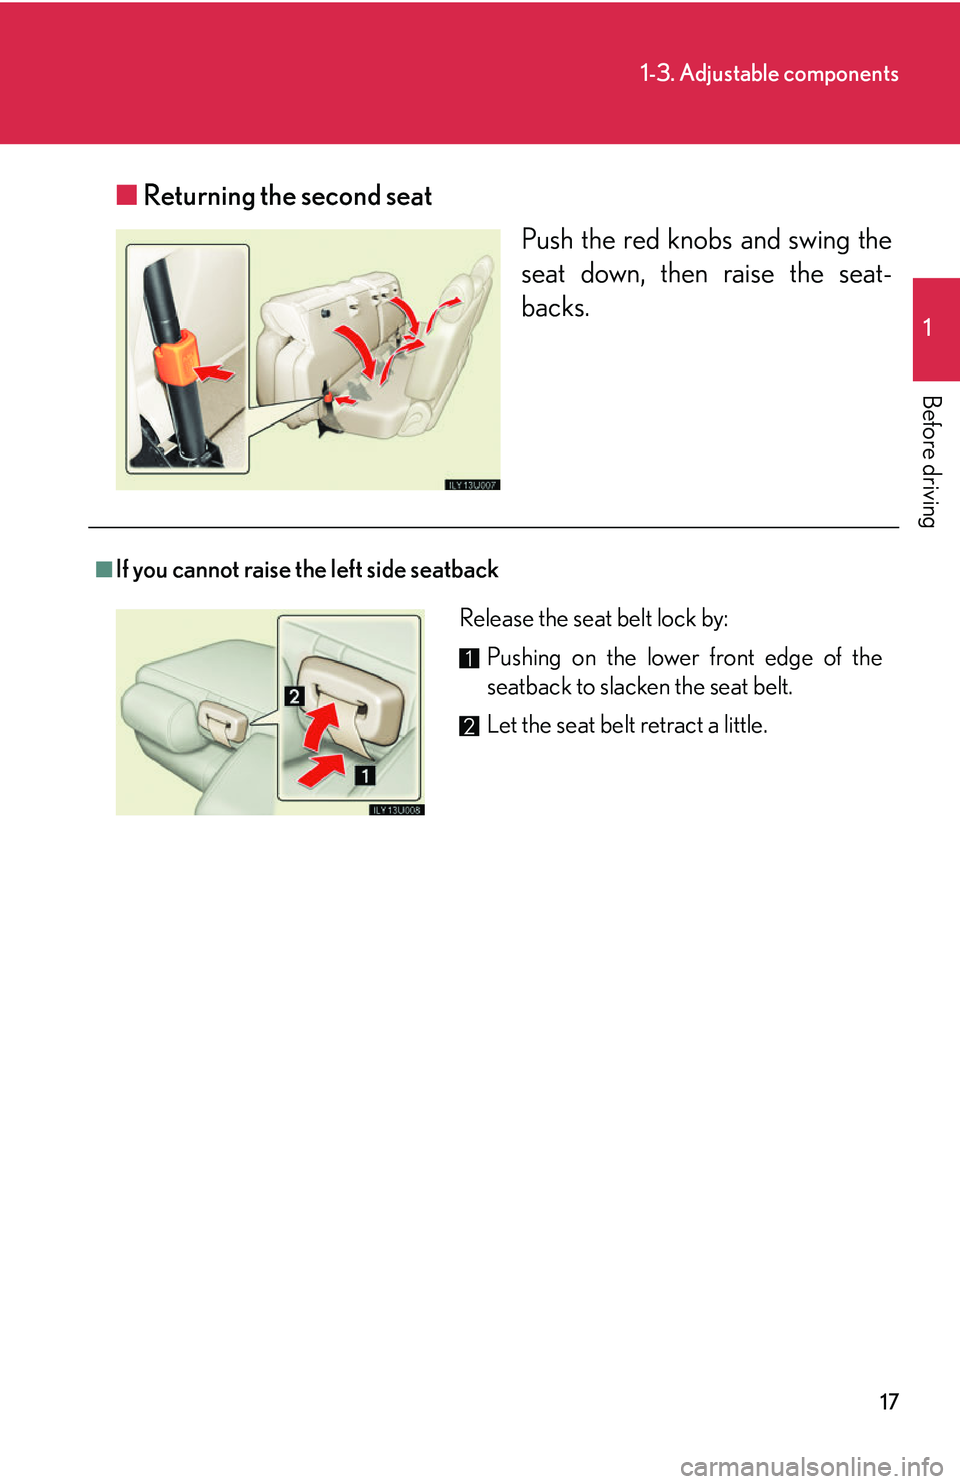
■Returning the second seat
Push the red knobs and swing the
seat down, then raise the seat-
backs.
■If you cannot raise the left side seatback
Release the seat belt lock by:
Pushing on the lower front edge of the
seatback to slacken the seat belt.
Let the seat belt retract a little.
Page 39 of 436

19
1-3. Adjustable components
1
Before driving
■Folding up the third seats
Lower the outboard head restraint to the lowest position and
remove the center head restraint.
Stow the center head restraint in the seatback. ( P. 2 7 )
Unlock the seatbacks by pushing
the lock release levers forward,
and fold them down.
Unlock the seat legs by pulling the
seat leg lock release handles, and
lift the seats sideward.
STEP1
STEP2
STEP3
STEP4
Page 41 of 436

21
1-3. Adjustable components
1
Before driving
Removing the third seatsFollow the procedure for “Folding up the third seats” up to STEP
3. Unlock the seat legs by pulling the
seat leg lock release handles, and
lift the seats. Retract the seat legs,
then place the seats on the floor.
Remove the seat lock cover and
push the red seat lock release
knobs outward, then lift the seats
free.
STEP1
STEP2
STEP3
■When returning the third seat to its original position
Reverse the steps listed.
Page 42 of 436

22
1-3. Adjustable components
CAUTION
■Reclining adjustment
Do not recline the seat more than necessary when the vehicle is in motion, to
reduce the risk of sliding under the lap belt.
If the seat is too reclined during an accident, the lap belt may slide past the hips and
apply restraint forces directly to the abdomen or your neck may contact the shoul-
der belt, increasing the risk of death or serious injury.
■When the seatback is folded
Do not sit on or place anything on the seatback while driving.
■When returning the seatbacks to their original position
Observe the following precautions. Failure to do so may result in death or serious
injury.
●Be careful not to get your hands or feet pinched in the seat.
●Make sure the seats are securely locked. Fa ilure to do so will prevent the seat belt
from operating properly.
●Check that the seat belts are not twisted or caught under the seat.
●Arrange the seat belts in the proper positions for ready use.
■When folding up the third seats
Fix the seats securely by adjusting the length of the holding strap. Failure to do so
may cause death or serious injury in the event of an accident or sudden braking.
■When removing or reinstalling the third seats
Observe the following precautions to prevent personal injury:
●Do not remove or reinstall the seats while the vehicle is moving.
●Do not leave the removed seat loose in the vehicle.
●Be careful not to get your hands or feet pinched in the seats.
●Be careful not to hit a person with the removed seat or drop it on yourself.
●Do not sit on or place anything on the removed seat.
●Install each seat in the same position fr om which it was removed. Failure to do so
will prevent third seat occupants fr om using the seat belts properly.
Page 46 of 436

26
1-3. Adjustable components
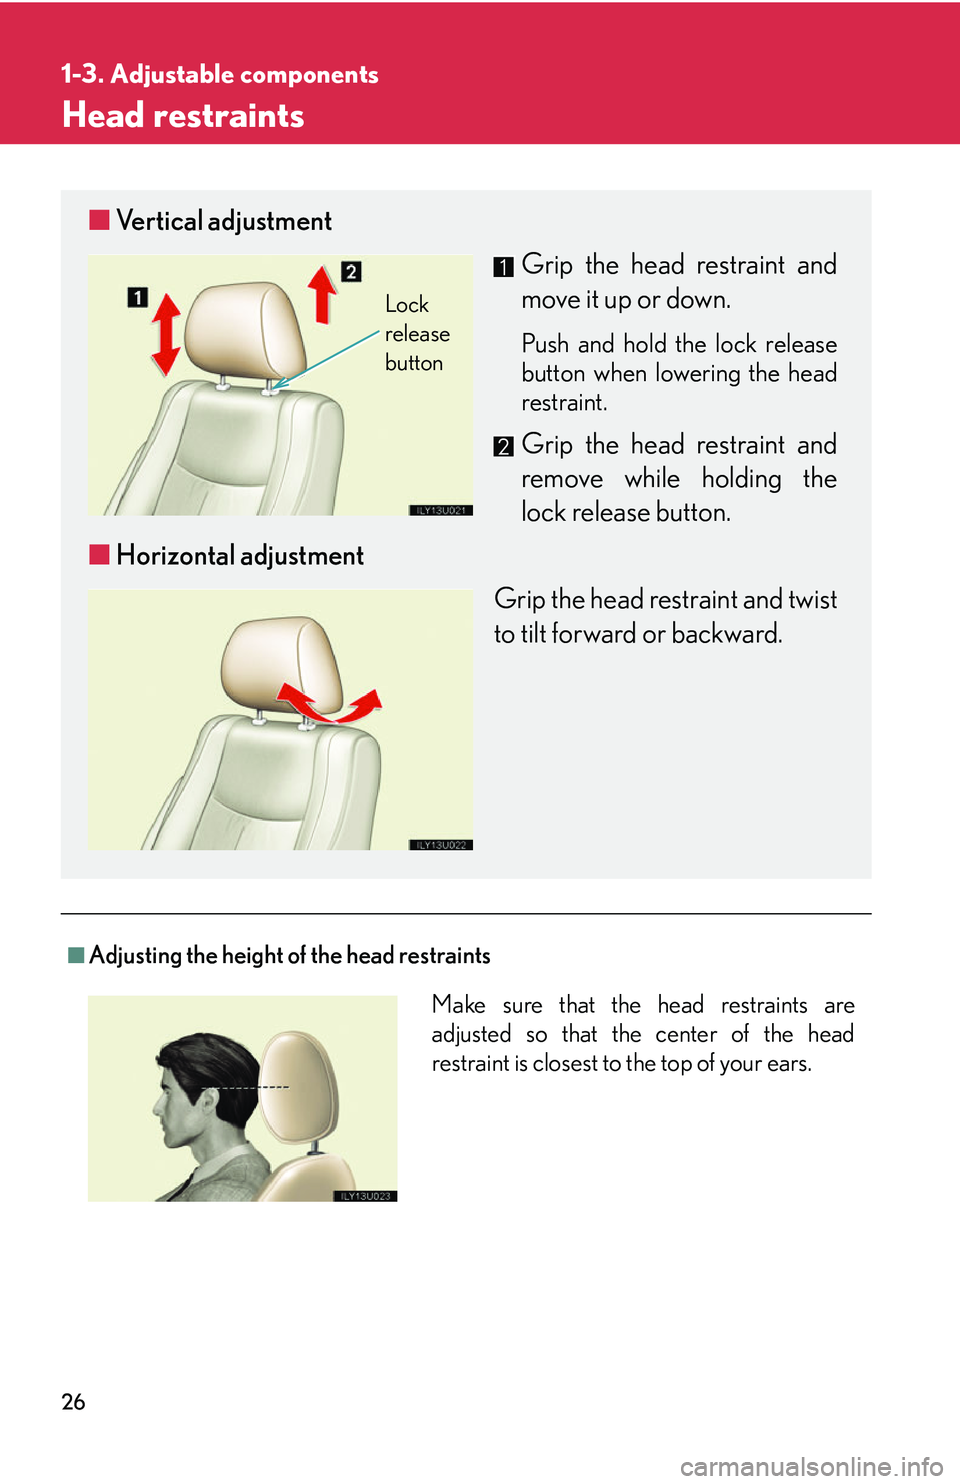
Head restraints
■Adjusting the height of the head restraints
■Vertical adjustment
Grip the head restraint and
move it up or down.
Push and hold the lock release
button when lowering the head
restraint.
Grip the head restraint and
remove while holding the
lock release button.
■ Horizontal adjustment
Grip the head restraint and twist
to tilt forward or backward.
Lock
release
button
Make sure that the head restraints are
adjusted so that the center of the head
restraint is closest to the top of your ears.
Page 47 of 436

27
1-3. Adjustable components
1
Before driving
■When an occupant sits on the second center seat
Always pull up the head restraint to the lock position.
■Head restraints of different seats
The head restraints are specially designed for the seats on which they are installed.
■When not using the third center seat head restraint (vehicles with third seat)
CAUTION
■Head restraint precautions
Observe the following precautions regarding the head restraints. Failure to do so
may result in death or serious injury.
●Adjust the head restraints to the correct position at all times.
●Do not drive with the head restraints removed.
Open the zipper on the back of the third seat
and stow the head restraint inside.
Page 51 of 436

31
1-3. Adjustable components
1
Before driving
Seat belt pretensioners (front seats)The pretensioner helps the seat
belt to quickly restrain the occu-
pant by retracting the seat belt
when the vehicle is subjected to
certain types of severe frontal colli-
sion.
The pretensioner may not activate
in the event of a minor frontal
impact, a side impact or a rear
impact.
■Emergency locking retractor (ELR)
The retractor will lock the belt during a sudd en stop or on impact. It may also lock if
you lean forward too quickly. A slow, easy motion will allow the belt to extend, and
you can move around fully.
■Automatic locking retractor (ALR)
When a passenger's shoulder belt is completely extended and then retracted even
slightly, the belt is locked in that position and cannot be extended. This feature is
used to hold the child restraint system (CRS) firmly. To free the belt again, fully
retract the belt and then pull the belt out once more. ( P. 8 1 )
Page 53 of 436

33
1-3. Adjustable components
1
Before driving
CAUTION
■Wearing a seat belt
Observe the following precautions to reduce the risk of injury in the event of sud-
den braking or an accident. Failing to do so may cause death or serious injury.
●Ensure that all passengers wear a seat belt.
●Always wear a seat belt properly.
●Each seat belt should be used by one person only. Do not use a seat belt for more
than one person at the same time, including children.
●Children should be seated in the rear seat and always use a seat belt and/or an
appropriate child restraint system.
●Do not recline the seat any more than necessary to achieve a proper seating
position. The seat belt is most effective when the occupants are sitting up straight
and well back in the seats.
●Do not wear the shoulder belt under your arm.
●Always wear your seat belt low and snug across your hips.
■Seat belt damage and wear
●Do not damage the seat belts by allowing the belt, plate or buckle to be jammed
in the door.
●Inspect the seat belt system periodically. Check for cuts, fraying, and loose parts.
Do not use a damaged seat belt until it is replaced. Damaged seat belts cannot
protect an occupant from injury.
●Ensure that the belt and tab are locked and the belt is not twisted. If the seat belt
does not function correctly, immediately contact your Lexus dealer.
●Replace the seat assembly, including the belt s, if your vehicle has been involved in
a serious accident, even if there is no obvious damage.
●Do not attempt to install, remove, modify , disassemble or dispose of a seat belt.
Have any necessary repairs carried out by your Lexus dealer. Inappropriate han-
dling of the pretensioner may cause it to activate or operate improperly and may
cause death or serious injury.
Page 59 of 436

39
1
1-3. Adjustable components
Before driving
Roof luggage carrier (if equipped)
Adjusting the position of cross railsTurn the knobs counterclockwise
to loosen the cross rails.
Slide the cross rails to the appro-
priate position for loading luggage.
After adjusting, be sure to tighten
the cross rails by turning knobs
clockwise.
Cross rails
Roof rails
STEP1
STEP2