brake Lexus HS250h 2010 Using the Bluetooth audio system / LEXUS 2010 HS250H (OM75006U) Owner's Manual
[x] Cancel search | Manufacturer: LEXUS, Model Year: 2010, Model line: HS250h, Model: Lexus HS250h 2010Pages: 608, PDF Size: 9.89 MB
Page 149 of 608

149
2-1. Driving procedures
2
When driving
CAUTION
■When starting the hybrid system
Always start the hybrid system while sitting in the driver’s seat. Do not depress the
accelerator pedal while starting the hybrid system under any circumstances.
Doing so may cause an accident resu lting in death or serious injury.
■Stopping the hybrid system in an emergency
If you want to stop the hybrid system in an emergency while driving the vehicle,
press and hold the “POWER” switch for more than 3 seconds.
However, do not touch the "POWER" switch while driving except in an emergency.
Turning the hybrid system off while driving will not cause loss of steering or braking
control, but the power assist to these systems will be lost. This will make it more diffi-
cult to steer and brake, so you should pull over and stop the vehicle as soon as it is
safe to do so.
NOTICE
■To prevent 12-volt battery discharge
●Do not leave the “POWER” switch in ACCESSORY or ON mode for long peri-
ods of time without the hybrid system on.
●If the hybrid system is off, but the indica tor on the “POWER” switch is illuminated,
this indicates that the “POWER” switch is still turned on. When exiting the vehi-
cle, always check that the “POWER” switch is off.
■When starting the hybrid system
Do not depress the accelerator pedal unnecessarily.
■Symptoms indicating a malfunction with the “POWER” switch
If the “POWER” switch seems to be operating somewhat differently than usual,
such as the switch sticking slightly, there may be a malfunction. Contact your Lexus
dealer immediately.
Page 153 of 608

153
2-1. Driving procedures
2
When driving
Hybrid transmission
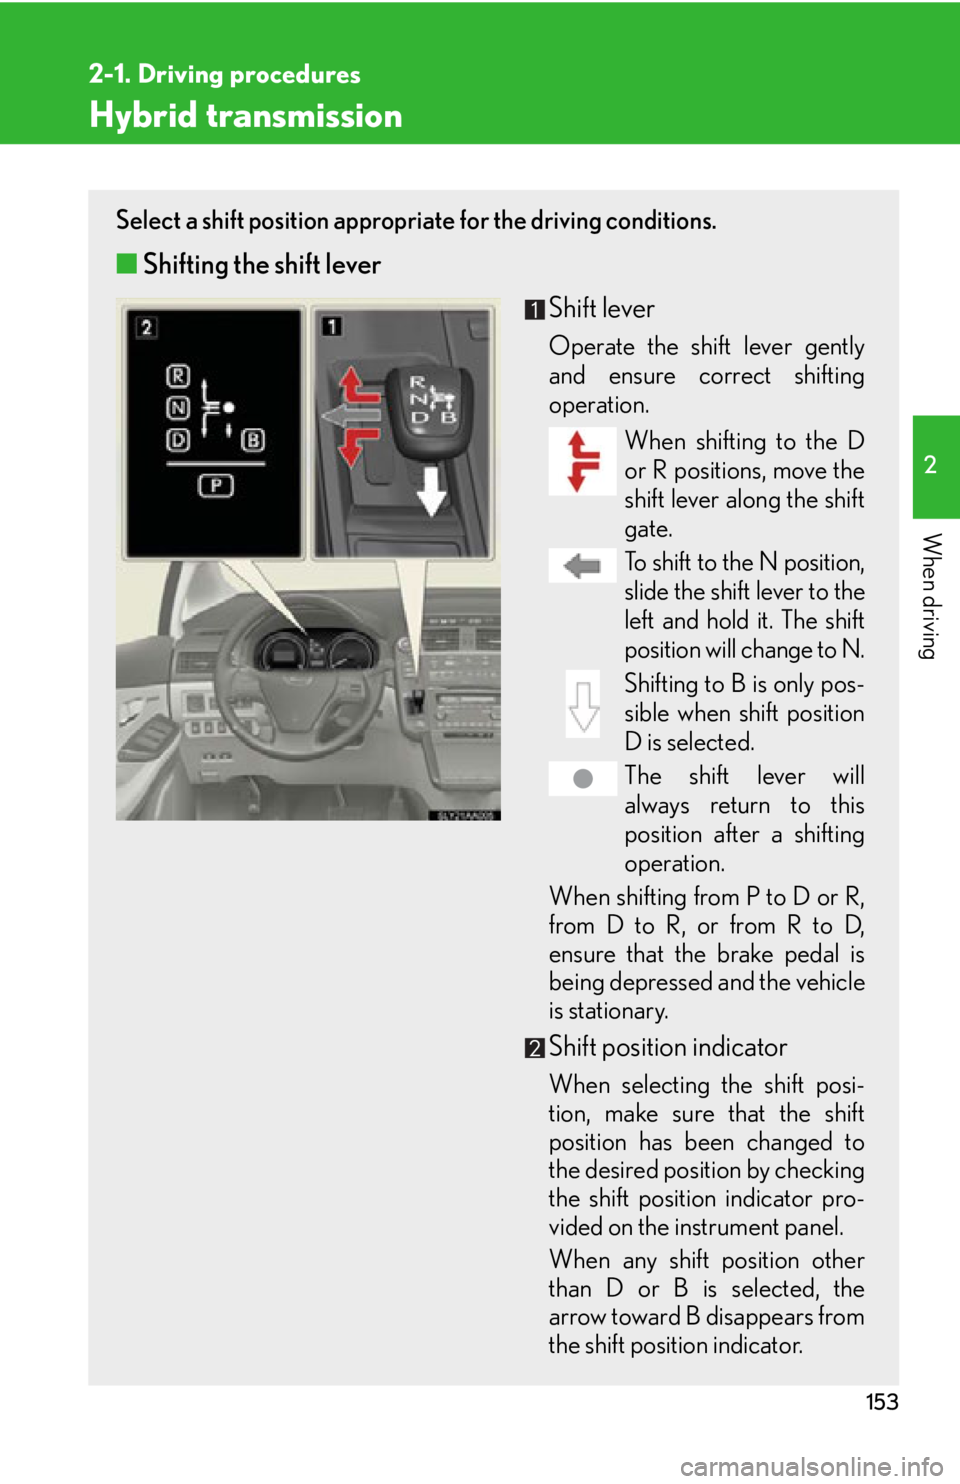
Select a shift position appropriate for the driving conditions.
■Shifting the shift lever
Shift lever
Operate the shift lever gently
and ensure correct shifting
operation.When shifting to the D
or R positions, move the
shif
t lever along the shift
gate.
To shift to the N position,
slide the shift lever to the
lef
t and hold it. The shift
position will change to N.
Shifting to B is only pos -
sible when shift position
D is selec
ted.
The shift lever will
always return to this
positi
on after a shifting
operation.
When shifting from P to D or R,
fr
om D to R, or from R to D,
ensure that the brake pedal is
being depressed and the vehicle
is stationary.
Shift position indicator
When selecting the shift posi -
tion, make sure that the shift
position has
been changed to
the desired position by checking
the shift position indicator pro -
vided on the instrument panel.
When any shift position other
than D or B is selected, the
arr
ow toward B disappears from
the shift position indicator.
Page 154 of 608

154
2-1. Driving procedures
■Shift position purpose
*: For good fuel economy and noise redu ction, the D position should usually
be used.
■ P position switch
The shift position can be changed to P thr
ough use of the P position
switch.
Fully stop the vehicle and keep
depr
essing the brake pedal, and
then press the P position switch.
When the shift position is
changed to P, the switch indica -
tor comes on.
Check that the P position indi -
cator is illuminated on the shift
position indicator
.
●Changing the shift position from P to other positions:
• While depressing the brake pedal firmly, operate the shift lever. If the
shift lever is operated without depressing the brake pedal, the buzzer
will sound and the shifting operation will be disabled.
• The shift position cannot be changed from P to B directly.
Shift positionFunction
PParking the vehicle/starting the hybrid system
RReversing
NNeutral
DNormal driving*
BApplying moderate engine braking when driving down
hills or on steep slopes
Page 156 of 608

156
2-1. Driving procedures
■For the shift positions
●When the “POWER” switch is off, the shift position cannot be changed.
●When the “POWER” switch is in ON mo de, the shift position can only be
changed to N.
●When the “READY” indicator is on, the sh ift position can be changed from P to
D, N or R.
●The shift position can only be changed to B directly from D.
In addition, if the shift position is change d in any of
the following situations, the
buzzer will sound and the shifting operation wi ll be disabled or the shift position will
automatically change to N. When this happens, select an appropriate shift position.
● Situations where the shifting operation will be disabled:
• When the shift lever is changed from P to
another position without depress-
ing the brake pedal.
• When the shift position is changed from P or N to B.
● Situations where the shift position will automatically change to N:
• When the P position switch is pressed while the vehicle is running.
• When shift position R is selected when the vehicle is moving forward.
• When shift position D is selected when the vehicle is moving in reverse.
• When the shift position is changed from R to B.
■Reverse warning buzzer
When shifting into R, a buzzer will sound to inform the
driver that the shift position is
in R.
■About engine braking
When shift position B is selected, releasing the accelerator pedal will apply engine
br
aking.
• When the vehicle is driven at high sp eeds, comp
ared to ordinary gasoline-
fueled vehicles, the engine braking deceleration is felt less than that of other
vehicles.
• The vehicle can be accelerated even when shift position B is selected.
If the vehicle is driven continuously in the B posi
tion, fuel efficiency will become low.
Usually, select the D position.
Page 157 of 608

157
2-1. Driving procedures
2
When driving
■Power mode automatic deactivation
Power mode is automatically deactivated if the “POWER” switch is turned off after
driving in power mode.
■Customization
Settings (e.g. Reverse warning buzzer) can be changed.
(Customizable features P. 5 7 2 )
CAUTION
■When driving on slippery road surfaces
Do not accelerate or shift gears suddenly.
Sudden changes in engine braking may cause the vehicle to spin or skid, resulting in
an accident.
■For the shift lever
Do not hang anything on the shift lever.
Doing so could prevent the shift lever fr om returning to position, causing unex-
pected accidents to occur when the vehicle is in motion.
NOTICE
■Situations where P position control system malfunctions are possible
If any of the following situations occurs, P position control system malfunctions are
possible.
Immediately stop the vehicle in a safe place on level ground, apply the parking
brake, and then contact your Lexus dealer.
●When the “P Lock Malfunction” warnin g message appears on the multi-informa-
tion display. ( P. 5 0 2 )
●When the P position switch indicator flashes.
●When the shift position symb ols (such as P and R) are flashing on the shift posi-
tion indicator.
●When the shift position indicator remains off.
■When in heavy traffic
If shift position N is sele cted, the hybrid battery (traction battery) will not be
charged. To help prevent the battery from discharging, avoid leaving the N position
selected for an extended period of time.
Page 160 of 608

160
2-1. Driving procedures
Parking brake
■Parking brake engaged warning buzzer
The buzzer sounds to indicate that parking b
rake is still engaged (with the vehicle
having reached a speed of 3 mph [5 km/h]). ( P. 5 0 6 )
NOTICE
■Before driving
Fully release the parking brake.
Driving the vehicle with the parking brake set will lead to brake components over-
heating, which may affect braking performance and increase brake wear.
To set the parking brake, fully
depress the parking brake pedal
with your left foot while
depressing the brake pedal with
your right foot.
(Depressing the pedal again
r
eleases the parking brake.)
U.S.A.Canada
Page 186 of 608

186
2-3. Operating the lights and windshield wipers
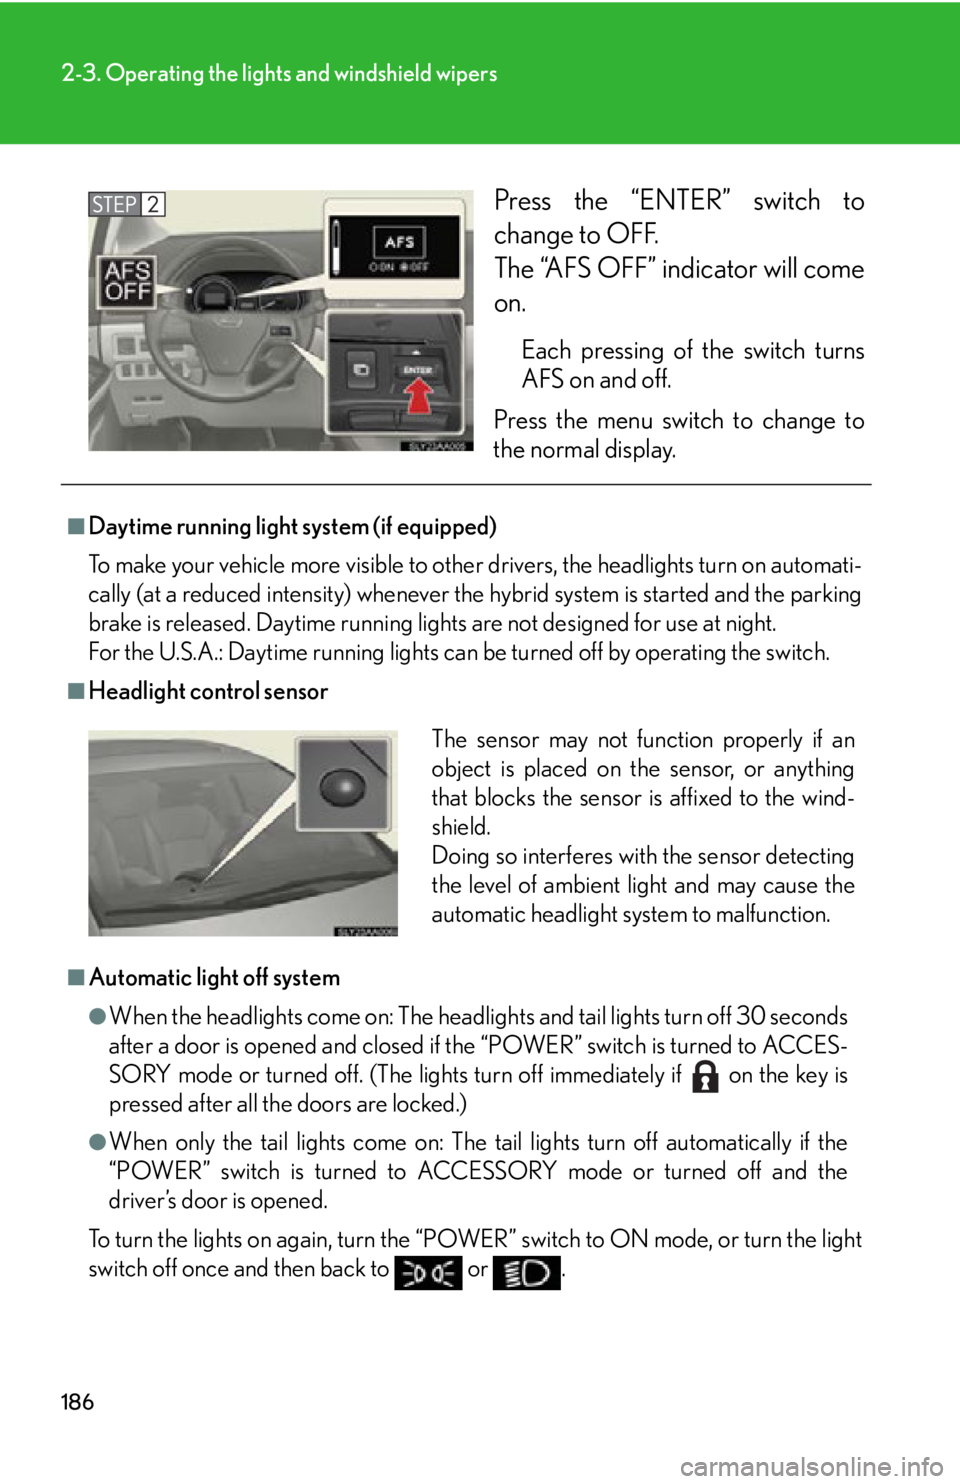
Press the “ENTER” switch to
change to OFF.
The “AFS OFF” indicator will come
on.
Each pressing of the switch turns
AFS on and off.
Press the menu switch to change to
the norma
l display.
■Daytime running light system (if equipped)
To make your vehicle more visible to othe r dr
ivers, the headlights turn on automati-
cally (at a reduced intensity) whenever the hy
brid system is started and the parking
brake is released. Daytime running ligh ts are not designed for use at night.
For the U.S.A.: Daytime running lights can be turned off by operating the switch.
■Headlight control sensor
■Automatic light off system
●When the headlights come on: The headligh ts and tail lights turn off 30 seconds
after a door is opened and closed if the “POWER” switch is turned to ACCES -
SORY mode or turned off. (The lights turn off immediately if on the key is
pressed after all the doors are locked.)
●When only the tail lights come on: The tail lights turn off automatically if the
“POWER” switch is turned to ACCESSORY mode or turned off and the
driver’s door is opened.
To turn the lights on again, turn the “POWER” s
witch to ON mode, or turn the light
switch off once and then back to or .
The sensor may not function properly if an
object is placed on the sensor, or anything
that blocks the sensor is affixed to the wind-
shield.
Doing so interferes with the sensor detecting
the level of ambient light and may cause the
automatic headlight system to malfunction.
Page 202 of 608

202
2-4. Using other driving systems
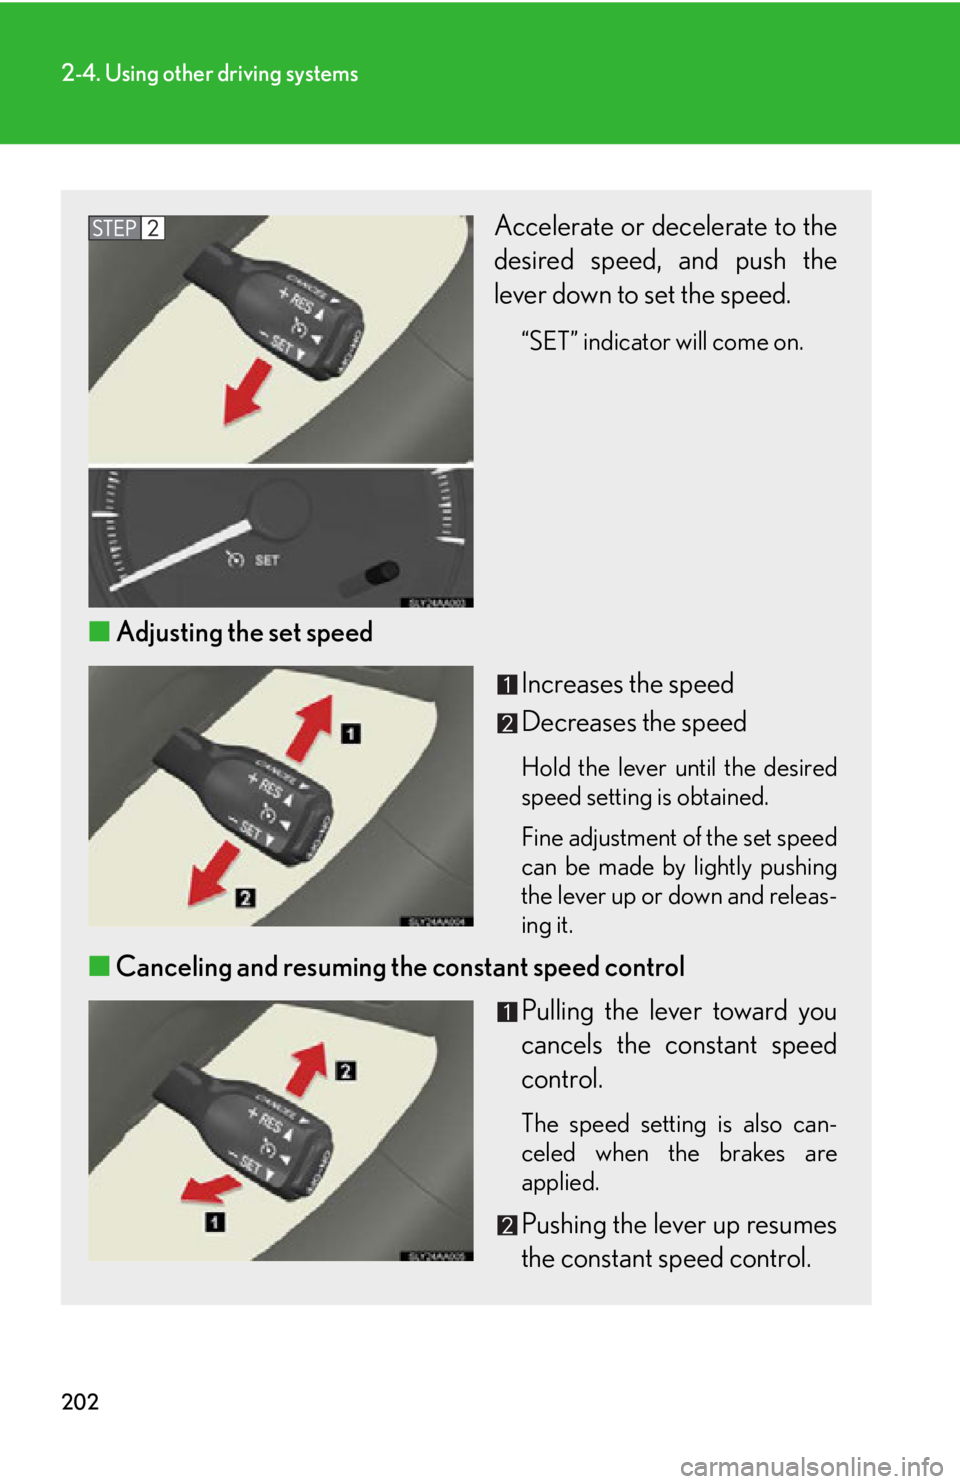
Accelerate or decelerate to the
desired speed, and push the
lever down to set the speed.
“SET” indicator will come on.
■Adjusting the set speed
Increases the speed
Decreases the speed
Hold the lever until the desired
speed setting is obtained.
Fine adjustment of the set speed
can be made b
y lightly pushing
the lever up or down and releas -
ing it.
■ Canceling and resuming the constant speed control
Pulling the lever toward you
cancels the constant speed
contr
ol.
The speed setting is also can -
celed when the brakes are
applied.
Pushing the lever up resumes
the constant speed control.
Page 208 of 608

208
2-4. Using other driving systems
■Changing the vehicle-to-vehicle distance
Pressing the button changes the
vehicle-to-vehicle distance as
follows:
Long
Medium
Short
The vehicle-to-vehicle distance
is set automatically to long
mode when the “POWER”
switch is turned to ON mode.
If a vehicle is running ahead of
y
ou, the preceding vehicle mark
will also be displayed.
■ Canceling and resuming the constant speed control
Pulling the lever toward you
cancels the cruise control.
The speed setting is also can -
celed when the brakes are
applied.
Pushing the lever up resumes
the cruise control and returns
v
ehicle speed to the set
speed.
Resuming is available when the
vehicle speed is more than
approximately 25 mph (40 km/
h).
Preceding vehicle mark
Page 209 of 608

209
2-4. Using other driving systems
2
When driving
Driving in vehicle-to-vehicle distance control mode
This mode employs a sensor to detect the presence of vehicles up to
approximately 400 ft. (120 m) ahead and to judge the distance between
your vehicle and those the vehicle ahead of you.
Note that vehicle-to-vehicle distance will close in when traveling on long
downhill slopes.
Example of constant speed cruising
When there are no vehicles ahead
The vehicle travels at the speed set by the driver. The desired vehicle-to-vehi-
cle distance can also be set by operating the vehicle-to-vehicle distance con -
trol.
Example of deceleration cruising
When the vehicle ahead is driving slower than the set speed
When a vehicle is detected running ahead of you, the system automatically
decelerates your vehicle. When a grea ter reduction in vehicle speed is nec-
essary, the system applies the brakes. A warning tone warns you when the
s
ystem cannot decelerate sufficiently to prevent your vehicle from closing in
on the vehicle ahead.