turn signal Lexus HS250h 2010 Using the Bluetooth audio system / LEXUS 2010 HS250H OWNERS MANUAL (OM75006U)
[x] Cancel search | Manufacturer: LEXUS, Model Year: 2010, Model line: HS250h, Model: Lexus HS250h 2010Pages: 608, PDF Size: 9.89 MB
Page 2 of 608

TABLE OF CONTENTSIndex
2
1-1. Hybrid systemHybrid system ................................... 24
Hybrid system precautions ......... 27
Energy monitor/consumption screen................................................ 32
Hybrid vehicle driving tips........... 37
1-2. Key information Keys ...................................................... 39
1-3. Opening, closing and locking
the doors
Smart access system with push-button start .......................... 44
Wireless remote control .............. 54
Doors.................................................... 57
Trunk..................................................... 60
1-4. Adjustable components (seats, mirrors, steering wheel)
Front seats .......................................... 64
Driving position memory
(driver’s seat) ................................. 68
Head restraints................................... 71
Seat belts ............................................ 73
Steering wheel.................................. 79
Inside rear view mirror................... 81
Outside rear view mirrors .......... 83 1-5. Opening and closing the windows
and moon roof
Power windows................................ 86
Moon roof .......................................... 89
1-6. Refueling Opening the fuel tank cap........... 92
1-7. Theft deterrent system Immobilizer system ........................ 96
Alarm.................................................... 98
Theft prevention labels
(for U.S.A.) .................................... 100
1-8. Safety information Correct driving posture .............. 101
SRS airbags ..................................... 103
Front passenger occupant
classification system .................... 115
Child restraint sy stems ............... 120
Installing child restraints ............. 124
2-1. Driving procedures Driving the vehicle ........................ 136
Power (ignition) switch ............... 145
EV drive mode ............................... 150
Hybrid transmission ..................... 153
Turn signal lever............................. 159
Parking brake ................................. 160
1Before driving
2When driving
Page 8 of 608
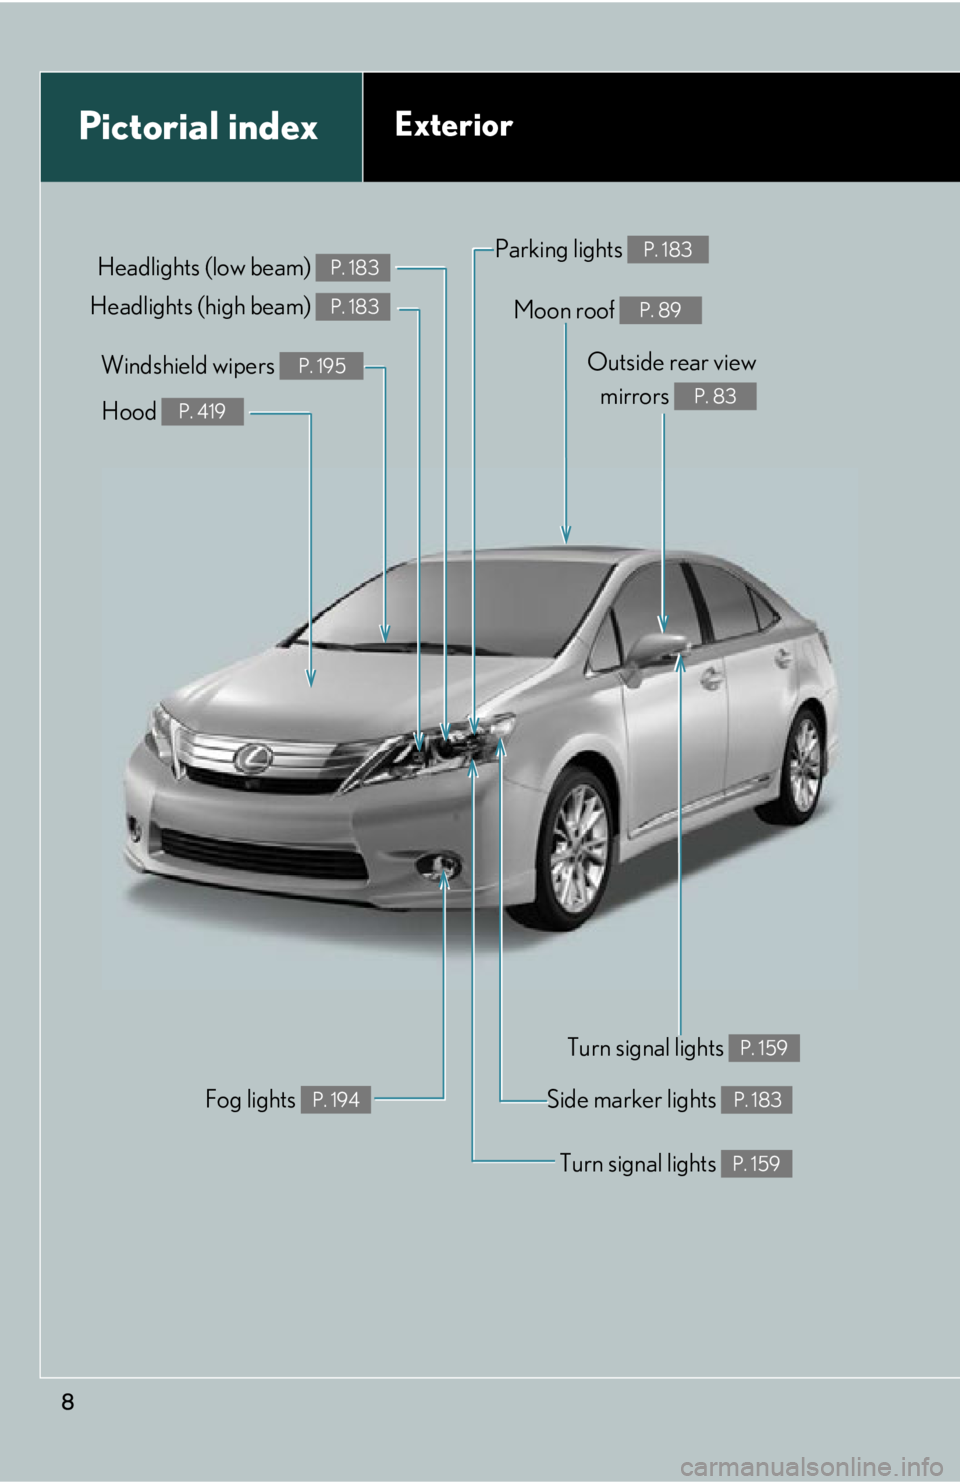
8
Pictorial indexExterior
Moon roof P. 89
Headlights (low beam) P. 183
Fog lights P. 194
Turn signal lights P. 159
Side marker lights P. 183
Hood P. 419
Parking lights P. 183
Windshield wipers P. 195Outside rear view mirrors
P. 83
Turn signal lights P. 159
Headlights (high beam) P. 183
Page 9 of 608
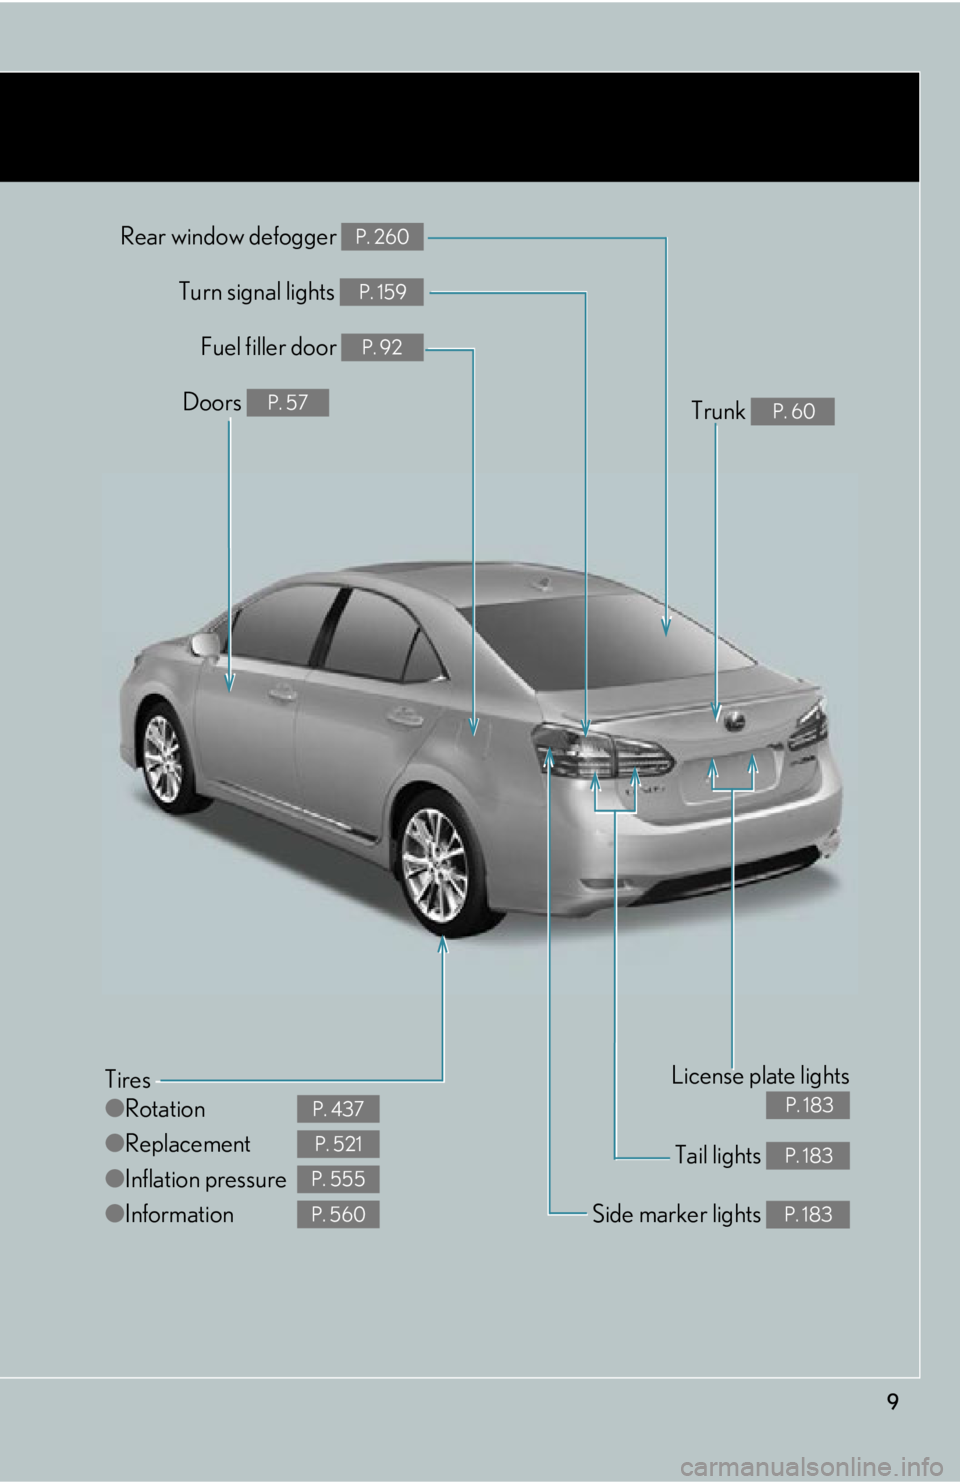
9
Tail lights P. 183
Rear window defogger P. 260
Tires
●Rotation
● Replacement
● Inflation pressure
● Information
P. 437
P. 521
P. 555
P. 560Side marker lights P. 183
Fuel filler door P. 92
Turn signal lights P. 159
License plate lights
P. 183
Doors P. 57Trunk P. 60
Page 14 of 608
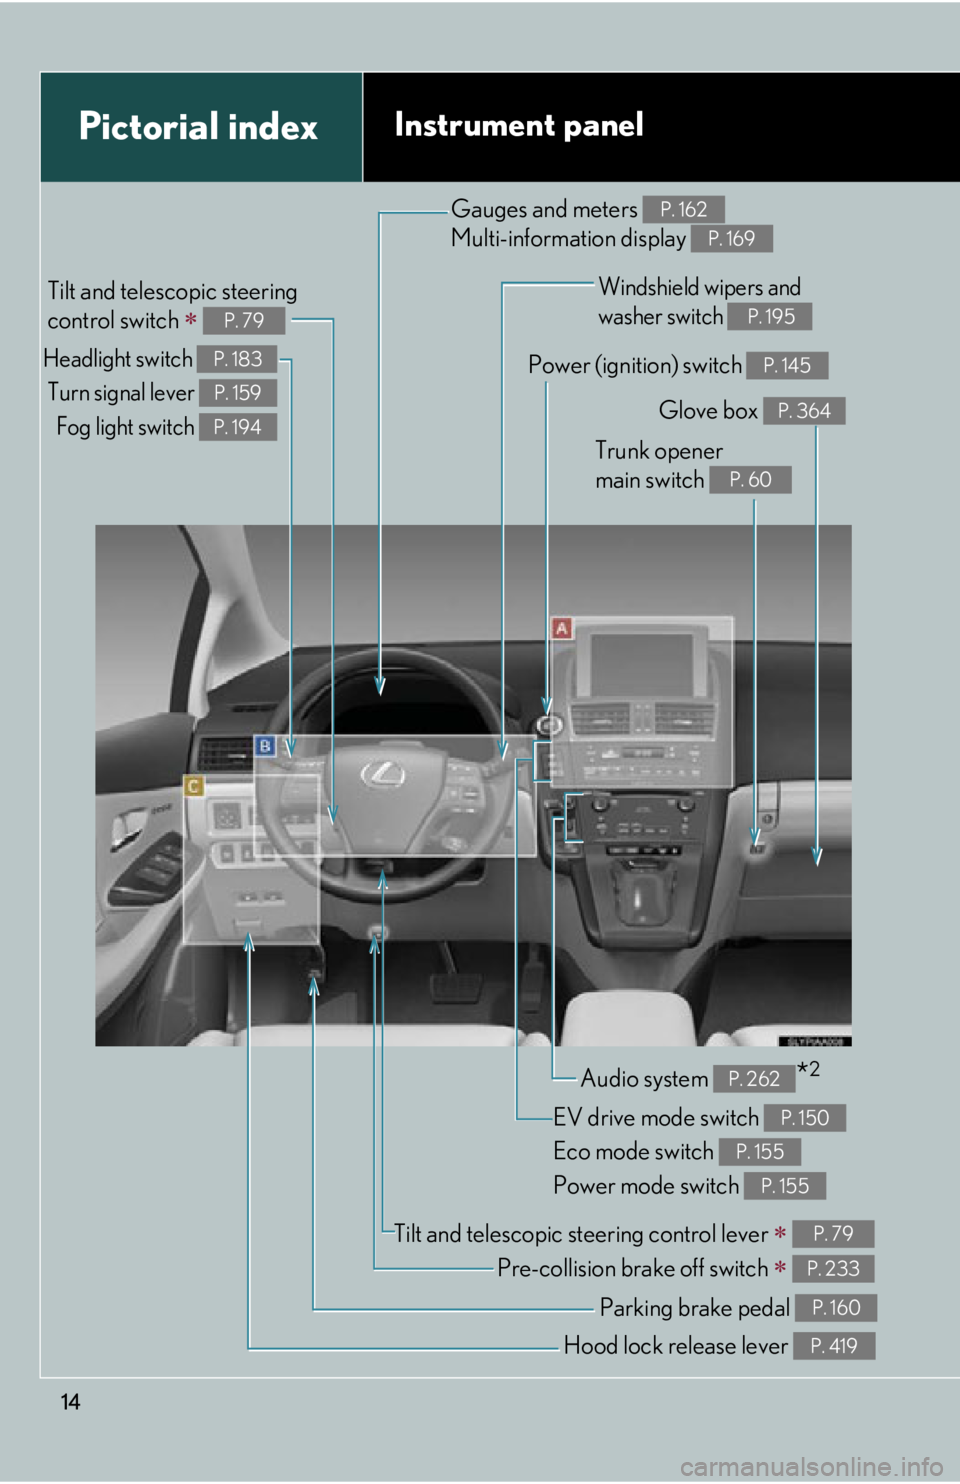
14
Pictorial indexInstrument panel
Headlight switch Turn signal lever Fog light switch P. 183
P. 159
P. 194
Tilt and telescopic steering
control switch
P. 79
Pre-collision brake off switch P. 233
Parking brake pedal P. 160
EV drive mode switch
Eco mode switch
Power mode switch P. 150
P. 155
P. 155
Hood lock release lever P. 419
Tilt and telescopic steering control lever P. 79
Glove box P. 364
Trunk opener
main switch
P. 60
Power (ignition) switch P. 145
Windshield wipers and
washer switch
P. 195
Gauges and meters
Multi-information display P. 162
P. 169
Audio system *2P. 262
Page 50 of 608

50
1-3. Opening, closing and locking the doors
■Note for the entry function
●Even when the electronic key is within the effective range (detection areas), the
system may not operate properly in the following cases:
• The electronic key is too close to the window or outside door handle, near the
ground, or in a high place when the doors are locked or unlocked.
• The electronic key is near the ground or in a high place, or too close to the rear bumper center when the trunk is unlocked.
• The electronic key is on the instrument panel, rear package tray or floor, or in the door pockets or glove box when the hybrid system is started or
“POWER” switch modes are changed.
●As long as the electronic key is within the effective range, the doors may be
locked or unlocked by anyone.
●Even if the electronic key is not inside th e vehicle, it may be possible to start the
hybrid system if the electronic key is near the window.
●The doors may unlock if a large amount of water splashes on the door handle,
such as in the rain or in a car wash when the electronic key is within the effective
range. (The door will automatically be locked after approximately 60 seconds if
the doors are not opened and closed.)
●Gripping the door handle when wearing a glove may not unlock the door.
●If the wireless remote control is used to lock the doors when the electronic key
is near the vehicle, there is a possibility that the door may not be unlocked by the
entry function. (Use the wireless re mote control to unlock the doors.)
●A sudden approach to the effective range or door handle may prevent the
doors from being unlocked. In this case, return the door handle to the original
position and check that the doors unlock before pulling the door handle again.
■Notes for locking the doors
●Touching the door lock sensor while we aring gloves may delay or prevent lock
operation. Remove the gloves and touch the lock sensor again.
●When the lock operation is performed using the lock sensor, recognition signals
will be shown up to two consecutive times. After this, no recognition signals will
be given.
●If the door handle becomes wet while the electronic key is within the effective
range, the door may lock and unlock repeatedly. Place the key in a position 6 ft.
(2 m) or more separate from the vehicle while the vehicle is being washed. (Take
care to ensure that the key is not stolen.)
Page 68 of 608

68
1-4. Adjustable components (seats, mirrors, steering wheel)
Driving position memory (driver’s seat)
: If equipped
Your preferred driving position (the po sition of the driver’s seat, steering
wheel and outside rear view mirrors) can be memorized and recalled with
the touch of a button. It is also possible to set this function to activate auto
-
matically when the doors are unlocked.
Three different driving positions can be entered into memory.
■ Entering a position to memory
Check that the shift position is in P.
Turn the “POWER” switch to ON mode.
Adjust the driver’s seat, steering wheel and outside r
ear view
mirrors to the desired positions.
While pressing and holding the
“
SET” button, or within 3 sec -
onds of pressing the “SET” but -
ton, press button 1, 2 or 3 until
the signal beeps.
If the selected button has
already been preset, the previ -
ously recorded position will be
o
verwritten.
■ Recalling the memorized position
Check that the shift position is in P.
Turn the “POWER” switch to ON mode.
Press button 1, 2 or 3 until the
signal beeps to r
ecall the
desired position.
Page 69 of 608
69
1-4. Adjustable components (seats, mirrors, steering wheel)
1
Before driving
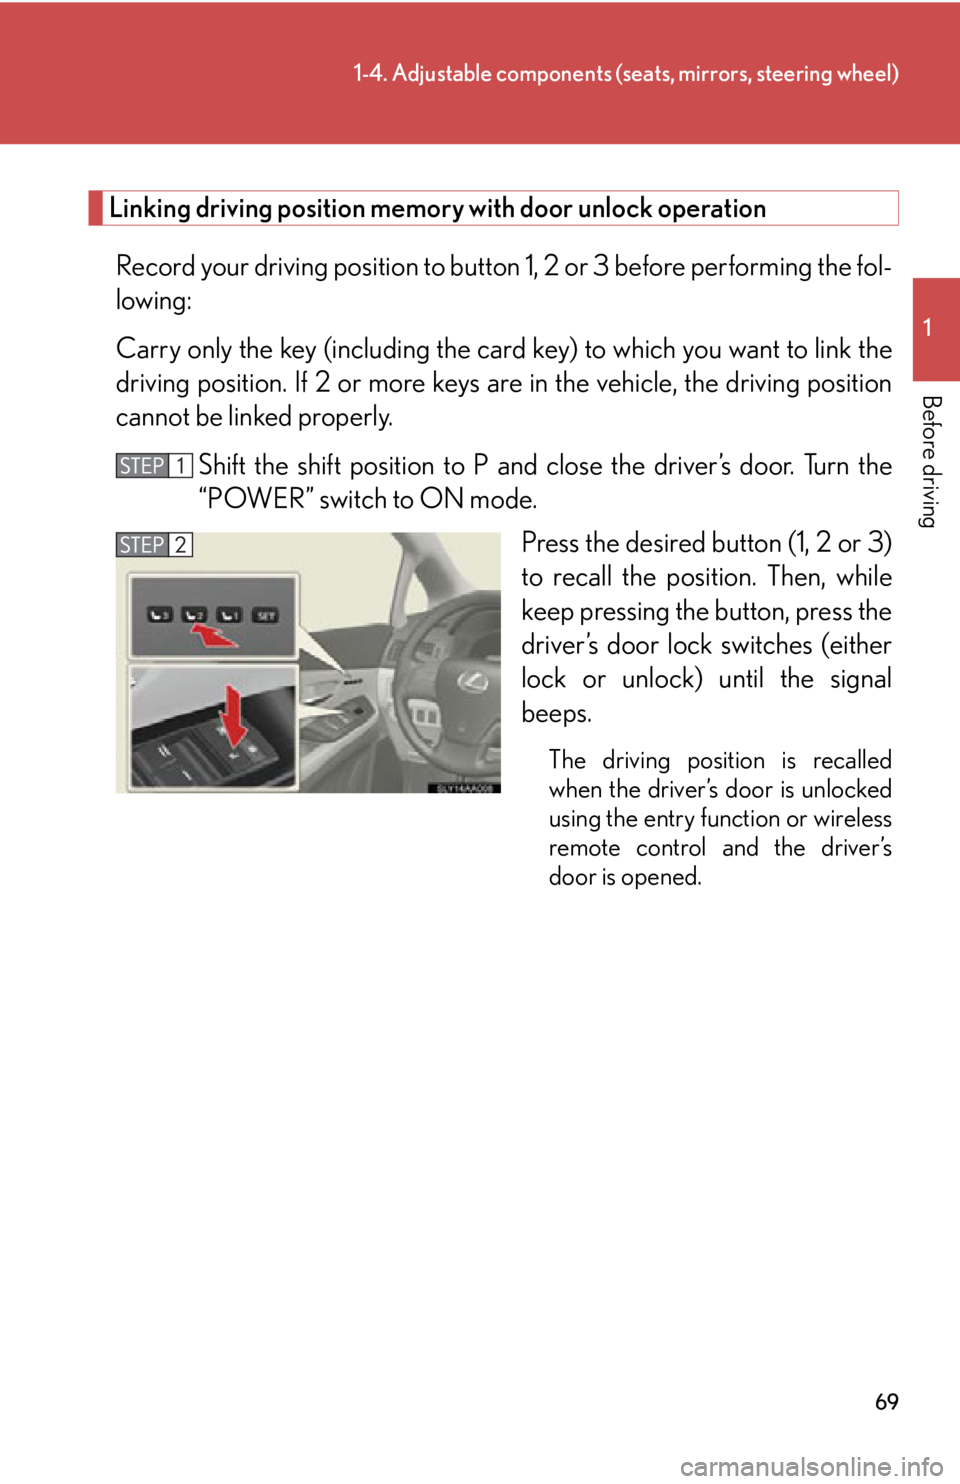
Linking driving position memory with door unlock operation
Record your driving position to button 1, 2 or 3 before performing the fol-
lowing:
Carry only the key (including the card k
ey) to which you want to link the
driving position. If 2 or more keys are in the vehi cle, the driving position
cannot be linked properly.
Shift the shift position to P and close the driv
er’s door. Turn the
“POWER” switch to ON mode.
Press the desired button (1, 2 or 3)
to r
ecall the position. Then, while
keep pressing the button, press the
driver’s door lock switches (either
lock or unlock) until the signal
beeps.
The driving position is recalled
when the driver’s door is unlocked
using the entry function or wireless
remote control and the driver’s
door is opened.
Page 70 of 608

70
1-4. Adjustable components (seats, mirrors, steering wheel)
■Operating the driving position memory after turning the “POWER” switch off
Memorized positions (except for the steeri ng
wheel position) can be activated up
to 180 seconds after the driver’s door is opened and another 60 seconds after it is
closed again, even after turning the “POWER” switch off.
■Canceling the linked do or unlock operation
Turn the “POWER” switch to ON mode and close the driver’s door.
While pressing the “SET” button, press the driver’s door lock switches
(either lock or unlock) until the signal beeps.
■Stopping seat position op eration part-way through
Perform any of the following operations:
●Press the “SET” button.
●Press button 1, 2 or 3.
●Adjust the seat using the switches (only cancels seat position recall).
●Adjust the steering wheel using the tilt and telescopic steering control switch
(only cancels steering wheel position recall).
■Correct seat position
When the seat is in the most forward or most ba
ckward position, and the seat is
being moved in those directions, the syst em may not correctly recognize the cur-
rent position and the memorized posi ti
on will not be correctly recalled.
■Customization
If a seat position is memorized, the driv er seat will mo
ve back the set distance
( P. 5 7 2
) from that memorized position.
CAUTION
■Seat adjustment caution
Take care during seat adjustment so that th e seat does not strike the rear passenger
or squeeze your body against the steering wheel.
Page 135 of 608
When driving2
135
2-1. Driving proceduresDriving the vehicle.................. 136
Power (ignition) switch .......... 145
EV drive mode.......................... 150
Hybrid transmission ............... 153
Turn signal lever ....................... 159
Parking brake ........................... 160
Horn ............................................. 161
2-2. Instrument cluster Gauges and meters ................ 162
Indicators and warning
lights ......................................... 165
Multi-information display ..... 169
Head-up display ...................... 175
2-3. Operating the lights and windshield wipers
Headlight switch...................... 183
Automatic High Beam .......... 188
Fog light switch ........................ 194
Windshield wipers and
washer ..................................... 195
Headlight cleaner switch.... 200 2-4. Using other driving systems
Cruise control.......................... 201
Dynamic radar cruise
control .................................... 205
LKA
(Lane-Keeping Assist) ........ 217
Driving assist systems ........... 225
Hill-start assist control ......... 230
Pre-Collision System ............ 232
2-5. Driving information Cargo and luggage ............... 240
Vehicle load limits .................. 243
Winter driving tips ................. 244
Trailer towing ........................... 247
Dinghy towing ......................... 248
Page 159 of 608
159
2-1. Driving procedures
2
When driving
Turn signal lever
■Turn signals can be operated when
The “POWER” switch is in ON mode.
■If the indicator flashes faster than usual
Check that a light bulb in the front or rear
turn signal lights has not burned out.
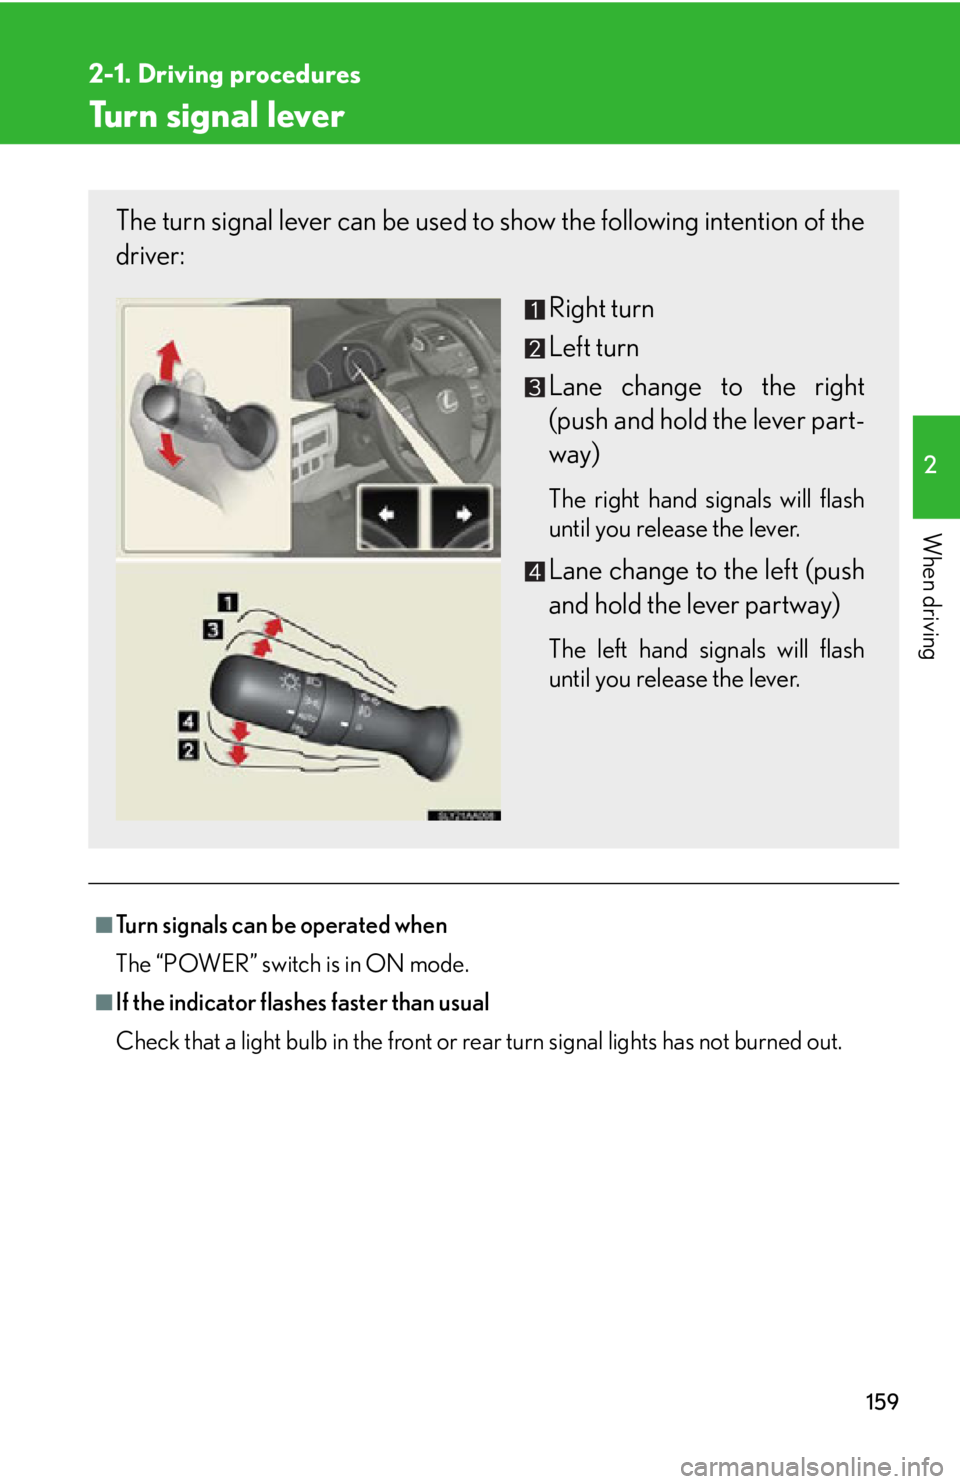
The turn signal lever can be used to show the following intention of the
driver:
Right turn
Left turn
Lane change to the right
(push and hold the lever part-
way)
The right hand signals will flash
until you release the lever.
Lane change to the left (push
and hold the lever partway)
The left hand signals will flash
until you release the lever.