Lexus HS250h 2010 Wide View Front Monitor System / LEXUS 2010 HS250H (OM75006U) Owner's Manual
HS250h 2010
Lexus
Lexus
https://www.carmanualsonline.info/img/36/29669/w960_29669-0.png
Lexus HS250h 2010 Wide View Front Monitor System / LEXUS 2010 HS250H (OM75006U) Owner's Manual
Page 467 of 608
467
4-3. Do-it-yourself maintenance
4
Maintenance and care
Headlight aim (LED headlights)
■Vertical movement adjustment bolts
Adjustment bolt A
Adjustment bolt B
■ Befor
e checking the headlight aim
Make sure the vehicle has a full tank of gasoline and the ar
ea
around the headlight is not deformed.
Park the vehicle on level ground.
Sit in the driver’s seat.
Bounce the vehicle several times.
■ A
djusting the headlight aim
Using a Phillips-head screw-
driver, turn bolt A in either
dir
ection.
Remember the turning direction
and the number of turns.
Page 469 of 608
469
4-3. Do-it-yourself maintenance
4
Maintenance and care
Light bulbs
You may replace the following bulbs by yourself. The difficulty level of
replacement varies depending on the bulb. If necessary bulb replacement
seems difficult to perform, contact your Lexus dealer.
For more information about replacing other light bulbs, contact your Lexus
dealer
.
■Preparing for light bulb replacement
Check the wattage of the light bulb to be replaced. ( P.
5 5 6 )
■ R
emove the engine compartment covers
P.
4 2 3
■ F
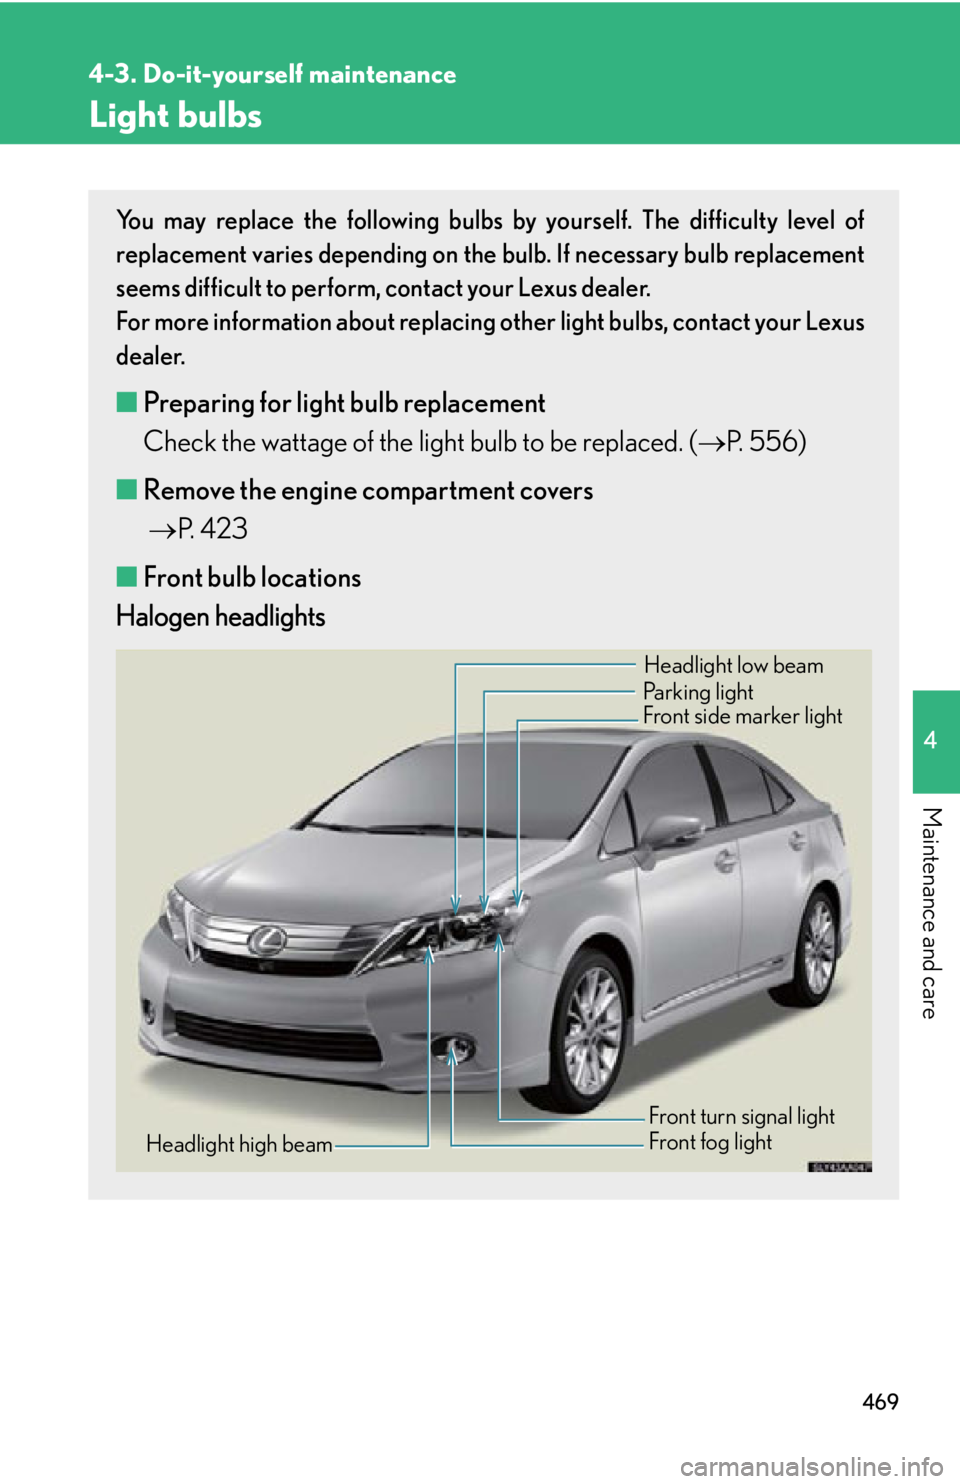
ront bulb locations
Halogen headlights
Front side marker lightHeadlight low beam
Parking light
Front turn signal light
Front fog light
Headlight high beam
Page 470 of 608
470
4-3. Do-it-yourself maintenance
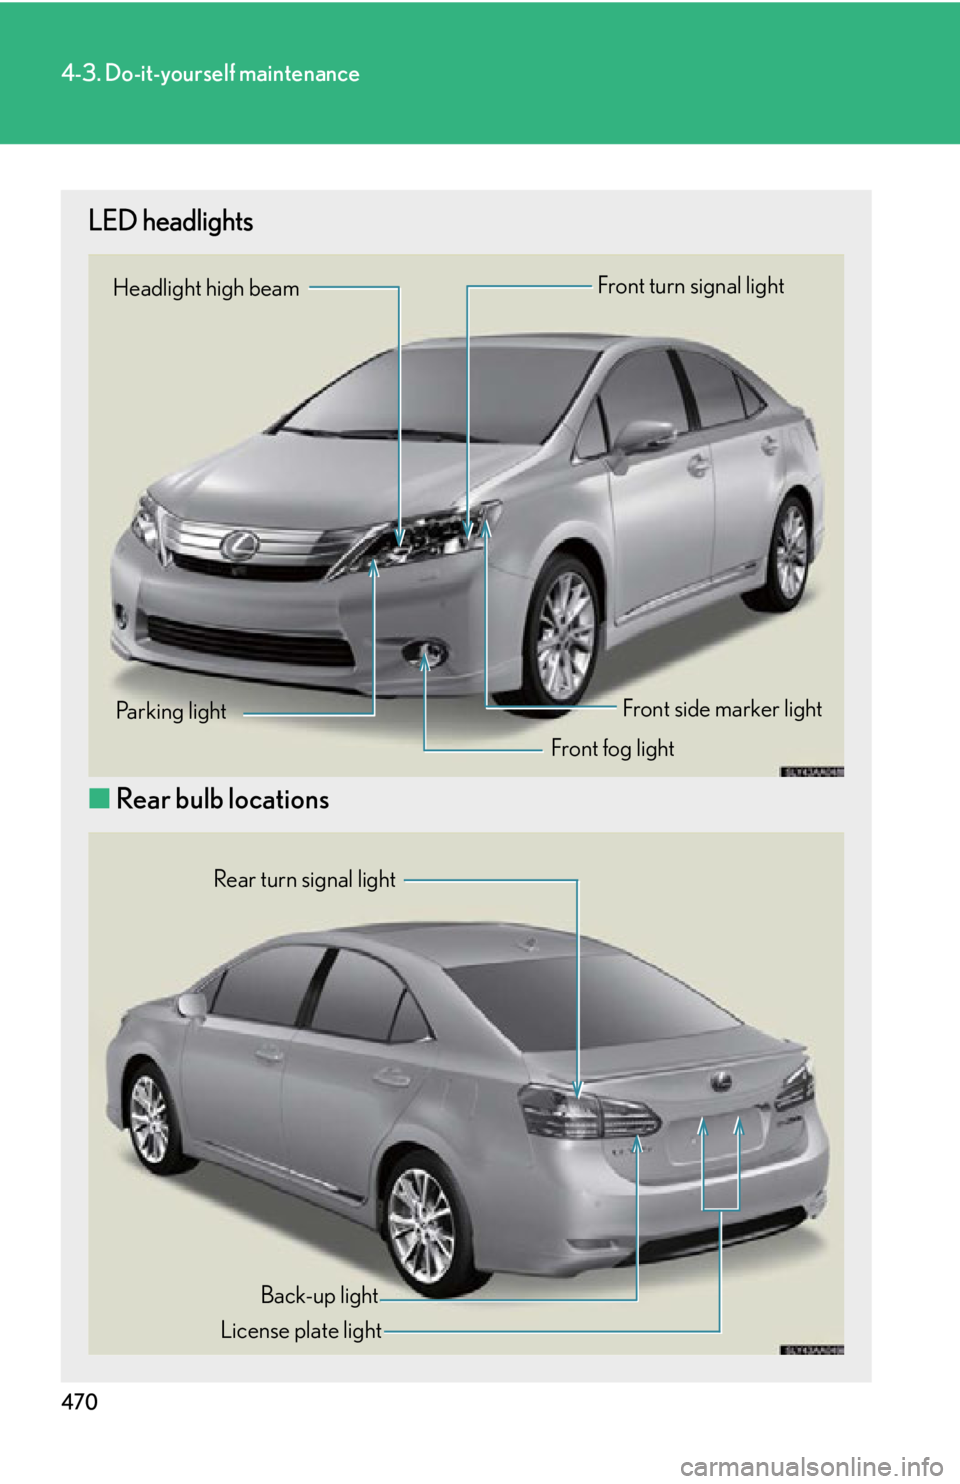
LED headlights
■Rear bulb locations
Headlight high beam
Front fog lightFront turn signal light
Parking lightFront side marker light
Rear turn signal lightBack-up light
License plate light
Page 471 of 608
471
4-3. Do-it-yourself maintenance
4
Maintenance and care
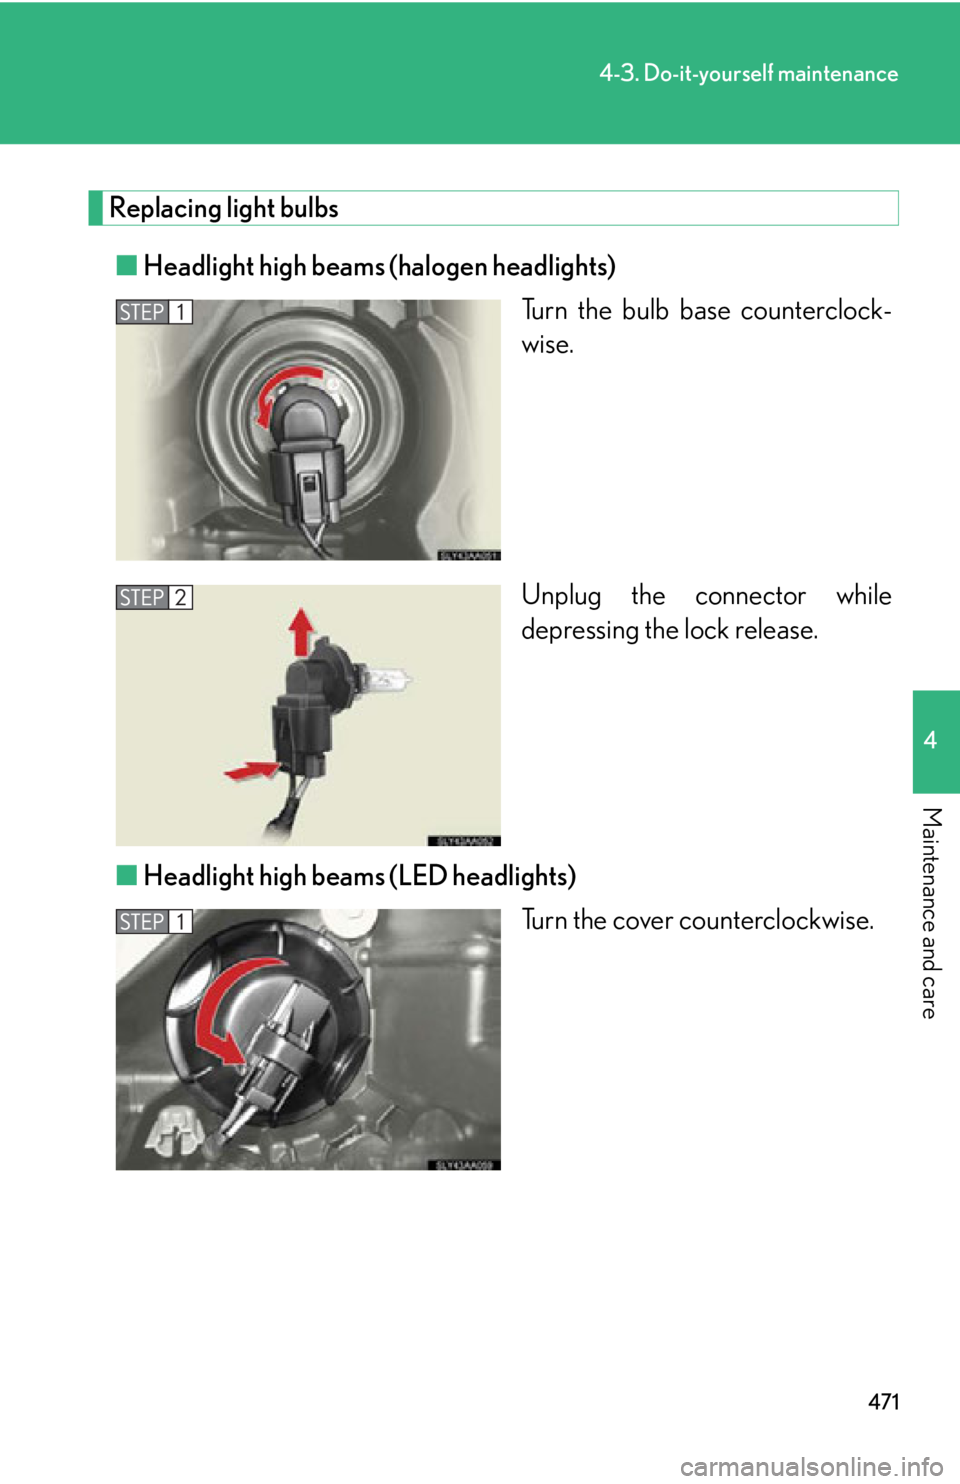
Replacing light bulbs
■Headlight high beams (halogen headlights)
Turn the bulb base counterclock-
wise.
Unplug the connector while
depr
essing the lock release.
■ Headlight high beams (LED headlights)
Turn the cover counterclockwise.
Page 472 of 608
472
4-3. Do-it-yourself maintenance
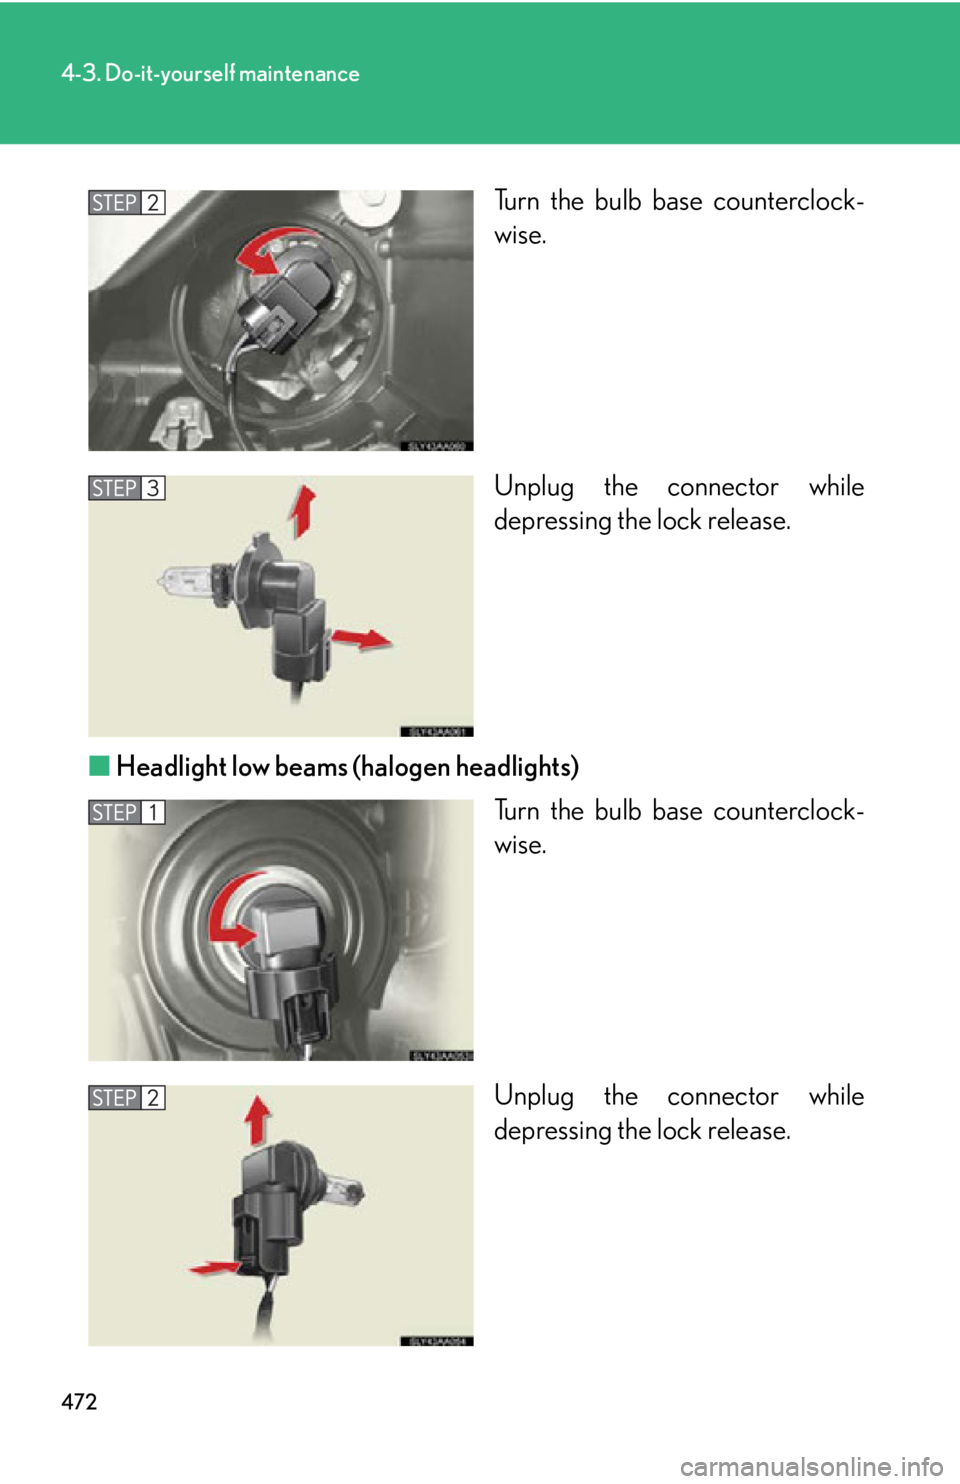
Turn the bulb base counterclock-
wise.
Unplug the connector while
depr
essing the lock release.
■ Headlight lo
w beams (halogen headlights)
Turn the bulb base counterclock -
wise.
Unplug the connector while
depr
essing the lock release.
Page 473 of 608
473
4-3. Do-it-yourself maintenance
4
Maintenance and care
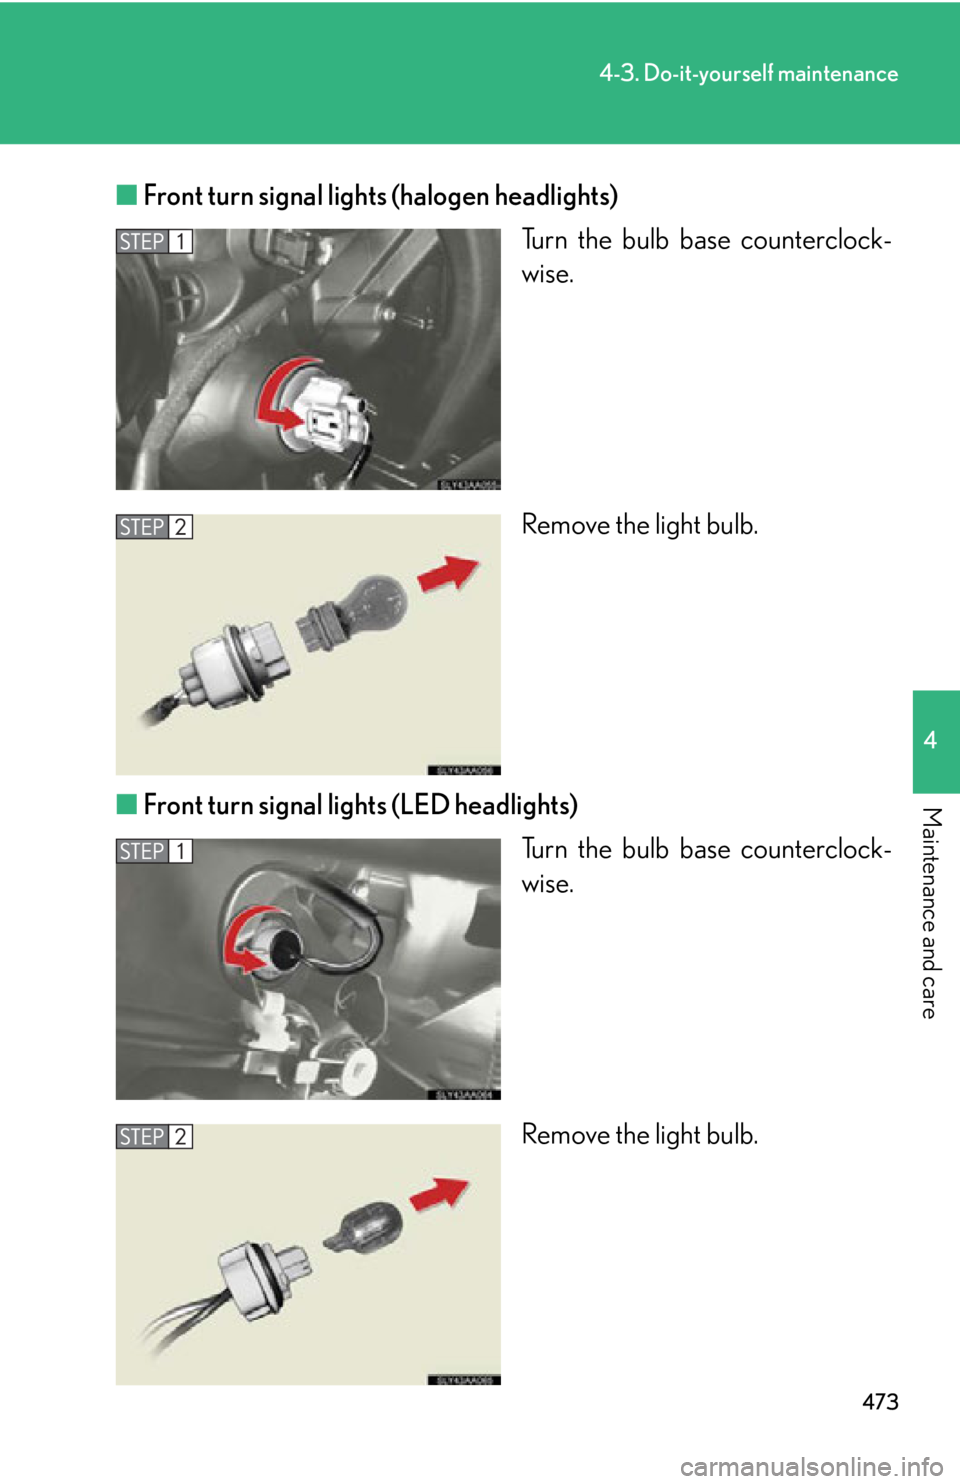
■Front turn signal lights (halogen headlights)
Turn the bulb base counterclock-
wise.
Remove the light bulb.
■ F
ront turn signal lights (LED headlights)
Turn the bulb base counterclock-
wise.
Remove the light bulb.
Page 474 of 608
474
4-3. Do-it-yourself maintenance
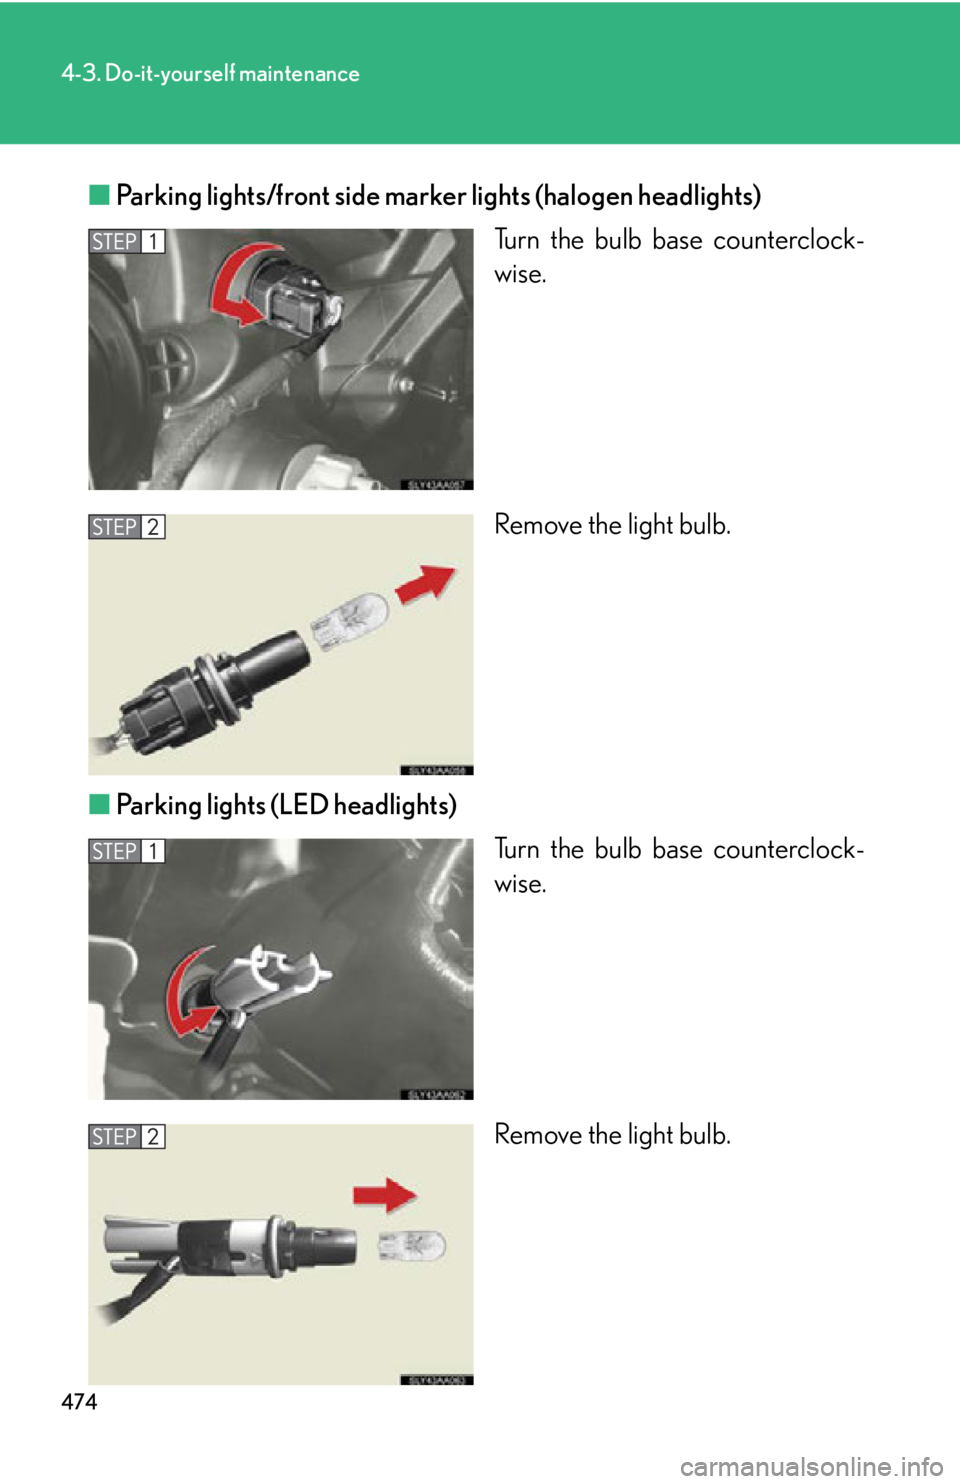
■Parking lights/front side marker lights (halogen headlights)
Turn the bulb base counterclock-
wise.
Remove the light bulb.
■ P
arking lights (LED headlights)
Turn the bulb base counterclock-
wise.
Remove the light bulb.
Page 475 of 608
475
4-3. Do-it-yourself maintenance
4
Maintenance and care
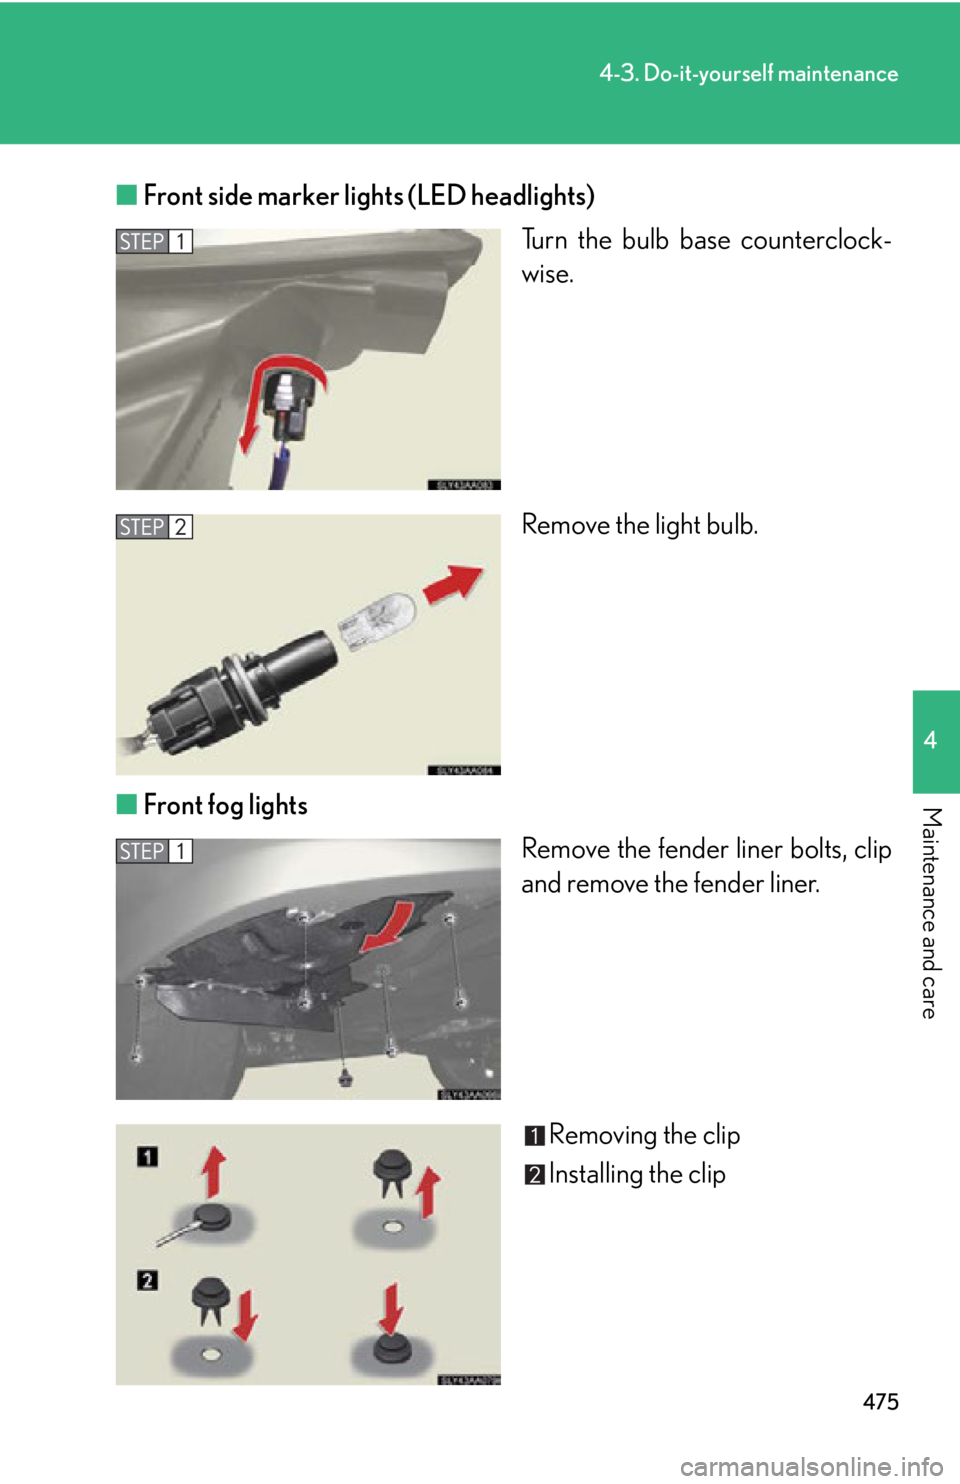
■Front side marker lights (LED headlights)
Turn the bulb base counterclock-
wise.
Remove the light bulb.
■ F
ront fog lights
Remove the fender liner bolts, clip
and r
emove the fender liner.
Removing the clip
Installing the clip
Page 479 of 608
479
4-3. Do-it-yourself maintenance
4
Maintenance and care
■Lights other than the above
If any of the lights listed belo
w has burnt out, have it replaced by your
Lexus dealer.
● Headlight lo
w beams (LED headlight type)
● Side turn signal lights
● Stop
/tail lights
●T
ail lights
●R
ear side marker lights
●High mounted stoplight
● Ou
ter foot lights
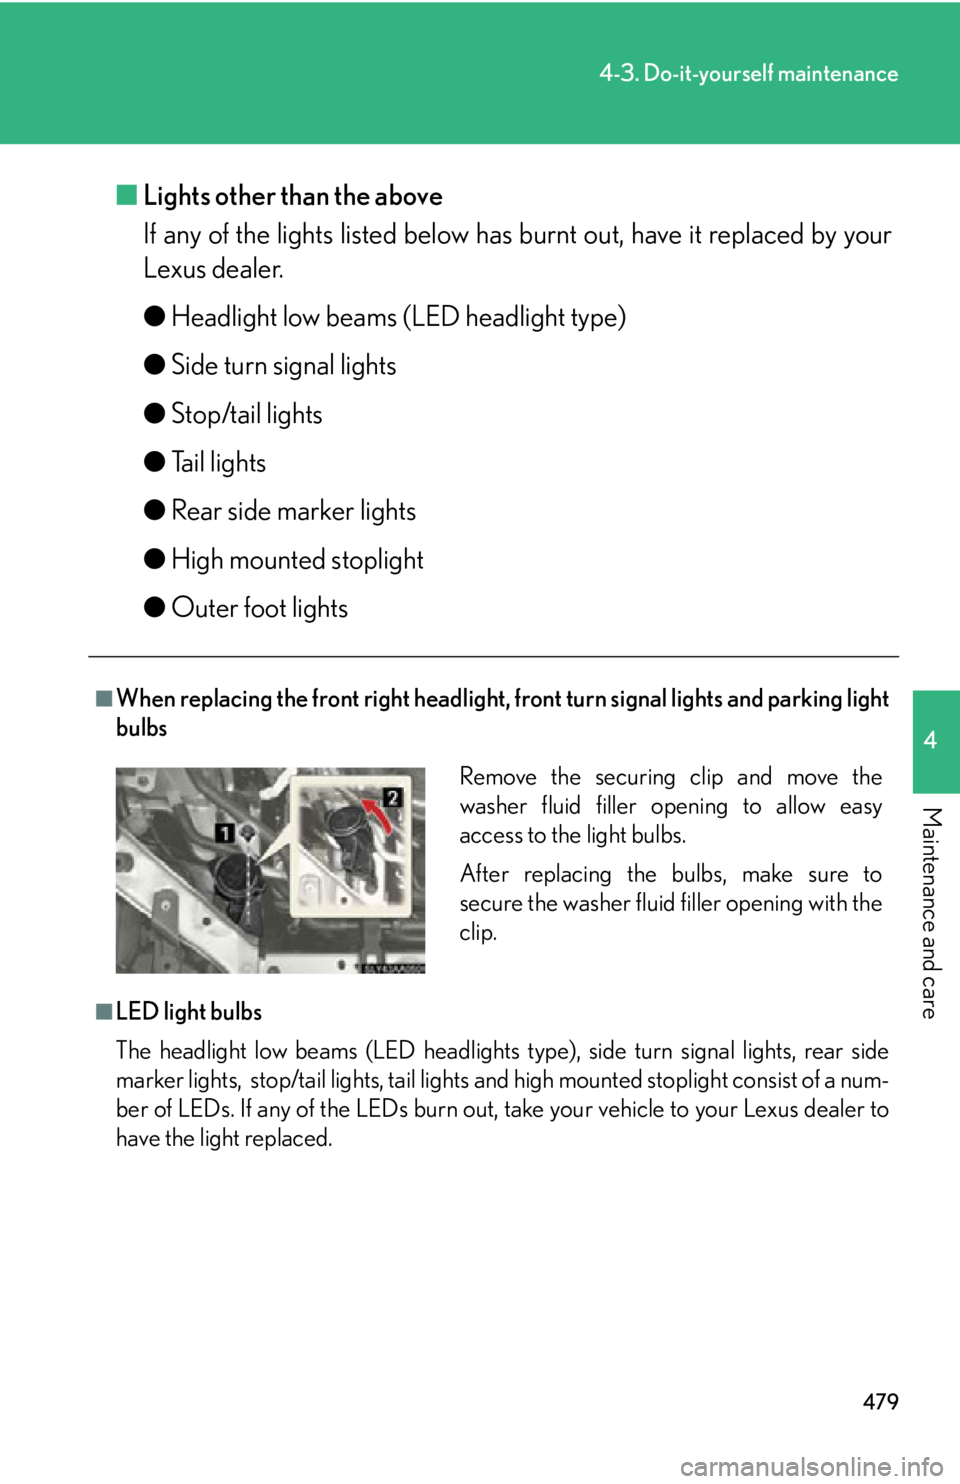
■When replacing the front right headlight, fr ont turn signal lights and parking light
bulbs
■LED light bulbs
The headlight low beams (LED headlights type), side tu
rn signal lights, rear side
marker lights, stop/tail lights, tail lights and high mounted stoplight consist of a num -
ber of LEDs. If any of the LEDs burn out, take your vehicle to your Lexus dealer to
hav
e the light replaced.
Remove the securing clip and move the
washer fluid filler opening to allow easy
access to the light bulbs.
After replacing the bulbs, make sure to
secure the washer fluid filler opening with the
clip.
Page 480 of 608

480
4-3. Do-it-yourself maintenance
■Condensation build-up on the inside of the lens
Contact your Lexus dealer for more information in the following situations. Tempo-
rary condensation build-up on the inside of the headlight lens does not indicate a
malfunction.
●Large drops of water have built up on the inside of the lens.
●Water has built up inside the headlight.
CAUTION
■Replacing light bulbs
●Turn off the lights. Do not attempt to replace the bulb immediately after turning
off the lights.
The bulbs become very hot and may cause burns.
●Do not touch the glass portion of the light bulb with bare hands. Hold the bulb by
the plastic or metal portion.
If the bulb is scratched or drop ped, it may blow out or crack.
●Fully install light bulbs and any parts used to secure them. Failur to do so may
result in heat damage, fire, or water ente ring the headlight unit. This may damage
the headlights or cause condensation to build up on the lens.
■To prevent damage or fire
Make sure bulbs are fully seated and locked.

