key Lexus HS250h 2011 Do-it-yourself maintenance / LEXUS 2011 HS250H (OM75037U) Service Manual
[x] Cancel search | Manufacturer: LEXUS, Model Year: 2011, Model line: HS250h, Model: Lexus HS250h 2011Pages: 628, PDF Size: 10.69 MB
Page 343 of 628
343
3-4. Using the hands-free phone system (for cellular phones)
3
Interior features
■Automatic volume adjustment
When vehicle speed reaches 50 mph (80 km/h) or more, the volume automati-
cally increases. The volume returns to the previous volume setting when vehicle
speed drops to 43 mph (70 km/h) or less.
■When using a voice command
For numbers, say a combination of single digits from zero to nine, # (pound),
(star), and + (plus).
Say the command correctly and clearly.
■Situations that the system may not recognize your voice
●When driving on rough roads
●When driving at high speeds
●When air is blowing out of the vents onto the microphone
●When the air conditioning fan emits a loud noise
■Operations that cannot be performed while driving
●Operating the system with
●Registering a cellular phone to the system
■Changing the passkey
P. 3 5 2
Page 349 of 628
349
3-4. Using the hands-free phone system (for cellular phones)
3
Interior features
Setting a cellular phone
Registering a cellular phone in the hands-free phone system allows the sys-
tem to function. The following function s can be used for registered cellular
phones:
■ Functions and operation procedures
To enter the menu for each function , follow the steps below using a
voice command or :
●Registering a cellular phone
1. “Setup” 2. “Phone Setup” 3. “Pair Phone”
● Selecting a cellular phone to be used
1. “Setup” 2. “Phone Setup” 3. “Connect Phone (Connect)”
● Changing the registered name of a cellular phone
1. “Setup” 2. “Phone Setup” 3. “Change Name”
● Listing the registered cellular phones
1. “Setup” 2. “Phone Setup” 3. “List Phones”
● Changing the passkey
1. “Setup” 2. “Phone Setup” 3. “Set Passkey”
● Deleting a registered cellular phone
1. “Setup” 2. “Phone Setup” 3. “Delete Phone”
Page 352 of 628
352
3-4. Using the hands-free phone system (for cellular phones)
Changing the passkeySelect “Set Passkey” using a voice command or .
Press the talk switch, say a 4 to 8-digit number, and select
“Confirm” using a voice command or .
When the entire number to be re gistered as a passkey has been
input, press again.
If the number to be registered has 8 digits, pressing of the knob is not
necessary.
Deleting a registered cellular phone
Select “Delete Phone” using a voice command or .
Select the cellular phone to be deleted by either of the following
methods and select “Confirm” using a voice command or
:
a. Press the talk switch and say the name of the desired cellular
phone.
b. Press the talk switch and say “List Phones”. When the name of
the desired cellular phone is read aloud, press the talk switch.
If the cellular phone to be deleted is paired as a Bluetooth
® audio player,
the registration of the audio player can be deleted at the same time. A
voice guidance instructio n to delete a Bluetooth
® audio player is heard.
Select “Yes” or “No” using a voice command or .
(Bluetooth
® audio player P. 316)
Page 357 of 628

357
3-4. Using the hands-free phone system (for cellular phones)
3
Interior features
■Initialization
●The following data in the system can be initialized:
•Phone book
• Outgoing and incoming call history
•Speed dials
• Registered cellular phone data
•Security code
• Registered Bluetooth
® enabled portable player data
• Passkey for the cellular phones
• Passkey for the Bluetooth
® audio players
•Guidance volume
• Receiver volume
• Ring tone volume
●Once the initialization has been complete d, the data cannot be restored to its
original state.
■When the phone book is locked
The following functions cannot be used:
●Dialing by inputting a name
●Speed dialing
●Dialing a number stored in the call history memory
●Using the phone book
Page 366 of 628

366
3-5. Using the interior lights
■Illuminated entry system
The lights automatically turn on/off according to “POWER” switch mode, the pres-
ence of the electronic key, whether the doors are locked/unlocked, and whether
the doors are opened/closed.
■To prevent 12-volt battery discharge
If the interior lights remain on when the door is not fully closed and the interior light
switch (door position on/ off) is on, the li ghts will go off automatically after 20 min-
utes.
■Customization
Settings (e.g. the time elapsed before the lights turn off) can be changed. (Custom-
izable features P. 5 8 0 )
Pe r s o n a l l i g h t s
Page 368 of 628
368
3-6. Using the storage features
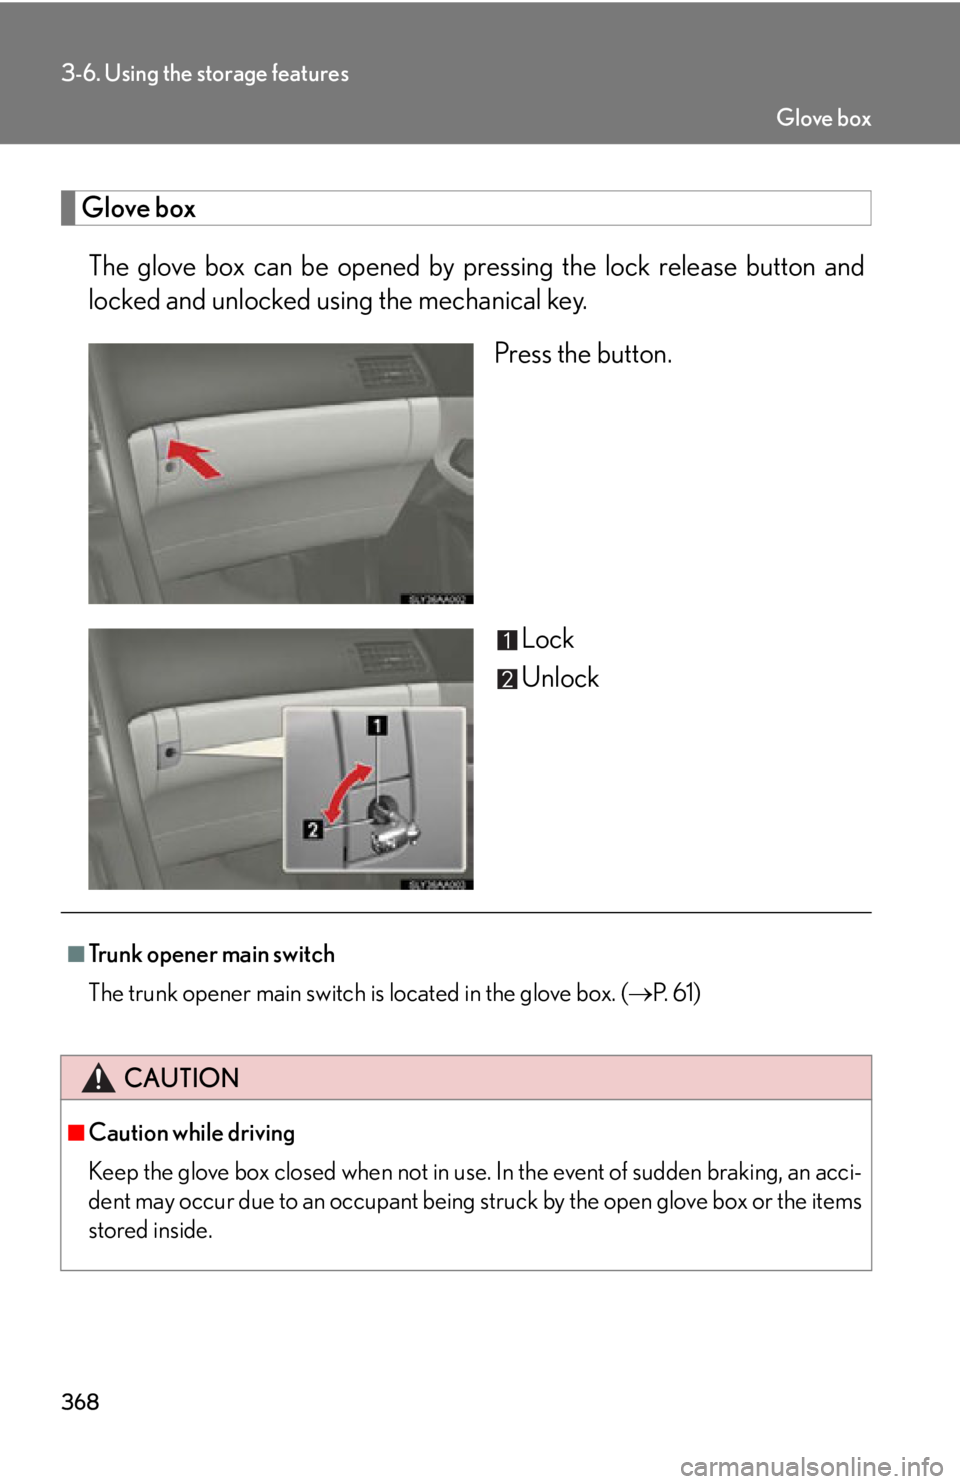
Glove boxThe glove box can be opened by pr essing the lock release button and
locked and unlocked using the mechanical key.
Press the button.
Lock
Unlock
■Trunk opener main switch
The trunk opener main switch is located in the glove box. ( P. 6 1 )
CAUTION
■Caution while driving
Keep the glove box closed when not in use. In the event of sudden braking, an acci-
dent may occur due to an occupant being struck by the open glove box or the items
stored inside.
Glove box
Page 407 of 628
Maintenance and care4
407
4-1. Maintenance and careCleaning and protecting the vehicle exterior............ 408
Cleaning and protecting the vehicle interior ............... 412
4-2. Maintenance Maintenance requirements ......................... 415
General maintenance ........... 417
Emission inspection and maintenance (I/M)
programs................................. 421 4-3. Do-it-yourself maintenance
Do-it-yourself service precautions ........................... 422
Hood .......................................... 425
Positioning a floor jack ......... 426
Engine compartment ........... 428
12-volt battery ........................ 439
Tires............................................ 443
Tire inflation pressure............ 451
Wheels ...................................... 454
Air conditioning filter ........... 456
Electronic key battery.......... 459
Checking and replacing fuses .......................................... 461
Headlight aim (LED headlights) ................. 473
Light bulbs ................................. 475
Page 409 of 628

409
4-1. Maintenance and care
4
Maintenance and care
■When using a car wash
If the door handle becomes wet while the electronic key is within the effective
range, the door may lock and unlock repeatedly. Place the key in a position 6 ft. (2
m) or more separate from the vehicle while the vehicle is being washed. (Take care
to ensure that the key is not stolen.)
■Aluminum wheels
●Remove any dirt immediately by using a neutral detergent. Do not use hard
brushes or abrasive cleaners. Do not use strong or harsh chemical cleaners.
Use the same mild detergent and wax as used on the paint.
●Do not use detergent on the wheels when they are hot, for example after driving
for long distance in the hot weather.
●Wash detergent from the wheels immediately after use.
■Bumpers and side moldings
Do not scrub with abrasive cleaners.
■Side windows water-repellent coating
●The following precautions can extend the effectiveness of the water-repellent
coating.
• Remove any dirt, etc. from the side windows regularly.
• Do not allow dirt and dust to accumulate on the windows for a long period.
Clean the windows with a soft, damp cloth as soon as possible.
• Do not use wax or glass cleaners that contain abrasives when cleaning the windows.
• Do not use any metallic objects to remove condensation build up.
●When the water-repellent performance has become insufficient, the coating
can be repaired. Contact your Lexus dealer.
■Outside rear view mirror rain -clearing coating (if equipped)
Observe the following precautions in order to retain the rain-clearing properties of
the mirrors:
●Clean the mirrors using a car shampoo or glass cleaner that does not contain
silicone or an abrasive compound, and rinse thoroughly with water.
●Allow the mirrors to be exposed to direct sunlight for 1 to 2 days.
Page 440 of 628
440
4-3. Do-it-yourself maintenance
■Before recharging
When recharging, the 12-volt battery produces hydrogen gas which is flammable
and explosive. Therefore, observe the following precautions before recharging:
●If recharging with the 12-volt battery installed on the vehicle, be sure to discon-
nect the ground cable.
●Make sure the power switch on the charger is off when connecting and discon-
necting the charger cables to the 12-volt battery.
■After recharging/reconnecting the 12-volt battery
●Unlocking the doors using the smart key system may not be possible immedi-
ately after reconnecting the 12-volt batt ery. If this happens, use the wireless
remote control or the mechanical key to lock/unlock the doors.
●Start the hybrid system with the “POWER” switch in ACCESSORY mode. The
hybrid system may not start with the “POWER” switch turned OFF. However,
the hybrid system will operate normally from the second attempt.
●The “POWER” switch mode is recorded by the vehicle. If the battery is recon-
nected, the vehicle will return the “POWER” switch mode to the status it was in
before the battery was disconnected. Make sure to turn off the power before
disconnect the battery. Take extra care when connecting the battery if the
“POWER” switch mode prior to discharge is unknown.
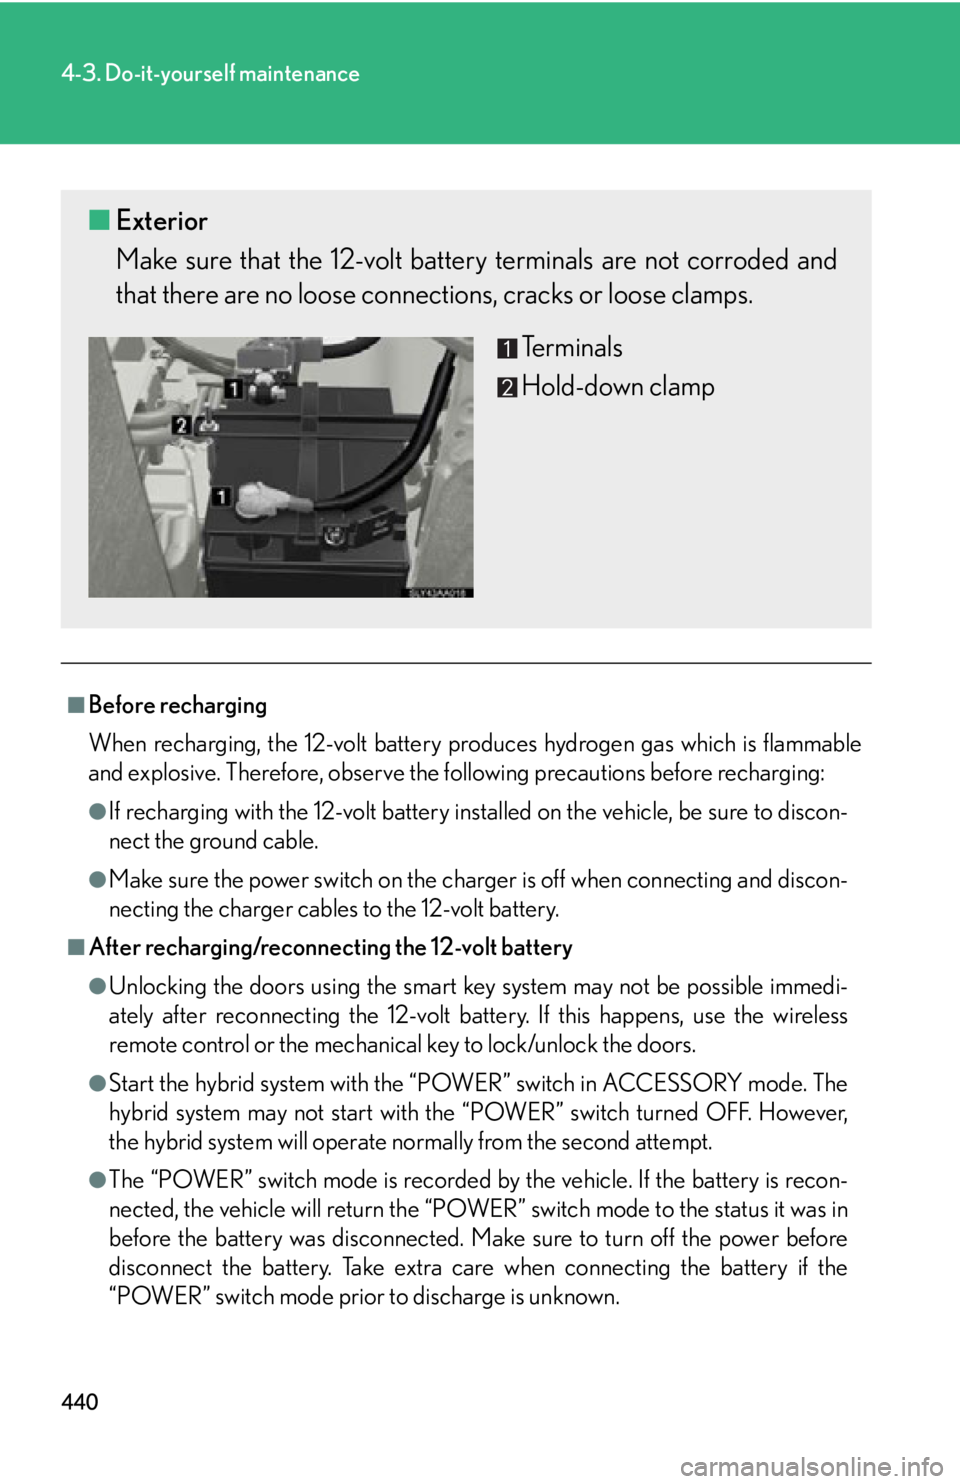
■ Exterior
Make sure that the 12-volt ba ttery terminals are not corroded and
that there are no loose connect ions, cracks or loose clamps.
Terminals
Hold-down clamp
Page 459 of 628
459
4-3. Do-it-yourself maintenance
4
Maintenance and care
Electronic key battery
Replace the battery with a new one if it is depleted.
■You will need the following items:
●Flathead screwdriver
● Small flathead screwdriver
● Lithium battery (CR1632)
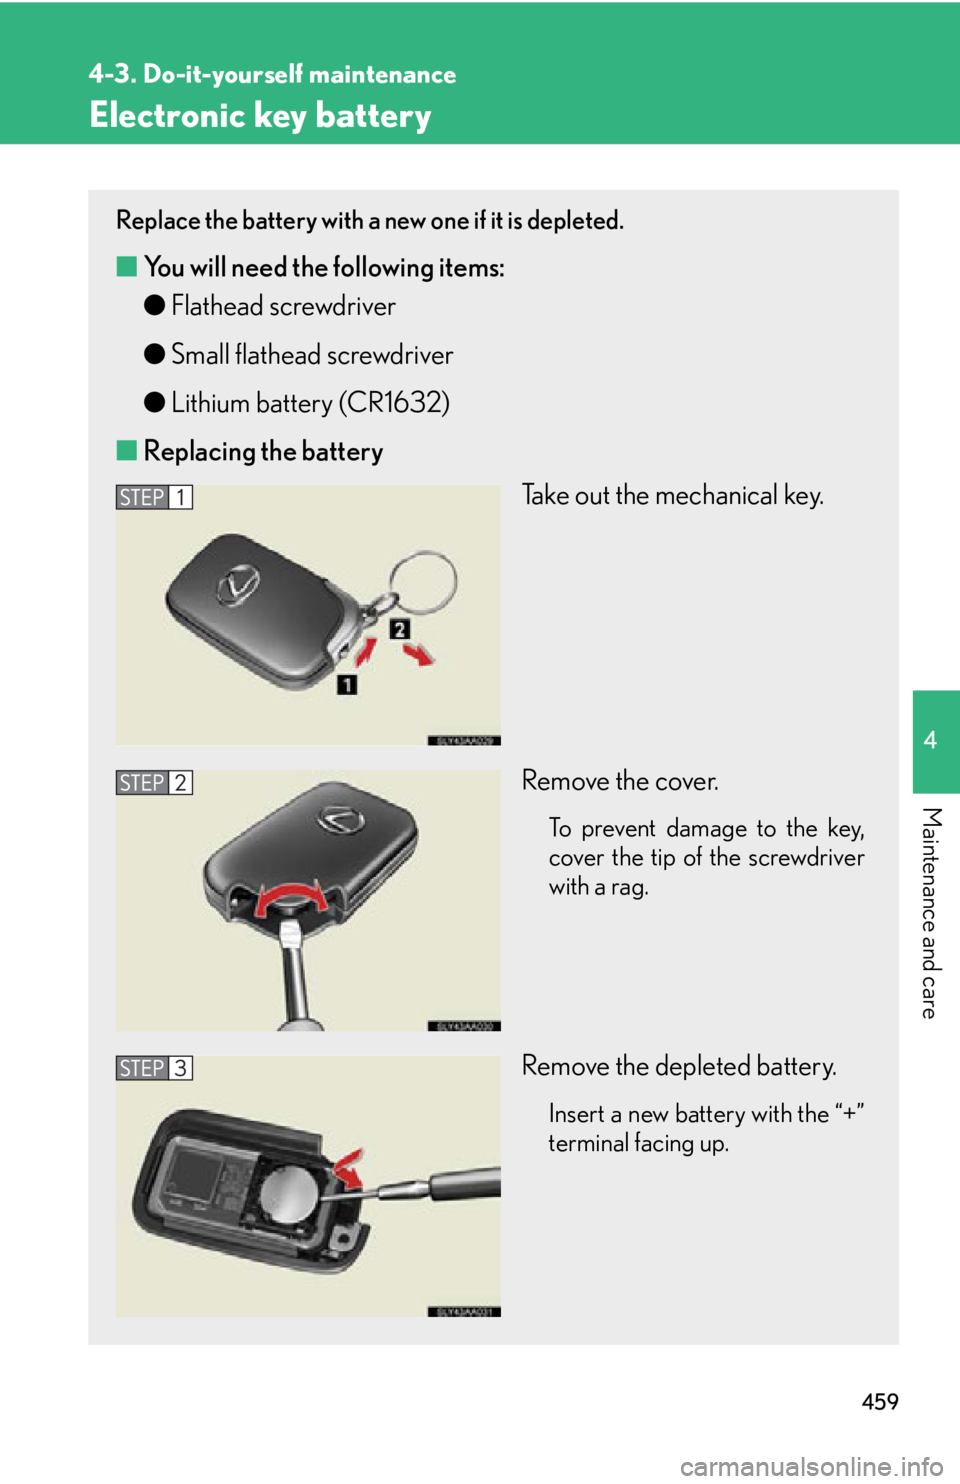
■ Replacing the battery
Take out the mechanical key.
Remove the cover.
To prevent damage to the key,
cover the tip of the screwdriver
with a rag.
Remove the depleted battery.
Insert a new battery with the “+”
terminal facing up.