fuse box Lexus HS250h 2011 Do-it-yourself maintenance / LEXUS 2011 HS250H OWNERS MANUAL (OM75037U)
[x] Cancel search | Manufacturer: LEXUS, Model Year: 2011, Model line: HS250h, Model: Lexus HS250h 2011Pages: 628, PDF Size: 10.69 MB
Page 5 of 628

1
2
3
4
5
6
7
5
3-6. Using the storage featuresList of storage features............... 367
• Glove box ................................... 368
• Console box ................................ 369
• Cup holders.................................. 371
• Bottle holders ............................. 373
• Auxiliary boxes........................... 374
3-7. Other interior features Sun visors......................................... 375
Vanity mirrors ................................ 376
Clock ................................................. 377
Power outlets ................................. 378
Seat heaters and ventilators ..................................... 379
Armrest ............................................. 381
Rear sunshade .............................. 382
Floor mat......................................... 384
Trunk compartment features......................................... 386
Garage door opener................. 388
Compass.......................................... 396
Safety Connect ............................ 400 4-1. Maintenance and care
Cleaning and protecting the vehicle exterior.................. 408
Cleaning and protecting the vehicle interior ..................... 412
4-2. Maintenance Maintenance requirements ...... 415
General maintena nce .................. 417
Emission inspection and maintenance (I/M)
programs ....................................... 421
4-3. Do-it-yourself maintenance Do-it-yourself service precautions .................................. 422
Hood ................................................. 425
Positioning a floor jack............... 426
Engine compartment.................. 428
12-volt battery................................ 439
Tires ................................................... 443
Tire inflation pressure.................. 451
Wheels ............................................. 454
Air conditioning filter.................. 456
Electronic key battery ................ 459
Checking and replacing fuses ................................................. 461
Headlight aim (LED headlights) ....................... 473
Light bulbs ....................................... 475
4Maintenance and care
Page 428 of 628
428
4-3. Do-it-yourself maintenance
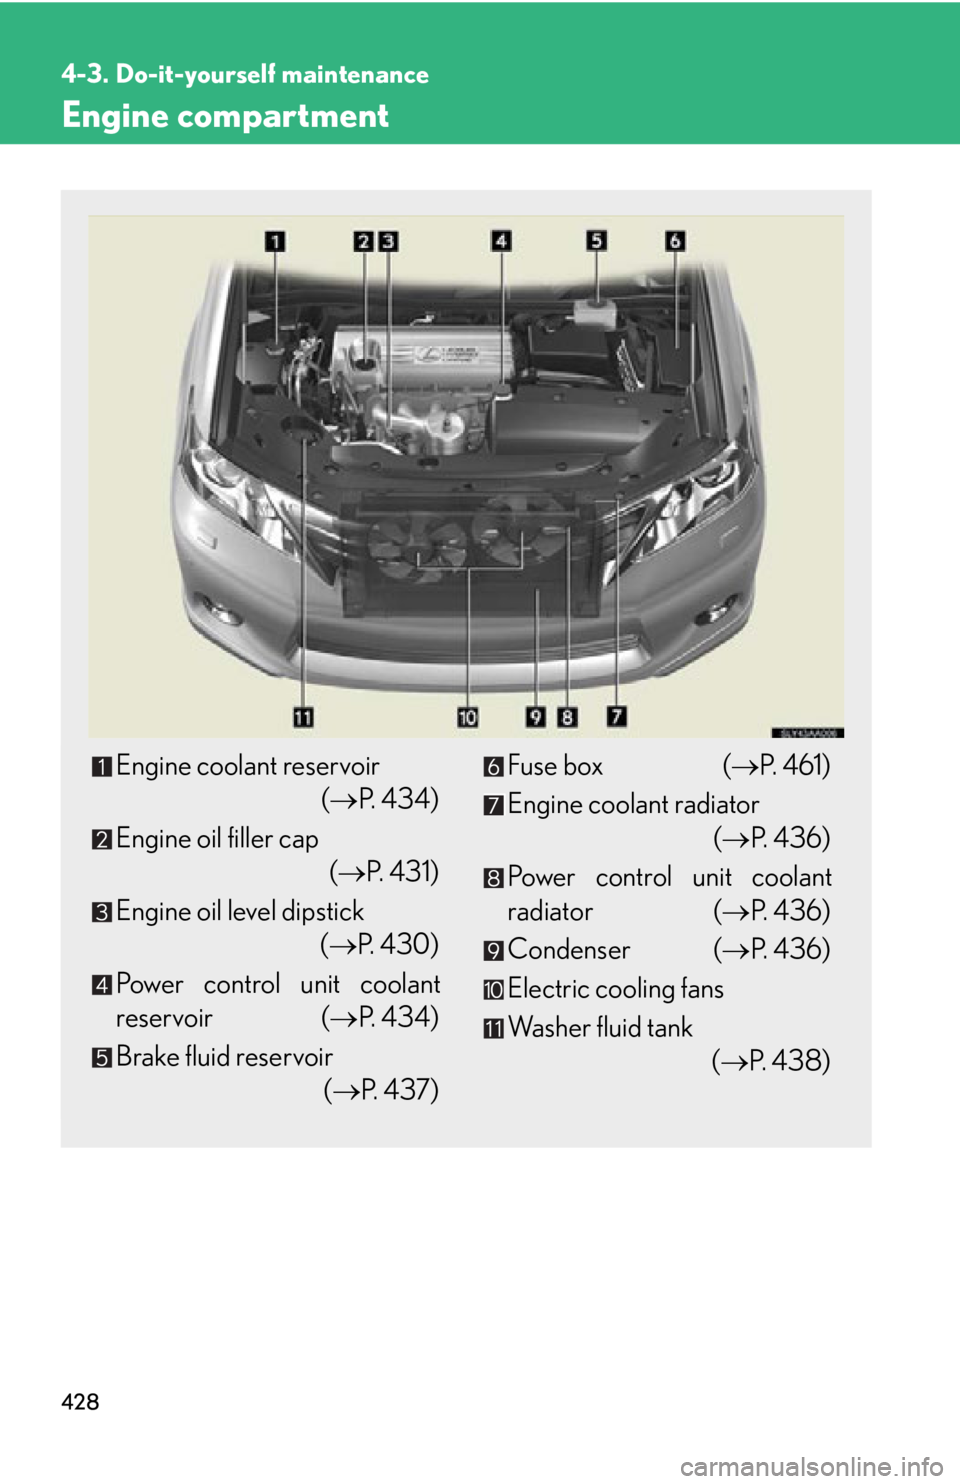
Engine compartment
Engine coolant reservoir (P. 4 3 4 )
Engine oil filler cap (P. 4 3 1 )
Engine oil level dipstick (P. 430)
Power control unit coolant
reservoir ( P. 4 3 4 )
Brake fluid reservoir (P. 4 3 7 )Fuse box ( P. 4 6 1 )
Engine coolant radiator (P. 4 3 6 )
Power control unit coolant
radiator ( P. 4 3 6 )
Condenser ( P. 4 3 6 )
Electric cooling fans
Washer fluid tank (P. 4 3 8 )
Page 461 of 628
461
4-3. Do-it-yourself maintenance
4
Maintenance and care
Checking and replacing fuses
If any of the electrical components do not operate, a fuse may have blown.
If this happens, check and replace the fuses as necessary.
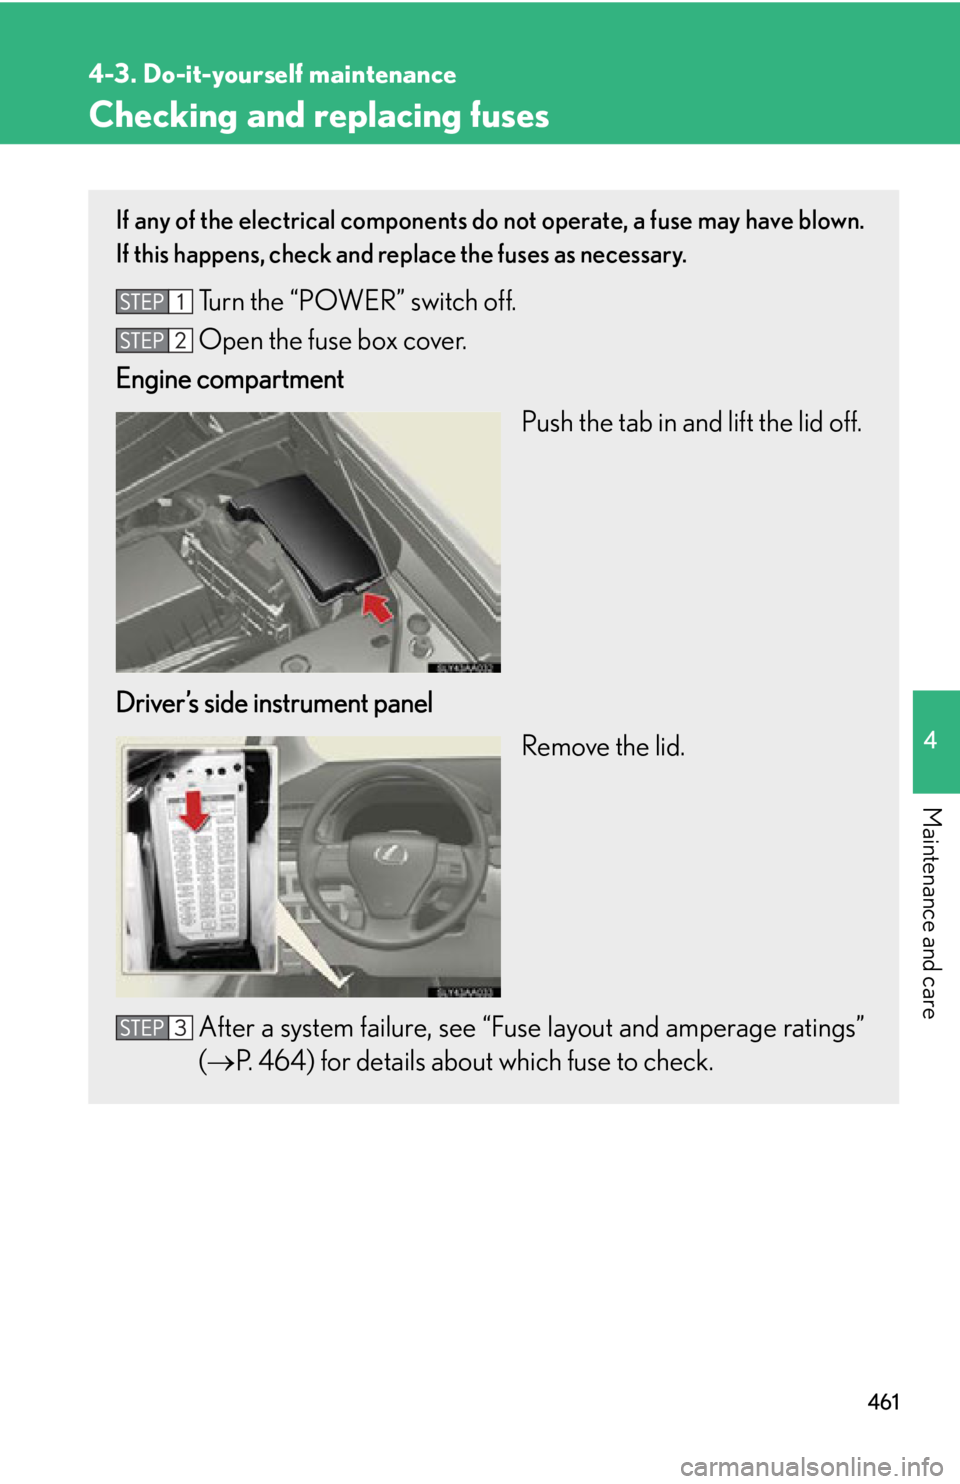
Turn the “POWER” switch off.
Open the fuse box cover.
Engine compartment
Push the tab in and lift the lid off.
Driver’s side instrument panel Remove the lid.
After a system failure, see “Fuse layout and amperage ratings”
( P. 464) for details about which fuse to check.
Page 462 of 628
462
4-3. Do-it-yourself maintenance
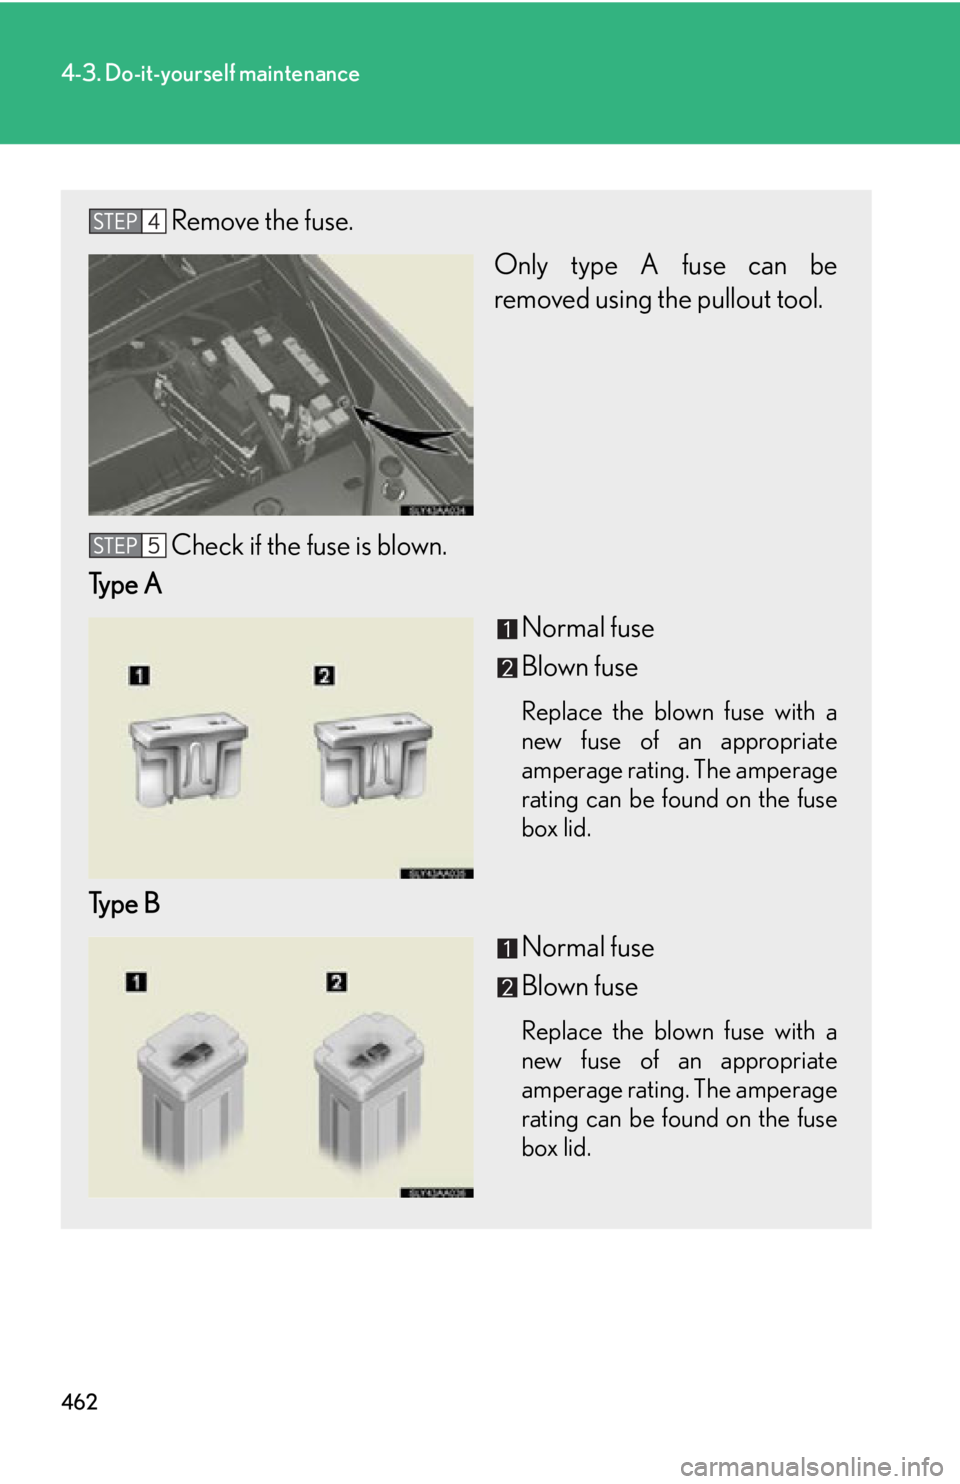
Remove the fuse.Only type A fuse can be
removed using the pullout tool.
Check if the fuse is blown.
Type A
Normal fuse
Blown fuse
Replace the blown fuse with a
new fuse of an appropriate
amperage rating. The amperage
rating can be found on the fuse
box lid.
Type BNormal fuse
Blown fuse
Replace the blown fuse with a
new fuse of an appropriate
amperage rating. The amperage
rating can be found on the fuse
box lid.
Page 463 of 628
463
4-3. Do-it-yourself maintenance
4
Maintenance and care
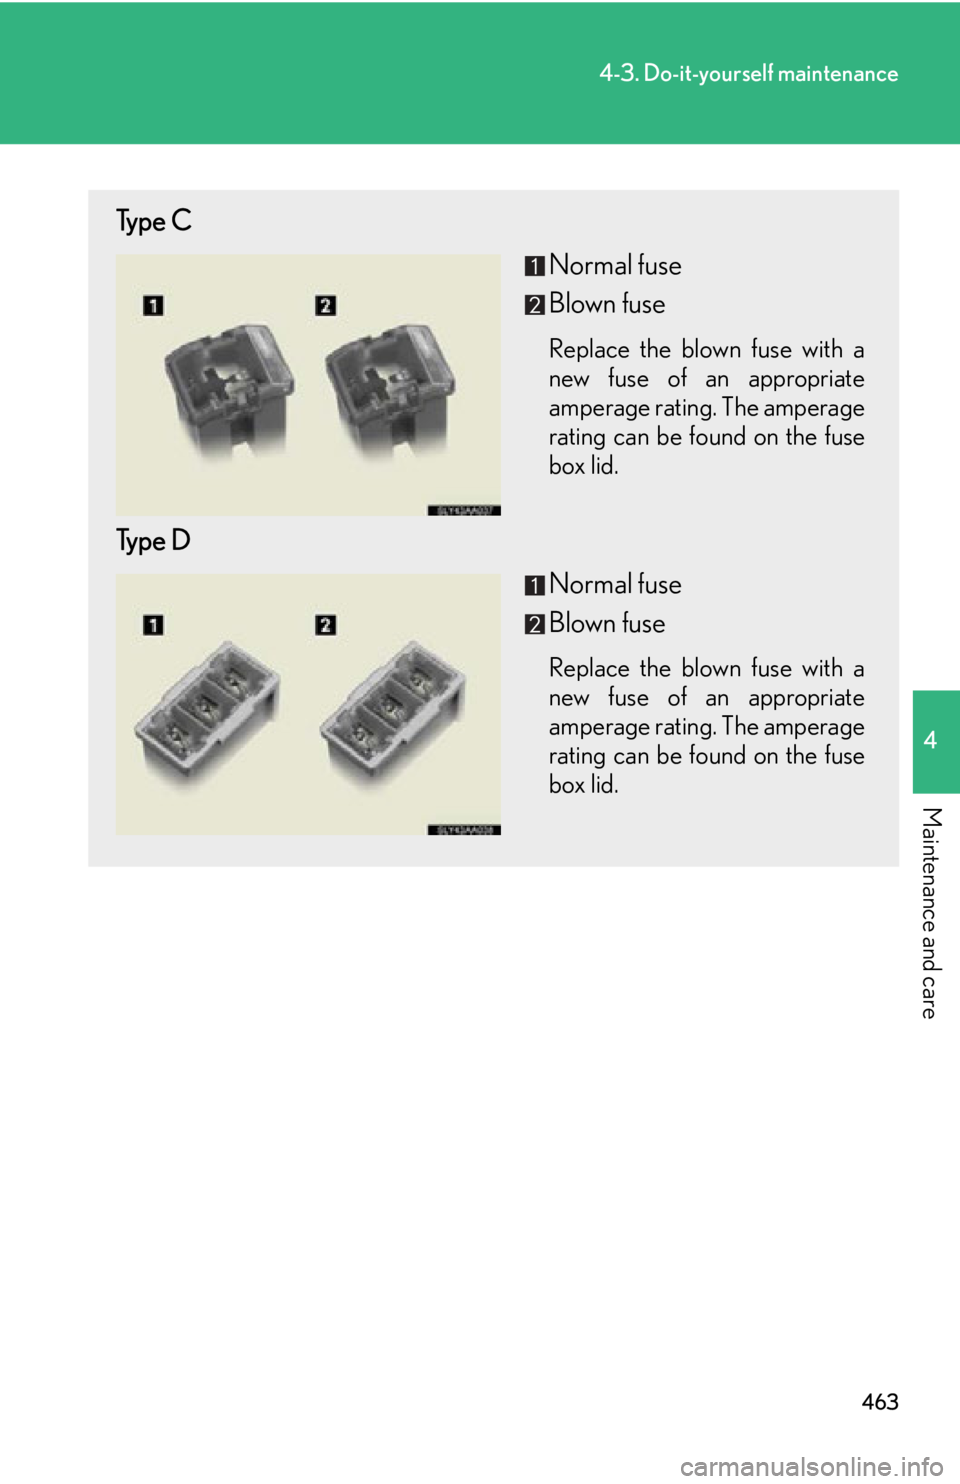
Type CNormal fuse
Blown fuse
Replace the blown fuse with a
new fuse of an appropriate
amperage rating. The amperage
rating can be found on the fuse
box lid.
Type DNormal fuse
Blown fuse
Replace the blown fuse with a
new fuse of an appropriate
amperage rating. The amperage
rating can be found on the fuse
box lid.
Page 468 of 628
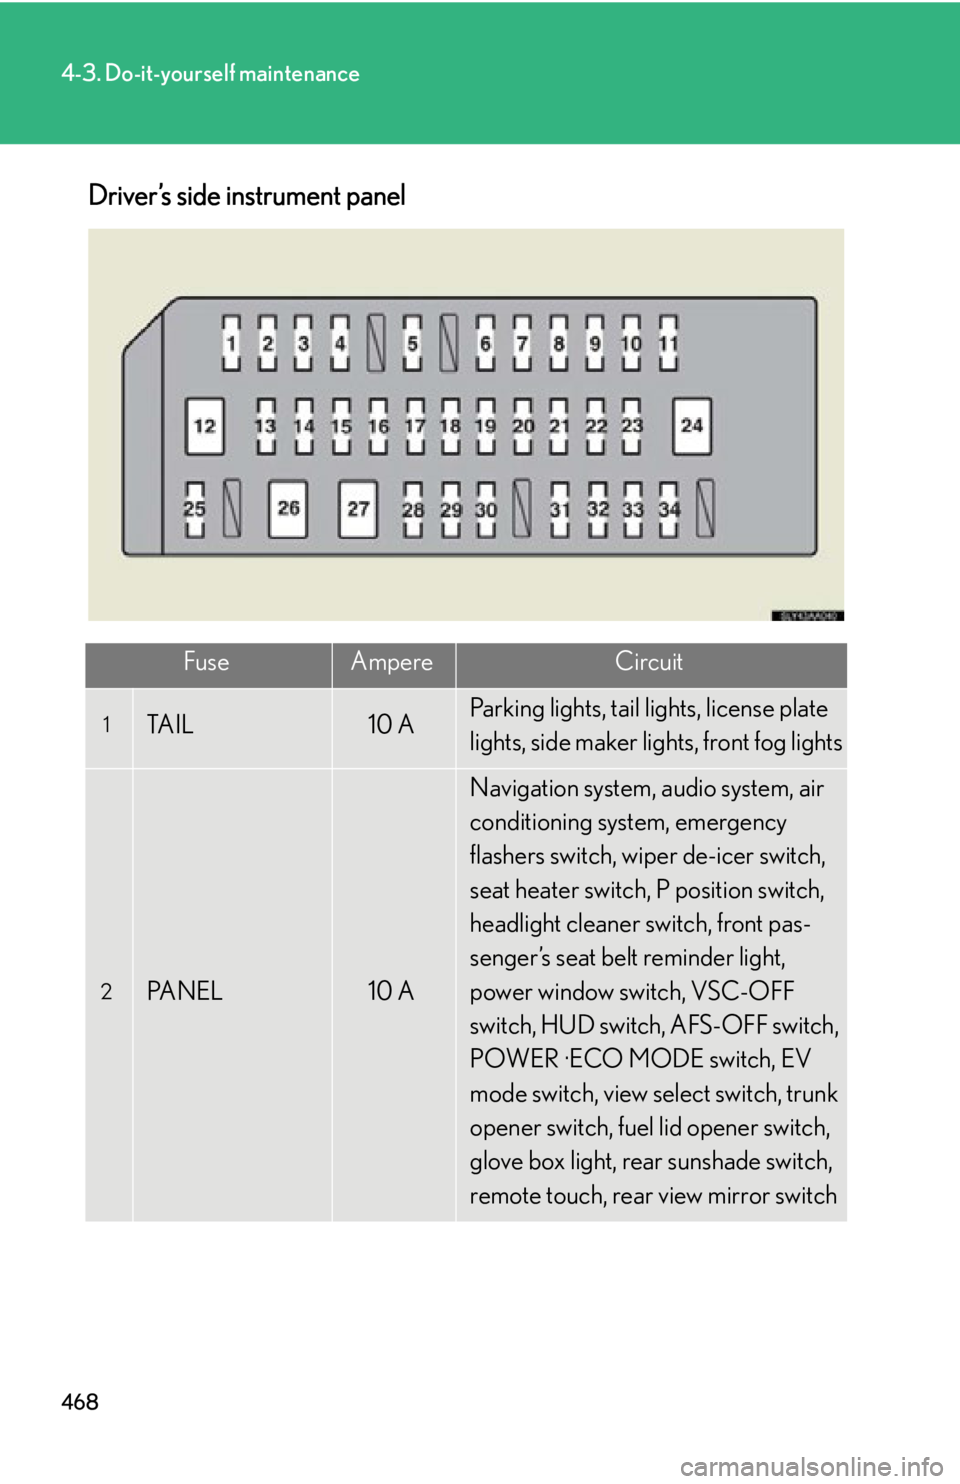
468
4-3. Do-it-yourself maintenance
Driver’s side instrument panel
FuseAmpereCircuit
1TA I L10 AParking lights, tail lights, license plate
lights, side maker lights, front fog lights
2PA N E L10 A
Navigation system, audio system, air
conditioning system, emergency
flashers switch, wiper de-icer switch,
seat heater switch, P position switch,
headlight cleaner switch, front pas-
senger’s seat belt reminder light,
power window switch, VSC-OFF
switch, HUD switch, AFS-OFF switch,
POWER ·ECO MODE switch, EV
mode switch, view select switch, trunk
opener switch, fuel lid opener switch,
glove box light, rear sunshade switch,
remote touch, rear view mirror switch
Page 472 of 628
472
4-3. Do-it-yourself maintenance
■After a fuse is replaced
●If the lights do not turn on even after the fuse has been replaced, a bulb may
need replacement. ( P. 475)
●If the replaced fuse blows again, have the vehicle inspected by your Lexus
dealer.
■If there is an overload in a circuit
The fuses are designed to blow, protecting the wiring harness from damage.
CAUTION
■To prevent system breakdowns and vehicle fire
Observe the following precautions.
Failure to do so may cause damage, and possibly a fire or injury.
●Never use a fuse of a higher amperage rating than indicated, or use any other
object in place of a fuse.
●Always use a genuine Lexus fuse or equivalent.
Never replace a fuse with a wire, even as a temporary fix.
This can cause extensive damage or even fire.
●Do not modify the fuses or fuse boxes.
■Fuse box near the power control unit
Never check or replace the fuses as there are high voltage parts and wiring near
the fuse box.
Doing so may cause electric shock, re sulting in death or serious injury.
NOTICE
■Before replacing fuses
Have the cause of electrical overload determined and repaired by your Lexus
dealer as soon as possible.
Page 543 of 628
5
When trouble arises
543
5-2. Steps to take in an emergency
If the vehicle 12-volt battery is discharged
The following procedures may be used to start the hybrid system if the vehi-
cle’s 12-volt battery is discharged.
You can also call your Lexus dealer or a qualified repair shop.
If you have a set of jumper (or booster) cables and a second vehicle
with a 12-volt battery, you can jump start your vehicle by following the
steps below.
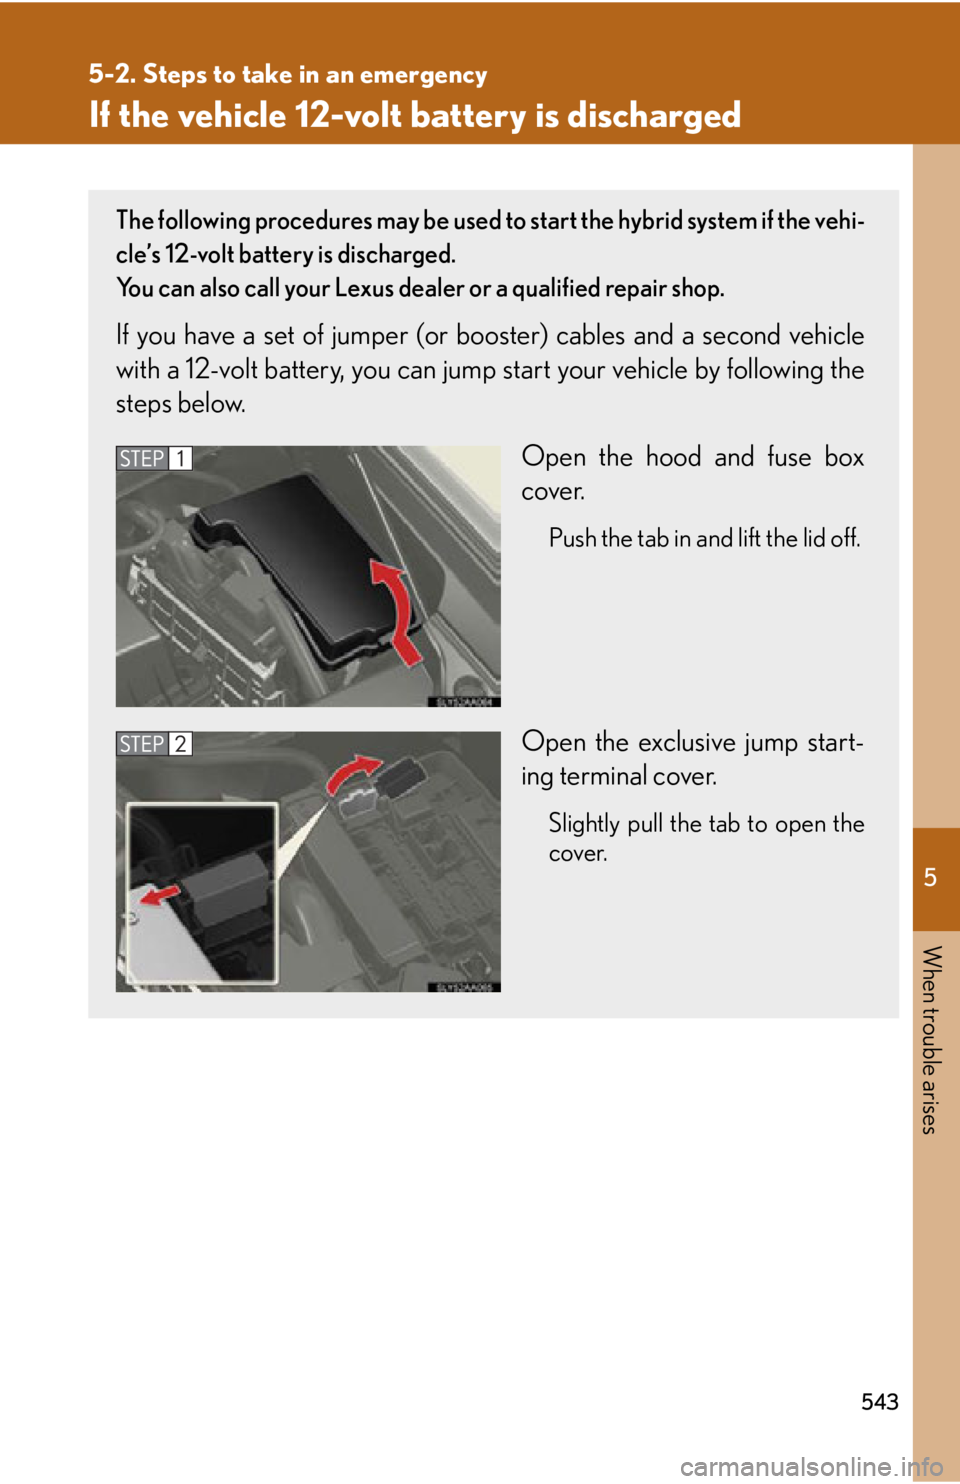
Open the hood and fuse box
cover.
Push the tab in and lift the lid off.
Open the exclusive jump start-
ing terminal cover.
Slightly pull the tab to open the
cover.
Page 545 of 628
5
When trouble arises
545
5-2. Steps to take in an emergency
■Starting the hybrid system when the 12-volt battery is discharged
The hybrid system cannot be started by push-starting.
■To prevent 12-volt battery discharge
●Turn off the headlights and the audio system while the hybrid system is off.
●Turn off any unnecessary electrical compon ents when the vehicle is running at a
low speed for an extended period, such as in heavy traffic.
■When the 12-volt battery is discharged
●The hybrid system may not start. (P. 440)
●If the 12-volt battery is depleted with the shift position in P, it will not be possible
to shift out of P. In this case, the vehicle cannot be towed without lifting both
front wheels because the front wheels are locked by the parking lock.
( P. 4 8 9 )
●When the 12-volt battery is reconnected, start the hybrid system, depress the
brake pedal, and confirm that it is poss ible to shift into each shift position.
Make sure the “READY” indicator comes on. If the indicator
does not come on, contact your Lexus dealer.
Once the hybrid system has started, remove the jumper cables
in the exact reverse order from which they were connected.
Close the exclusive jump starting terminal cover and reinstall
the fuse box cover.
Once the hybrid system starts, have the vehicle inspected at your
Lexus dealer as soon as possible.
Page 615 of 628
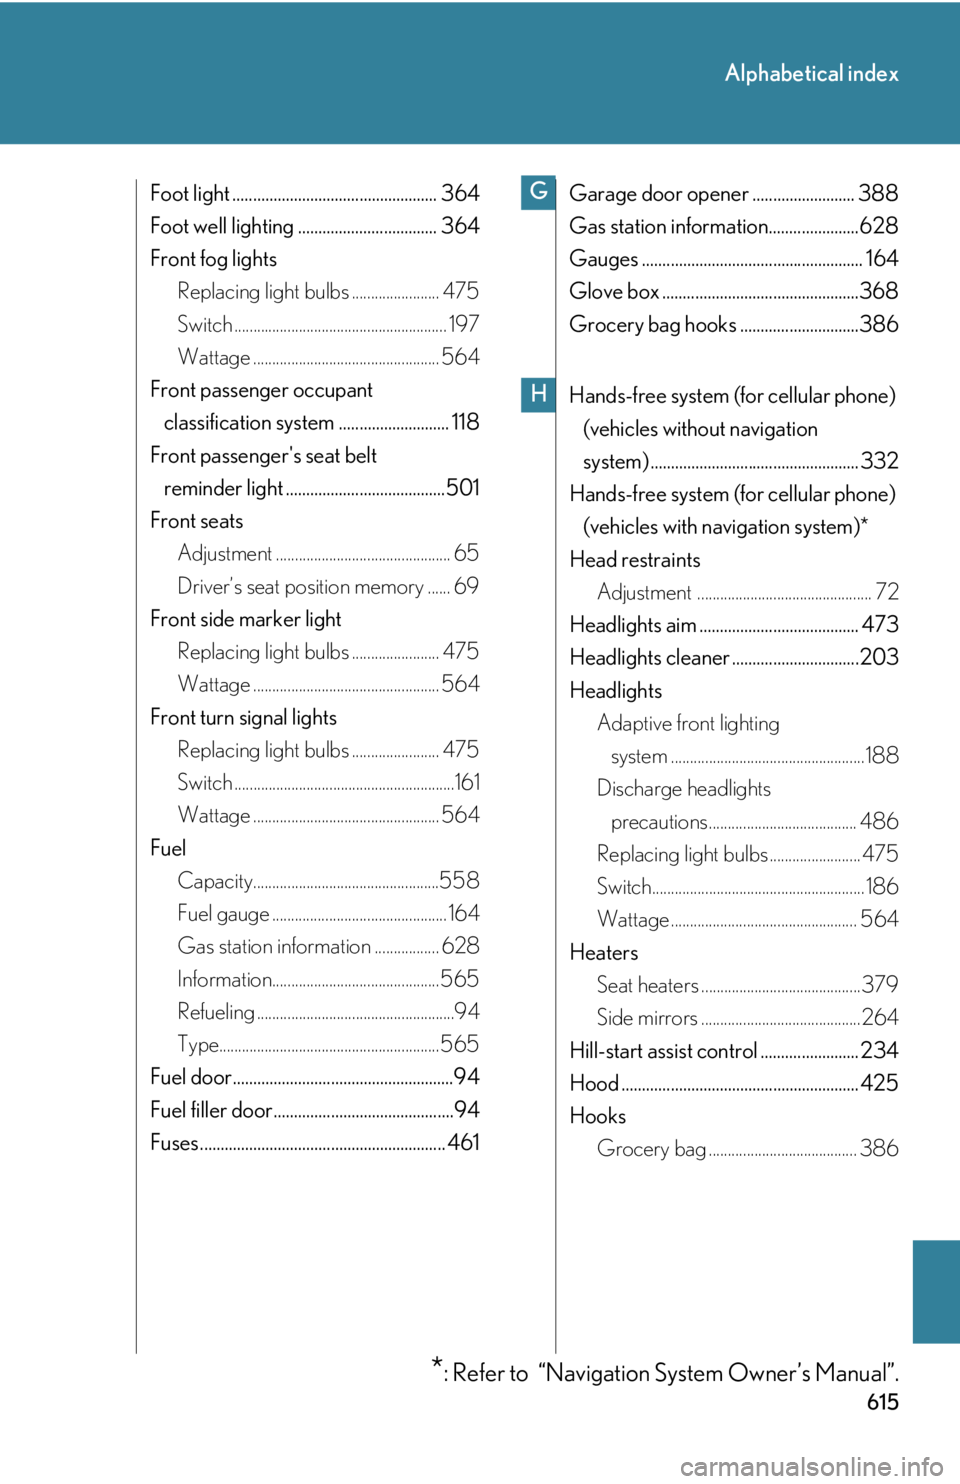
615
Alphabetical index
Foot light .................................................. 364
Foot well lighting .................................. 364
Front fog lightsReplacing light bulbs ....................... 475
Switch ........................................................ 197
Wattage ................................................. 564
Front passenger occupant classification system ........................... 118
Front passenger's seat belt reminder light .......................................501
Front seats Adjustment .............................................. 65
Driver’s seat position memory ...... 69
Front side marker light Replacing light bulbs ....................... 475
Wattage ................................................. 564
Front turn signal lights Replacing light bulbs ....................... 475
Switch ..........................................................161
Wattage ................................................. 564
Fuel Capacity.................................................558
Fuel gauge .............................................. 164
Gas station information ................. 628
Information............................................ 565
Refueling ....................................................94
Type.......................................................... 565
Fuel door......................................................94
Fuel filler door............................................94
Fuses............................................................ 461 Garage door opener ......................... 388
Gas station information......................628
Gauges ...................................................... 164
Glove box ................................................368
Grocery bag hooks .............................386
Hands-free system (f
or cellular phone)
(vehicles without navigation
system) ................................................... 332
Hands-free system (f or cellular phone)
(vehicles with navigation system)*
Head restraints Adjustment .............................................. 72
Headlights aim ....................................... 473
Headlights cleaner ...............................203
Headlights Adaptive front lighting system ...................................................188
Discharge headlights precautions....................................... 486
Replacing light bulbs ........................ 475
Switch........................................................ 186
Wattage ................................................. 564
Heaters Seat heaters ..........................................379
Side mirrors ..........................................264
Hill-start assist control ........................ 234
Hood .......................................................... 425
Hooks Grocery bag ....................................... 386G
*: Refer to “Navigation System Owner’s Manual”.
H