Lexus HS250h 2011 Do-it-yourself maintenance / LEXUS 2011 HS250H QUICK GUIDE (OM75039U) Manual PDF
Manufacturer: LEXUS, Model Year: 2011, Model line: HS250h, Model: Lexus HS250h 2011Pages: 94, PDF Size: 6.01 MB
Page 71 of 94
71
■Loading multiple CDs
Press and hold the “LOAD” button until you hear a beep.
“WAIT” is shown on the display.
Insert a CD when the indicators on the slot turn from amber to green.
The display changes from “WAIT” to “LOAD”.
The indicators on the slot turn to amber when the CD is inserted.
Insert the next CD when the indicators on the slot turn from amber to green again.
Repeat the procedure for the remaining CDs.
To cancel the operation, press the “LOAD” button. If you do not insert a CD within 15
seconds, loading will cancelled automatically.
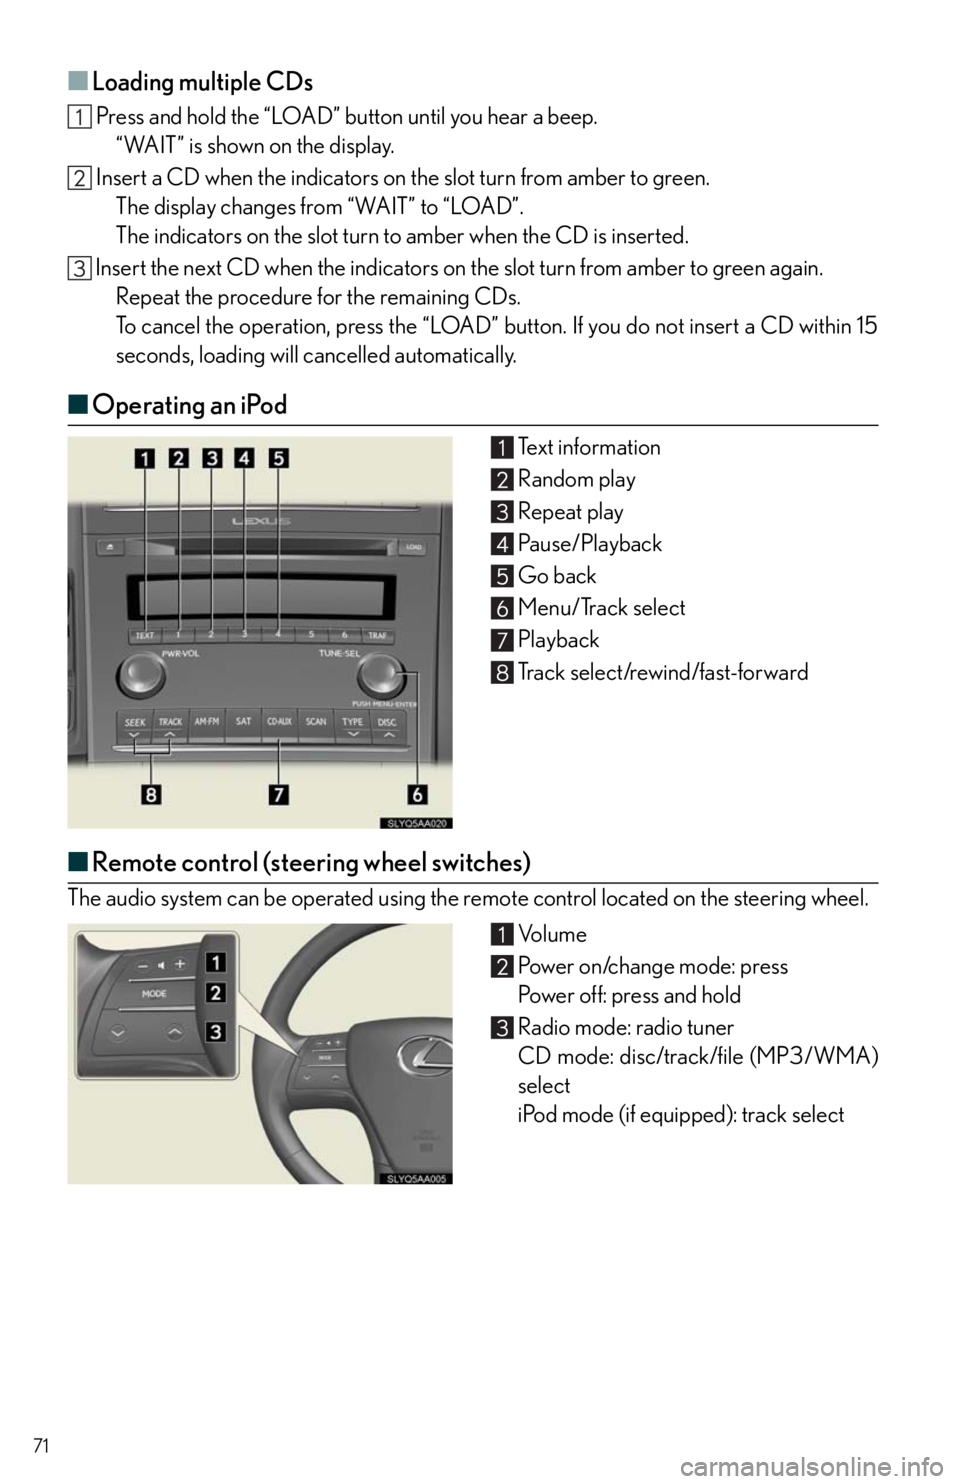
■Operating an iPod
Te x t i n f o r m a t i o n
Random play
Repeat play
Pause/Playback
Go back
Menu/Track select
Playback
Track select/rewind/fast-forward
■Remote control (steering wheel switches)
The audio system can be operated using the remote control located on the steering wheel.
Vo l u m e
Power on/change mode: press
Po w e r o f f : p r e s s a n d h o l d
Radio mode: radio tuner
CD mode: disc/track/file (MP3/WMA)
select
iPod mode (if equipped): track select
Page 72 of 94
72
Air Conditioning System
(without navigation system)
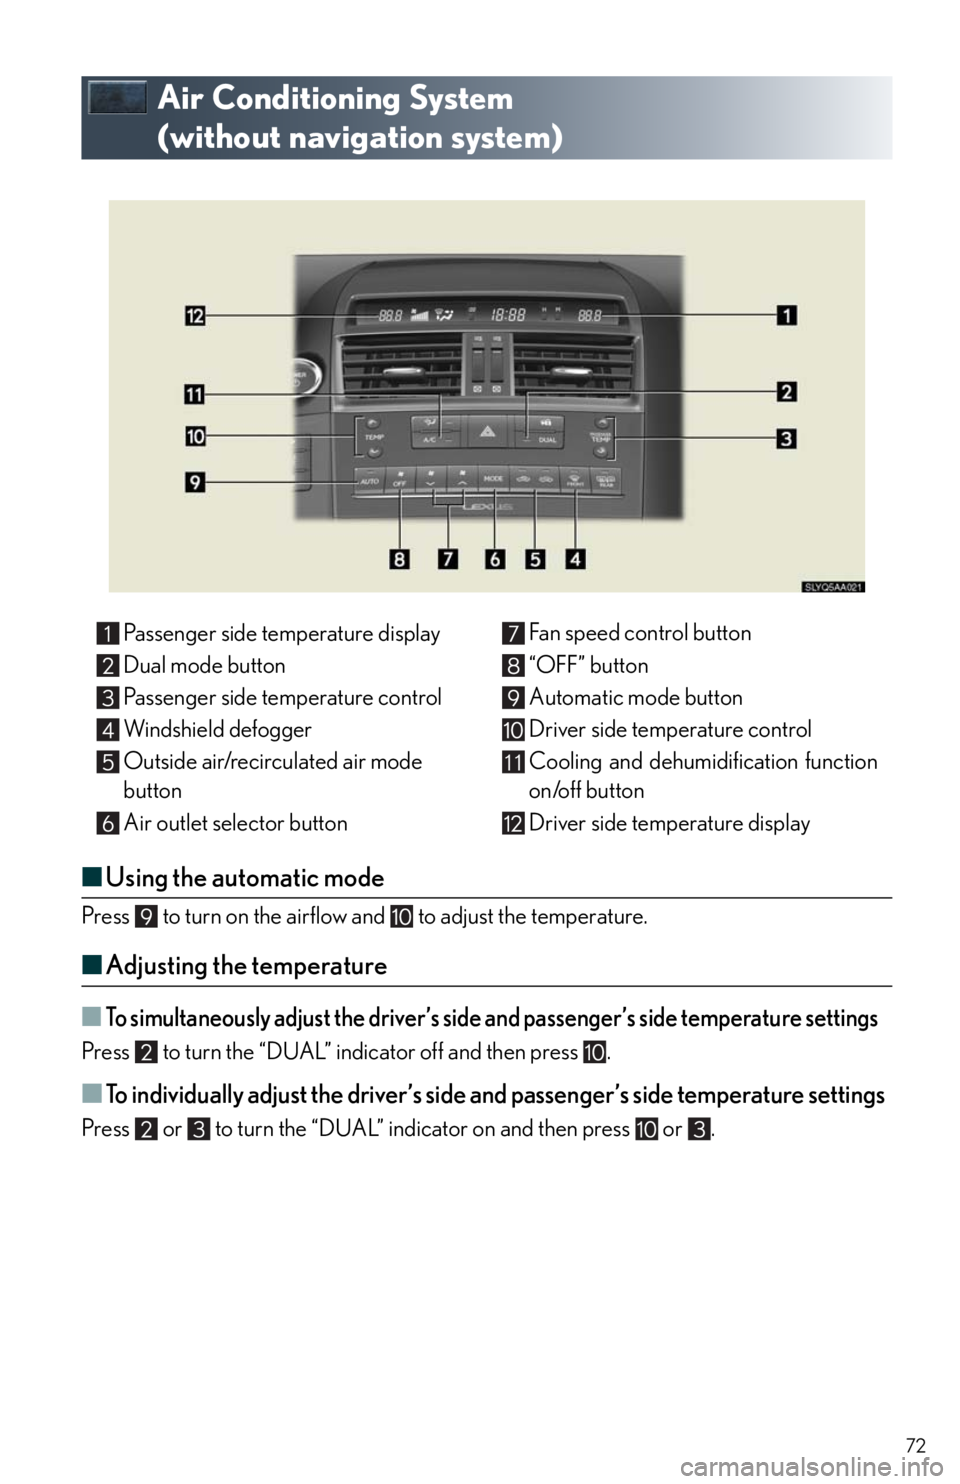
■Using the automatic mode
Press to turn on the airflow and to adjust the temperature.
■Adjusting the temperature
■To simultaneously adjust the driver’s side and passenger’s side temperature settings
Press to turn the “DUAL” indicator off and then press .
■To individually adjust the driver’s side and passenger’s side temperature settings
Press or to turn the “DUAL” indicator on and then press or .Passenger side temperature display
Dual mode button
Passenger side temperature control
Windshield defogger
Outside air/recirculated air mode
button
Air outlet selector buttonFan speed control button
“OFF” button
Automatic mode button
Driver side temperature control
Cooling and dehumidification function
on/off button
Driver side temperature display
11
Page 73 of 94
73
Voice Command System
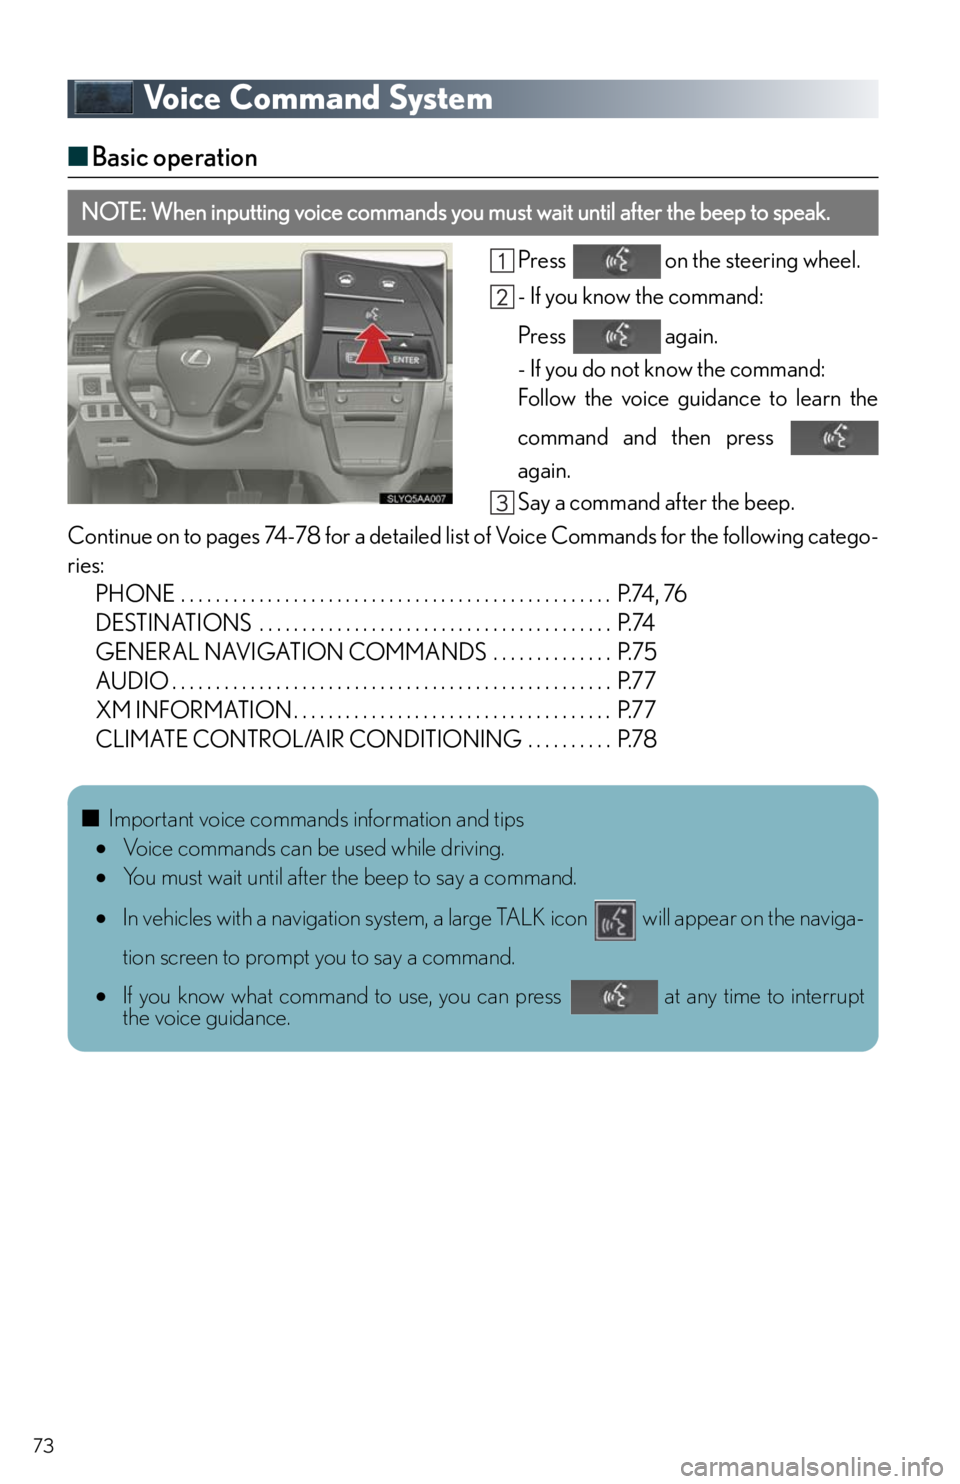
■Basic operation
Press on the steering wheel.
- If you know the command:
Press again.
- If you do not know the command:
Follow the voice guidance to learn the
command and then press
again.
Say a command after the beep.
Continue on to pages 74-78 for a detailed list of Voice Commands for the following catego-
ries:
PHONE . . . . . . . . . . . . . . . . . . . . . . . . . . . . . . . . . . . . . . . . . . . . . . . . . . P.74, 76
DESTINATIONS . . . . . . . . . . . . . . . . . . . . . . . . . . . . . . . . . . . . . . . . . P.74
GENERAL NAVIGATION COMMANDS . . . . . . . . . . . . . . P.75
AUDIO . . . . . . . . . . . . . . . . . . . . . . . . . . . . . . . . . . . . . . . . . . . . . . . . . . . P.77
XM INFORMATION . . . . . . . . . . . . . . . . . . . . . . . . . . . . . . . . . . . . . P.77
CLIMATE CONTROL/AIR CONDITIONING . . . . . . . . . . P.78
NOTE: When inputting voice commands you must wait until after the beep to speak.
■Important voice commands information and tips
Voice commands can be used while driving.
You must wait until after the beep to say a command.
In vehicles with a navigation system, a large TALK icon will appear on the naviga-
tion screen to prompt you to say a command.
If you know what command to use, you can press at any time to interrupt
the voice guidance.
Page 74 of 94
74
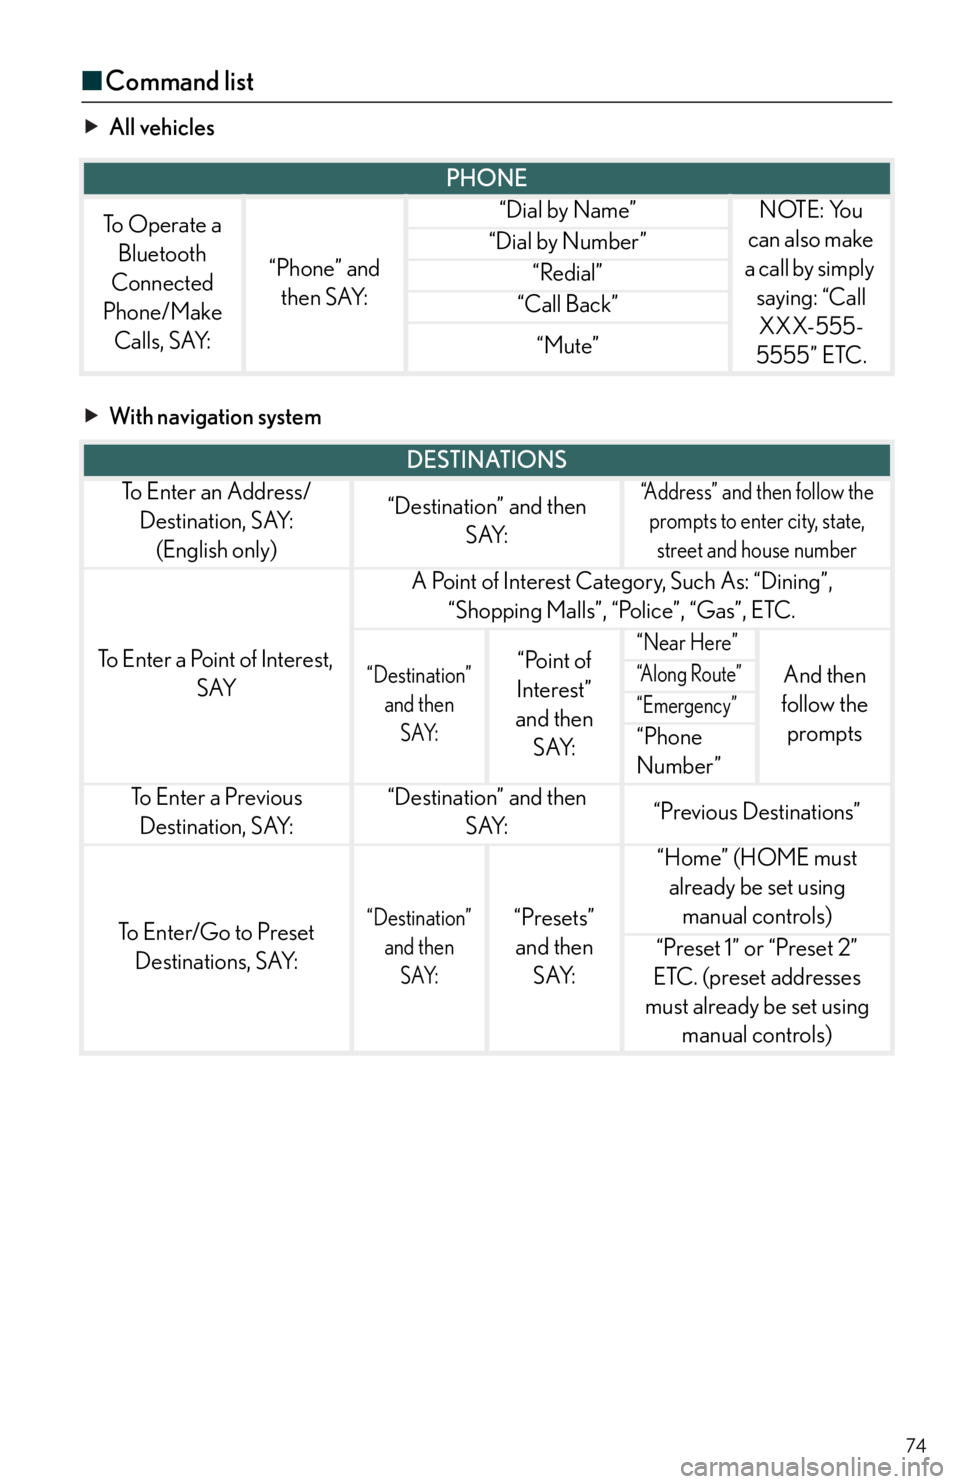
■Command list
All vehicles
With navigation system
PHONE
To Operate a
Bluetooth
Connected
Phone/Make
Calls, SAY:
“Phone” and
then SAY:
“Dial by Name”NOTE: You
can also make
a call by simply
saying: “Call
XXX-555-
5555” ETC.
“Dial by Number”
“Redial”
“Call Back”
“Mute”
DESTINATIONS
To E n t e r a n A d d r e s s /
Destination, SAY:
(English only)“Destination” and then
SAY:“Address” and then follow the
prompts to enter city, state,
street and house number
To Enter a Point of Interest,
SAY
A Point of Interest Category, Such As: “Dining”,
“Shopping Malls”, “Police”, “Gas”, ETC.
“Destination”
and then
SAY:“Point of
Interest”
and then
SAY:“Near Here”
And then
follow the
prompts“A l o n g R o u t e ”
“Emergency”
“Phone
Number”
To E n t e r a P r e v i o u s
Destination, SAY:“Destination” and then
SAY:“Previous Destinations”
To Enter/Go to Preset
Destinations, SAY:“Destination”
and then
SAY:“Presets”
and then
SAY:
“Home” (HOME must
already be set using
manual controls)
“Preset 1” or “Preset 2”
ETC. (preset addresses
must already be set using
manual controls)
Page 75 of 94
75
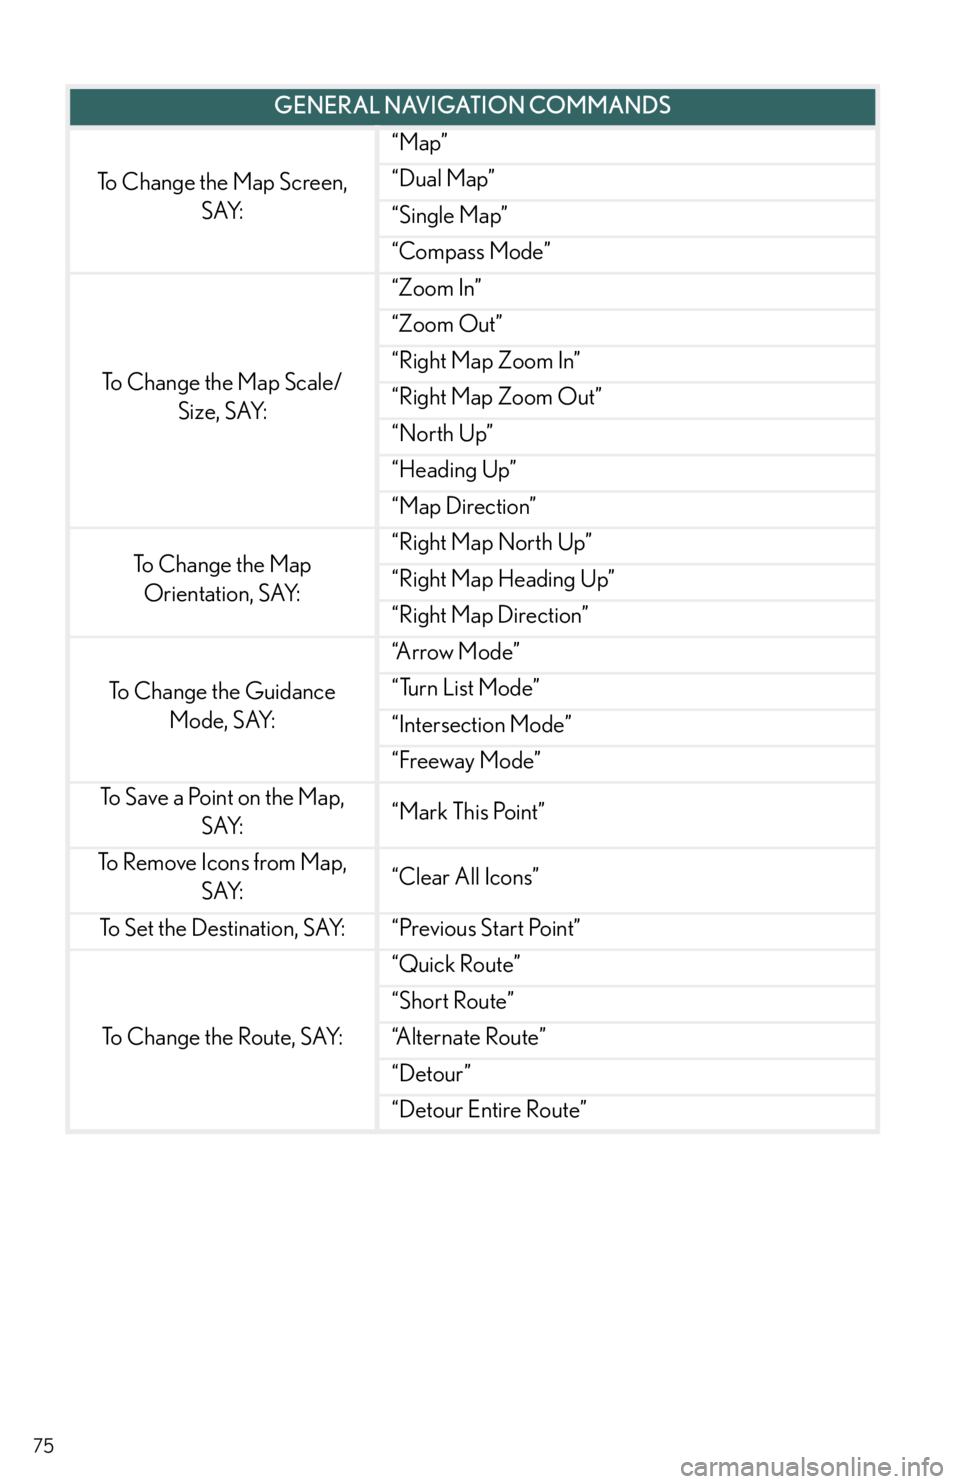
GENERAL NAVIGATION COMMANDS
To Change the Map Screen,
SAY:
“Map”
“Dual Map”
“Single Map”
“Compass Mode”
To Change the Map Scale/
Size, SAY:
“Zoom In”
“Zoom Out”
“Right Map Zoom In”
“Right Map Zoom Out”
“North Up”
“Heading Up”
“Map Direction”
To C h a n g e t h e M a p
Orientation, SAY:“Right Map North Up”
“Right Map Heading Up”
“Right Map Direction”
To Change the Guidance
Mode, SAY:
“A r r o w M o d e ”
“Turn List Mode”
“Intersection Mode”
“Freeway Mode”
To Save a Point on the Map,
SAY:“Mark This Point”
To Remove Icons from Map,
SAY:“Clear All Icons”
To Set the Destination, SAY:“Previous Start Point”
To Change the Route, SAY:
“Quick Route”
“Short Route”
“A l t e r n a t e R o u t e ”
“Detour”
“Detour Entire Route”
Page 76 of 94
76
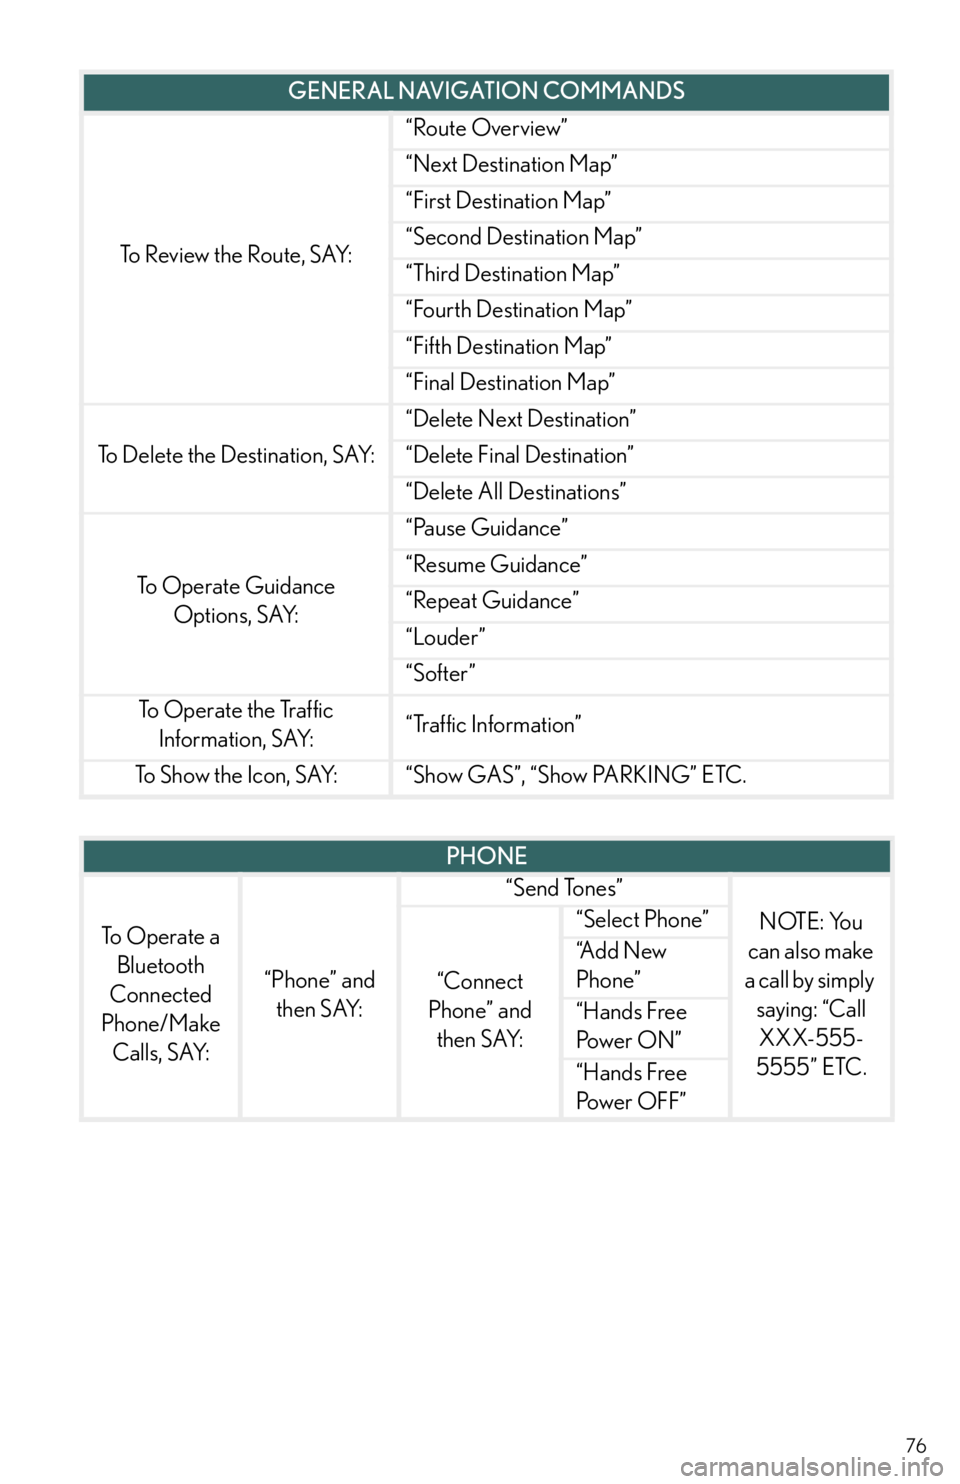
To Review the Route, SAY:
“Route Overview”
“Next Destination Map”
“First Destination Map”
“Second Destination Map”
“Third Destination Map”
“Fourth Destination Map”
“Fifth Destination Map”
“Final Destination Map”
To Delete the Destination, SAY:
“Delete Next Destination”
“Delete Final Destination”
“Delete All Destinations”
To Operate Guidance
Options, SAY:
“Pause Guidance”
“Resume Guidance”
“Repeat Guidance”
“Louder”
“Softer”
To Operate the Traffic
Information, SAY:“Traffic Information”
To Show the Icon, SAY:“Show GAS”, “Show PARKING” ETC.
GENERAL NAVIGATION COMMANDS
PHONE
To Operate a
Bluetooth
Connected
Phone/Make
Calls, SAY:
“Phone” and
then SAY:
“Send Tones”
NOTE: You
can also make
a call by simply
saying: “Call
XXX-555-
5555” ETC.
“Connect
Phone” and
then SAY:
“Select Phone”
“A d d N e w
Phone”
“Hands Free
Pow e r O N ”
“Hands Free
Power OFF”
Page 77 of 94
77
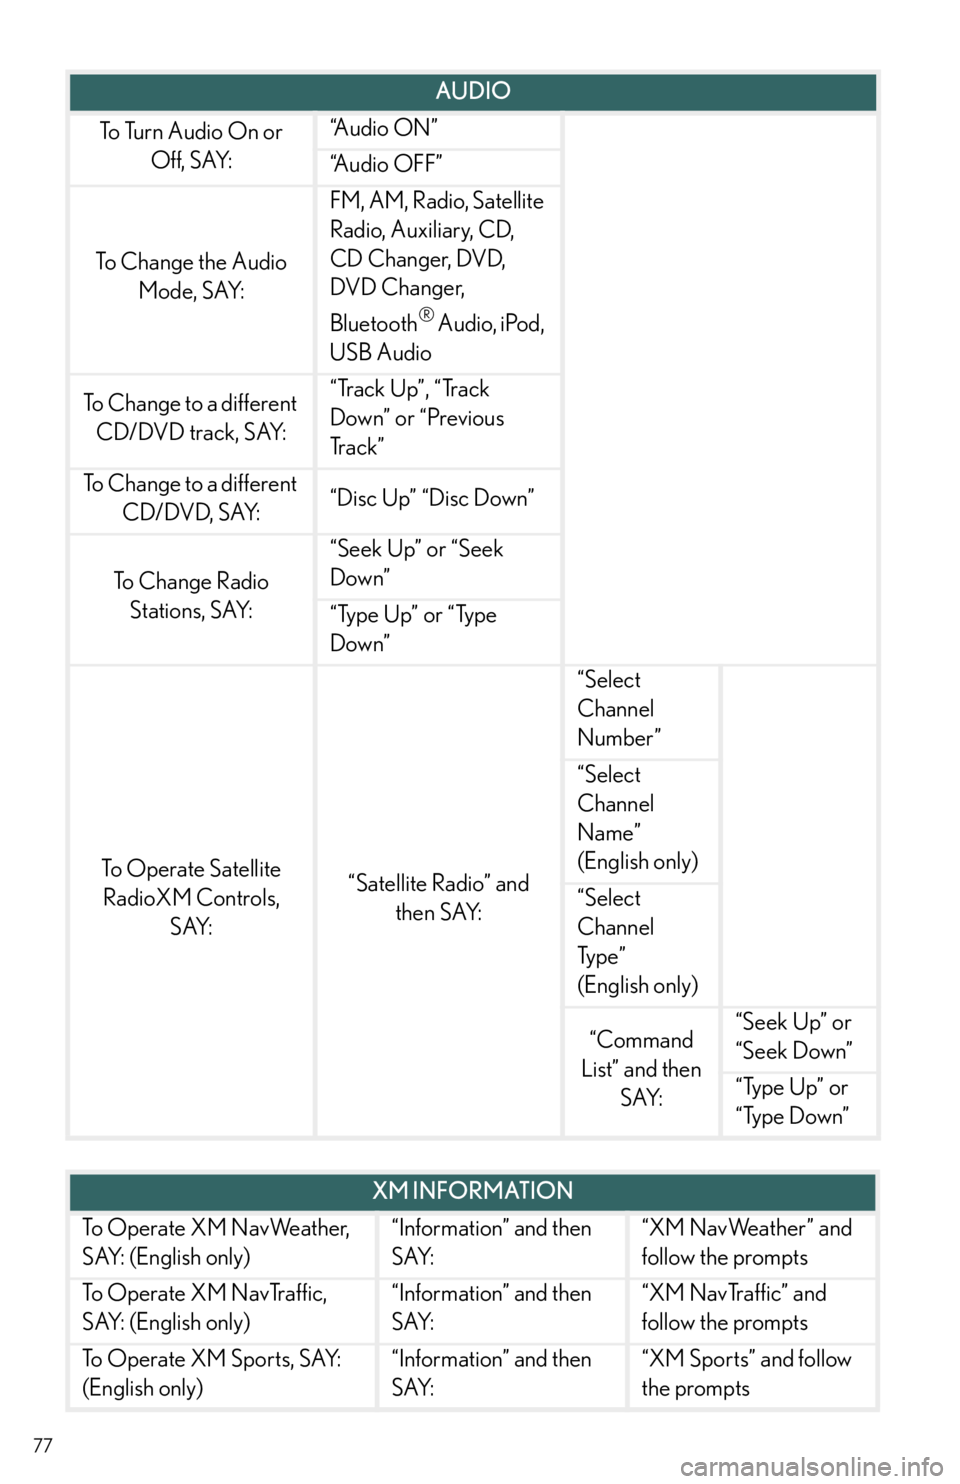
AUDIO
To Turn Audio On or
Off, SAY:“A u d i o O N ”
“Audio OFF”
To Change the Audio
Mode, SAY:
FM, AM, Radio, Satellite
Radio, Auxiliary, CD,
CD Changer, DVD,
DVD Changer,
Bluetooth
® Audio, iPod,
USB Audio
To Change to a different
CD/DVD track, SAY:“Track Up”, “Track
Down” or “Previous
Tr a c k ”
To Change to a different
CD/DVD, SAY:“Disc Up” “Disc Down”
To C h a n g e R a d i o
Stations, SAY:
“Seek Up” or “Seek
Down”
“Type Up” or “Type
Down”
To Operate Satellite
RadioXM Controls,
SAY:“Satellite Radio” and
then SAY:
“Select
Channel
Number”
“Select
Channel
Name”
(English only)
“Select
Channel
Ty p e ”
(English only)
“Command
List” and then
SAY:“Seek Up” or
“Seek Down”
“Type Up” or
“Type Down”
XM INFORMATION
To Operate XM NavWeather,
SAY: (English only)“Information” and then
SAY:“XM NavWeather” and
follow the prompts
To Operate XM NavTraffic,
SAY: (English only)“Information” and then
SAY:“XM NavTraffic” and
follow the prompts
To Operate XM Sports, SAY:
(English only)“Information” and then
SAY:“XM Sports” and follow
the prompts
Page 78 of 94
78
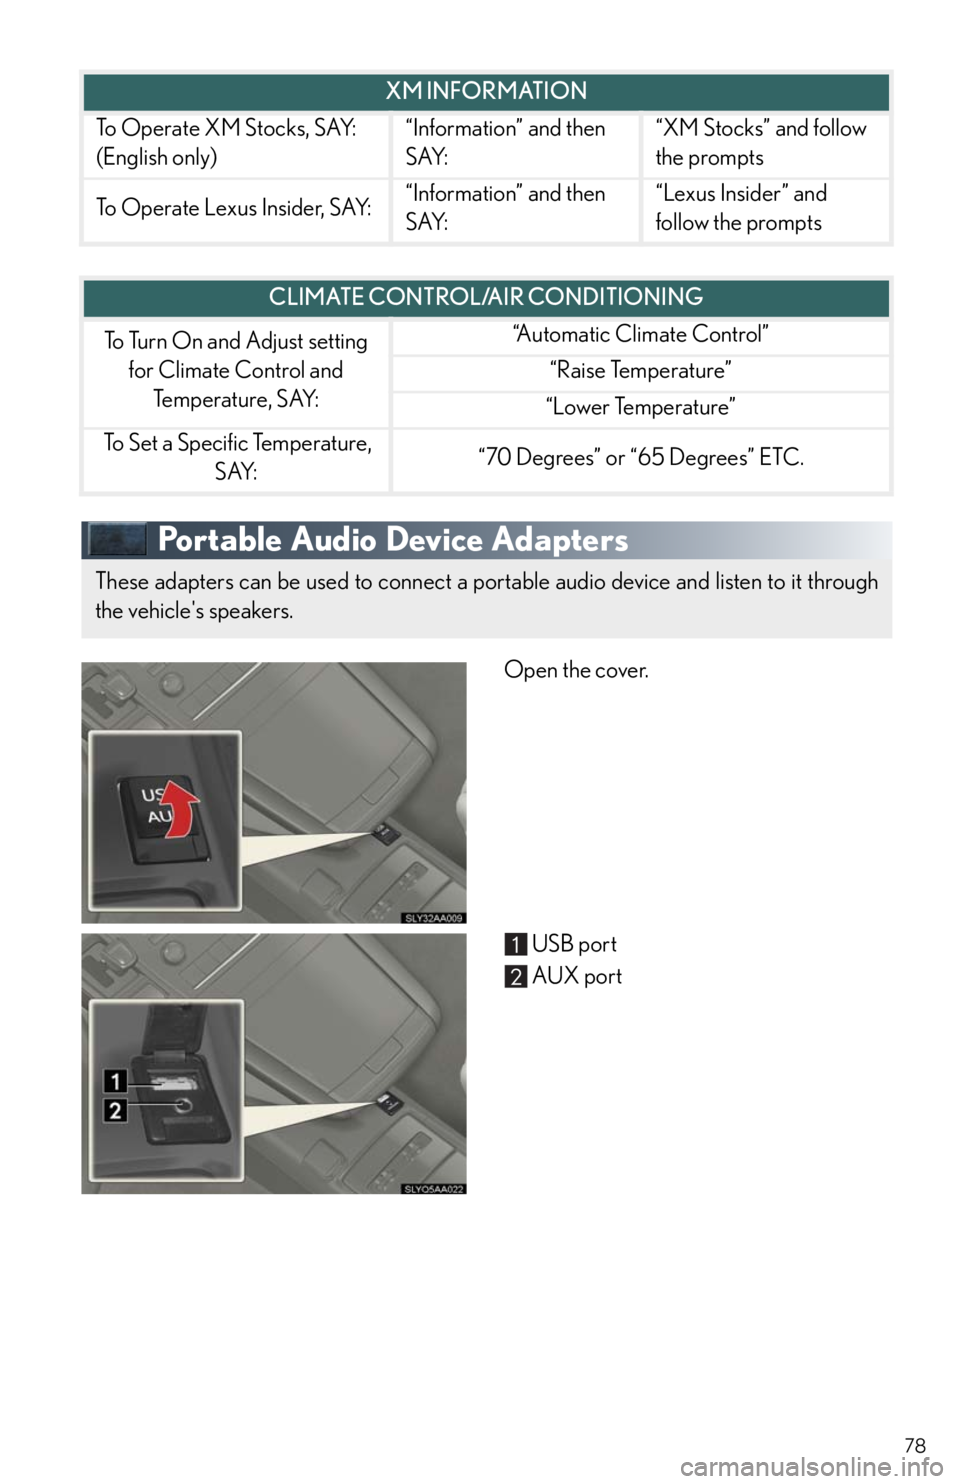
Portable Audio Device Adapters
Open the cover.
USB port
AUX port
To Operate XM Stocks, SAY:
(English only)“Information” and then
SAY:“XM Stocks” and follow
the prompts
To Operate Lexus Insider, SAY:“Information” and then
SAY:“Lexus Insider” and
follow the prompts
XM INFORMATION
CLIMATE CONTROL/AIR CONDITIONING
To Turn On and Adjust setting
for Climate Control and
Te m p e r a t u r e , S AY:“Automatic Climate Control”
“Raise Temperature”
“Lower Temperature”
To Set a Specific Temperature,
SAY:“70 Degrees” or “65 Degrees” ETC.
These adapters can be used to connect a portable audio device and listen to it through
the vehicle's speakers.
Page 79 of 94
79
Garage Door Opener (If Equipped)
The garage door opener (HomeLink® Universal Transceiver) is manufactured under license
from HomeLink®.
■Programming the HomeLink® (for U.S.A. owners)
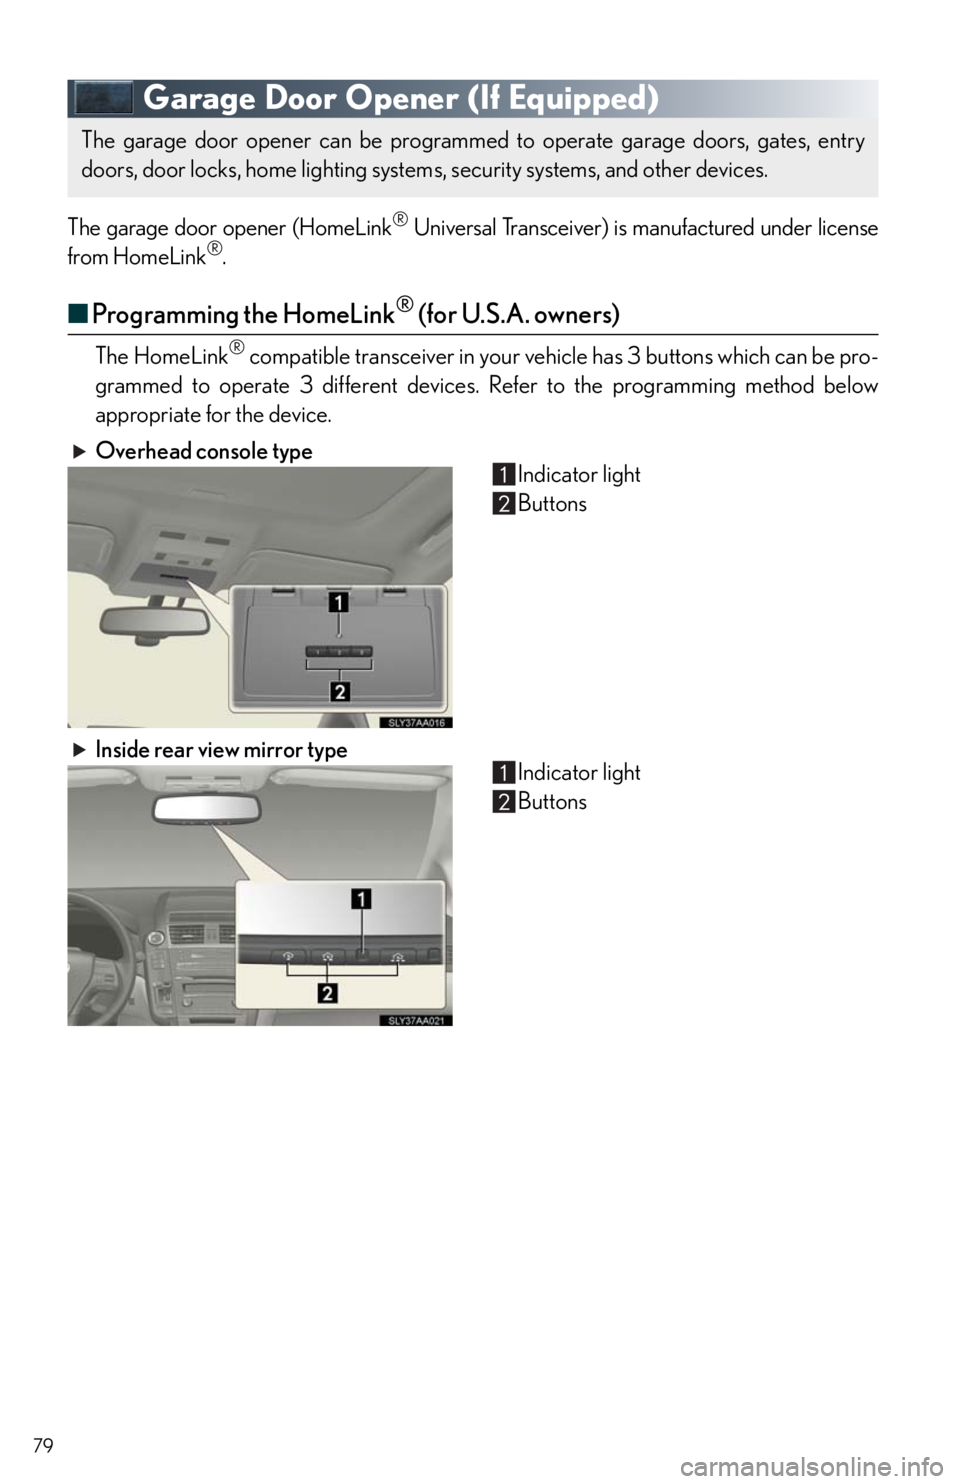
The HomeLink® compatible transceiver in your vehicle has 3 buttons which can be pro-
grammed to operate 3 different devices. Refer to the programming method below
appropriate for the device.
Overhead console type
Indicator light
Buttons
Inside rear view mirror type
Indicator light
Buttons
The garage door opener can be programmed to operate garage doors, gates, entry
doors, door locks, home lighting systems, security systems, and other devices.
Page 80 of 94
80
■Programming HomeLink®
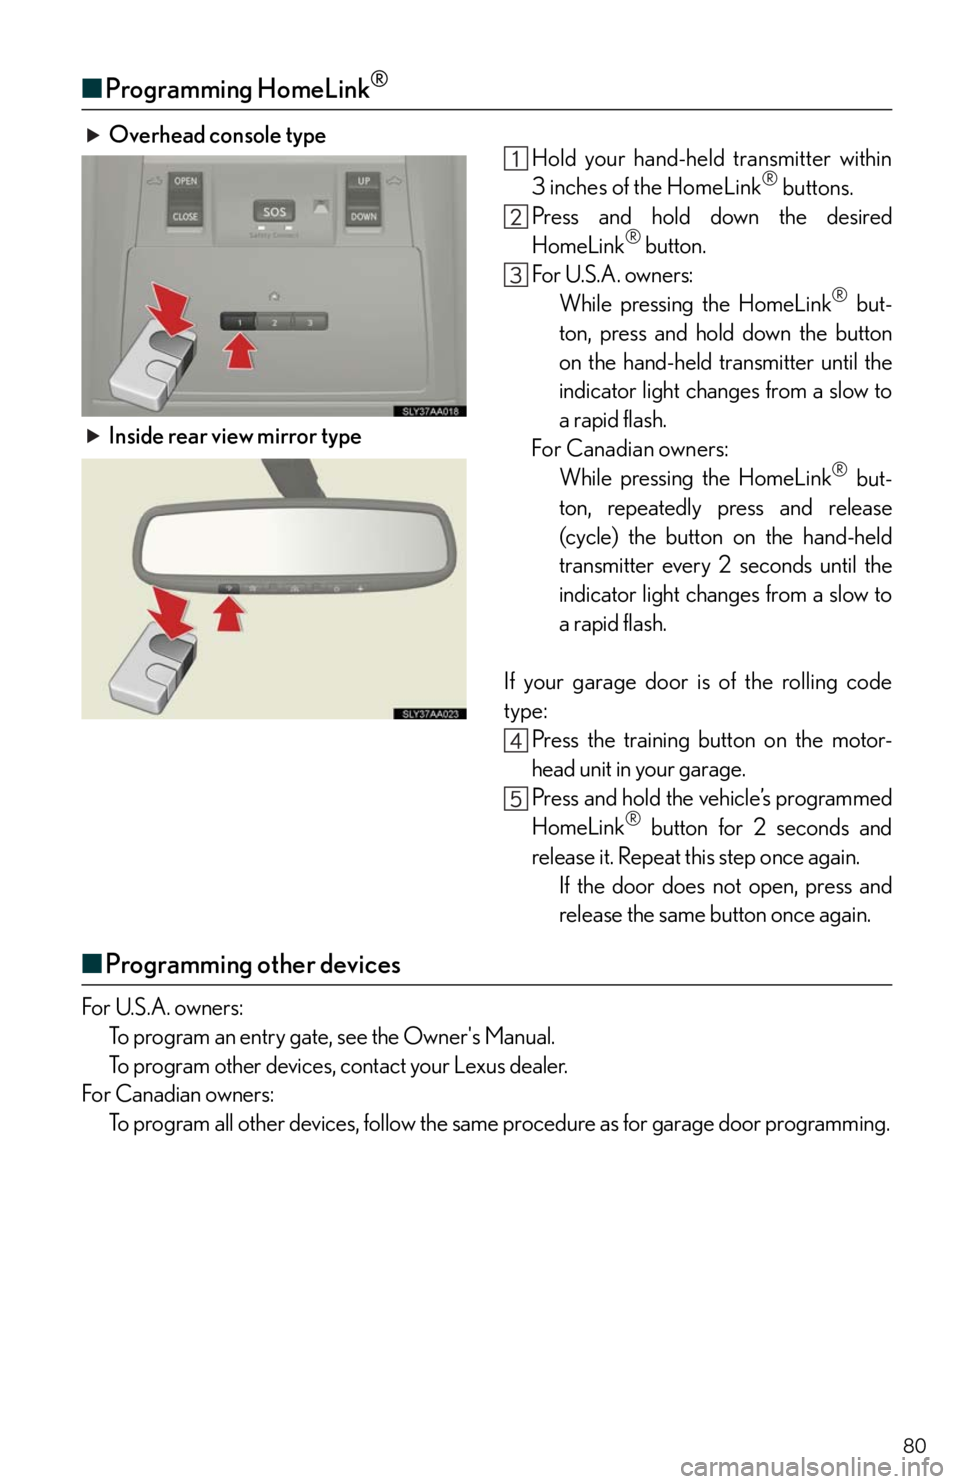
Overhead console type
Hold your hand-held transmitter within
3 inches of the HomeLink
® buttons.
Press and hold down the desired
HomeLink
® button.
For U.S.A. owners:
While pressing the HomeLink
® but-
ton, press and hold down the button
on the hand-held transmitter until the
indicator light changes from a slow to
a rapid flash.
For Canadian owners:
While pressing the HomeLink
® but-
ton, repeatedly press and release
(cycle) the button on the hand-held
transmitter every 2 seconds until the
indicator light changes from a slow to
a rapid flash.
If your garage door is of the rolling code
type:
Press the training button on the motor-
head unit in your garage.
Press and hold the vehicle’s programmed
HomeLink
® button for 2 seconds and
release it. Repeat this step once again.
If the door does not open, press and
release the same button once again.
■Programming other devices
For U.S.A. owners:
To program an entry gate, see the Owner's Manual.
To program other devices, contact your Lexus dealer.
For Canadian owners:
To program all other devices, follow the same procedure as for garage door programming.
Inside rear view mirror type