display Lexus IS F 2008 Do-It-Yourself Maintenance /
[x] Cancel search | Manufacturer: LEXUS, Model Year: 2008, Model line: IS F, Model: Lexus IS F 2008Pages: 452, PDF Size: 6.49 MB
Page 186 of 452
186
3-1. Using the air conditioning system and defogger
Automatic air conditioning system
Using the automatic mode
Press .The air conditioni ng system begins to operate. Air outlets and
fan speed are automatically adjusted according to the tem-
perature setting.
Press to switch to automatic mode. The air conditioning system au tomatically switches between
outside air and recirculated air modes.
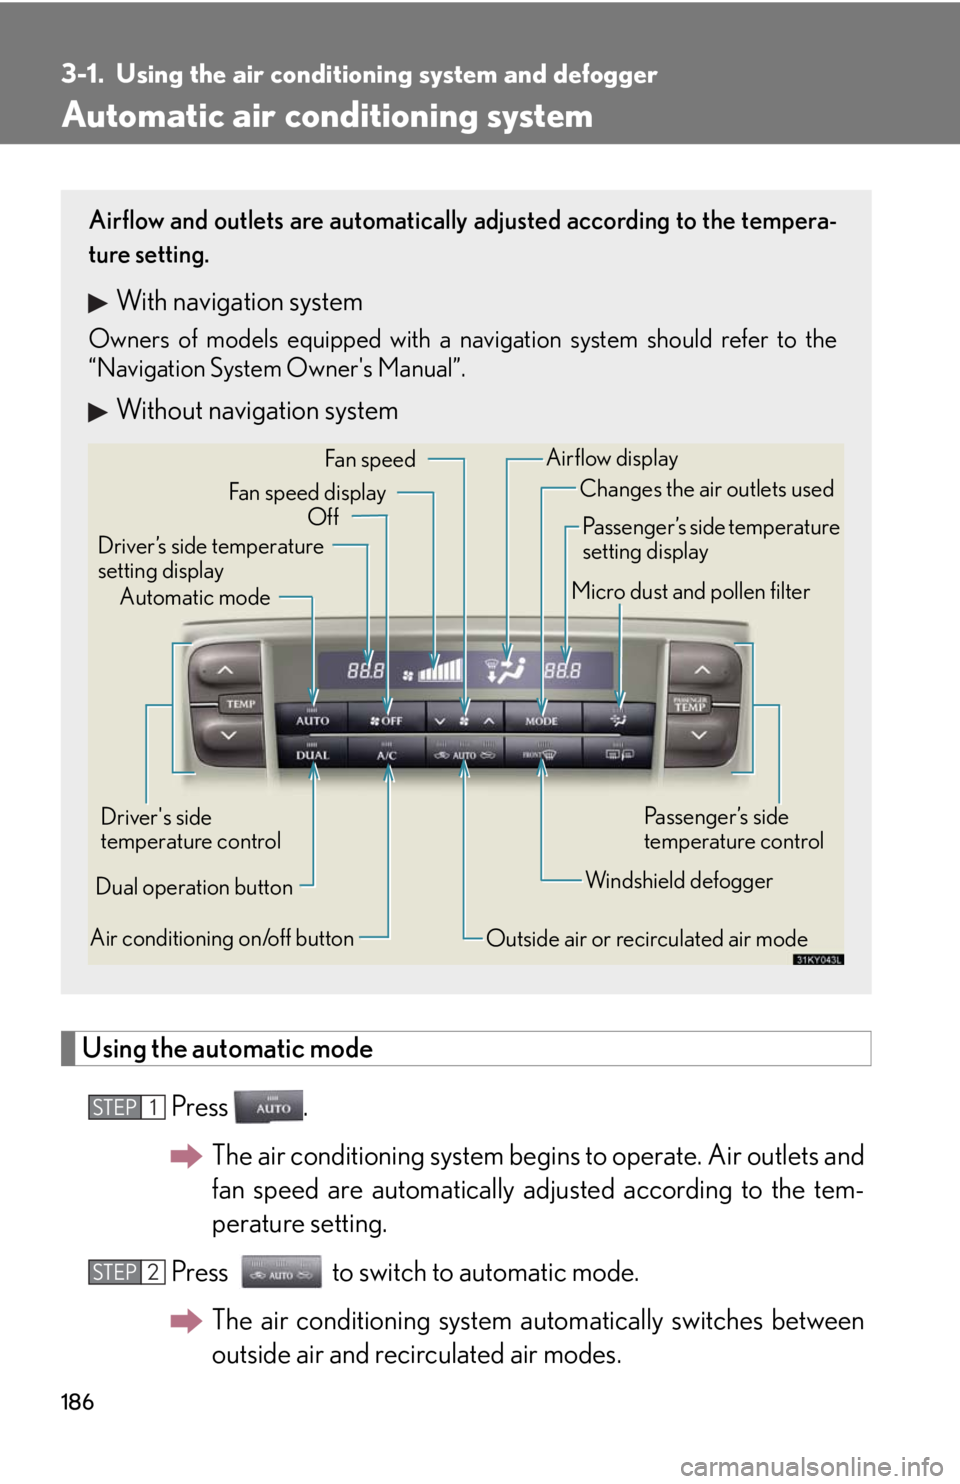
Airflow and outlets are automatically adjusted according to the tempera-
ture setting.
With navigation system
Owners of models equipped with a navigation system should refer to the
“Navigation System Owner's Manual”.
Without navigation system
Automatic mode
Driver’s side temperature
setting display Changes the air outlets used
Off Fan speed
Airflow display
Fan speed display
Passenger’s side temperature
setting display
Micro dust and pollen filter
Driver's side
temperature control
Air conditioning on/off button Outside air or recirculated air modeWindshield defoggerPassenger’s side
temperature control
Dual operation button
STEP1
STEP2
Page 198 of 452
198
3-2. Using the audio system
Using the radio
Setting station presets (excluding XM® Satellite Radio)
Search for desired stations by turning
or pressing “ ” or
“ ” on .
Press and hold the button (from to ) the station is to
be set to until you hear a beep.
Scanning radio stations (excluding XM® Satellite Radio)
■ Scanning the preset radio stations
Press and hold until you hear a beep.
Preset stations will be played for 5 seconds each.
When the desired station is reached, press once again.
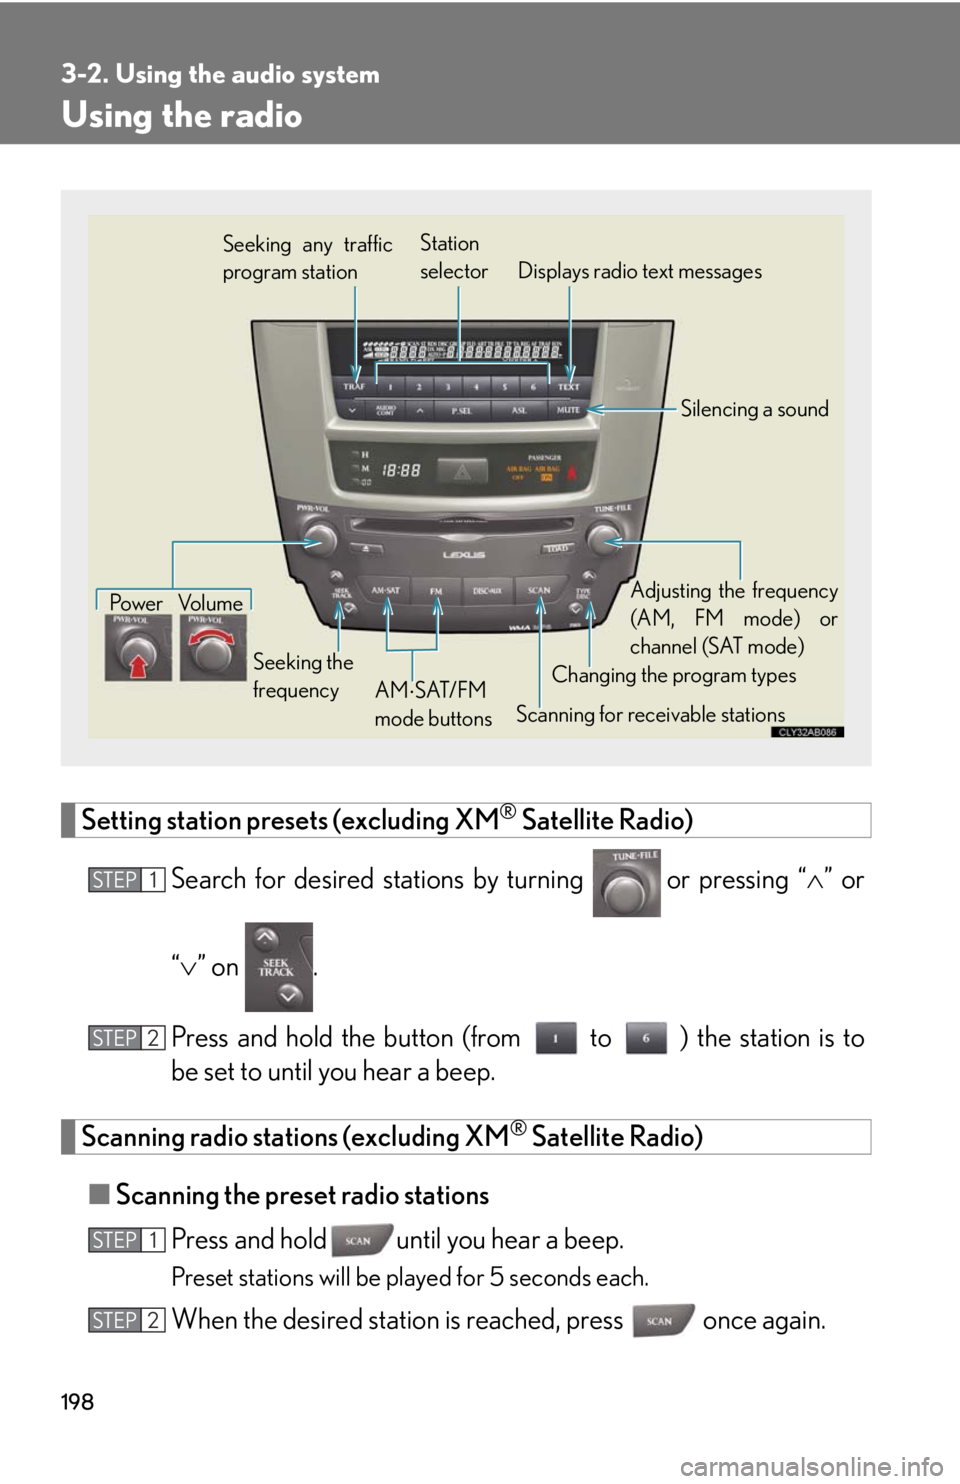
Seeking any traffic
program station Station
selector Displays radio text messages
Pow e r Vo l u m e
Scanning for receivable stations
Seeking the
frequency
Changing the program typesAdjusting the frequency
(AM, FM mode) or
channel (SAT mode)
AM SAT/FM
mode buttons
Silencing a sound
STEP1
STEP2
STEP1
STEP2
Page 200 of 452
200
3-2. Using the audio system
■Displaying radio station names
Press .
■ Displaying radio text messages
Press twice.
If “MSG” shows in the display, a text message will be displayed.
If the text continues past the end of the display, is displayed. Press and
hold until you hear a beep.
XM® Satellite Radio (if equipped)
■ Receiving XM
® Satellite Radio
Press .
The display changes as follows each time is pressed.
“A M ” “SAT1” “SAT2” “SAT3”
Turn to select the desired channel in the all categories or
press “ ” or “ ” on to select the de sired channel in the cur-
rent category.
■ Setting XM
® Satellite Radio channel presets
Select the desired channel. Press and hold the button
(from to ) the channel is to be set to until you hear a beep.
■ Changing the channel category
Press “ ” or “ ” on .
STEP1
STEP2
Page 201 of 452
201
3-2. Using the audio system
3
Interior features
■Scanning XM® Satellite Radio channels
● Scanning channels in the current category
Press .
When the desired channel is reached, press again.
● Scanning preset channels
Press and hold until you hear a beep.
When the desired channel is reached, press again.
■ Displaying text information
Press .
The display will show up to 10 characters.
The display changes as follows each time is pressed.
● “CH NAME”
● “TITLE” (SONG/PROGRAM TITLE)
● “NAME” (ARTIST NAME/FEATURE)
● “CH NUMBER”
STEP1
STEP2
STEP1
STEP2
Page 203 of 452
203
3-2. Using the audio system
3
Interior features
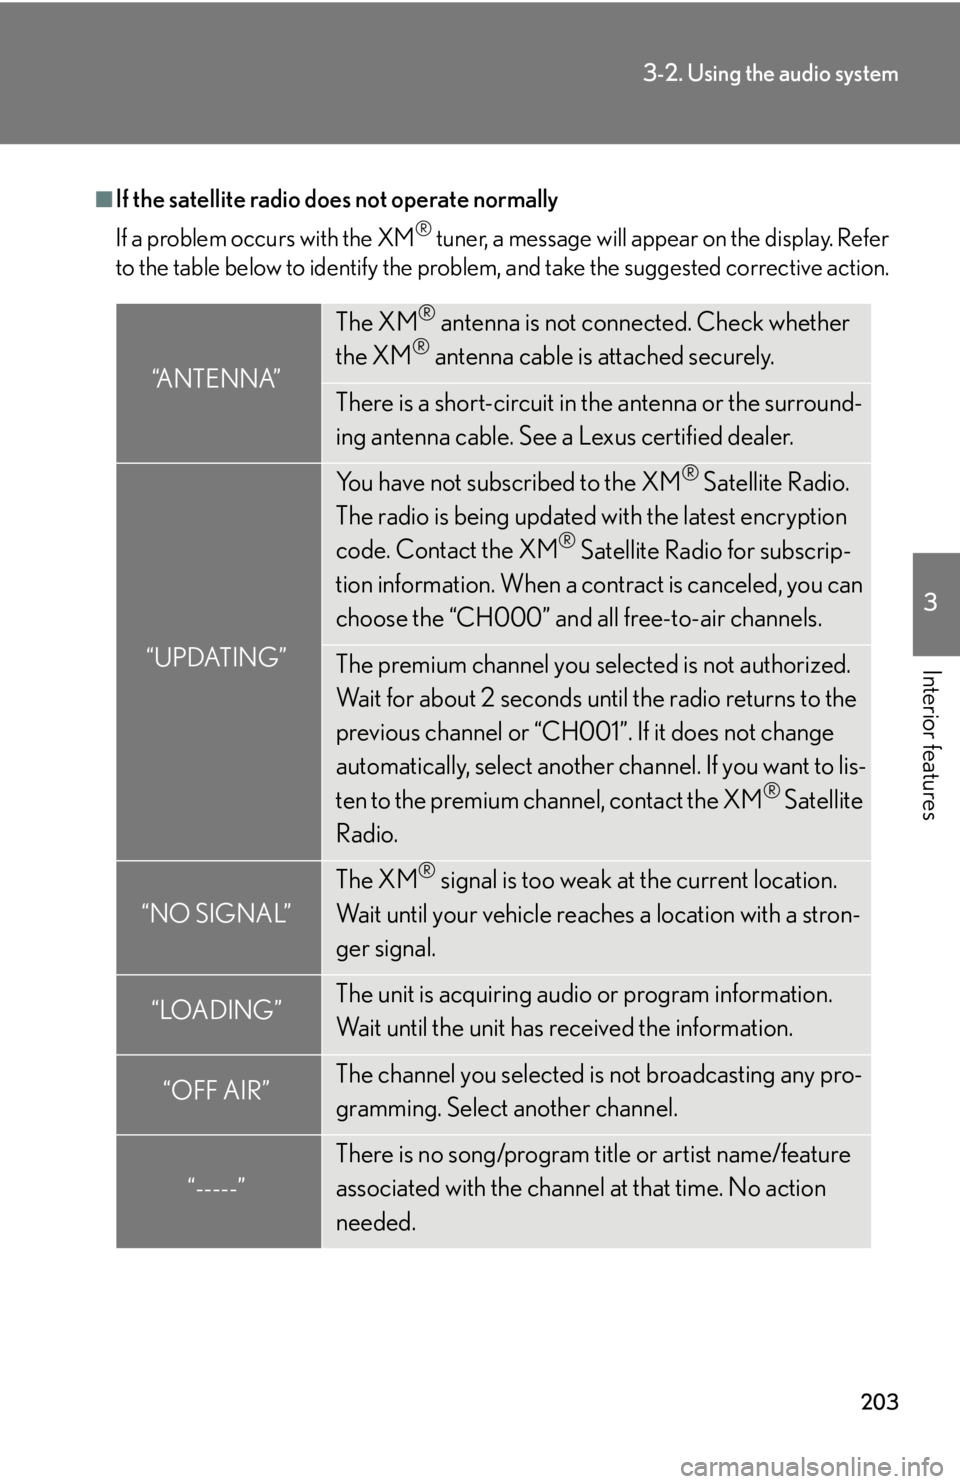
■If the satellite radio does not operate normally
If a problem occurs with the XM
® tuner, a message will appear on the display. Refer
to the table below to identify the problem, and take the suggested corrective action.
“ANTENNA”
The XM® antenna is not connected. Check whether
the XM® antenna cable is attached securely.
There is a short-circuit in the antenna or the surround-
ing antenna cable. See a Lexus certified dealer.
“UPDATING”
You have not subscribed to the XM® Satellite Radio.
The radio is being updated with the latest encryption
code. Contact the XM
® Satellite Radio for subscrip-
tion information. When a co ntract is canceled, you can
choose the “CH000” and all free-to-air channels.
The premium channel you selected is not authorized.
Wait for about 2 seconds until the radio returns to the
previous channel or “CH001”. If it does not change
automatically, select another channel. If you want to lis-
ten to the premium channel, contact the XM
® Satellite
Radio.
“NO SIGNAL”
The XM® signal is too weak at the current location.
Wait until your vehicle reaches a location with a stron-
ger signal.
“LOADING”The unit is acquiring audio or program information.
Wait until the unit has received the information.
“OFF AIR”The channel you selected is not broadcasting any pro-
gramming. Select another channel.
“-----”
There is no song/program title or artist name/feature
associated with the channel at that time. No action
needed.
Page 205 of 452
205
3-2. Using the audio system
3
Interior features
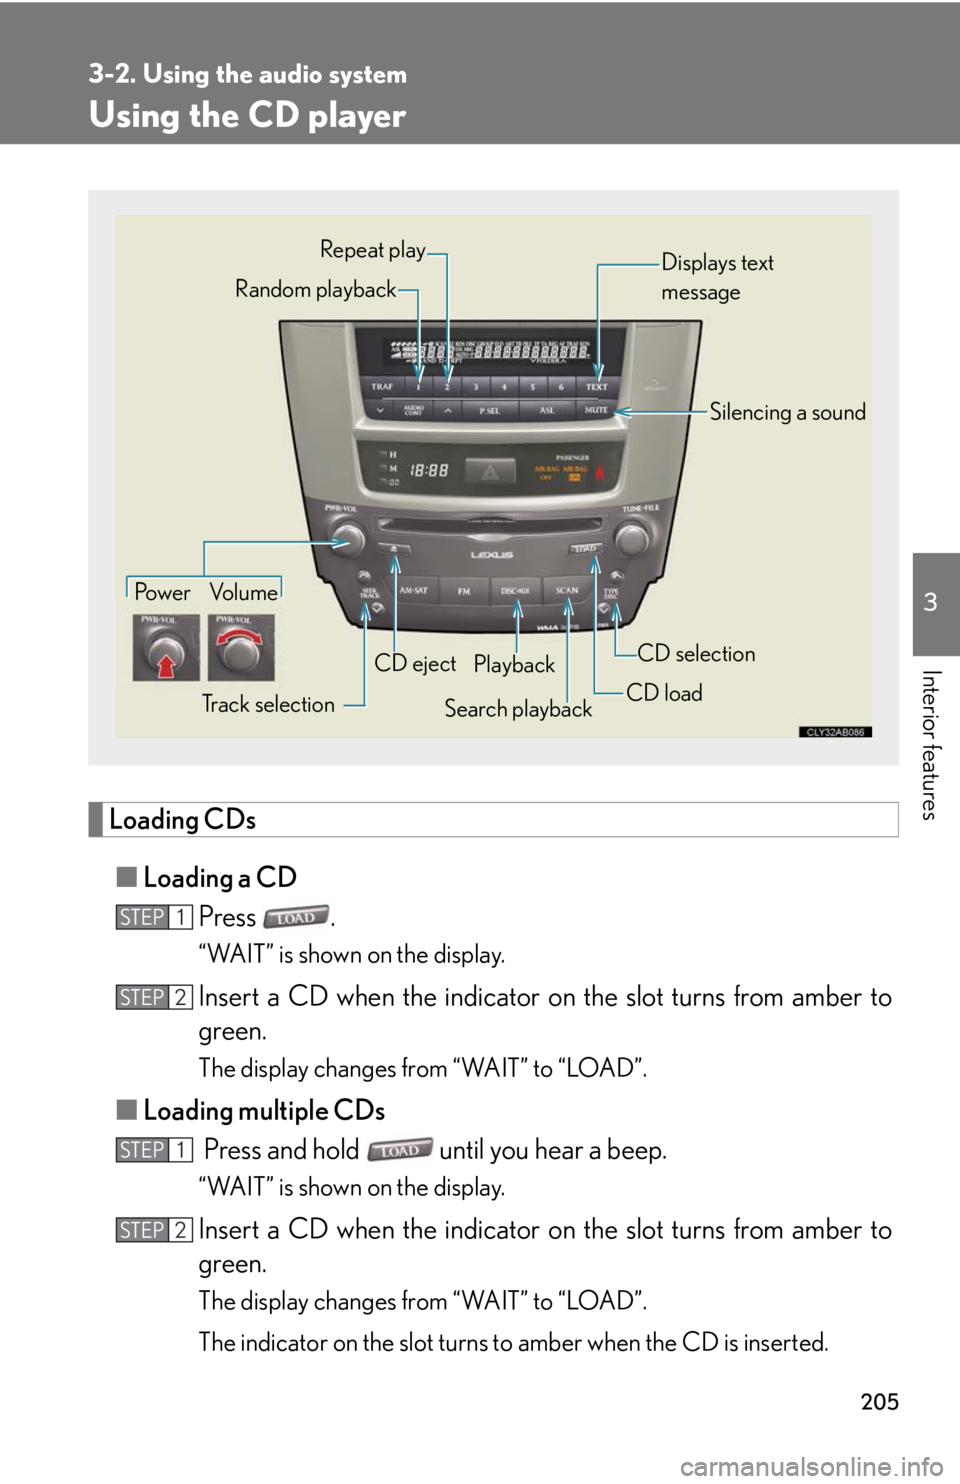
Using the CD player
Loading CDs■ Loading a CD
Press .
“WAIT” is shown on the display.
Insert a CD when the indicator on the slot turns from amber to
green.
The display changes from “WAIT” to “LOAD”.
■Loading multiple CDs
Press and hold until you hear a beep.
“WAIT” is shown on the display.
Insert a CD when the indicator on the slot turns from amber to
green.
The display changes from “WAIT” to “LOAD”.
The indicator on the slot turns to amber when the CD is inserted.
Po w e r Vo l u m e
Track selection CD eject
Playback
Search playback CD loadCD selection
Random playback Repeat play
Displays text
message
Silencing a sound
STEP1
STEP2
STEP1
STEP2
Page 206 of 452
206
3-2. Using the audio system
Insert the next CD when the indicator on the slot turns from
amber to green again.
Repeat the procedure for the remaining CDs.
To stop the operation, press .
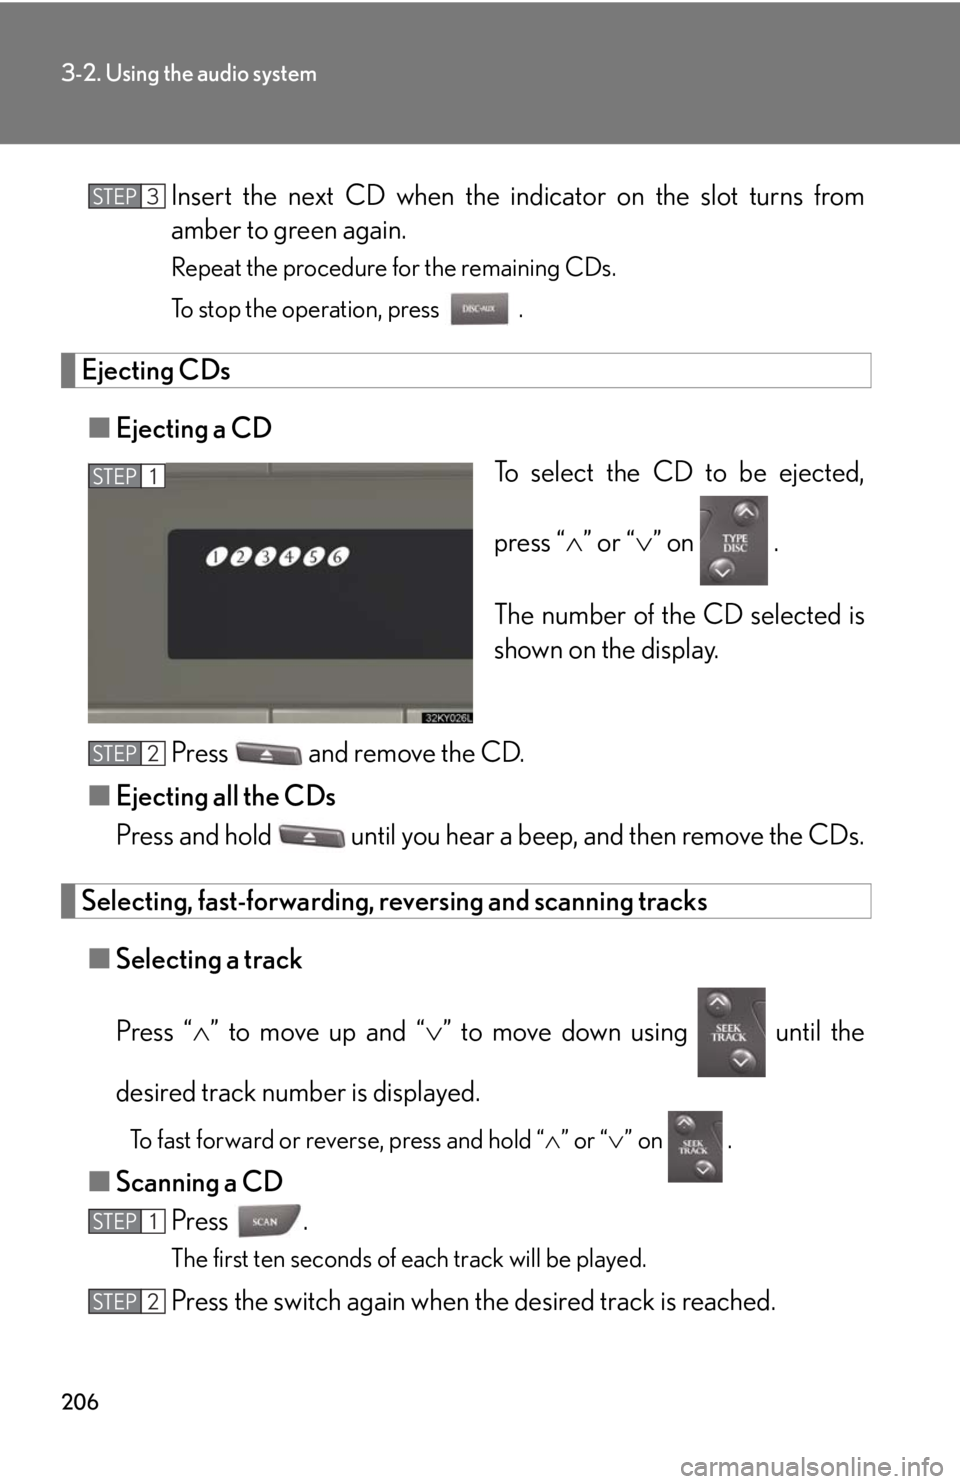
Ejecting CDs■ Ejecting a CD
To select the CD to be ejected,
press “” or “ ” on .
The number of the CD selected is
shown on the display.
Press and remove the CD.
■ Ejecting all the CDs
Press and hold until you hear a beep, and then remove the CDs.
Selecting, fast-forwarding, re versing and scanning tracks
■ Selecting a track
Press “ ” to move up and “ ” to move down using until the
desired track number is displayed.
To fast forward or reverse, press and hold “ ” or “ ” on .
■ Scanning a CD
Press .
The first ten seconds of each track will be played.
Press the switch again when the desired track is reached.
STEP3
STEP1
STEP2
STEP1
STEP2
Page 207 of 452
207
3-2. Using the audio system
3
Interior features
Selecting a CD■ Selecting a CD to play
To select the desired CD, press “ ” or “ ” on .
■ Scanning loaded CDs
Press and hold until you hear a beep.
The first ten seconds of the first track on each CD will be played.
Press again when the desired CD is reached.
Random playback
■ Current CD
Press (RAND).
Songs are played in random order until random playback is canceled.
■All CDs
Press and hold (RAND) until you hear a beep.
Tracks on all loaded CDs are played in a random order until the button is
pressed once more.
Repeat play
■ To repeat a track
Press (RPT).
■ To repeat all of the tracks on a CD
Press and hold (RPT) until you hear a beep.
Switching the display
Press .
Each time the switch is pressed, the display changes in the order of Track no./
Elapsed time CD title Track name.
STEP1
STEP2
Page 208 of 452
208
3-2. Using the audio system
■Display
Up to 12 characters can be displayed at a time.
If there are 13 characters or more, pressing and holding for 1 second or
more will display the remaining characters.
A maximum of 24 characters can be displayed.
If is pressed for 1 second or more again or has not been pressed for 6 sec-
onds or more, the display will return to the first 12 characters.
Depending on the contents recorded, the characters may not be displayed prop-
erly or may not be displayed at all.
■Canceling random, repeat and scan playback
Press (RAND), (RPT) or again.
■When “LOAD”, “ERROR” or “WAIT” is shown on the display
“LOAD”: This indicates that the CD pl ayer has completed loading the CD.
“ERROR”: Make sure the label of the displayed disc is facing up, and then reinsert it in the player.
“WAIT”: Operation is stopped due to a hi gh temperature inside the player. Wait
for a while and then press . Contact your Lexus dealer if the CD
still cannot be played back.
■Discs that can be used
Discs with the marks shown below can be used.
Playback may not be possible depending on recording format or disc features, or
due to scratches, dirt or deterioration.
CDs with copy-protection features may not play correctly.
■CD player protection feature
To protect the internal components, play back is automatically stopped when a
problem is detected.
■If CDs are left inside the CD player or in the ejected position for extended peri-
ods
CDs may be damaged and may not play properly.
Page 211 of 452
211
3-2. Using the audio system
3
Interior features
Playing back MP3 and WMA discs
Loading, ejecting and selecting MP3 and WMA discs P. 2 0 5
Selecting a folder
■ Selecting folders one at a time
Press ( ) or ( ) to select the desired folder.
■ Selecting the desired folder by cueing the first file of each folder
Press and hold until you hear a beep. When the desired folder is
reached, press once again.
■ Returning to the first folder
Press and hold ( ) until you hear a beep.
Po w e r Vo l u m e
CD ejectPlayback
Search playback CD loadCD selection File selection
Random playback
Repeat play
Displays text message
Folder selection
File selection
Silencing a sound