Lexus IS F 2008 Owner's Manual
Manufacturer: LEXUS, Model Year: 2008,
Model line: IS F,
Model: Lexus IS F 2008
Pages: 454, PDF Size: 6.26 MB
Lexus IS F 2008 Owner's Manual
IS F 2008
Lexus
Lexus
https://www.carmanualsonline.info/img/36/29687/w960_29687-0.png
Lexus IS F 2008 Owner's Manual
Trending: wheel bolts, emergency towing, sensor, fuel pump, trunk release, oil level, temperature gauge
Page 331 of 454
330
4-3. Do-it-yourself maintenance
08_IS F_U_(L/O_0711)
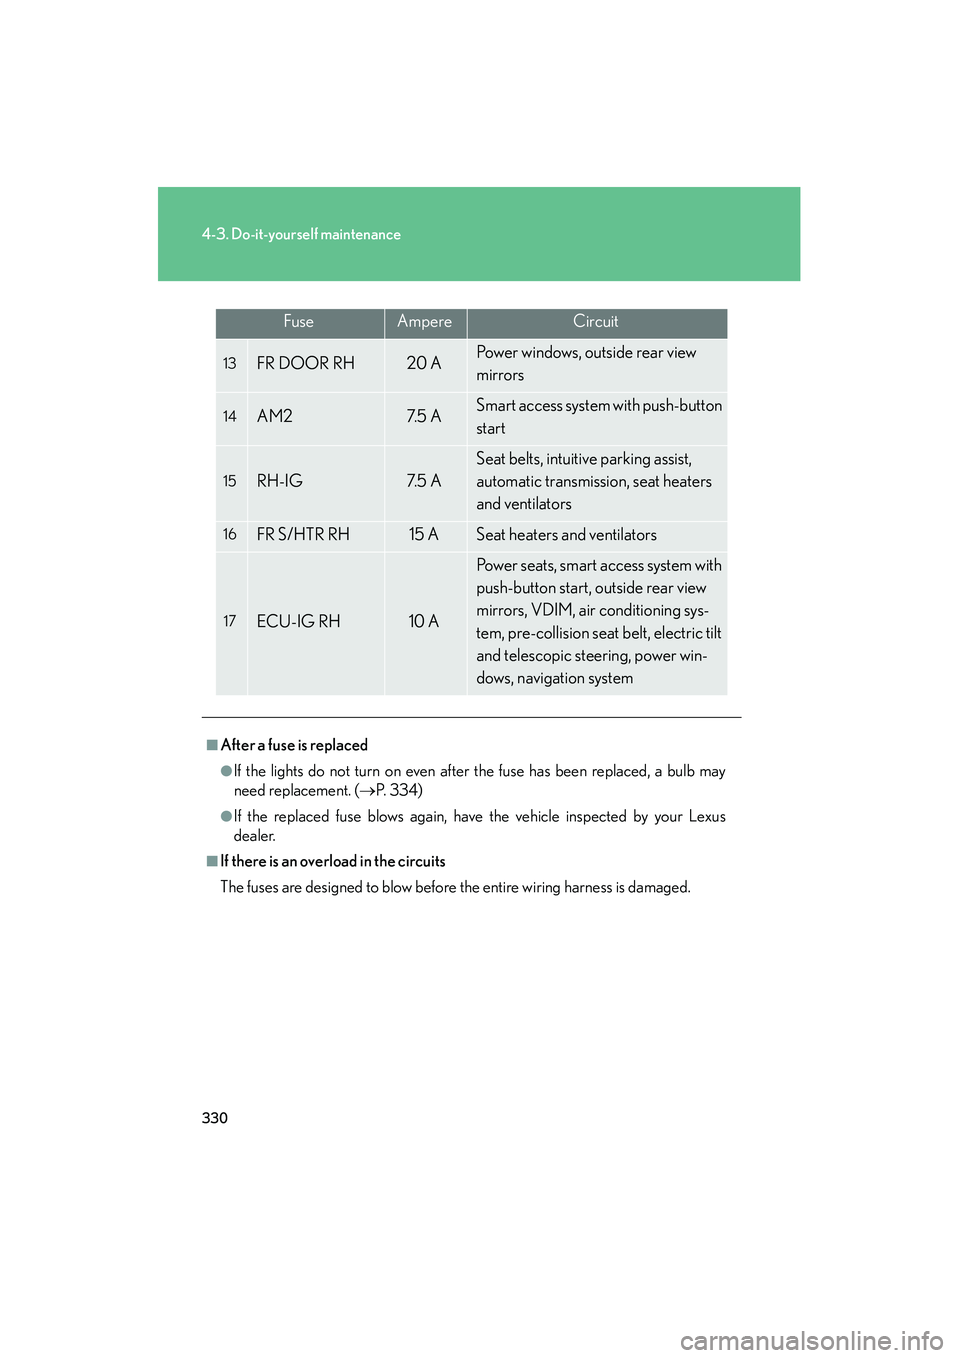
FuseAmpereCircuit
13FR DOOR RH20 APower windows, outside rear view
mirrors
14AM27. 5 ASmart access system with push-button
start
15RH-IG7. 5 A
Seat belts, intuitive parking assist,
automatic transmission, seat heaters
and ventilators
16FR S/HTR RH15 ASeat heaters and ventilators
17ECU-IG RH10 A
Power seats, smart access system with
push-button start, outside rear view
mirrors, VDIM, air conditioning sys-
tem, pre-collision seat belt, electric tilt
and telescopic steering, power win-
dows, navigation system
■After a fuse is replaced
●If the lights do not turn on even after the fuse has been replaced, a bulb may
need replacement. (→P. 3 3 4 )
●If the replaced fuse blows again, have the vehicle inspected by your Lexus
dealer.
■If there is an overload in the circuits
The fuses are designed to blow before the entire wiring harness is damaged.
Page 332 of 454
331
4-3. Do-it-yourself maintenance
4
Maintenance and care
08_IS F_U_(L/O_0711)
CAUTION
■To prevent system breakdowns and vehicle fire
Observe the following precautions.
Failing to do so may cause damage, and possibly a fire or injury.
●Never use a fuse of a higher amperage rating than indicated, or use any other
object in place of a fuse.
●Always use a genuine Lexus fuse or equivalent.
Never replace a fuse with a wire, even as a temporary fix.
This can cause extensive damage or even fire.
●Do not modify fuses or the fuse box.
NOTICE
■Before replacing fuses
Have the cause of electrical overload determined and repaired by your Lexus
dealer.
Page 333 of 454
332
4-3. Do-it-yourself maintenance
08_IS F_U_(L/O_0711)
Headlight aim
■Removing the engine compartment cover.
→ P. 2 8 3
■ Vertical movement adjusting bolts
Adjustment bolt A
Adjustment bolt B
■ Before checking the headlight aim
Make sure the vehicle has a full tank of gas and the area around
the headlight is not deformed.
Park the vehicle on level ground.
Sit in the driver’s seat.
Bounce the vehicle several times.
■ Adjusting the headlight aim
Turn bolt A in either direction
using a Phillips-head screw-
driver.
Remember the turning direction
and the number of turns in mind.
STEP1
STEP2
STEP3
STEP4
STEP1
Page 334 of 454
333
4-3. Do-it-yourself maintenance
4
Maintenance and care
08_IS F_U_(L/O_0711)
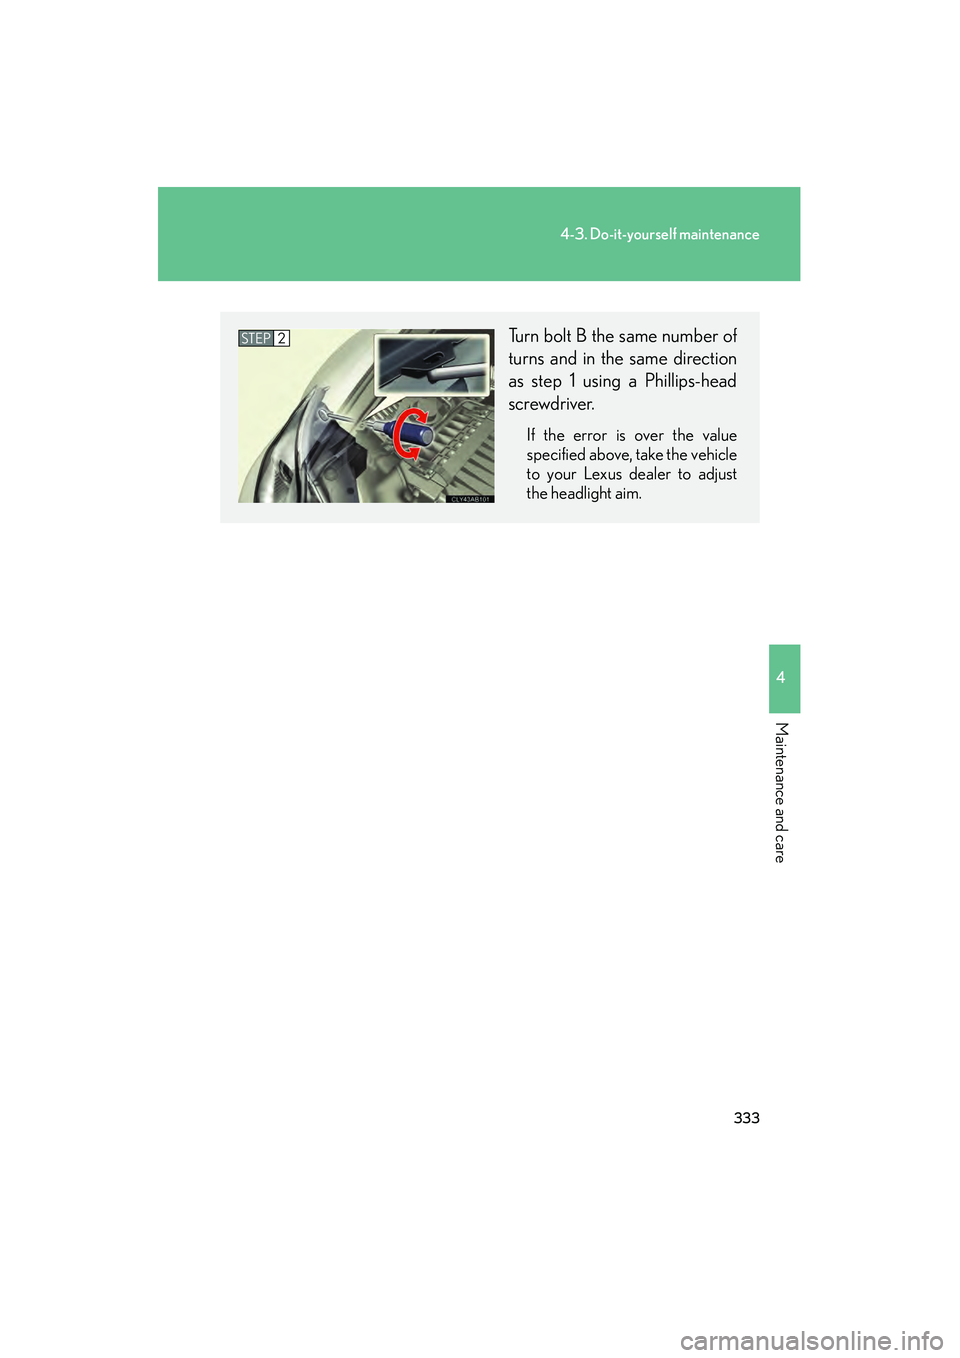
Turn bolt B the same number of
turns and in the same direction
as step 1 using a Phillips-head
screwdriver.
If the error is over the value
specified above, take the vehicle
to your Lexus dealer to adjust
the headlight aim.
STEP2
Page 335 of 454
334
4-3. Do-it-yourself maintenance
08_IS F_U_(L/O_0711)
Light bulbs
Replacing light bulbs■ Back-up lights
Open the trunk door and remove
the cover clips.
You may replace the following bulbs yourself. For more information about
replacing other light bulbs, contact your Lexus dealer.
■Preparing a replacement light bulb
Check the wattage of the light bulb being replaced. ( →P. 4 0 8 )
■ Bulb locations
Rear turn signal light Back-up light
STEP1
Page 336 of 454
335
4-3. Do-it-yourself maintenance
4
Maintenance and care
08_IS F_U_(L/O_0711)Partly remove the cover. Remove
the wire harness and turn the bulb
base counterclockwise.
Remove the light bulb.
■ Rear turn si gnal lights
Open the trunk door and remove
the cover.
Remove the connector and turn
the bulb base counterclockwise.
STEP2
STEP3
STEP1
STEP2
Page 337 of 454
336
4-3. Do-it-yourself maintenance
08_IS F_U_(L/O_0711)Remove the light bulb.
■ Bulbs other than the above
If any of the bulbs listed below has burnt out, have your Lexus dealer
replace it.
● Headlight low and high beams (discharge bulbs)
● Headlight high beams
● Front fog lights
● Parking lights
● Front turn signal lights
● Front side marker lights
● Stop/tail lights
● Tail lights
● Rear side marker lights
● High mounted stoplight
● License plate lights
STEP3
Page 338 of 454
337
4-3. Do-it-yourself maintenance
4
Maintenance and care
08_IS F_U_(L/O_0711)
■Condensation build-up on the inside of the lens
Contact your Lexus dealer for more information in the following situations. Tempo-
rary condensation build-up on the inside of the headlight lens does not indicate a
malfunction.
●Large drops of water are built up on the inside of the lens.
●Water has built up inside the headlight.
■Discharge headlights
If voltage to the discharge bulbs is insufficient, the bulbs may not come on, or may
go out temporarily. The discharge bulbs will come on when normal power is
restored.
■LED tail lights, stop/tail lights and high mounted stoplight
The tail lights, stop/tail lights and high mounted stoplight consist of a number of
LEDs. If any of the LEDs burn out, take your vehicle to your Lexus dealer to have the
light replaced.
Page 339 of 454

338
4-3. Do-it-yourself maintenance
08_IS F_U_(L/O_0711)
CAUTION
■Replacing light bulbs
●Turn off the lights. Do not attempt to replace the bulb immediately after turning
off the lights.
The bulbs become very hot and may cause burns.
●Do not touch the glass portion of the light bulb with bare hands. Hold the bulb by
the plastic or metal portion.
If the bulb is scratched or dropped it may blow out or crack.
●Fully install light bulbs and any parts used to secure them. Failing to do so may
result in heat damage, fire, or water entering the headlight unit. This may damage
the headlights or cause condensation to build up on the lens.
●Do not attempt to take apart or repair the low beam headlight bulbs, connectors,
power supply circuits, or related components.
Doing so could result in electric shock and serious injury or death.
■Discharge headlights
●Contact your Lexus dealer before replacing discharge headlights (including light
bulbs).
●Do not touch the high-intensity discharge headlight’s high voltage socket when
the headlights are turned on.
An extremely high voltage of 20000 V will be discharged and could result in
serious injury or death by electric shock.
■To prevent damage or fire
Make sure bulbs are fully seated and locked.
Page 340 of 454
When trouble arises5
339
08_IS F_U_(L/O_0711)
5-1. Essential information..... 340If your vehicle needs to be towed................................ 340
If you think something is wrong .................................. 346
Fuel pump shut off system.... 347
Event data recorder ............. 348 5-2. Steps to take in an
emergency ................... 350
If a warning light turns on or a warning buzzer
sounds... ................................. 350
If a warning message is displayed................................ 360
If you have a flat tire................ 374
If the engine will not start .... 383
If the shift lever cannot be shifted from P ....................... 384
If you lose your keys .............. 385
If the electronic key does not operate properly.......... 386
If the vehicle battery is discharged ............................ 389
If your vehicle overheats ..... 392
If the vehicle becomes stuck........................................ 395
Trending: lane assist, seat memory, maintenance, jump start, engine, alarm, power steering


