stop start Lexus IS F 2009 Repair Manual
[x] Cancel search | Manufacturer: LEXUS, Model Year: 2009, Model line: IS F, Model: Lexus IS F 2009Pages: 458, PDF Size: 6.33 MB
Page 298 of 458

297
4-3. Do-it-yourself maintenance
4
Maintenance and care
08_IS F_U_(L/O_0808)
■Before recharging
When recharging, the battery produces hydrogen gas which is flammable and
explosive. Therefore, before recharging:
●If recharging with the battery installed on the vehicle, be sure to disconnect the
ground cable.
●Make sure the power switch on the charger is off when connecting and discon-
necting the charger cables to the battery.
■After recharging/reconnecting the battery
In some cases, the engine may not start. Follow the procedure bellow to initialize
the system.Shift the shift lever to “P”, and turn the “ENGINE START STOP” switch
OFF.
Open and close any of the doors.
Start the engine. (If the engine does not start first time, repeat the proce-
dure.)
If the engine will not start even after multiple attempts at the above method, contact
your Lexus dealer.
CAUTION
■Chemicals in the battery
A battery contains poisonous and corrosive sulfuric acid and may produce hydro-
gen gas which is flammable and explosive. To reduce the risk of death or serious
injury, take the following precautions while working on or near battery:
●Do not cause sparks by touching the battery terminals with tools.
●Do not smoke or light a match near the battery.
●Avoid contact with eyes, skin and clothes.
●Never inhale or swallow electrolyte.
●Wear protective safety glasses when working near the battery.
●Keep children away from the battery.
STEP1
STEP2
STEP3
Page 302 of 458

301
4-3. Do-it-yourself maintenance
4
Maintenance and care
08_IS F_U_(L/O_0808)
Initializing the tire pressure warning system■ The tire pressure warning system must be initialized when the tire
inflation pressure is changed (such as when changing traveling
speed.)
When the tire pressure warning system is initialized, the current tire
inflation pressure is set as the benchmark pressure.
■ How to initialize the tire pressure warning system
To initialize the system, use the satellite switch. ( →P. 2 4 0 )
Park the vehicle in safe place and turn the “ENGINE START
STOP” switch to OFF.
While the vehicle is moving, initialization is not performed.
Adjust the tire inflation pressure to the specified cold tire inflation
pressure level. (→ P. 4 1 1 )
Make sure to adjust the tire pressure to the specified cold tire inflation
pressure level. The tire pressure warning system will operate based on
this pressure level.
Turn the “ENGINE START STOP” switch to IGNITION ON
mode.
STEP1
STEP2
STEP3
Page 303 of 458

302
4-3. Do-it-yourself maintenance
08_IS F_U_(L/O_0808)The tire inflation pressure initial-
ization setting display
Continue to press “<” or “>” until
the initialization setting display
appears.
It may take several minutes to com-
plete the setting. Wait for several
minutes before turning the
“ENGINE START STOP” switch to
OFF if necessary.
Recording tire inflation pressure
settings
Press and hold the “ON/OFF” but-
ton until the tire pressure warning
light blinks slowly 3 times and the
message “PRESSURE INITIAL”
showing that the initial setting is
complete is displayed on the multi-
information display.
Wait for a few minutes with the IGNITION ON mode, and then
turn the “ENGINE START STOP” switch to OFF.
STEP4
STEP5
Page 318 of 458

317
4-3. Do-it-yourself maintenance
4
Maintenance and care
08_IS F_U_(L/O_0808)
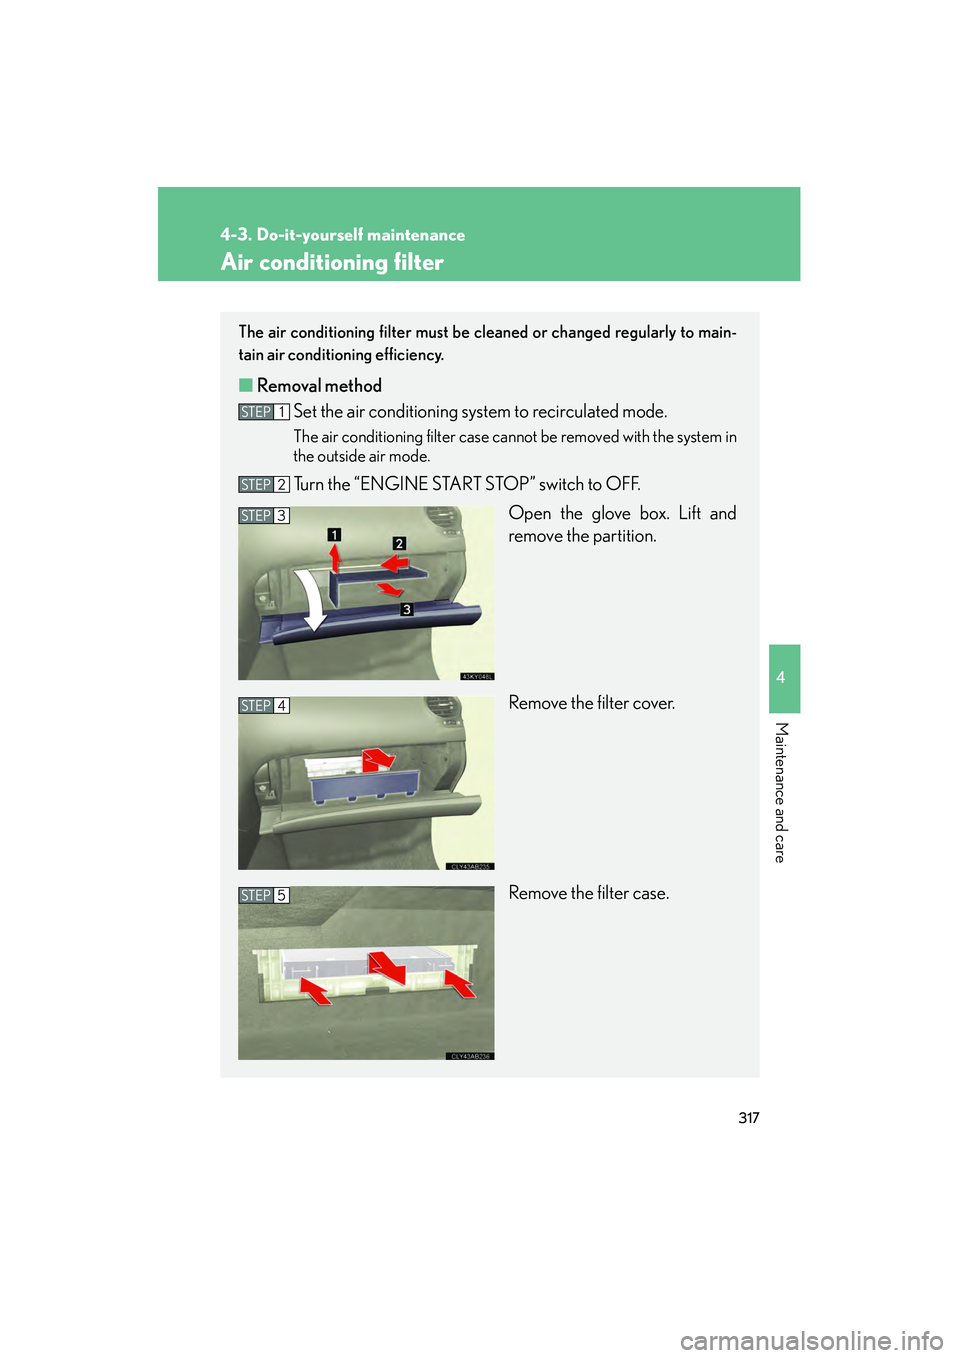
Air conditioning filter
The air conditioning filter must be cleaned or changed regularly to main-
tain air conditioning efficiency.
■ Removal method
Set the air conditioning system to recirculated mode.
The air conditioning filter case cannot be removed with the system in
the outside air mode.
Turn the “ENGINE START STOP” switch to OFF.
Open the glove box. Lift and
remove the partition.
Remove the filter cover.
Remove the filter case.
STEP1
STEP2
STEP3
STEP4
STEP5
Page 323 of 458

322
4-3. Do-it-yourself maintenance
08_IS F_U_(L/O_0808)
Checking and replacing fuses
If any of the electrical components do not operate, a fuse may have blown.
If this happens, check and replace the fuses as necessary.
Turn the “ENGINE START STOP” switch to OFF.
Engine compartment (type B): Remove the engine compart-
ment cover. (→P. 2 8 7 )
Open the fuse box cover.
Engine compartment (type A)
Push the tabs in and lift the lid
off.
Engine compartment (type B) Push the tabs in and lift the lid
off.STEP1
STEP2
STEP3
Page 328 of 458

327
4-3. Do-it-yourself maintenance
4
Maintenance and care
08_IS F_U_(L/O_0808)
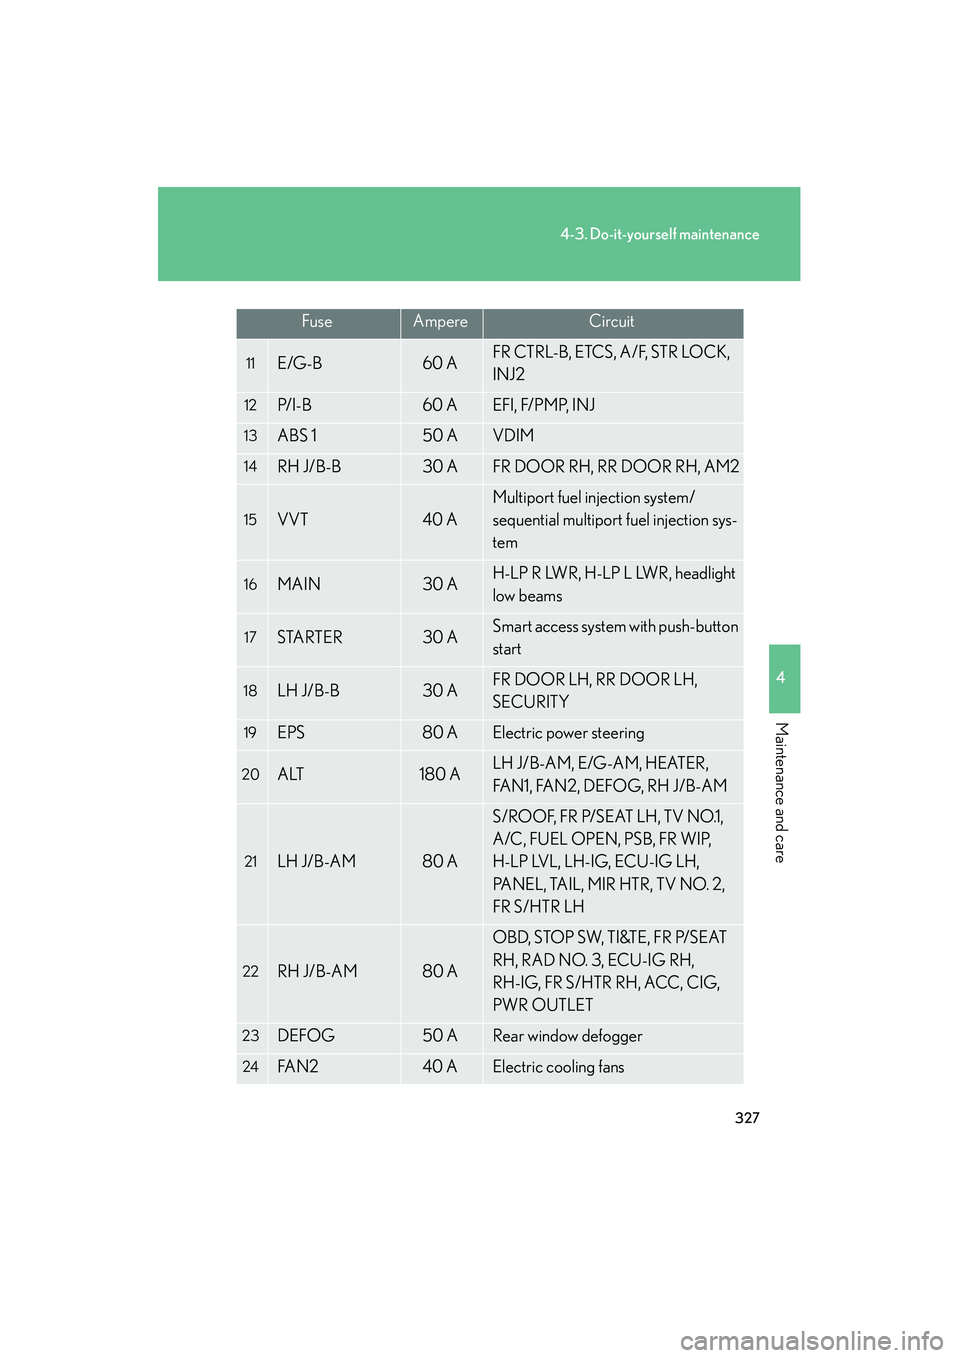
11E/G-B60 AFR CTRL-B, ETCS, A/F, STR LOCK,
INJ2
12P/ I - B60 AEFI, F/PMP, INJ
13ABS 150 AVDIM
14RH J/B-B30 AFR DOOR RH, RR DOOR RH, AM2
15VVT40 A
Multiport fuel injection system/
sequential multiport fuel injection sys-
tem
16MAIN30 AH-LP R LWR, H-LP L LWR, headlight
low beams
17STARTER30 ASmart access system with push-button
start
18LH J/B-B30 AFR DOOR LH, RR DOOR LH,
SECURITY
19EPS80 AElectric power steering
20ALT180 ALH J/B-AM, E/G-AM, HEATER,
FAN1, FAN2, DEFOG, RH J/B-AM
21LH J/B-AM80 A
S/ROOF, FR P/SEAT LH, TV NO.1,
A/C, FUEL OPEN, PSB, FR WIP,
H-LP LVL, LH-IG, ECU-IG LH,
PANEL, TAIL, MIR HTR, TV NO. 2,
FR S/HTR LH
22RH J/B-AM80 A
OBD, STOP SW, TI&TE, FR P/SEAT
RH, RAD NO. 3, ECU-IG RH,
RH-IG, FR S/HTR RH, ACC, CIG,
PWR OUTLET
23DEFOG50 ARear window defogger
24FA N 240 AElectric cooling fans
FuseAmpereCircuit
Page 333 of 458

332
4-3. Do-it-yourself maintenance
08_IS F_U_(L/O_0808)
FuseAmpereCircuit
14RR DOOR LH20 APo w e r w i n d o w s
15FR DOOR LH20 APower windows, outside rear view
mirror (left)
16SECURITY7. 5 ASmart access system with push-button
start
17H-LP LVL7. 5 AAFS
18LH-IG10 A
Charging system, headlight cleaner,
rear window defogger, electric cool-
ing fans, emergency flashers, turn sig-
nal lights, back-up lights, stop lights,
outside rear view mirror defoggers,
seat belts, intuitive parking assist, air
conditioning system
19FR WIP30 AWindshield wipers
Page 334 of 458

333
4-3. Do-it-yourself maintenance
4
Maintenance and care
08_IS F_U_(L/O_0808)■
Passenger’s side instrument panel
FuseAmpereCircuit
1FR P/SEAT RH30 APo w e r s e a t
2DOOR DL15 A
3OBD7. 5 AOn-board diagnosis system
4STOP SW7. 5 AStop lights, VDIM
5TI & TE20 AElectric tilt and telescopic steering
column
6RAD NO. 310 AAudio system
7GAUGE7. 5 AMeters and gauges
8IGN10 A
SRS airbag system, stop lights, steer-
ing lock system, fuel system, front pas-
senger occupant classification system
9ACC7. 5 A
Clock, air conditioning system, audio
system, navigation system, display,
outside rear view mirrors, smart
access system with push-button start,
glove box light, console box light
10CIG15 ACigarette lighter
11PWR OUTLET15 APo w e r o u t l e t
12RR DOOR RH20 APo w e r w i n d o w s
Page 347 of 458

346
5-1. Essential information
08_IS F_U_(L/O_0808)
■Emergency towing procedureRelease the parking brake.
Shift the shift lever to N.
Put the “ENGINE START STOP” switch in ACCESSORY mode (engine
off) or IGNITION ON mode (engine running).
CAUTION
■Caution while towing
●Use extreme caution when towing the vehicle.
Avoid sudden starts or erratic driving maneuvers which place excessive stress on
the emergency towing eyelet and the cables or chains.
●If the engine is not running, the power assist for the brakes and steering will not
function, making steering and braking more difficult.
NOTICE
■To prevent causing serious damage to the transmission
Never tow this vehicle from the rear with four wheels on the ground. This may cause
serious damage to the transmission.
STEP1
STEP2
STEP3
Page 350 of 458

5
When trouble arises
349
5-1. Essential information
08_IS F_U_(L/O_0808)
Towing with a wheel lift-type truckFrom the front Use a towing dolly under the rear
wheels.
From the rear Turn the “ENGINE START STOP”
switch to the ACCESSORY mode
so that the steering wheel is
unlocked.
NOTICE
■To prevent causing serious damage to the transmission
Never tow this vehicle from the front with the rear wheels on the ground.
■To prevent damaging the vehicle
●Do not tow the vehicle from the rear with the “ENGINE START STOP” switch
OFF.
The steering lock mechanism is not strong enough to hold the front wheel
straight.
●When raising the vehicle from the rear, ensure adequate ground clearance for
towing at the opposite end of the raised vehicle. Without adequate clearance, the
vehicle could be damaged while being towed from the rear.