phone Lexus IS220d 2012 Navigation manual
[x] Cancel search | Manufacturer: LEXUS, Model Year: 2012, Model line: IS220d, Model: Lexus IS220d 2012Pages: 407, PDF Size: 23.8 MB
Page 60 of 407
58
ISF_IS_ISC_Navi_EE1. QUICK REFERENCE...................... 60
2. DESTINATION SEARCH............... 62
SELECTING THE SEARCH AREA ....... 62
DESTINATION SEARCH BY HOME ... 64
DESTINATION SEARCH BY
QUICK ACCESS................................... 65
DESTINATION SEARCH BY “Address” ...
65
DESTINATION SEARCH BY “POI*” ... 69
DESTINATION SEARCH BY “Map” .... 72
DESTINATION SEARCH BY “Memory” ...
73
DESTINATION SEARCH BY “Previous”...
73
DESTINATION SEARCH BY
“Intersection” ......................................... 74
DESTINATION SEARCH BY
“Motorway ent./exit” ............................. 75
DESTINATION SEARCH BY
“Coordinates”......................................... 76
DESTINATION SEARCH BY
“Telephone no.” ..................................... 76
DESTINATION SEARCH BY
“POI* near cursor”................................. 77
DESTINATION SEARCH BY
“UK Postal Code” .................................. 80
3. STARTING ROUTE GUIDANCE .. 81
1DESTINATION SEARCH
Page 63 of 407
61
1. DESTINATION SEARCH
3
NAVIGATION SYSTEM
ISF_IS_ISC_Navi_EE
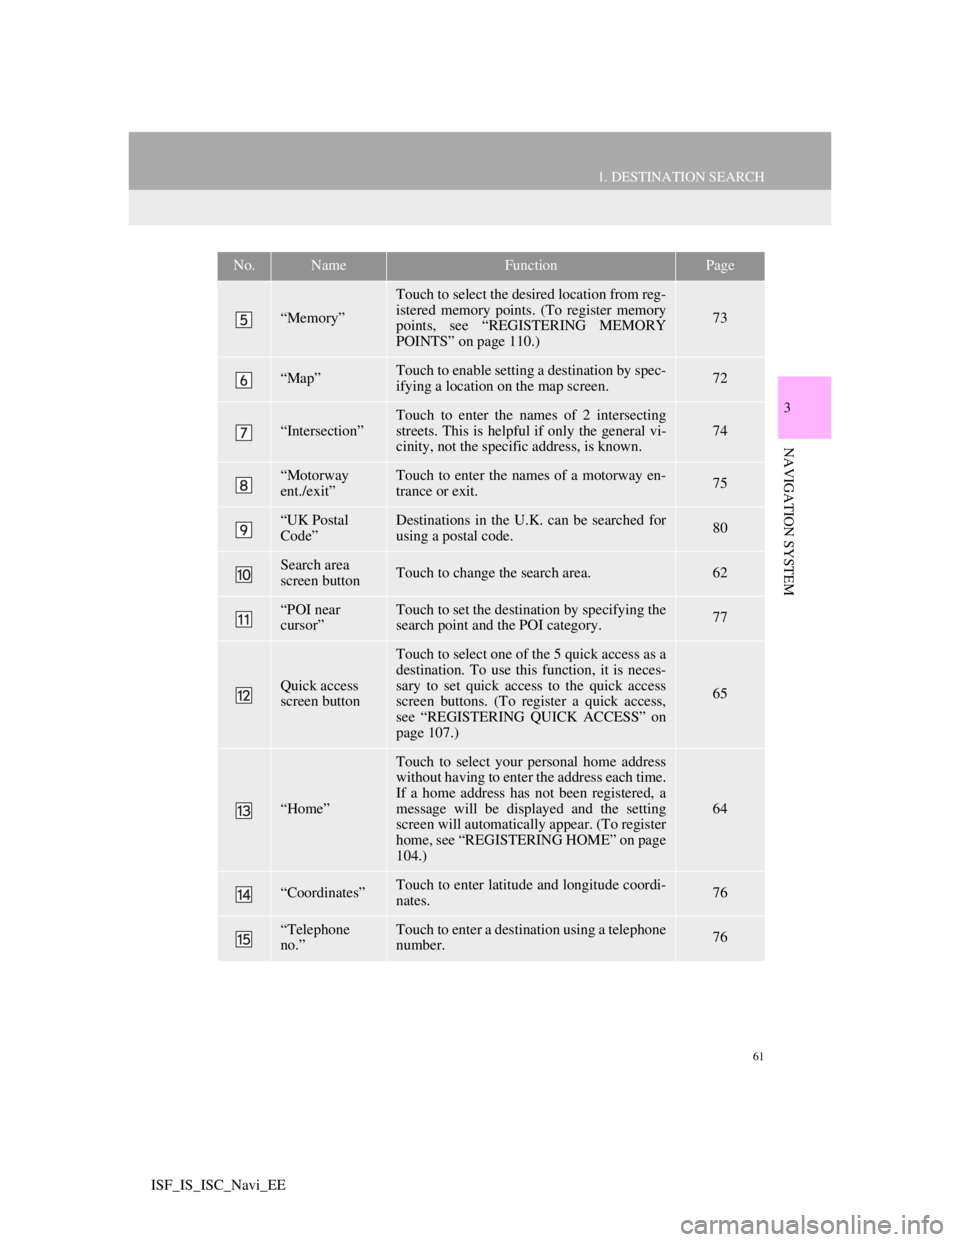
“Memory”
Touch to select the desired location from reg-
istered memory points. (To register memory
points, see “REGISTERING MEMORY
POINTS” on page 110.)
73
“Map”Touch to enable setting a destination by spec-
ifying a location on the map screen.72
“Intersection”
Touch to enter the names of 2 intersecting
streets. This is helpful if only the general vi-
cinity, not the specific address, is known.
74
“Motorway
ent./exit”Touch to enter the names of a motorway en-
trance or exit.75
“UK Postal
Code”Destinations in the U.K. can be searched for
using a postal code.80
Search area
screen buttonTouch to change the search area.62
“POI near
cursor”Touch to set the destination by specifying the
search point and the POI category.77
Quick access
screen button
Touch to select one of the 5 quick access as a
destination. To use this function, it is neces-
sary to set quick access to the quick access
screen buttons. (To register a quick access,
see “REGISTERING QUICK ACCESS” on
page 107.)
65
“Home”
Touch to select your personal home address
without having to enter the address each time.
If a home address has not been registered, a
message will be displayed and the setting
screen will automatically appear. (To register
home, see “REGISTERING HOME” on page
104.)
64
“Coordinates”Touch to enter latitude and longitude coordi-
nates.76
“Telephone
no.”Touch to enter a destination using a telephone
number.76
No.NameFunctionPage
Page 65 of 407
63
1. DESTINATION SEARCH
3
NAVIGATION SYSTEM
ISF_IS_ISC_Navi_EE
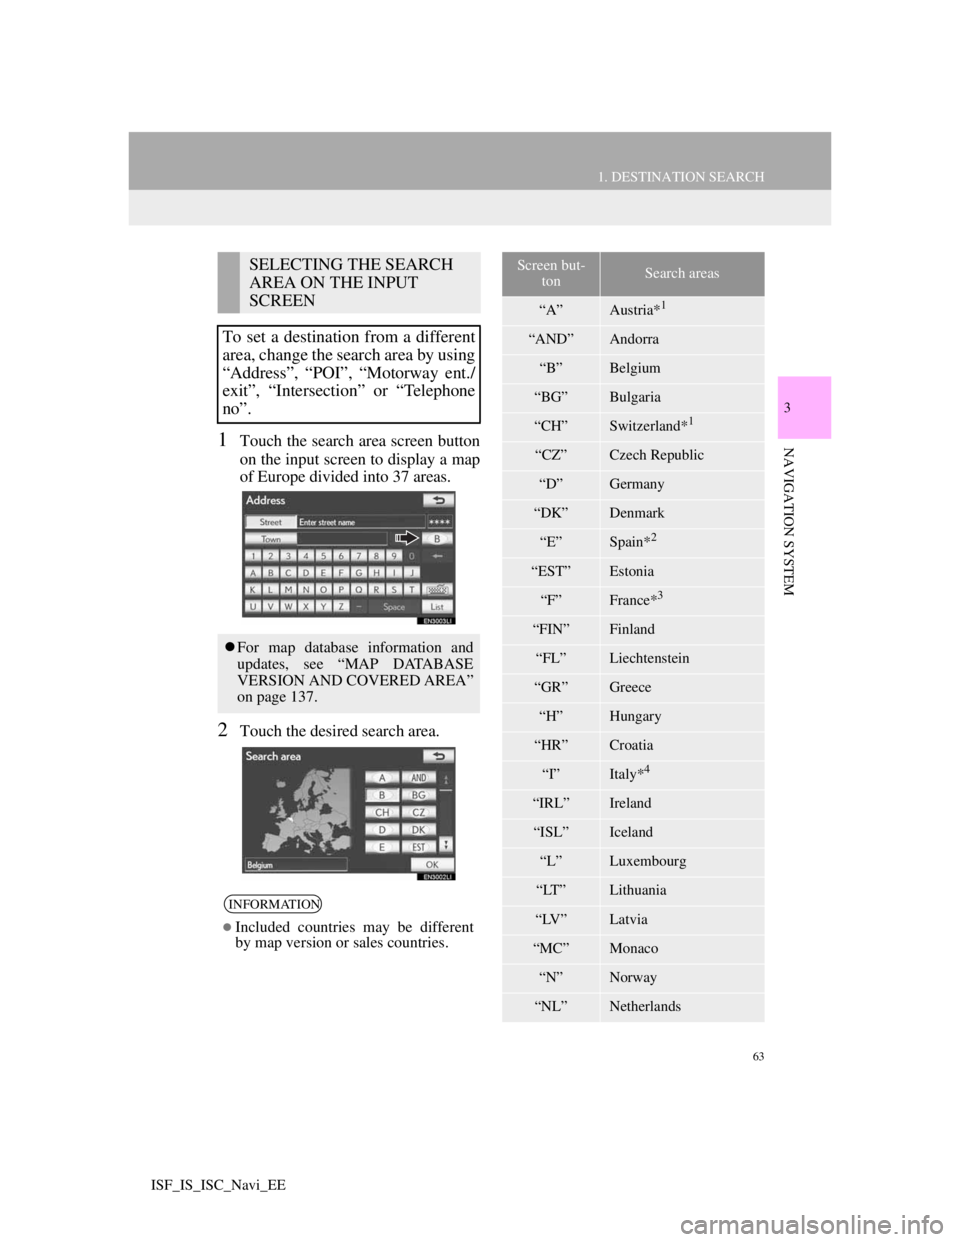
1Touch the search area screen button
on the input screen to display a map
of Europe divided into 37 areas.
2Touch the desired search area.
SELECTING THE SEARCH
AREA ON THE INPUT
SCREEN
To set a destination from a different
area, change the search area by using
“Address”, “POI”, “Motorway ent./
exit”, “Intersection” or “Telephone
no”.
For map database information and
updates, see “MAP DATABASE
VERSION AND COVERED AREA”
on page 137.
INFORMATION
Included countries may be different
by map version or sales countries.
Screen but-
tonSearch areas
“A”Austria*1
“AND”Andorra
“B”Belgium
“BG”Bulgaria
“CH”Switzerland*1
“CZ”Czech Republic
“D”Germany
“DK”Denmark
“E”Spain*2
“EST”Estonia
“F”France*3
“FIN”Finland
“FL”Liechtenstein
“GR”Greece
“H”Hungary
“HR”Croatia
“I”Italy*4
“IRL”Ireland
“ISL”Iceland
“L”Luxembourg
“LT”Lithuania
“LV”Latvia
“MC”Monaco
“N”Norway
“NL”Netherlands
Page 78 of 407
76
1. DESTINATION SEARCH
ISF_IS_ISC_Navi_EE
1Press the “NAV” button, and touch
“Menu” if the map screen is dis-
played.
2Touch “Destination” on the “Menu”
screen.
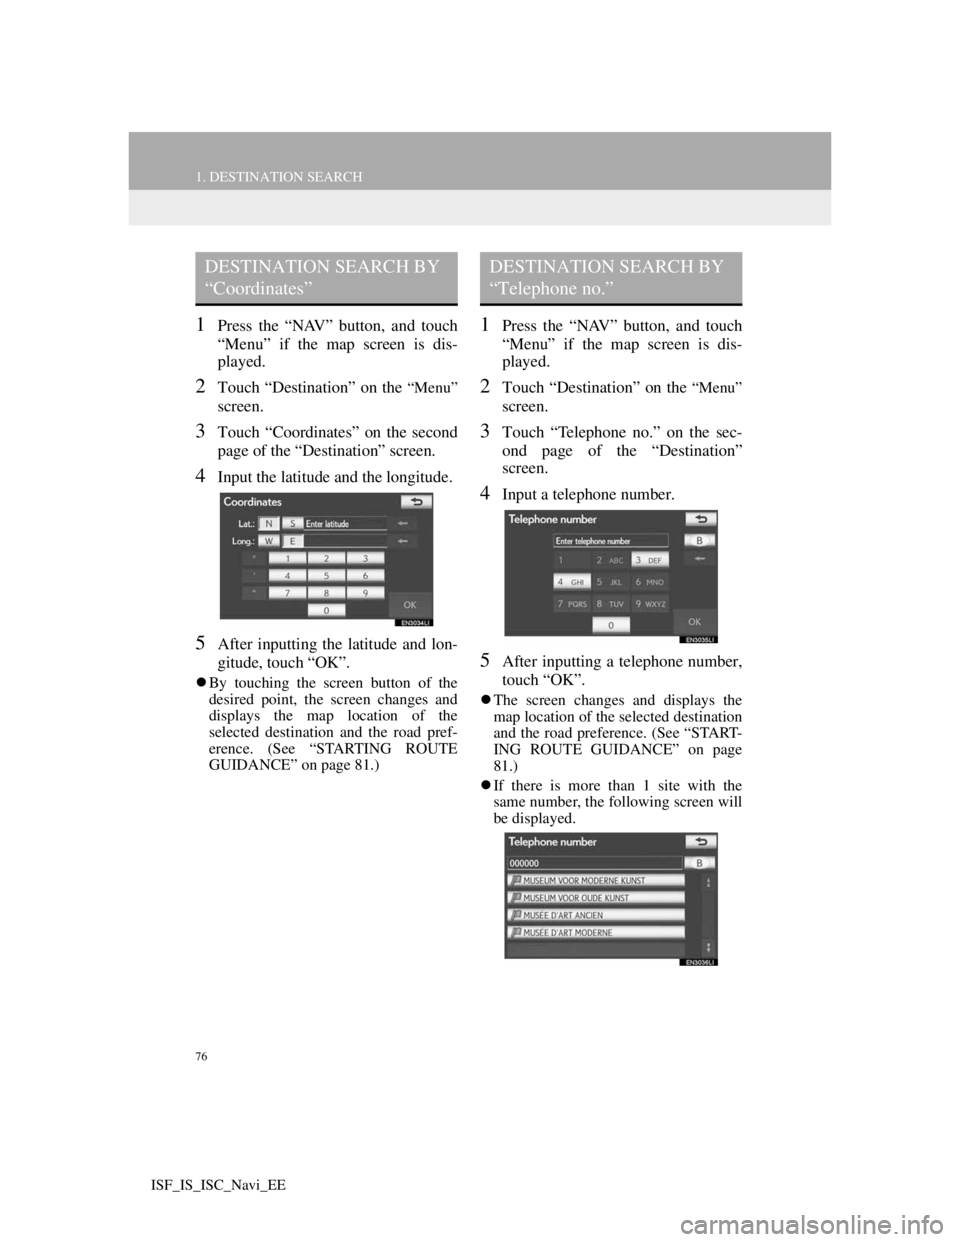
3Touch “Coordinates” on the second
page of the “Destination” screen.
4Input the latitude and the longitude.
5After inputting the latitude and lon-
gitude, touch “OK”.
By touching the screen button of the
desired point, the screen changes and
displays the map location of the
selected destination and the road pref-
erence. (See “STARTING ROUTE
GUIDANCE” on page 81.)
1Press the “NAV” button, and touch
“Menu” if the map screen is dis-
played.
2Touch “Destination” on the “Menu”
screen.
3Touch “Telephone no.” on the sec-
ond page of the “Destination”
screen.
4Input a telephone number.
5After inputting a telephone number,
touch “OK”.
The screen changes and displays the
map location of the selected destination
and the road preference. (See “START-
ING ROUTE GUIDANCE” on page
81.)
If there is more than 1 site with the
same number, the following screen will
be displayed.
DESTINATION SEARCH BY
“Coordinates”DESTINATION SEARCH BY
“Telephone no.”
Page 79 of 407
77
1. DESTINATION SEARCH
3
NAVIGATION SYSTEM
ISF_IS_ISC_Navi_EE
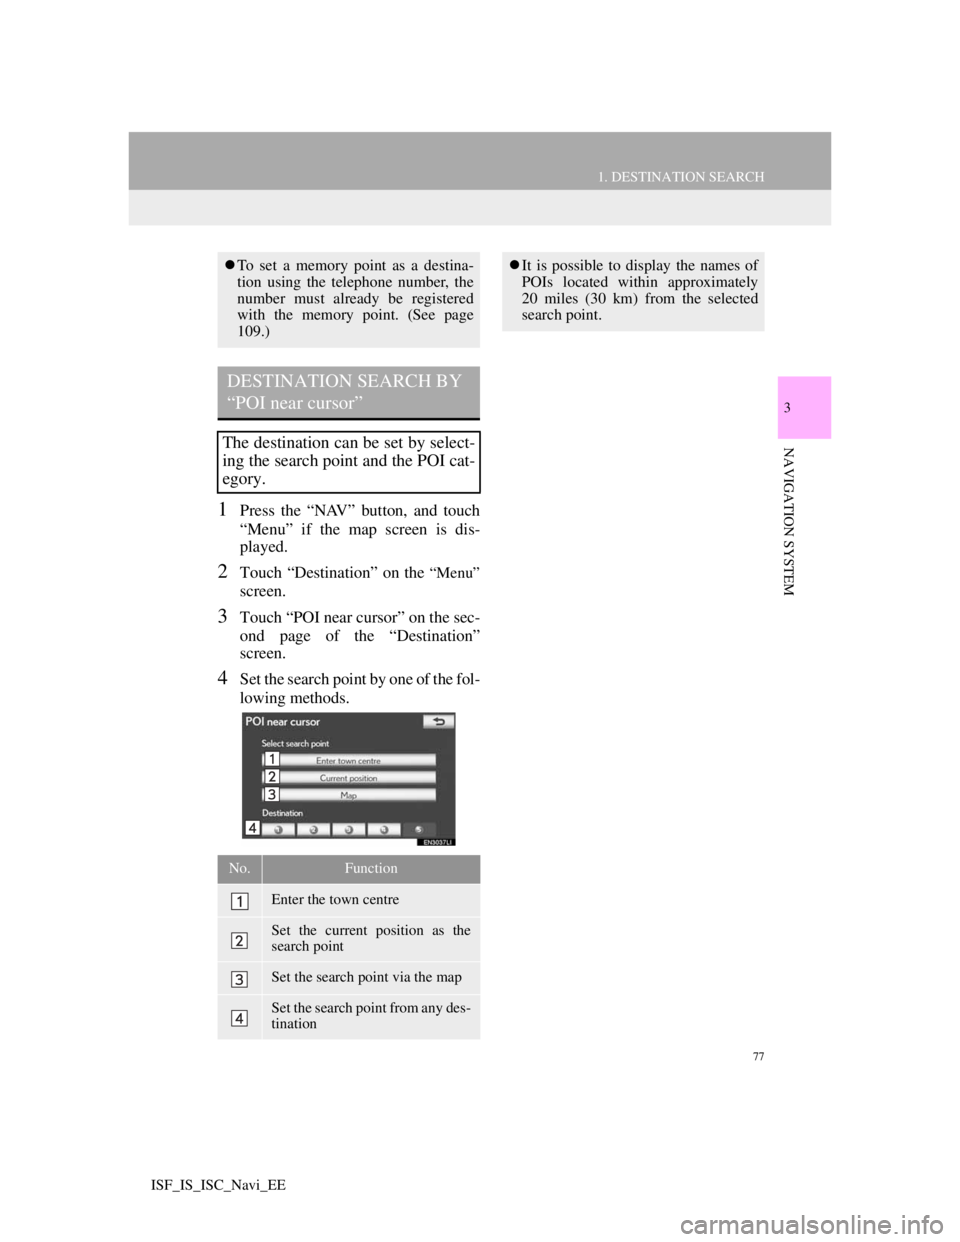
1Press the “NAV” button, and touch
“Menu” if the map screen is dis-
played.
2Touch “Destination” on the “Menu”
screen.
3Touch “POI near cursor” on the sec-
ond page of the “Destination”
screen.
4Set the search point by one of the fol-
lowing methods.
To set a memory point as a destina-
tion using the telephone number, the
number must already be registered
with the memory point. (See page
109.)
DESTINATION SEARCH BY
“POI near cursor”
The destination can be set by select-
ing the search point and the POI cat-
egory.
No.Function
Enter the town centre
Set the current position as the
search point
Set the search point via the map
Set the search point from any des-
tination
It is possible to display the names of
POIs located within approximately
20 miles (30 km) from the selected
search point.
Page 83 of 407
81
1. DESTINATION SEARCH
3
NAVIGATION SYSTEM
ISF_IS_ISC_Navi_EE
3. STARTING ROUTE GUIDANCE
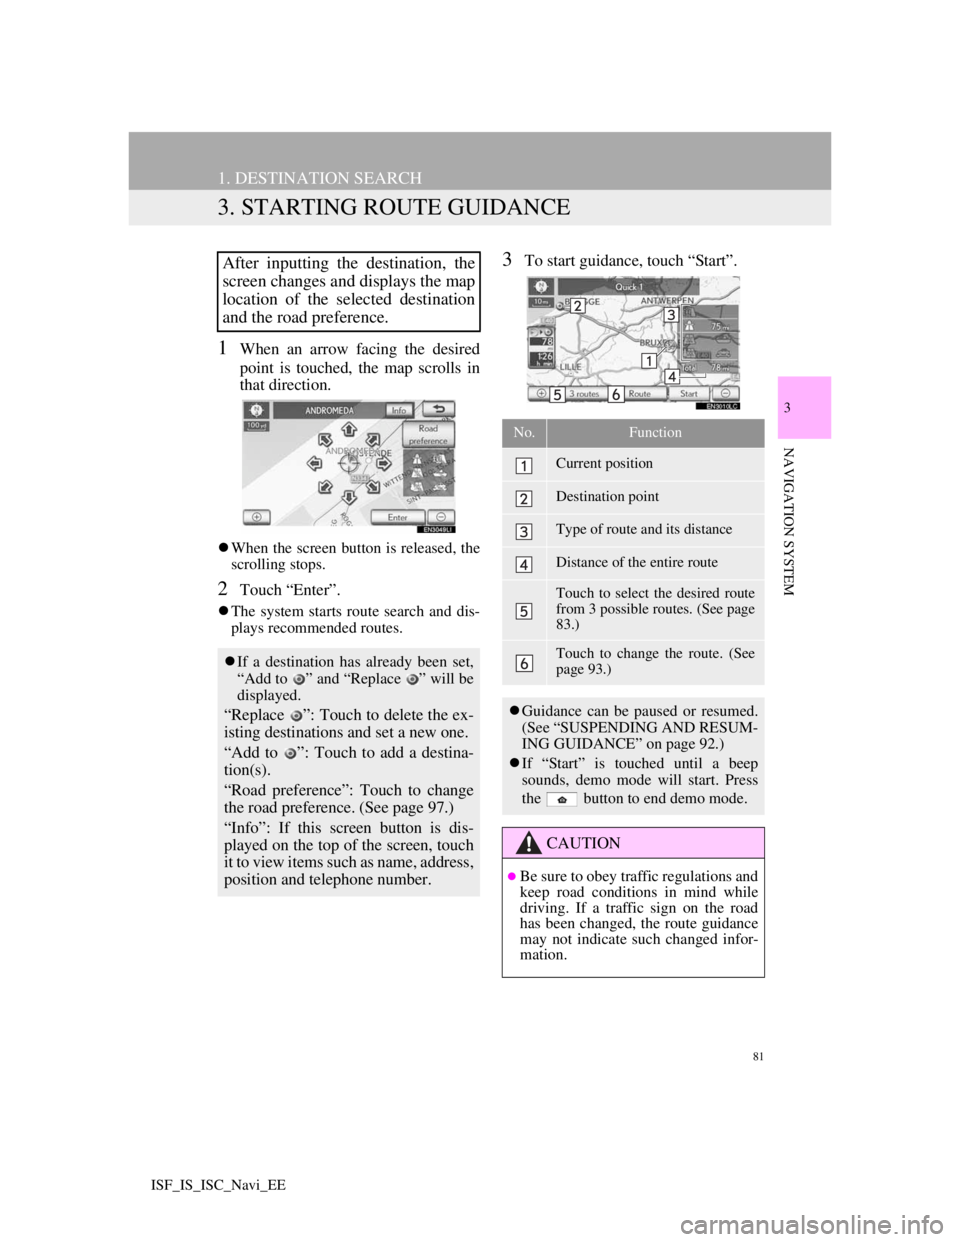
1When an arrow facing the desired
point is touched, the map scrolls in
that direction.
When the screen button is released, the
scrolling stops.
2Touch “Enter”.
The system starts route search and dis-
plays recommended routes.
3To start guidance, touch “Start”.After inputting the destination, the
screen changes and displays the map
location of the selected destination
and the road preference.
If a destination has already been set,
“Add to ” and “Replace ” will be
displayed.
“Replace ”: Touch to delete the ex-
isting destinations and set a new one.
“Add to ”: Touch to add a destina-
tion(s).
“Road preference”: Touch to change
the road preference. (See page 97.)
“Info”: If this screen button is dis-
played on the top of the screen, touch
it to view items such as name, address,
position and telephone number.
No.Function
Current position
Destination point
Type of route and its distance
Distance of the entire route
Touch to select the desired route
from 3 possible routes. (See page
83.)
Touch to change the route. (See
page 93.)
Guidance can be paused or resumed.
(See “SUSPENDING AND RESUM-
ING GUIDANCE” on page 92.)
If “Start” is touched until a beep
sounds, demo mode will start. Press
the button to end demo mode.
CAUTION
Be sure to obey traffic regulations and
keep road conditions in mind while
driving. If a traffic sign on the road
has been changed, the route guidance
may not indicate such changed infor-
mation.
Page 107 of 407
105
3. MEMORY POINTS
3
NAVIGATION SYSTEM
ISF_IS_ISC_Navi_EE
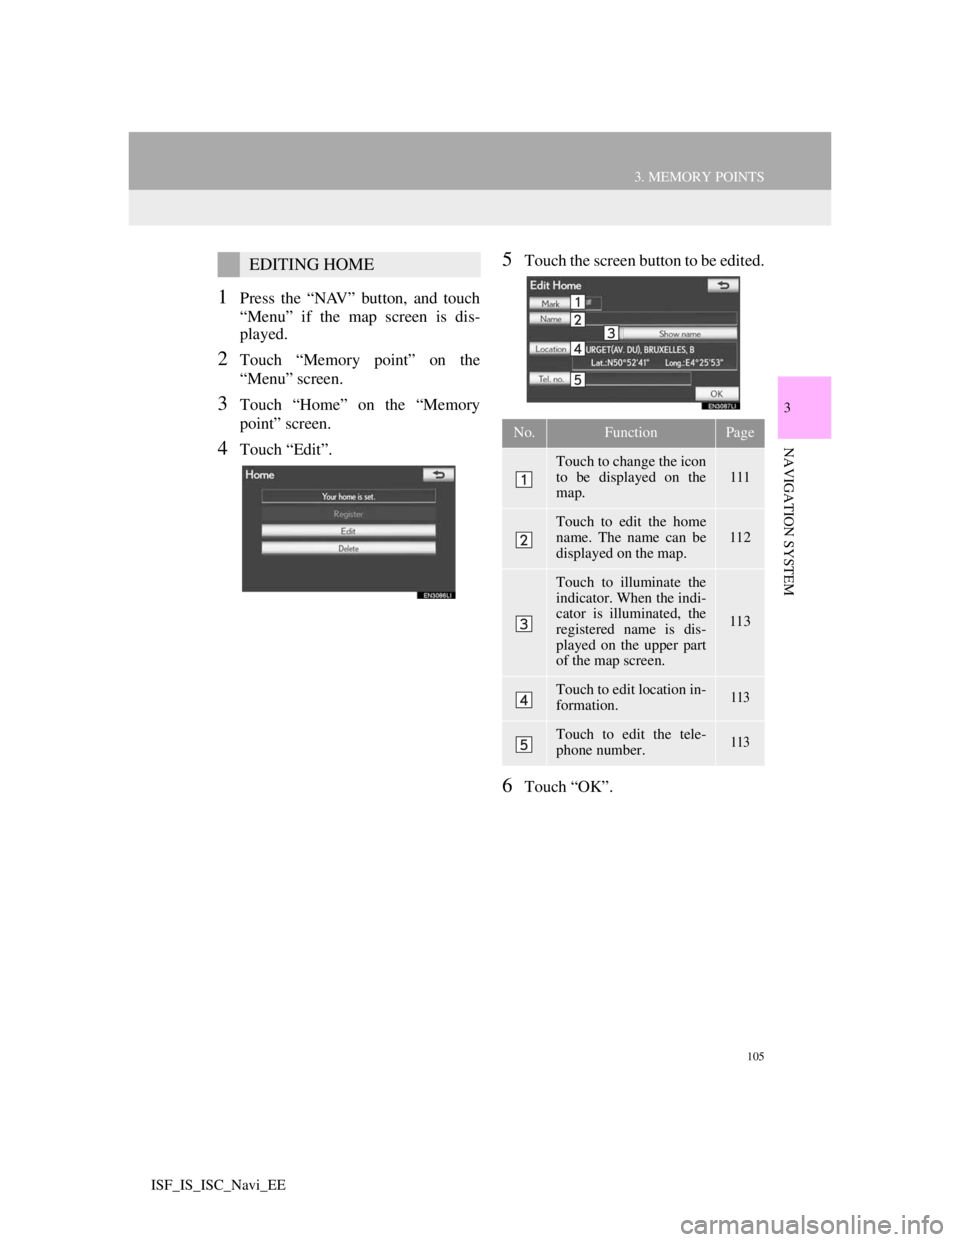
1Press the “NAV” button, and touch
“Menu” if the map screen is dis-
played.
2Touch “Memory point” on the
“Menu” screen.
3Touch “Home” on the “Memory
point” screen.
4Touch “Edit”.
5Touch the screen button to be edited.
6Touch “OK”.
EDITING HOME
No.FunctionPage
Touch to change the icon
to be displayed on the
map.111
Touch to edit the home
name. The name can be
displayed on the map.
112
Touch to illuminate the
indicator. When the indi-
cator is illuminated, the
registered name is dis-
played on the upper part
of the map screen.
113
Touch to edit location in-
formation.113
Touch to edit the tele-
phone number.113
Page 110 of 407
108
3. MEMORY POINTS
ISF_IS_ISC_Navi_EE
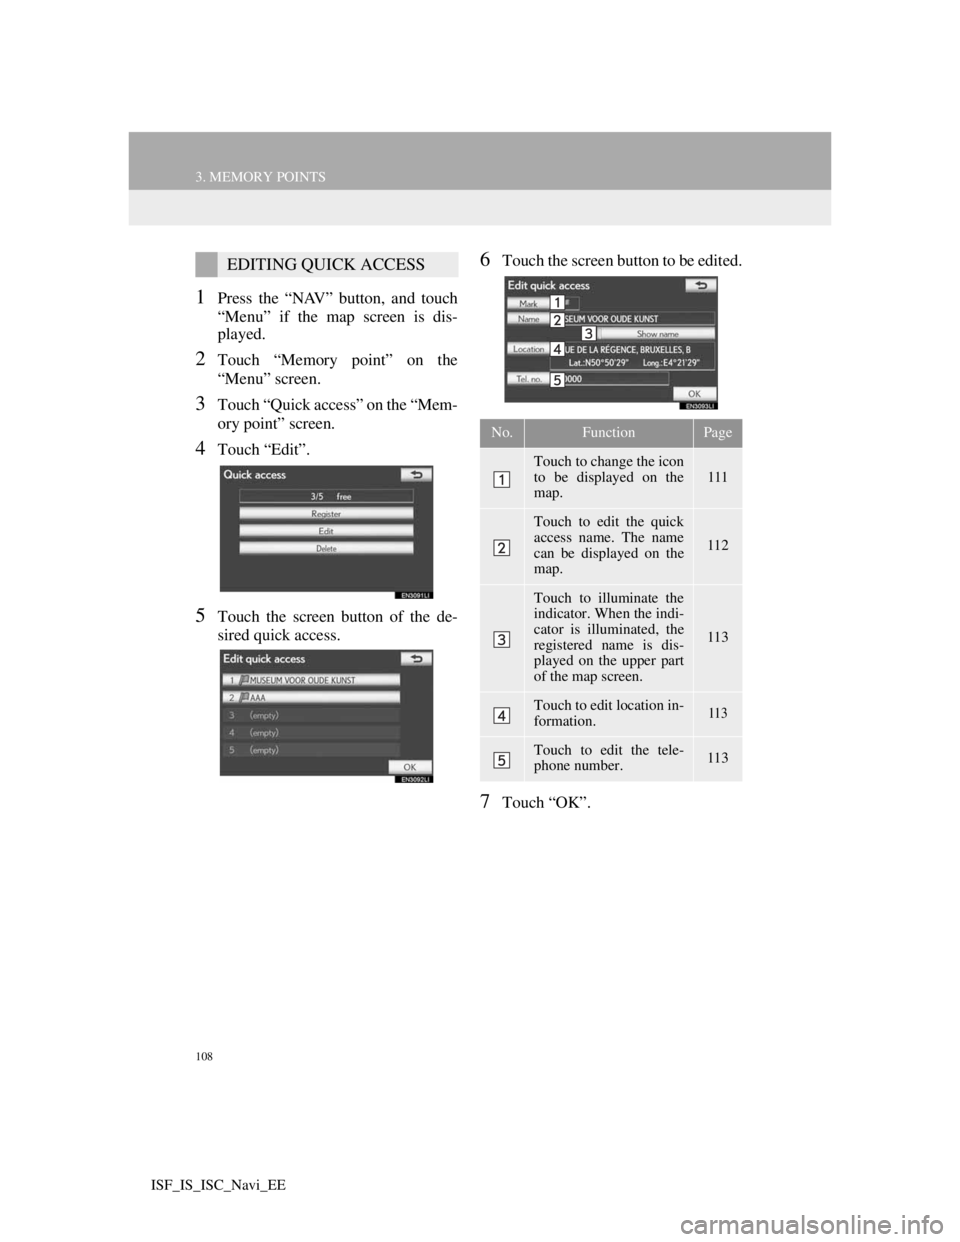
1Press the “NAV” button, and touch
“Menu” if the map screen is dis-
played.
2Touch “Memory point” on the
“Menu” screen.
3Touch “Quick access” on the “Mem-
ory point” screen.
4Touch “Edit”.
5Touch the screen button of the de-
sired quick access.
6Touch the screen button to be edited.
7Touch “OK”.
EDITING QUICK ACCESS
No.FunctionPage
Touch to change the icon
to be displayed on the
map.111
Touch to edit the quick
access name. The name
can be displayed on the
map.
112
Touch to illuminate the
indicator. When the indi-
cator is illuminated, the
registered name is dis-
played on the upper part
of the map screen.
113
Touch to edit location in-
formation.113
Touch to edit the tele-
phone number.113
Page 112 of 407
110
3. MEMORY POINTS
ISF_IS_ISC_Navi_EE
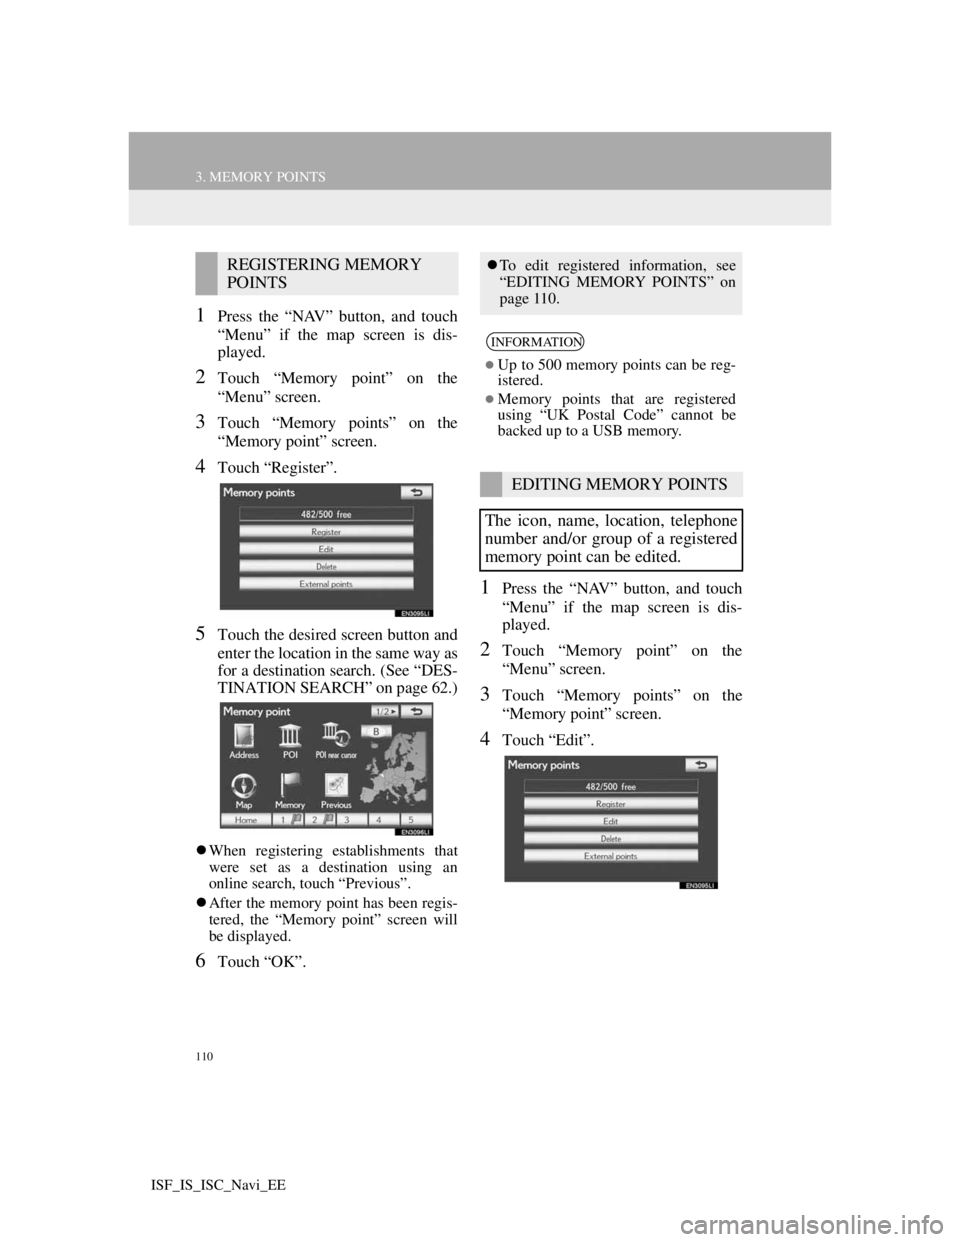
1Press the “NAV” button, and touch
“Menu” if the map screen is dis-
played.
2Touch “Memory point” on the
“Menu” screen.
3Touch “Memory points” on the
“Memory point” screen.
4Touch “Register”.
5Touch the desired screen button and
enter the location in the same way as
for a destination search. (See “DES-
TINATION SEARCH” on page 62.)
When registering establishments that
were set as a destination using an
online search, touch “Previous”.
After the memory point has been regis-
tered, the “Memory point” screen will
be displayed.
6Touch “OK”.
1Press the “NAV” button, and touch
“Menu” if the map screen is dis-
played.
2Touch “Memory point” on the
“Menu” screen.
3Touch “Memory points” on the
“Memory point” screen.
4Touch “Edit”.
REGISTERING MEMORY
POINTSTo edit registered information, see
“EDITING MEMORY POINTS” on
page 110.
INFORMATION
Up to 500 memory points can be reg-
istered.
Memory points that are registered
using “UK Postal Code” cannot be
backed up to a USB memory.
EDITING MEMORY POINTS
The icon, name, location, telephone
number and/or group of a registered
memory point can be edited.
Page 113 of 407
111
3. MEMORY POINTS
3
NAVIGATION SYSTEM
ISF_IS_ISC_Navi_EE
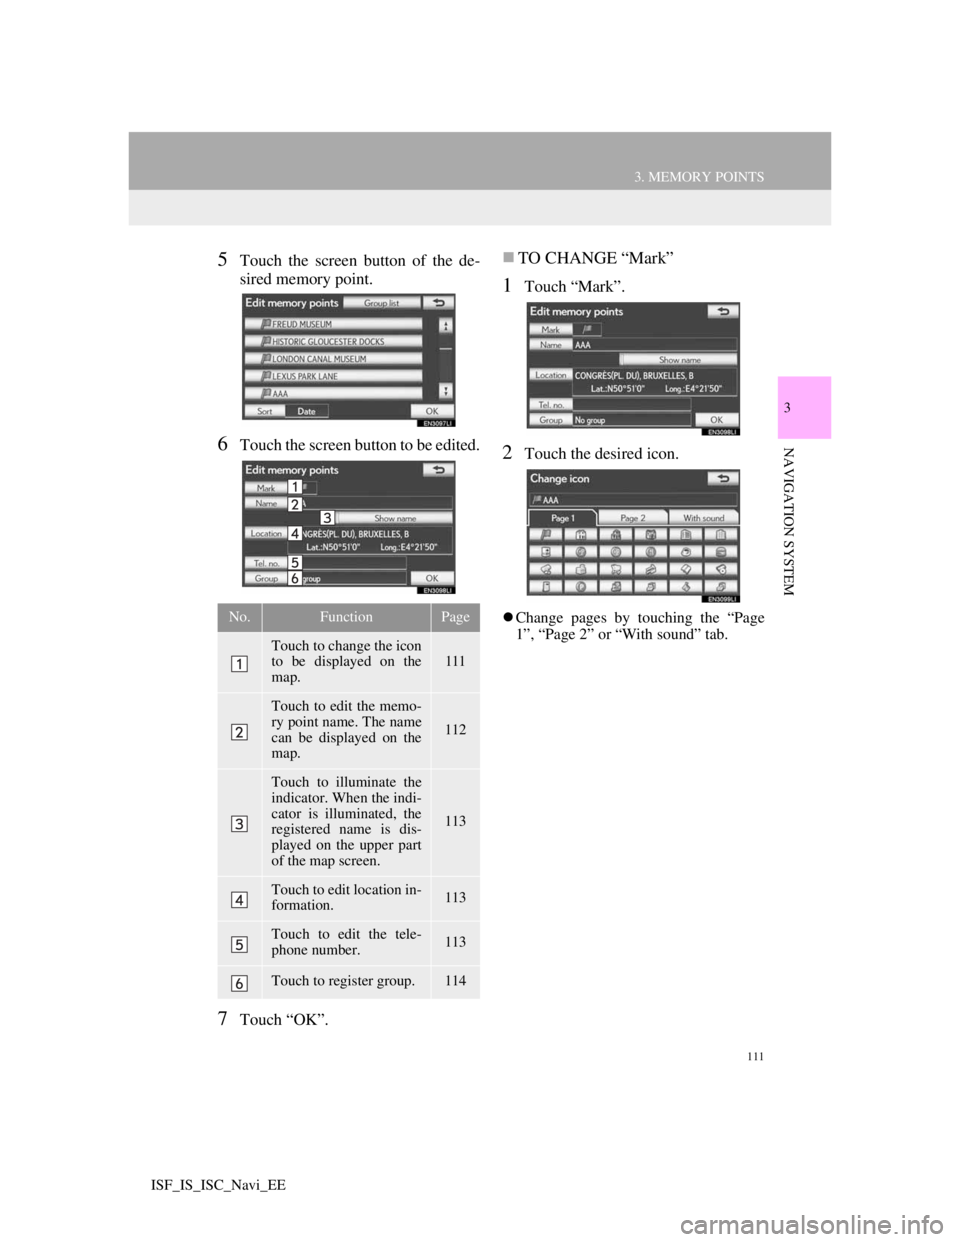
5Touch the screen button of the de-
sired memory point.
6Touch the screen button to be edited.
7Touch “OK”.
TO CHANGE “Mark”
1Touch “Mark”.
2Touch the desired icon.
Change pages by touching the “Page
1”, “Page 2” or “With sound” tab.No.FunctionPage
Touch to change the icon
to be displayed on the
map.111
Touch to edit the memo-
ry point name. The name
can be displayed on the
map.
112
Touch to illuminate the
indicator. When the indi-
cator is illuminated, the
registered name is dis-
played on the upper part
of the map screen.
113
Touch to edit location in-
formation.113
Touch to edit the tele-
phone number.113
Touch to register group.114