ECO mode Lexus IS220d 2012 Navigation manual
[x] Cancel search | Manufacturer: LEXUS, Model Year: 2012, Model line: IS220d, Model: Lexus IS220d 2012Pages: 407, PDF Size: 23.8 MB
Page 28 of 407
28
ISF_IS_ISC_Navi_EE
1. BASIC INFORMATION BEFORE OPERATION
1. INITIAL SCREEN
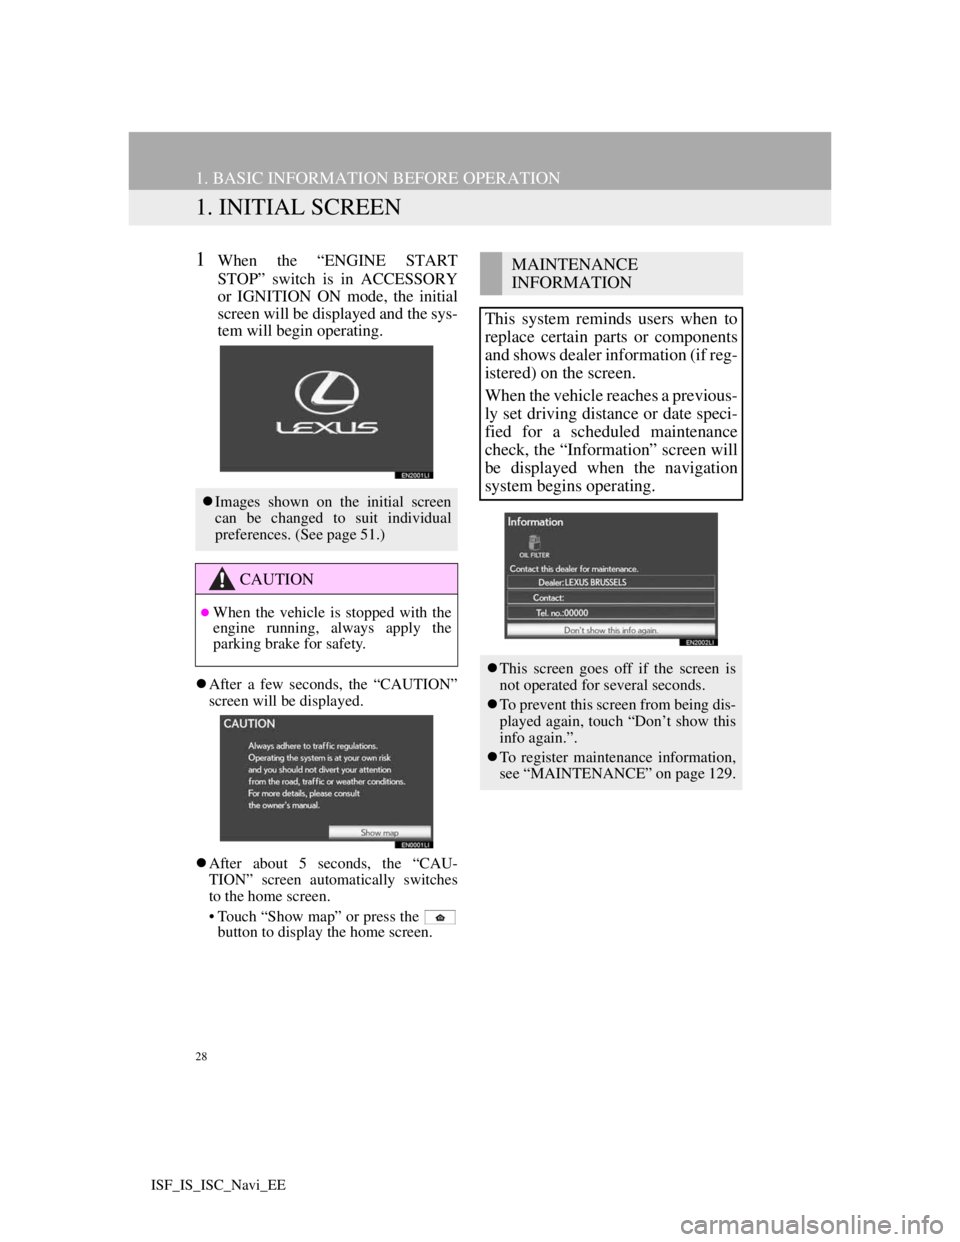
1When the “ENGINE START
STOP” switch is in ACCESSORY
or IGNITION ON mode, the initial
screen will be displayed and the sys-
tem will begin operating.
After a few seconds, the “CAUTION”
screen will be displayed.
After about 5 seconds, the “CAU-
TION” screen automatically switches
to the home screen.
• Touch “Show map” or press the
button to display the home screen.
Images shown on the initial screen
can be changed to suit individual
preferences. (See page 51.)
CAUTION
When the vehicle is stopped with the
engine running, always apply the
parking brake for safety.
MAINTENANCE
INFORMATION
This system reminds users when to
replace certain parts or components
and shows dealer information (if reg-
istered) on the screen.
When the vehicle reaches a previous-
ly set driving distance or date speci-
fied for a scheduled maintenance
check, the “Information” screen will
be displayed when the navigation
system begins operating.
This screen goes off if the screen is
not operated for several seconds.
To prevent this screen from being dis-
played again, touch “Don’t show this
info again.”.
To register maintenance information,
see “MAINTENANCE” on page 129.
Page 83 of 407
81
1. DESTINATION SEARCH
3
NAVIGATION SYSTEM
ISF_IS_ISC_Navi_EE
3. STARTING ROUTE GUIDANCE
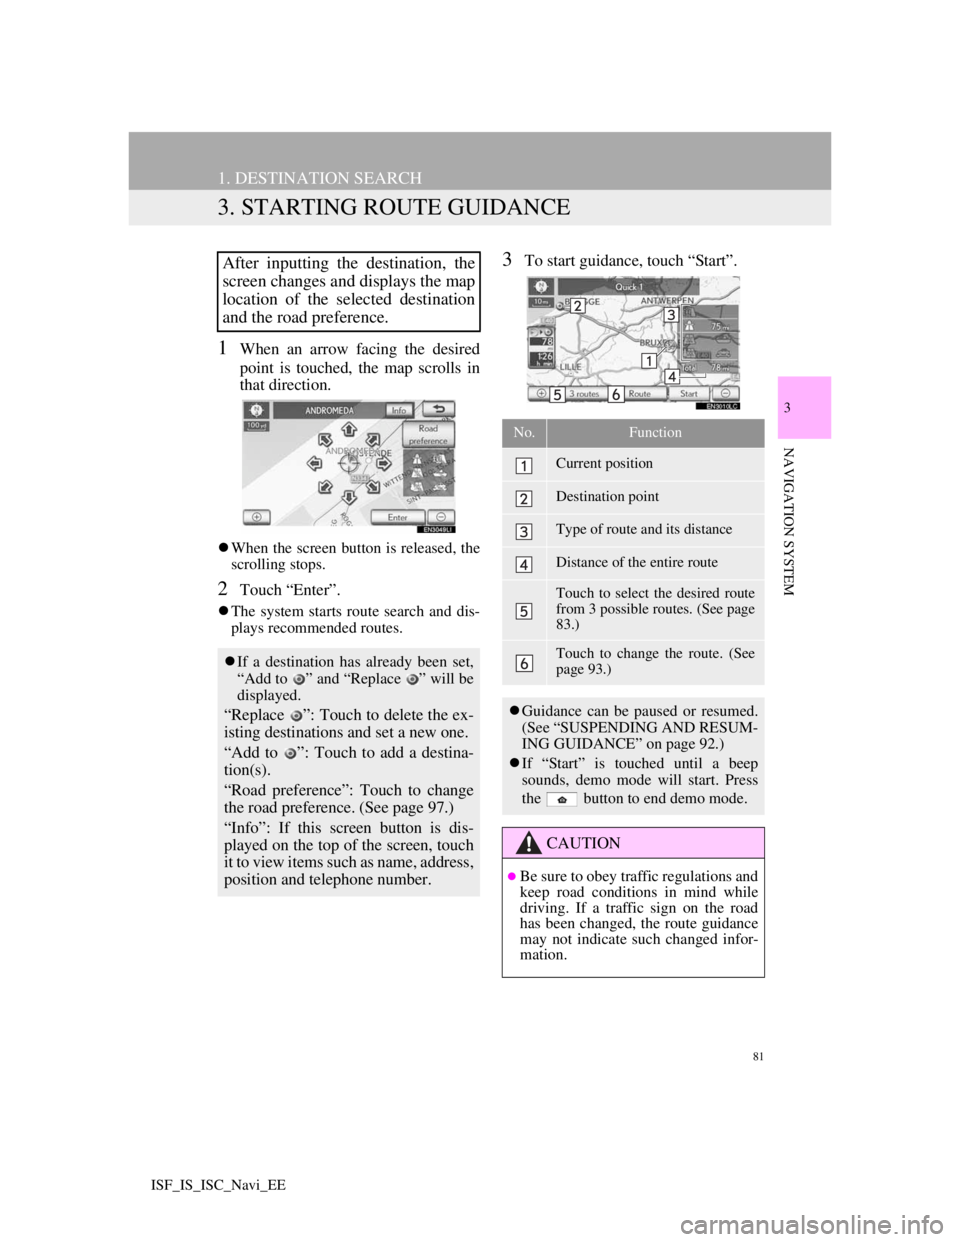
1When an arrow facing the desired
point is touched, the map scrolls in
that direction.
When the screen button is released, the
scrolling stops.
2Touch “Enter”.
The system starts route search and dis-
plays recommended routes.
3To start guidance, touch “Start”.After inputting the destination, the
screen changes and displays the map
location of the selected destination
and the road preference.
If a destination has already been set,
“Add to ” and “Replace ” will be
displayed.
“Replace ”: Touch to delete the ex-
isting destinations and set a new one.
“Add to ”: Touch to add a destina-
tion(s).
“Road preference”: Touch to change
the road preference. (See page 97.)
“Info”: If this screen button is dis-
played on the top of the screen, touch
it to view items such as name, address,
position and telephone number.
No.Function
Current position
Destination point
Type of route and its distance
Distance of the entire route
Touch to select the desired route
from 3 possible routes. (See page
83.)
Touch to change the route. (See
page 93.)
Guidance can be paused or resumed.
(See “SUSPENDING AND RESUM-
ING GUIDANCE” on page 92.)
If “Start” is touched until a beep
sounds, demo mode will start. Press
the button to end demo mode.
CAUTION
Be sure to obey traffic regulations and
keep road conditions in mind while
driving. If a traffic sign on the road
has been changed, the route guidance
may not indicate such changed infor-
mation.
Page 156 of 407
151
1. TELEPHONE OPERATION
4
TELEPHONE
ISF_IS_ISC_Navi_EE
If a Bluetooth® phone is disconnected
on purpose, such as turning it off, this
does not happen. Reconnect the
Bluetooth
® phone manually.
RECONNECTING THE
Bluetooth® PHONE
If a Bluetooth® phone is
disconnected due to poor reception
from the Bluetooth
® network when
the “ENGINE START STOP”
switch is in ACCESSORY or
IGNITION ON mode, the system
automatically reconnects the
Bluetooth
® phone. When “Display
telephone status” is set to “On”, the
connection status is displayed.
Page 212 of 407
205
1. AUDIO/VIDEO SYSTEM OPERATION
5
AUDIO/VIDEO SYSTEM
ISF_IS_ISC_Navi_EE
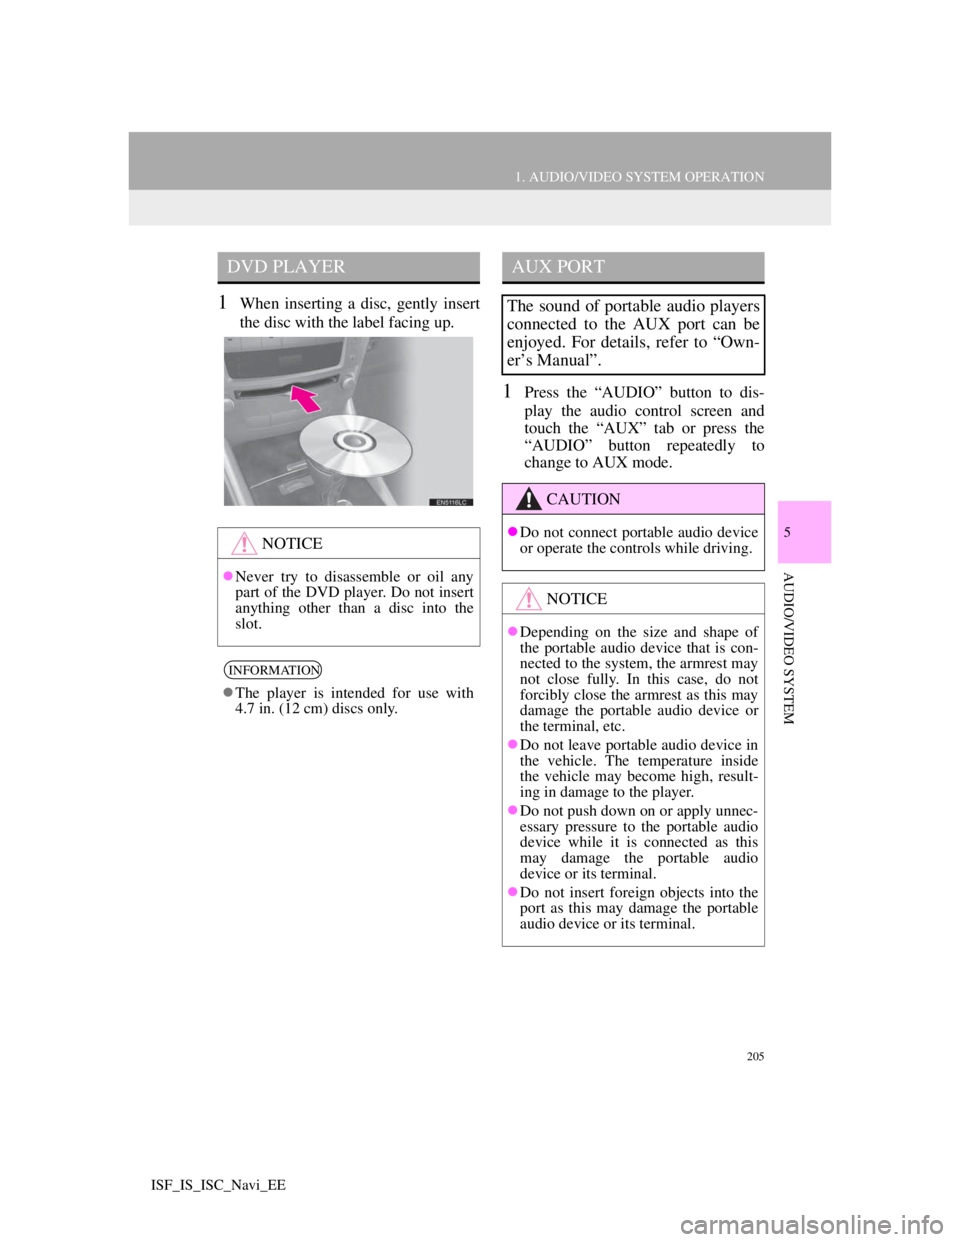
1When inserting a disc, gently insert
the disc with the label facing up.
1Press the “AUDIO” button to dis-
play the audio control screen and
touch the “AUX” tab or press the
“AUDIO” button repeatedly to
change to AUX mode.
DVD PLAYER
NOTICE
Never try to disassemble or oil any
part of the DVD player. Do not insert
anything other than a disc into the
slot.
INFORMATION
The player is intended for use with
4.7 in. (12 cm) discs only.
AUX PORT
The sound of portable audio players
connected to the AUX port can be
enjoyed. For details, refer to “Own-
er’s Manual”.
CAUTION
Do not connect portable audio device
or operate the controls while driving.
NOTICE
Depending on the size and shape of
the portable audio device that is con-
nected to the system, the armrest may
not close fully. In this case, do not
forcibly close the armrest as this may
damage the portable audio device or
the terminal, etc.
Do not leave portable audio device in
the vehicle. The temperature inside
the vehicle may become high, result-
ing in damage to the player.
Do not push down on or apply unnec-
essary pressure to the portable audio
device while it is connected as this
may damage the portable audio
device or its terminal.
Do not insert foreign objects into the
port as this may damage the portable
audio device or its terminal.
Page 214 of 407
207
1. AUDIO/VIDEO SYSTEM OPERATION
5
AUDIO/VIDEO SYSTEM
ISF_IS_ISC_Navi_EE
3. RADIO OPERATION
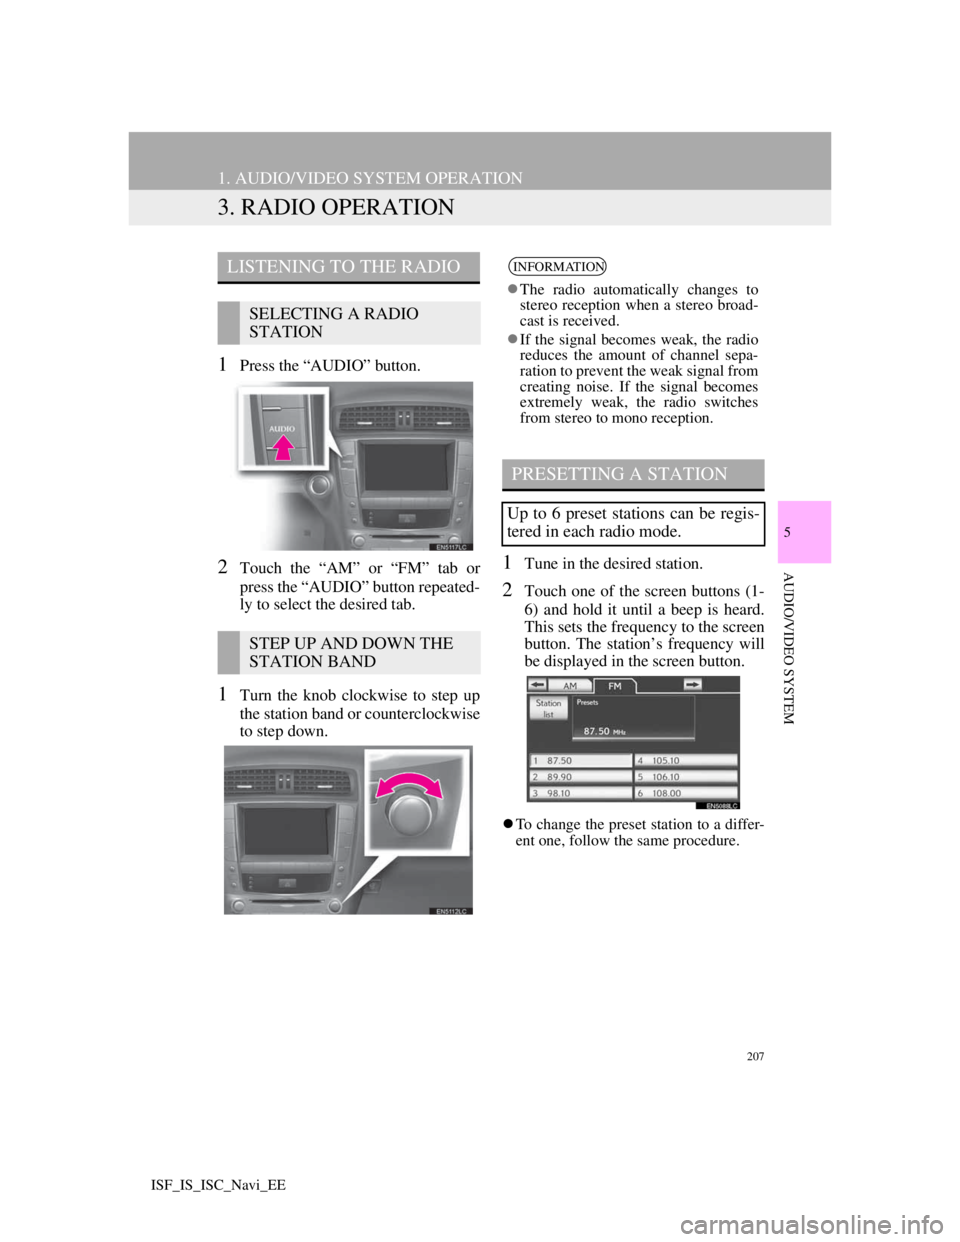
1Press the “AUDIO” button.
2Touch the “AM” or “FM” tab or
press the “AUDIO” button repeated-
ly to select the desired tab.
1Turn the knob clockwise to step up
the station band or counterclockwise
to step down.
1Tune in the desired station.
2Touch one of the screen buttons (1-
6) and hold it until a beep is heard.
This sets the frequency to the screen
button. The station’s frequency will
be displayed in the screen button.
To change the preset station to a differ-
ent one, follow the same procedure.
LISTENING TO THE RADIO
SELECTING A RADIO
STATION
STEP UP AND DOWN THE
STATION BAND
INFORMATION
The radio automatically changes to
stereo reception when a stereo broad-
cast is received.
If the signal becomes weak, the radio
reduces the amount of channel sepa-
ration to prevent the weak signal from
creating noise. If the signal becomes
extremely weak, the radio switches
from stereo to mono reception.
PRESETTING A STATION
Up to 6 preset stations can be regis-
tered in each radio mode.
Page 224 of 407
217
1. AUDIO/VIDEO SYSTEM OPERATION
5
AUDIO/VIDEO SYSTEM
ISF_IS_ISC_Navi_EE
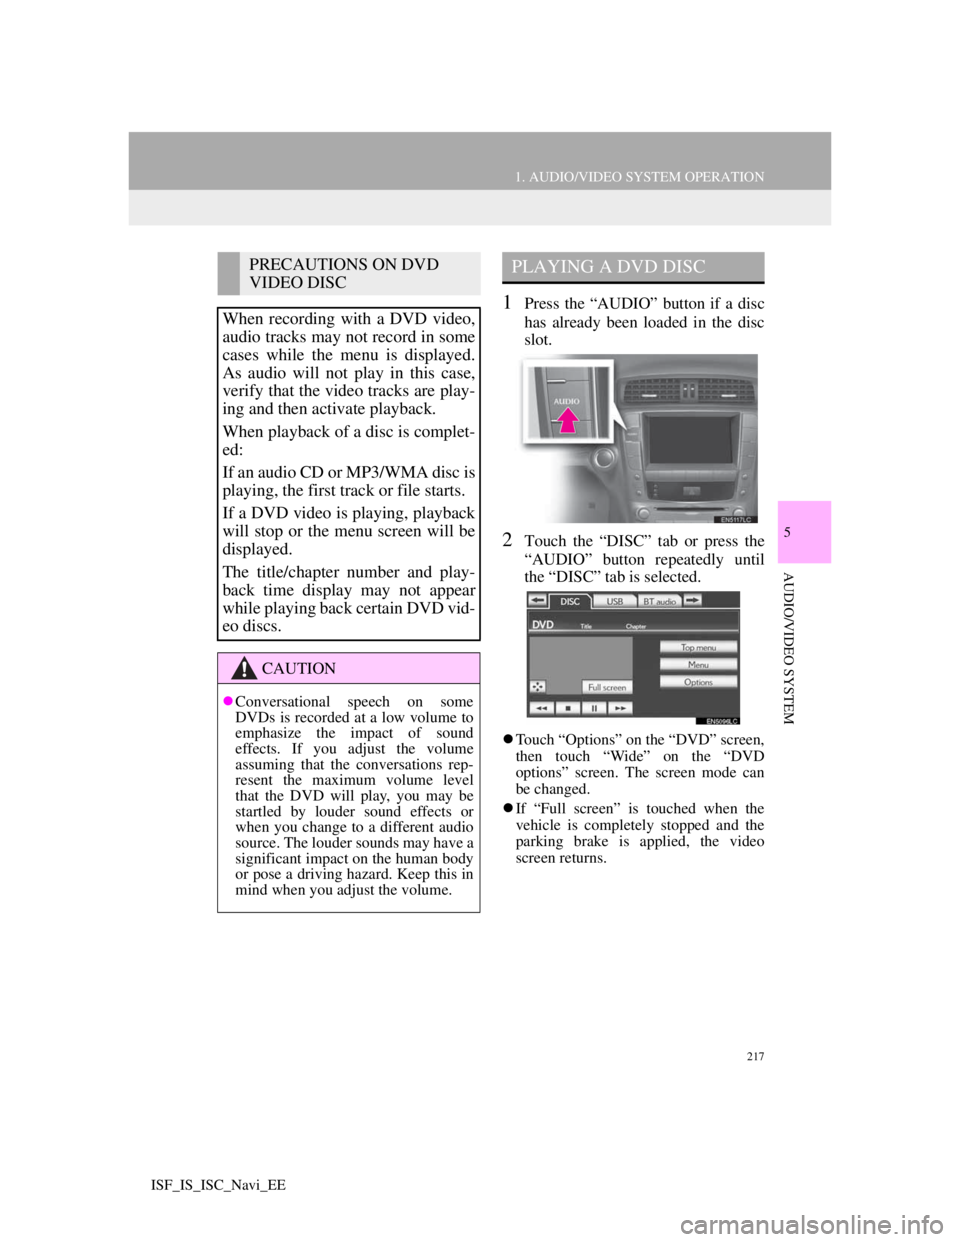
1Press the “AUDIO” button if a disc
has already been loaded in the disc
slot.
2Touch the “DISC” tab or press the
“AUDIO” button repeatedly until
the “DISC” tab is selected.
Touch “Options” on the “DVD” screen,
then touch “Wide” on the “DVD
options” screen. The screen mode can
be changed.
If “Full screen” is touched when the
vehicle is completely stopped and the
parking brake is applied, the video
screen returns.
PRECAUTIONS ON DVD
VIDEO DISC
When recording with a DVD video,
audio tracks may not record in some
cases while the menu is displayed.
As audio will not play in this case,
verify that the video tracks are play-
ing and then activate playback.
When playback of a disc is complet-
ed:
If an audio CD or MP3/WMA disc is
playing, the first track or file starts.
If a DVD video is playing, playback
will stop or the menu screen will be
displayed.
The title/chapter number and play-
back time display may not appear
while playing back certain DVD vid-
eo discs.
CAUTION
Conversational speech on some
DVDs is recorded at a low volume to
emphasize the impact of sound
effects. If you adjust the volume
assuming that the conversations rep-
resent the maximum volume level
that the DVD will play, you may be
startled by louder sound effects or
when you change to a different audio
source. The louder sounds may have a
significant impact on the human body
or pose a driving hazard. Keep this in
mind when you adjust the volume.
PLAYING A DVD DISC
Page 253 of 407
246
1. AUDIO/VIDEO SYSTEM OPERATION
ISF_IS_ISC_Navi_EE
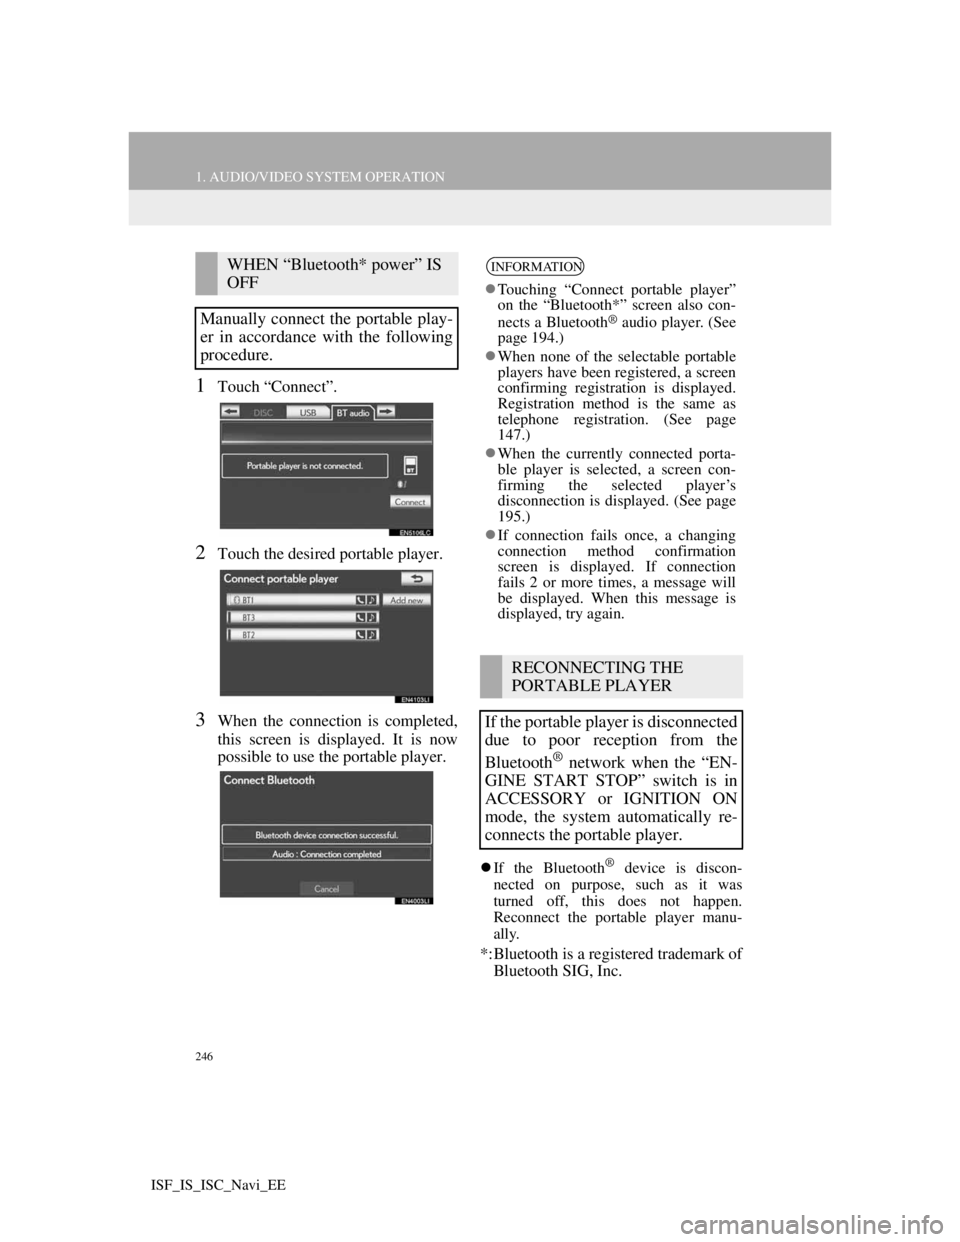
1Touch “Connect”.
2Touch the desired portable player.
3When the connection is completed,
this screen is displayed. It is now
possible to use the portable player.
If the Bluetooth® device is discon-
nected on purpose, such as it was
turned off, this does not happen.
Reconnect the portable player manu-
ally.
*:Bluetooth is a registered trademark of
Bluetooth SIG, Inc.
WHEN “Bluetooth* power” IS
OFF
Manually connect the portable play-
er in accordance with the following
procedure.INFORMATION
Touching “Connect portable player”
on the “Bluetooth*” screen also con-
nects a Bluetooth
® audio player. (See
page 194.)
When none of the selectable portable
players have been registered, a screen
confirming registration is displayed.
Registration method is the same as
telephone registration. (See page
147.)
When the currently connected porta-
ble player is selected, a screen con-
firming the selected player’s
disconnection is displayed. (See page
195.)
If connection fails once, a changing
connection method confirmation
screen is displayed. If connection
fails 2 or more times, a message will
be displayed. When this message is
displayed, try again.
RECONNECTING THE
PORTABLE PLAYER
If the portable player is disconnected
due to poor reception from the
Bluetooth
® network when the “EN-
GINE START STOP” switch is in
ACCESSORY or IGNITION ON
mode, the system automatically re-
connects the portable player.
Page 270 of 407

263
2. SETUP
5
AUDIO/VIDEO SYSTEM
ISF_IS_ISC_Navi_EE
TONE
BALANCE
1Touch the “Sound” tab to display
this screen.
2Touch the desired screen button.
3Touch “OK”.
TONE AND BALANCE
How good an audio program sounds
is largely determined by the mix of
the treble, mid and bass levels. In
fact, different kinds of music and vo-
cal programs usually sound better
with different mixes of treble, mid
and bass.
A good balance of the left and right
stereo channels and of the front and
rear sound levels is also important.
Keep in mind that when listening to
a stereo recording or broadcast,
changing the right/left balance will
increase the volume of 1 group of
sounds while decreasing the volume
of another.
Screen buttonFunction
“Treble”
“+” or “-”Touch to adjust high-
pitched tones.
“Mid” “+” or
“-”Touch to adjust mid-
pitched tones.
“Bass” “+” or
“-”Touch to adjust low-
pitched tones.
“Front” or
“Rear”
Touch to adjust sound
balance between the
front and rear speak-
ers.
“L” or “R”
Touch to adjust the
sound balance be-
tween the left and
right speakers.
INFORMATION
The tone of each mode (such as AM,
FM and DVD player) can be adjusted.
Page 277 of 407

270
1. AIR CONDITIONING SYSTEM OPERATION
ISF_IS_ISC_Navi_EE
2. SOME BASICS
1Press the Climate button to display
the air conditioning control screen.
CLIMATE CONTROL
Air outlets and fan speed are auto-
matically adjusted according to the
temperature setting.
The “ENGINE START STOP”
switch must be in IGNITION ON
mode.
A function that enables automatic
return to the previous screen from the
air conditioning control screen can be
selected. See page 47 for details.
NOTICE
To prevent the battery from being dis-
charged, do not leave the air condi-
tioning system on longer than
necessary when the engine is not run-
ning.
INFORMATION
During use, various odors from inside
and outside the vehicle may enter into
and accumulate in the air condition-
ing system. This may then cause odor
to be emitted from the vents.
To reduce potential odors from occur-
ring:
• It is recommended that the air condi-
tioning system be set to outside air
mode prior to turning the vehicle
off.
• The start timing of the blower may
be delayed for a short period of time
immediately after the air condition-
ing system is started in automatic
operation mode.
Page 284 of 407

277
1. AIR CONDITIONING SYSTEM OPERATION
6
AIR CONDITIONING
ISF_IS_ISC_Navi_EE
1Press the pollen removal mode but-
ton.
Usually the system will turn off auto-
matically after 1 or 3 minutes.
To stop the operation, press the pollen
removal mode button again.
CAUTION
When the outside rear view mirror
defoggers are on, do not touch the
outside surface of the rear view mir-
ror as it can become very hot and burn
you.
NOTICE
When cleaning the inside of the rear
window, be careful not to scratch or
damage the heater wires or connec-
tors.
To prevent the battery from being dis-
charged, turn the switch off when the
engine is not running.
INFORMATION
The defoggers will automatically turn
off after 15 to 60 minutes. The opera-
tion time changes according to the
ambient temperature and vehicle
speed.
If further defrosting or defogging is
desired, simply actuate the switch
again. When the surface has cleared,
press the button once again to turn the
defogger off. Continuous use may
cause the battery to discharge, espe-
cially during stop-and-go driving.
The defogger is not designed to dry
rain water or to melt snow.
If the outside rear view mirrors are
heavily coated with ice, use a spray
de-icer before operating the system.
When the retractable hardtop is open,
the rear window defogger is not oper-
able. The indicator will come on if the
outside rear view mirror defoggers
are used. (IS250C)
POLLEN REMOVAL MODE
Outside air mode switches to recircu-
lated air mode. Pollen is removed
from the air flows to the upper part of
the body.
INFORMATION
In order to prevent the window from
fogging up when the outside air is
cold, the following may occur:
• Outside air mode does not switch to
recirculated air mode.
• The air conditioning system oper-
ates automatically.
• The operation cancels after 1 min-
ute.
In rainy weather, the windows may
fog up. Press the windshield air flow
button.