reset Lexus IS220d 2012 Navigation manual
[x] Cancel search | Manufacturer: LEXUS, Model Year: 2012, Model line: IS220d, Model: Lexus IS220d 2012Pages: 407, PDF Size: 23.8 MB
Page 58 of 407
56
2. SETUP
ISF_IS_ISC_Navi_EE
2. VOICE SETTINGS
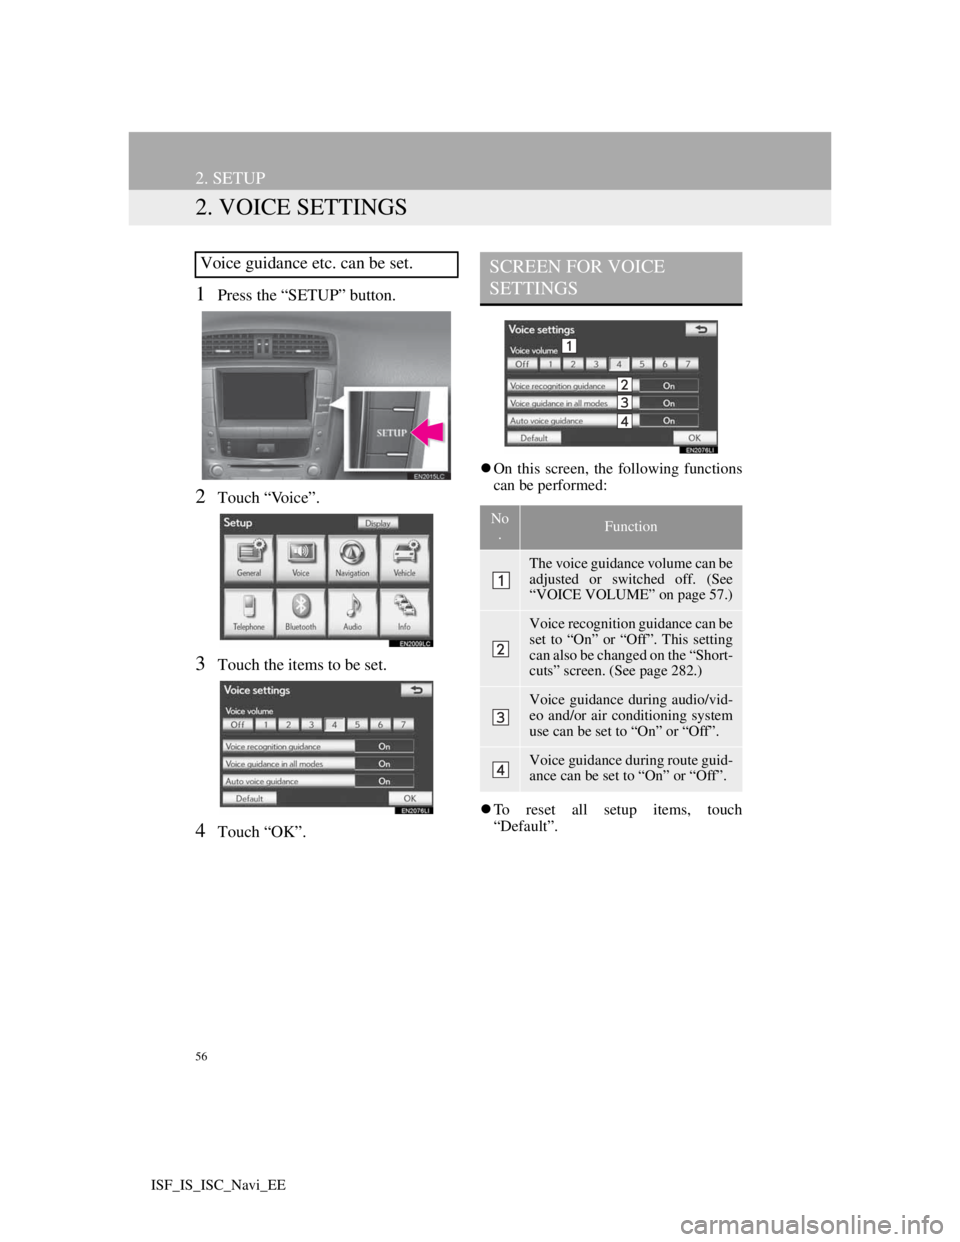
1Press the “SETUP” button.
2Touch “Voice”.
3Touch the items to be set.
4Touch “OK”.
On this screen, the following functions
can be performed:
To reset all setup items, touch
“Default”.
Voice guidance etc. can be set.SCREEN FOR VOICE
SETTINGS
No
.Function
The voice guidance volume can be
adjusted or switched off. (See
“VOICE VOLUME” on page 57.)
Voice recognition guidance can be
set to “On” or “Off”. This setting
can also be changed on the “Short-
cuts” screen. (See page 282.)
Voice guidance during audio/vid-
eo and/or air conditioning system
use can be set to “On” or “Off”.
Voice guidance during route guid-
ance can be set to “On” or “Off”.
Page 128 of 407
125
4. SETUP
3
NAVIGATION SYSTEM
ISF_IS_ISC_Navi_EE
To reset all setup items, touch
“Default”.
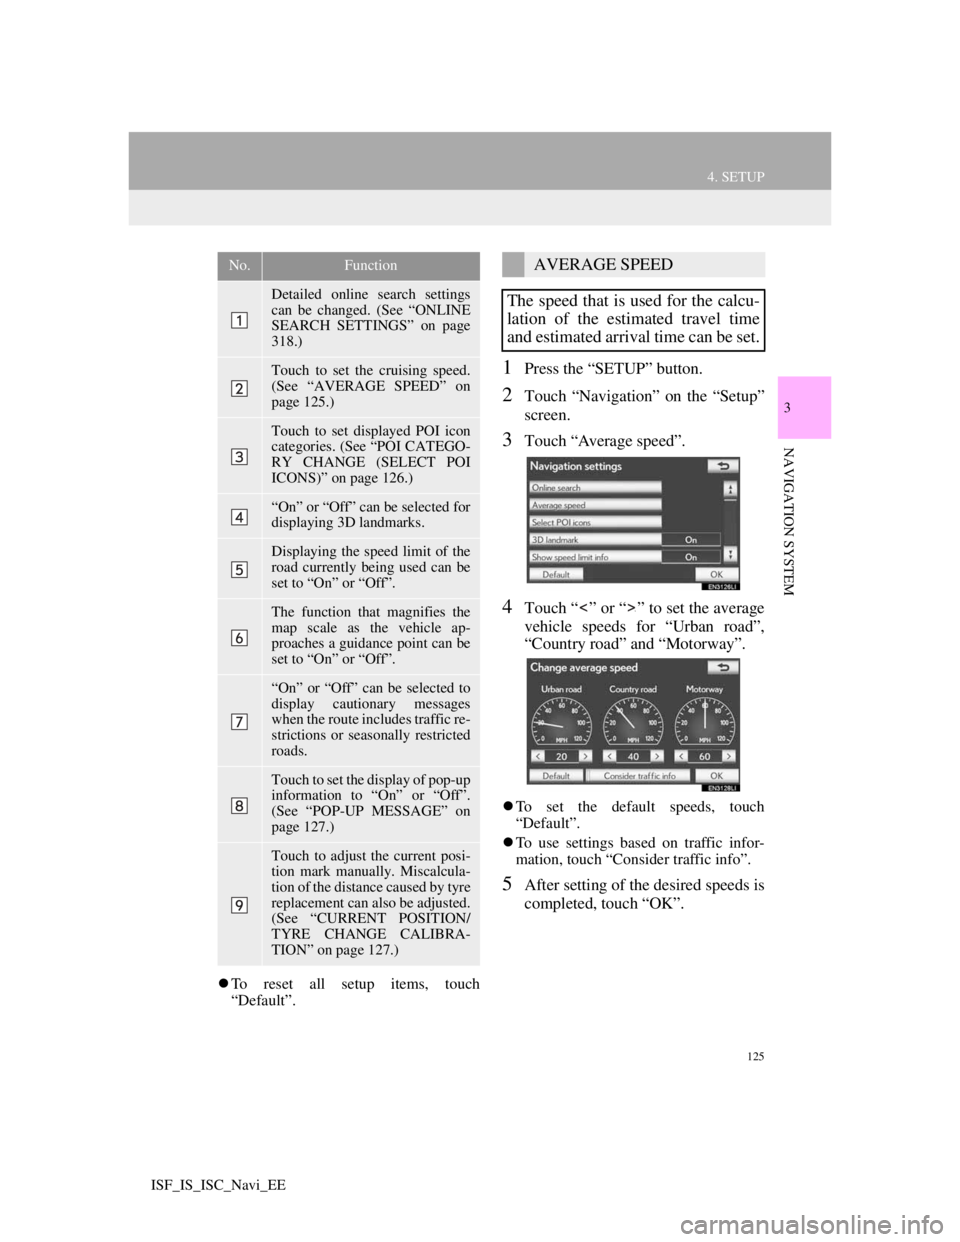
1Press the “SETUP” button.
2Touch “Navigation” on the “Setup”
screen.
3Touch “Average speed”.
4Touch “ ” or “ ” to set the average
vehicle speeds for “Urban road”,
“Country road” and “Motorway”.
To set the default speeds, touch
“Default”.
To use settings based on traffic infor-
mation, touch “Consider traffic info”.
5After setting of the desired speeds is
completed, touch “OK”.
No.Function
Detailed online search settings
can be changed. (See “ONLINE
SEARCH SETTINGS” on page
318.)
Touch to set the cruising speed.
(See “AVERAGE SPEED” on
page 125.)
Touch to set displayed POI icon
categories. (See “POI CATEGO-
RY CHANGE (SELECT POI
ICONS)” on page 126.)
“On” or “Off” can be selected for
displaying 3D landmarks.
Displaying the speed limit of the
road currently being used can be
set to “On” or “Off”.
The function that magnifies the
map scale as the vehicle ap-
proaches a guidance point can be
set to “On” or “Off”.
“On” or “Off” can be selected to
display cautionary messages
when the route includes traffic re-
strictions or seasonally restricted
roads.
Touch to set the display of pop-up
information to “On” or “Off”.
(See “POP-UP MESSAGE” on
page 127.)
Touch to adjust the current posi-
tion mark manually. Miscalcula-
tion of the distance caused by tyre
replacement can also be adjusted.
(See “CURRENT POSITION/
TYRE CHANGE CALIBRA-
TION” on page 127.)
AVERAGE SPEED
The speed that is used for the calcu-
lation of the estimated travel time
and estimated arrival time can be set.
Page 135 of 407
132
4. SETUP
ISF_IS_ISC_Navi_EE
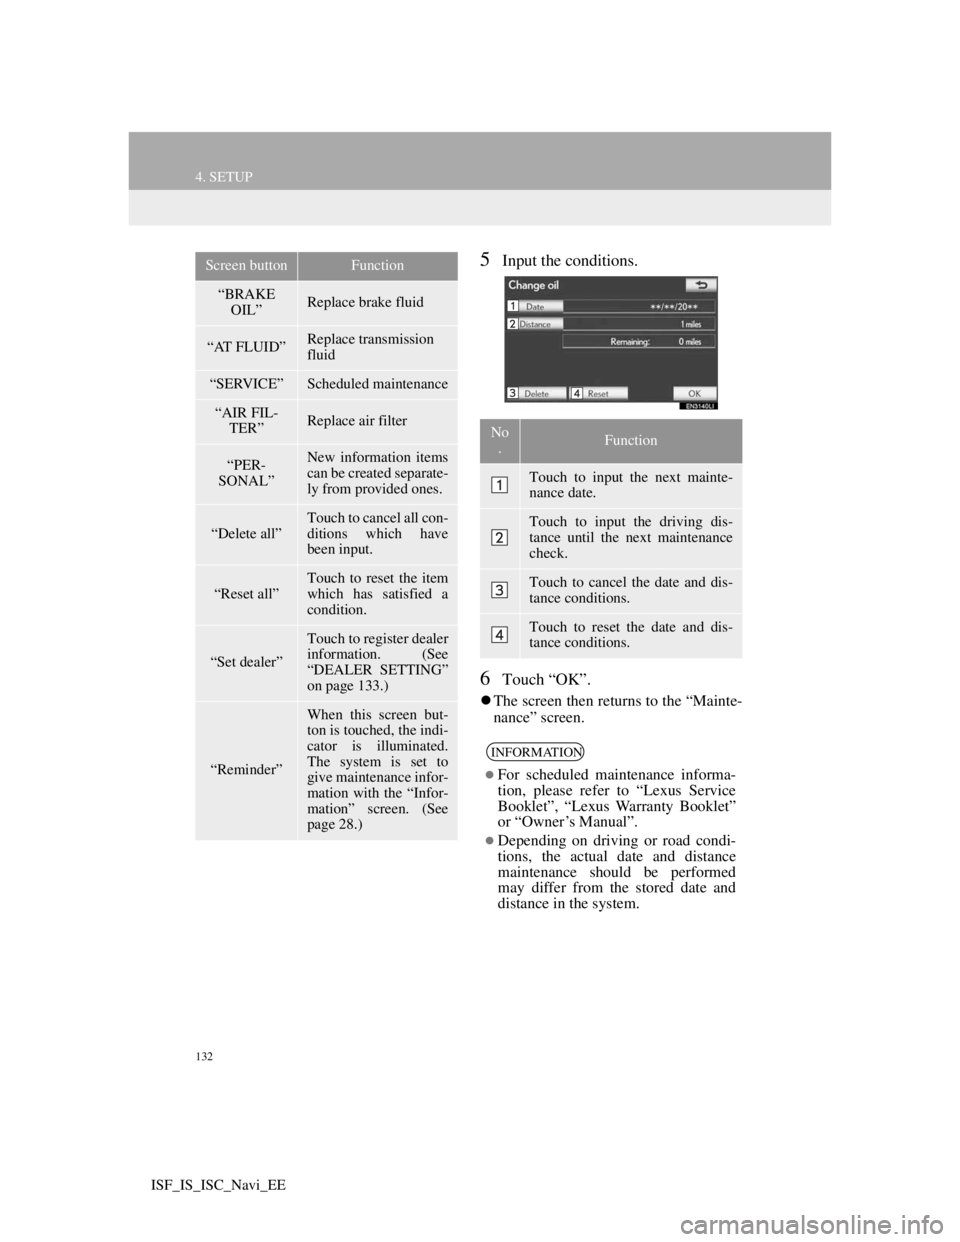
5Input the conditions.
6Touch “OK”.
The screen then returns to the “Mainte-
nance” screen.
“BRAKE
OIL”Replace brake fluid
“AT FLUID”Replace transmission
fluid
“SERVICE”Scheduled maintenance
“AIR FIL-
TER”Replace air filter
“PER-
SONAL”New information items
can be created separate-
ly from provided ones.
“Delete all”
Touch to cancel all con-
ditions which have
been input.
“Reset all”Touch to reset the item
which has satisfied a
condition.
“Set dealer”
Touch to register dealer
information. (See
“DEALER SETTING”
on page 133.)
“Reminder”
When this screen but-
ton is touched, the indi-
cator is illuminated.
The system is set to
give maintenance infor-
mation with the “Infor-
mation” screen. (See
page 28.)
Screen buttonFunction
No
.Function
Touch to input the next mainte-
nance date.
Touch to input the driving dis-
tance until the next maintenance
check.
Touch to cancel the date and dis-
tance conditions.
Touch to reset the date and dis-
tance conditions.
INFORMATION
For scheduled maintenance informa-
tion, please refer to “Lexus Service
Booklet”, “Lexus Warranty Booklet”
or “Owner’s Manual”.
Depending on driving or road condi-
tions, the actual date and distance
maintenance should be performed
may differ from the stored date and
distance in the system.
Page 187 of 407
181
2. SETUP
4
TELEPHONE
ISF_IS_ISC_Navi_EE
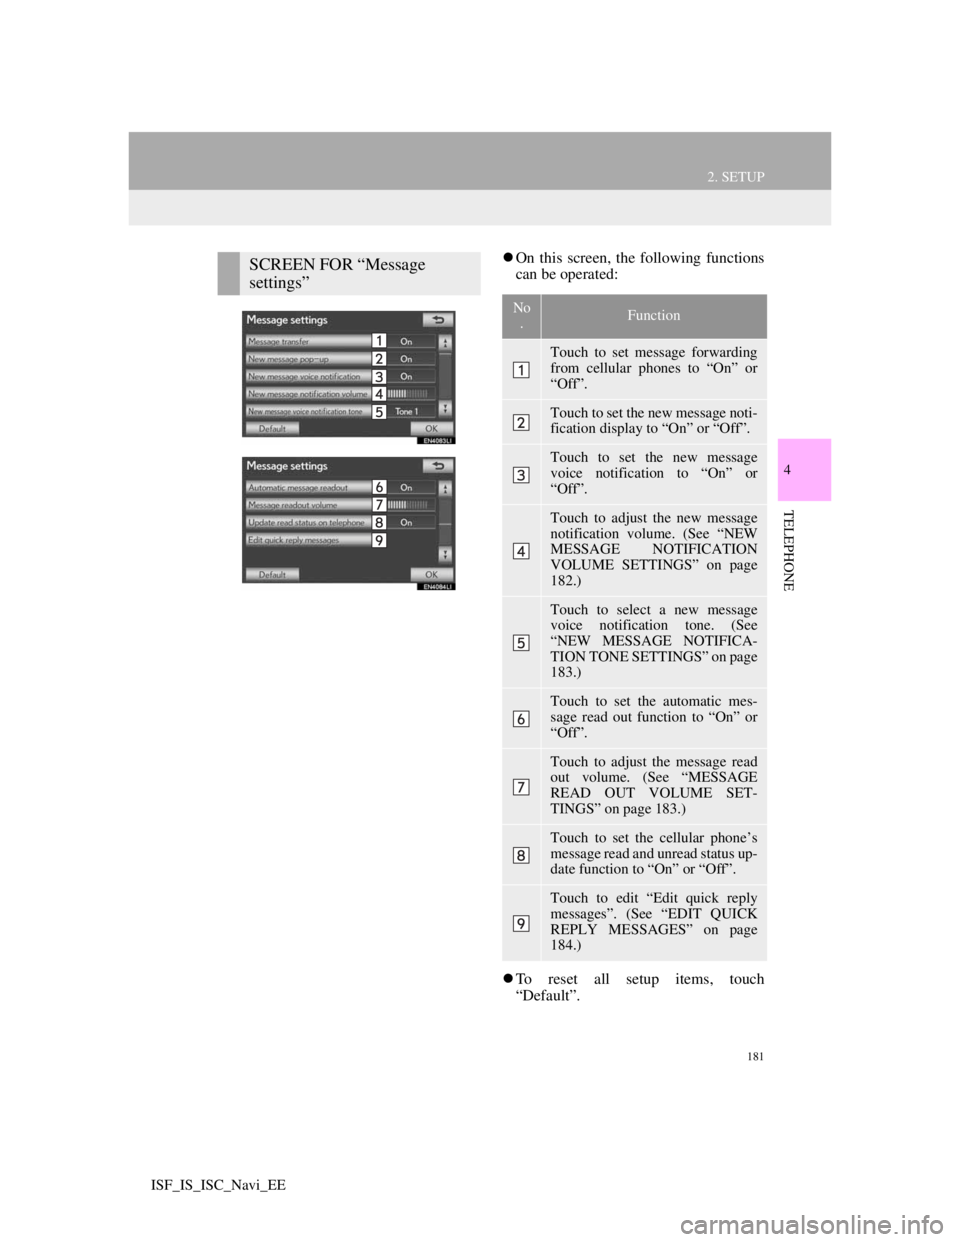
On this screen, the following functions
can be operated:
To reset all setup items, touch
“Default”.SCREEN FOR “Message
settings”
No
.Function
Touch to set message forwarding
from cellular phones to “On” or
“Off”.
Touch to set the new message noti-
fication display to “On” or “Off”.
Touch to set the new message
voice notification to “On” or
“Off”.
Touch to adjust the new message
notification volume. (See “NEW
MESSAGE NOTIFICATION
VOLUME SETTINGS” on page
182.)
Touch to select a new message
voice notification tone. (See
“NEW MESSAGE NOTIFICA-
TION TONE SETTINGS” on page
183.)
Touch to set the automatic mes-
sage read out function to “On” or
“Off”.
Touch to adjust the message read
out volume. (See “MESSAGE
READ OUT VOLUME SET-
TINGS” on page 183.)
Touch to set the cellular phone’s
message read and unread status up-
date function to “On” or “Off”.
Touch to edit “Edit quick reply
messages”. (See “EDIT QUICK
REPLY MESSAGES” on page
184.)
Page 191 of 407
185
2. SETUP
4
TELEPHONE
ISF_IS_ISC_Navi_EE
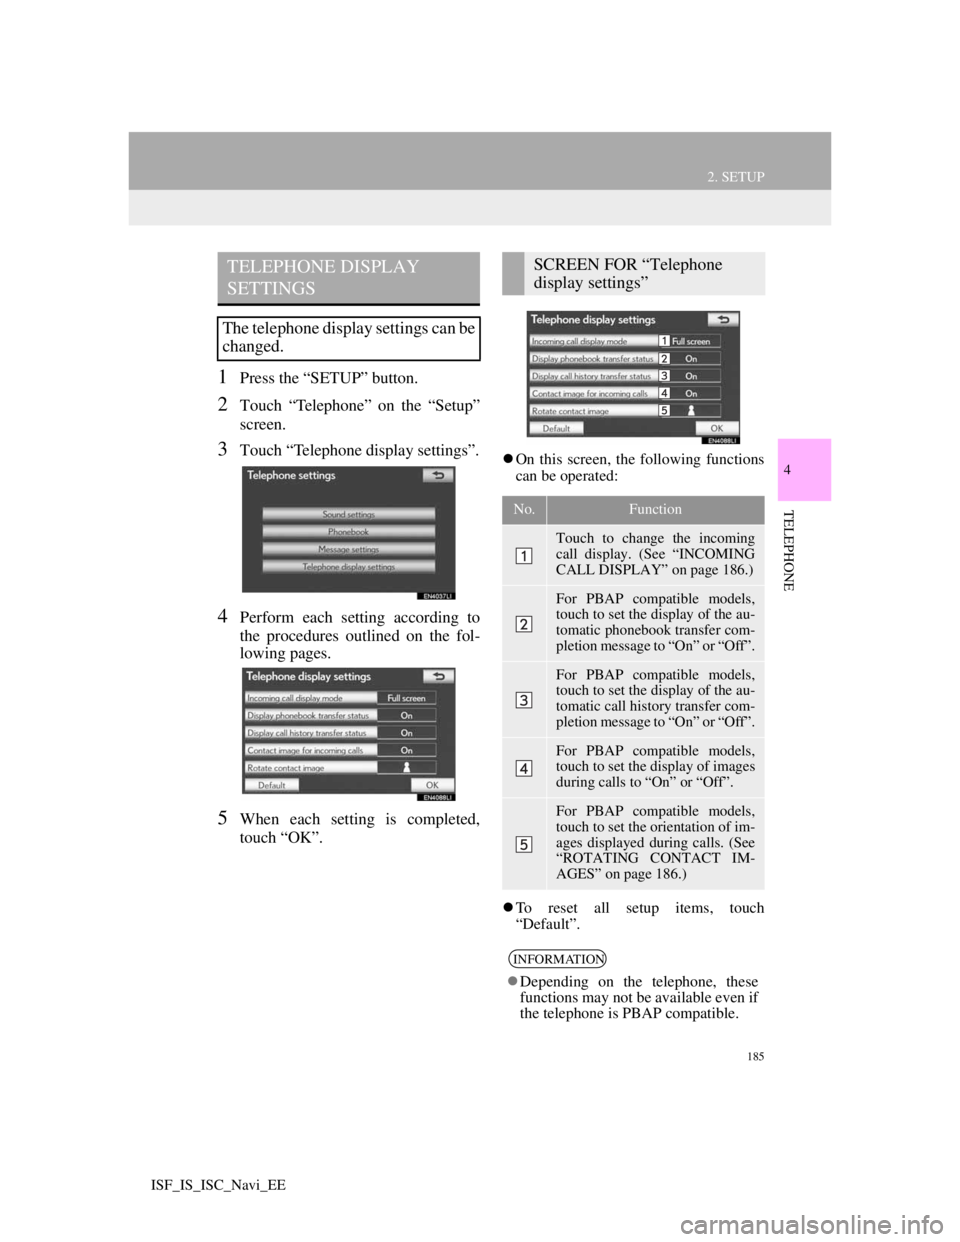
1Press the “SETUP” button.
2Touch “Telephone” on the “Setup”
screen.
3Touch “Telephone display settings”.
4Perform each setting according to
the procedures outlined on the fol-
lowing pages.
5When each setting is completed,
touch “OK”.
On this screen, the following functions
can be operated:
To reset all setup items, touch
“Default”.
TELEPHONE DISPLAY
SETTINGS
The telephone display settings can be
changed.
SCREEN FOR “Telephone
display settings”
No.Function
Touch to change the incoming
call display. (See “INCOMING
CALL DISPLAY” on page 186.)
For PBAP compatible models,
touch to set the display of the au-
tomatic phonebook transfer com-
pletion message to “On” or “Off”.
For PBAP compatible models,
touch to set the display of the au-
tomatic call history transfer com-
pletion message to “On” or “Off”.
For PBAP compatible models,
touch to set the display of images
during calls to “On” or “Off”.
For PBAP compatible models,
touch to set the orientation of im-
ages displayed during calls. (See
“ROTATING CONTACT IM-
AGES” on page 186.)
INFORMATION
Depending on the telephone, these
functions may not be available even if
the telephone is PBAP compatible.
Page 205 of 407
198
ISF_IS_ISC_Navi_EE1. QUICK REFERENCE.................... 200
2. SOME BASICS .............................. 202
SPEECH COMMAND SYSTEM .......... 202
TURNING THE SYSTEM
ON AND OFF...................................... 203
MUTING AND PAUSING
THE SYSTEM ..................................... 203
SWITCHING BETWEEN
FUNCTIONS ....................................... 203
SELECTING SCREEN SIZE................. 204
DVD PLAYER ....................................... 205
AUX PORT ............................................ 205
USB PORT ............................................. 206
3. RADIO OPERATION .................... 207
LISTENING TO THE RADIO .............. 207
PRESETTING A STATION .................. 207
SELECTING A STATION .................... 208
RDS (RADIO DATA SYSTEM) ........... 208
1AUDIO/VIDEO SYSTEM
OPERATION
Page 207 of 407
200
ISF_IS_ISC_Navi_EE
1. AUDIO/VIDEO SYSTEM OPERATION
1. QUICK REFERENCE
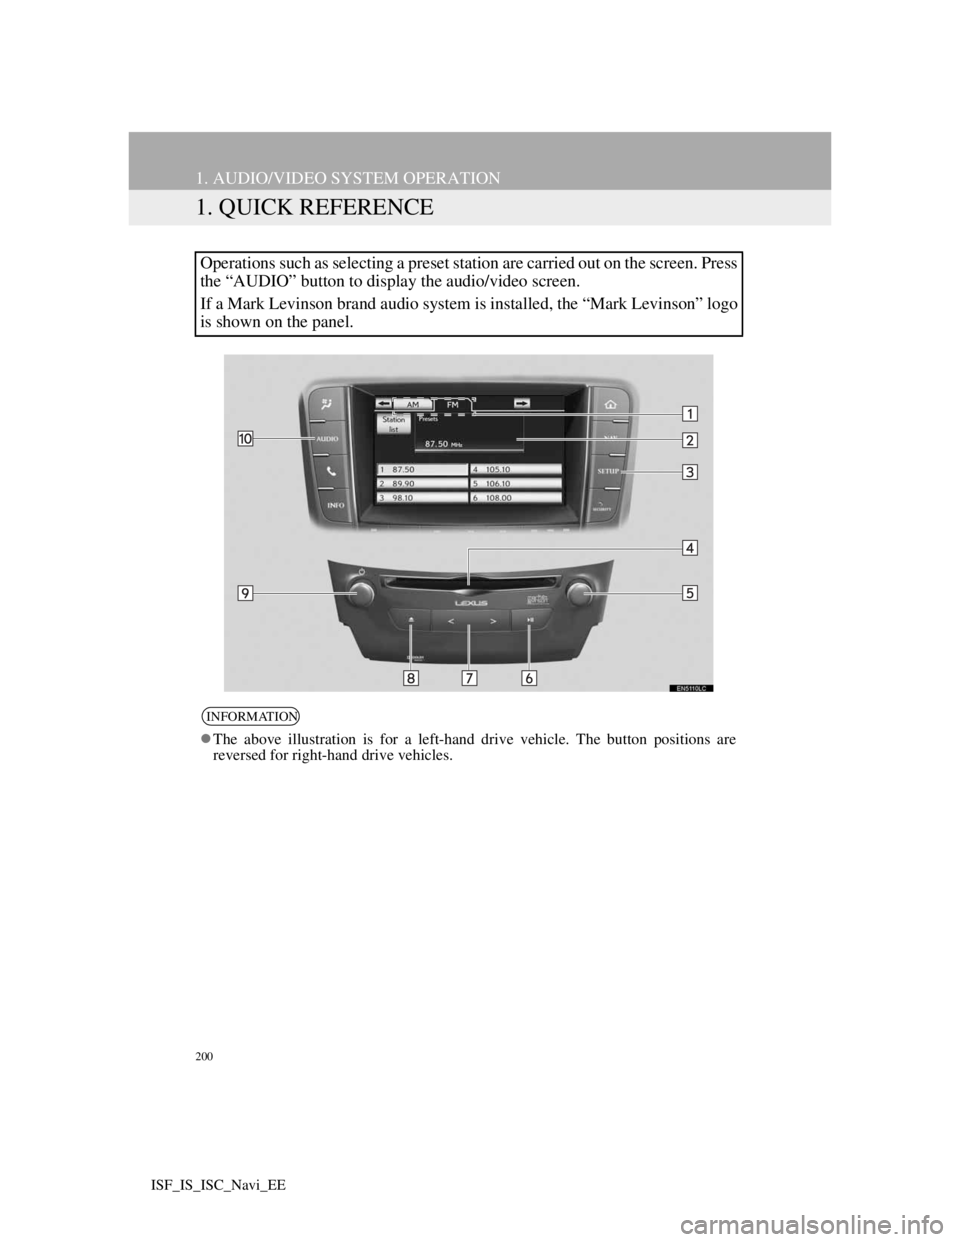
Operations such as selecting a preset station are carried out on the screen. Press
the “AUDIO” button to display the audio/video screen.
If a Mark Levinson brand audio system is installed, the “Mark Levinson” logo
is shown on the panel.
INFORMATION
The above illustration is for a left-hand drive vehicle. The button positions are
reversed for right-hand drive vehicles.
Page 208 of 407
201
1. AUDIO/VIDEO SYSTEM OPERATION
5
AUDIO/VIDEO SYSTEM
ISF_IS_ISC_Navi_EE
No.NameFunctionPage
Function menu
tabTouch the screen tabs to select the desired au-
dio mode.203
Function menu
display screenUse this screen to control the selected audio
mode.203
“SETUP” buttonPress to display the “Setup” screen.262
Disc slotInsert discs into the slot.210
Tune/Scroll knob
Turn to step up and step down the station
band, or skip to the next or previous track,
DVD chapter, etc. Also, the knob can be used
to enter selections on the track/file and album/
folder screens by pressing it.207, 211,
212, 214,
215, 218,
234, 239,
247, 249
“ ” buttonPress to mute/unmute or pause/resume the
current operation.203
Channel/Track
button
Press the “ ” or “ ” button to preset up or
down for a station, or to change a desired
track, file or chapter.
Press and hold the “ ” or “ ” button to seek
up or down for a station, or to fast forwarding/
rewinding for a track or file.208, 211,
214, 215,
218, 234,
235, 239,
240, 241,
242, 247,
248, 250
“ ” buttonPress to eject a disc.210
Power/Volume
knobPress to turn the audio system on and off, and
turn to adjust the volume.203
“AUDIO” buttonPress to display the audio control screen.203
Page 214 of 407
207
1. AUDIO/VIDEO SYSTEM OPERATION
5
AUDIO/VIDEO SYSTEM
ISF_IS_ISC_Navi_EE
3. RADIO OPERATION
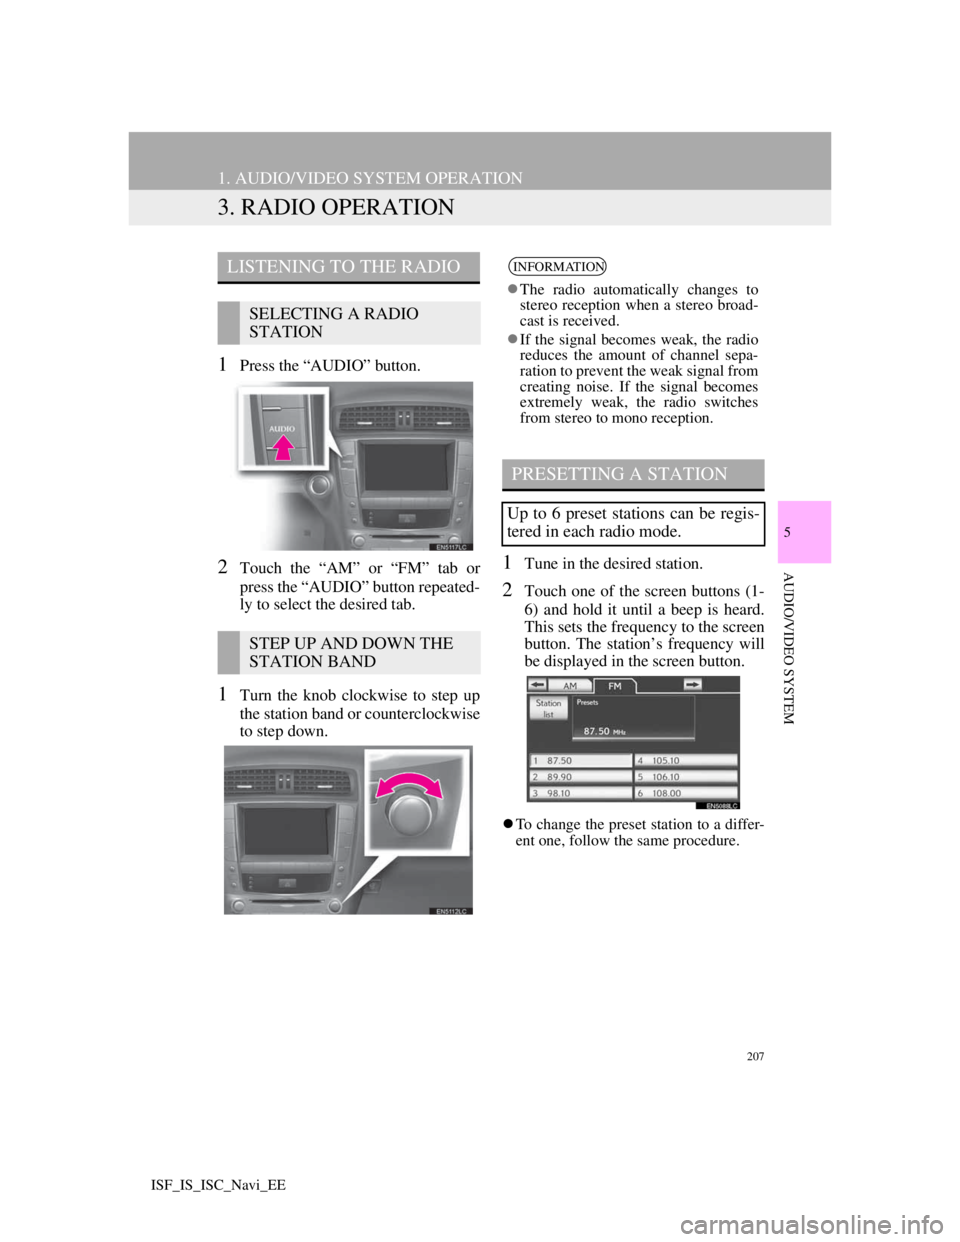
1Press the “AUDIO” button.
2Touch the “AM” or “FM” tab or
press the “AUDIO” button repeated-
ly to select the desired tab.
1Turn the knob clockwise to step up
the station band or counterclockwise
to step down.
1Tune in the desired station.
2Touch one of the screen buttons (1-
6) and hold it until a beep is heard.
This sets the frequency to the screen
button. The station’s frequency will
be displayed in the screen button.
To change the preset station to a differ-
ent one, follow the same procedure.
LISTENING TO THE RADIO
SELECTING A RADIO
STATION
STEP UP AND DOWN THE
STATION BAND
INFORMATION
The radio automatically changes to
stereo reception when a stereo broad-
cast is received.
If the signal becomes weak, the radio
reduces the amount of channel sepa-
ration to prevent the weak signal from
creating noise. If the signal becomes
extremely weak, the radio switches
from stereo to mono reception.
PRESETTING A STATION
Up to 6 preset stations can be regis-
tered in each radio mode.
Page 215 of 407
208
1. AUDIO/VIDEO SYSTEM OPERATION
ISF_IS_ISC_Navi_EE
Preset tuning: Touch one of the preset
channels on the screen or press the “ ”
or “ ” button of Channel/Track to select
the desired station. The screen button is
highlighted and the station frequency
appears on the screen.
Seek tuning: Press and hold the “ ” or
“ ” button of Channel/Track. The radio
will begin seeking up or down for a sta-
tion of the nearest frequency and will
stop when a station is found. Each time
the button is pressed, the stations will be
searched automatically one after anoth-
er.
WHEN RECEIVING FM
SELECTING A STATION
Tune in the desired station using one
of the following methods.
RDS (RADIO DATA
SYSTEM)
Depending on the availability of
RDS infrastructure, the service may
not function properly.
AF (ALTERNATIVE
FREQUENCY) FUNCTION
A station providing good reception is
automatically selected if current re-
ception worsens.
TA (TRAFFIC
ANNOUNCEMENT)
FUNCTION
The tuner will automatically seek a
station that regularly broadcasts traf-
fic information and the station broad-
casts when the traffic information
program starts.
“TP” will appear on the screen.