set Lexus IS250 2006 Do-it-yourself maintenance / LEXUS 2006 IS350/250 QUICK REFERENCE GUIDE
[x] Cancel search | Manufacturer: LEXUS, Model Year: 2006, Model line: IS250, Model: Lexus IS250 2006Pages: 54, PDF Size: 3.36 MB
Page 9 of 54
Topic 1
Entering and Exiting
9
Theft Deterrent System
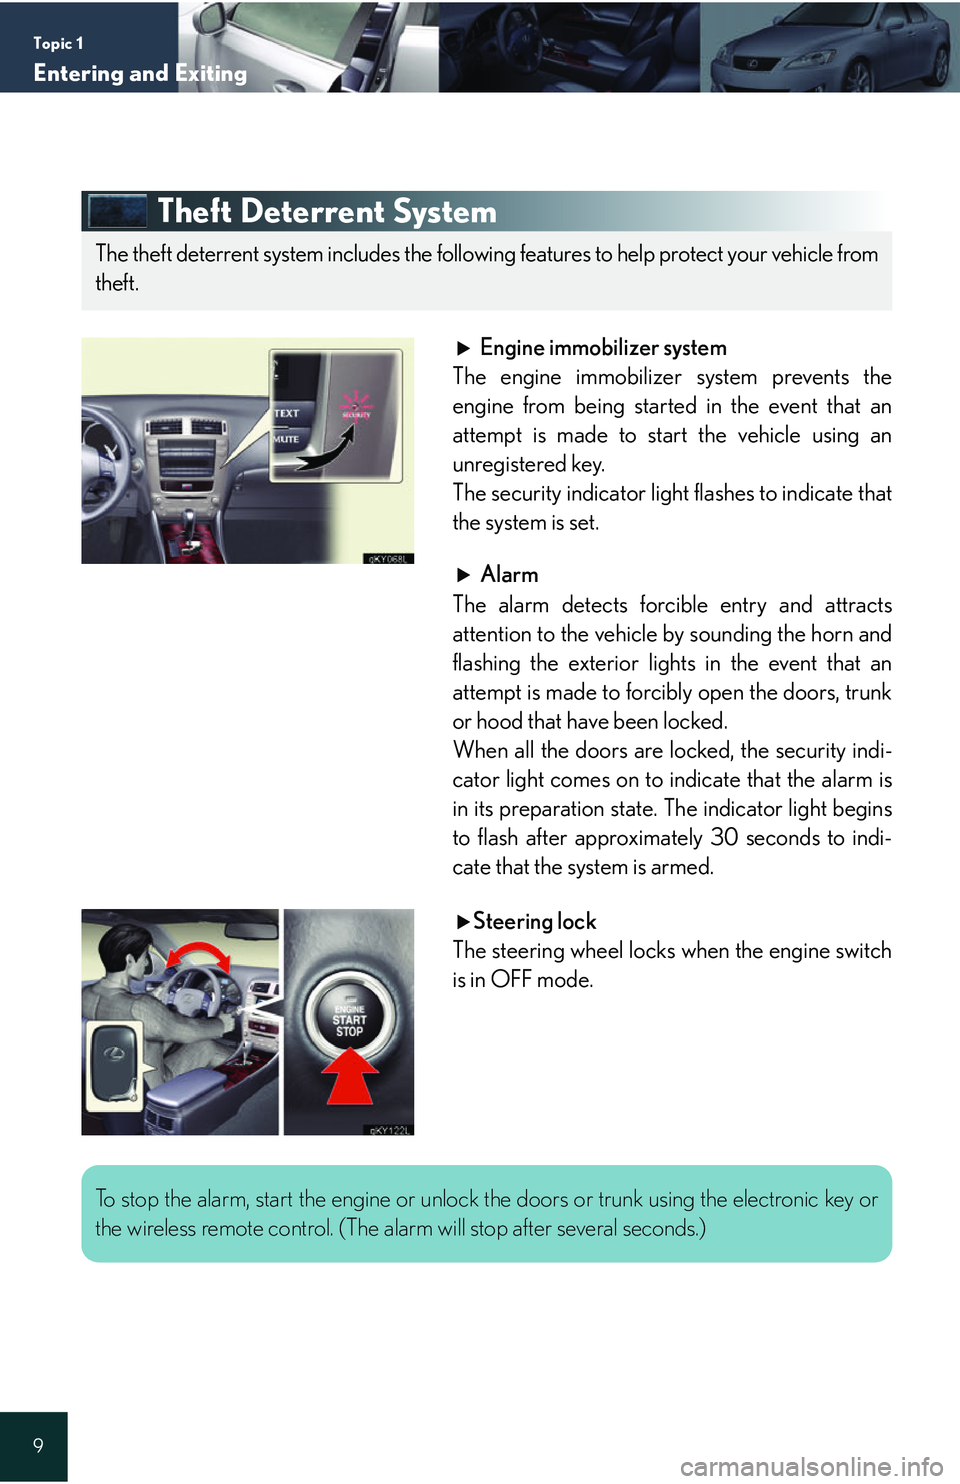
Engine immobilizer system
The engine immobilizer system prevents the
engine from being started in the event that an
attempt is made to start the vehicle using an
unregistered key.
The security indicator light flashes to indicate that
the system is set.
Alarm
The alarm detects forcible entry and attracts
attention to the vehicle by sounding the horn and
flashing the exterior lights in the event that an
attempt is made to forcibly open the doors, trunk
or hood that have been locked.
When all the doors are locked, the security indi-
cator light comes on to indicate that the alarm is
in its preparation state. The indicator light begins
to flash after approximately 30 seconds to indi-
cate that the system is armed.
Steering lock
The steering wheel locks when the engine switch
is in OFF mode.
The theft deterrent system includes the followi ng features to help protect your vehicle from
theft.
To stop the alarm, start the engine or unlock the doors or trunk using the electronic key or
the wireless remote control. (The alarm will stop after several seconds.)
Page 13 of 54
Topic 2
Before Driving
13
Driving and Seat Position Memory System (If Equipped)
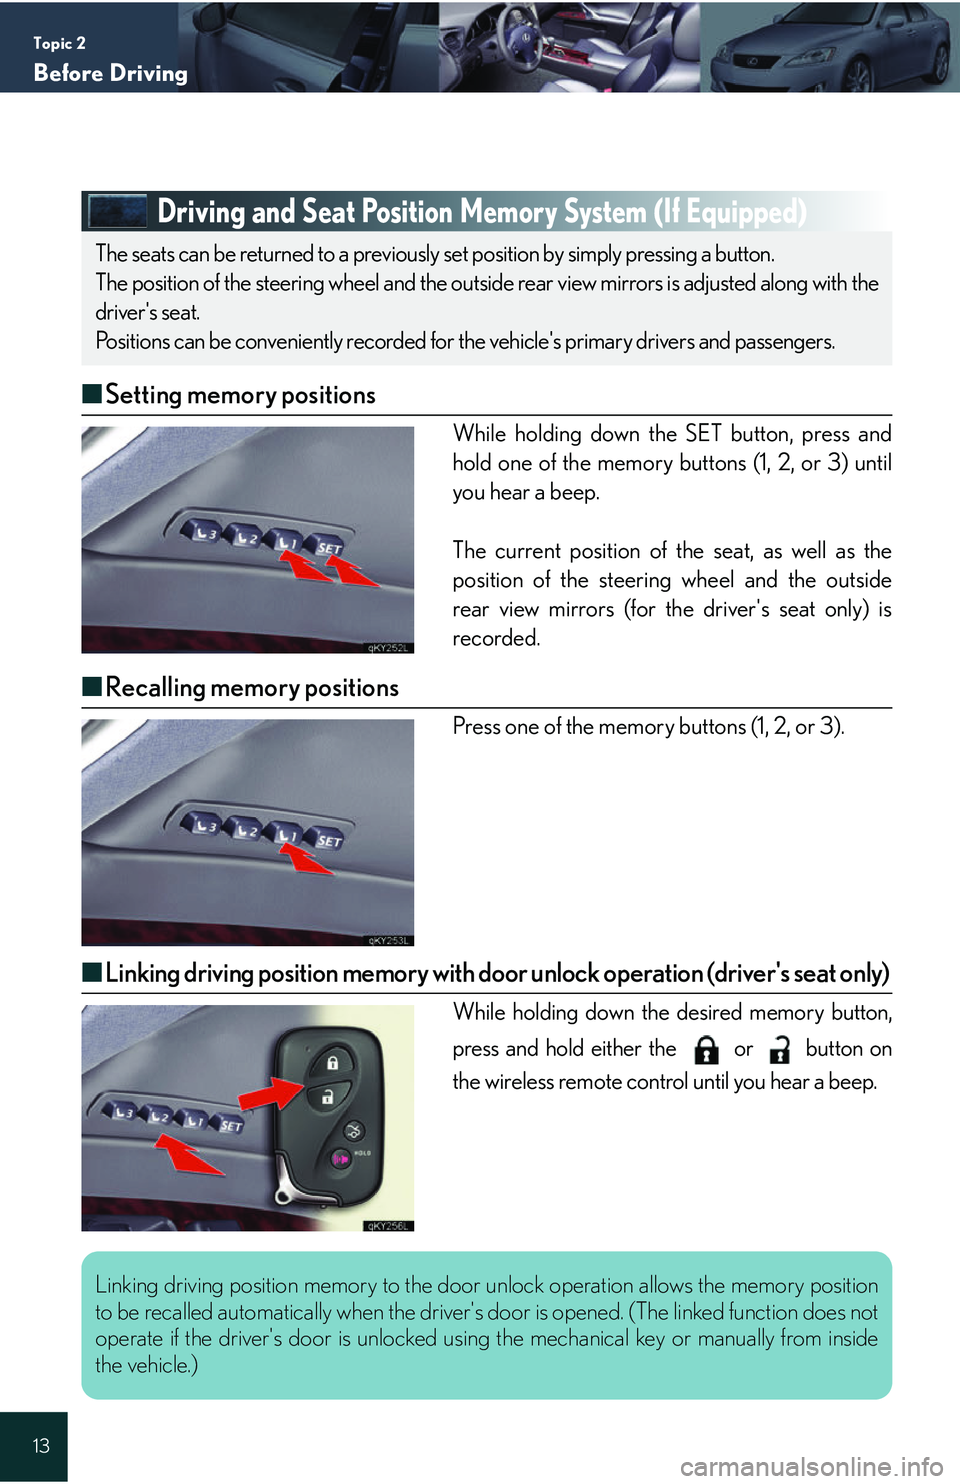
■Setting memory positions
While holding down the SET button, press and
hold one of the memory buttons (1, 2, or 3) until
you hear a beep.
The current position of the seat, as well as the
position of the steering wheel and the outside
rear view mirrors (for the driver's seat only) is
recorded.
■Recalling memory positions
Press one of the memory buttons (1, 2, or 3).
■Linking driving position memory with door unlock operation (driver's seat only)
While holding down the desired memory button,
press and hold either the or button on
the wireless remote control until you hear a beep.
The seats can be returned to a previously set position by simply pressing a button.
The position of the steering wheel and the outside rear view mirrors is adjusted along with the
driver's seat.
Positions can be conveniently recorded for the vehicle's primary drivers and passengers.
Linking driving position memory to the door unlock operation allows the memory position
to be recalled automatically when the driver's door is opened. (The linked function does not
operate if the driver's door is unlocked us ing the mechanical key or manually from inside
the vehicle.)
Page 15 of 54

Topic 2
Before Driving
15
Anti-glare Inside Rear View Mirror
To turn AUTO mode ON/OFF, press the AUTO
button.
The indicator comes on when AUTO mode is
turned ON.
Steering Wheel
■Manually adjustable type
To adjust the steering wheel, press the lever down
and move the steering wheel to the desired posi-
tion. Lock the steering wheel in place by pulling
the lever up.
■Power-adjustable type
Up
Down
Away from the driver
Toward the driver
The anti-glare mirror uses a sensor to detect light from vehicles behind and automatically
reduces glare.
1
2
3
4
The power-adjustable type steering wheel retracts automatically when the engine switch is
turned OFF to allow for easy exit and entry. The steering wheel returns automatically to its
previously set position when the engine switch is switched to ACC or IG-ON mode.
Page 19 of 54

Topic 3
When Driving
19
Manual Transmission
To operate the shift lever, the clutch pedal must be
fully depressed.
To shift into R, the ring on the shift lever must be
pulled up.
Parking Brake
■Automatic transmission
To set the parking brake : firmly depress the park-
ing brake pedal.
To release the parking brake : depress the park-
ing brake pedal again.
■ Manual transmission
To set the parking brake : pull the parking
brake lever firmly upward.
To release the parking brake : press and hold
the lock release button and lift the lever slightly
before lowering it as far as it will go.1
2
Page 20 of 54

Topic 3
When Driving
20
Entering and Exiting
Before DrivingBefore Driving
When DrivingWhen Driving
Rain and
Night Driving
Driving Comfort
Opening and Closing
What to do if ...
Customizing Yo u r L e x u s
Multi-information Display
■ Display information
● Trip information
Outside temperature
Driving range
Average fuel consumption
Average fuel consumption after refueling
Current fuel consumption
Average vehicle speed
Gear position (automatic transmissions only)
● Satellite switch mode
● Dynamic radar cruise control settings
(if equipped)
● Lexus parking assist-sensor infomation
(if equipped)
● Wa r n i n g m e s s a g e s
■Changing the display of trip information
Trip information items can be switched by press-
ing the DISP switch.
The multi-information display shows information about your vehicle, including the items
shown below.
Ty p e ATy p e B
■ When using the parking assist system or dy namic radar cruise control, the appropriate
display is shown on the screen.
■ In the event that a problem is detected in any of the vehicle's systems, a warning message is
shown on the multi-information display.
Page 21 of 54
Topic 3
When Driving
21
Satellite Switches
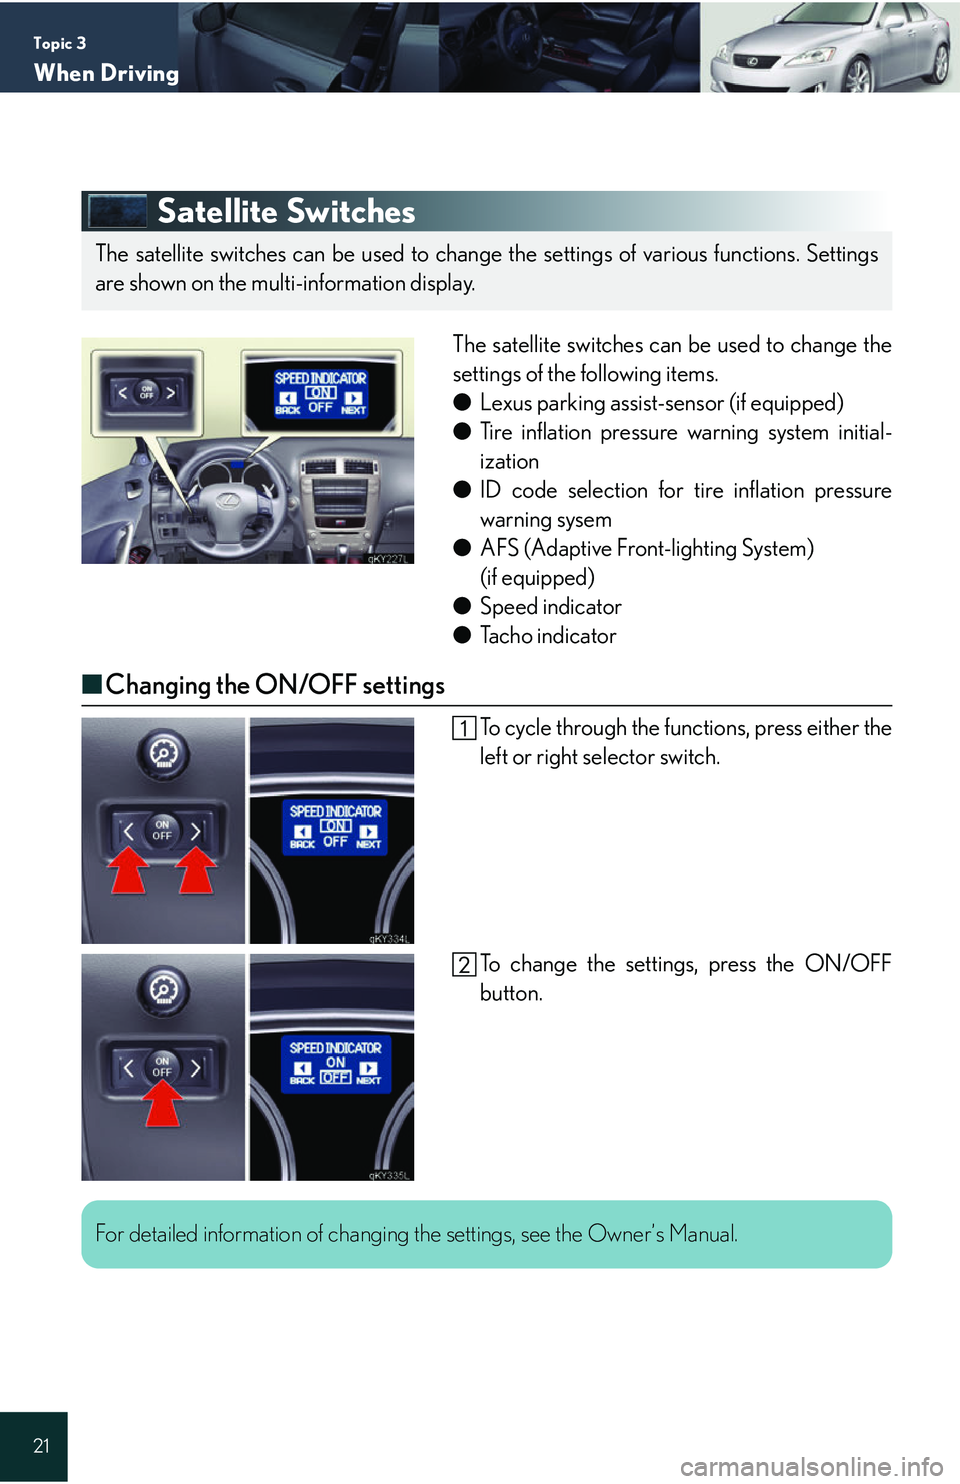
The satellite switches can be used to change the
settings of the following items.
● Lexus parking assist-sensor (if equipped)
● Tire inflation pressure warning system initial-
ization
● ID code selection for tire inflation pressure
warning sysem
● AFS (Adaptive Front-lighting System)
(if equipped)
● Speed indicator
● Tacho indicator
■Changing the ON/OFF settings
To cycle through the functions, press either the
left or right selector switch.
To change the settings, press the ON/OFF
button.
The satellite switches can be used to change the settings of various functions. Settings
are shown on the multi-information display.
For detailed information of changing the settings, see the Owner’s Manual.
Page 24 of 54
Topic 3
When Driving
24
Entering and Exiting
Before DrivingBefore Driving
When DrivingWhen Driving
Rain and
Night Driving
Driving Comfort
Opening and Closing
What to do if ...
Customizing Yo u r L e x u s
Cruise Control (If Equipped)
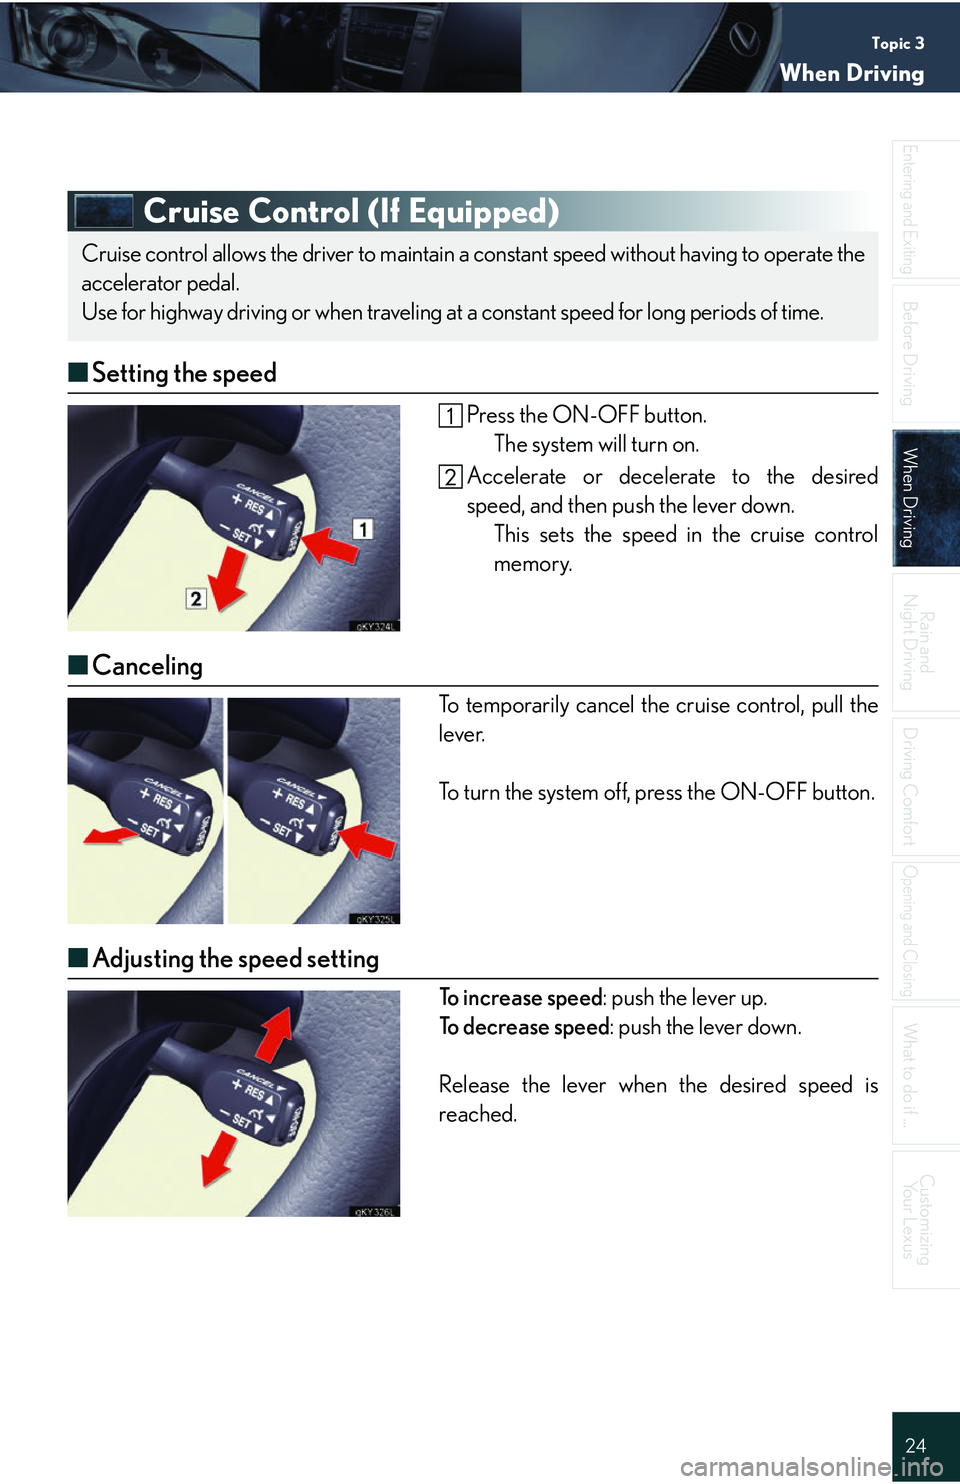
■ Setting the speed
Press the ON-OFF button.
The system will turn on.
Accelerate or decelerate to the desired
speed, and then push the lever down. This sets the speed in the cruise control
memory.
■Canceling
To temporarily cancel the cruise control, pull the
lever.
To turn the system off, press the ON-OFF button.
■Adjusting the speed setting
To i n c r e a s e s p e e d : push the lever up.
To decrease speed : push the lever down.
Release the lever when the desired speed is
reached.
Cruise control allows the driver to maintain a constant speed without having to operate the
accelerator pedal.
Use for highway driving or when traveling at a constant speed for long periods of time.
Page 25 of 54
Topic 3
When Driving
25
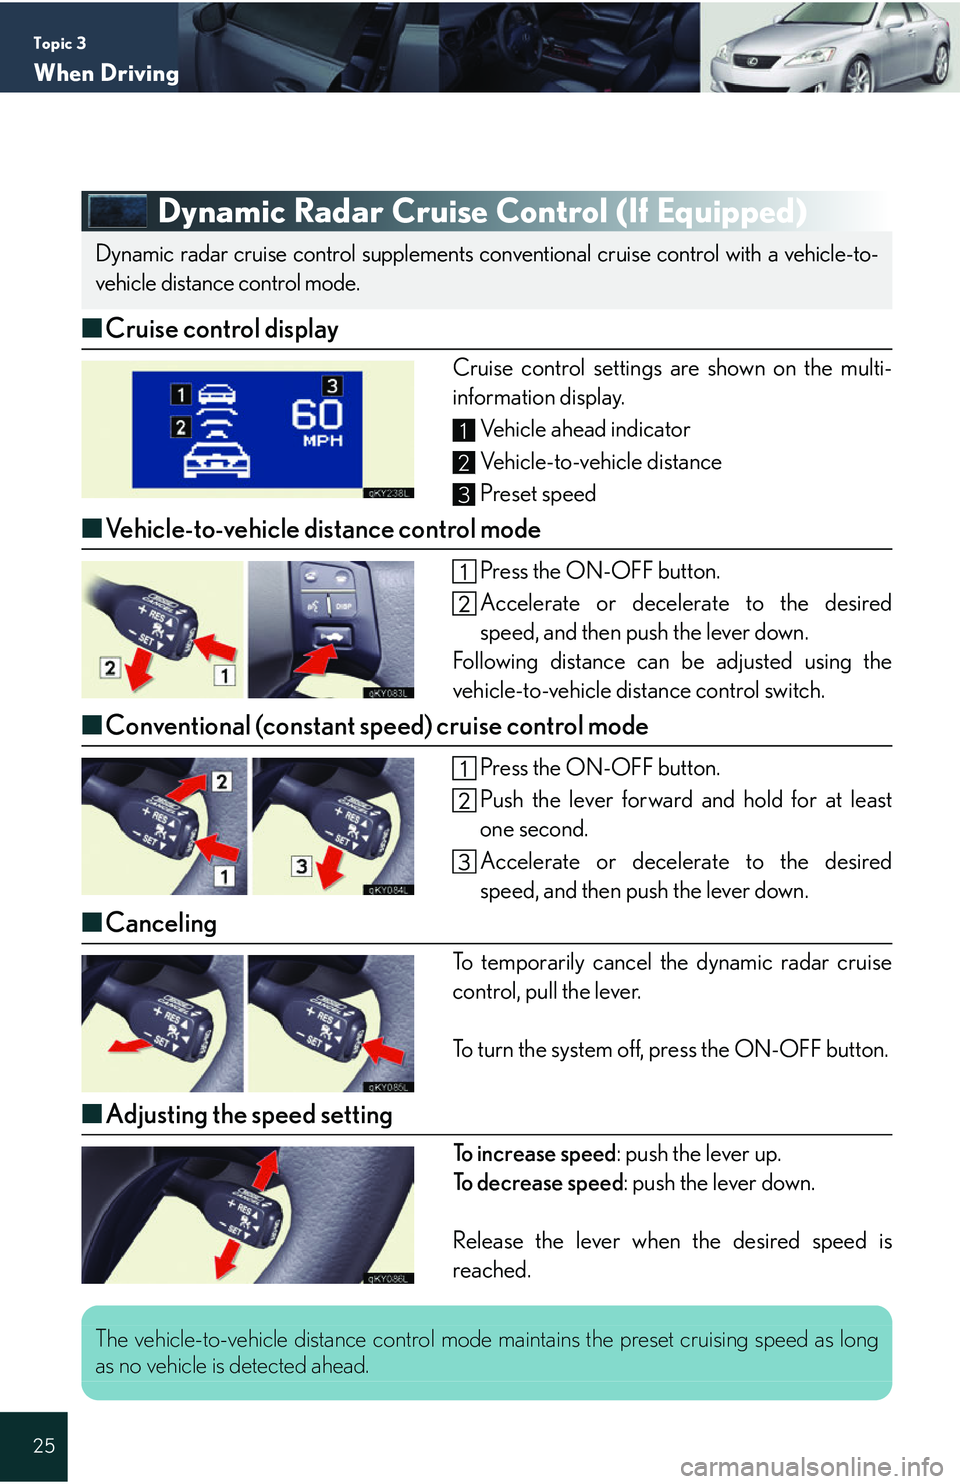
Dynamic Radar Cruise Control (If Equipped)
■Cruise control display
Cruise control settings are shown on the multi-
information display.
Vehicle ahead indicator
Vehicle-to-vehicle distance
Preset speed
■Vehicle-to-vehicle distance control mode
Press the ON-OFF button.
Accelerate or decelerate to the desired
speed, and then push the lever down.
Following distance can be adjusted using the
vehicle-to-vehicle dist ance control switch.
■Conventional (constant speed) cruise control mode
Press the ON-OFF button.
Push the lever forward and hold for at least
one second.
Accelerate or decelerate to the desired
speed, and then push the lever down.
■Canceling
To temporarily cancel the dynamic radar cruise
control, pull the lever.
To turn the system off, press the ON-OFF button.
■Adjusting the speed setting
To increase speed : push the lever up.
To decrease speed : push the lever down.
Release the lever when the desired speed is
reached.
Dynamic radar cruise control supplements conventional cruise control with a vehicle-to-
vehicle distance control mode.
1
2
3
The vehicle-to-vehicle distance control mode maintains the pr eset cruising speed as long
as no vehicle is detected ahead.
Page 31 of 54

Topic 5
Driving Comfort
31
Audio System (without navigation system)
Owners of models equipped with a navigation system should refer to the “Navigation System
Owner's Manual”.
■Basic operation
Sound quality modes
Listening position (if equipped)
ASL (Automatic Sound Levelizer)
Audio sources
Power/Volume
■Audio sources
AMS AT: AM radio/Satellite radio*
FM: FM radio
DISC
AUX: CD player/Auxiliary audio device
*:
The optional Lexus genuine satellite tuner and antenna allows you to receive and play
XM satellite radio broadcasts. (Subscription is required. For detailed information, see
the Owner’s Manual.)
■ Radio
Traffic information
Station presets
Text messages
Radio tuner
RDS genre select
Scan
All radio stations: press
Preset radio stations: press and hold
Seek
■Entering station presets
Select the desired station by using th e tune, the seek or the scan function.
Press and hold one of the preset buttons (1~6) until you hear a beep, indicating that the
station is set.
1
2
3
4
5
1
2
3
4
5
6
7
Page 34 of 54

Topic 5
Driving Comfort
34
Entering and Exiting
When Driving
Rain and
Night Driving
Driving ComfortDriving Comfort
Opening and Closing
What to do if ...
Customizing Your Lexus
Before Driving
Air Conditioning System (wit hout navigation system)
Owners of models equipped with a navigation system should refer to the “Navigation System
Owner's Manual”.
■Using the automatic mode
Press the AUTO button.
Adjust the temperature using the TEMP but-
tons.
■Adjusting the temperature in DUAL mode
In DUAL mode, driver and passenger side tem-
perature settings can be adjusted separately.
Press the DUAL button.
Adjust the driver side temperature using the
TEMP buttons, and the passenger side temper-
ature using the PASSENGER TEMP buttons.
Driver side temperature control
Switch to automatic mode
Driver side temperature display
OFF button
Fan speed controls
Air flow controls Passenger side temperature display
Micro dust and pollen filter
Passenger side temperature control
Windshield defog/defrost
Outside air/recirculated air mode switch
A/C switch
Dual mode switch1
2
3
4
5
6
7
8
9
10
11
12
13