ECU Lexus IS250 2006 Using the audio system / LEXUS 2006 IS350/250 THROUGH APRIL 2006 PROD. (OM53508U) Owner's Guide
[x] Cancel search | Manufacturer: LEXUS, Model Year: 2006, Model line: IS250, Model: Lexus IS250 2006Pages: 433, PDF Size: 10.9 MB
Page 167 of 433

149
2-5. Driving information
2
When driving
CAUTION
■Storage precautions
●Do not place anything on the package tray behind the rear seatback.
Such items may be thrown about and possib ly injure people in the vehicle during
sudden braking or in an accident.
●Do not drive with objects on top of the instrument panel.
They may interfere with the driver’s field of view or move during sharp accelera-
tion or turning, thus impairing the driver ’s control of the vehicle. In an accident
they may injure the vehicle occupants.
●Secure all items in the occupant compartment, as they may shift and injure some-
one during an accident or sudden braking.
■Capacity and distribution
●Do not exceed the maximum axle weight ra ting or the total vehicle weight rating.
●Even if the total load of occupant's weight and the cargo load is less than the total
load capacity, do not apply the load unevenly. Improper loading may cause dete-
rioration of steering or braking control which may cause death or serious injury.
Page 197 of 433

179
3-2. Using the audio system
3
Interior features
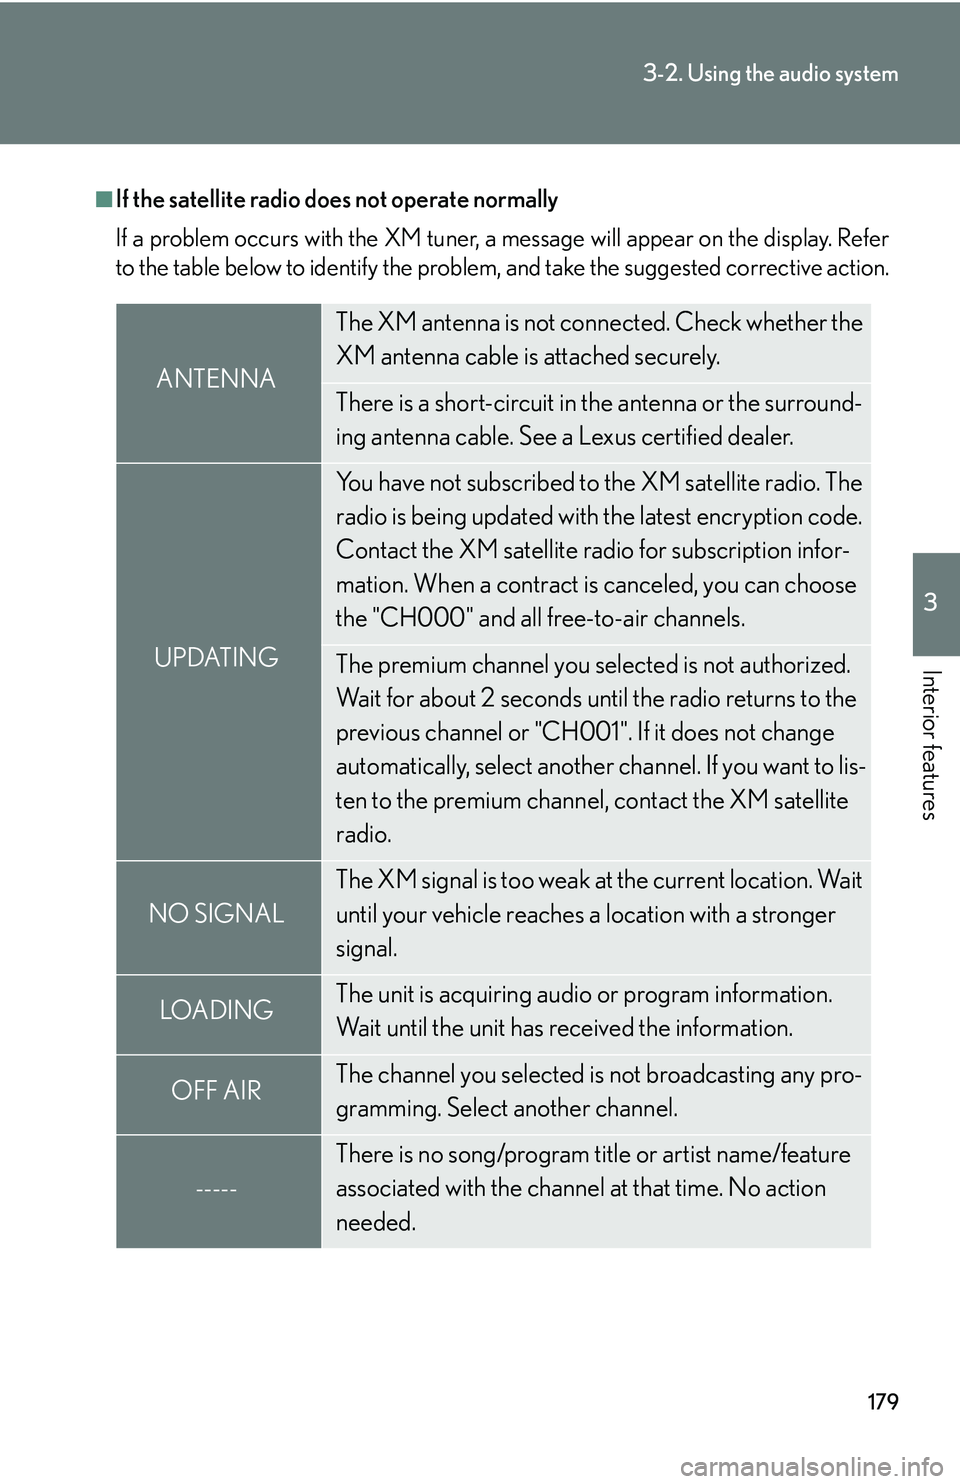
■If the satellite radio does not operate normally
If a problem occurs with the XM tuner, a message will appear on the display. Refer
to the table below to identify the problem, and take the suggested corrective action.
ANTENNA
The XM antenna is not connected. Check whether the
XM antenna cable is attached securely.
There is a short-circuit in the antenna or the surround-
ing antenna cable. See a Lexus certified dealer.
UPDATING
You have not subscribed to the XM satellite radio. The
radio is being updated with the latest encryption code.
Contact the XM satellite radio for subscription infor-
mation. When a contract is canceled, you can choose
the "CH000" and all free-to-air channels.
The premium channel you selected is not authorized.
Wait for about 2 seconds until the radio returns to the
previous channel or "CH001". If it does not change
automatically, select another channel. If you want to lis-
ten to the premium channel, contact the XM satellite
radio.
NO SIGNAL
The XM signal is too weak at the current location. Wait
until your vehicle reaches a location with a stronger
signal.
LOADIN GThe unit is acquiring audio or program information.
Wait until the unit has received the information.
OFF AIRThe channel you selected is not broadcasting any pro-
gramming. Select another channel.
-----
There is no song/program title or artist name/feature
associated with the channel at that time. No action
needed.
Page 247 of 433

229
3-5. Other interior features
3
Interior features
Floor mat
CAUTION
■When inserting the floor mat
Make sure the floor mat is properly placed on the floor carpet. If the floor mat slips
and interferes with the movement of the pedals during driving, it may cause an acci-
dent.
Securely place a mat that matches th e size of the space on the carpet.
Secure the driver’s floor mat
using the hooks provided.
Page 248 of 433

230
3-5. Other interior features
Trunk features
■Cargo hooks
Cargo hooks are provided for
securing loose items.
■ Shopping bag hooks
■ First-aid kit storage belt (if equipped)
Loosen
Tighten
Page 251 of 433

233
3-5. Other interior features
3
Interior features
Garage door opener
The garage door opener (HomeLink Universal Transceiver) is manufactured
under license from HomeLink.
Programming the HomeLink (for U.S.A. owners)
The HomeLink
compatible transceiver in your vehicle has 3 buttons
which can be programmed to operate 3 different devices. Refer to the
programming method below appropriate for the device.
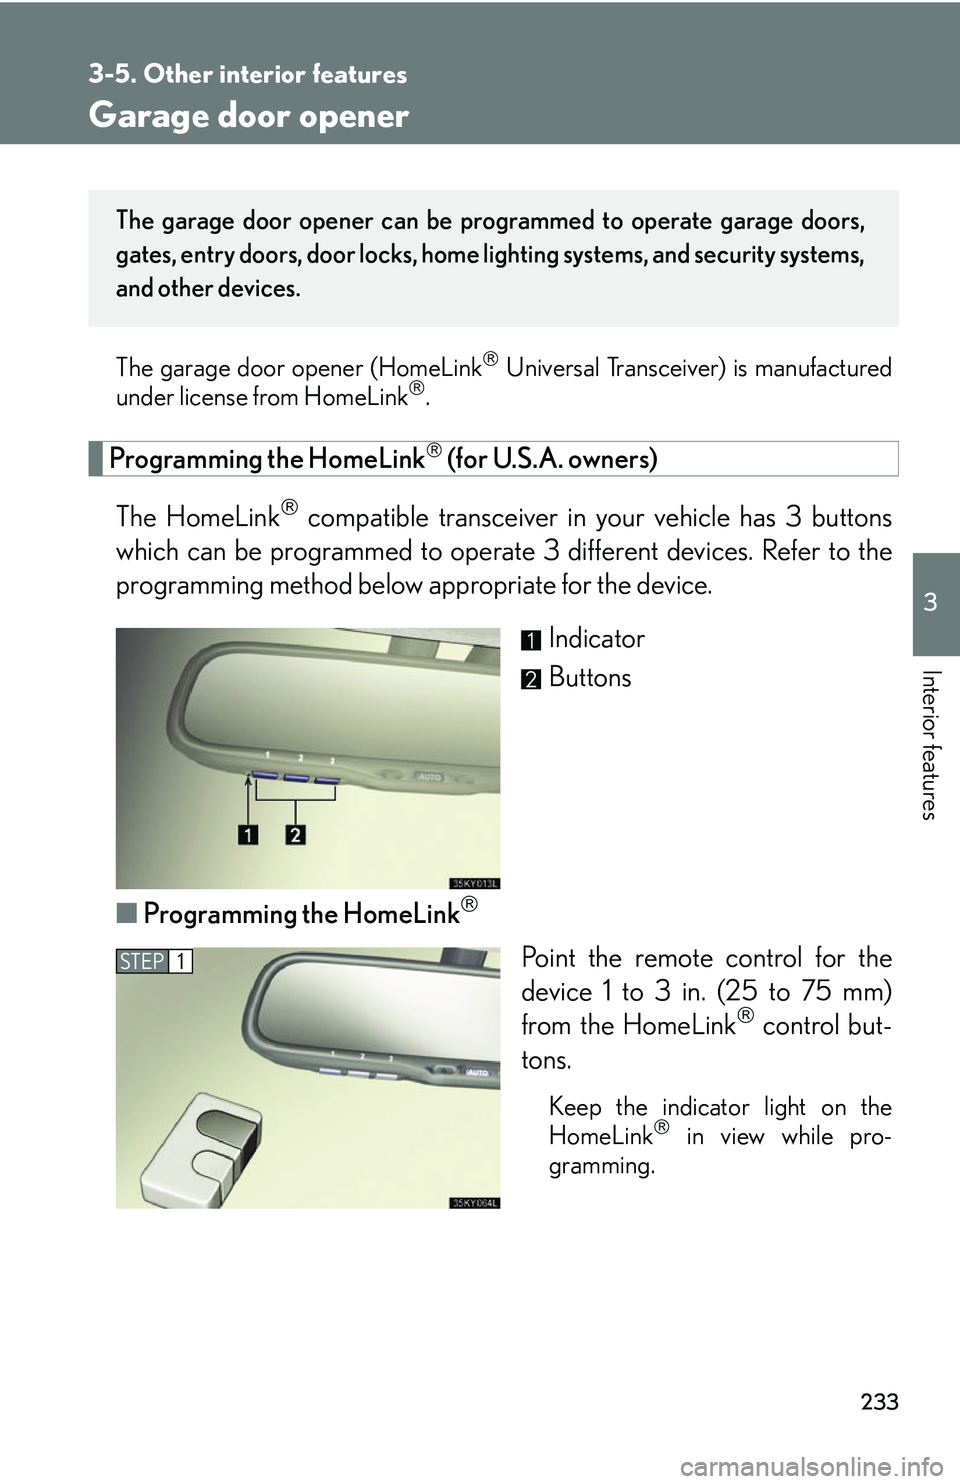
Indicator
Buttons
■ Programming the HomeLink
Point the remote control for the
device 1 to 3 in . (25 to 75 mm)
from the HomeLink
control but-
tons.
Keep the indicator light on the
HomeLink in view while pro-
gramming.
The garage door opener can be pr ogrammed to operate garage doors,
gates, entry doors, door locks, home lighting systems, and security systems,
and other devices.
STEP1
Page 254 of 433

236
3-5. Other interior features
Test the operation of the HomeLink by pressing the newly pro-
grammed button. Check to see if the gate/device operates cor-
rectly.
Repeat the steps above to program another device for each of
the remaining HomeLink
buttons.
■ Programming other devices
To program other devices such as home security systems, home door
locks or lighting, contact your au thorized Lexus dealer for assistance.
■ Reprogramming a button
The individual HomeLink
buttons cannot be erased but can be
reprogrammed. To reprogram a button, follow the “Basic program-
ming” instructions.
Operating the HomeLink
Press the appropriate HomeLink button. The HomeLink indicator
light on the HomeLink transceiver should turn on.
The HomeLink continues to send a signal fo r up to 20 seconds as long as
the button is pressed.
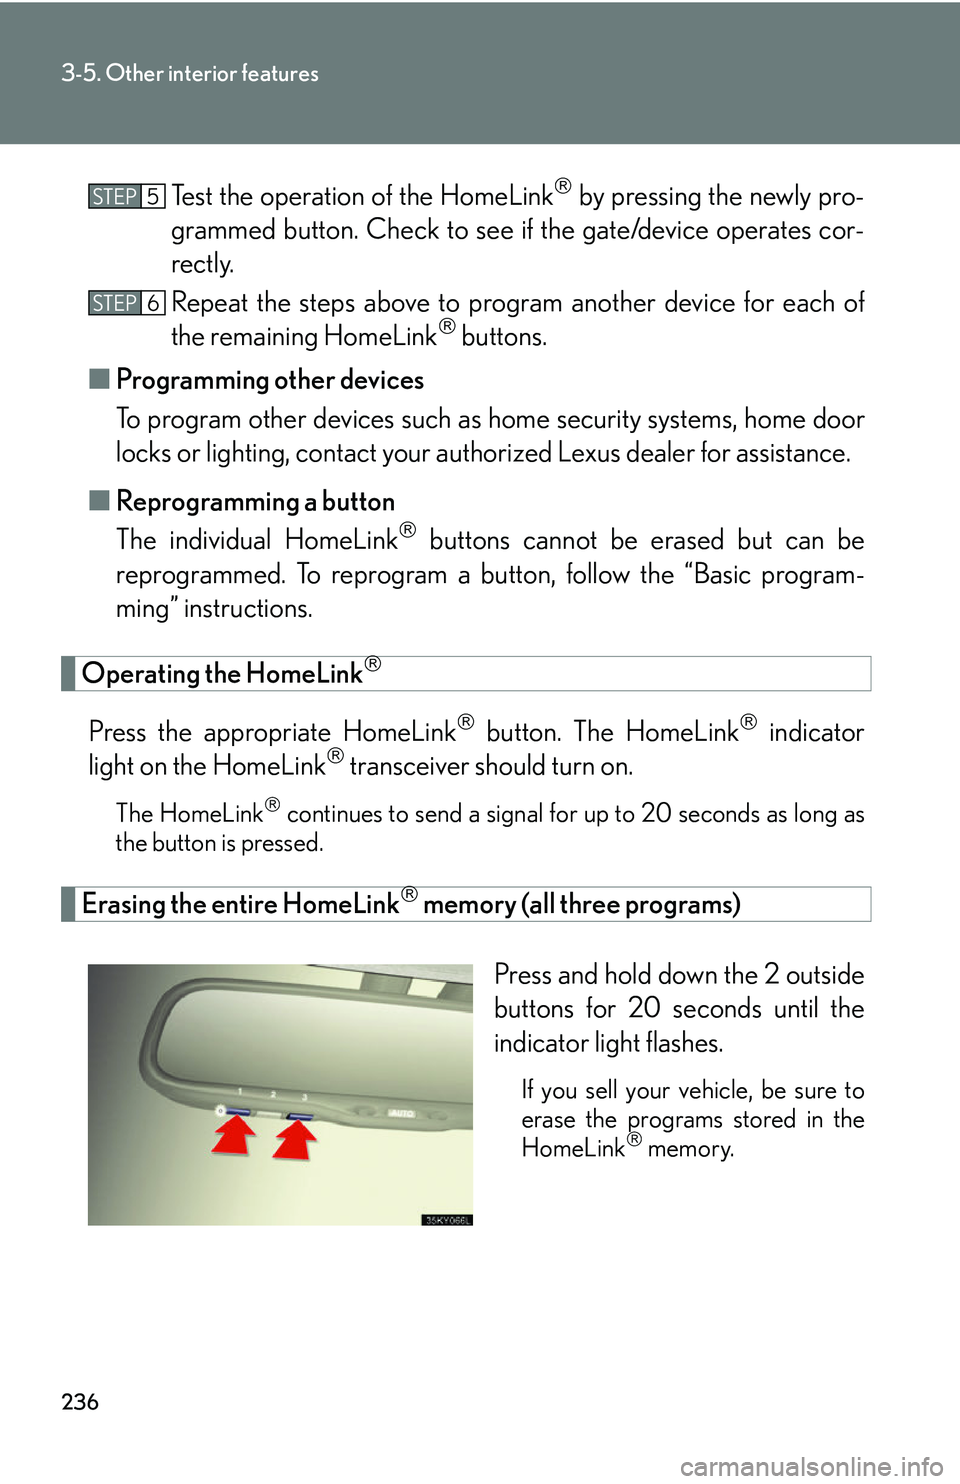
Erasing the entire HomeLink memory (all three programs)
Press and hold down the 2 outside
buttons for 20 seconds until the
indicator light flashes.
If you sell your vehicle, be sure to
erase the programs stored in the
HomeLink
memory.
STEP5
STEP6
Page 259 of 433

241
3-5. Other interior features
3
Interior features
CAUTION
■While driving the vehicle
Do not adjust the display. Be sure to adjust the display only when the vehicle is
stopped.
■When doing the circling calibration
Be sure to secure a wide space, and watch out for people and vehicles in the neigh-
borhood. Do not violate any local traffic rules while performing circling calibration.
NOTICE
■To avoid the compass malfunctions
Do not place magnets or any metal objects near the inside rear view mirror.
Doing this may cause a malfunction of the compass sensor.
■To ensure normal operation of the compass
●Do not perform circling calibration of the compass in a place where the earth's
magnetic field is subject to interference by artificial magnetic fields.
●During calibration, do not operate electric systems (moon roof, power windows,
etc.) as they may interfere with the calibration.
Page 270 of 433

252
4-2. Maintenance
Vehicle interior
ItemsCheck points
Accelerator pedal• Moves smoothly (without uneven pedal effort or catching)?
Automatic transmission “Park”
mechanism• Can the vehicle be hold securely on an incline with the shift lever in
P?
Brake pedal
• Moves smoothly?
• Does it have appropriate clearance and correct amount of free play?
Brakes
• Not pull to one side when applied?
• Loss of brake effectiveness?
• Spongy feeling brake pedal?
• Pedal almost touches floor?
Head restraints• Move smoothly and lock securely?
Indicators/buzzers• Function properly?
Lights
• Do all the lights come on?
• Headlights aimed correctly? ( P. 3 0 9 )
Pa r k i n g b r a ke
• Moves smoothly?
• Can hold the vehicle securely on
an incline?
Seat belts
• Does the seat belt system operate smoothly?
• Are the belts undamaged?
Seats• Do the seat controls operate prop- erly?
Page 295 of 433

277
4-3. Do-it-yourself maintenance
4
Maintenance and care
●When replacing only the tire, the sensor already installed on the wheel
does not need to be replaced.
● Replacing both a wheel and its sensor.
When new tire pressure sensors are installed, new sensor ID codes must be
registered in the ECU and tire inflatio n pressure sensor must be initialized.
( P. 277, 278)
Initializing the tire pressure warning system
■ The tire pressure warning system must be initialized in the following
circumstances:
●When the standard tire pressure changes by replacing tires or
wheels
● When tires are rotated.
● When tire pressure sensors are replaced.
● When driving with the tires inflated to a higher than standard tire
pressure.
When the tire pressure warning sy stem is initialized, the current tire
pressure is set as the pressure benchmark.
■ How to initialize the tire pressure warning system
To initialize the system, use the satellite switch. ( P. 214)
Park the vehicle in safe place and turn off the engine.
Adjust the tire pressure to the specified pressure ( P. 3 7 8 )
Turn the engine switch to IG-ON mode.
Make sure to adjust the tire pressure to the specified level. The tire infla-
tion pressure warning system will operate based on this pressure level.
STEP1
STEP2
STEP3
Page 317 of 433

299
4-3. Do-it-yourself maintenance
4
Maintenance and care
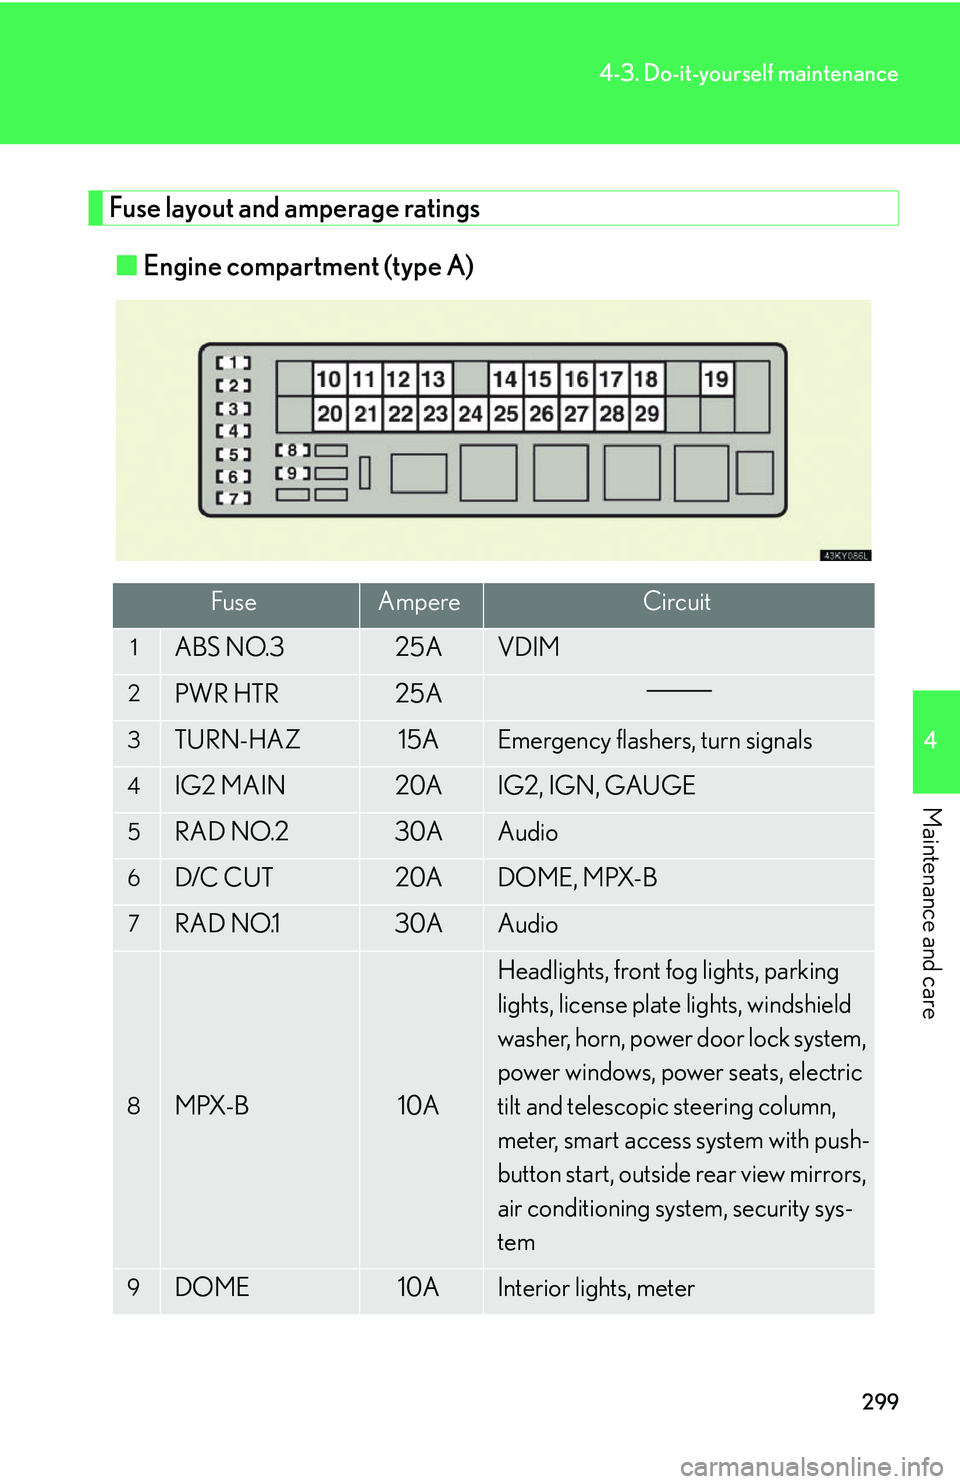
Fuse layout and amperage ratings■ Engine compartment (type A)
FuseAmpereCircuit
1ABS NO.325AVDIM
2PWR HTR25A
3TURN-HAZ15AEmergency flashers, turn signals
4IG2 MAIN20AIG2, IGN, GAUGE
5RAD NO.230AAudio
6D/C CUT20ADOME, MPX-B
7RAD NO.130AAudio
8MPX-B10A
Headlights, front fog lights, parking
lights, license plate lights, windshield
washer, horn, power door lock system,
power windows, power seats, electric
tilt and telescopic steering column,
meter, smart access system with push-
button start, outside rear view mirrors,
air conditioning system, security sys-
tem
9DOME10AInterior lights, meter