ECO mode Lexus IS250 2007 Basic Functions / LEXUS 2007 IS350/250 (OM53578U) User Guide
[x] Cancel search | Manufacturer: LEXUS, Model Year: 2007, Model line: IS250, Model: Lexus IS250 2007Pages: 445, PDF Size: 9.85 MB
Page 130 of 445

112
2-2. Instrument cluster
■Changing the indicator setting
The satellite switch can be used to change the set speed at which the
yellow speed or tacho indicator ring comes on.
The setting can be made only when the engine switch is in IG-ON
mode and the vehicle is stopped.
Push the
or switch to select the speed or tacho indicator set mode.
( ) Turn the speed or tacho indicator to OFF and then ON by pushing
the ON/OFF button. ( )
After one second, the mode enters
the indicator setting mode.
The speedometer or tachometer
needle moves to the previously set
speed.
STEP1
Page 131 of 445

113
2-2. Instrument cluster
2
When driving
Push the or switch within 6 seconds of the speedometer or tachome-
ter needle moving to change the setting of the desired speed, then turn
the indicator mode to ON by pushing the ON/OFF button.
Pushing and holding the switch changes values at a faster rate.
If the satellite switch is not operated for some time, the multi-information dis-
play returns to its previously displayed content.
The yellow indicator is displayed to indicate that the desired speed has
been set.
STEP2
■Speed indicator display conditions and vehicle speed setting range
Vehicle speed setting range: Approximately 30 to 100 mph
(approximately 50 to 160 km/h)
When the maximum speed is selected, the speed indicator comes on only in red.
■Tacho indicator display conditions and engine speed setting range
Engine rpm setting range: Approximately 2000 to 6500 rpm (r/min)
When the maximum rpms is selected, the tacho indicator comes on only in red.
Page 135 of 445

117
2-2. Instrument cluster
2
When driving
CAUTION
■If a safety system warning light does not come on
Should a safety system light such as ABS and the SRS airbag warning light not
come on when you start the engine, this could mean that these systems are not
available to help protect you in an accident, which could result in death or serious
injury. Have the vehicle inspected by your Lexus dealer immediately if this occurs.
■Warning lights
Warning lights inform the driver of malfunctions in any of the vehi-
cle’s systems. (P. 3 3 9 )
*: These lights turn on when the engine switch is turned to IG-ON mode
to indicate that a system check is being performed. They will turn off
after the engine is started, or after a few seconds. There may be a mal-
function in a system if a light does not come on, or if the lights do not turn
off. Have the vehicle inspected by your Lexus dealer.
(U.S.A.)(Canada)(Canada)(U.S.A.)
(Canada)(U.S.A.)(if equipped)
******
******
Page 146 of 445

128
2-3. Operating the lights and windshield wipers
■Rain drop sensor (vehicles equipped with the rain-sensing windshield wipers)
■If no windshield washer fluid sprays
Check that the washer nozzles are not blocked if there is washer fluid in the wind-
shield washer fluid reservoir.
■Customization
Settings (e.g. drip prevention function) can be changed. (P. 406)
CAUTION
■Caution regarding the use of windshield wipers in AUTO mode
The windshield wipers may operate unexpectedly if the sensor is touched or the
windshield is subject to vibration in AUTO mode. Take care that your fingers or any-
thing else do not become caught in the windshield wipers.
NOTICE
■When the windshield is dry
Do not use the wipers, as they may damage the windshield.
■When there is no washer fluid spray from the nozzle
Damage to the washer fluid pump may be caused if the lever is pulled toward you
and held continually.
The sensor judges the amount of raindrops.
Page 151 of 445

133
2-4. Using other driving systems
2
When driving
Dynamic radar cruise control (if equipped)
Dynamic radar cruise control supplements conventional cruise control
with a vehicle-to-vehicle distance control. In the vehicle-to-vehicle dis-
tance control mode, the vehicle automatically accelerates or decelerates
in order to maintain a set following distance from vehicles ahead.
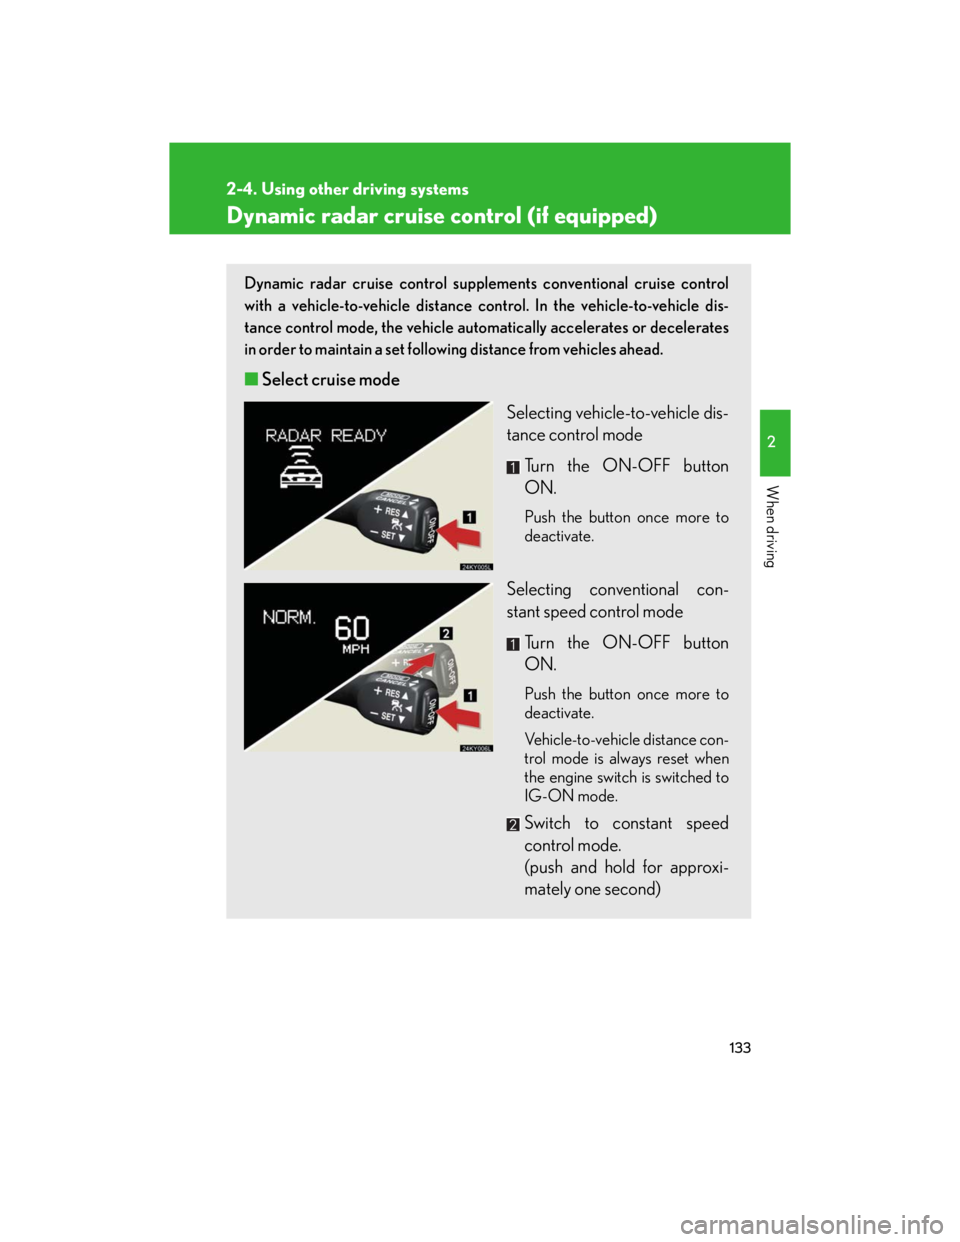
■Select cruise mode
Selecting vehicle-to-vehicle dis-
tance control mode
Turn the ON-OFF button
ON.
Push the button once more to
deactivate.
Selecting conventional con-
stant speed control mode
Turn the ON-OFF button
ON.
Push the button once more to
deactivate.
Vehicle-to-vehicle distance con-
trol mode is always reset when
the engine switch is switched to
IG-ON mode.
Switch to constant speed
control mode.
(push and hold for approxi-
mately one second)
Page 185 of 445

167
2-5. Driving information
2
When driving
Dinghy towing (vehicles with a manual transmission)
Towing your vehicle with 4 wheels on the ground
To prevent damage to your vehicle, perform the following procedures
before towing.
Shift the shift lever to neutral.
Switch to ACC mode. (P. 9 8 )
Ensure that the audio system and other powered devices have been
turned OFF.
Release the parking brake.
After towing, leave the engine in idle for at least 3 minutes before driv-
ing the vehicle.
■Necessary equipment and accessories
Specialized equipment and accessories are required for dinghy towing. Contact
the service branch of the motor home manufacturer regarding recommended
equipment.
Your vehicle can be dinghy towed in a forward direction (with 4 wheels on
the ground) behind a motor home.
STEP1
STEP2
STEP3
Page 200 of 445

182
3-2. Using the audio system
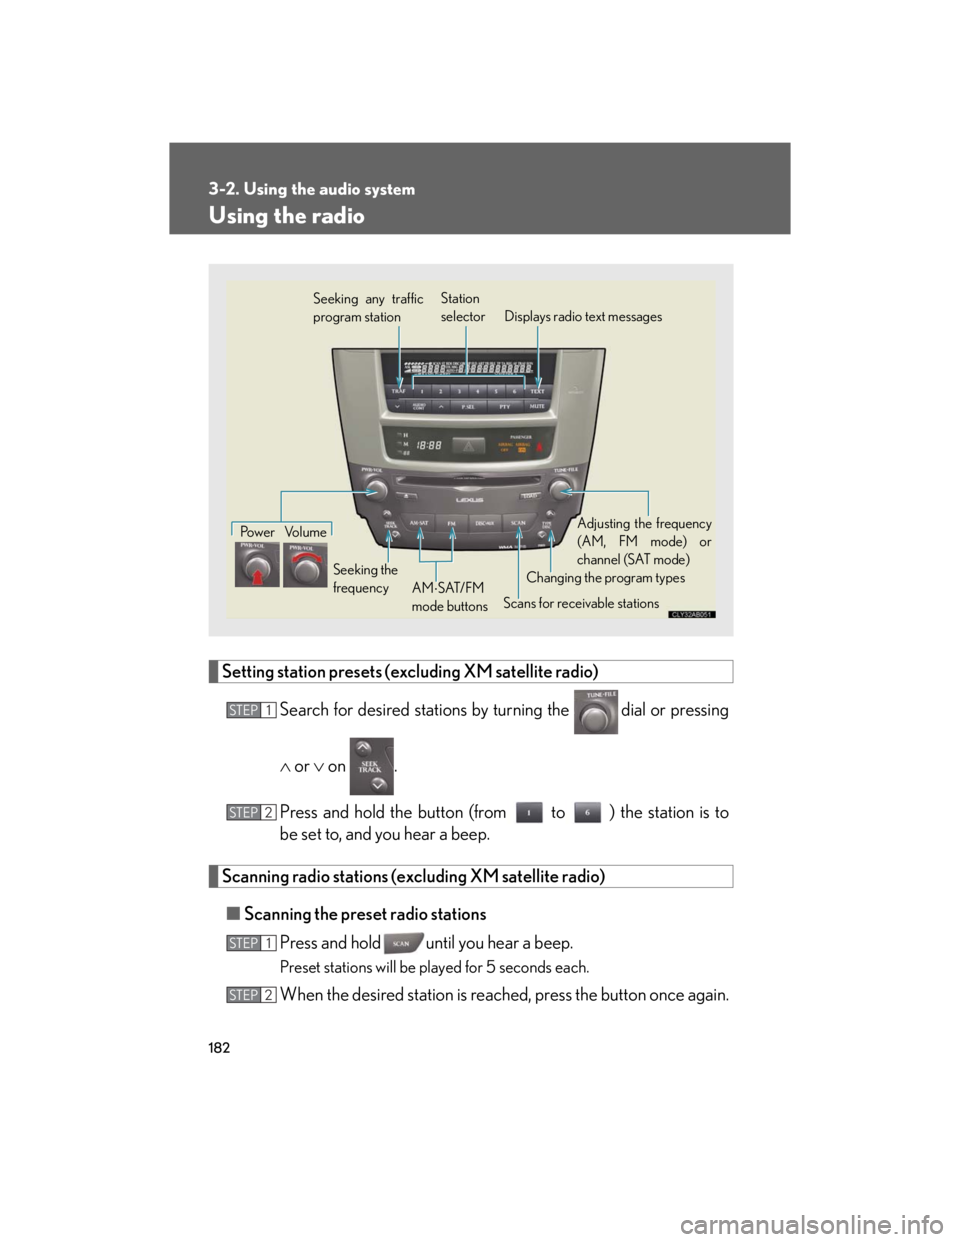
Using the radio
Setting station presets (excluding XM satellite radio)
Search for desired stations by turning the
dial or pressing
or on .
Press and hold the button (from to ) the station is to
be set to, and you hear a beep.
Scanning radio stations (excluding XM satellite radio)
■Scanning the preset radio stations
Press and hold until you hear a beep.
Preset stations will be played for 5 seconds each.
When the desired station is reached, press the button once again.
Seeking any traffic
program stationStation
selector Displays radio text messages
Po w e r Vo l u m e
Scans for receivable stations Seeking the
frequencyChanging the program typesAdjusting the frequency
(AM, FM mode) or
channel (SAT mode)
AMSAT/FM
mode buttons
STEP1
STEP2
STEP1
STEP2
Page 216 of 445

198
3-2. Using the audio system
■MP3 and WMA files
MP3 (MPEG Audio LAYER 3) is a standard audio compression format.
Files can be compressed to approximately 1 /10 of their original size by using MP3
compression.
WMA (Windows Media
TMAudio) is a Microsoft audio compression format.
This format compresses audio data to a size smaller than that of the MP3 format.
There is a limit to the MP3 and WMA file standards and to the media/formats
recorded by them that can be used.
●MP3 file compatibility
• Compatible standards
MP3 (MPEG1 LAYER3, MPEG2 LSF LAYER3)
• Compatible sampling frequencies
MPEG1 LAYER3: 32, 44.1, 48 (kHz)
MPEG2 LSF LAYER3: 16, 22.05, 24 (kHz)
• Compatible bit rates
MPEG1 LAYER3: 64, 80, 96, 112, 128, 160, 192, 224, 256, 320 (kbps)
• MPEG2 LSF LAYER3: 64, 80, 96, 112, 128, 144, 160 (kbps)
* Compatible with VBR
• Compatible channel modes: stereo, joint stereo, dual channel and monaural
●WMA file compatibility
• Compatible standards
WMA Ver. 7, 8, 9
• Compatible sampling frequencies
32, 44.1, 48 (kHz)
• Compatible bit rates
Ver . 7, 8: CBR 48, 64, 80, 96, 128, 160, 192 (kbps)
Ver. 9: CBR 48, 64, 80, 96, 128, 160, 192, 256, 320 (kbps)
*Only compatible with 2-channel playback
●Compatible media
Media that can be used for MP3 and WMA playback are CD-Rs and CD-RWs.
Playback in some instances may not be possible, depending on the status of the
CD-R or CD-RW. Playback may not be possible or the audio may jump if the disc
is scratched or marked with fingerprints.
Page 217 of 445

199
3-2. Using the audio system
3
Interior features
●Compatible disc formats
The following disc formats can be used.
• Disc formats: CD-ROM Mode 1 and Mode 2
CD-ROM XA Mode 2, Form 1 and Form 2
• File formats: ISO9660 level 1, level 2, (Romeo, Joliet)
MP3 and WMA files written in any format other than those listed above may
not play correctly, and their file names and folder names may not be dis-
played correctly.
Items related to standards and limitations are as follows.
• Maximum directory hierarchy: 8 levels
• Maximum length of folder names/file names: 32 characters
• Maximum number of folders: 192 (including the root)
• Maximum number of files per disc: 255
●File names
The only files that can be recognized as MP3/WMA and played are those with
the extension .mp3 or .wma.
●Multi-sessions
As the audio system is compatible with multi-sessions, it is possible to play discs
that contain MP3 and WMA files. However, only the first session can be played.
●ID3 and WMA tags
ID3 tags can be added to MP3 files, making it possible to record the track title
and artist name, etc.
The system is compatible with ID3 Ver. 1.0, 1.1, and Ver. 2.2, 2.3 ID3 tags. (The
number of characters is based on ID3 Ver. 1.0 and 1.1.)
WMA tags can be added to WMA files, making it possible to record the track
title and artist name in the same way as with ID3 tags.
Page 228 of 445

210
3-3. Using the interior lights
■Illuminated entry system
The following interior lights come on automatically when you approach the vehicle
with the electronic key on your person. Note that the illuminated entry system oper-
ates only when the interior light switch (door position ON/OFF) is ON.
●Front overhead courtesy light
●Rear overhead courtesy light
●Outer foot light
The following lights turn on when any of the doors is unlocked or opened.
●Front interior light
●Rear interior lights
●Front foot well lighting
●Front door courtesy lighting
●Front scuff lighting
The following lights turn on for approximately 15 seconds when the engine switch is
turned to OFF from the IG-ON or ACC mode. (The lights turn off immediately if
the doors are locked or the engine switch is set to ACC or IG-ON mode.)
●Front overhead courtesy light
●Rear overhead courtesy light
■To prevent the battery from being discharged
If the overhead courtesy lights and interior lights remain ON when the door is not
fully closed and the interior light switch (door position ON/OFF) is ON, the lights
will go off automatically after 20 minutes.
■Customization
Setting (e.g. The time elapsed before lights turn off) can be changed. (
P. 406)
Front door courtesy lighting
Front scuff lighting (if equipped)
Outer foot lights
Turning the instrument panel light control knob fully to the left disables the
shift lever lighting and front foot well lighting.