display Lexus IS250 2008 Using the air conditioning system and defogger / LEXUS 2008 IS250 (OM53699U) Owner's Guide
[x] Cancel search | Manufacturer: LEXUS, Model Year: 2008, Model line: IS250, Model: Lexus IS250 2008Pages: 464, PDF Size: 6.61 MB
Page 164 of 464
164
2-4. Using other driving systems
Intuitive parking assist (if equipped)
The distance to obstacles measured by the sensors is communicated via
the multi-information display and a buzzer when parallel parking or
maneuvering into a garage. Always check the surrounding area when
using this system.
For vehicles equipped with a navigation system, refer to the separate “Navi-
gation System Owner’s Manual” for further details.
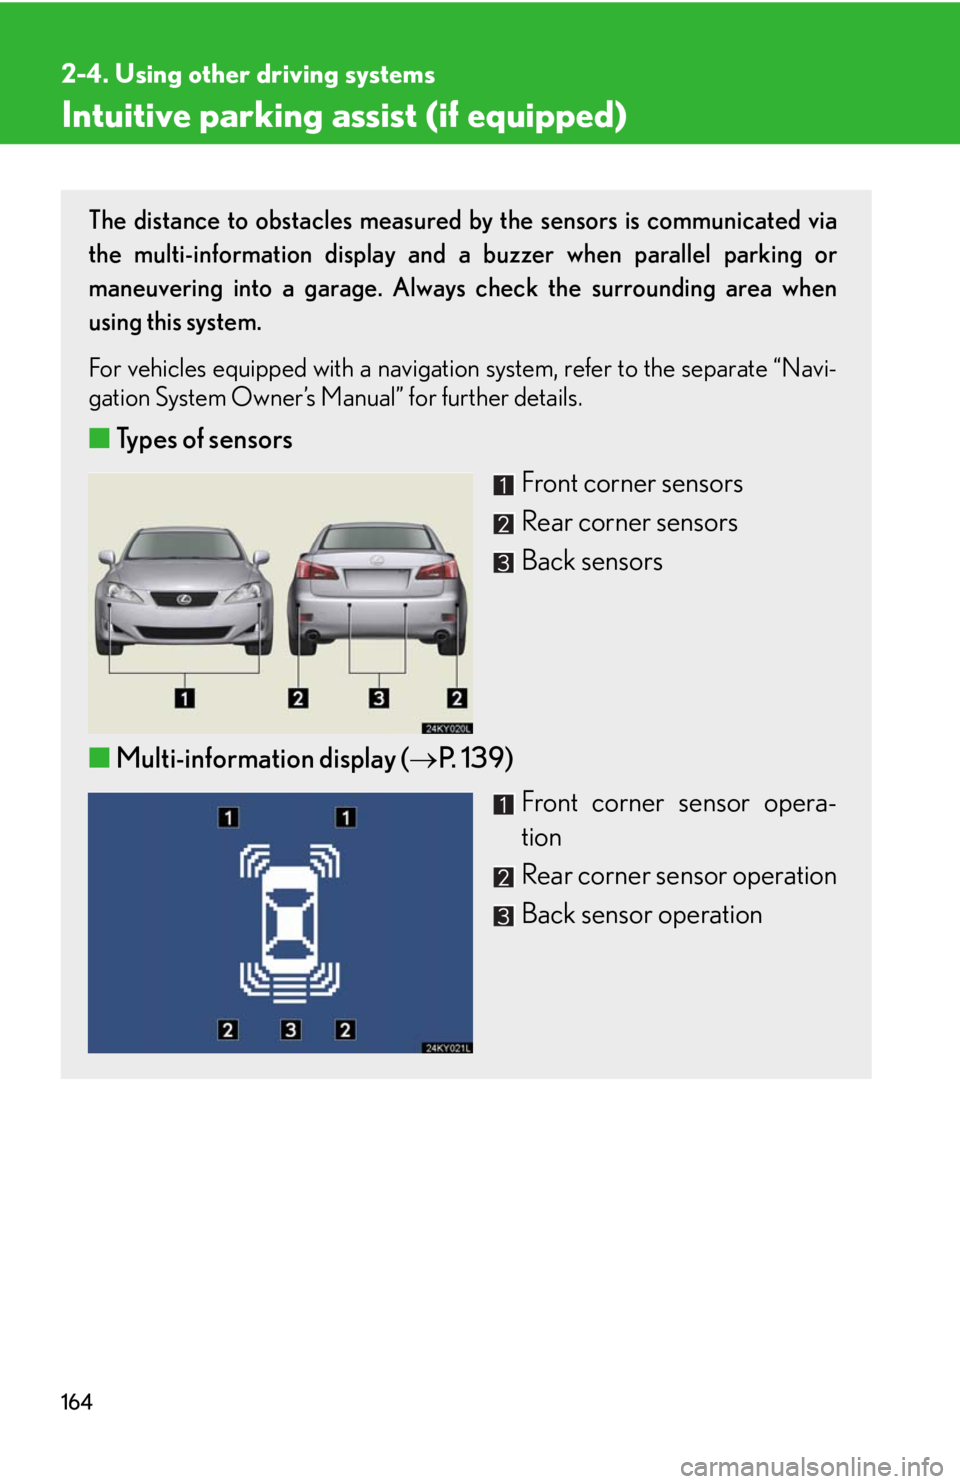
■ Types of sensors
Front corner sensors
Rear corner sensors
Back sensors
■ Multi-information display ( P. 1 3 9 )
Front corner sensor opera-
tion
Rear corner sensor operation
Back sensor operation
Page 165 of 464
165
2-4. Using other driving systems
2
When driving
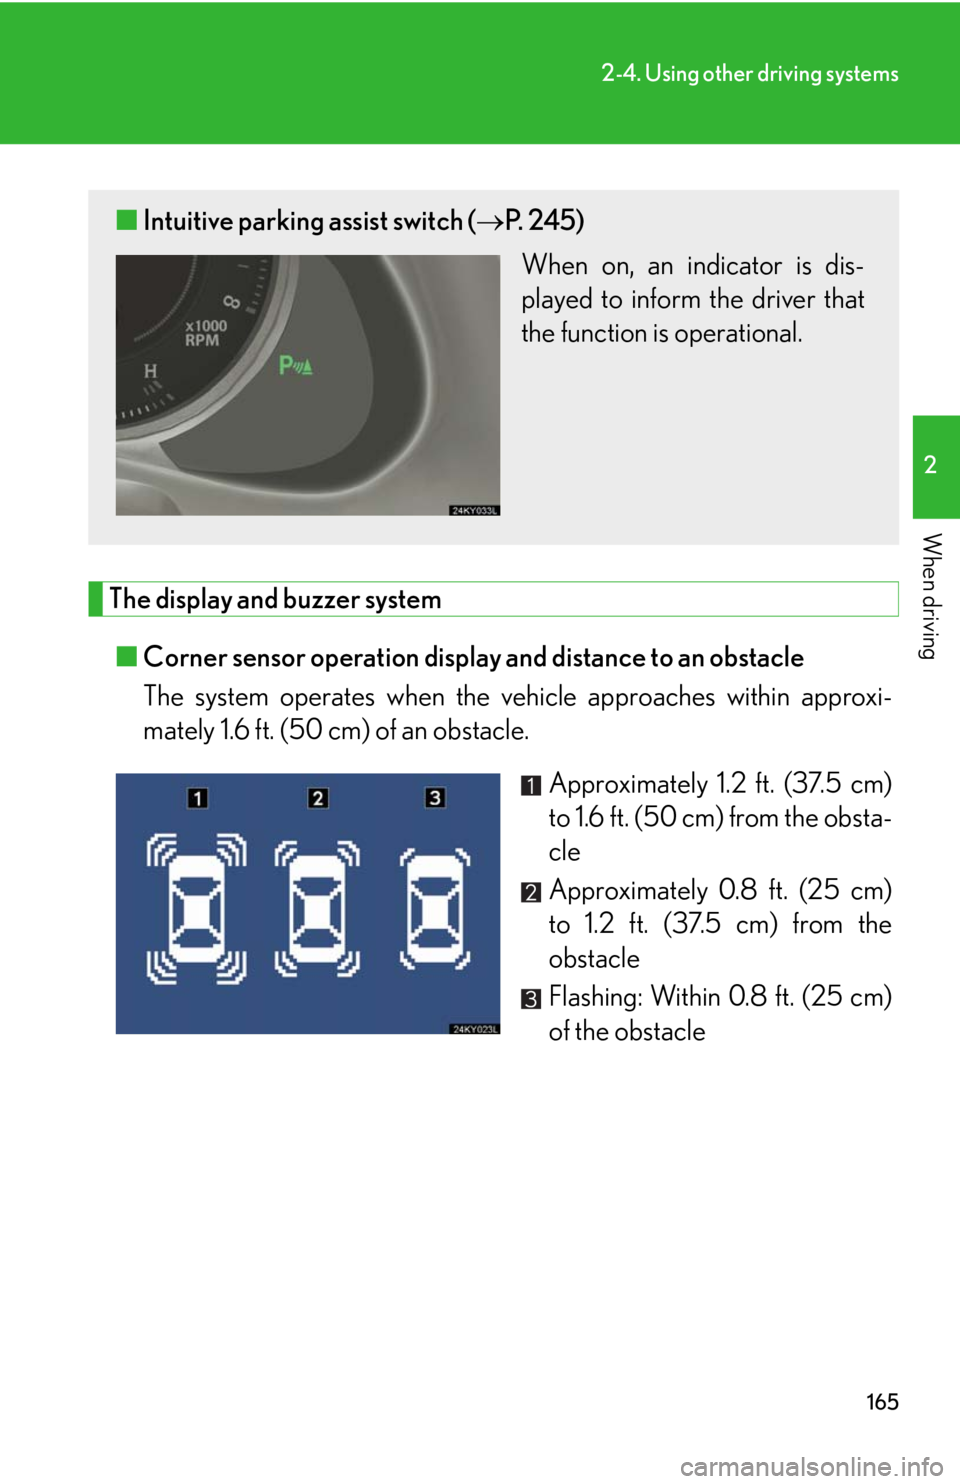
The display and buzzer system■ Corner sensor operation display and distance to an obstacle
The system operates when the vehicle approaches within approxi-
mately 1.6 ft. (50 cm) of an obstacle.
Approximately 1.2 ft. (37.5 cm)
to 1.6 ft. (50 cm) from the obsta-
cle
Approximately 0.8 ft. (25 cm)
to 1.2 ft. (37.5 cm) from the
obstacle
Flashing: Within 0.8 ft. (25 cm)
of the obstacle
■Intuitive parking assist switch ( P. 2 4 5 )
When on, an indicator is dis-
played to inform the driver that
the function is operational.
Page 166 of 464
166
2-4. Using other driving systems
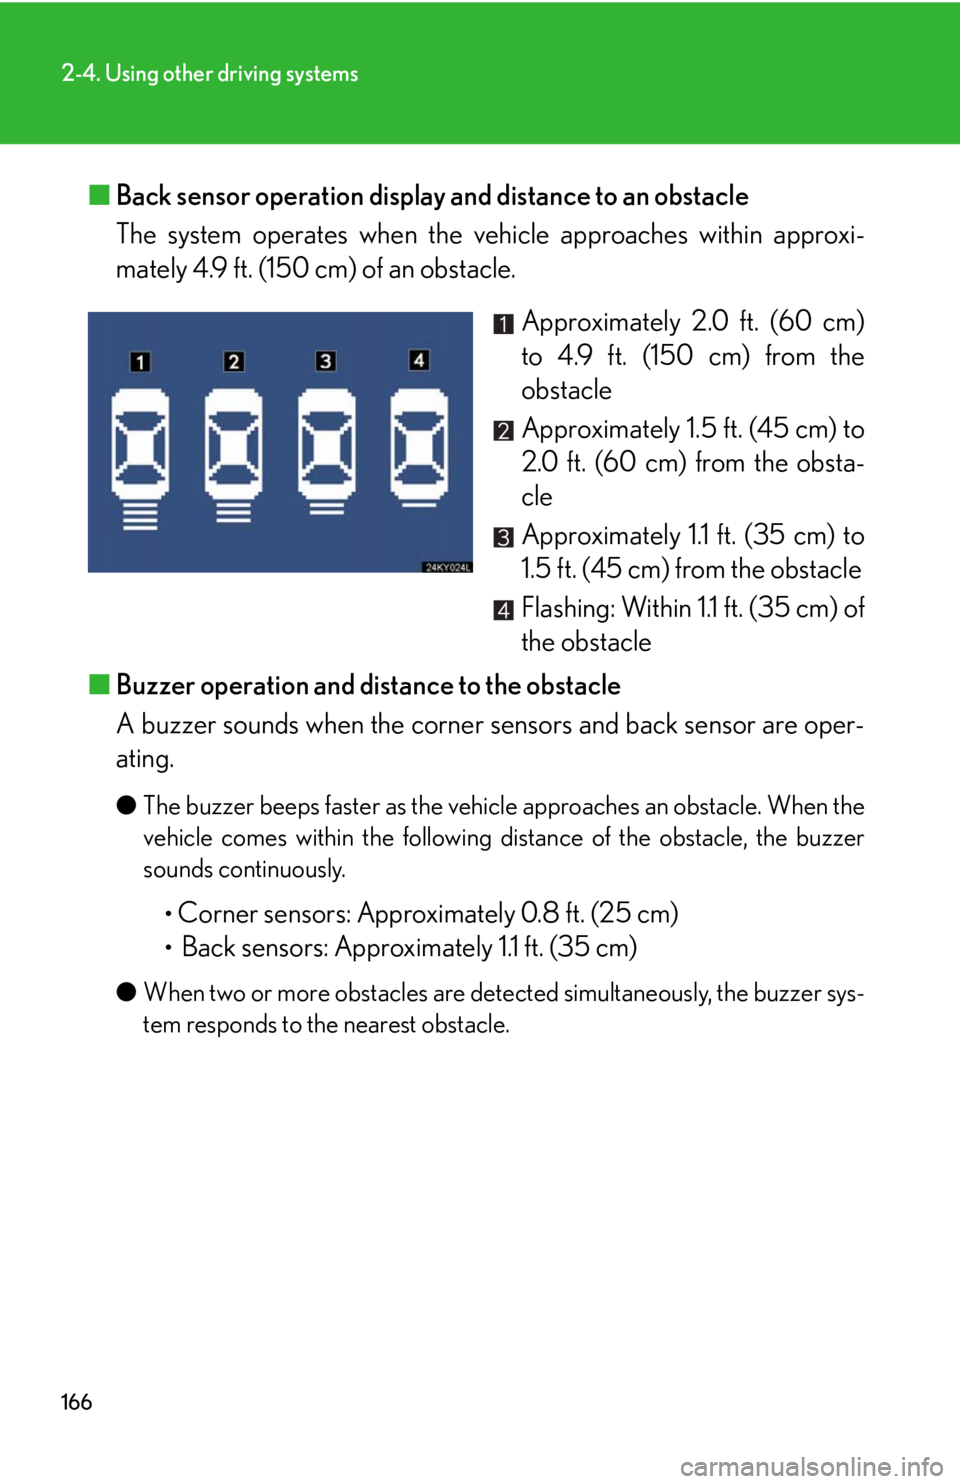
■Back sensor operation display and distance to an obstacle
The system operates when the vehicle approaches within approxi-
mately 4.9 ft. (150 cm) of an obstacle.
Approximately 2.0 ft. (60 cm)
to 4.9 ft. (150 cm) from the
obstacle
Approximately 1.5 ft. (45 cm) to
2.0 ft. (60 cm) from the obsta-
cle
Approximately 1.1 ft. (35 cm) to
1.5 ft. (45 cm) from the obstacle
Flashing: Within 1.1 ft. (35 cm) of
the obstacle
■ Buzzer operation and distance to the obstacle
A buzzer sounds when the corner se nsors and back sensor are oper-
ating.
● The buzzer beeps faster as the vehicle approaches an obstacle. When the
vehicle comes within the following distance of the obstacle, the buzzer
sounds continuously.
•Corner sensors: Approximately 0.8 ft. (25 cm)
• Back sensors: Approximately 1.1 ft. (35 cm)
●When two or more obstacles are detected simultaneously, the buzzer sys-
tem responds to the nearest obstacle.
Page 168 of 464

168
2-4. Using other driving systems
■Sensor detection information
●Certain vehicle conditions and the surrounding environment may affect the
ability of the sensor to correctly detect obstacles. Particular instances where this
may occur are listed below.
• There is dirt, snow or ice on the sensor.
• The sensor is frozen.
• The sensor is covered in any way.
• The vehicle is leaning considerably to one side.
• On an extremely bumpy road, on an incline, on gravel, or on grass.
• The vicinity of the vehicle is noisy due to vehicle horns, motorcycle engines,
air brakes of large vehicles, or other loud noises producing ultrasonic waves.
• There is another vehicle equipped with parking assist sensors in the vicinity.
• The sensor is coated with a sheet of spray or heavy rain.
• The vehicle is equipped with a fender pole or wireless antenna.
• Towing eyelets are installed.
• The bumper or sensor receives a strong impact.
• The vehicle is approaching a tall or curved curb.
• In harsh sunlight or intense cold weather
In addition to the examples above, there are instances in which, because of their
shapes, signs and other object s may be judged by the sensor to be closer than they
are.
●The shape of the obstacle may prevent th e sensor from detecting it. Pay particu-
lar attention to the following obstacles.
• Wires, fences, ropes etc.
• Cotton, snow and other materials that absorb radio waves
• Sharply-angled objects
•Low obstacles
• Tall obstacles with upper sections projec ting outwards in the direction of your
vehicle
■When the display flashes an d a message is displayed
P. 3 6 9
■Certification (Canada only)
This ISM device complies with Canadian ICES-001.
Page 192 of 464
192
3-1. Using the air conditioning system and defogger
Automatic air conditioning system
Using the automatic mode
Press .The air conditioning system will begin to operate. Air outlets
and fan speed are automatically adjusted according to the
temperature setting.
Press to switch to automatic mode. (IS350 only) Automatically switches between outside air and recirculated
air modes.
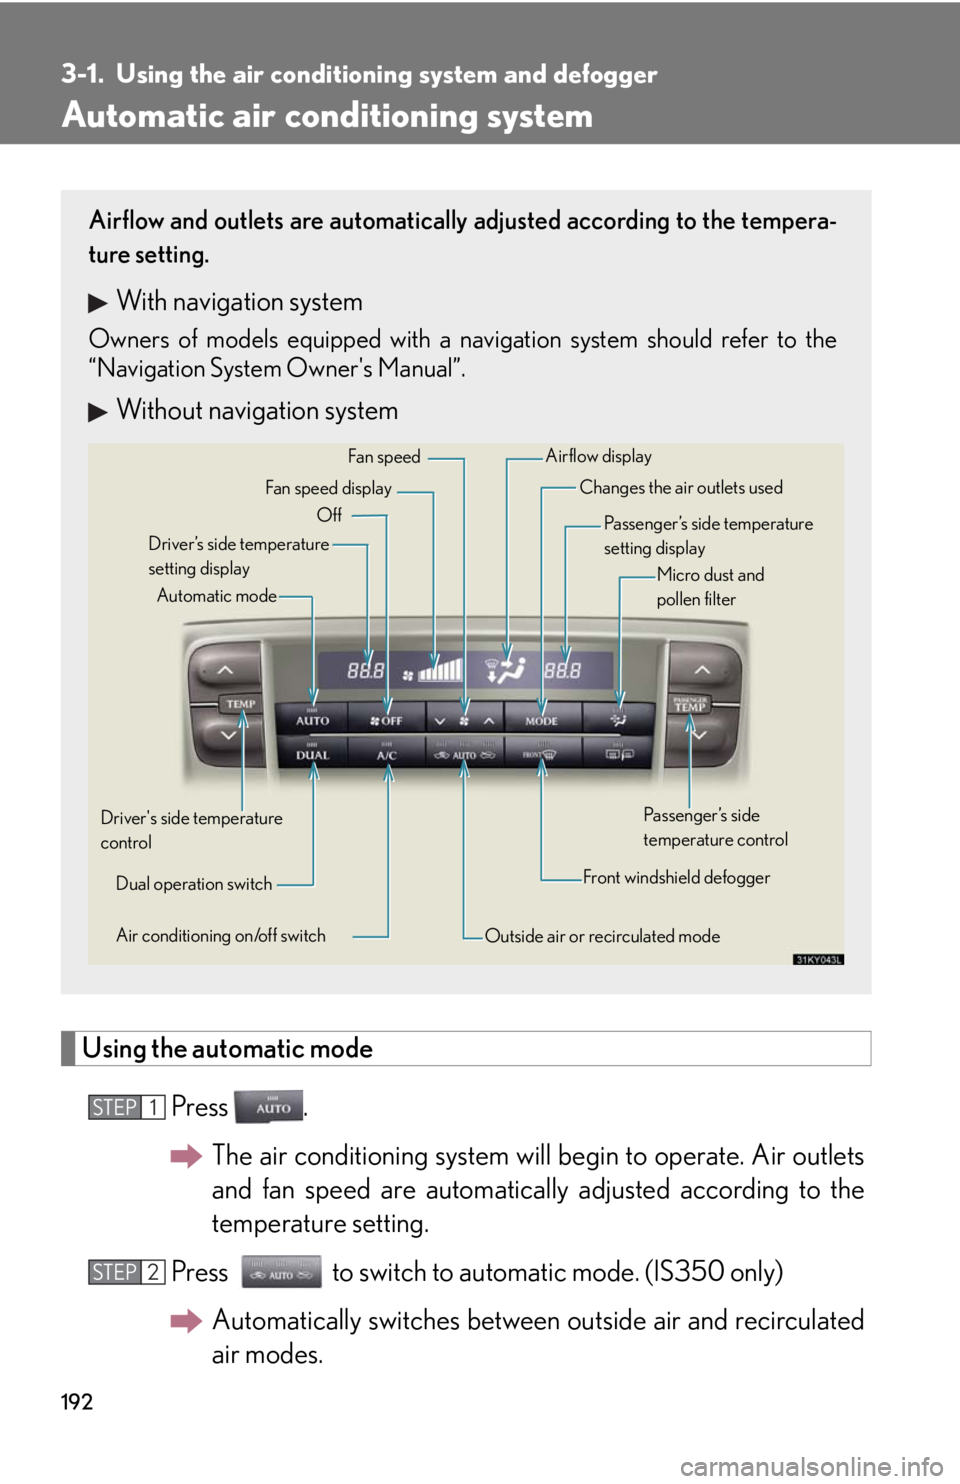
Airflow and outlets are automatically adjusted according to the tempera-
ture setting.
With navigation system
Owners of models equipped with a navigation system should refer to the
“Navigation System Owner's Manual”.
Without navigation system
Automatic mode
Driver’s side temperature
setting display Changes the air outlets used
Off Fan speed
Airflow display
Fan speed display
Passenger’s side temperature
setting displayMicro dust and
pollen filter
Driver's side temperature
control Air conditioning on/off switch Outside air or recirculated modeFront windshield defoggerPassenger’s side
temperature control
Dual operation switch
STEP1
STEP2
Page 204 of 464
204
3-2. Using the audio system
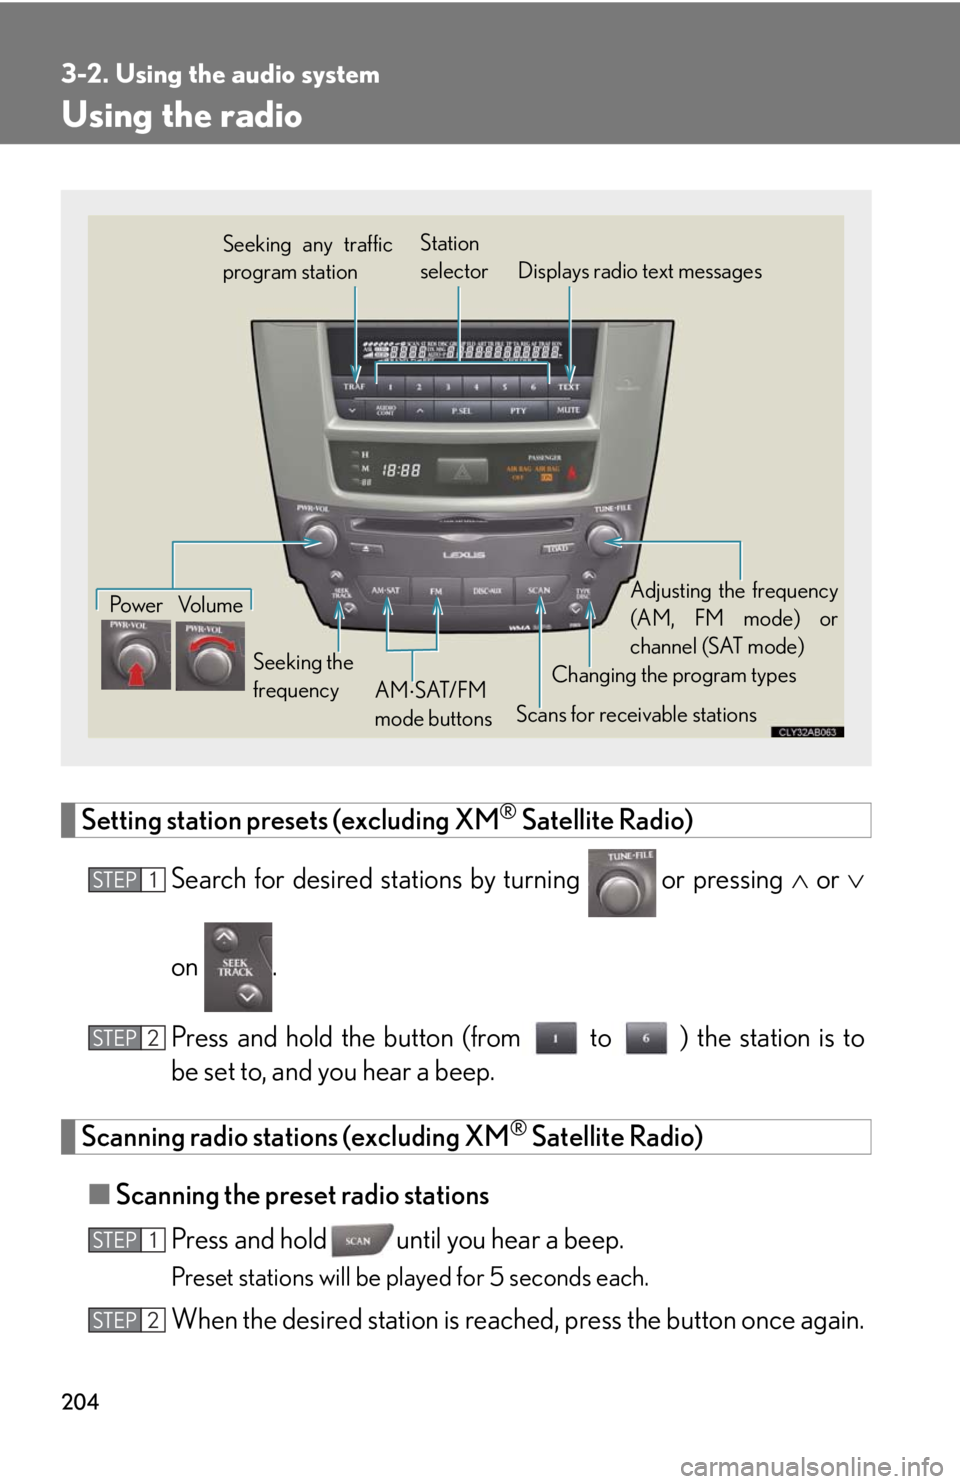
Using the radio
Setting station presets (excluding XM® Satellite Radio)
Search for desired stations by turning
or pressing or
on .
Press and hold the button (from to ) the station is to
be set to, and you hear a beep.
Scanning radio stations (excluding XM® Satellite Radio)
■ Scanning the preset radio stations
Press and hold until you hear a beep.
Preset stations will be played for 5 seconds each.
When the desired station is reach ed, press the button once again.
Seeking any traffic
program stationStation
selector Displays radio text messages
Pow e r Vo l u m e
Scans for receivable stations
Seeking the
frequency
Changing the program typesAdjusting the frequency
(AM, FM mode) or
channel (SAT mode)
AM SAT/FM
mode buttons
STEP1
STEP2
STEP1
STEP2
Page 206 of 464
206
3-2. Using the audio system
■Displaying radio station names
Press .
■ Displaying radio text messages
Press twice.
If MSG shows in the display, a text message will be displayed.
If the text continues past the end of the display, is displayed. Press and
hold until you hear a beep.
XM® Satellite Radio (if equipped)
■ Receiving XM
® Satellite Radio
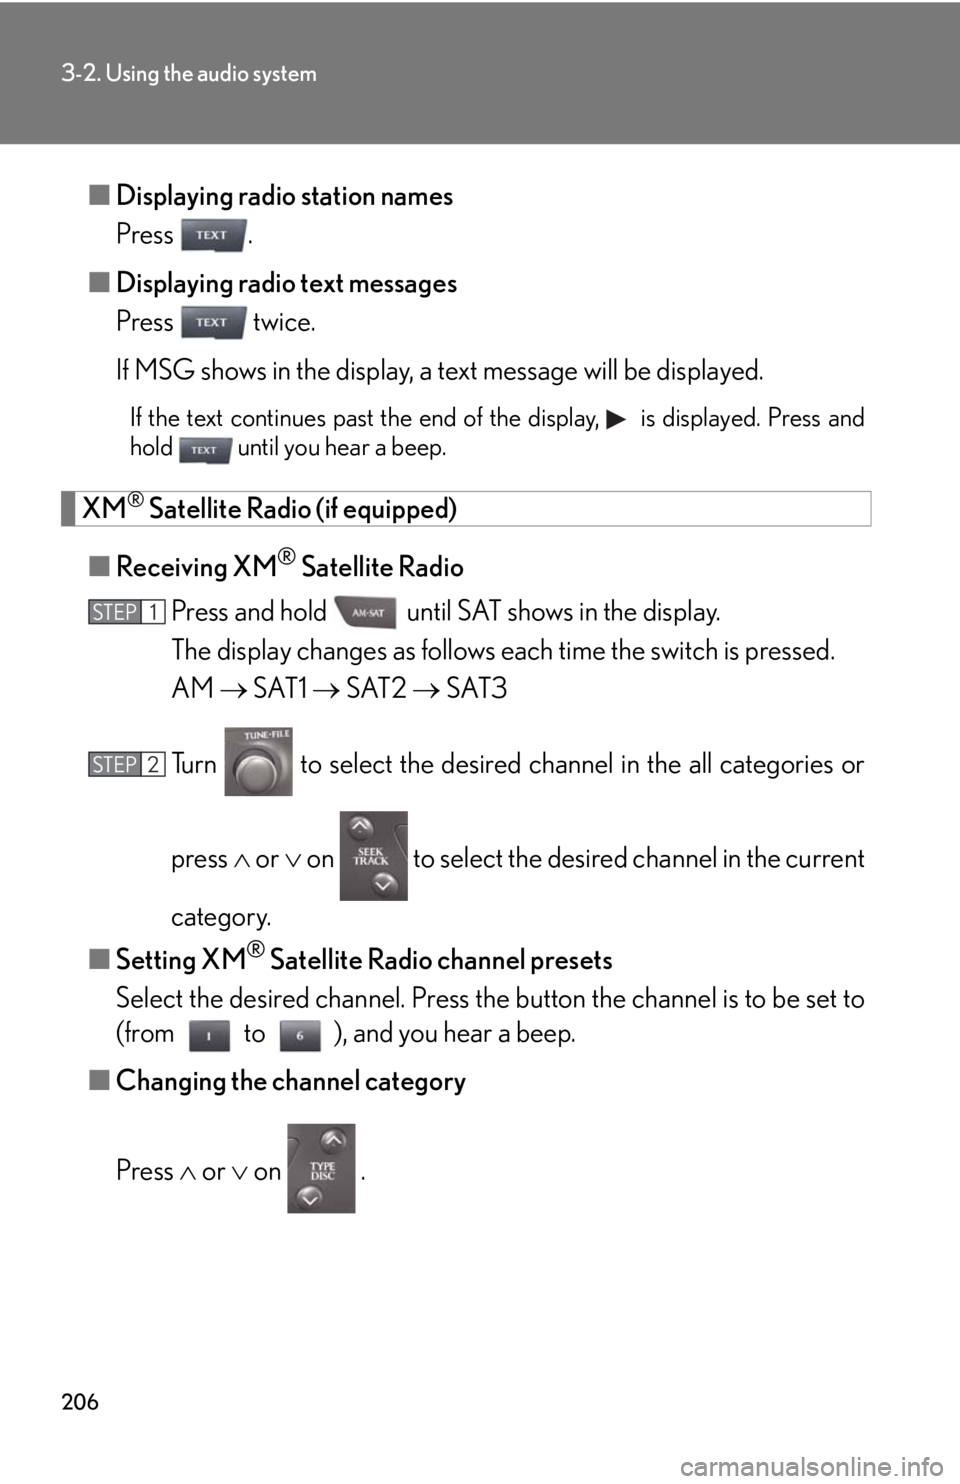
Press and hold until SAT shows in the display.
The display changes as follows each time the switch is pressed.
AM SAT1 SAT2 SAT3
Turn to select the desired channel in the all categories or
press or on to select the desired channel in the current
category.
■ Setting XM
® Satellite Radio channel presets
Select the desired channel. Press the button the channel is to be set to
(from to ), and you hear a beep.
■ Changing the channel category
Press or on .
STEP1
STEP2
Page 207 of 464
207
3-2. Using the audio system
3
Interior features
■Scanning XM® Satellite Radio channels
● Scanning channels in the current category
Press .
When the desired channel is reached, press the switch
again.
● Scanning preset channels
Press and hold until you hear a beep.
When the desired channel is reached, press the switch
again.
■ Displaying text information
Press .
The display will show up to 10 characters.
The display changes as follows each time the button is pressed.
● CH NAME
● TITLE (SONG/PROGRAM TITLE)
● NAME (ARTIST NAME/FEATURE)
● CH NUMBER
STEP1
STEP2
STEP1
STEP2
Page 209 of 464
209
3-2. Using the audio system
3
Interior features
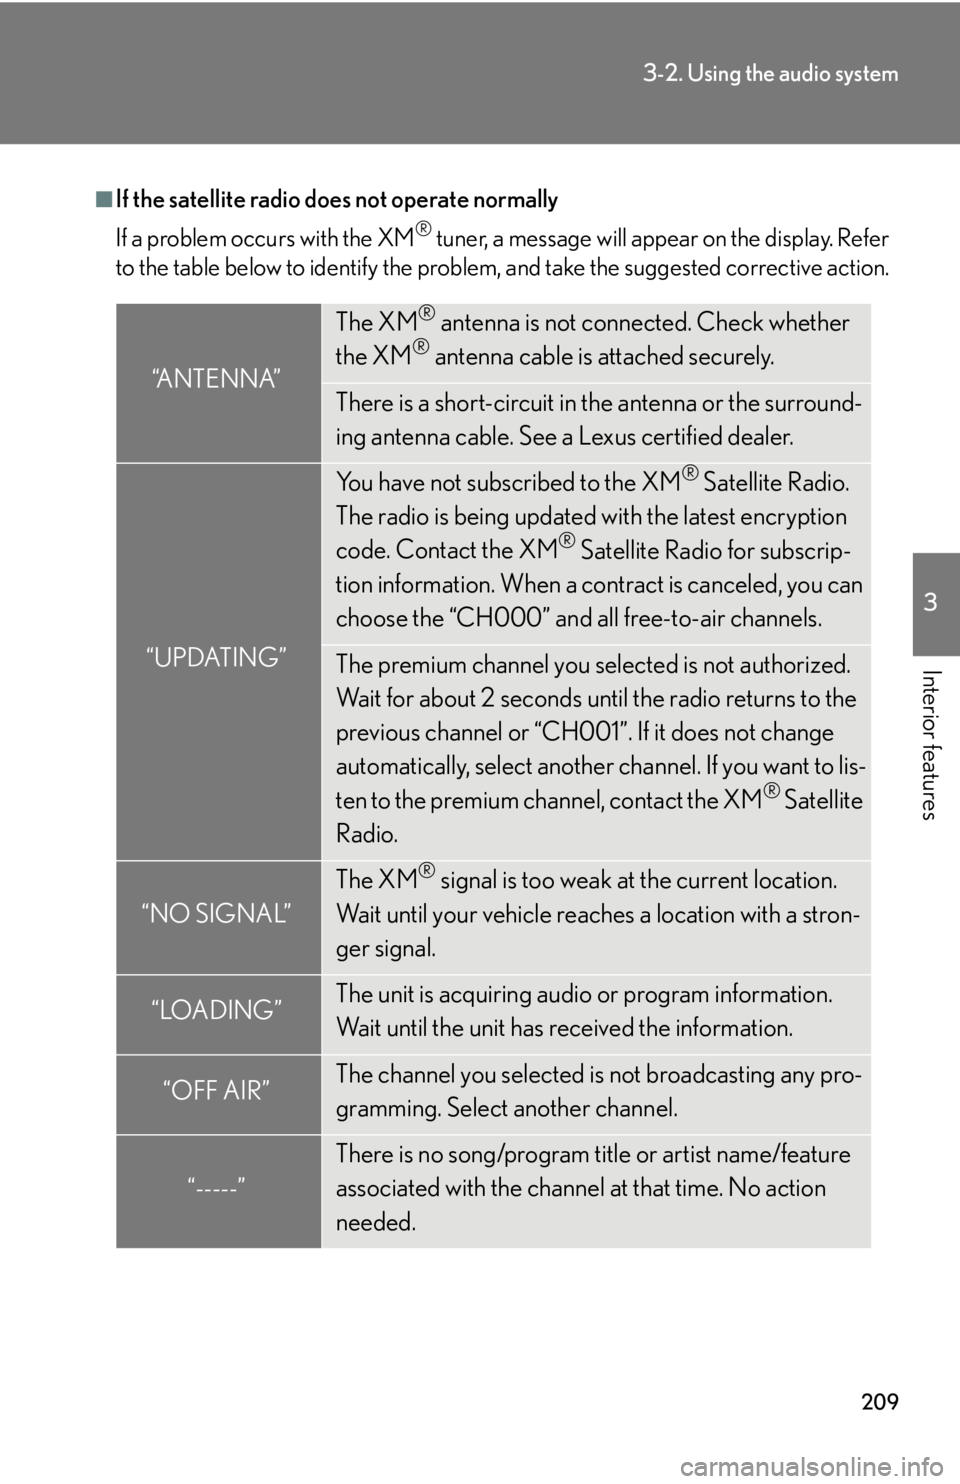
■If the satellite radio does not operate normally
If a problem occurs with the XM
® tuner, a message will appear on the display. Refer
to the table below to identify the problem, and take the suggested corrective action.
“ANTENNA”
The XM® antenna is not connected. Check whether
the XM® antenna cable is attached securely.
There is a short-circuit in the antenna or the surround-
ing antenna cable. See a Lexus certified dealer.
“UPDATING”
You have not subscribed to the XM® Satellite Radio.
The radio is being updated with the latest encryption
code. Contact the XM
® Satellite Radio for subscrip-
tion information. When a co ntract is canceled, you can
choose the “CH000” and all free-to-air channels.
The premium channel you selected is not authorized.
Wait for about 2 seconds until the radio returns to the
previous channel or “CH001”. If it does not change
automatically, select another channel. If you want to lis-
ten to the premium channel, contact the XM
® Satellite
Radio.
“NO SIGNAL”
The XM® signal is too weak at the current location.
Wait until your vehicle reaches a location with a stron-
ger signal.
“LOADING”The unit is acquiring audio or program information.
Wait until the unit has received the information.
“OFF AIR”The channel you selected is not broadcasting any pro-
gramming. Select another channel.
“-----”
There is no song/program title or artist name/feature
associated with the channel at that time. No action
needed.
Page 211 of 464
211
3-2. Using the audio system
3
Interior features
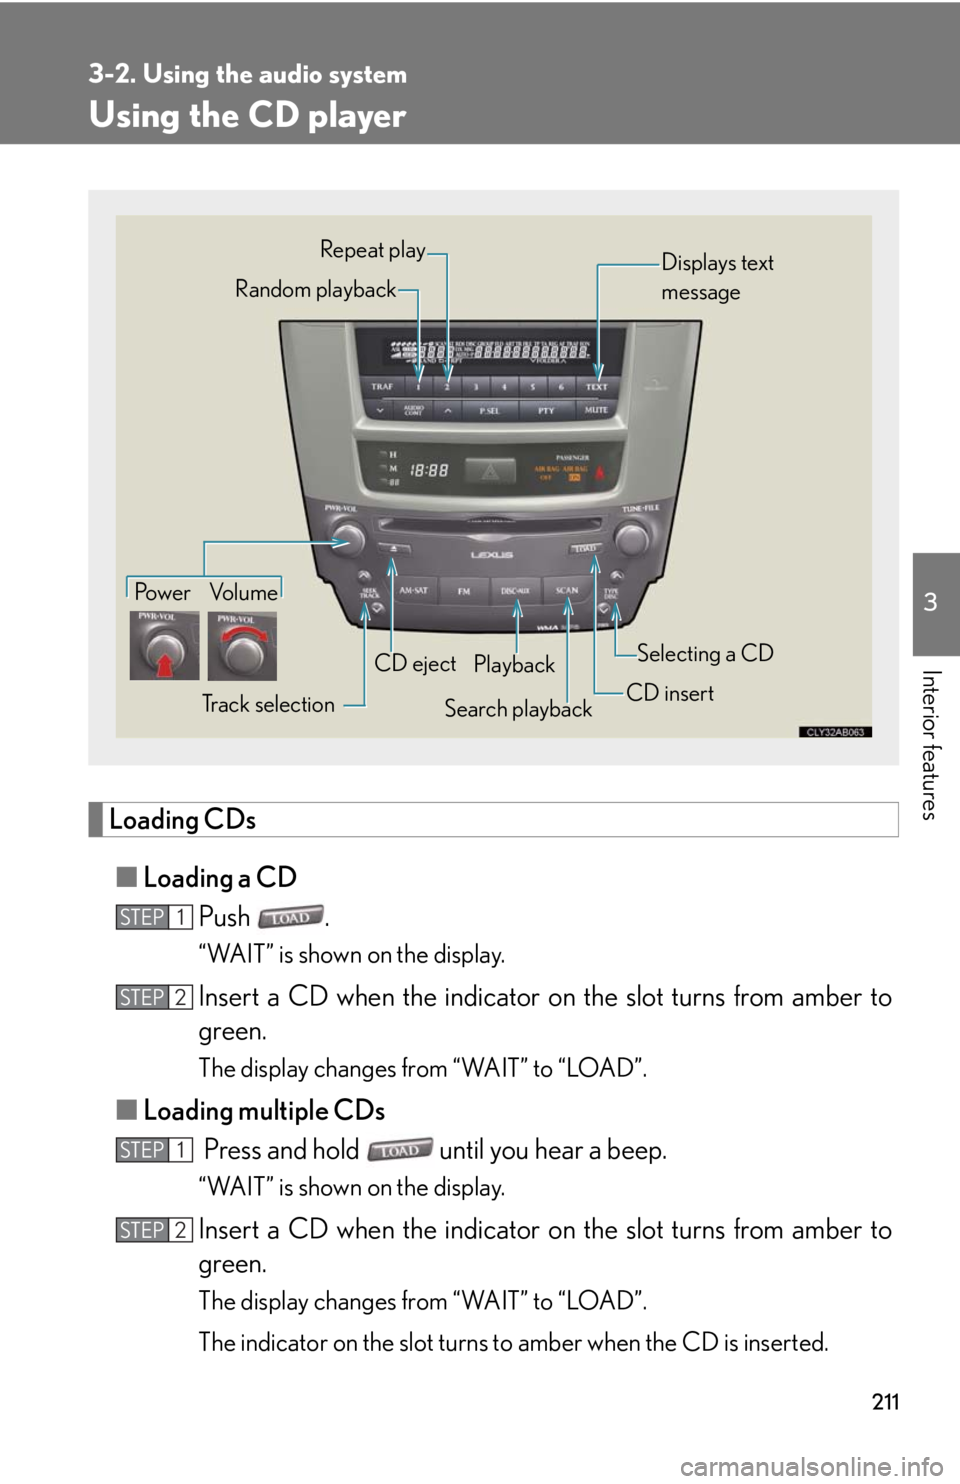
Using the CD player
Loading CDs■ Loading a CD
Push .
“WAIT” is shown on the display.
Insert a CD when the indicator on the slot turns from amber to
green.
The display changes from “WAIT” to “LOAD”.
■Loading multiple CDs
Press and hold until you hear a beep.
“WAIT” is shown on the display.
Insert a CD when the indicator on the slot turns from amber to
green.
The display changes from “WAIT” to “LOAD”.
The indicator on the slot turns to amber when the CD is inserted.
Po w e r Vo l u m e
Track selectionCD eject
Playback
Search playback CD insertSelecting a CD
Random playback Repeat play
Displays text
message
STEP1
STEP2
STEP1
STEP2