ECO mode Lexus IS250 2009 Using the audio system / LEXUS 2009 IS350/250 (OM53669U) Owner's Guide
[x] Cancel search | Manufacturer: LEXUS, Model Year: 2009, Model line: IS250, Model: Lexus IS250 2009Pages: 488, PDF Size: 6.24 MB
Page 222 of 488

222
3-2. Using the audio system
Using the radio
Setting station presets (excluding XM® Satellite Radio)
Search for desired stations by turning
or pressing “ ” or
“ ” on .
Press and hold the button (from to ) the station is to
be set to until you hear a beep.
Scanning radio stations (excluding XM® Satellite Radio)
■ Scanning the preset radio stations
Press and hold until you hear a beep.
Preset stations will be played for 5 seconds each.
When the desired station is reached, press once again.
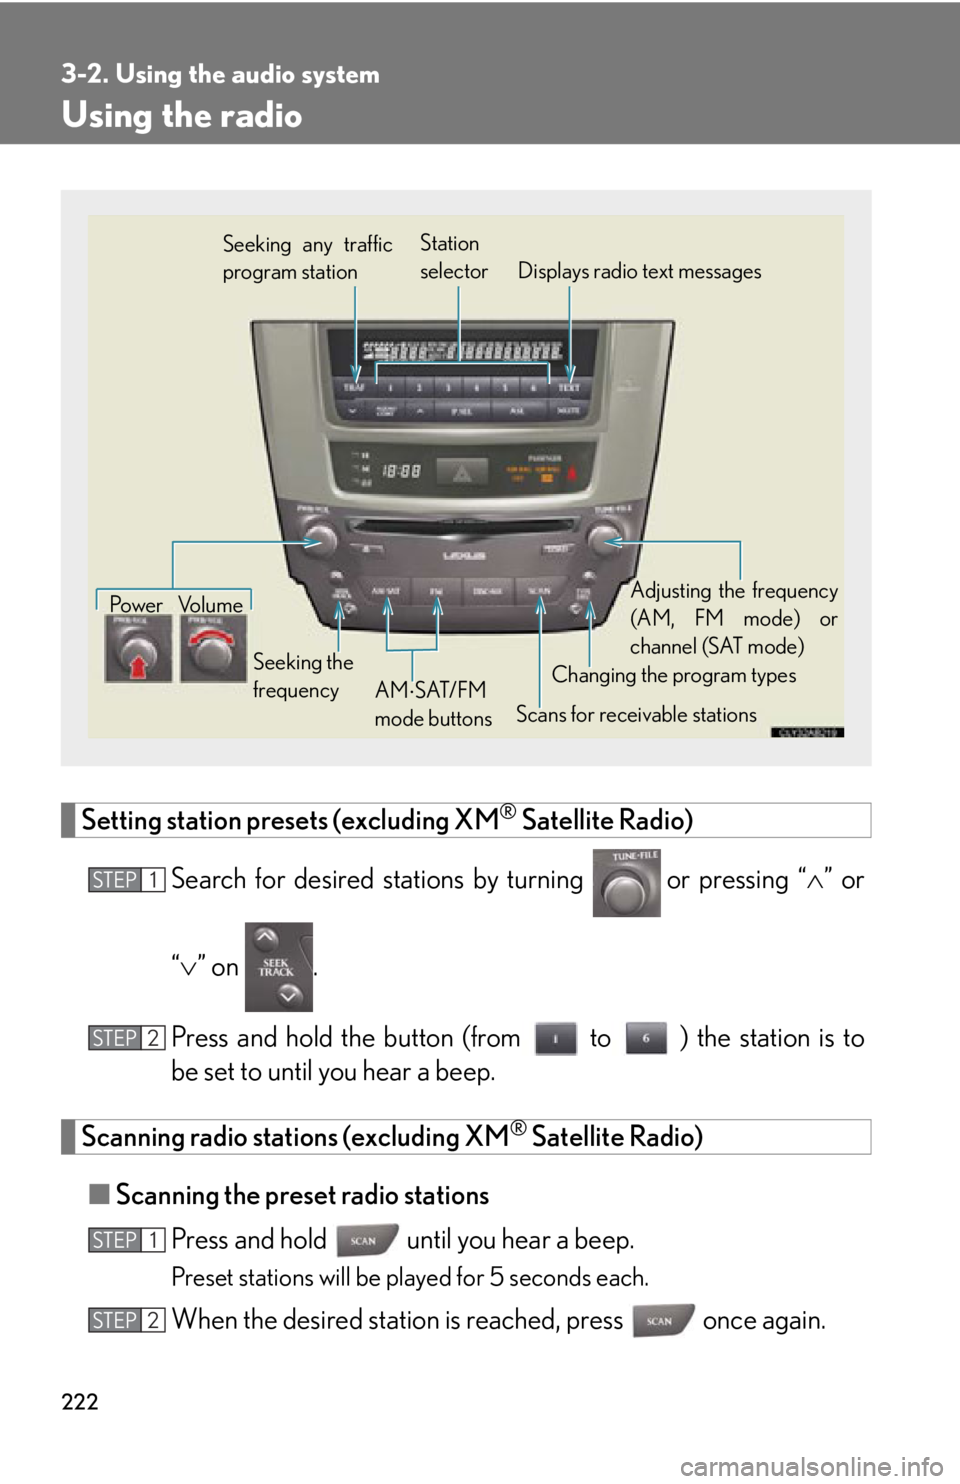
Seeking any traffic
program station Station
selector Displays radio text messages
Pow e r Vo l u m e
Scans for receivable stations
Seeking the
frequency
Changing the program typesAdjusting the frequency
(AM, FM mode) or
channel (SAT mode)
AM SAT/FM
mode buttons
STEP1
STEP2
STEP1
STEP2
Page 238 of 488

238
3-2. Using the audio system
■Lens cleaners
Do not use lens cleaners. Doing so may damage the CD player.
■MP3 and WMA files
MP3 (MPEG Audio LAYER 3) is a standard audio compression format.
Files can be compressed to approximately 1 /10 of their original size by using MP3
compression.
WMA (Windows Media
TM Audio) is a Microsoft audio compression format.
This format compresses audio data to a size smaller than that of the MP3 format.
There is a limit to the MP3 and WMA file standards and to the media/formats
recorded by them that can be used.
●MP3 file compatibility
• Compatible standards MP3 (MPEG1 LAYER3, MPEG2 LSF LAYER3)
• Compatible sampling frequencies MPEG1 LAYER3: 32, 44.1, 48 (kHz)
MPEG2 LSF LAYER3: 16, 22.05, 24 (kHz)
• Compatible bit rates (compatible with VBR) MPEG1 LAYER3: 64, 80, 96, 112, 128, 160, 192, 224, 256, 320 (kbps)
MPEG2 LSF LAYER3: 64, 80, 96, 112, 128, 144, 160 (kbps)
• Compatible channel modes: stereo, joint stereo, dual channel and monaural
●WMA file compatibility
• Compatible standards
WMA Ver. 7, 8, 9
• Compatible sampling frequencies 32, 44.1, 48 (kHz)
• Compatible bit rates (only compat ible with 2-channel playback)
Ver. 7, 8: CBR 48, 64, 80, 96, 128, 160, 192 (kbps)
Ver. 9: CBR 48, 64, 80, 96, 128, 160, 192, 256, 320 (kbps)
Page 239 of 488

239
3-2. Using the audio system
3
Interior features
●Compatible media
Media that can be used for MP3 and WMA playback are CD-Rs and CD-RWs.
Playback in some instances may not be possible, depending on the status of the
CD-R or CD-RW. Playback may not be po ssible or the audio may jump if the disc
is scratched or marked with fingerprints.
●Compatible disc formats
The following disc formats can be used.
• Disc formats: CD-ROM Mode 1 and Mode 2
CD-ROM XA Mode 2, Form 1 and Form 2
• File formats: ISO9660 Level 1, Level 2, (Romeo, Joliet) MP3 and WMA files written in any format other than those listed above may
not play correctly, and their file names and folder names may not be dis-
played correctly.
Items related to standards and limitations are as follows.
• Maximum directory hierarchy: 8 levels
• Maximum length of folder names/file names: 32 characters
• Maximum number of folders: 192 (including the root)
• Maximum number of files per disc: 255
●File names
The only files that can be recognized as MP3/WMA and played are those with
the extension .mp3 or .wma.
●Multi-sessions
As the audio system is compatible with multi-sessions, it is possible to play discs
that contain MP3 and WMA files. However, only the first session can be played.
●ID3 and WMA tags
ID3 tags can be added to MP3 files, making it possible to record the track title
and artist name, etc.
The system is compatible with ID3 Ver. 1. 0, 1.1, and Ver. 2.2, 2.3 ID3 tags. (The
number of characters is based on ID3 Ver. 1.0 and 1.1.)
WMA tags can be added to WMA files, ma king it possible to record the track
title and artist name in the same way as with ID3 tags.
Page 245 of 488

245
3-2. Using the audio system
3
Interior features
Using the steering wheel audio switches
Turning on the power
Press when the audio system is turned off.
The audio system can be turned off by holding down for 1 second or
more.
Changing the audio source
Press when the audio system is turned on. The audio source
changes as follows each time is pressed. If no discs are inserted in
the player, that mode will be skipped.
FM1 FM2 CD changer AUXAM SAT1 SAT2 SAT3
Adjusting the volume
Press “+” on to increase the volu me and “-” to decrease the vol-
ume.
Hold down to continue increa sing or decreasing the volume.
Some audio features can be controlled using the switches on the steering
wheel.
Turns the power on, select
audio source
Vo l u m e
Radio: Select radio stations
CD: Select tracks, files (MP3
and WMA) and discs
Page 267 of 488

267
3-5. Other interior features
3
Interior features
■The seat heaters can be used when
The “ENGINE START STOP” switch is in IGNITION ON mode.
■When not in use
Set the dial to “0”. The indicator light turns off.
Vehicles with a manual transmissionHeats the seats
The indicator light comes on.
The higher the number, the
warmer the seats become.Front
passenger’s
seat
Driver’s
seat
Page 270 of 488

270
3-5. Other interior features
■The seat heaters and ventilators can be used when
The “ENGINE START STOP” switch is in IGNITION ON mode.
■When not in use
Set the dial to “0”. The indicator light turns off.
Vehicles with a manual transmissionHeats the seats
The indicator light (amber)
comes on.
The higher the number, the
warmer the seats become.
Blows air from the seats
The indicator light (green)
comes on.
The higher the number, the
stronger the airflow becomes.
Driver’s
seatFront
passenger’s
seat
Page 316 of 488

316
4-3. Do-it-yourself maintenance
■Engine oil consumption
●The amount of engine oil consumed depends on the oil viscosity, the quality of
the oil and the way the vehicle is driven.
●More oil is consumed under driving conditions such as high speeds and fre-
quent acceleration and deceleration.
●A new engine consumes more oil.
●When judging the amount of oil consumpt ion, keep in mind that the oil may
have become diluted, making it difficult to judge the true level accurately.
●Oil consumption: Max. 1.1 qt./600 miles, 0.9 lmp.qt./600 miles (1.0 L per 1000
km)
●If you consume more than 1.1 qt. (1.0 L, 0.9 lmp.qt.) every 600 miles (1000 km),
contact your Lexus dealer.
■After changing the engine oil (U.S.A. only)
The oil change system should be reset. Perform the following procedures:
Switch the display to the odometer ( P. 142) when the engine is running.
Turn the “ENGINE START STOP” switch OFF.
While pressing the trip meter reset button, set the “ENGINE START
STOP” switch to the IGNITION ON mode (but do not start the engine
because otherwise the reset mode will be cancelled). Continue to press
and hold the button until the trip meter displays 000000.
CAUTION
■Used engine oil
●Used engine oil contains potentially harmful contaminants which may cause skin
disorders such as inflammati on or skin cancer, so care should be taken to avoid
prolonged and repeated contact. To remove used engine oil from your skin, wash
thoroughly with soap and water.
●Dispose of used oil and filters only in a safe and acceptable manner. Do not dis-
pose of used oil and filters in househol d trash, in sewers or onto the ground.
Call your Lexus dealer, service station or auto parts store for information con-
cerning recycling or disposal.
●Do not leave used engine oil within the reach of children.
STEP1
STEP2
STEP3
Page 325 of 488

325
4-3. Do-it-yourself maintenance
4
Maintenance and care
Tires
Replace or rotate tires in accordance with maintenance schedules and
treadwear.
■Checking tires
New tread
Treadwear indicator
Worn tread
The location of treadwear indi-
cators is shown by the “TWI” or
“” marks, etc., molded on the
sidewall of each tire.
Check spare tire condition and
pressure if not rotated.
■ Tire rotation
2WD models with 16-inch tires or AWD models
Rotate the tires in the order
shown.
To equalize tire wear and extend
tire life, Lexus recommends that
tire rotation is carried out at the
same interval as tire inspection.
Do not fail to initialize the tire
pressure warning system after
tire rotation.
2WD models with non-directional 17-inch tiresRotate the tires in the order
shown.
To equalize tire wear and extend
tire life, Lexus recommends that
tire rotation is carried out at the
same interval as tire inspection.
Front
Front
Page 329 of 488

329
4-3. Do-it-yourself maintenance
4
Maintenance and care
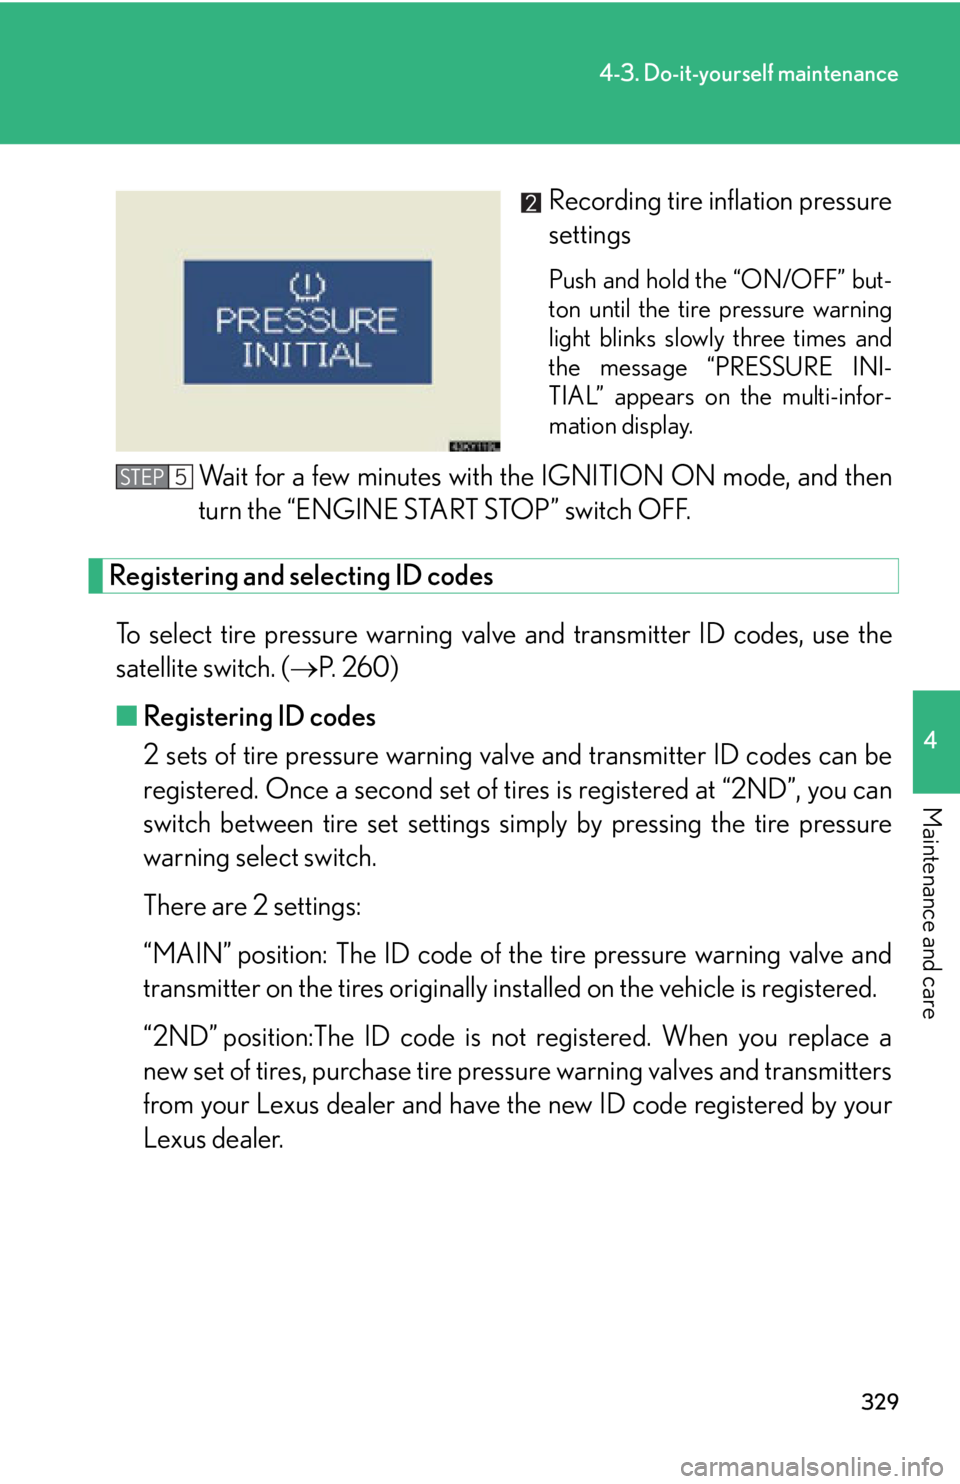
Recording tire inflation pressure
settings
Push and hold the “ON/OFF” but-
ton until the tire pressure warning
light blinks slowly three times and
the message “PRESSURE INI-
TIAL” appears on the multi-infor-
mation display.
Wait for a few minutes with the IGNITION ON mode, and then
turn the “ENGINE START STOP” switch OFF.
Registering and selecting ID codesTo select tire pressure warning valve and transmitter ID codes, use the
satellite switch. ( P. 260)
■ Registering ID codes
2 sets of tire pressure warning va lve and transmitter ID codes can be
registered. Once a second set of ti res is registered at “2ND”, you can
switch between tire set settings simply by pressing the tire pressure
warning select switch.
There are 2 settings:
“MAIN” position: The ID code of the tire pressure warning valve and
transmitter on the tires originally installed on the vehicle is registered.
“2ND” position:The ID code is not registered. When you replace a
new set of tires, purchase tire pressure warning valves and transmitters
from your Lexus dealer and have th e new ID code registered by your
Lexus dealer.
STEP5
Page 334 of 488

334
4-3. Do-it-yourself maintenance
CAUTION
■Tire pressure warning system operation
The tire pressure warning system may not provide warning immediately if a tire
bursts or if sudden air leakage occurs.
■When inspecting or replacing tires
Observe the following precautions to prevent accidents. Failure to do so may cause
damage to parts of the drive train, as well as dangerous handling characteristics,
which may lead to fatal or injury accidents.
●Do not mix tires of different makes, models, tread patterns or treadwear.
●Do not use tire sizes other than those recommended by Lexus.
●Do not mix radial, bias-belted, or bias-ply tires.
●Do not mix summer, all season and winter tires.
●Do not use tires that have been used on another vehicle.
Do not use tires if you do not know how they were used previously.
■When initializing the tire pressure warning system
Do not press the satellite switch without first adjusting the tire inflation pressure to
the specified level. Otherwise, the tire pressure warning light may not come on
even if the tire inflation pressure is low, or it may come on when the tire inflation
pressure is actually normal.
NOTICE
■Repairing or replacing tires, wheels and tire pressure warning valves and trans-
mitters
When removing or fitting the wheels, tire s or the tire pressure warning valve and
transmitter, contact your Lexus dealer as the tire pressure warning valve and trans-
mitter may be damaged if not handled correctly.
■To avoid damaging the tire pressu re warning valves and transmitters
Do not use liquid sealants on flat tires.