engine Lexus IS250 2010 Navigation Manual
[x] Cancel search | Manufacturer: LEXUS, Model Year: 2010, Model line: IS250, Model: Lexus IS250 2010Pages: 391, PDF Size: 38.06 MB
Page 247 of 391
AUDIO/VIDEO SYSTEM
246
(a) Connecting Bluetoothraudio play-
er
To use the Bluetooth raudio system,
you need to enter your portable player
into the system. Once you have
registered it, you can enjoy your music
on the vehicle’s audio system. (See “—
Setting Bluetooth raudio” on page
355.)
For the operation procedure for the
portable player, see the instruction
manual that comes with it.
DWhen the connection method is
“From Vehicle”.
DWhen the auto connection is on
When the portable player is
standby for the connection, it
will be automatically connected
whenever the “ENGINE START
STOP” switch is in either AC-
CESSORY or IGNITION ON
mode.
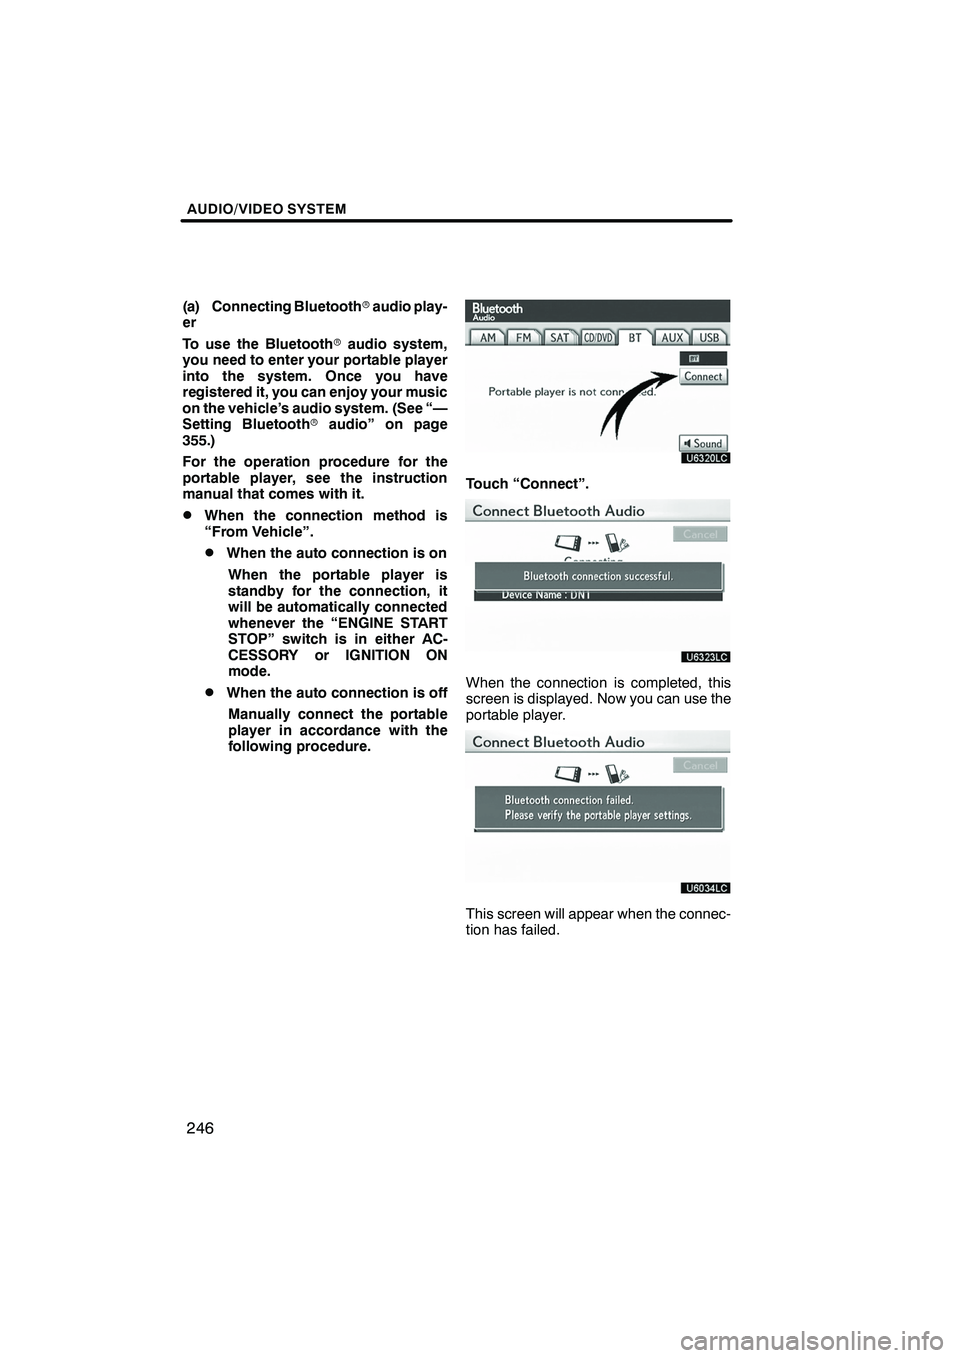
DWhen the auto connection is offManually connect the portable
player in accordance with the
following procedure.
Touch “Connect”.
When the connection is completed, this
screen is displayed. Now you can use the
portable player.
This screen will appear when the connec-
tion has failed.
ISF/IS NAVI (U)
Finish
Page 248 of 391
AUDIO/VIDEO SYSTEM
247
D
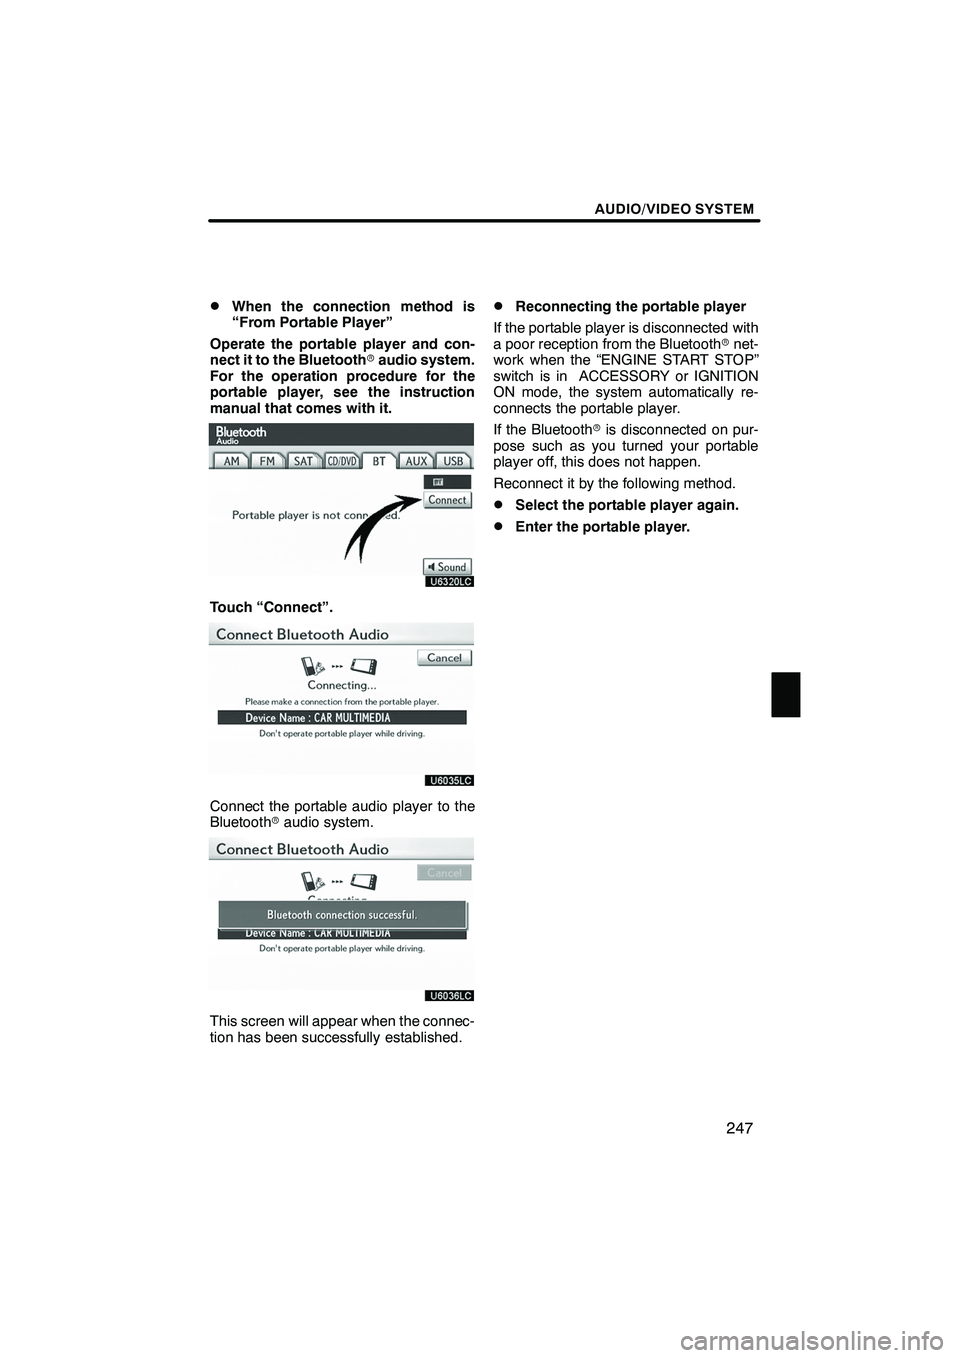
When the connection method is
“From Portable Player”
Operate the portable player and con-
nect it to the Bluetooth raudio system.
For the operation procedure for the
portable player, see the instruction
manual that comes with it.
Touch “Connect”.
Connect the portable audio player to the
Bluetooth raudio system.
This screen will appear when the connec-
tion has been successfully established.
DReconnecting the portable player
If the portable player is disconnected with
a poor reception from the Bluetooth rnet-
work when the “ENGINE START STOP”
switch is in ACCESSORY or IGNITION
ON mode, the system automatically re-
connects the portable player.
If the Bluetooth ris disconnected on pur-
pose such as you turned your portable
player off, this does not happen.
Reconnect it by the following method.
DSelect the portable player again.
DEnter the portable player.
ISF/IS NAVI (U)
Finish
7
Page 272 of 391
AIR CONDITIONING
271
12Micro dust and pollen filter button279
...........................
13“OFF” button 272, 274
..........
14“AUTO” button 272
............
15“TEMP” buttons
(Driver side temperature control but-
ton) (At the independent mode that
display shows “DUAL”; mainly for
driver and secondarily for front pas-
senger)
(At the linked mode that display does
not show “DUAL”; for driver)
272, 274
.......................
16“CLIMATE” button
(Air conditioning operation screen
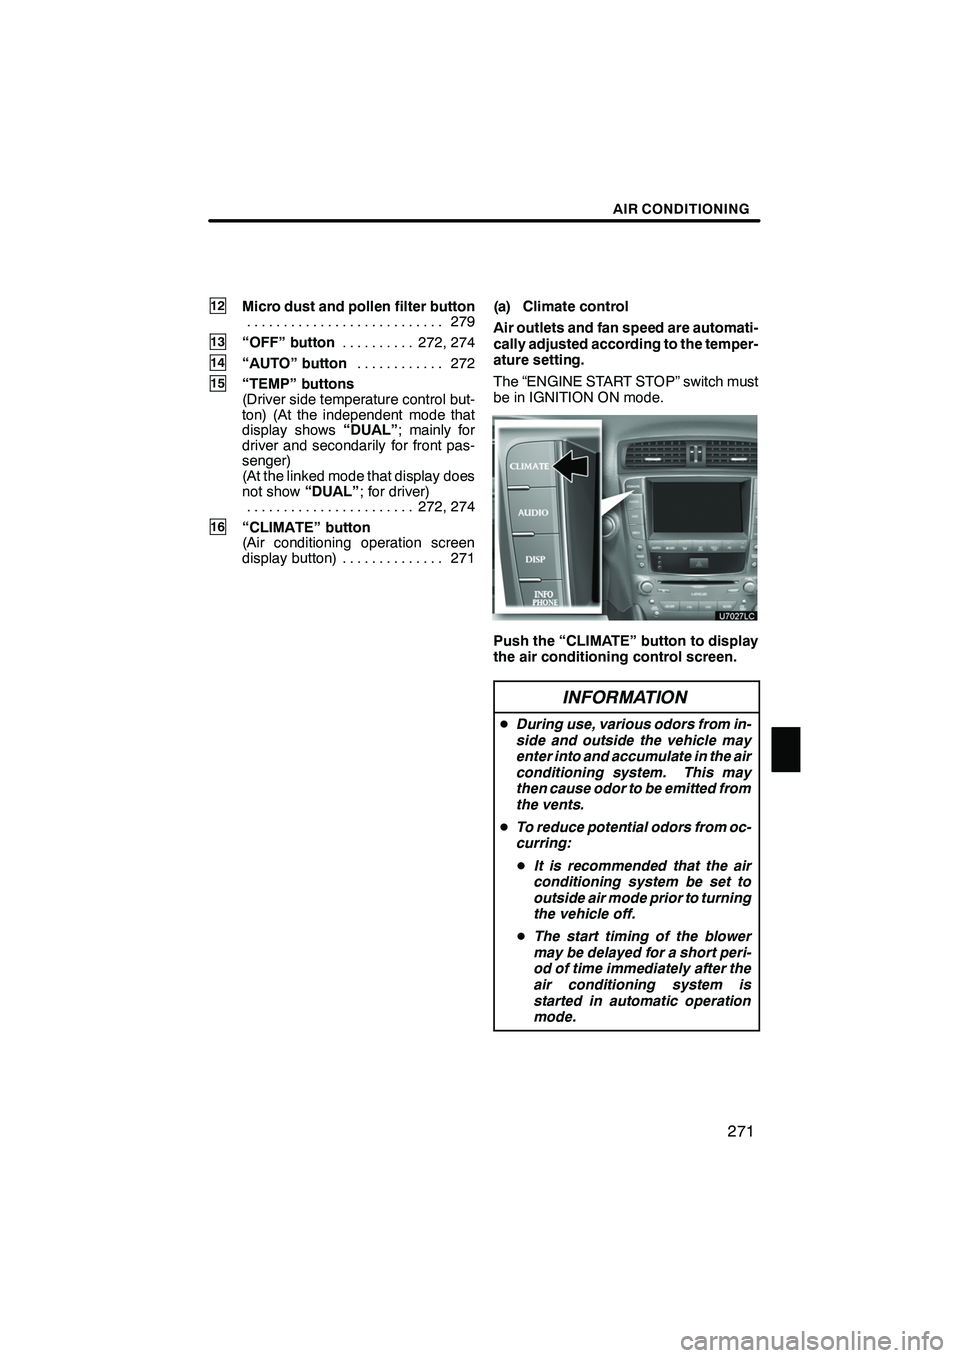
display button) 271 .............. (a) Climate control
Air outlets and fan speed are automati-
cally adjusted according to the temper-
ature setting.
The “ENGINE START STOP” switch must
be in IGNITION ON mode.
Push the “CLIMATE” button to display
the air conditioning control screen.
INFORMATION
D
During use, various odors from in-
side and outside the vehicle may
enter into and accumulate in the air
conditioning system. This may
then cause odor to be emitted from
the vents.
D To reduce potential odors from oc-
curring:
D It is recommended that the air
conditioning system be set to
outside air mode prior to turning
the vehicle off.
D The start timing of the blower
may be delayed for a short peri-
od of time immediately after the
air conditioning system is
started in automatic operation
mode.
ISF/IS NAVI (U)
Finish
8
Page 273 of 391

AIR CONDITIONING
272
NOTICE
To prevent the battery from being dis-
charged, do not leave the air condi-
tioning on longer than necessary
when the engine is not running.
By pushing the switch above, you can
operate the voice command system.
For the operation of the voice command
system and the command, see pages 44
and 49.(b) Using automatic air conditioning
system
DSwitching to automatic operation
mode
Push the “AUTO” button.
The air conditioning system begins to op-
erate. Air outlets and fan speed are auto-
matically adjusted according to the tem-
perature setting.
Push
“OFF” button to turn the air condi-
tioning system off.
DSetting the vehicle interior tempera-
ture
Push the “ ” button on “TEMP” to in-
crease the temperature and “ ” to de-
crease the temperature.
ISF/IS NAVI (U)
Finish
Page 279 of 391
AIR CONDITIONING
278
DSwitching between outside air and
recirculated air modes
Recirculated air mode or outside
air mode may be automatically
switched to in accordance with the
temperature setting and the inside
temperature.
D Window defogger feature
Recirculated air mode may auto-
matically switch to outside air
mode in situations where the win-
dows need to be defogged.
D When outside air temperature is
below 32 _F(0 _C)
The cooling and dehumidification
function may not operate even
when “A/C” is on.
D When the indicator light on “A/C”
flashes
Touch “A/C” to turn off the air con-
ditioning system and turn it on
again. There may be a problem in
the air conditioning system if the
indicator light continues to flash.
Turn the air conditioning system
off and have it inspected by your
Lexus dealer.
D Automatic air intake change mode
(on some models)
In automatic mode, the system au-
tomatically switches between re-
circulated air and outside air
modes according to whether the
system detects harmful sub-
stances such as exhaust gas in the
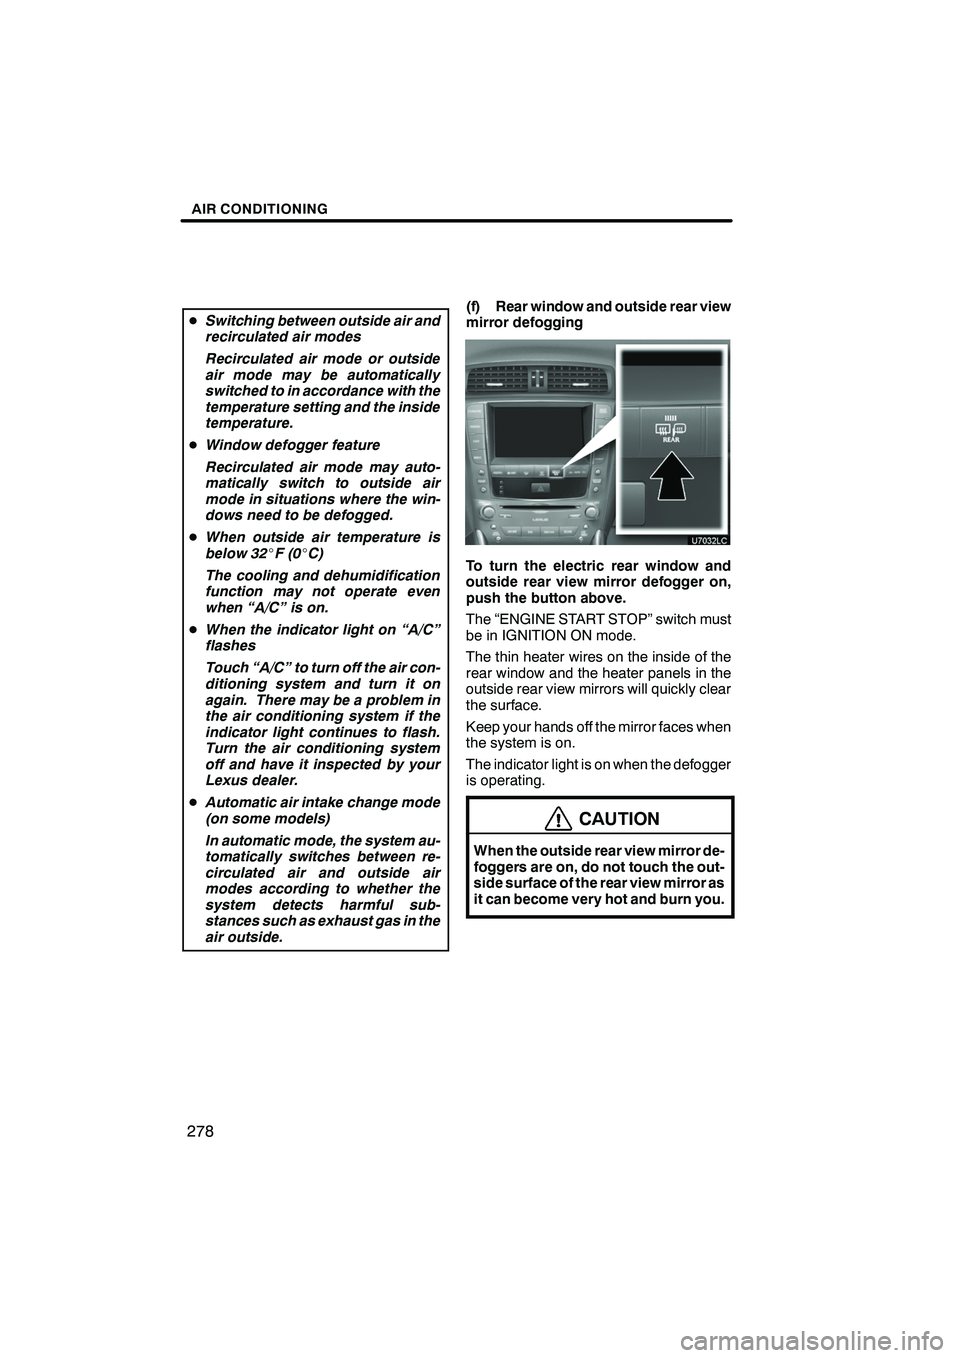
air outside.(f) Rear window and outside rear view
mirror defogging
To turn the electric rear window and
outside rear view mirror defogger on,
push the button above.
The “ENGINE START STOP” switch must
be in IGNITION ON mode.
The thin heater wires on the inside of the
rear window and the heater panels in the
outside rear view mirrors will quickly clear
the surface.
Keep your hands off the mirror faces when
the system is on.
The indicator light is on when the defogger
is operating.
CAUTION
When the outside rear view mirror de-
foggers are on, do not touch the out-
side surface of the rear view mirror as
it can become very hot and burn you.
ISF/IS NAVI (U)
Finish
Page 280 of 391
AIR CONDITIONING
279
The defoggers will automatically turn off
after 15 to 60 minutes. The operation time
changes according to the ambient temper-
ature and vehicle speed.
If further defrosting or defogging is de-
sired, simply actuate the switch again.
When the surface has cleared, push the
button once again to turn the defogger off.
Continuous use may cause the battery to
discharge, especially during stop−and− go
driving. The defogger is not designed to
dry rain water or to melt snow.
If the outside rear view mirrors are heavily
coated with ice, use a spray de −icer before
operating the system.
NOTICE
DWhen cleaning the inside of the
rear window, be careful not to
scratch or damage the heater wires
or connectors.
DTo prevent the battery from being
discharged, turn the switch off
when the engine is not running.
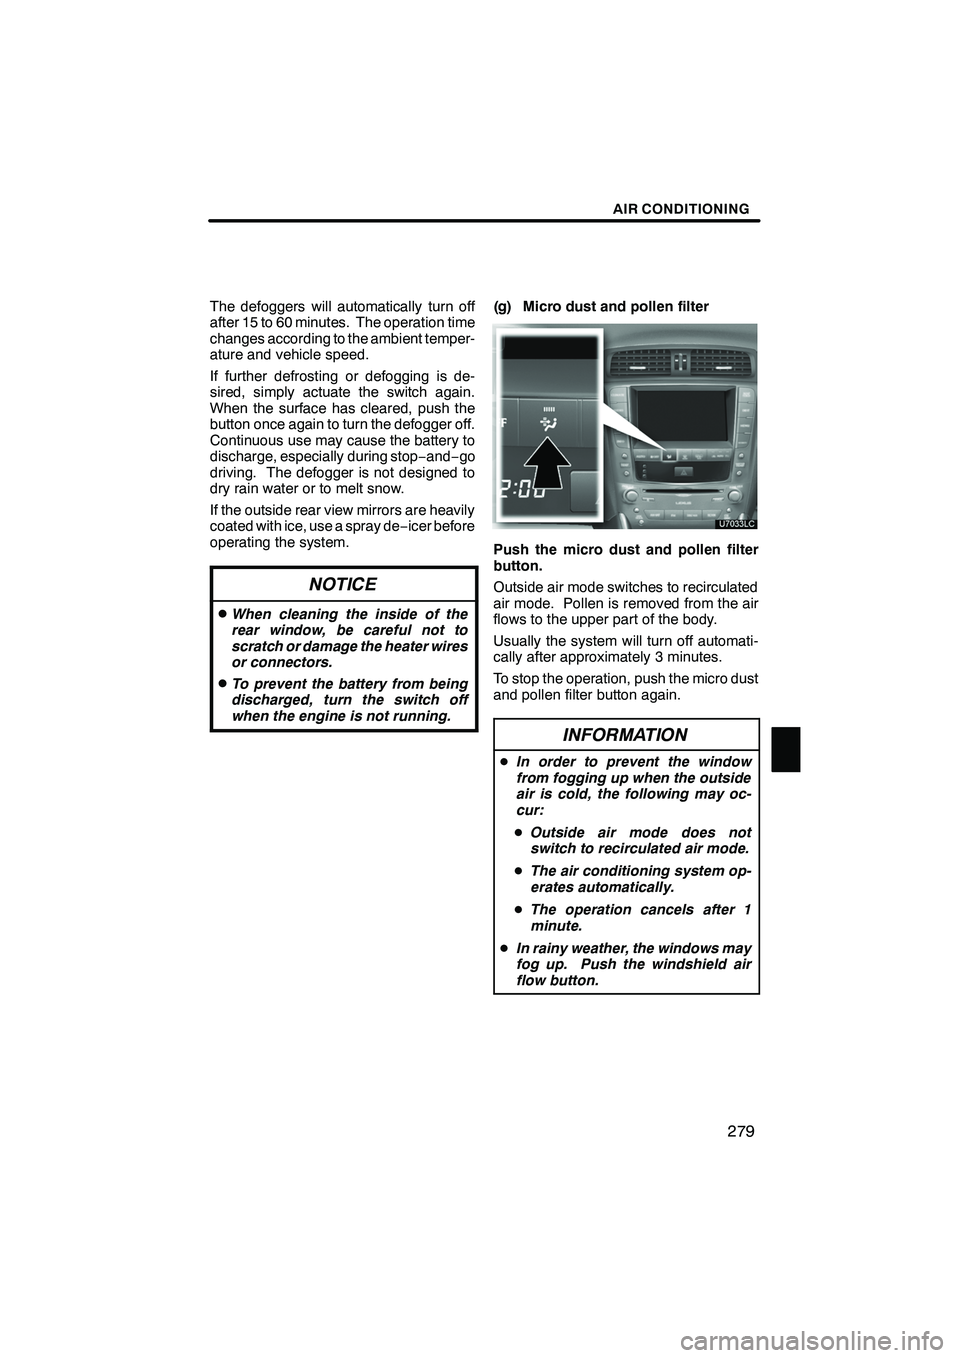
(g) Micro dust and pollen filter
Push the micro dust and pollen filter
button.
Outside air mode switches to recirculated
air mode. Pollen is removed from the air
flows to the upper part of the body.
Usually the system will turn off automati-
cally after approximately 3 minutes.
To stop the operation, push the micro dust
and pollen filter button again.
INFORMATION
D In order to prevent the window
from fogging up when the outside
air is cold, the following may oc-
cur:
D Outside air mode does not
switch to recirculated air mode.
D The air conditioning system op-
erates automatically.
D The operation cancels after 1
minute.
D In rainy weather, the windows may
fog up. Push the windshield air
flow button.
ISF/IS NAVI (U)
Finish
8
Page 283 of 391
REAR VIEW MONITOR SYSTEM
282
The rear view monitor system assists
the driver by displaying an image of the
view behind the vehicle while backing
up.
To display the rear view image on the
screen, shift the shift lever to “R” when
the “ENGINE START STOP” switch is in
IGNITION ON mode.
If you move the shift lever out of the “R”, the
screen returns to the previous screen. Op-
erating another function of the navigation
system will display another screen.
Vehicles with intuitive parking assist−
sensor — when the intuitive parking as-
sist− sensors are turned on and an ob-
stacle is detected in front of or behind
your vehicle, a warning appears on the
right top of the rear view monitor. For
details, see “Intuitive parking assist” on
page 288.
The rear view monitor system is a supple-
ment device intended to assist back up.
When backing up, be sure to check behind
and all around the vehicle visually.
CAUTION
DNever depend on the rear view
monitor system entirely when
backing up. Always make sure
your intended path is clear.
Use caution, just as you would
when backing up any vehicle.
DNever back up while looking only at
the screen. The image on the
screen is different from actual
conditions. Depicted distances
between objects and flat surfaces
will differ from actual distance. If
you back up while looking only at
the screen, you may hit a vehicle, a
person or an object. When backing
up, be sure to check behind and all
around the vehicle visually and
with mirrors before proceeding.
DDo not use the system when the
trunk is not completely closed.
DUse your own eyes to confirm the
vehicle’s surroundings, as the dis-
played image may become faint or
dark, and moving images will be
distorted, or not entirely visible
when the outside temperature is
low. When backing up, be sure to
check behind and all around the ve-
hicle visually and with mirror be-
fore proceeding.
DDo not use the system in the follow-
ing cases:
DOn icy or slick road surfaces, or
in snow.
DWhen using tire chains or emer-
gency tires.
DOn an uneven road, such as a
slope.
ISF/IS NAVI (U)
Finish
Rear view monitor system—
Page 289 of 391
INTUITIVE PARKING ASSIST
288
The distance to obstacles measured by
the sensors is communicated via the dis-
play and a buzzer when parallel parking or
maneuvering into a garage. Always check
the surrounding area when using this sys-
tem.
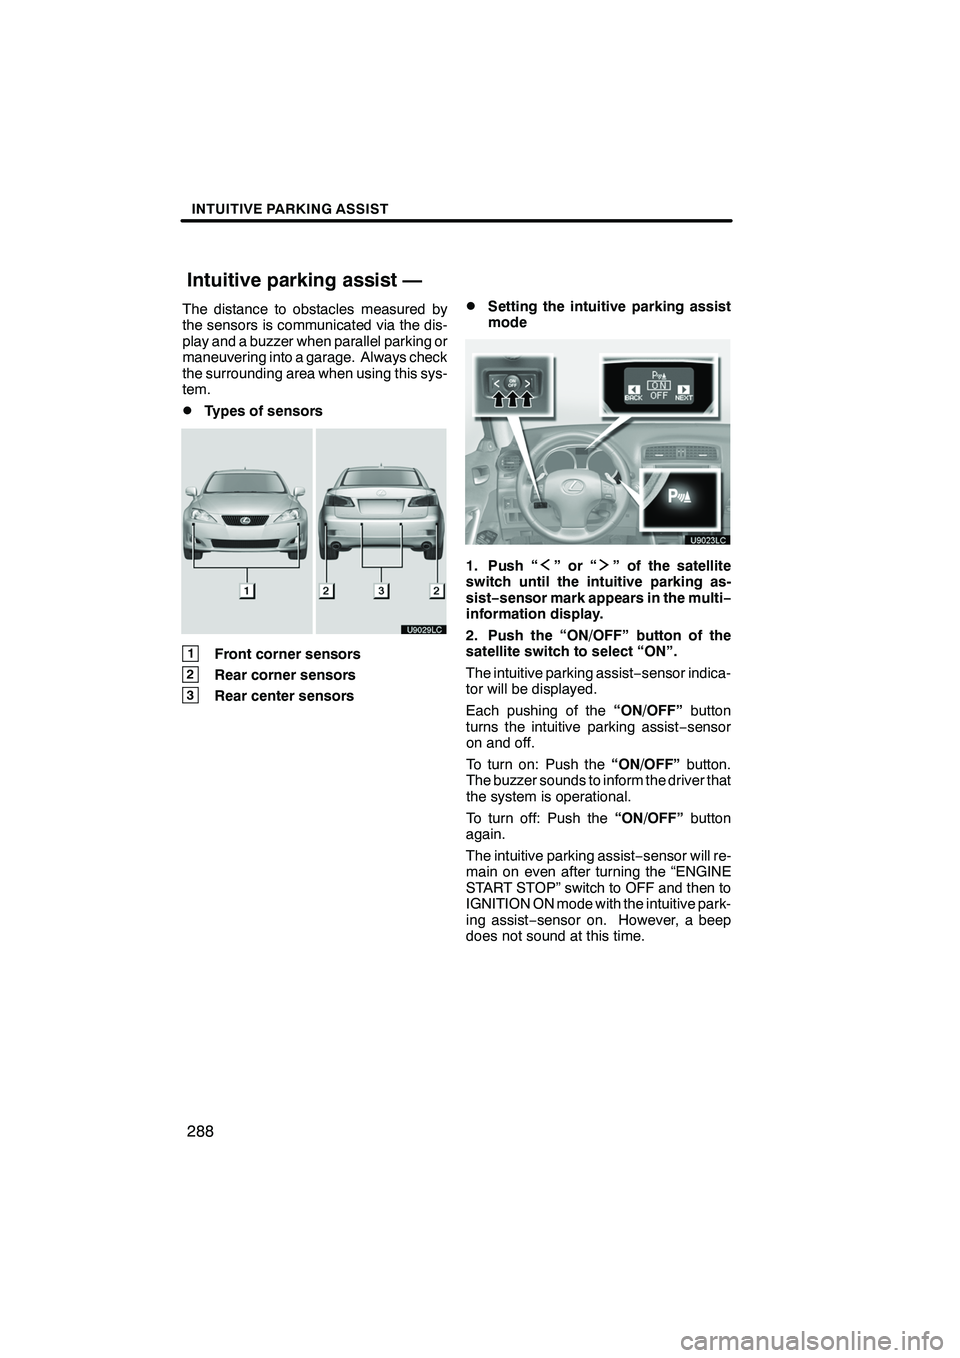
DTypes of sensors
1Front corner sensors
2Rear corner sensors
3Rear center sensors
DSetting the intuitive parking assist
mode
1. Push “”or“” of the satellite
switch until the intuitive parking as-
sist− sensor mark appears in the multi−
information display.
2. Push the “ON/OFF” button of the
satellite switch to select “ON”.
The intuitive parking assist −sensor indica-
tor will be displayed.
Each pushing of the “ON/OFF”button
turns the intuitive parking assist −sensor
on and off.
To turn on: Push the “ON/OFF”button.
The buzzer sounds to inform the driver that
the system is operational.
To turn off: Push the “ON/OFF”button
again.
The intuitive parking assist −sensor will re-
main on even after turning the “ENGINE
START STOP” switch to OFF and then to
IGNITION ON mode with the intuitive park-
ing assist −sensor on. However, a beep
does not sound at this time.
ISF/IS NAVI (U)
Finish
Intuitive parking assist —
Page 292 of 391
INTUITIVE PARKING ASSIST
291
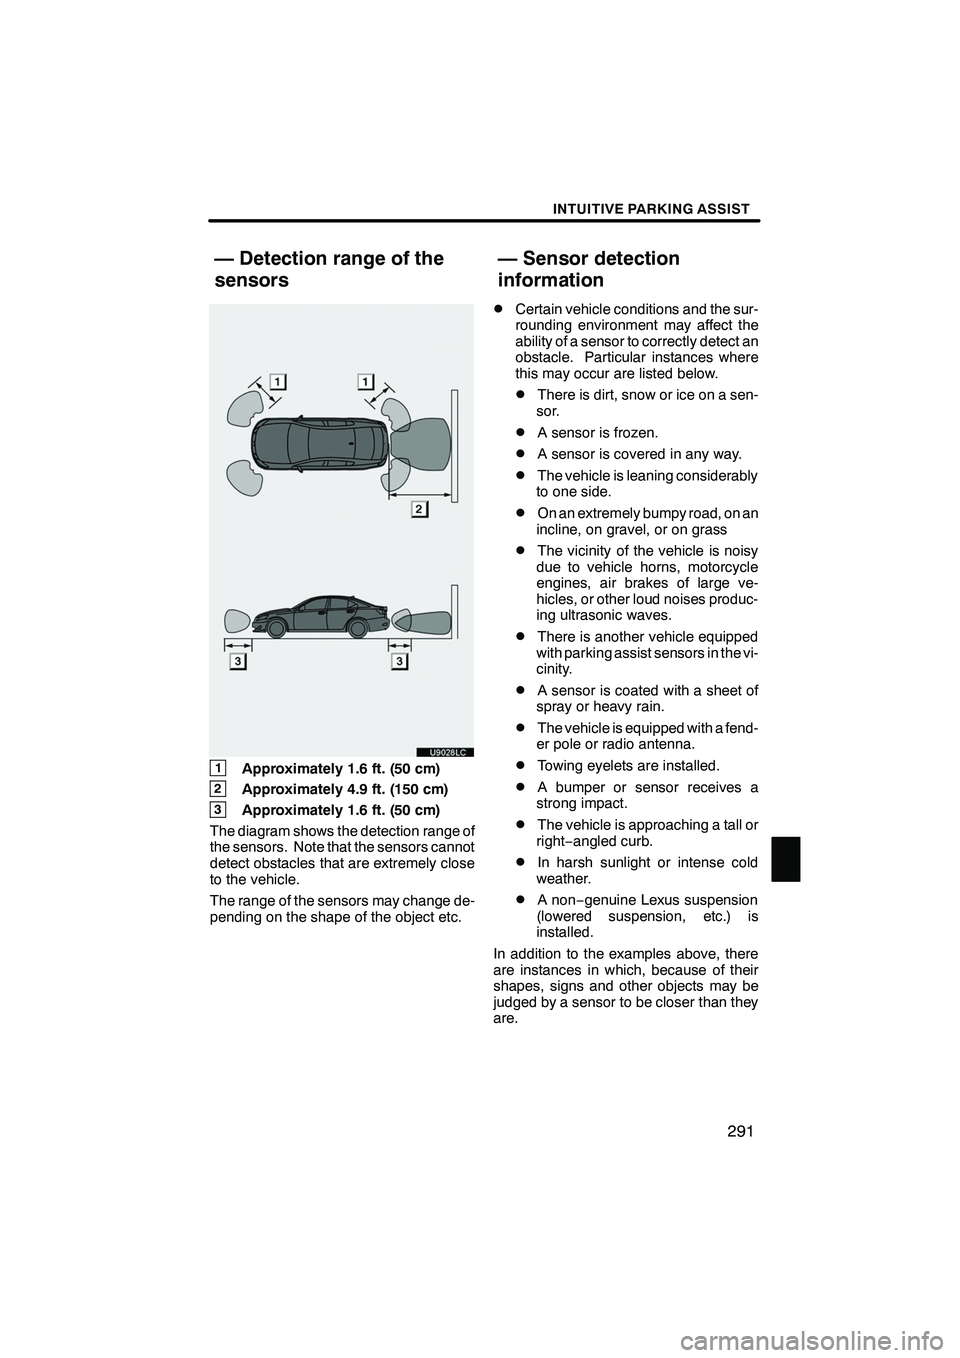
1Approximately 1.6 ft. (50 cm)
2Approximately 4.9 ft. (150 cm)
3Approximately 1.6 ft. (50 cm)
The diagram shows the detection range of
the sensors. Note that the sensors cannot
detect obstacles that are extremely close
to the vehicle.
The range of the sensors may change de-
pending on the shape of the object etc.
DCertain vehicle conditions and the sur-
rounding environment may affect the
ability of a sensor to correctly detect an
obstacle. Particular instances where
this may occur are listed below.
DThere is dirt, snow or ice on a sen-
sor.
DA sensor is frozen.
DA sensor is covered in any way.
DThe vehicle is leaning considerably
to one side.
DOn an extremely bumpy road, on an
incline, on gravel, or on grass
DThe vicinity of the vehicle is noisy
due to vehicle horns, motorcycle
engines, air brakes of large ve-
hicles, or other loud noises produc-
ing ultrasonic waves.
DThere is another vehicle equipped
with parking assist sensors in the vi-
cinity.
DA sensor is coated with a sheet of
spray or heavy rain.
DThe vehicle is equipped with a fend-
er pole or radio antenna.
DTowing eyelets are installed.
DA bumper or sensor receives a
strong impact.
DThe vehicle is approaching a tall or
right− angled curb.
DIn harsh sunlight or intense cold
weather.
DA non −genuine Lexus suspension
(lowered suspension, etc.) is
installed.
In addition to the examples above, there
are instances in which, because of their
shapes, signs and other objects may be
judged by a sensor to be closer than they
are.
ISF/IS NAVI (U)
Finish
— Detection range of the
sensors — Sensor detection
information
10
Page 327 of 391
SETUP
326
D
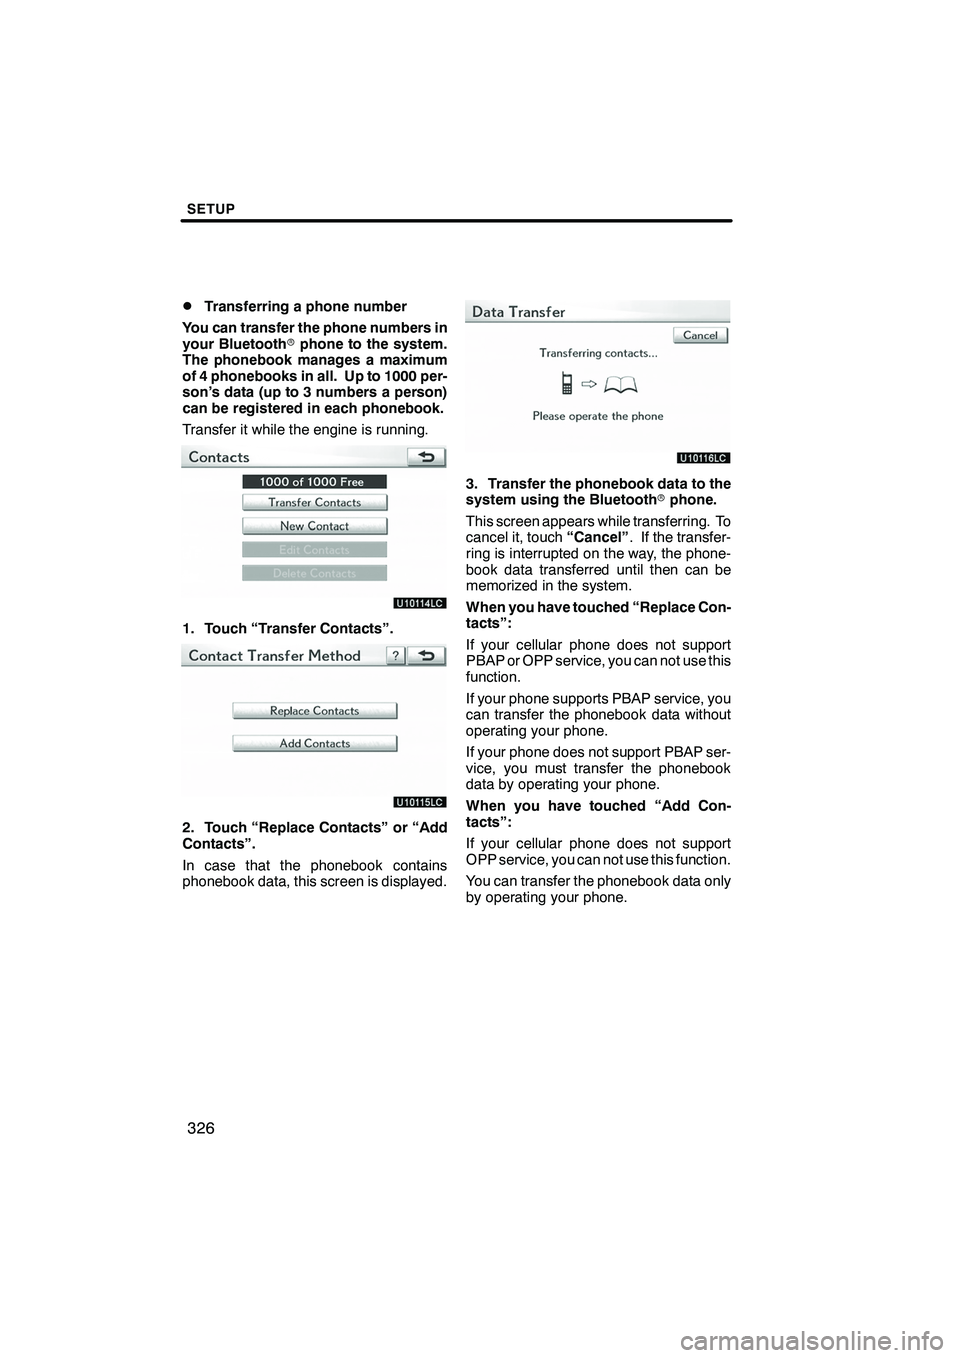
Transferring a phone number
You can transfer the phone numbers in
your Bluetooth rphone to the system.
The phonebook manages a maximum
of 4 phonebooks in all. Up to 1000 per-
son’s data (up to 3 numbers a person)
can be registered in each phonebook.
Transfer it while the engine is running.
1. Touch “Transfer Contacts”.
2. Touch “Replace Contacts” or “Add
Contacts”.
In case that the phonebook contains
phonebook data, this screen is displayed.
3. Transfer the phonebook data to the
system using the Bluetooth rphone.
This screen appears while transferring. To
cancel it, touch “Cancel”. If the transfer-
ring is interrupted on the way, the phone-
book data transferred until then can be
memorized in the system.
When you have touched “Replace Con-
tacts”:
If your cellular phone does not support
PBAP or OPP service, you can not use this
function.
If your phone supports PBAP service, you
can transfer the phonebook data without
operating your phone.
If your phone does not support PBAP ser-
vice, you must transfer the phonebook
data by operating your phone.
When you have touched “Add Con-
tacts”:
If your cellular phone does not support
OPP service, you can not use this function.
You can transfer the phonebook data only
by operating your phone.
ISF/IS NAVI (U)
Finish