door lock Lexus IS250 2010 Using The Air Conditioning System And Defogger / LEXUS 2010 IS350 IS250 (OM53A23U) Owner's Guide
[x] Cancel search | Manufacturer: LEXUS, Model Year: 2010, Model line: IS250, Model: Lexus IS250 2010Pages: 578, PDF Size: 16.25 MB
Page 55 of 578

55
1-3. Adjustable components (seats, mirrors, steering wheel)
1
Before driving
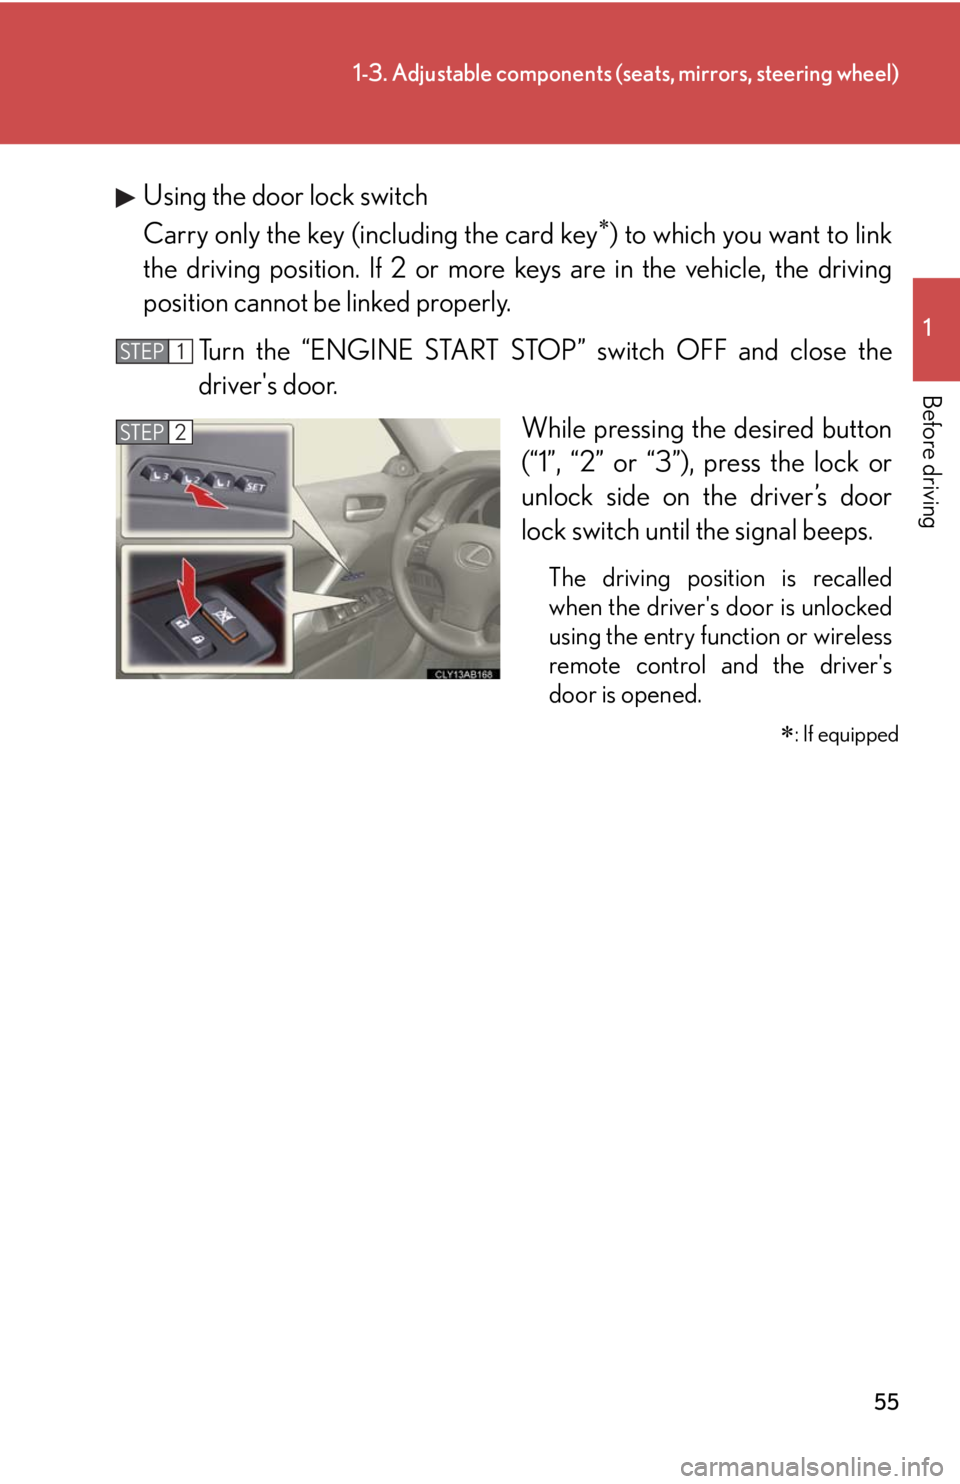
Using the door lock switch
Carry only the key (including the card key
) to which you want to link
the driving position. If 2 or more keys are in the vehicle, the driving
position cannot be linked properly.
Turn the “ENGINE START STOP” switch OFF and close the
driver's door.
While pressing the desired button
(“1”, “2” or “3”), press the lock or
unlock side on the driver’s door
lock switch until the signal beeps.
The driving position is recalled
when the driver's door is unlocked
using the entry function or wireless
remote control and the driver's
door is opened.
: If equipped
STEP1
STEP2
Page 56 of 578

56
1-3. Adjustable components (seats, mirrors, steering wheel)
■Canceling the linked door unlock operation
Turn the “ENGINE START STOP” switch OFF and close the driver's door.
Using the wireless remote control: While pushing the “SET” button, press
on the wireless remote control until the signal beeps.
Using the door lock switch: While pressing the “SET” button, press the
lock or unlock side on the door lock switch until the signal beeps.
■Operating the driving position memory after turning the “ENGINE START
STOP” switch OFF
Memorized positions (except for the steering wheel position) can be activated up
to 180 seconds after the driver's door is opened and another 60 seconds after it is
closed again, even after turning the “ENGINE START STOP” switch OFF.
■To cancel seat position recall
Perform any of the following operations.
●Push the “SET” button.
●Push button “1”, “2” or “3”.
●Adjust the seat using the switches (only cancels seat position recall).
■If the battery is disconnected
The memorized positions are erased when the battery is disconnected.
CAUTION
■Seat adjustment caution
Take care during seat adjustment that the seat does not strike the rear passenger or
squeeze your body against the steering wheel.
STEP1
STEP2
Page 67 of 578

67
1-3. Adjustable components (seats, mirrors, steering wheel)
1
Before driving
CAUTION
■Child restraint lock function belt precaution
Do not allow children to play with the child restraint lock function belt. If the belt
becomes twisted around a child’s neck, it will not be possible to pull the belt out
leading to choking or other serious injuries that could result in death. If this occurs
and the buckle cannot be unfastened, scissors should be used to cut the belt.
■Seat belt damage and wear
Inappropriate handling of the pretensioner may prevent it from operating properly
resulting in death or serious injury.
●Do not damage the seat belts by allowing the belt, plate, or buckle to be jammed
in the door.
●Inspect the seat belt system periodically. Check for cuts, fraying, and loose parts.
Do not use a damaged seat belt until it is replaced. Damaged seat belts cannot
protect an occupant from death or serious injury.
●Ensure that the belt and tab are locked and the belt is not twisted.
If the seat belt does not function correctly, immediately contact your Lexus
dealer.
●Replace the seat assembly, including the belts, if your vehicle has been involved in
a serious accident, even if there's no obvious damage.
●Do not attempt to install, remove, modify, disassemble or dispose of the seat belts.
Have any necessary repairs carried out by your Lexus dealer.
■Using a seat belt extender
●Do not wear the seat belt extender if you can fasten the seat belt without the
extender.
●Do not use the seat belt extender when installing a child restraint system because
the belt will not securely hold the child restraint system, increasing the risk of
death or serious injury in the event of an accident.
●The personalized extender may not be safe on another vehicle, when used by
another person, or at a different seating position other than the one originally
intended.
Page 77 of 578

77
1-4. Opening and closing the windows and moon roof
1
Before driving
■The power windows can be operated when
The “ENGINE START STOP” switch is in IGNITION ON mode.
■Door lock linked window operation
The power windows can be opened and closed using the mechanical key.
(P. 505)
■Operating the power windows after turning the “ENGINE START STOP” switch
OFF
The power windows can be operated for approximately 45 seconds even after the
“ENGINE START STOP” switch is switched to ACCESSORY mode or turned
OFF. They cannot, however, be operated once either front door is opened.
■Jam protection function
If an object becomes caught between the window and the window frame, window
travel is stopped and the window is opened slightly.
■Customization that can be configured at Lexus dealer
Settings (e.g. linked door lock operation) can be changed.
(Customizable features P. 5 5 0 )
Page 80 of 578

80
1-4. Opening and closing the windows and moon roof
■The moon roof can be operated when
The “ENGINE START STOP” switch is in IGNITION ON mode.
■Moon roof open warning buzzer
The buzzer sounds and a message is shown on the multi-information display in the
instrument panel when the “ENGINE START STOP” switch is turned OFF and the
driver's door is opened with the moon roof open.
■Door lock linked moon roof operation
The moon roof can be opened and closed using the mechanical key. (P. 505)
■Operating the moon roof after turning the “ENGINE START STOP” switch OFF
The moon roof can be operated for approximately 45 seconds even after the
“ENGINE START STOP” switch is switched to ACCESSORY mode or turned
OFF. It cannot, however, be operated once either front door is opened.
■Jam protection function
If an object is detected between the moon roof and the frame while closing or tilting
down, travel is stopped and the moon roof opens slightly.
■To reduce moon roof wind noise
Drive with the moon roof opened to slightly before the fully open position as driving
with the moon roof opened fully will cause wind noise.
■Sunshade
The sunshade can be opened and closed manually. However, the sunshade will
open automatically when the moon roof is opened.
Page 81 of 578

81
1-4. Opening and closing the windows and moon roof
1
Before driving
■When the moon roof does not close normally
Perform the following procedure:
●If the moon roof closes but then re-opens slightly
Press and hold the “CLOSE” switch.*
1
The moon roof will close, reopen and pause for approximately 10 sec-
onds.*2 Then it will close again, tilt up and pause for approximately 1 sec-
ond. Finally, it will tilt down, open and close.
Check to make sure that the moon roof is completely closed and then
release the switch.
●If the moon roof tilts down but then tilts back up
Press and hold the “TILT” switch*
1 until the moon roof moves into the tilt
up position and stops.
Release the “TILT” switch once and then press and hold the “TILT” switch
again.*
1
The moon roof will pause for approximately 10 seconds in the tilt up posi-
tion.*2 Then it will adjust slightly and pause for approximately 1 second.
Finally, it will tilt down, open and close.
Check to make sure that the moon roof is completely closed and then
release the switch.
*
1: If the switch is released at the incorrect time, the procedure will have to be per-
formed again from the beginning.
*
2: If the switch is released after the above mentioned 10 second pause, automatic
operation will be disabled. In that case, press and hold the “CLOSE” or “TILT”
switch, and the moon roof will tilt up and pause for approximately 1 second.
Then it will tilt down, open and close. Check to make sure that the moon roof is
completely closed and then release the switch.
If the moon roof does not fully close even after performing the above procedure
correctly, have the vehicle inspected by your Lexus dealer.
■Customization that can be configured at Lexus dealer
Settings (e.g. linked door lock operation) can be changed.
(Customizable features P. 5 5 0 )
STEP1
STEP2
STEP1
STEP2
STEP3
Page 88 of 578

88
1-6. Theft deterrent system
Alarm
The system sounds the alarm and flashes the lights when forcible entry is
detected.
■Triggering of the alarm
The alarm is triggered in the following situations.
●A locked door or trunk is unlocked or opened in any way other
than using the entry function, wireless remote door lock function
or mechanical key with the alarm being set.
●The hood is opened with the alarm being set.
■Setting the alarm system
Close the doors, trunk and
hood, and lock all doors.
The system will be set automati-
cally after 30 seconds.
The indicator light changes from
being on to flashing when the
system is set.
■Deactivating or stopping the alarm
Do one of the following to deactivate or stop the alarm.
●Unlock the doors or trunk using the entry function, wireless
remote door lock function or mechanical key.
●Turn the “ENGINE START STOP” switch to the ACCESSORY or
IGNITION ON mode or start the engine. (The alarm will be
deactivated or stopped after a few seconds.)
Page 89 of 578

89
1-6. Theft deterrent system
1
Before driving
■System maintenance
The vehicle has a maintenance-free type of alarm system.
■Items to check before locking the vehicle
To prevent unexpected triggering of the alarm and vehicle theft, make sure of the
following.
●Nobody is in the vehicle.
●The windows and moon roof are closed before the alarm is set.
●No valuables or other personal items are left in the vehicle.
■Tr i g g e r i n g o f t h e a l a r m
The alarm may be triggered in the following situations.
(Stopping the alarm deactivates the alarm system.)
●A person inside the vehicle opens a door, the trunk or hood.
●The battery is recharged or replaced when the vehicle is locked.
■When the battery is disconnected
Be sure to deactivate the alarm system.
If the battery is disconnected before deactivating the alarm system, the alarm may
be triggered when the battery is reconnected.
■Alarm-operated door lock
●When the alarm is operating, the doors are locked automatically to prevent
intruders.
●Do not leave the key inside the vehicle when the alarm is operating, and make
sure the key is not inside the vehicle when recharging or replacing the battery.
NOTICE
■To ensure the system correctly
Do not modify and remove the system. If modified or removed, the proper opera-
tion of the system cannot be guaranteed.
Page 125 of 578

125
2-1. Driving procedures
2
When driving
Starting on a steep uphill
Automatic transmission
Firmly set the parking brake and shift the shift lever to D.
Gently depress the accelerator pedal.
Release the parking brake.
Manual transmission
With the parking brake firmly set and the clutch pedal fully
depressed, shift the shift lever into 1.
Lightly depress the accelerator pedal at the same time as gradu-
ally releasing the clutch pedal.
Release the parking brake.
■Parking the vehicle
Automatic transmission
With the shift lever in D, depress the brake pedal.
Set the parking brake. (P. 1 4 8 )
Shift the shift lever to P. (P. 1 3 9 )
Press the “ENGINE START STOP” switch to stop the engine.
Lock the door, making sure that you have the electronic key on
your person.
Manual transmission
While depressing the clutch pedal, depress the brake pedal.
Set the parking brake. (P. 1 4 8 )
Shift the shift lever into N. (P. 145)
Press the “ENGINE START STOP” switch to stop the engine.
Lock the door, making sure that you have the electronic key on
your person.
STEP1
STEP2
STEP3
STEP4
STEP5
STEP1
STEP2
STEP3
STEP4
STEP5
STEP1
STEP2
STEP3
STEP1
STEP2
STEP3
Page 167 of 578

167
2-3. Operating the lights and windshield wipers
2
When driving
■Automatic light off system
●When the headlights come on: The headlights and tail lights turn off 30 seconds
after a door is opened and closed if the “ENGINE START STOP” switch has
been switched to ACCESSORY mode or turned OFF. (The lights turn off
immediately if on the key is pressed after all doors are locked.)
●When only the tail lights come on: The tail lights turn off automatically if the
“ENGINE START STOP” switch is switched to ACCESSORY mode or turned
OFF and driver’s door is opened.
To turn the lights on again, switch to IGNITION ON mode, or turn the light switch
off once and then back to or
.
■Automatic headlight leveling system (vehicles with discharge headlights)
The level of the headlights is automatically adjusted according to the number of
passengers and the loading condition of the vehicle to ensure that the headlights do
not interfere with other road users.
■If “AFS OFF” flashes... (vehicles with discharge headlights)
It may indicate a malfunction in the system. Contact your Lexus dealer.
■Customization that can be configured at Lexus dealer
Settings (e.g. light sensor sensitivity) can be changed.
(Customizable features P. 5 5 0 )
NOTICE
■To prevent battery discharge
Do not leave the lights on longer than necessary when the engine is not running.