display Lexus IS250 2010 Using The Air Conditioning System And Defogger / LEXUS 2010 IS350 IS250 (OM53A23U) Workshop Manual
[x] Cancel search | Manufacturer: LEXUS, Model Year: 2010, Model line: IS250, Model: Lexus IS250 2010Pages: 578, PDF Size: 16.25 MB
Page 267 of 578
265
3-2. Using the audio system
3
Interior features
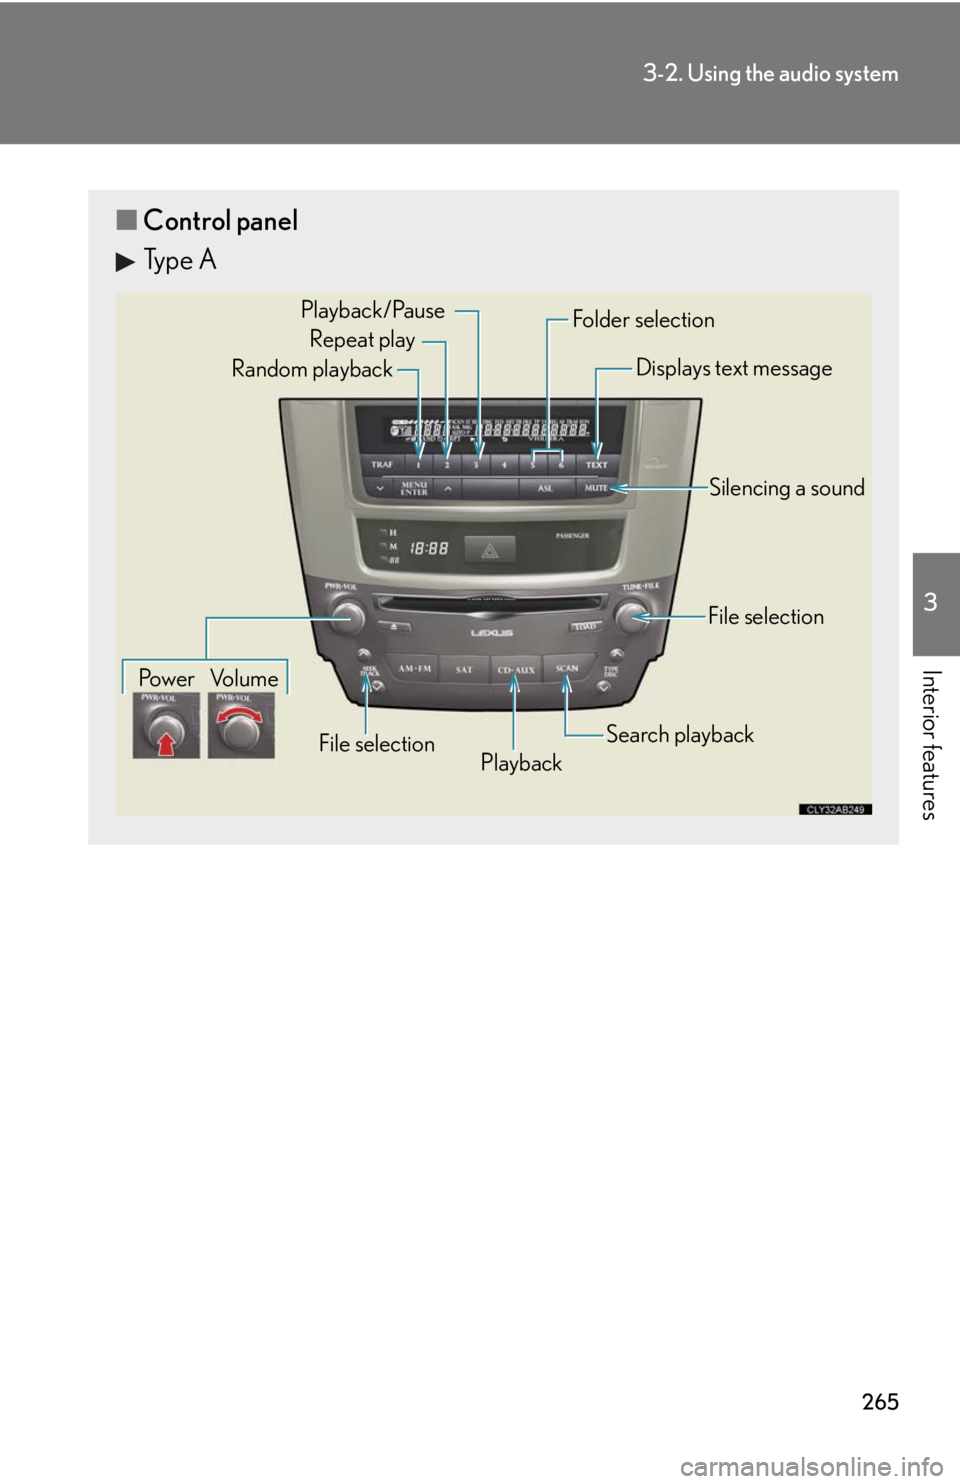
■Control panel
Type A
Repeat play
Playback Playback/Pause
Folder selection
File selection Random playback
Po w e r Vo l u m eDisplays text message
Silencing a sound
Search playback
File selection
Page 268 of 578
266
3-2. Using the audio system
Selecting a folder
■Selecting folders one at a time
Press () or () to select the desired folder.
■Selecting the desired folder by cueing the first file of each folder
(type A only)
Press and hold until you hear a beep. When the desired folder is
reached, press once again.
■Returning to the first folder
Press and hold () until you hear a beep.
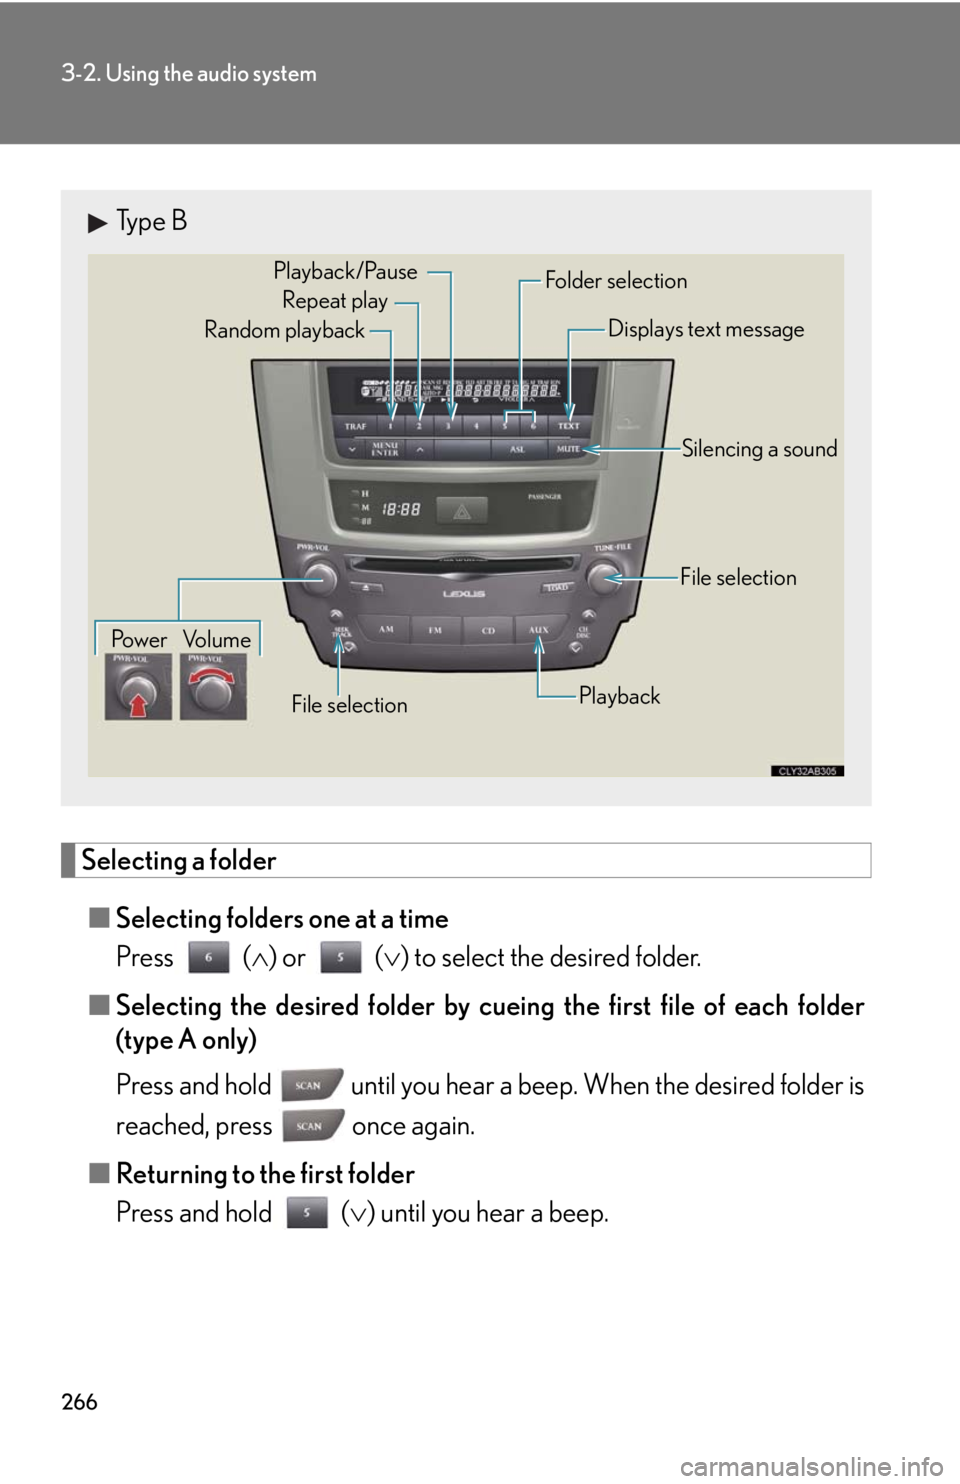
Type B
Repeat play Playback/Pause
Folder selection
File selection Random playback
Po w e r Vo l u m eDisplays text message
Silencing a sound
Playback
File selection
Page 270 of 578
268
3-2. Using the audio system
Switching the display
Press .
Each time is pressed, the display changes in the order of Elapsed time
Folder name File name Album title (MP3 only) Track title
Artist name.
■USB memory functions
●Depending on the USB memory that is connected to the system, the device
itself may not be operable and certain functions may not be available. If the
device is inoperable or a function is unavailable due to a malfunction (as
opposed to a system specification), disconnecting the device and reconnecting
it once again may resolve the problem.
●If the USB memory still does not begin operation after being disconnected and
reconnected, format the memory.
■Display
Up to 12 characters can be displayed at a time.
If there are 13 characters or more, pressing and holding until you hear a
beep will display the remaining characters.
A maximum of 24 characters can be displayed.
If is pressed until you hear a beep again or has not been pressed for 6 sec-
onds or more, the display will return to the first 12 characters.
Depending on the contents recorded, the characters may not be displayed prop-
erly or may not be displayed at all.
■Canceling random, repeat and scan playback
Press (RAND), (RPT), again.
■Error messages
“ERROR”: This indicates a problem in the USB memory or its connection.
“NO MUSIC”: This indicates that no MP3/WMA files are included in the USB
memory.
Page 271 of 578
269
3-2. Using the audio system
3
Interior features
■USB memory
●Compatible devices
USB memory that can be used for MP3 and WMA playback
●Compatible device formats
The following device formats can be used:
• USB communication formats: USB2.0 FS (12 mbps)
• File formats: FAT16/32 (Windows)
• Correspondence class: Mass storage class
MP3 and WMA files written in any format other than those listed above may not
play correctly, and their file names and folder names may not be displayed cor-
rectly.
Items related to standards and limitations are as follows:
• Maximum directory hierarchy: 8 levels
• Maximum number of folders in a device: 999 (including the root)
• Maximum number of files in a device: 65025
• Maximum number of files per folder: 255
●MP3 and WMA files
MP3 (MPEG Audio LAYER 3) is a standard audio compression format.
Files can be compressed to approximately 1 /10 of their original size using MP3
compression.
WMA (Windows Media
TM Audio) is a Microsoft audio compression format.
This format compresses audio data to a size smaller than that of the MP3 format.
There is a limit to the MP3 and WMA file standards that can be used and to the
media/formats on which the files are recorded.
Page 276 of 578
274
3-2. Using the audio system
Adjusting the Automatic Sound Levelizer (ASL)
Press .
The ASL switches between on and off modes each time is
pressed.
ASL automatically adjusts the volume and tone quality according to the noise
level as you drive your vehicle.
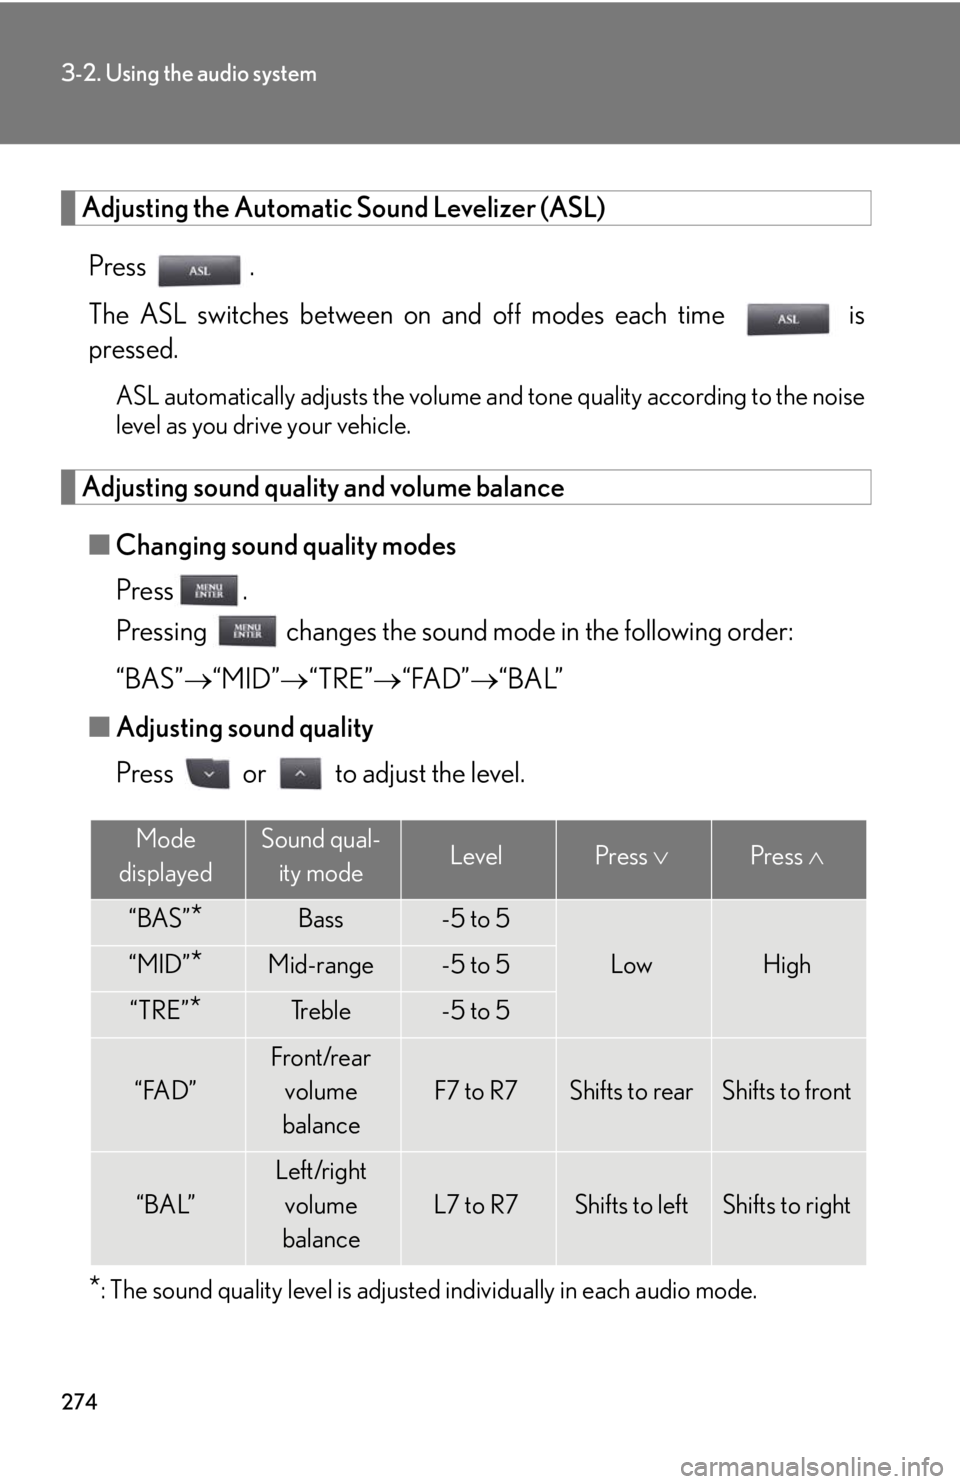
Adjusting sound quality and volume balance
■Changing sound quality modes
Press .
Pressing changes the sound mode in the following order:
“BAS”“MID”“TRE”“FAD”“BAL”
■Adjusting sound quality
Press or to adjust the level.
*: The sound quality level is adjusted individually in each audio mode.
Mode
displayedSound qual-
ity modeLevelPress Press
“BAS”*Bass-5 to 5
LowHigh“MID”*Mid-range-5 to 5
“TRE”*Tr e b l e-5 to 5
“FAD”
Front/rear
volume
balance
F7 to R7Shifts to rearShifts to front
“BAL”
Left/right
volume
balance
L7 to R7Shifts to leftShifts to right
Page 285 of 578
283
3-3. Using the Bluetooth® audio system
3
Interior features
Using the Bluetooth® audio system
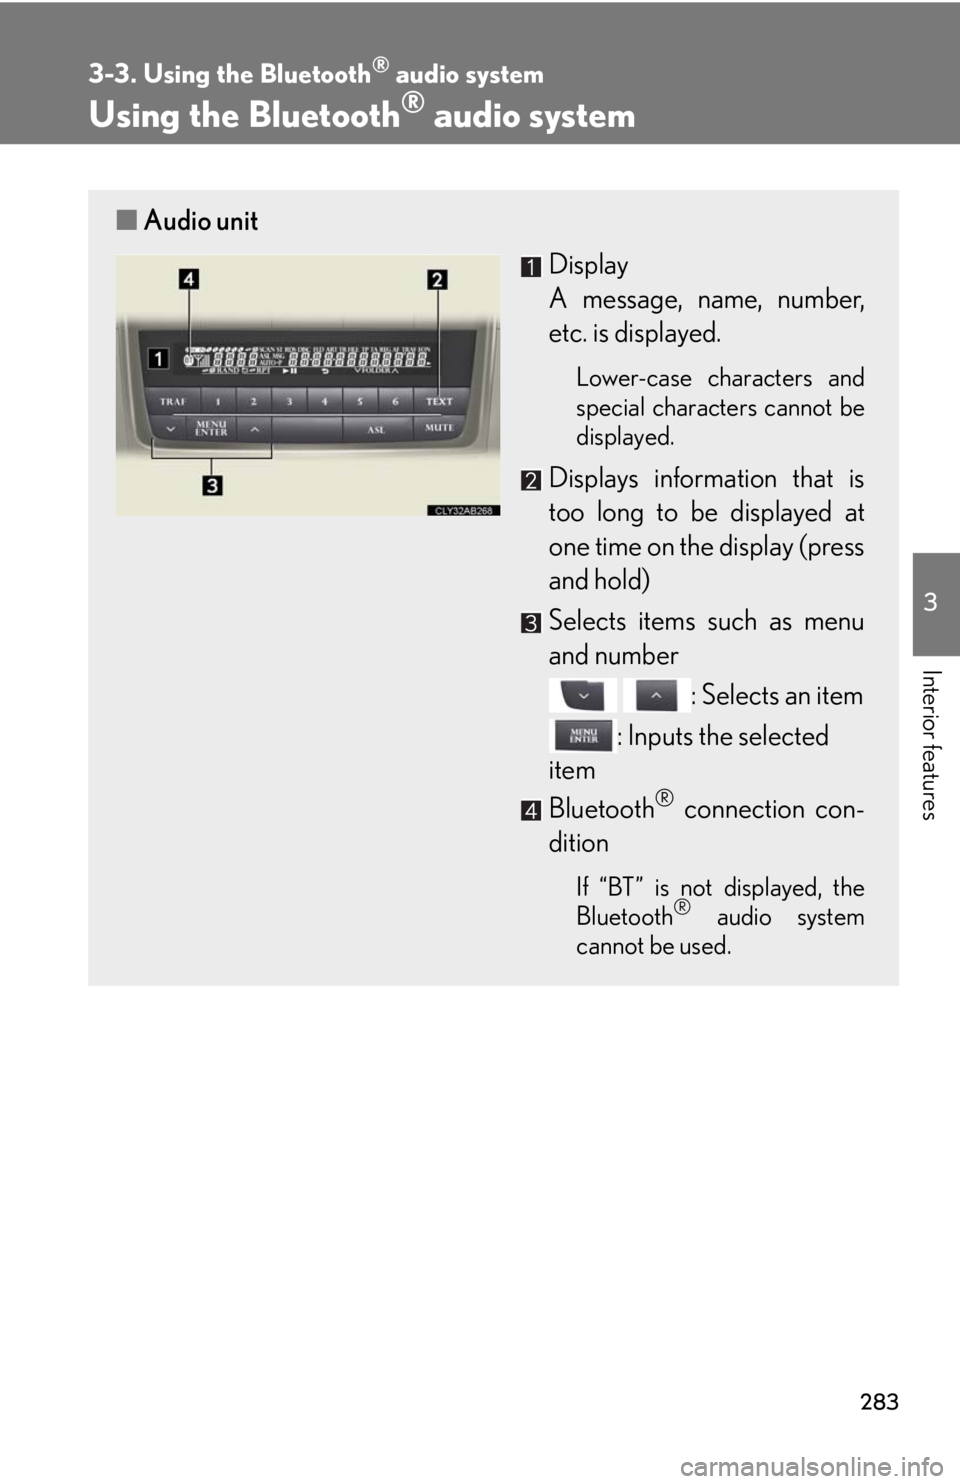
■Audio unit
Display
A message, name, number,
etc. is displayed.
Lower-case characters and
special characters cannot be
displayed.
Displays information that is
too long to be displayed at
one time on the display (press
and hold)
Selects items such as menu
and number
: Selects an item
: Inputs the selected
item
Bluetooth
® connection con-
dition
If “BT” is not displayed, the
Bluetooth® audio system
cannot be used.
Page 286 of 578

284
3-3. Using the Bluetooth® audio system
Operating the system using voice commands
By following voice guidance instructions output from the speaker, voice
commands enable the operation of the Bluetooth
® audio system without
the need to check the display or operate , and .
■Operation procedure when using voice commands
Press the talk switch and follow voice guidance instructions.
■Auxiliary commands when using voice commands
The following auxiliary commands can be used when operating the
system using a voice command:
“Cancel”: Exits the Bluetooth
® audio system
“Repeat”: Repeats the previous voice guidance instruction
“Go back”: Returns to the previous procedure
“Help”: Reads aloud the function summary if a help comment is regis-
tered for the selected function
Page 287 of 578
285
3-3. Using the Bluetooth® audio system
3
Interior features
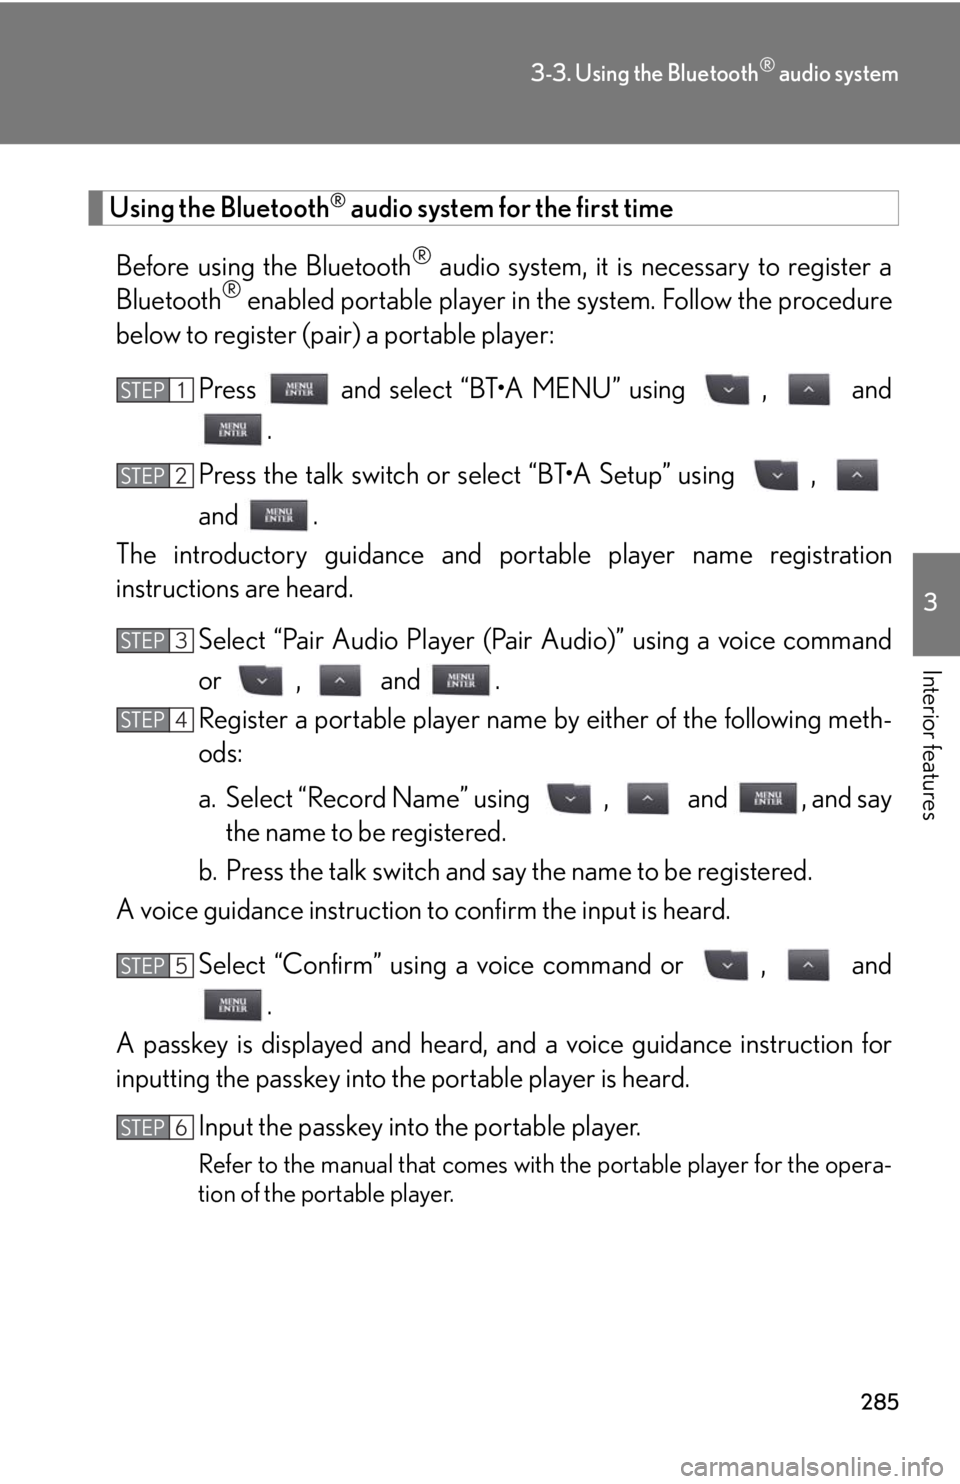
Using the Bluetooth® audio system for the first time
Before using the Bluetooth
® audio system, it is necessary to register a
Bluetooth® enabled portable player in the system. Follow the procedure
below to register (pair) a portable player:
Press and select “BT•A MENU” using , and
.
Press the talk switch or select “BT•A Setup” using ,
and .
The introductory guidance and portable player name registration
instructions are heard.
Select “Pair Audio Player (Pair Audio)” using a voice command
or , and .
Register a portable player name by either of the following meth-
ods:
a. Select “Record Name” using , and , and say
the name to be registered.
b. Press the talk switch and say the name to be registered.
A voice guidance instruction to confirm the input is heard.
Select “Confirm” using a voice command or , and
.
A passkey is displayed and heard, and a voice guidance instruction for
inputting the passkey into the portable player is heard.
Input the passkey into the portable player.
Refer to the manual that comes with the portable player for the opera-
tion of the portable player.
STEP1
STEP2
STEP3
STEP4
STEP5
STEP6
Page 288 of 578
286
3-3. Using the Bluetooth® audio system
Guidance for registration completion is heard.
If the portable player has a Bluetooth
® phone, the phone can be regis-
tered at the same time. A voice guidance instruction to register a Blue-
tooth
® phone is heard.
Select “Yes” or “No” using a voice command or ,
and . (Bluetooth
® phone P. 302)
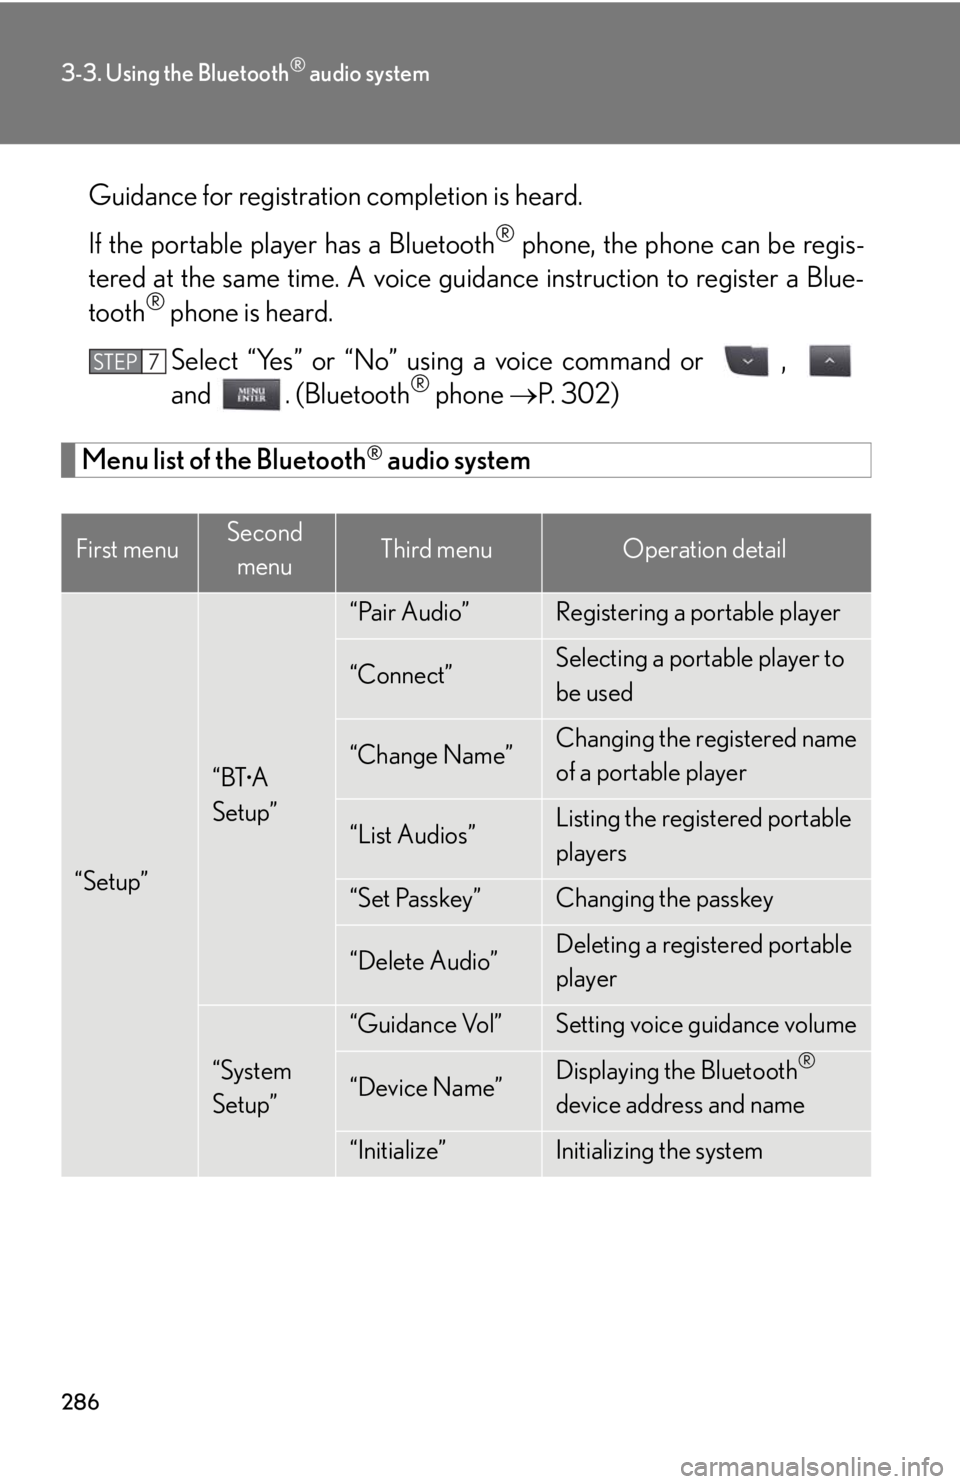
Menu list of the Bluetooth® audio system
First menuSecond
menuThird menuOperation detail
“Setup”
“BT•A
Setup”
“Pair Audio”Registering a portable player
“Connect”Selecting a portable player to
be used
“Change Name”Changing the registered name
of a portable player
“List Audios”Listing the registered portable
players
“Set Passkey”Changing the passkey
“Delete Audio”Deleting a registered portable
player
“System
Setup”
“Guidance Vol”Setting voice guidance volume
“Device Name”Displaying the Bluetooth®
device address and name
“Initialize”Initializing the system
STEP7
Page 290 of 578
288
3-3. Using the Bluetooth® audio system
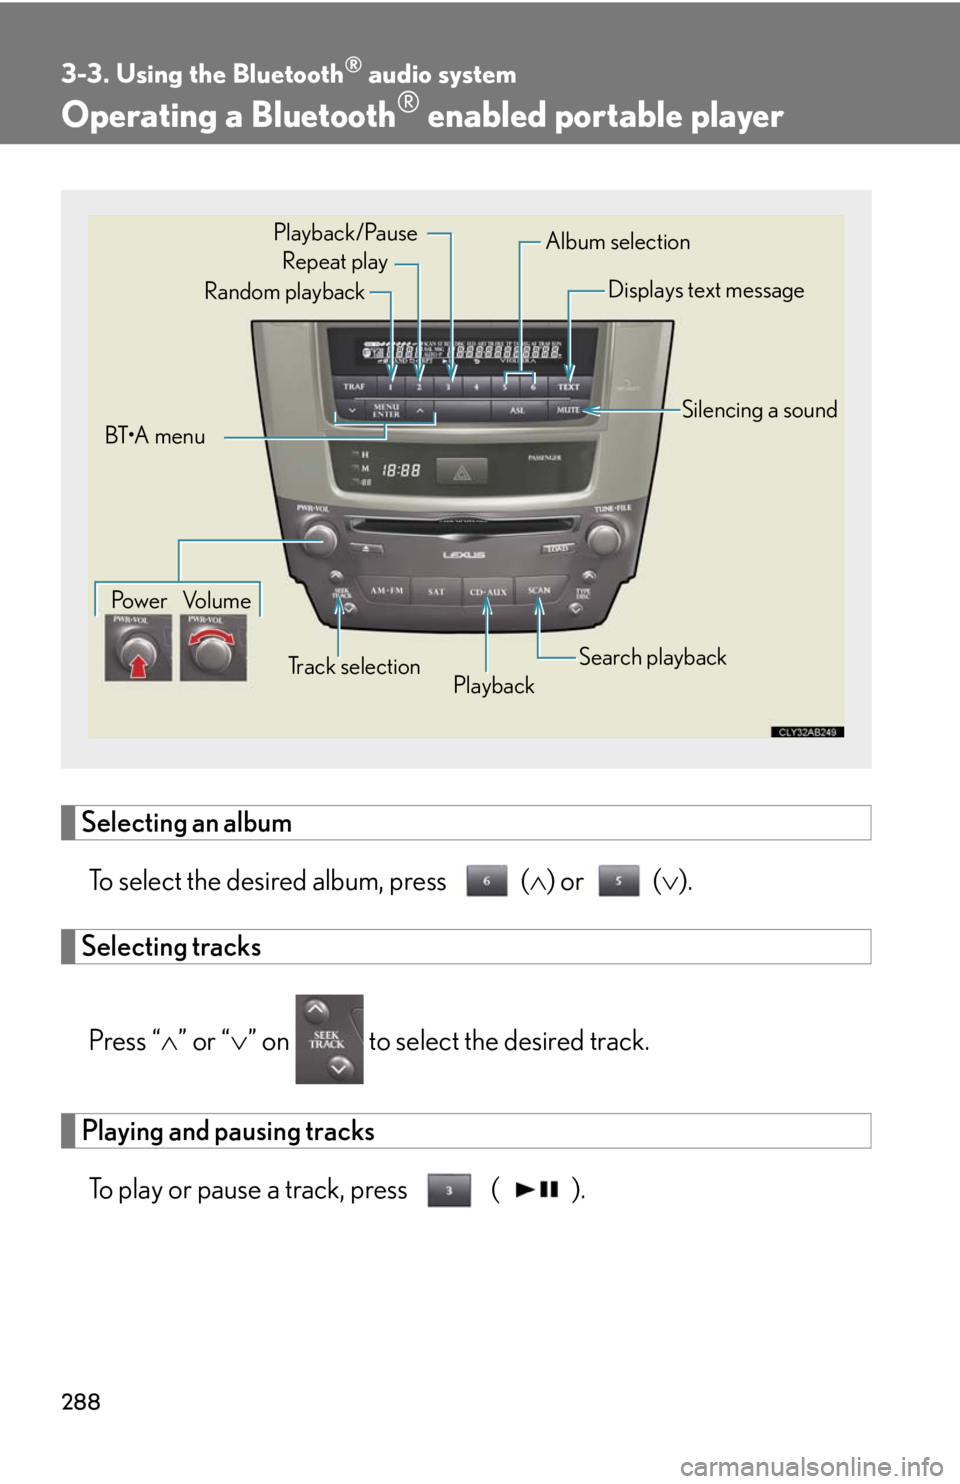
Operating a Bluetooth® enabled portable player
Selecting an album
To select the desired album, press () or ().
Selecting tracks
Press “” or “” on to select the desired track.
Playing and pausing tracks
To play or pause a track, press ( ).
Repeat play
Playback Playback/Pause
Album selection
Track selection Random playback
Po w e r Vo l u m eDisplays text message
Silencing a sound
Search playback
BT•A menu