oil Lexus IS250 2012 Using the air conditioning system and defogger / LEXUS 2012 IS250,IS350 (OM53A87U) User Guide
[x] Cancel search | Manufacturer: LEXUS, Model Year: 2012, Model line: IS250, Model: Lexus IS250 2012Pages: 592, PDF Size: 6.2 MB
Page 397 of 592

397
4-3. Do-it-yourself maintenance
4
Maintenance and care
Engine compartment
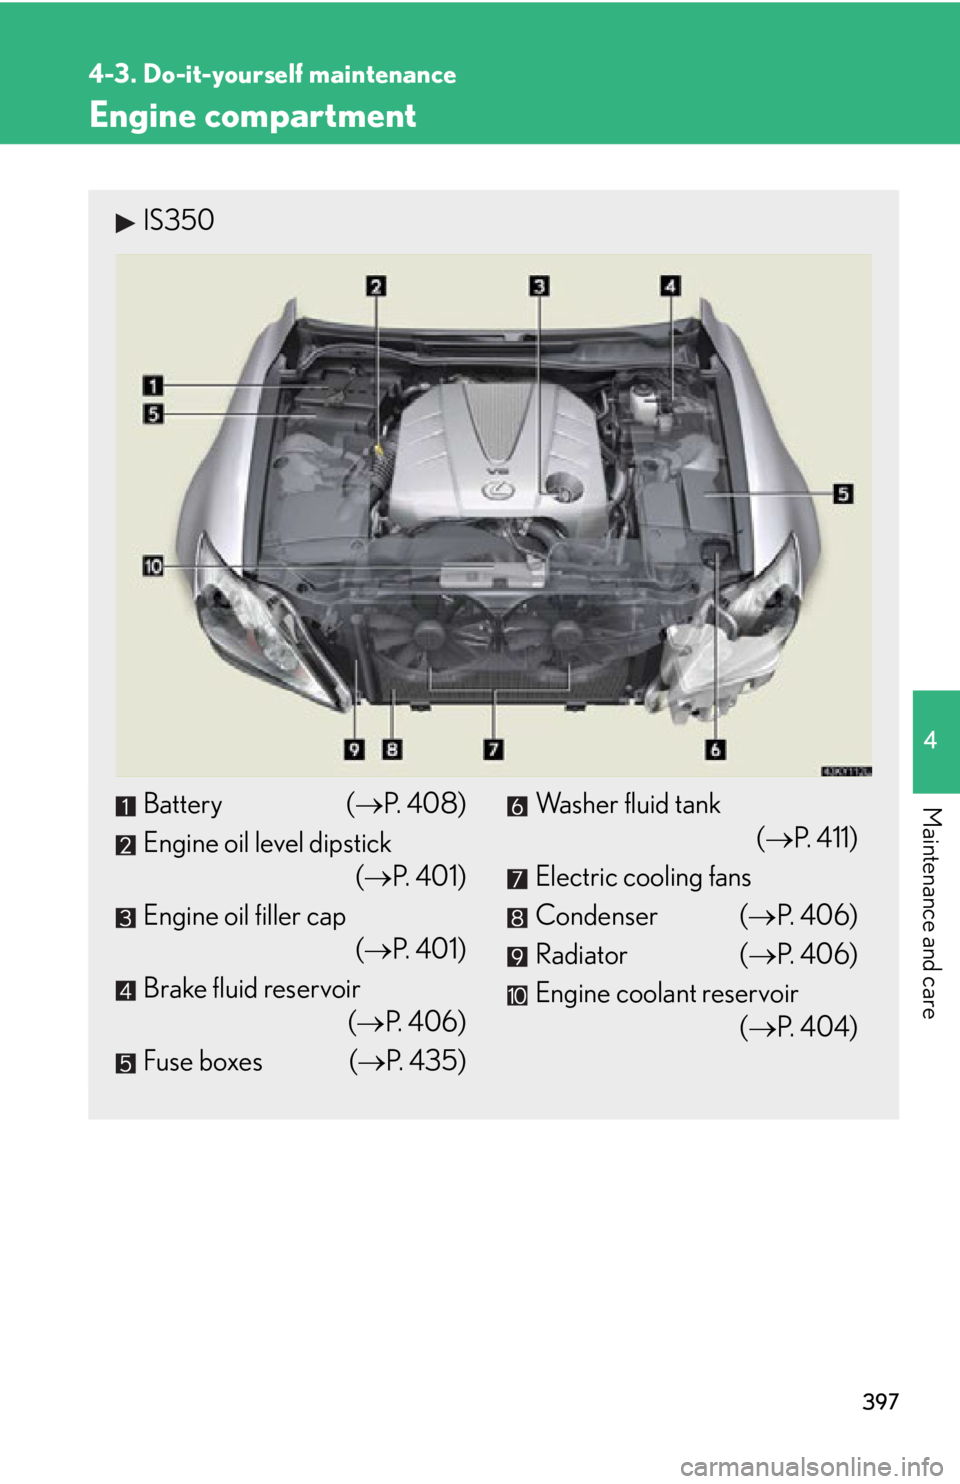
IS350
Battery (P. 4 0 8 )
Engine oil level dipstick (P. 4 0 1 )
Engine oil filler cap (P. 4 0 1 )
Brake fluid reservoir (P. 4 0 6 )
Fuse boxes ( P. 435)Washer fluid tank
(P. 411)
Electric cooling fans
Condenser ( P. 4 0 6 )
Radiator ( P. 4 0 6 )
Engine coolant reservoir (P. 4 0 4 )
Page 398 of 592

398
4-3. Do-it-yourself maintenance
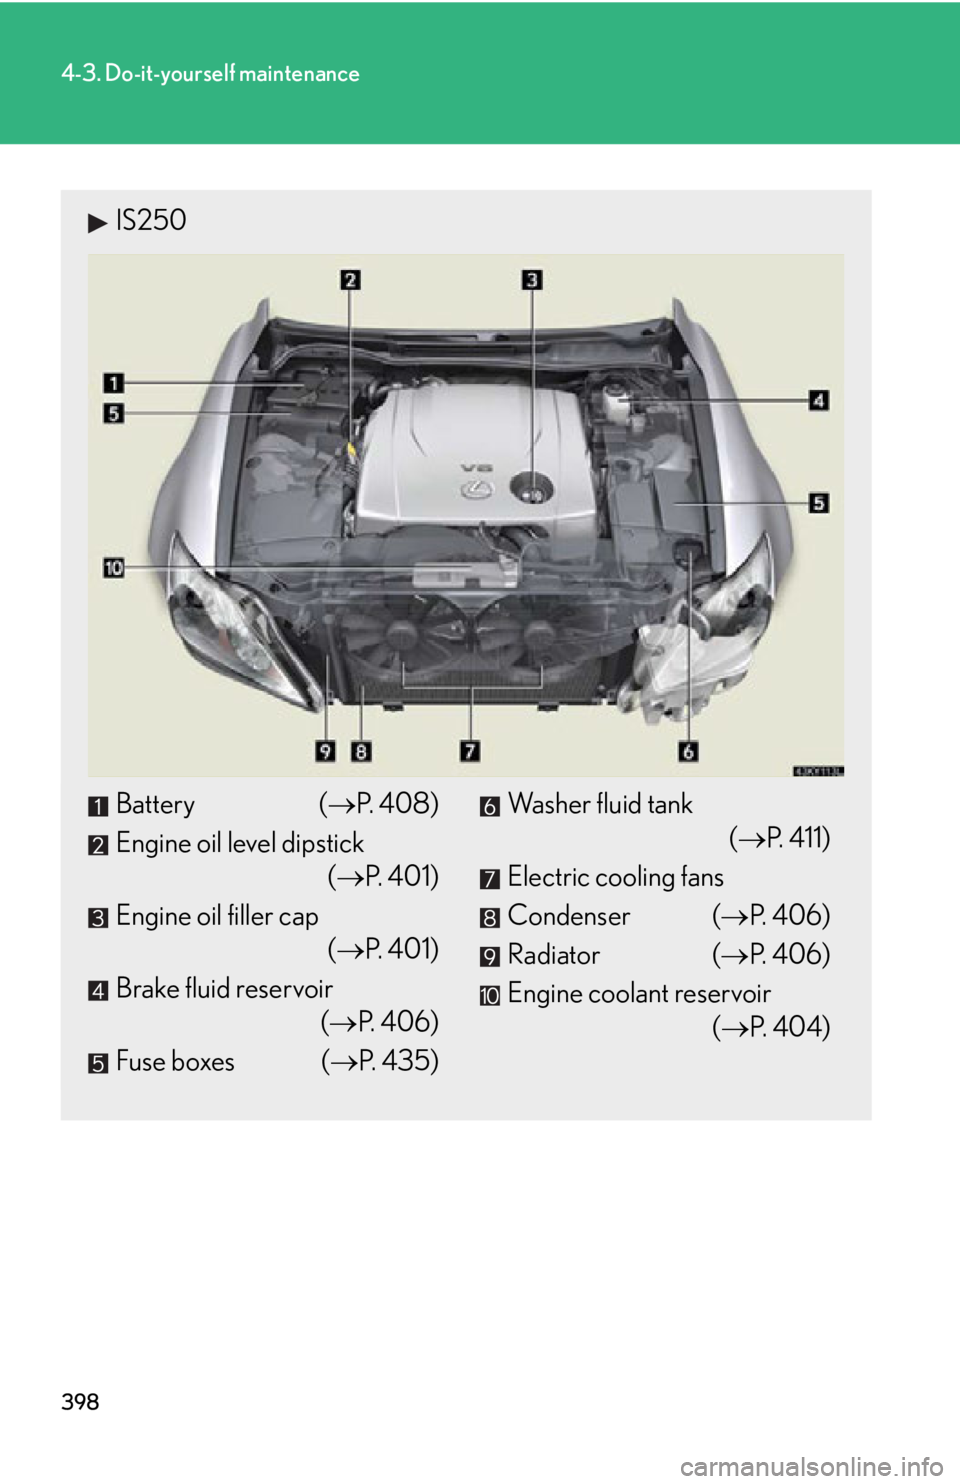
IS250
Battery (P. 4 0 8 )
Engine oil level dipstick (P. 4 0 1 )
Engine oil filler cap (P. 4 0 1 )
Brake fluid reservoir (P. 4 0 6 )
Fuse boxes ( P. 435)Washer fluid tank
(P. 411)
Electric cooling fans
Condenser ( P. 4 0 6 )
Radiator ( P. 4 0 6 )
Engine coolant reservoir (P. 4 0 4 )
Page 401 of 592

401
4-3. Do-it-yourself maintenance
4
Maintenance and care
Engine oilWith the engine at operating temperat ure and turned off, check the oil
level on the dipstick.
■ Checking the engine oil
Park the vehicle on level grou nd. After warming up the engine
and turning it off, wait more than five minutes for the oil to drain
back into the bottom of the engine.
Hold a rag under the end and pull
the dipstick out.
Wipe the dipstick clean.
Reinsert the dipstick fully.
Holding a rag under the end, pull the dipstick out and check the
oil level.
Wipe the dipstick and reinsert it fully.
Low
Full
STEP1
STEP2
STEP3
STEP4
STEP5
STEP6
Page 402 of 592

402
4-3. Do-it-yourself maintenance
■Adding engine oil
If the oil level is below or near the
low level mark, add engine oil of
the same type as already in the
engine.
Make sure to check th e oil type and prepare the items needed before
adding oil.
Remove the oil filler cap by turning it counterclockwise.
Add engine oil slowly, checking the dipstick.
Install the oil filler cap by turning it clockwise.
Engine oil selection P. 5 2 4
Oil quantity
(Low Full)1.6 qt. (1.5 L, 1.3 Imp. qt.)
ItemsClean funnel
STEP1
STEP2
STEP3
Page 403 of 592

403
4-3. Do-it-yourself maintenance
4
Maintenance and care
■Engine oil consumption
●The amount of engine oil consumed depends on the oil viscosity, the quality of
the oil and the way the vehicle is driven.
●More oil is consumed under driving conditions such as high speeds and fre-
quent acceleration and deceleration.
●A new engine consumes more oil.
●When judging the amount of oil consumpt ion, keep in mind that the oil may
have become diluted, making it difficult to judge the true level accurately.
●Oil consumption: Max. 1.1 qt./600 miles (0.9 Imp. qt./600 miles, 1.0 L/1000
km)
●If your vehicle consumes more than 1.1 qt. (1.0 L, 0.9 Imp. qt.) every 600 miles
(1000 km), contact your Lexus dealer.
CAUTION
■Used engine oil
●Used engine oil contains potentially harmful contaminants which may cause skin
disorders such as inflammati on or skin cancer, so care should be taken to avoid
prolonged and repeated contact. To remove used engine oil from your skin, wash
thoroughly with soap and water.
●Dispose of used oil and filters only in a safe and acceptable manner. Do not dis-
pose of used oil and filters in househol d trash, in sewers or onto the ground.
Call your Lexus dealer, service station or auto parts store for information con-
cerning recycling or disposal.
●Do not leave used engine oil within the reach of children.
Page 404 of 592

404
4-3. Do-it-yourself maintenance
Engine coolantThe coolant level is satisfactory if it is between the “FULL” and “LOW”
lines on the reservoir when the engine is cold.
Reservoir cap
“FULL”
“LOW”
If the level is on or below the
“LOW” line, add coolant up to the
“FULL” line.
NOTICE
■To prevent serious engine damage
Check the oil level on a regular basis.
■When replacing the engine oil
●Be careful not to spill engine oil on the vehicle components.
●Avoid overfilling, or the engine could be damaged.
●Check the oil level on the dipstick every time you refill the vehicle.
●Be sure the engine oil filler cap is properly tightened.
Page 481 of 592

5
When trouble arises
481
5-2. Steps to take in an emergency
If a warning message is displayed
Stop the vehicle immediately.A buzzer sounds and a warning message is shown on the multi-informa-
tion display. The following warning indicates the possibility of damage to
the vehicle that may lead to an accident. Immediately stop the vehicle in a
safe place and contact your Lexus dealer.
Wa r n i n g m e s s a g eDetails
(for U.S.A.)
(for Canada) (Flashing)Indicates an abnormal engine oil pressure.The warning light may turn on if the engine oil pres-
sure is too low.
If a warning is shown on the multi-information display, stay calm and per-
form the following actions:
Master warning light
The master warning light also
comes on or flashes in order to
indicate that a message is cur-
rently being displayed on the
multi-information display.
Multi-information display
If any of the warning lights turns on again after performing the follow-
ing actions, contact your Lexus dealer.
Page 486 of 592

486
5-2. Steps to take in an emergency
Indicates that engine oil
level is low.Check the level of engine
oil, and add if necessary.
(U.S.A. only)
Indicates that all mainte-
nance according to the
driven distance on the
maintenance schedule*
should be performed
soon.
If necessary, perform
maintenance.
Comes on approximately
4500 miles (7200 km)
after the maintenance
data has been reset.
(U.S.A. only)
Indicates that all mainte-
nance is required to cor-
respond to the driven
distance on the mainte-
nance schedule*.
Perform the necessary
maintenance. Please reset
the maintenance data
after the maintenance is
performed (P. 3 8 6 )
Comes on approximately
5000 miles (8000 km)
after the maintenance
data has been reset.
(The indicator will not
work properly unless the
maintenance data has
been reset.)
Wa r n i n g m e s s a g eDetailsCorrection procedure
Page 498 of 592

498
5-2. Steps to take in an emergency
CAUTION
●Use a jack stand if it is necessary to get under the vehicle.
Take particular care when lowering the vehicle to ensure that no one working on or
near the vehicle may be injured.
■Replacing a flat tire
●Do not attach a heavily damaged wheel orna ment, as it may fly off the wheel while
the vehicle is moving.
●Failure to follow these precautions could cause the wheel nuts to loosen and the
tire to fall off, resulting in death or serious injury.
• Never use oil or grease on the wheel bolts or wheel nuts.
Oil and grease may cause the wheel nuts to be excessively tightened, leading
to bolt or disc wheel damage. In addition, the oil or grease can cause the
wheel nuts to loosen and the wheel may fall off, causing a serious accident.
Remove any oil or grease from the wheel bolts or wheel nuts.
• Have the wheel nuts tightened with a to rque wrench to 76 ft•lbf (103 N•m,
10.5 kgf•m) as soon as possible after changing wheels.
■When using the spare tire
●Remember that your compact spare tire is specifically designed for use with your
vehicle. Do not use your compact spare tire on another vehicle.
●Do not use two compact spare tires simultaneously.
●Replace the compact spare tire with a standard tire as soon as possible.
●Avoid sudden acceleration, deceleration an d braking, as well as sharp cornering.
■Speed limit when using the spare tire
Do not drive at speeds in excess of 50 mph (80 km/h) when a compact spare tire is
installed on the vehicle.
The compact spare tire is not designed for driving at high speeds. Failing to observe
this precaution may lead to an accident causing death or serious injury.
Page 519 of 592

Vehicle specifications6
519
6-1. SpecificationsMaintenance data (fuel, oil level, etc.) .............. 520
Fuel information ..................... 537
Tire information....................... 541
6-2. Customization Customizable features ........ 553
6-3. Initialization Items to initialize .................... 559