bulb Lexus IS250 2012 Using the air conditioning system and defogger / LEXUS 2012 IS250,IS350 OWNERS MANUAL (OM53A87U)
[x] Cancel search | Manufacturer: LEXUS, Model Year: 2012, Model line: IS250, Model: Lexus IS250 2012Pages: 592, PDF Size: 6.2 MB
Page 5 of 592

1
2
3
4
5
6
7
5
3-6. Using the storage featuresList of storage features............... 329
• Glove box ................................... 330
• Console boxes .......................... 330
• Overhead console ................... 332
• Cup holders................................. 332
• Bottle holders/door pockets ............................... 334
• Auxiliary box .............................. 335
3-7. Other interior features Sun visors......................................... 336
Vanity mirrors ................................ 337
Clock ................................................ 338
Satellite switch es .......................... 339
Ashtrays ........................................... 342
Cigarette lighter ........................... 343
Power outlet ................................... 344
Seat heaters.................................... 345
Seat heaters and ventilators .................................... 348
Armrest ............................................. 351
Rear sunshade ............................... 352
Trunk storage extension ........... 354
Coat hooks .................................... 355
Floor mat.......................................... 356
Trunk features................................ 357
Garage door opener................. 360
Compass.......................................... 366
Safety Connect ............................. 370 4-1. Maintenance and care
Cleaning and protecting the vehicle exterior................... 378
Cleaning and protecting the vehicle interior .................... 382
4-2. Maintenance Maintenance requirements.............................. 385
General maintenance ................ 387
Emission inspection and maintenance (I/M)
programs ..................................... 390
4-3. Do-it-yourself maintenance Do-it-yourself service precautions ................................... 391
Hood ................................................. 394
Positioning a floor jack............... 395
Engine compartment.................. 397
Tires .................................................... 412
Tire inflation pressure................. 424
Wheels ............................................. 428
Air conditioning filter................. 430
Electronic key battery ................ 433
Checking and replacing fuses ................................................ 435
Headlight aim ................................ 449
Light bulbs ........................................ 451
4Maintenance and care
Page 154 of 592

154
2-1. Driving procedures
Turn signal lever
■Turn signals can be operated when
The “ENGINE START STOP” switch is in IGNITION ON mode.
■If the indicators flash faster than usual
Check that a light bulb in the turn signal lights has not burned out.
Right turn
Left turn
Move and hold the lever part-
way to signal a lane change
The right hand signal will flash
until you release the lever.
Move and hold the lever part-
way to signal a lane change
The left hand signal will flash
until you release the lever.
Page 377 of 592
Maintenance and care4
377
4-1. Maintenance and careCleaning and protecting the vehicle exterior............. 378
Cleaning and protecting the vehicle interior ............. 382
4-2. Maintenance Maintenance requirements ....................... 385
General maintenance .......... 387
Emission inspection and maintenance (I/M)
programs............................... 390 4-3. Do-it-yourself
maintenance
Do-it-yourself service precautions ............................ 391
Hood .......................................... 394
Positioning a floor jack ......... 395
Engine compartment ........... 397
Tires............................................. 412
Tire inflation pressure........... 424
Wheels ...................................... 428
Air conditioning filter ........... 430
Electronic key battery.......... 433
Checking and replacing fuses ........................................ 435
Headlight aim ......................... 449
Light bulbs ................................. 451
Page 448 of 592
448
4-3. Do-it-yourself maintenance
■After a fuse is replaced
●If the lights do not turn on even after the fuse has been replaced, a bulb may
need replacement. ( P. 4 5 1 )
●If the replaced fuse blows again, have the vehicle inspected by your Lexus
dealer.
■If there is an overload in the circuits
The fuses are designed to blow, protecting the wiring harness from damage.
CAUTION
■To prevent system breakdowns and vehicle fire
Observe the following precautions.
Failing to do so may cause damage , and possibly a fire or injury.
●Never use a fuse of a higher amperage rating than indicated, or use any other
object in place of a fuse.
●Always use a genuine Lexus fuse or equivalent.
Never replace a fuse with a wire, even as a temporary fix.
This can cause extensive damage or even fire.
●Do not modify the fuses or the fuse box.
NOTICE
■Before replacing fuses
Have the cause of electrical overload determined and repaired by your Lexus
dealer.
Page 451 of 592
451
4-3. Do-it-yourself maintenance
4
Maintenance and care
Light bulbs
You may replace the following bulbs yourself. For more information about
replacing other light bulbs, contact your Lexus dealer.
■Preparing a replacement light bulb
Check the wattage of the light bulb being replaced. ( P. 5 3 6 )
■ Removing the engine compartment cover
P. 3 9 9
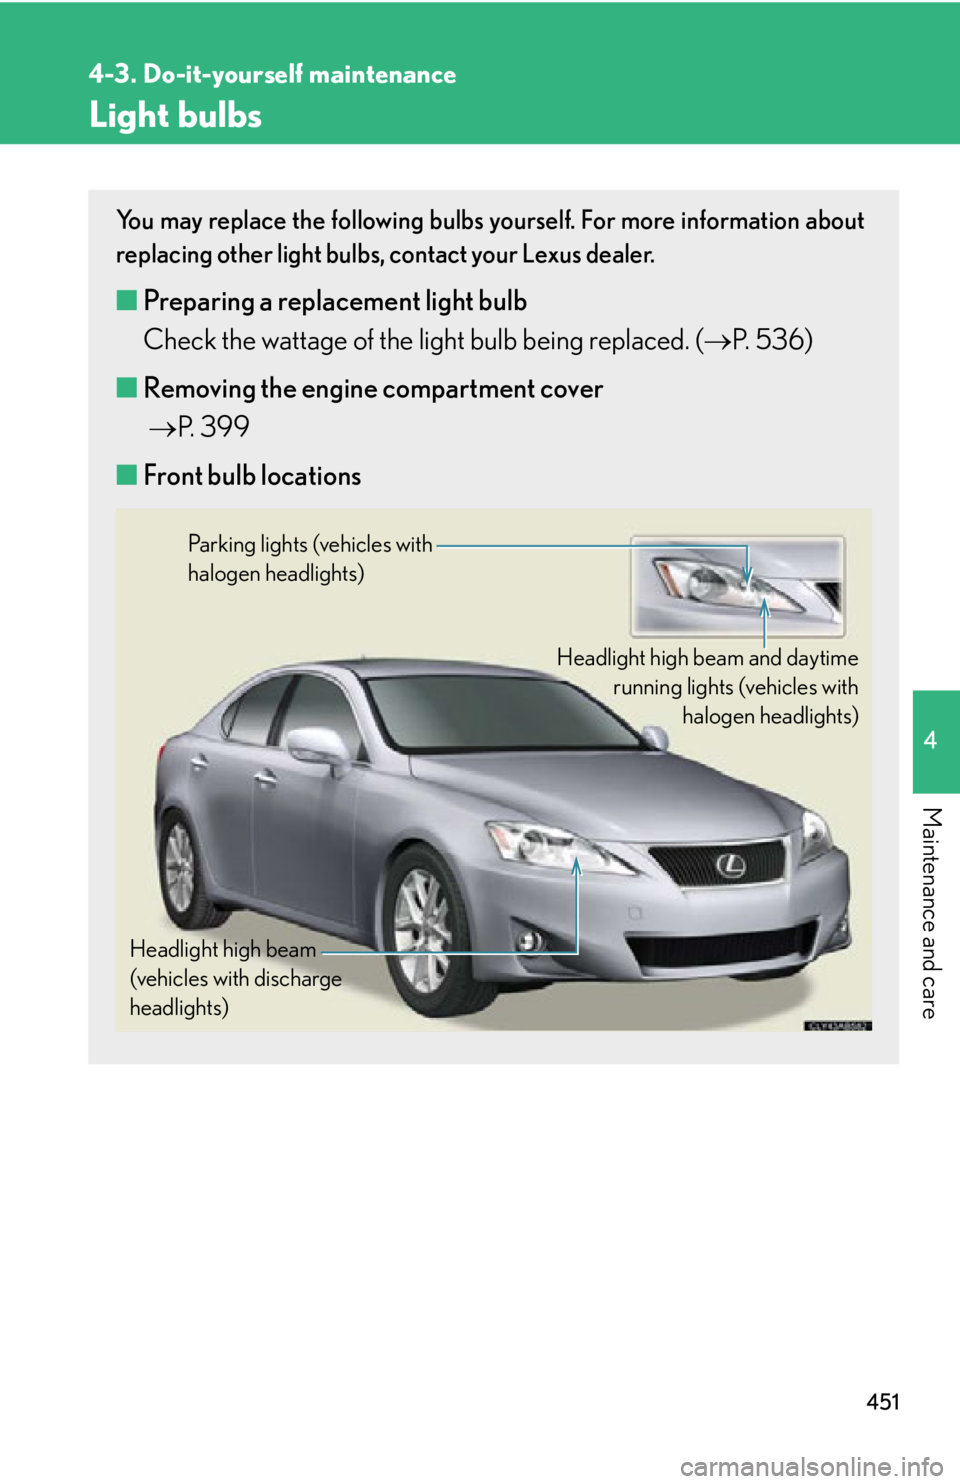
■ Front bulb locations
Parking lights (vehicles with
halogen headlights)
Headlight high beam and daytimerunning lights (vehicles with halogen headlights)
Headlight high beam
(vehicles with discharge
headlights)
Page 452 of 592

452
4-3. Do-it-yourself maintenance
■Rear bulb locations
Rear turn signal light
Back-up light
Page 453 of 592
453
4-3. Do-it-yourself maintenance
4
Maintenance and care
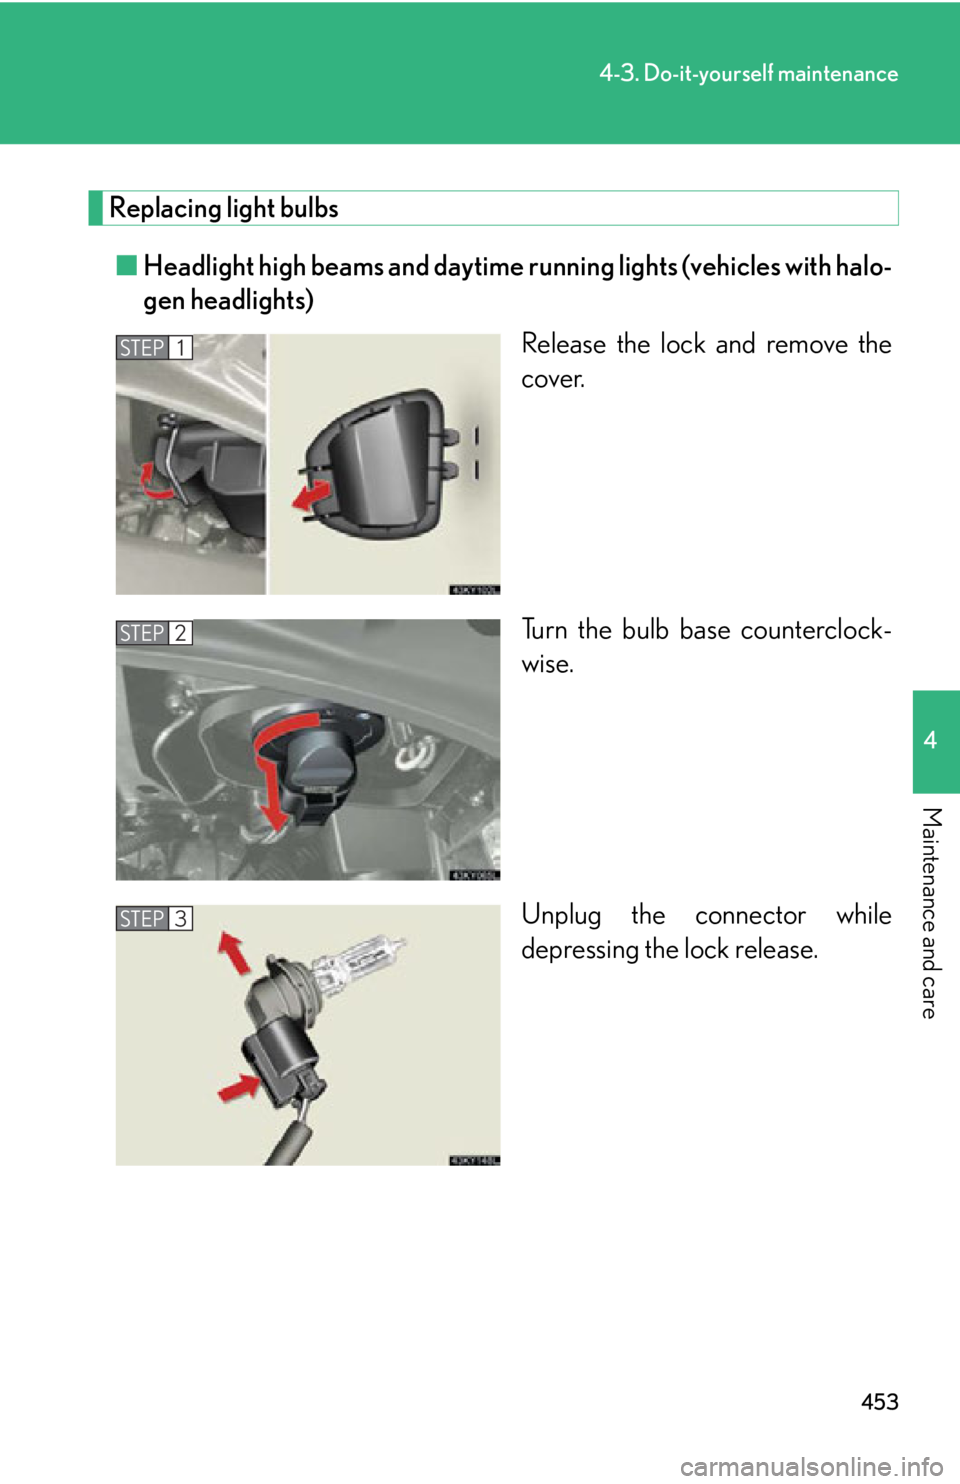
Replacing light bulbs■ Headlight high beams and daytime r unning lights (vehicles with halo-
gen headlights)
Release the lock and remove the
cover.
Turn the bulb base counterclock-
wise.
Unplug the connector while
depressing the lock release.
STEP1
STEP2
STEP3
Page 454 of 592
454
4-3. Do-it-yourself maintenance
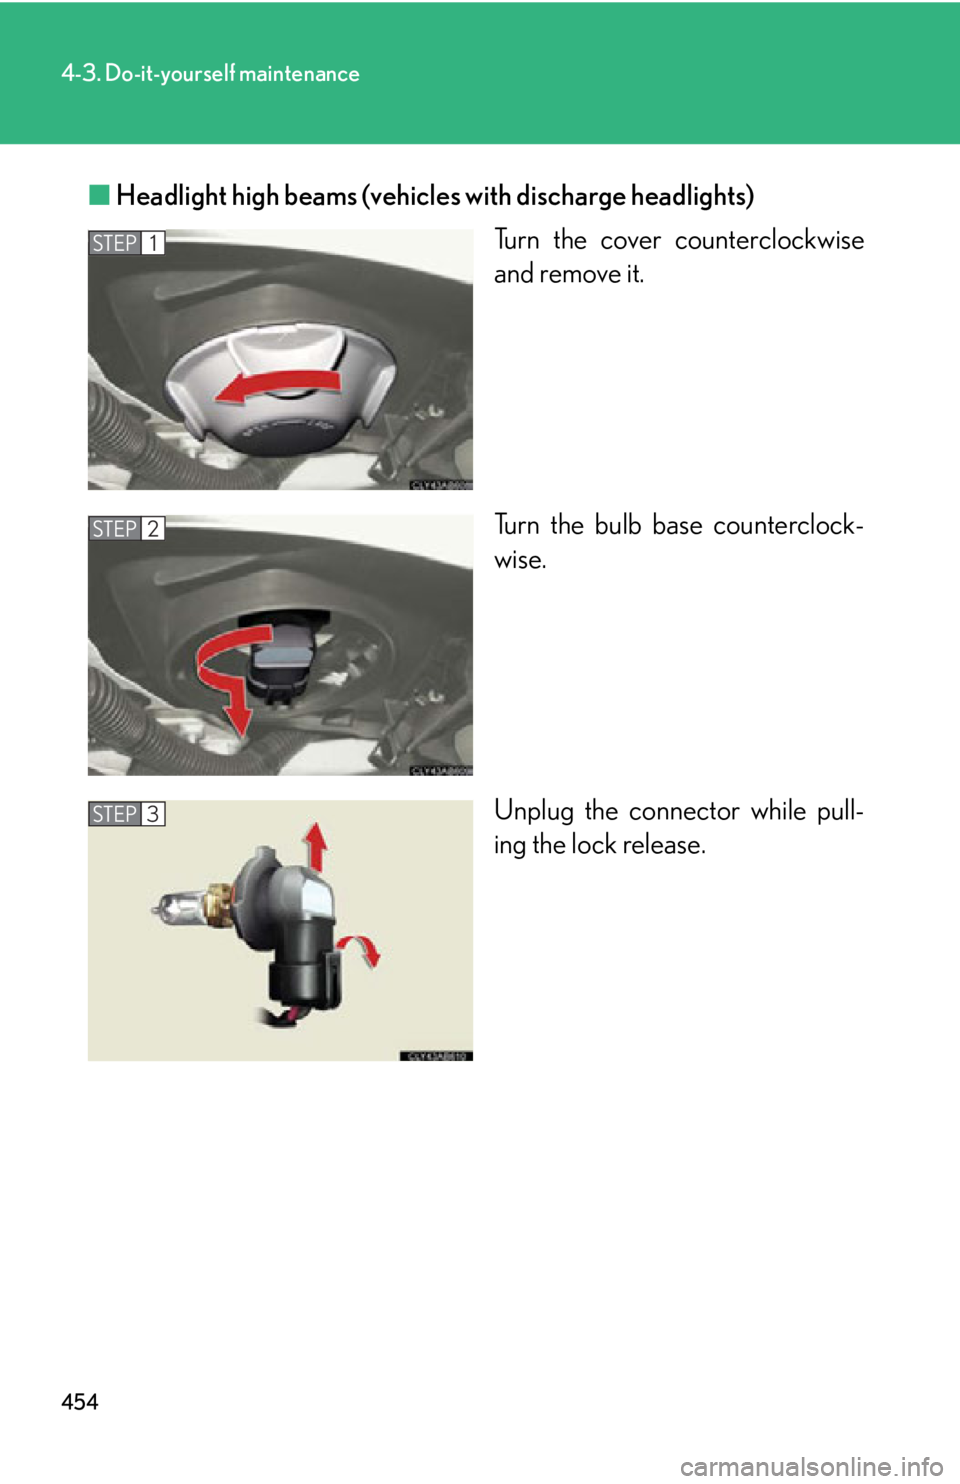
■Headlight high beams (vehicles with discharge headlights)
Turn the cover counterclockwise
and remove it.
Turn the bulb base counterclock-
wise.
Unplug the connector while pull-
ing the lock release.
STEP1
STEP2
STEP3
Page 455 of 592

455
4-3. Do-it-yourself maintenance
4
Maintenance and care
■Parking lights (vehicles with halogen headlights)
Release the lock and remove the
cover.
Turn the bulb base counterclock-
wise.
Remove the light bulb.
■ Back-up lights
Open the trunk door and remove
the trunk panel cover clips.
STEP1
STEP2
STEP3
STEP1
Page 456 of 592

456
4-3. Do-it-yourself maintenance
Partly remove the trunk panel
cover and turn the bulb base coun-
terclockwise.
Remove the light bulb.
■ Rear turn signal lights
Open the trunk door and remove
the cover.
Turn the bulb base counterclock-
wise.STEP2
STEP3
STEP1
STEP2