Lexus IS250 2013 Navigation Manual / LEXUS 2013 IS250,IS350 QUICK GUIDE (OM53B68U) Workshop Manual
Manufacturer: LEXUS, Model Year: 2013,
Model line: IS250,
Model: Lexus IS250 2013
Pages: 86, PDF Size: 1.56 MB
Lexus IS250 2013 Navigation Manual / LEXUS 2013 IS250,IS350 QUICK GUIDE (OM53B68U) Workshop Manual
IS250 2013
Lexus
Lexus
https://www.carmanualsonline.info/img/36/29794/w960_29794-0.png
Lexus IS250 2013 Navigation Manual / LEXUS 2013 IS250,IS350 QUICK GUIDE (OM53B68U) Workshop Manual
Trending: clock, park assist, remote control, light, bluetooth, phone, turn signal
Page 51 of 86
51
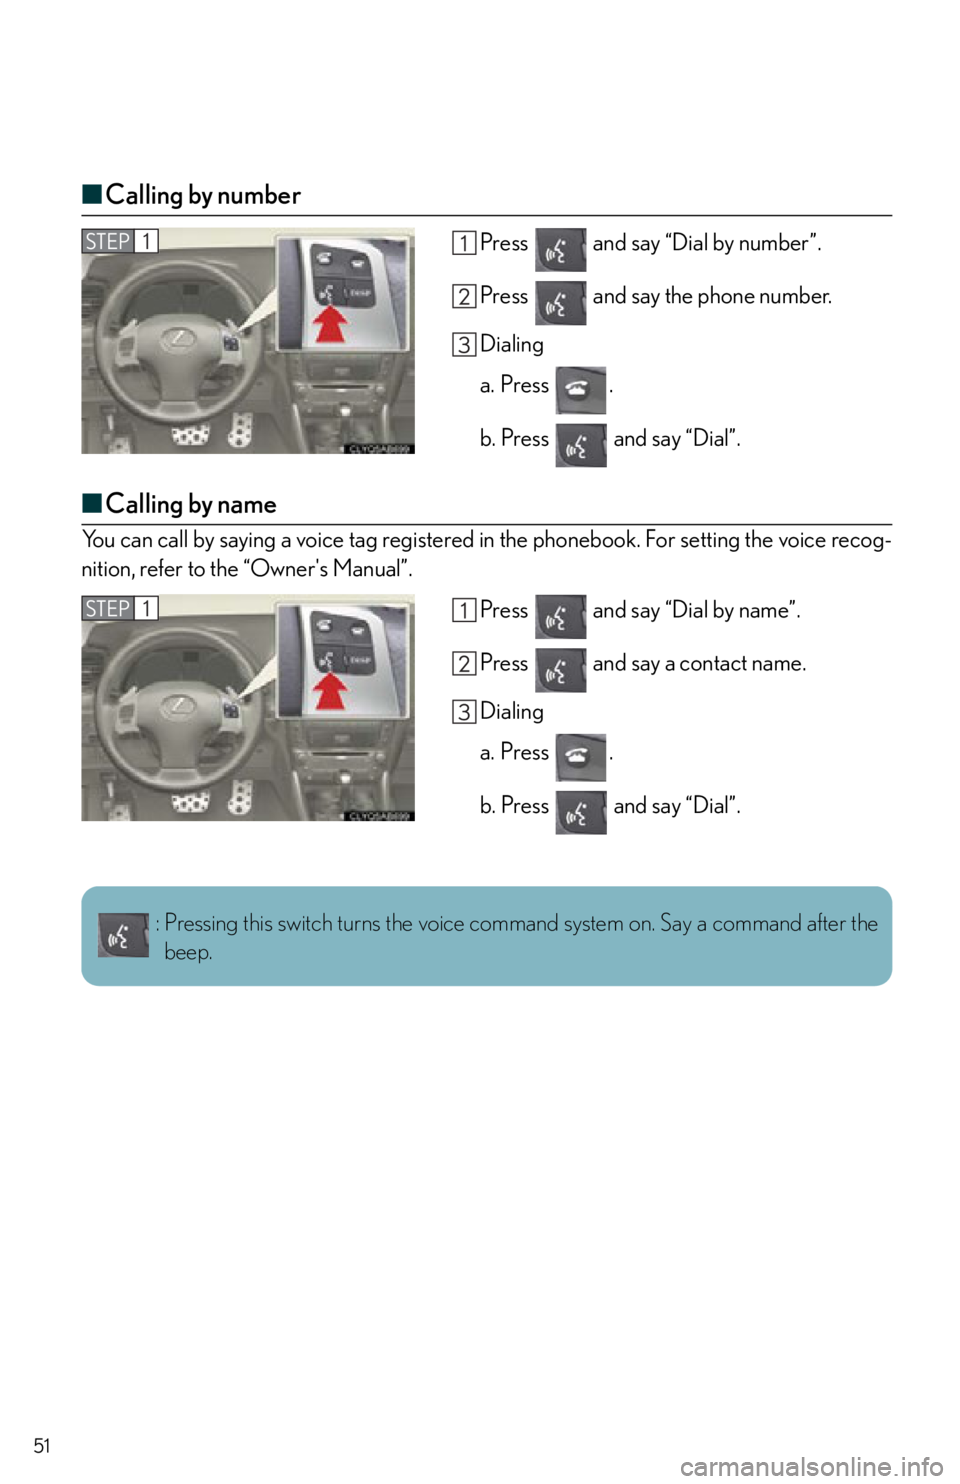
■Calling by number
Press and say “Dial by number”.
Press and say the phone number.
Dialing
a. Press .
b. Press and say “Dial”.
■Calling by name
You can call by saying a voice tag registered in the phonebook. For setting the voice recog-
nition, refer to the “Owner's Manual”.
Press and say “Dial by name”.
Press and say a contact name.
Dialing
a. Press .
b. Press and say “Dial”.
STEP1
STEP1
: Pressing this switch turns the voice command system on. Say a command after the
beep.
Page 52 of 86
52
■Calling by speed dial
Press .
Press the desired preset button (1-6).
Press .STEP1
STEP2
Page 53 of 86
53
■Phonebook transfer
Press .
Press and say “Phonebook”.
Press and say “Add entry”.
Press and say “By phone”.
Press and say “Confirm”.
Transfer the phonebook data to the system
using the cellular phone.
Refer to the cellular phone user’s manual for
cellular phone operation.
Press and say “Previous” or “Next” until
the desired data is displayed.
Press and say “Confirm”.
Press and say the desired name.
Press and say “Confirm”.
Press and say “Confirm” again.STEP1
10
11
Phonebook transfer may not be possible depending on phone model.
: Pressing this switch turns the voice command system on. Say a command after the
beep.
Page 54 of 86
54
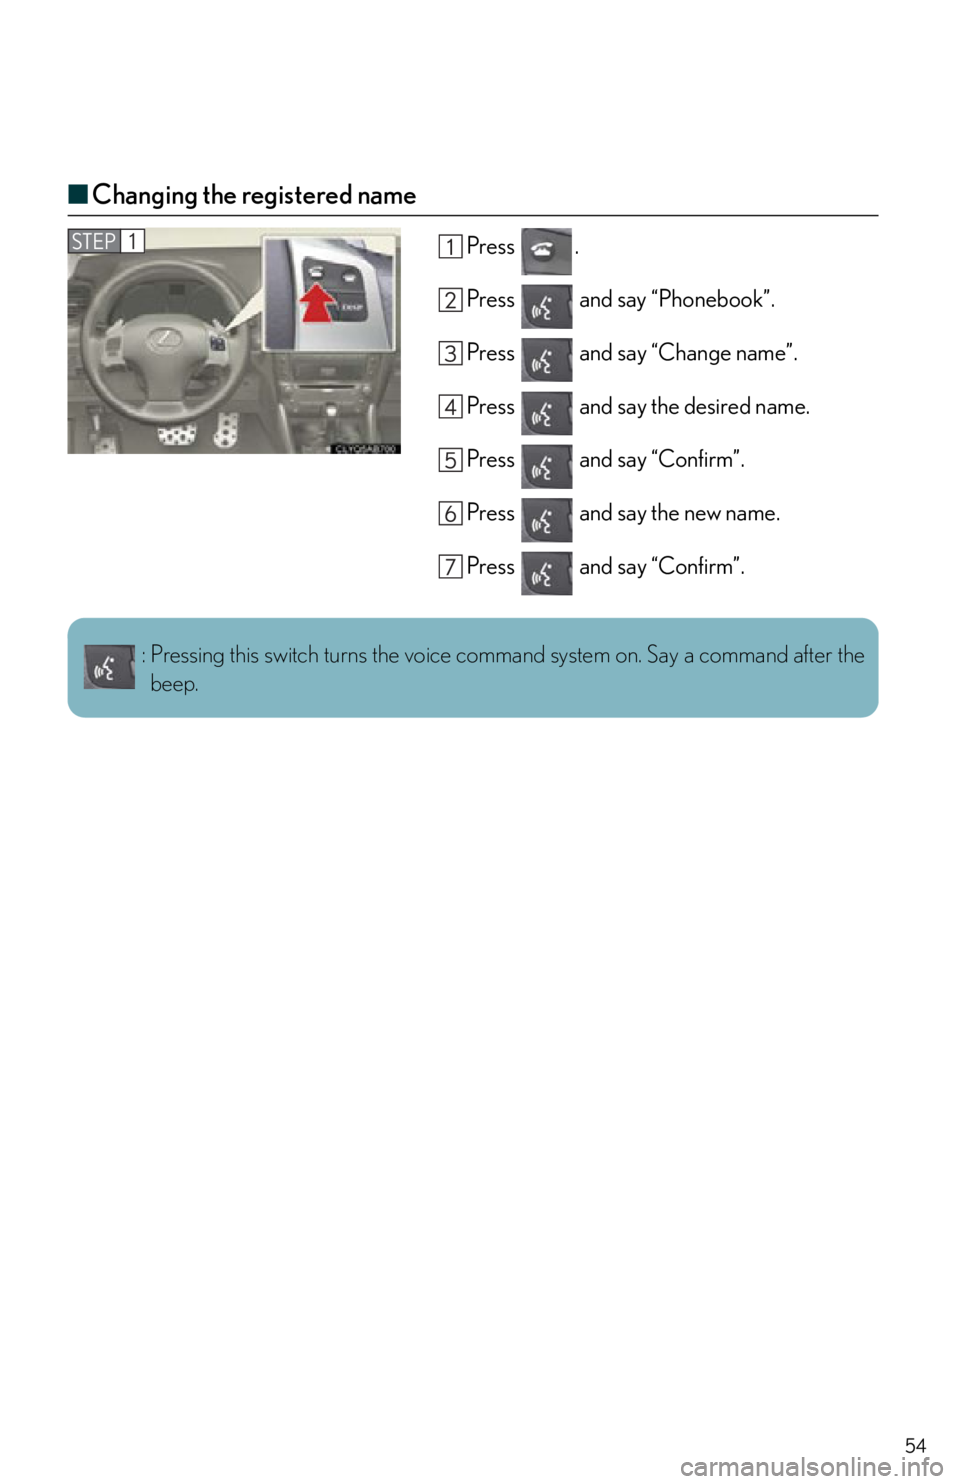
■Changing the registered name
Press .
Press and say “Phonebook”.
Press and say “Change name”.
Press and say the desired name.
Press and say “Confirm”.
Press and say the new name.
Press and say “Confirm”.STEP1
: Pressing this switch turns the voice command system on. Say a command after the
beep.
Page 55 of 86
55
■Registering a speed dial
Press .
Press and say “Phonebook”.
Press and say “Set speed dial”.
Select the data to be registered.
Press and say the desired name.
Press and say “Confirm”.
Press the desired preset button (1-6).
Press and say “Confirm”.STEP1
STEP7
: Pressing this switch turns the voice command system on. Say a command after the
beep.
Page 56 of 86
56
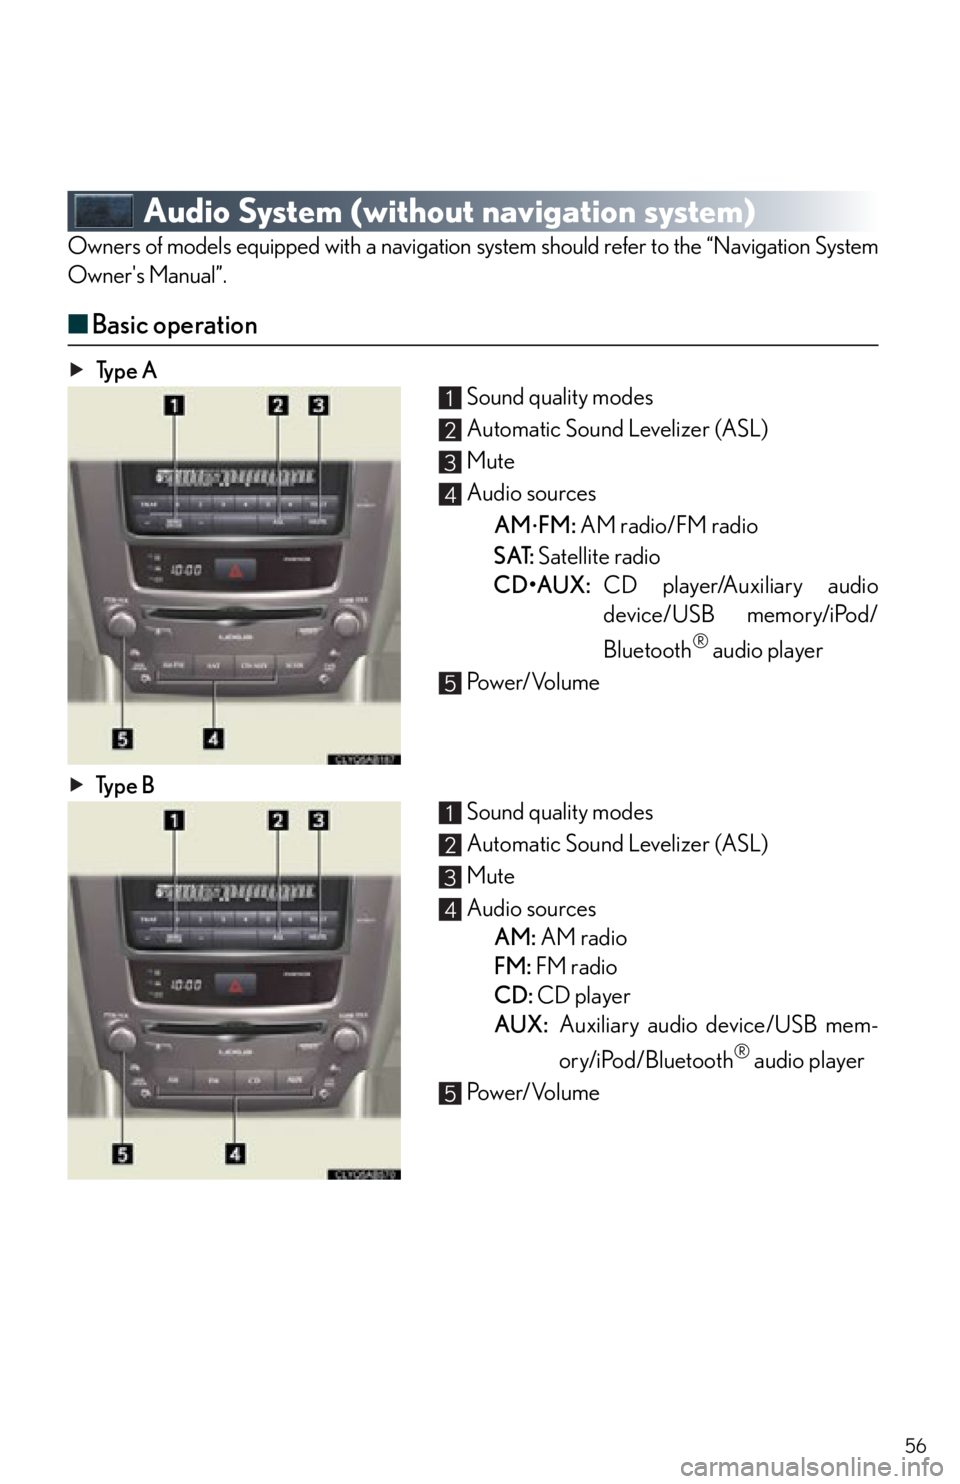
Audio System (without navigation system)
Owners of models equipped with a navigation system should refer to the “Navigation System
Owner's Manual”.
■Basic operation
Ty p e A
Sound quality modes
Automatic Sound Levelizer (ASL)
Mute
Audio sources
AM
FM: AM radio/FM radio
S AT: Satellite radio
CD•AUX: CD player/Auxiliary audio
device/USB memory/iPod/
Bluetooth
® audio player
Power/Volume
Ty p e B Sound quality modes
Automatic Sound Levelizer (ASL)
Mute
Audio sources
AM: AM radio
FM: FM radio
CD: CD player
AUX: Auxiliary audio device/USB mem-
ory/iPod/Bluetooth
® audio player
Power/Volume
1
2
3
4
5
1
2
3
4
5
Page 57 of 86
57
■Radio
Ty p e A
Traffic information
Station presets
Text messages
Radio tuner
RDS genre select
Scanning radio stations
Seek
Ty p e B Traffic information
Station presets
Radio tuner
Station select
Seek
■Entering station presets
Press the desired station by using the tune, the seek or the scan function.
Press and hold one of the preset buttons (1-6 ) until you hear a beep, indicating that the
station is set.
1
2
3
4
5
6
7
1
2
3
4
5
Page 58 of 86
58
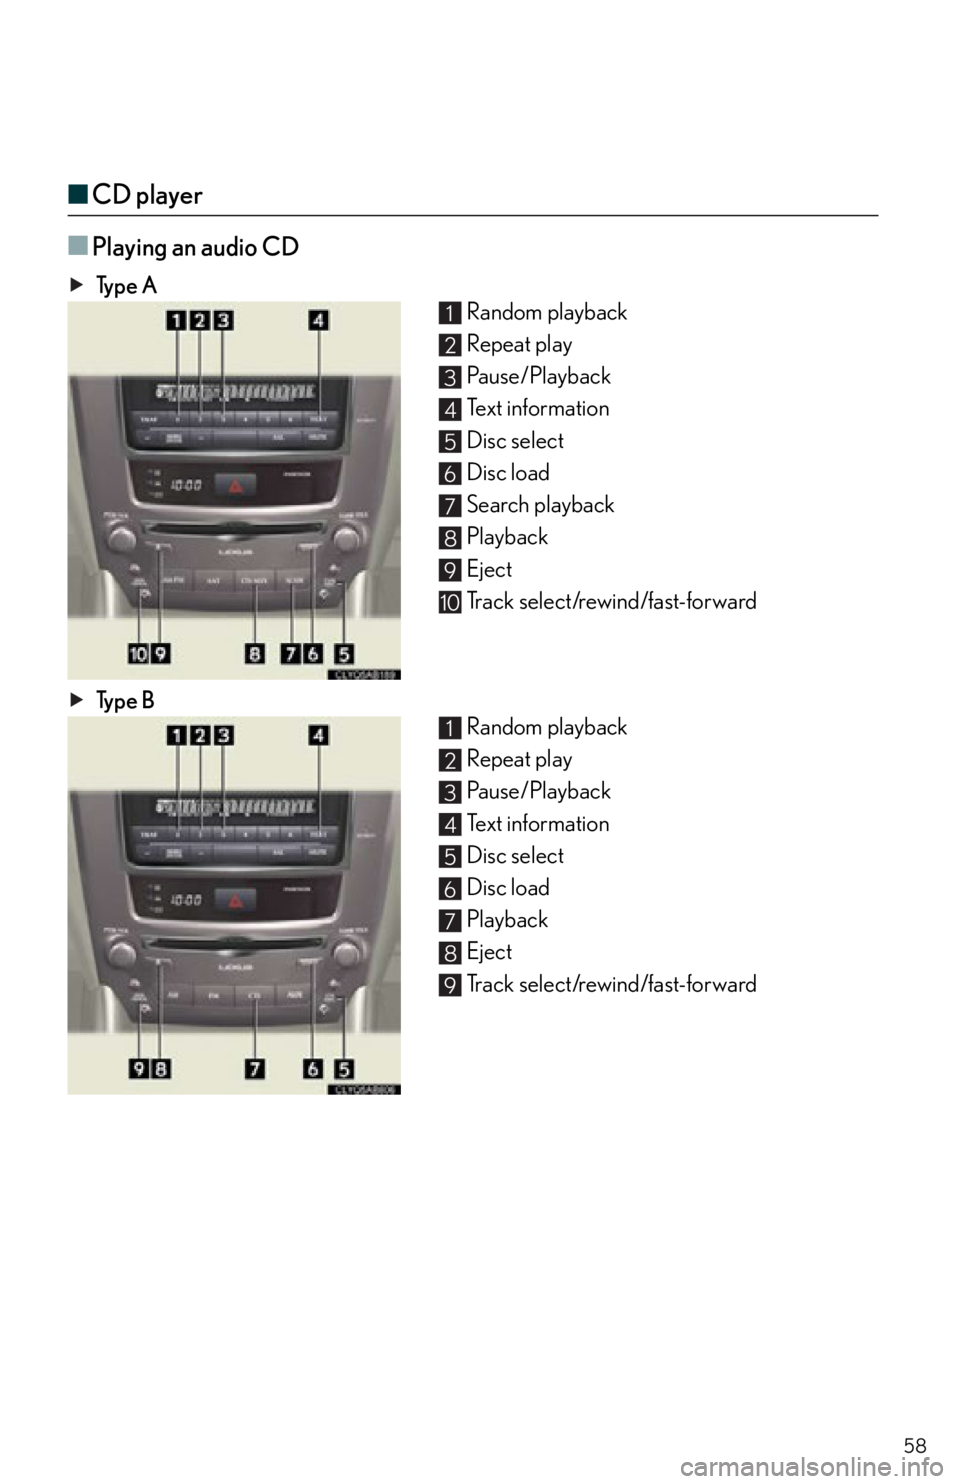
■CD player
■
Playing an audio CD
Ty p e A Random playback
Repeat play
Pause/Playback
Text information
Disc select
Disc load
Search playback
Playback
Eject
Track select/rewind/fast-forward
Ty p e B Random playback
Repeat play
Pause/Playback
Text information
Disc select
Disc load
Playback
Eject
Track select/rewind/fast-forward
1
2
3
4
5
6
7
8
9
10
1
2
3
4
5
6
7
8
9
Page 59 of 86
59
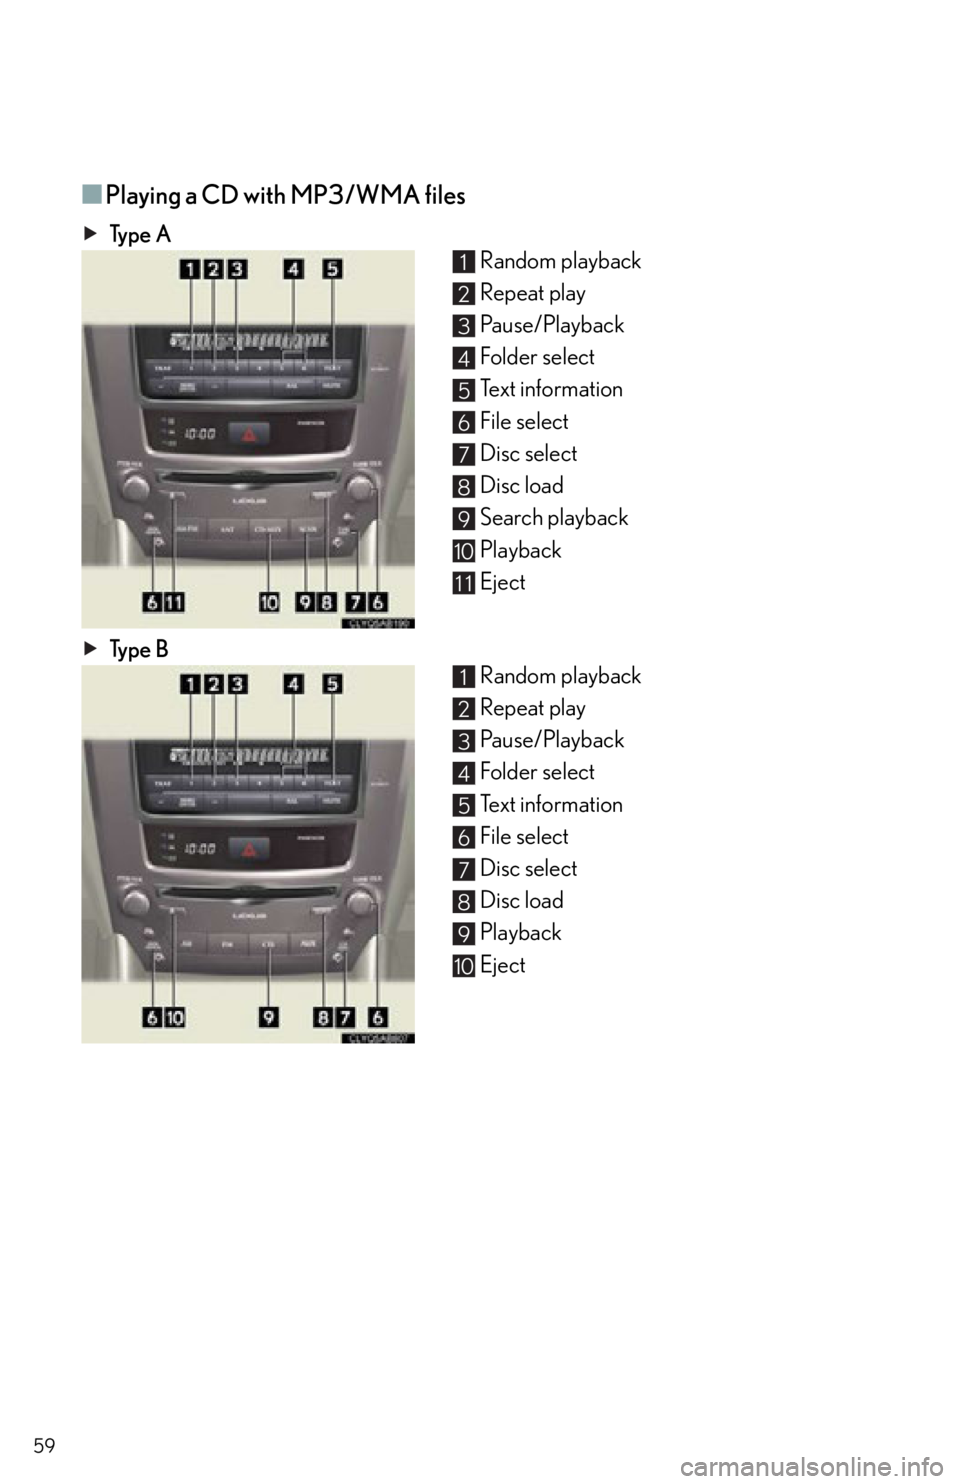
■Playing a CD with MP3/WMA files
Ty p e ARandom playback
Repeat play
Pause/Playback
Folder select
Text information
File select
Disc select
Disc load
Search playback
Playback
Eject
Ty p e B Random playback
Repeat play
Pause/Playback
Folder select
Text information
File select
Disc select
Disc load
Playback
Eject
1
2
3
4
5
6
7
8
9
10
11
1
2
3
4
5
6
7
8
9
10
Page 60 of 86
60
■Loading a CD
Press the “LOAD” button.“WAIT” is shown on the display.
Insert a CD when the indicators on the slot turn from amber to green.
The display changes from “WAIT” to “LOAD”.
■Loading multiple CDs
Press and hold the “LOAD” button until you hear a beep. “WAIT” is shown on the display.
Insert a CD when the indicators on the slot turn from amber to green.
The display changes from “WAIT” to “LOAD”.
The indicators on the slot turn to amber when the CD is inserted.
Insert the next CD when the indicators on the slot turn from amber to green again.
Repeat the procedure for the remaining CDs.
To cancel the operation, press the “LOAD” button. If you do not insert a CD within 15
seconds, loading will cancelled automatically.
Trending: warning light, warning lights, sat nav, door lock, fuel pressure, seat adjustment, height
