Lexus IS250 2014 2014-2015 IS250/350 TVIP V4 Remote Engine Starter (RES) Owners G / LEXUS 2014 IS250,IS350 QUICK GUIDE (OM53B33U) Service Manual
Manufacturer: LEXUS, Model Year: 2014,
Model line: IS250,
Model: Lexus IS250 2014
Pages: 78, PDF Size: 4.35 MB
Lexus IS250 2014 2014-2015 IS250/350 TVIP V4 Remote Engine Starter (RES) Owners G / LEXUS 2014 IS250,IS350 QUICK GUIDE (OM53B33U) Service Manual
IS250 2014
Lexus
Lexus
https://www.carmanualsonline.info/img/36/29776/w960_29776-0.png
Lexus IS250 2014 2014-2015 IS250/350 TVIP V4 Remote Engine Starter (RES) Owners G / LEXUS 2014 IS250,IS350 QUICK GUIDE (OM53B33U) Service Manual
Trending: air conditioning, tire pressure reset, ignition, mirror, fuel consumption, turn signal, fuse
Page 41 of 78
41
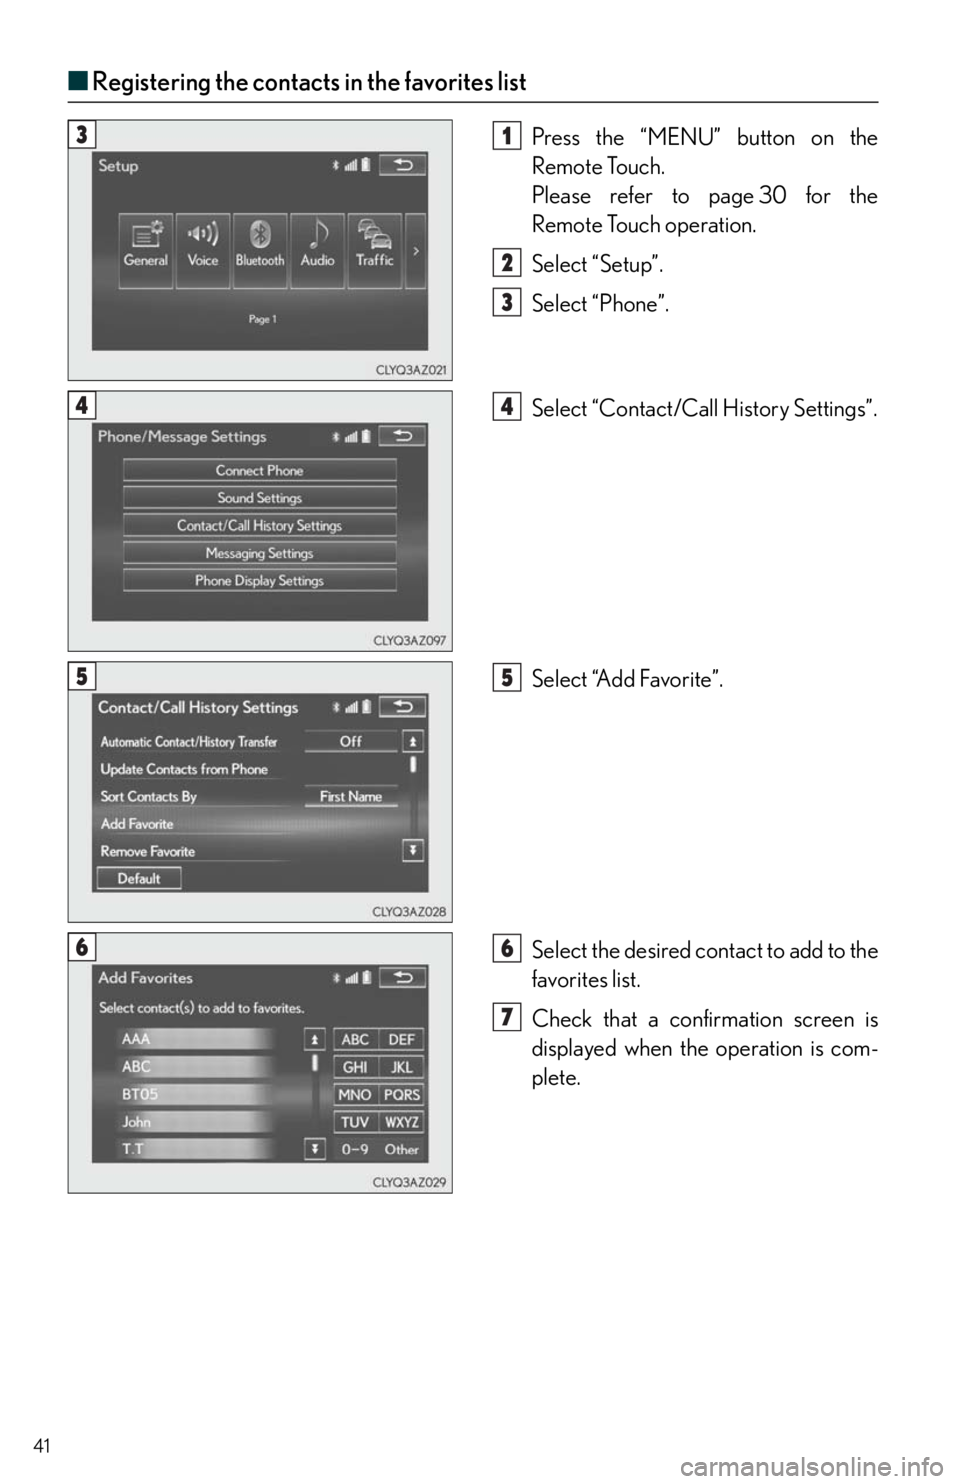
■Registering the contacts in the favorites list
Press the “MENU” button on the
Remote Touch.
Please refer to page 30 for the
Remote Touch operation.
Select “Setup”.
Select “Phone”.
Select “Contact/Call History Settings”.
Select “Add Favorite”.
Select the desired contact to add to the
favorites list.
Check that a confirmation screen is
displayed when the operation is com-
plete.31
2
3
44
55
66
7
Page 42 of 78
42
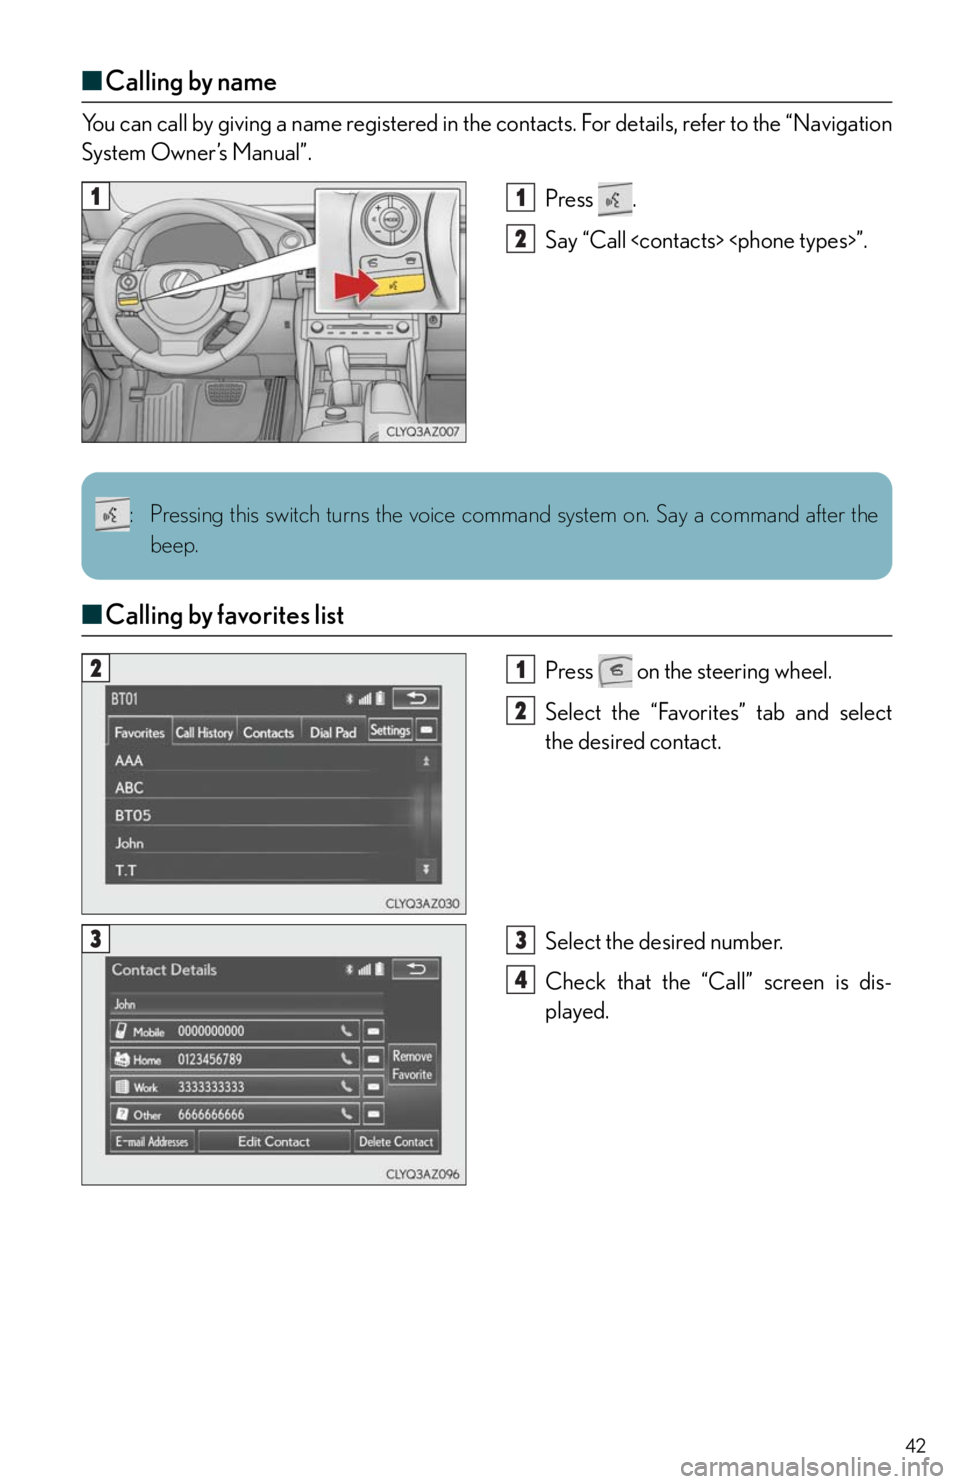
■Calling by name
You can call by giving a name registered in the contacts. For details, refer to the “Navigation
System Owner’s Manual”.
Press .
Say “Call ”.
■Calling by favorites list
Press on the steering wheel.
Select the “Favorites” tab and select
the desired contact.
Select the desired number.
Check that the “Call” screen is dis-
played.
11
2
: Pressing this switch turns the voice command system on. Say a command after the
beep.
21
2
33
4
Page 43 of 78
43
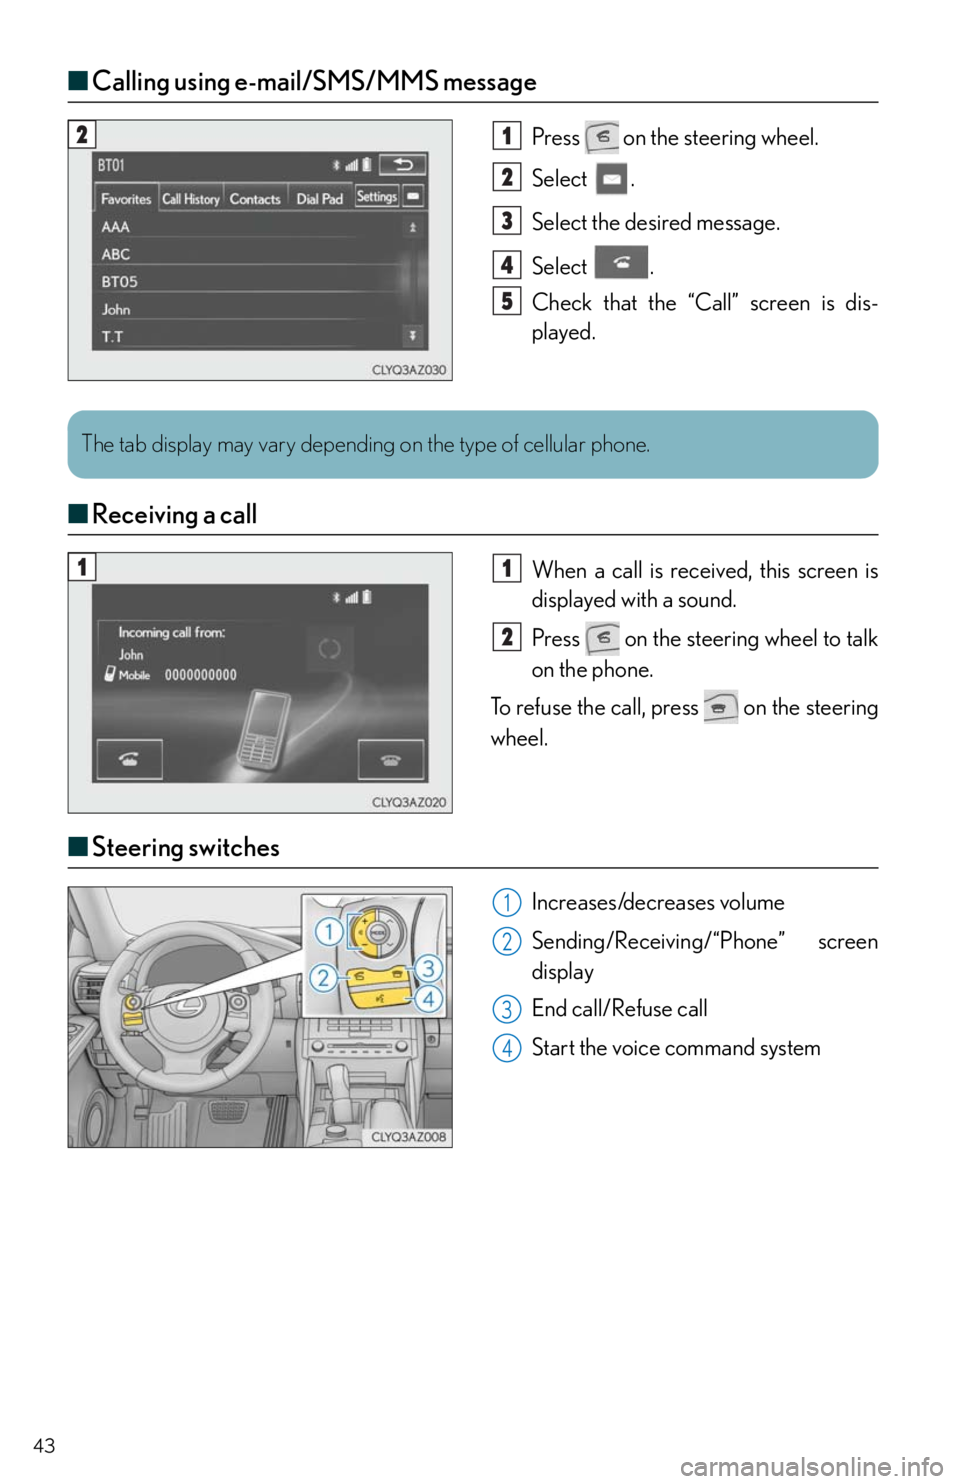
■Calling using e-mail/SMS/MMS message
Press on the steering wheel.
Select .
Select the desired message.
Select .
Check that the “Call” screen is dis-
played.
■Receiving a call
When a call is received, this screen is
displayed with a sound.
Press on the steering wheel to talk
on the phone.
To refuse the call, press on the steering
wheel.
■Steering switches
Increases/decreases volume
Sending/Receiving/“Phone” screen
display
End call/Refuse call
Start the voice command system
21
2
3
4
5
The tab display may vary depending on the type of cellular phone.
11
2
1
2
3
4
Page 44 of 78
44
Audio System (with navigation system)
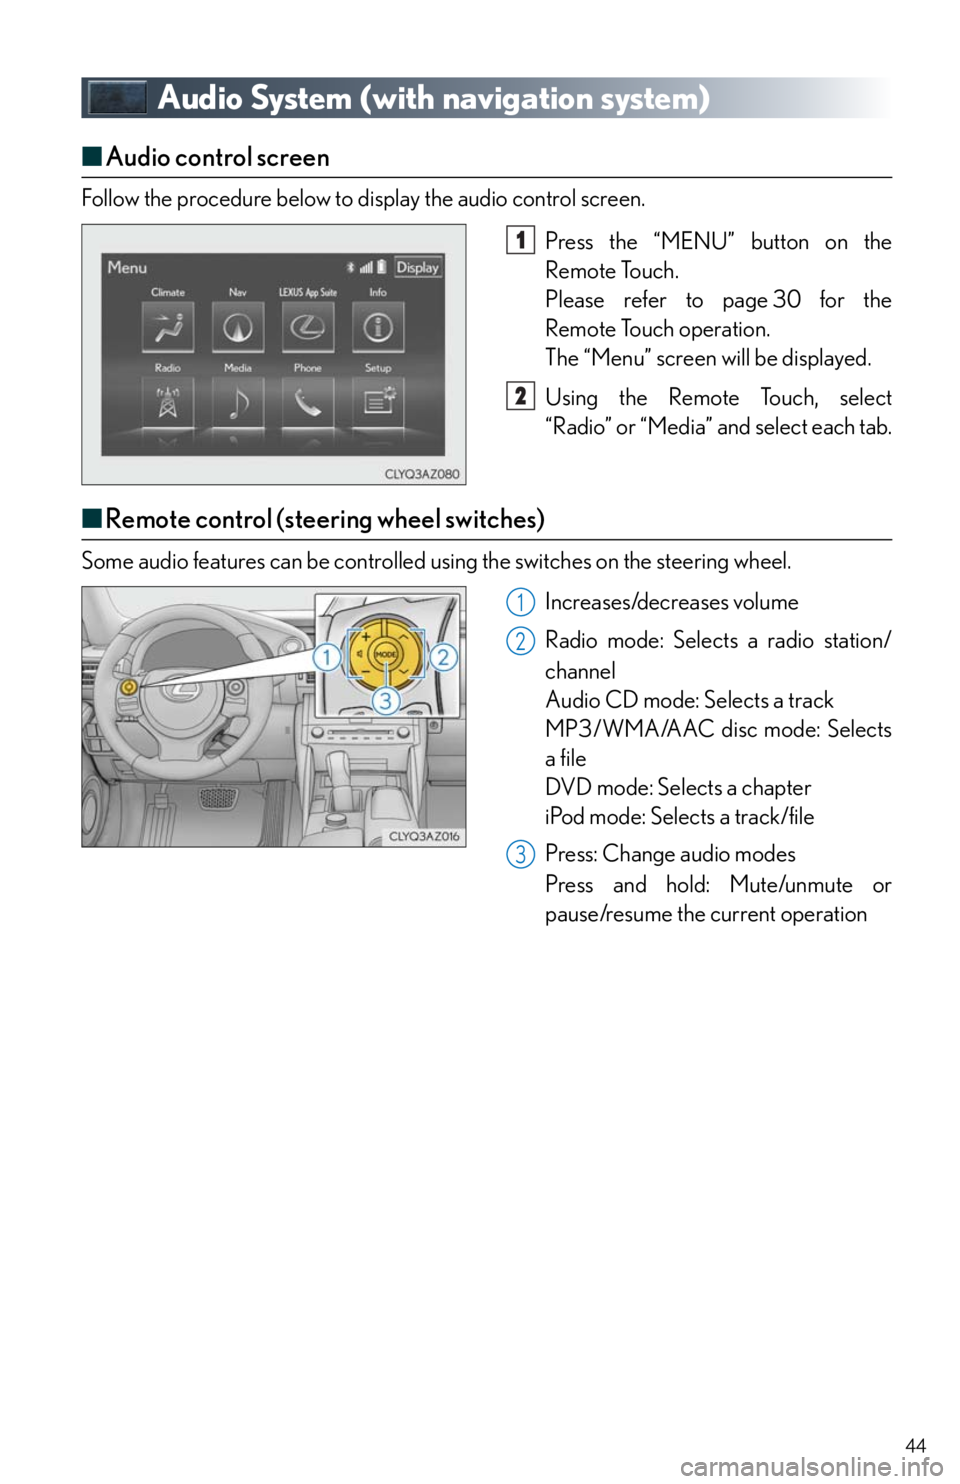
■Audio control screen
Follow the procedure below to display the audio control screen.
Press the “MENU” button on the
Remote Touch.
Please refer to page 30 for the
Remote Touch operation.
The “Menu” screen will be displayed.
Using the Remote Touch, select
“Radio” or “Media” and select each tab.
■Remote control (steering wheel switches)
Some audio features can be controlled using the switches on the steering wheel.
Increases/decreases volume
Radio mode: Selects a radio station/
channel
Audio CD mode: Selects a track
MP3/WMA/AAC disc mode: Selects
a file
DVD mode: Selects a chapter
iPod mode: Selects a track/file
Press: Change audio modes
Press and hold: Mute/unmute or
pause/resume the current operation
1
2
1
2
3
Page 45 of 78
45
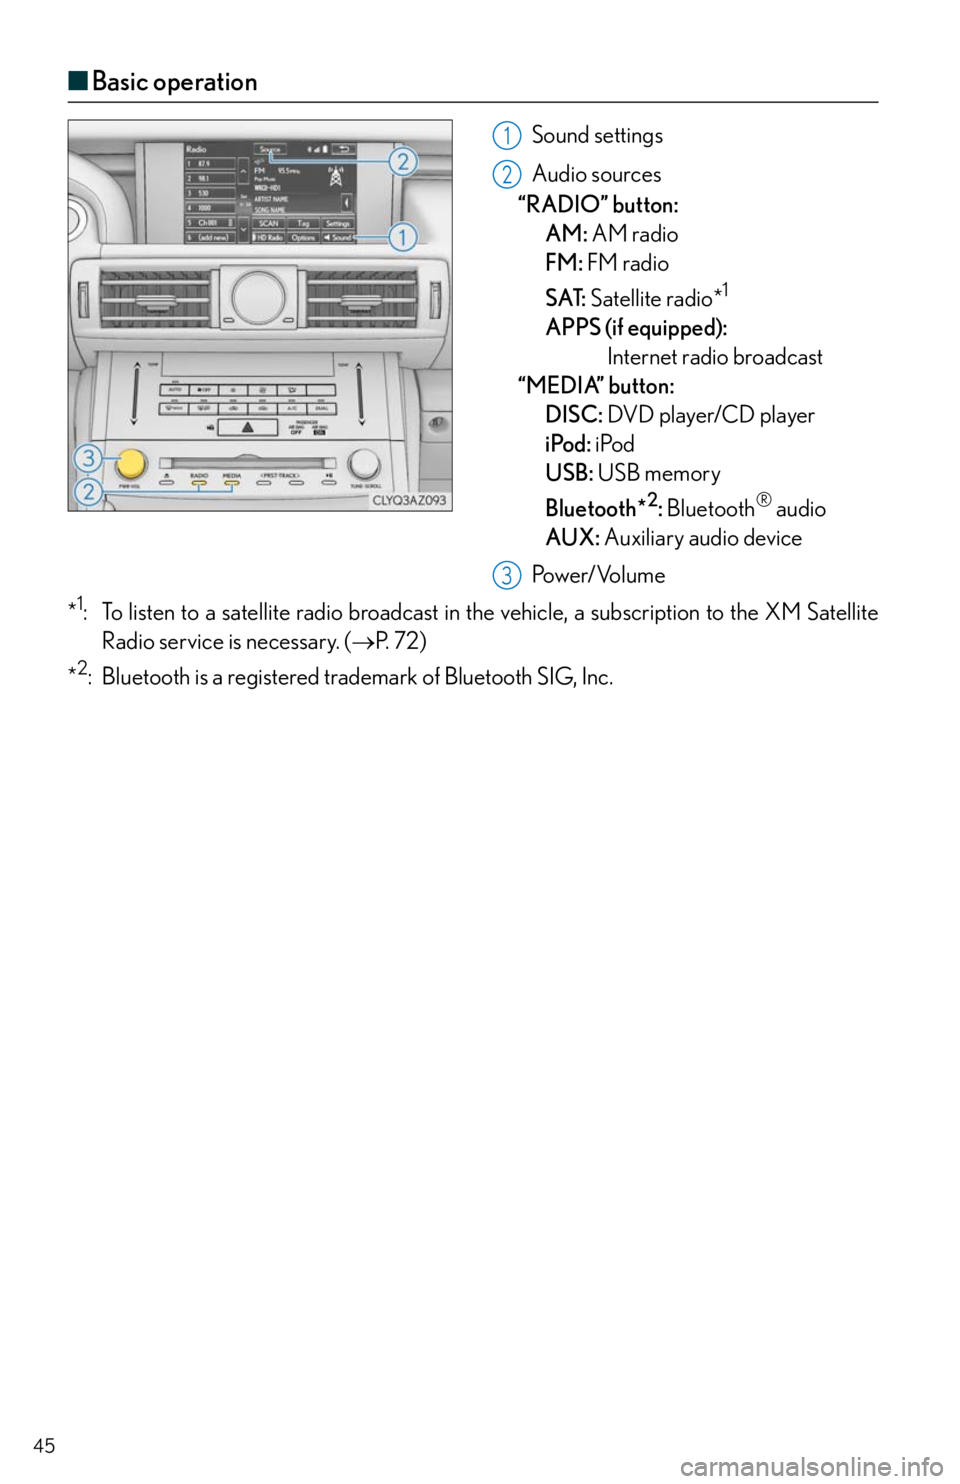
■Basic operation
Sound settings
Audio sources
“RADIO” button:
AM: AM radio
FM: FM radio
SAT: Satellite radio*
1
APPS (if equipped):
Internet radio broadcast
“MEDIA” button:
DISC: DVD player/CD player
iPod: iPod
USB: USB memory
Bluetooth*
2: Bluetooth® audio
AUX: Auxiliary audio device
Pow e r/ Vo l u m e
*
1: To listen to a satellite radio broadcast in the vehicle, a subscription to the XM Satellite
Radio service is necessary. (P. 7 2 )
*
2: Bluetooth is a registered trademark of Bluetooth SIG, Inc.
1
2
3
Page 46 of 78
46
■Radio
Tuning to preset stations/channels
Scanning for receivable stations
Using HD Radio
TM Te c h n o l o g y ( f o r
U.S.A., if equipped)
Cache radio operation buttons
Adjusting the frequency
Press: Selects a preset station
Press and hold: Seeks for a station
■Entering station presets
Tune in the desired station.
Select “add new”.
Select “Yes” on the confirmation screen.
Select “OK” after setting the new preset station.
Radio mode has a mix preset function, which can store up to 36 stations (6 stations per
page x 6 pages) from any of the AM, FM or SAT bands.
■DVD player/CD player
■
Playing an audio CD
Playback/pause
Repeat playback
Random playback
Selecting a track
Disc slot
CD eject
1
2
3
4
5
6
1
2
3
4
1
2
3
4
5
6
Page 47 of 78
47
■Playing a CD with MP3/WMA/AAC files
Playback/pause
Repeat playback
Random playback
Selecting a file
Selecting a folder
Selecting a file/fast forward/rewind
Disc slot
CD eject
■Playing a DVD
Image display (full screen)
Rewind
Stop
Playback/pause
Fast for ward
Selecting a chapter
Disc slot
DVD eject
1
2
3
4
5
6
7
8
1
2
3
4
5
6
7
8
Page 48 of 78
48
■Operating an iPod
■
Playing an iPod audio
Playback/pause
Repeat playback
Random playback
Selecting a play mode
Selecting a track/fast forward/rewind
■Playing an iPod video
Image display (full screen)
Rewind
Playback/pause
Fa st for wa rd
Selecting a file
1
2
3
4
5
1
2
3
4
5
Page 49 of 78
49
Lexus Display Audio Controller
(with Lexus Display Audio)
■Basic operation
Display the “Source” screen or audio
top screen
Display the “Menu” screen (P. 5 0 )
Display the previous screen
Turn or move the controller to select a
function and number.
Move the controller to display the left
or right side of screen.
Push the controller to enter the
selected function and number.
By using the Lexus Display Audio controller, you can control the audio system, hands-
free system, etc.
1
2
3
4
Page 50 of 78
50
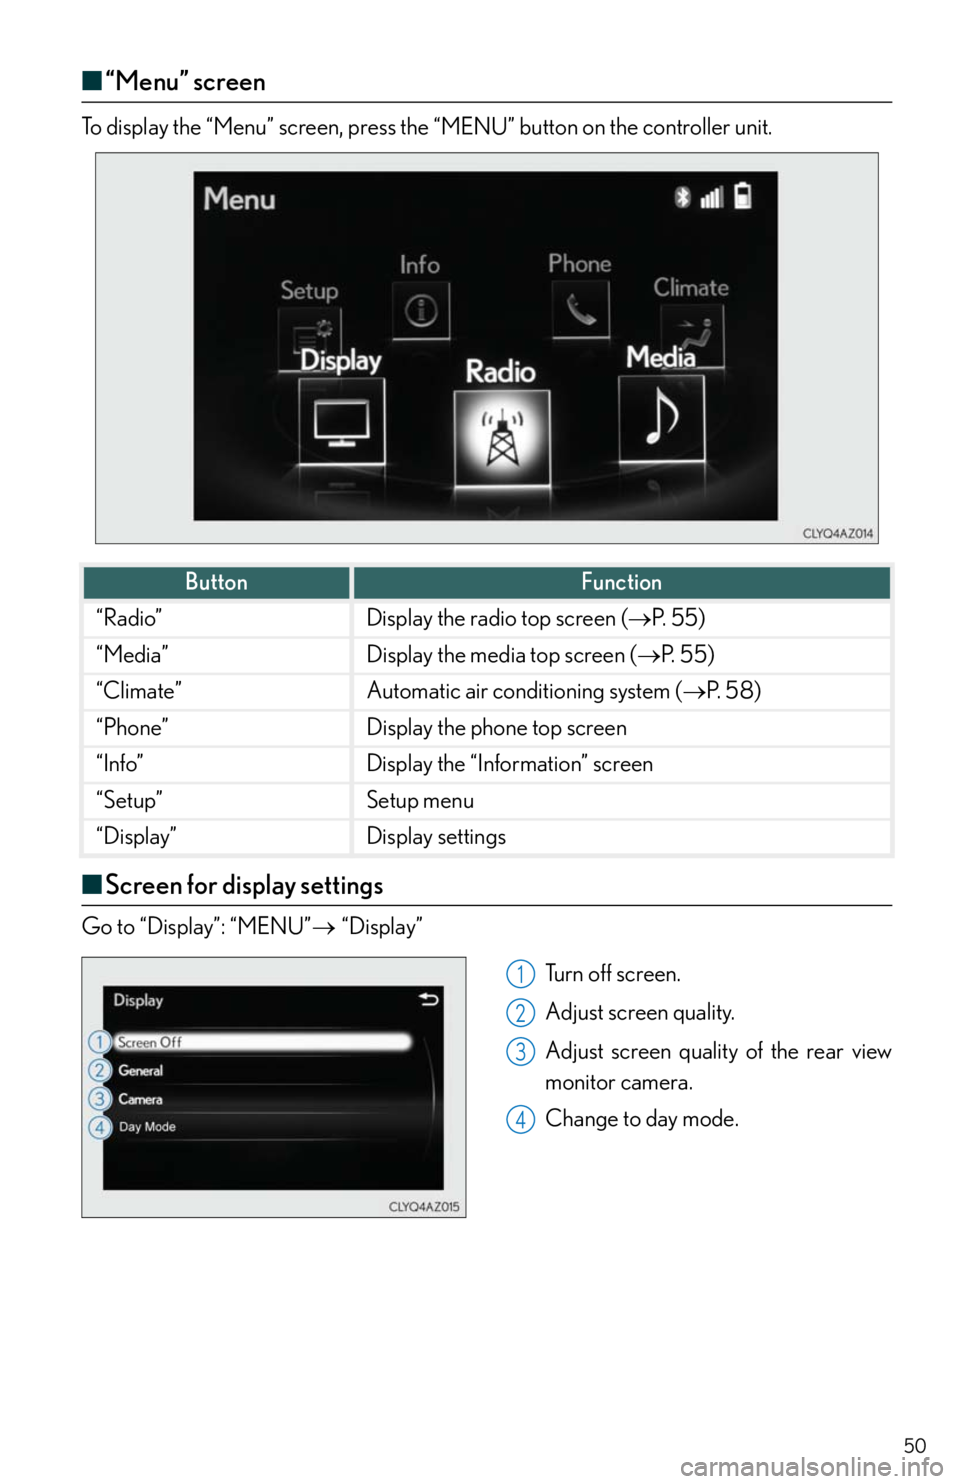
■“Menu” screen
“Menu” screenTo display the “Menu” screen, press the “MENU” button on the controller unit.
■Screen for display settings
Go to “Display”: “MENU”“Display”
Tu r n o f f s c r e e n .
Adjust screen quality.
Adjust screen quality of the rear view
monitor camera.
Change to day mode.
ButtonFunction
“Radio”Display the radio top screen (P. 5 5 )
“Media”Display the media top screen (P. 5 5 )
“Climate”Automatic air conditioning system (P. 5 8 )
“Phone”Display the phone top screen
“Info”Display the “Information” screen
“Setup”Setup menu
“Display”Display settings
1
2
3
4
Trending: charging, brakes, bluetooth, climate settings, pairing phone, fuel, reset
