display Lexus IS250 2014 Bluetooth settings / LEXUS 2014 IS250,IS350 QUICK GUIDE (OM53B33U) User Guide
[x] Cancel search | Manufacturer: LEXUS, Model Year: 2014, Model line: IS250, Model: Lexus IS250 2014Pages: 78, PDF Size: 4.35 MB
Page 29 of 78
29
Tire Pressure Warning System
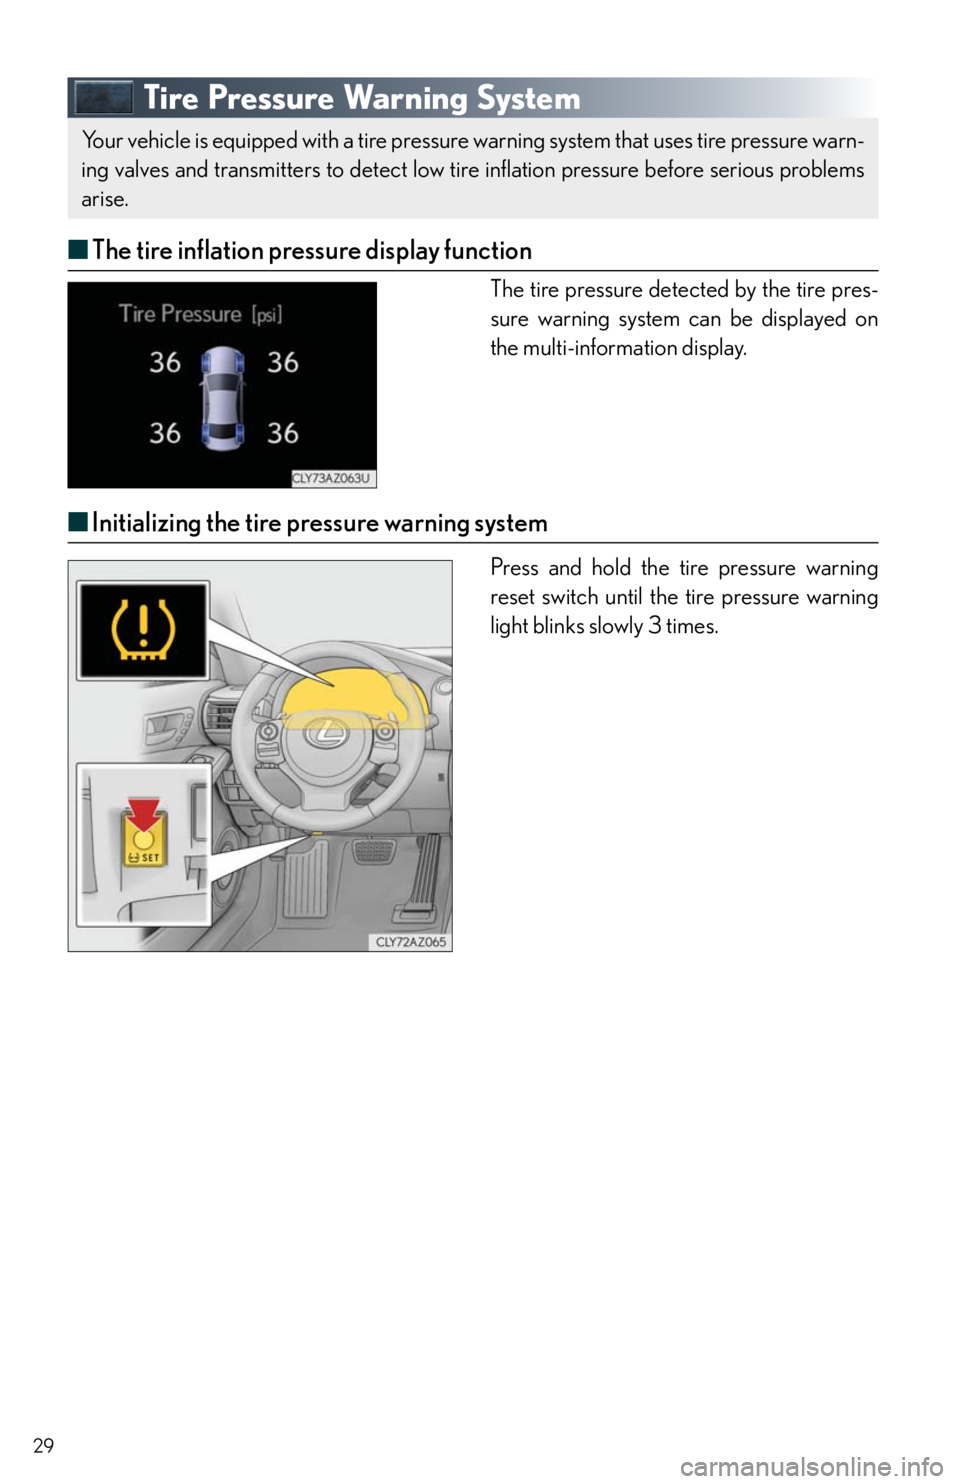
■The tire inflation pressure display function
The tire pressure detected by the tire pres-
sure warning system can be displayed on
the multi-information display.
■Initializing the tire pressure warning system
Press and hold the tire pressure warning
reset switch until the tire pressure warning
light blinks slowly 3 times.
Your vehicle is equipped with a tire pressure warning system that uses tire pressure warn-
ing valves and transmitters to detect low tire inflation pressure before serious problems
arise.
Page 30 of 78
30
Remote Touch (with navigation system)
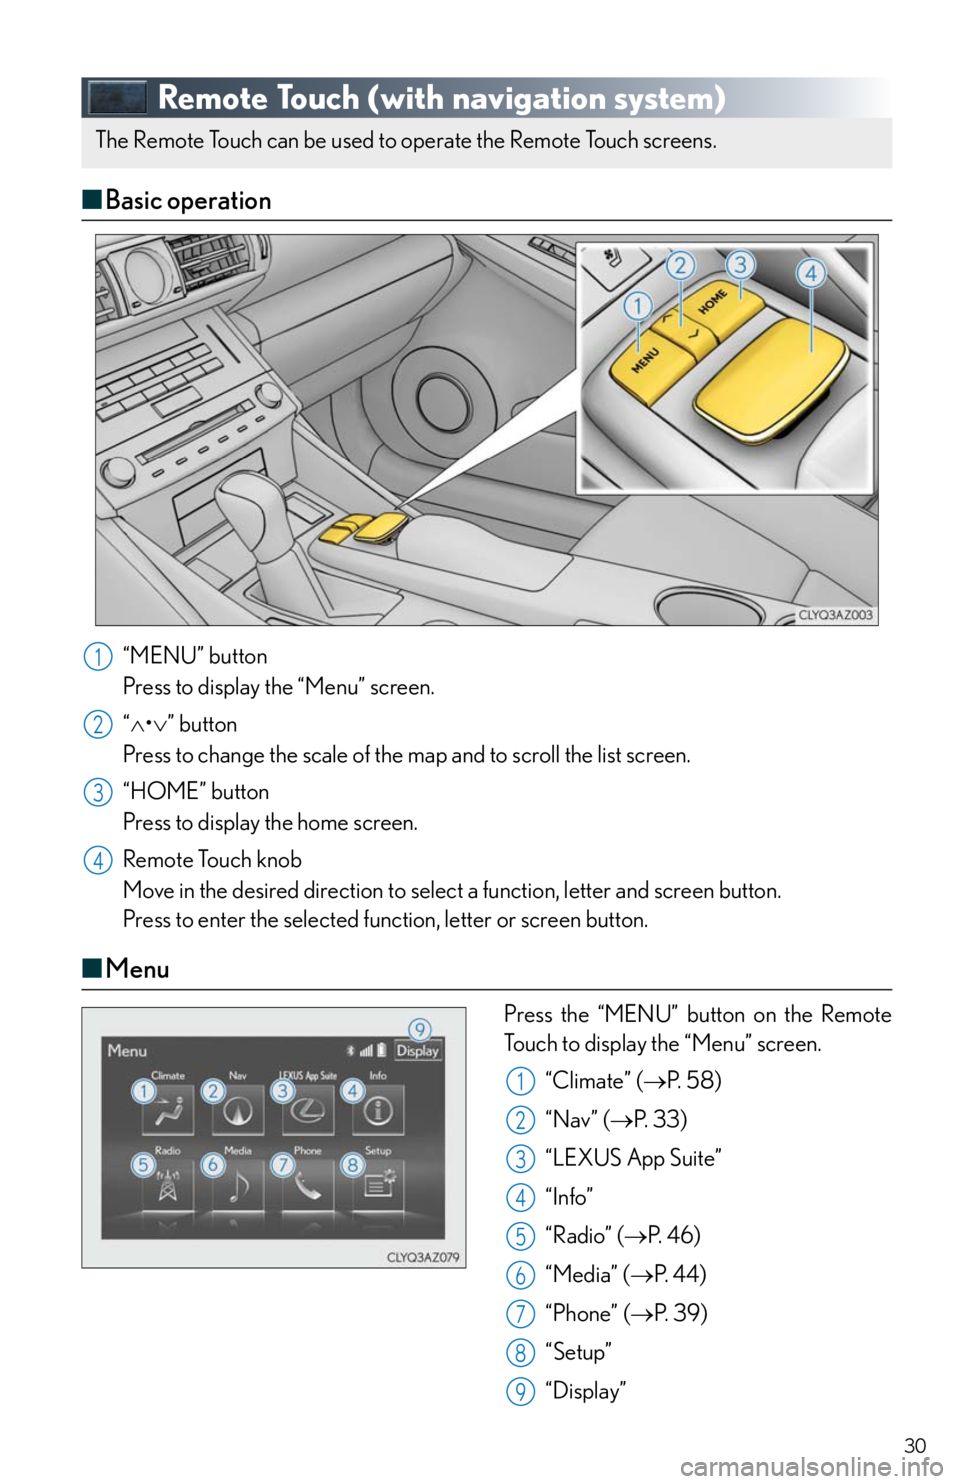
■Basic operation
“MENU” button
Press to display the “Menu” screen.
“•” button
Press to change the scale of the map and to scroll the list screen.
“HOME” button
Press to display the home screen.
Remote Touch knob
Move in the desired direction to select a function, letter and screen button.
Press to enter the selected function, letter or screen button.
■Menu
Press the “MENU” button on the Remote
Touch to display the “Menu” screen.
“Climate” (P. 5 8 )
“Nav” (P. 3 3 )
“LEXUS App Suite”
“Info”
“Radio” (P. 4 6 )
“Media” (P. 44)
“Phone” (P. 3 9 )
“Setup”
“Display”
The Remote Touch can be used to operate the Remote Touch screens.
1
2
3
4
1
2
3
4
5
6
7
8
9
Page 31 of 78
31
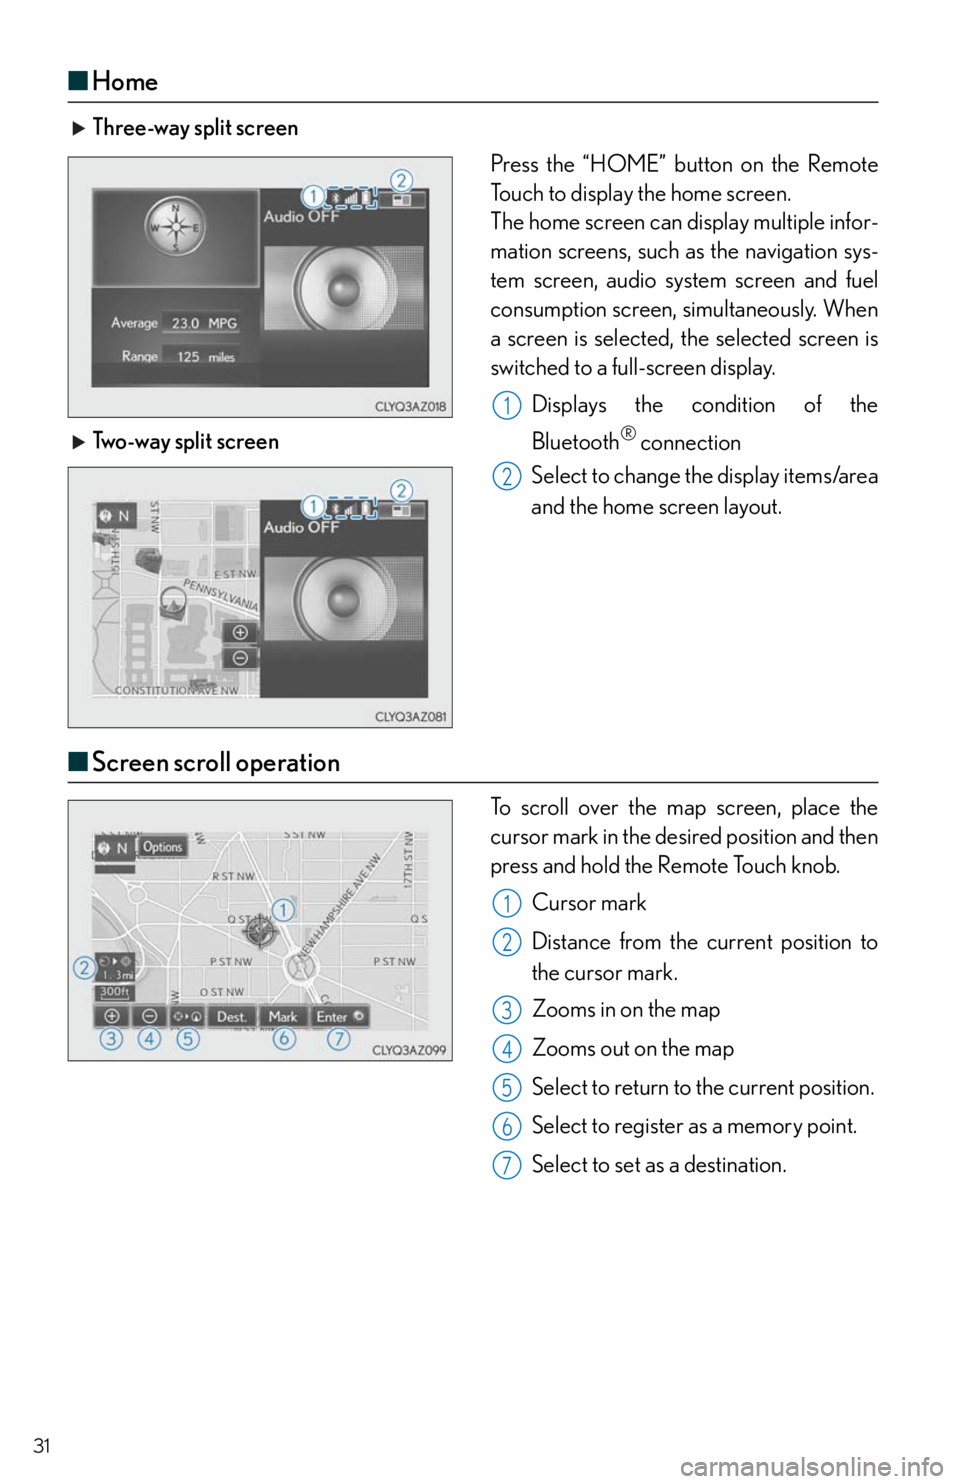
■Home
Three-way split screen
Press the “HOME” button on the Remote
Touch to display the home screen.
The home screen can display multiple infor-
mation screens, such as the navigation sys-
tem screen, audio system screen and fuel
consumption screen, simultaneously. When
a screen is selected, the selected screen is
switched to a full-screen display.
Displays the condition of the
Bluetooth
® connection
Select to change the display items/area
and the home screen layout. Two-way split screen
■Screen scroll operation
To scroll over the map screen, place the
cursor mark in the desired position and then
press and hold the Remote Touch knob.
Cursor mark
Distance from the current position to
the cursor mark.
Zooms in on the map
Zooms out on the map
Select to return to the current position.
Select to register as a memory point.
Select to set as a destination.
1
2
1
2
3
4
5
6
7
Page 33 of 78
33
Navigation System (if equipped)
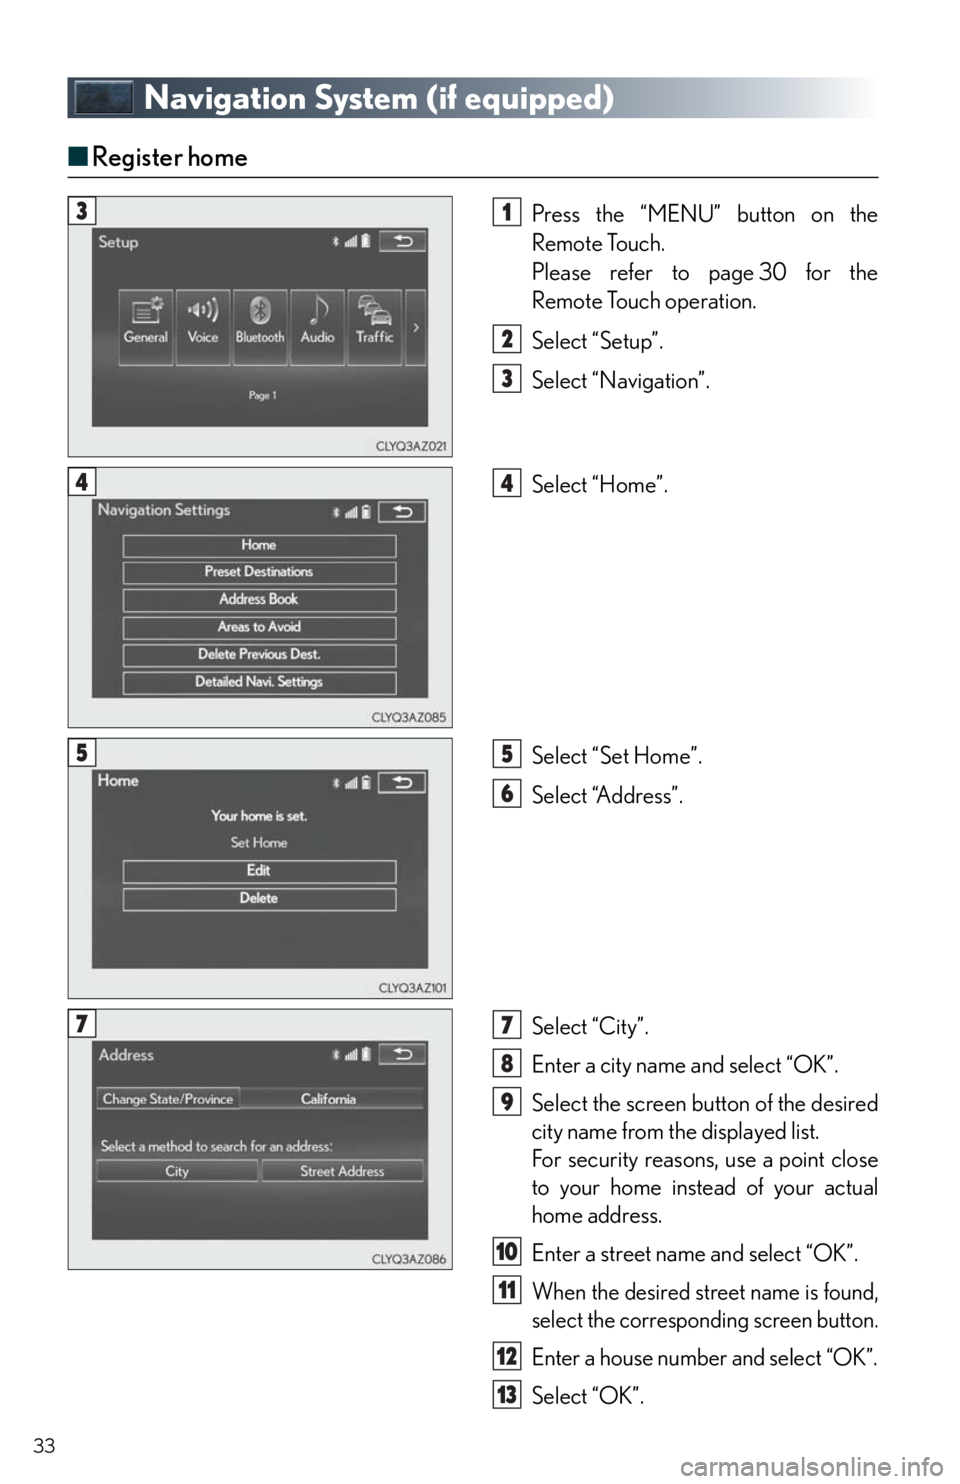
■Register home
Press the “MENU” button on the
Remote Touch.
Please refer to page 30 for the
Remote Touch operation.
Select “Setup”.
Select “Navigation”.
Select “Home”.
Select “Set Home”.
Select “Address”.
Select “City”.
Enter a city name and select “OK”.
Select the screen button of the desired
city name from the displayed list.
For security reasons, use a point close
to your home instead of your actual
home address.
Enter a street name and select “OK”.
When the desired street name is found,
select the corresponding screen button.
Enter a house number and select “OK”.
Select “OK”.
31
2
3
44
55
6
77
8
9
10
11
12
13
Page 34 of 78
34
■Destination input Search by address
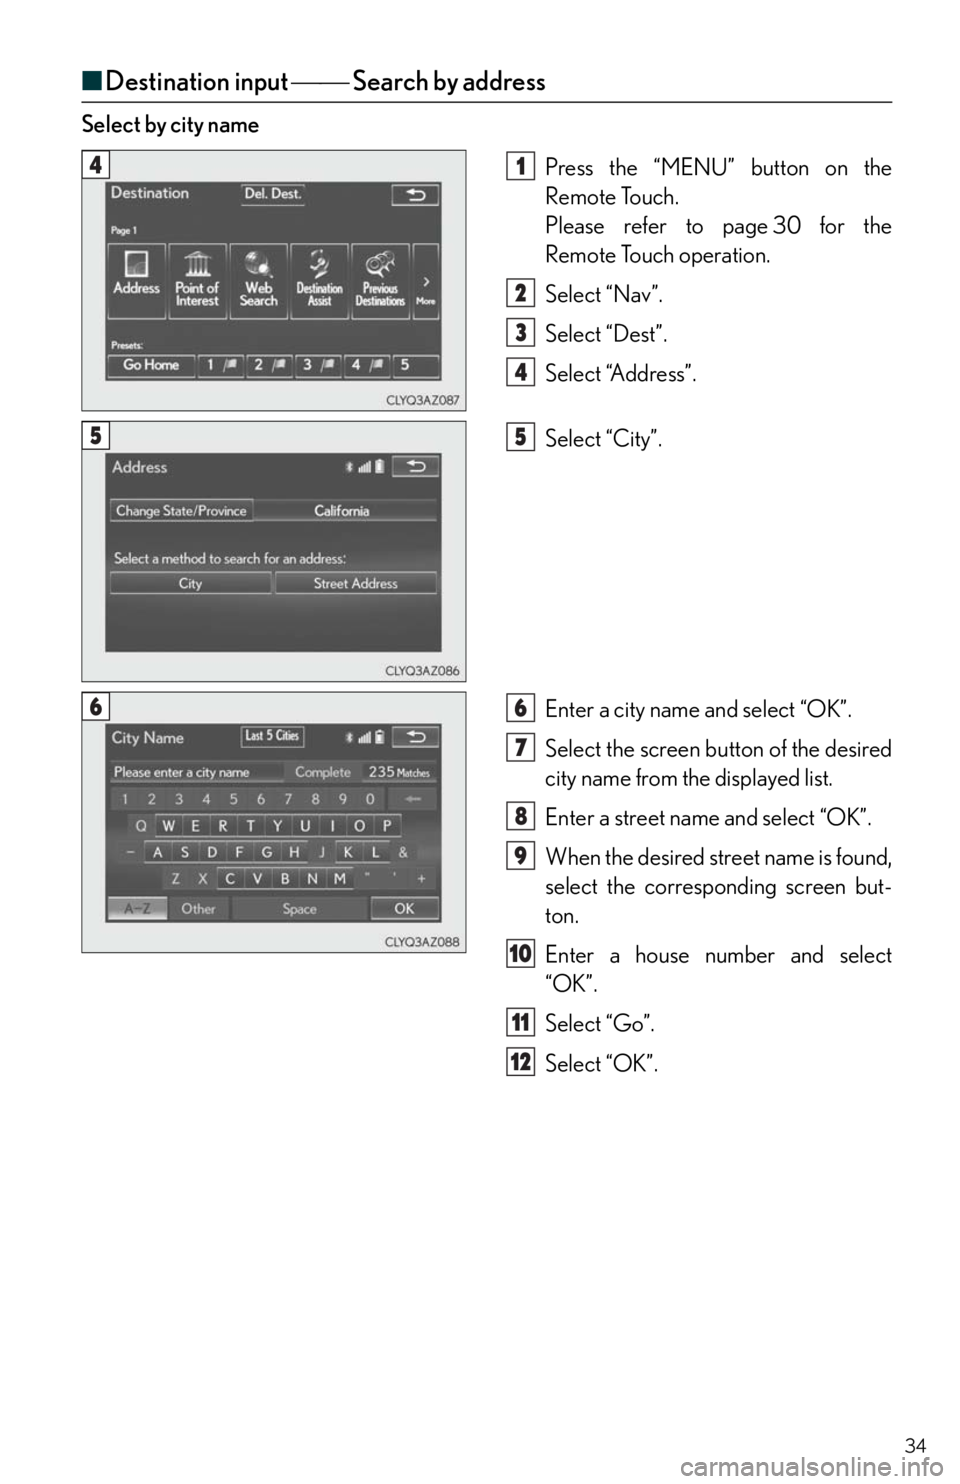
Select by city name
Press the “MENU” button on the
Remote Touch.
Please refer to page 30 for the
Remote Touch operation.
Select “Nav”.
Select “Dest”.
Select “Address”.
Select “City”.
Enter a city name and select “OK”.
Select the screen button of the desired
city name from the displayed list.
Enter a street name and select “OK”.
When the desired street name is found,
select the corresponding screen but-
ton.
Enter a house number and select
“OK”.
Select “Go”.
Select “OK”.
41
2
3
4
55
66
7
8
9
10
11
12
Page 35 of 78
35
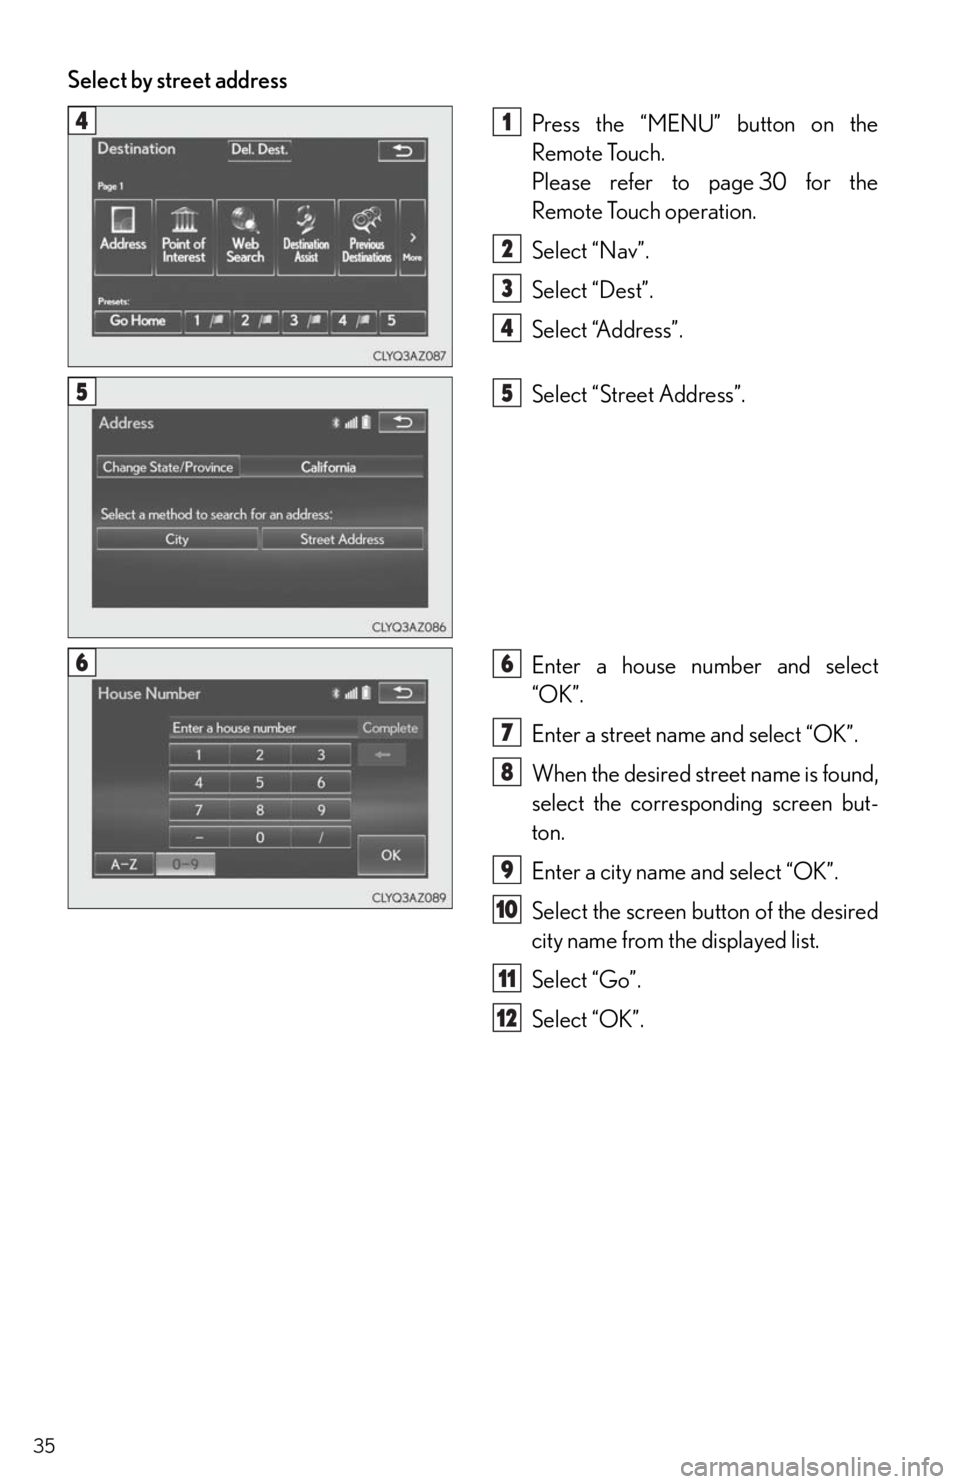
Select by street address
Press the “MENU” button on the
Remote Touch.
Please refer to page 30 for the
Remote Touch operation.
Select “Nav”.
Select “Dest”.
Select “Address”.
Select “Street Address”.
Enter a house number and select
“OK”.
Enter a street name and select “OK”.
When the desired street name is found,
select the corresponding screen but-
ton.
Enter a city name and select “OK”.
Select the screen button of the desired
city name from the displayed list.
Select “Go”.
Select “OK”.
41
2
3
4
55
66
7
8
9
10
11
12
Page 37 of 78
37
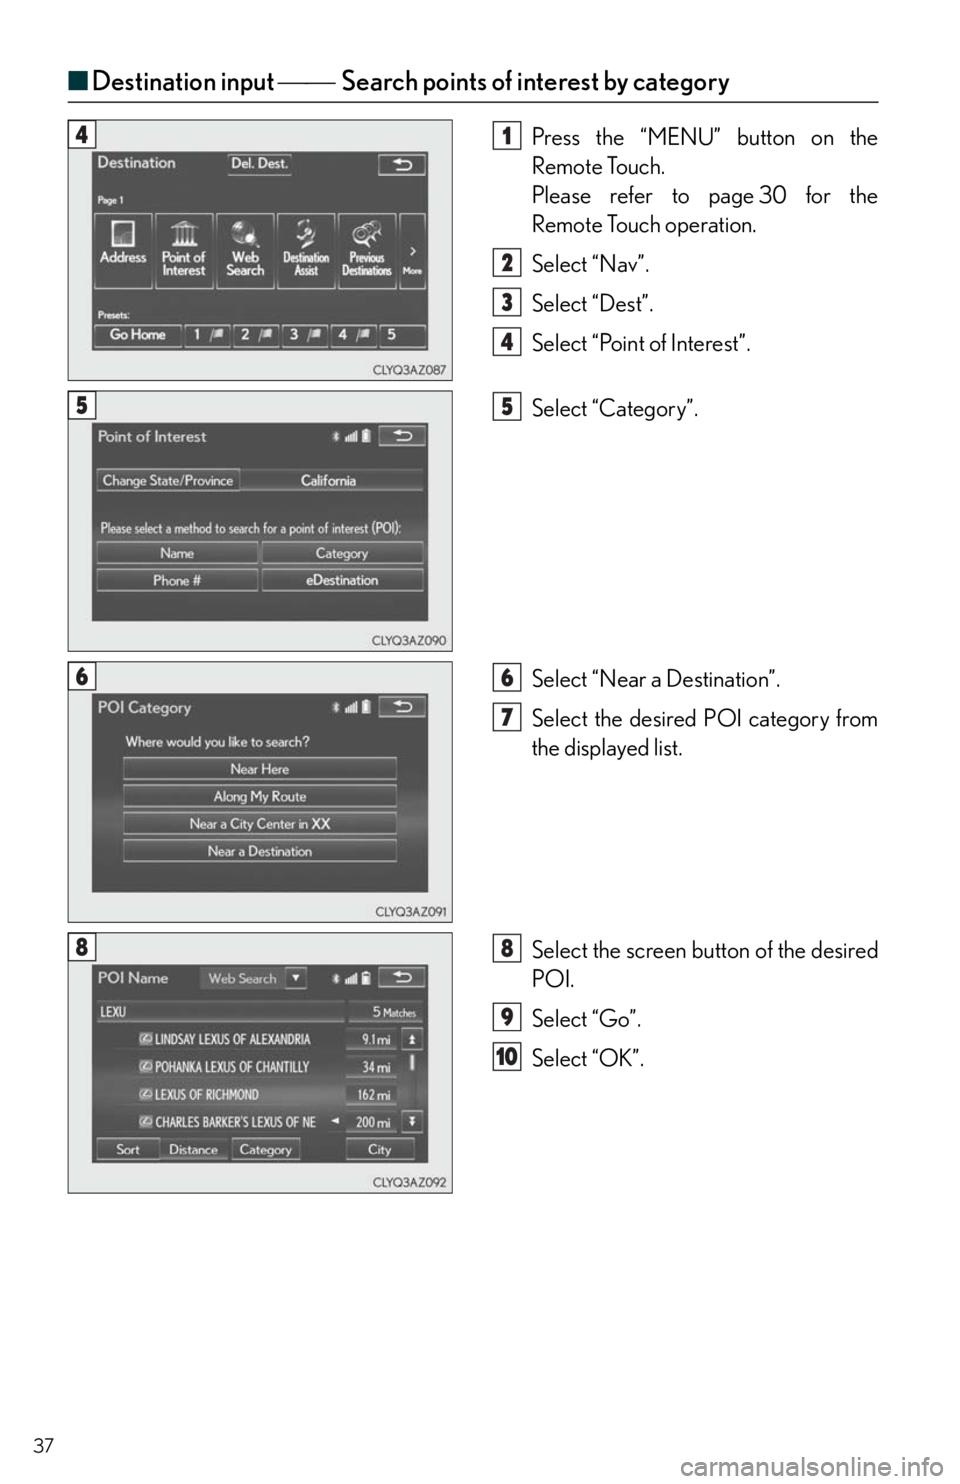
■Destination input Search points of interest by category
Press the “MENU” button on the
Remote Touch.
Please refer to page 30 for the
Remote Touch operation.
Select “Nav”.
Select “Dest”.
Select “Point of Interest”.
Select “Category”.
Select “Near a Destination”.
Select the desired POI category from
the displayed list.
Select the screen button of the desired
POI.
Select “Go”.
Select “OK”.41
2
3
4
55
66
7
88
9
10
Page 39 of 78
39
Hands-free System For Cellular Phone
(with navigation system)
■Bluetooth® phone pairing
Compatible Bluetooth®-equipped phones can be connected to the vehicle, enabling hands-
free operation. Please refer to the cellular phone manufacturer’s user guide for pairing pro-
cedures, or go to “www.lexus.com/MobileLink
” (for U.S.A.) for more phone information.
To use a Bluetooth
® phone, it is necessary
to first register it in the system.
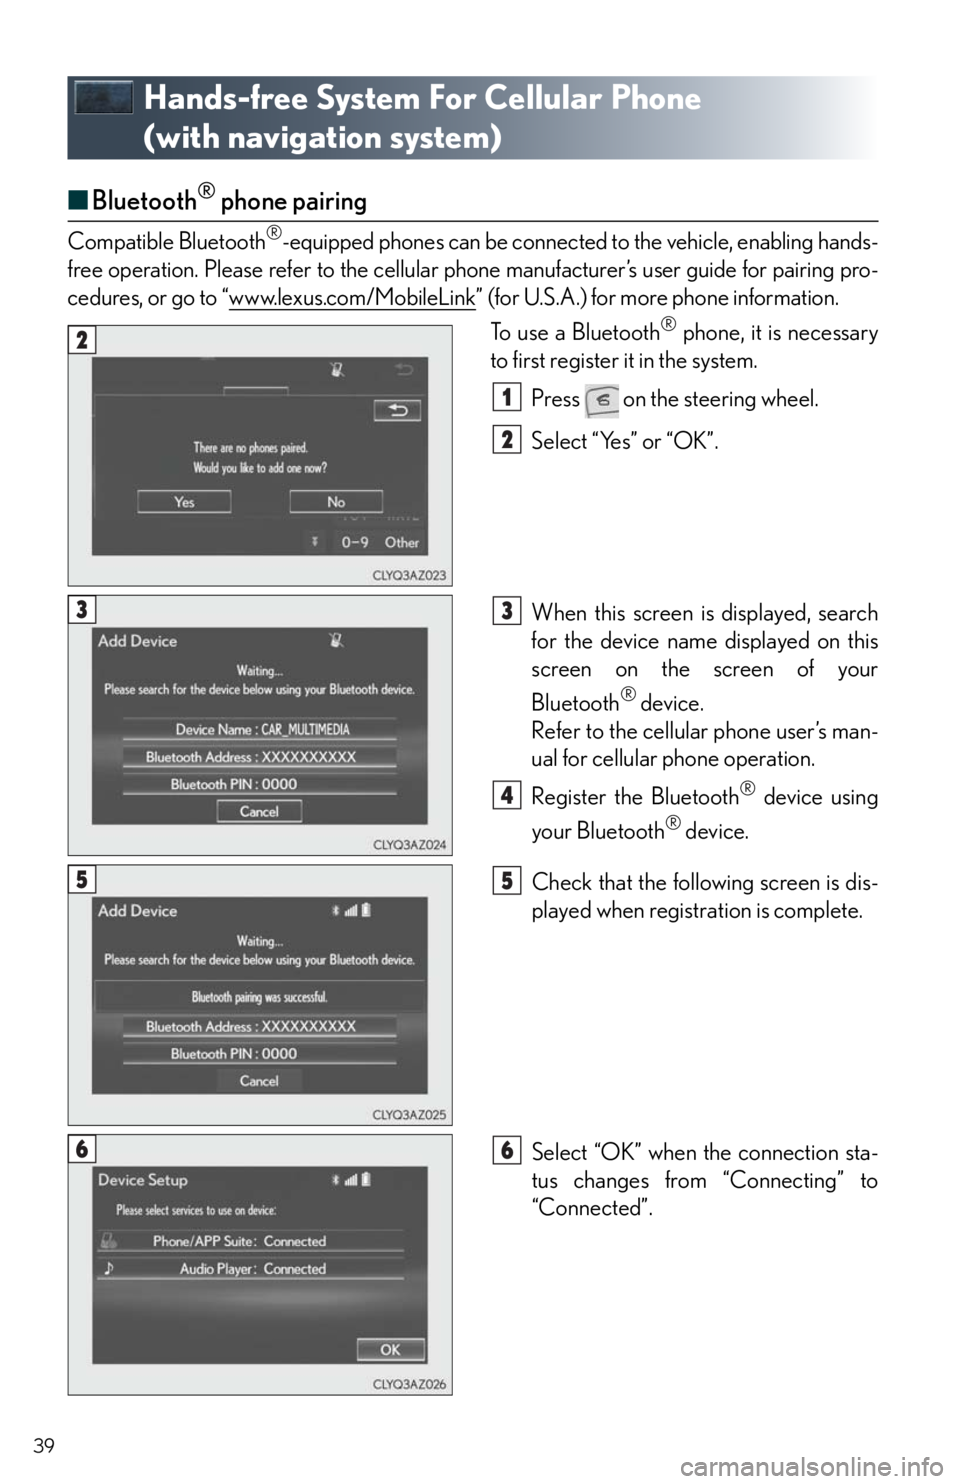
Press on the steering wheel.
Select “Yes” or “OK”.
When this screen is displayed, search
for the device name displayed on this
screen on the screen of your
Bluetooth
® device.
Refer to the cellular phone user’s man-
ual for cellular phone operation.
Register the Bluetooth
® device using
your Bluetooth
® device.
Check that the following screen is dis-
played when registration is complete.
Select “OK” when the connection sta-
tus changes from “Connecting” to
“Connected”.
2
1
2
33
4
55
66
Page 40 of 78
40
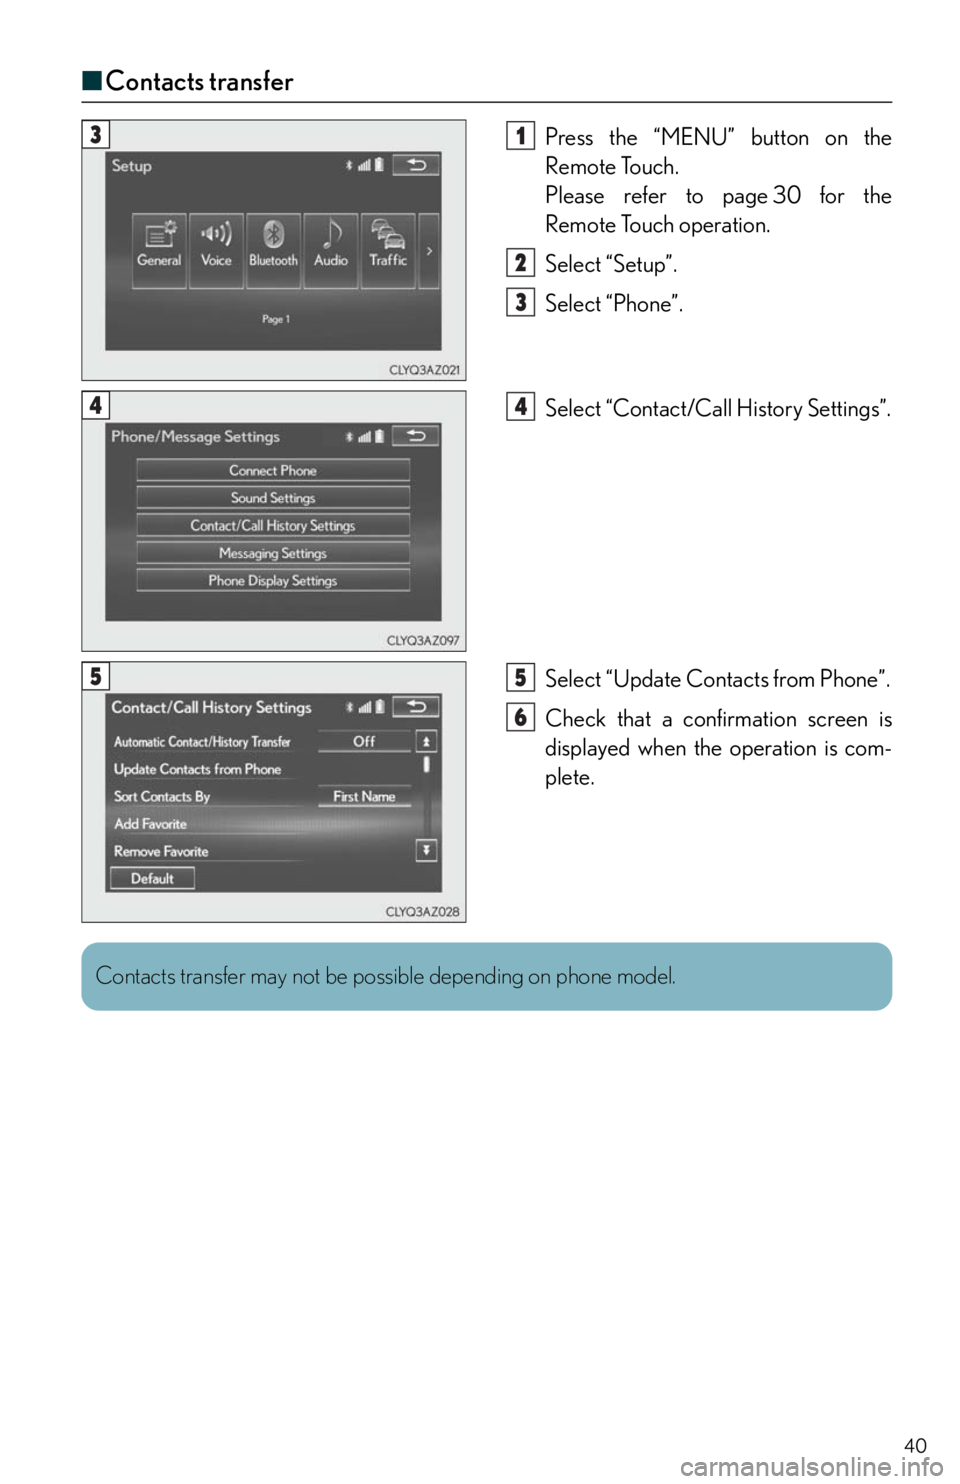
■Contacts transfer
Press the “MENU” button on the
Remote Touch.
Please refer to page 30 for the
Remote Touch operation.
Select “Setup”.
Select “Phone”.
Select “Contact/Call History Settings”.
Select “Update Contacts from Phone”.
Check that a confirmation screen is
displayed when the operation is com-
plete.31
2
3
44
55
6
Contacts transfer may not be possible depending on phone model.
Page 41 of 78
41
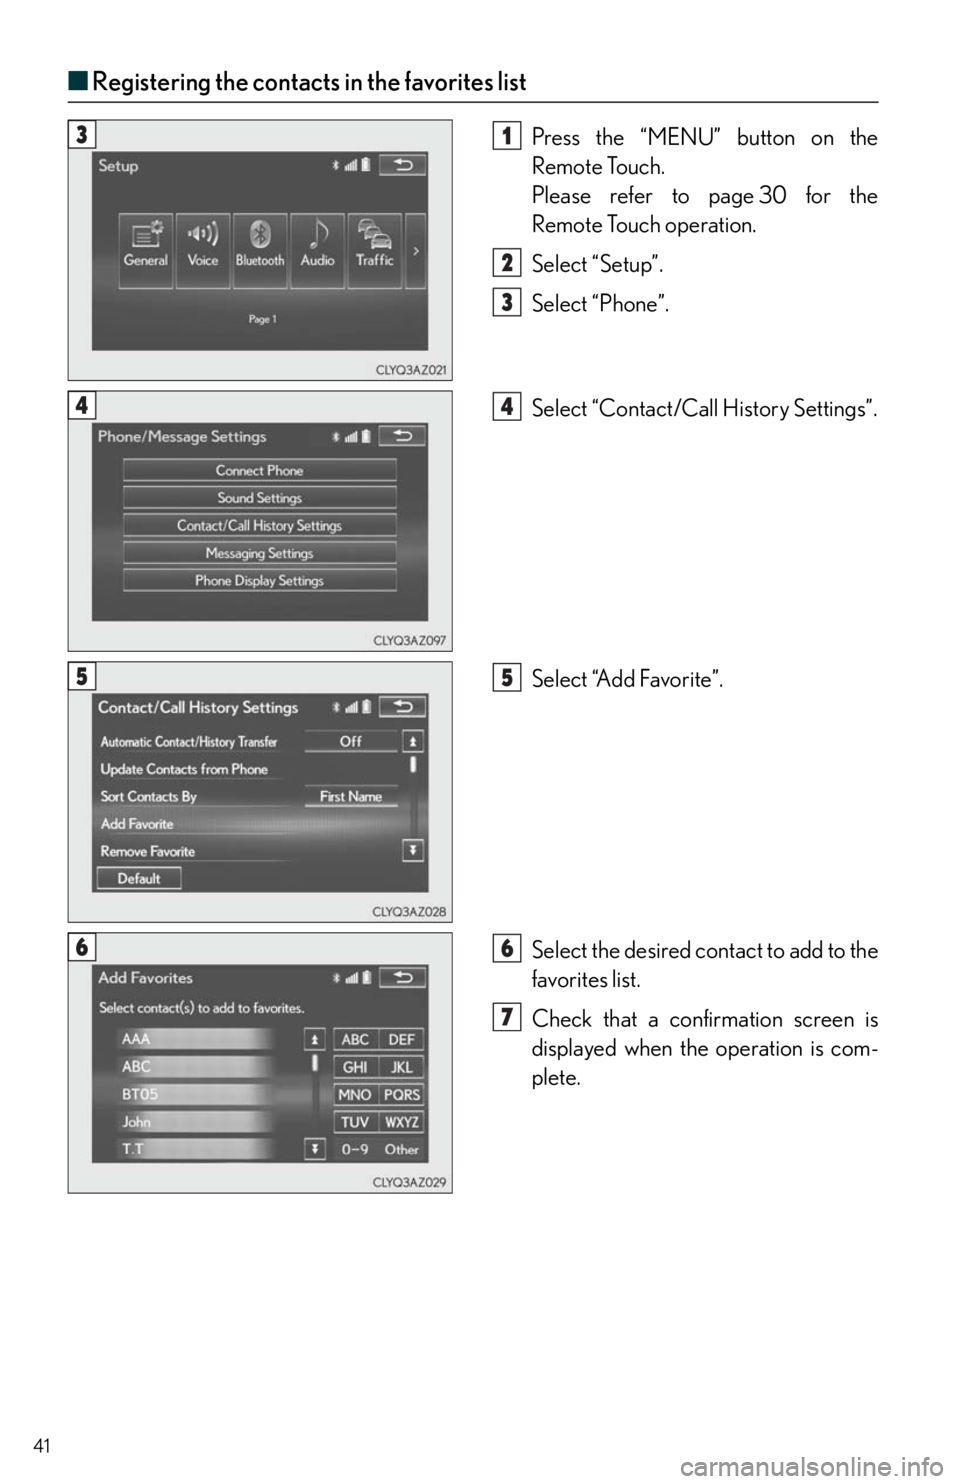
■Registering the contacts in the favorites list
Press the “MENU” button on the
Remote Touch.
Please refer to page 30 for the
Remote Touch operation.
Select “Setup”.
Select “Phone”.
Select “Contact/Call History Settings”.
Select “Add Favorite”.
Select the desired contact to add to the
favorites list.
Check that a confirmation screen is
displayed when the operation is com-
plete.31
2
3
44
55
66
7