REV Lexus IS250 2015 Owner's Manual
[x] Cancel search | Manufacturer: LEXUS, Model Year: 2015, Model line: IS250, Model: Lexus IS250 2015Pages: 586, PDF Size: 8.66 MB
Page 444 of 586
4437-3. Do-it-yourself maintenance
7
Maintenance and care
IS350/250_U (OM53C50U)
■After a fuse is replaced
●If the lights do not turn on even after the fuse has been replaced, a bulb may need
replacement. (→P. 444)
●If the replaced fuse blows again, have the vehicle inspected by your Lexus dealer.
■If there is an overload in a circuit
The fuses are designed to blow, protec ting the wiring harness from damage.
■When replacing light bulbs
Lexus recommends that you use genuine Lexus products designed for this vehicle.
Because certain bulbs are connected to circuits designed to prevent overload, non-gen-
uine parts or parts not designed for this vehicle may be unusable.
CAUTION
■To prevent system breakdowns and vehicle fire
Observe the following precautions.
Failure to do so may cause damage to the vehicle, and possibly a fire or injury.
●Never use a fuse of a higher amperage rating than that indicated, or use any other
object in place of a fuse.
●Always use a genuine Lexus fuse or equivalent.
Never replace a fuse with a wire, even as a temporary fix.
●Do not modify the fuses or fuse boxes.
NOTICE
■Before replacing fuses
Have the cause of electrical overload determined and repaired by your Lexus dealer as
soon as possible.
Page 454 of 586

4537-3. Do-it-yourself maintenance
7
Maintenance and care
IS350/250_U (OM53C50U)
CAUTION
■Replacing light bulbs
●Turn off the lights. Do not attempt to replace the bulb immediately after turning off the
lights.
The bulbs become very hot and may cause burns.
●Do not touch the glass portion of the light bulb with bare hands. When it is unavoid-
able to hold the glass portion, use and hold with a clean dry cloth to avoid getting
moisture and oils on the bulb.
Also, if the bulb is scratched or dropped, it may blow out or crack.
●Fully install light bulbs and any parts used to secure them. Failure to do so may result
in heat damage, fire, or water entering the headlight unit. This may damage the head-
lights or cause condensation to build up on the lens.
■Discharge headlights (if equipped)
●Contact your Lexus dealer before replacing the discharge headlights (including light
bulbs).
●Do not touch the discharge headlight’s high voltage socket when the headlights are
turned on.
An extremely high voltage of 30000 V will be discharged and could result in death
or serious injury by electric shock.
●Do not attempt to take apart or repair the headlight bulbs, connectors, power supply
circuits, or related components.
Doing so could result in electric shock and death or serious injury.
■To prevent damage or fire
●Make sure bulbs are fully seated and locked.
●Check the wattage of the bulb before installing to prevent heat damage.
●Vehicles with discharge headlights:
While the headlights are turned on, and for a
short time after they have been turned off,
metal components at the rear of the headlight
assembly will be extremely hot. To prevent
burns, do not touch these metal components
until you are certain they have cooled down.
Metal components
Page 460 of 586
4598-2. Steps to take in an emergency
8
When trouble arises
IS350/250_U (OM53C50U)
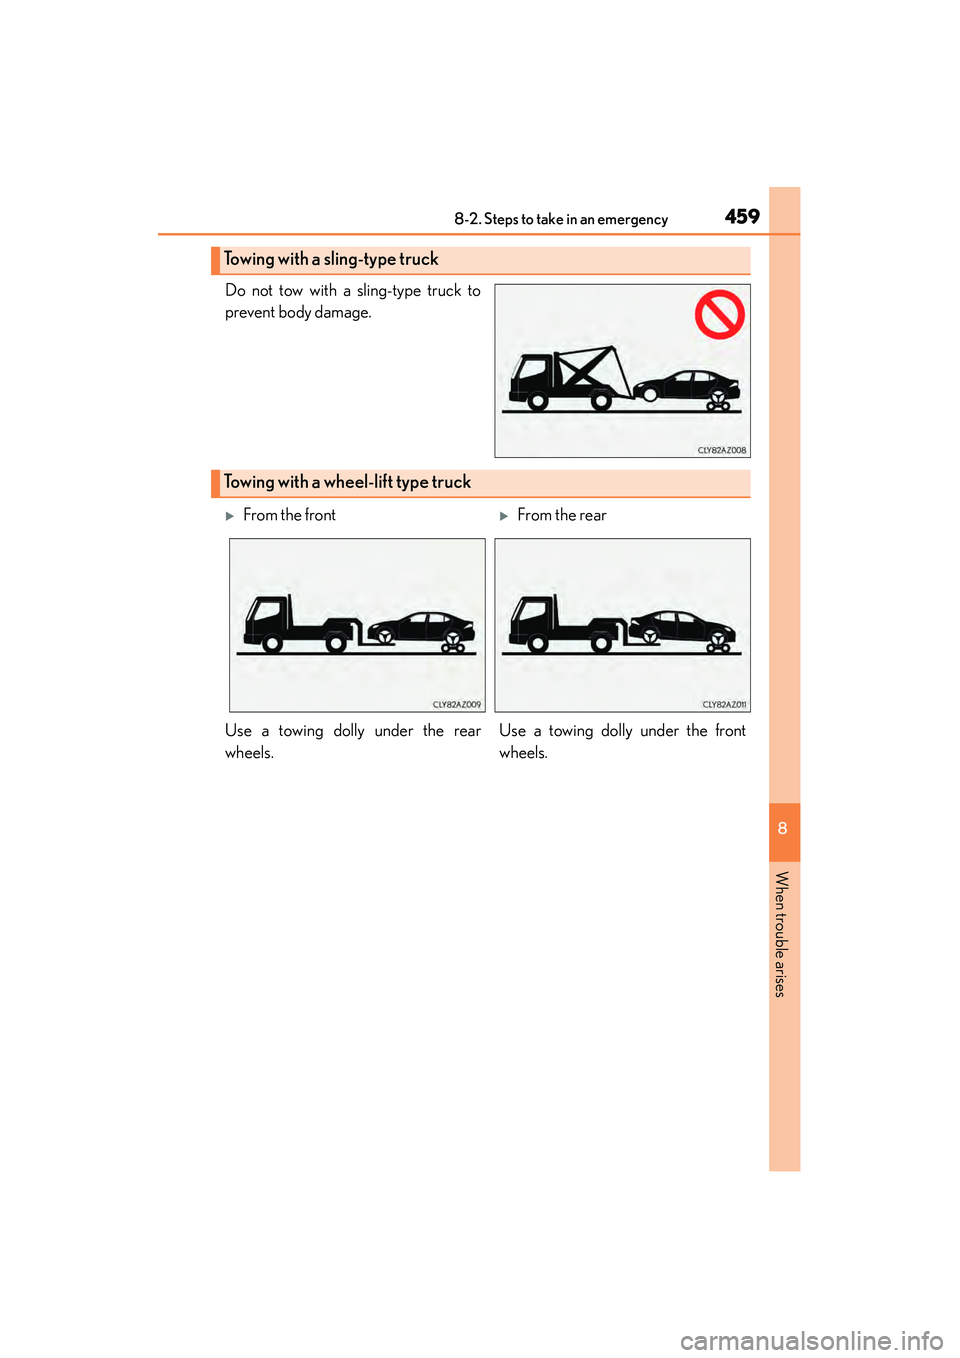
Do not tow with a sling-type truck to
prevent body damage.
Towing with a sling-type truck
Towing with a wheel-lift type truck
�XFrom the front�XFrom the rear
Use a towing dolly under the rear
wheels. Use a towing dolly under the front
wheels.
Page 464 of 586
4638-2. Steps to take in an emergency
8
When trouble arises
IS350/250_U (OM53C50U)
CAUTION
■While towing
●When towing using a cables or chains, avoid sudden starts, etc. which place excessive
stress on the towing eyelets, cables or chains. The towing eyelets, cables or chains
may become damaged, broken debris may hit people and cause serious damage.
●Do not turn the engine switch off.
There is a possibility that the steering wheel is locked and cannot be operated.
■Installing towing eyelet to the vehicle
Make sure that towing eyelet is installed securely.
If not securely installed, towing eyelet may come loose during towing.
NOTICE
■To prevent damage to the vehicle when towing using a wheel-lift type truck (2WD
models)
●Do not tow the vehicle from the rear when the engine switch is off. The steering lock
mechanism is not strong enough to hold the front wheels straight.
●When raising the vehicle from the rear, ensure adequate ground clearance for towing
at the opposite end of the raised vehicle. Without adequate clearance, the vehicle
could be damaged while being towed from the rear.
■To prevent damage to the vehicle when towing using a wheel-lift type truck (AWD
models)
When raising the vehicle, ensure adequate ground clearance for towing at the oppo-
site end of the raised vehicle. Without adequate clearance, the vehicle could be dam-
aged while being towed.
■To prevent body damage when to wing with a sling-type truck
Do not tow with a sling-type truck, either from the front or rear.
Page 472 of 586
4718-2. Steps to take in an emergency
8
When trouble arises
IS350/250_U (OM53C50U)
CAUTION
■Maintenance of the tires
Each tire, including the spare (if provided), should be checked monthly when cold and
inflated to the inflation pressure recommended by the vehicle manufacturer on the
vehicle placard or tire inflation pressure label (tire and load information label). (If your
vehicle has tires of a different size than the size indicated on the vehicle placard or tire
inflation pressure label [tire and load in formation label], you should determine the
proper tire inflation pressure for those tires.)
As an added safety feature, your vehicle has been equipped with a tire pressure moni-
toring system (TPMS-tire pressure warning system) that illuminates a low tire pressure
telltale (tire pressure warning light) when on e or more of your tires is significantly
under-inflated. Accordingly, when the low ti re pressure telltale (tire pressure warning
light) illuminates, you should stop and check yo ur tires as soon as possible, and inflate
them to the proper pressure. Driving on a significantly under-inflated tire causes the
tire to overheat and can lead to tire failure. Under-inflation also reduces fuel efficiency
and tire tread life, and may affect the vehicle’s handling and stopping ability.
Please note that the TPMS (tire pressure warning system) is not a substitute for proper
tire maintenance, and it is the driver’s responsibility to maintain correct tire pressure,
even if under-inflation has not reached the level to trigger illumination of the TPMS low
tire pressure telltale (tire pressure warning light).
Your vehicle has also been equipped with a TPMS (tire pressure warning system) mal-
function indicator to indicate when the system is not operating properly. The TPMS
(tire pressure warning system) malfunction indicator is combined with the low tire pres-
sure telltale (tire pressure warning light). When the system detects a malfunction, the
telltale will flash for approximately one minu te and then remain continuously illumi-
nated. This sequence will continue upon su bsequent vehicle start-ups as long as the
malfunction exists. When the malfunction indicator is illuminated, the system may not
be able to detect or signal low tire pressure as intended.
TPMS (tire pressure warning system) malfun ctions may occur for a variety of reasons,
including the installation of replacement or alternate tires or wheels on the vehicle that
prevent the TPMS (tire pressure warning system) from functioning properly. Always
check the TPMS (tire pressure warning syst em) malfunction telltale after replacing one
or more tires or wheels on your vehicle to ensure that the replacement or alternate
tires and wheels allow the TPMS (tire pressure warning system) to continue to function
properly.
NOTICE
■To ensure the tire pressure warning system operates properly
Do not install tires with different specificatio ns or makers, as the tire pressure warning
system may not operate properly.
Page 490 of 586
4898-2. Steps to take in an emergency
8
When trouble arises
IS350/250_U (OM53C50U)
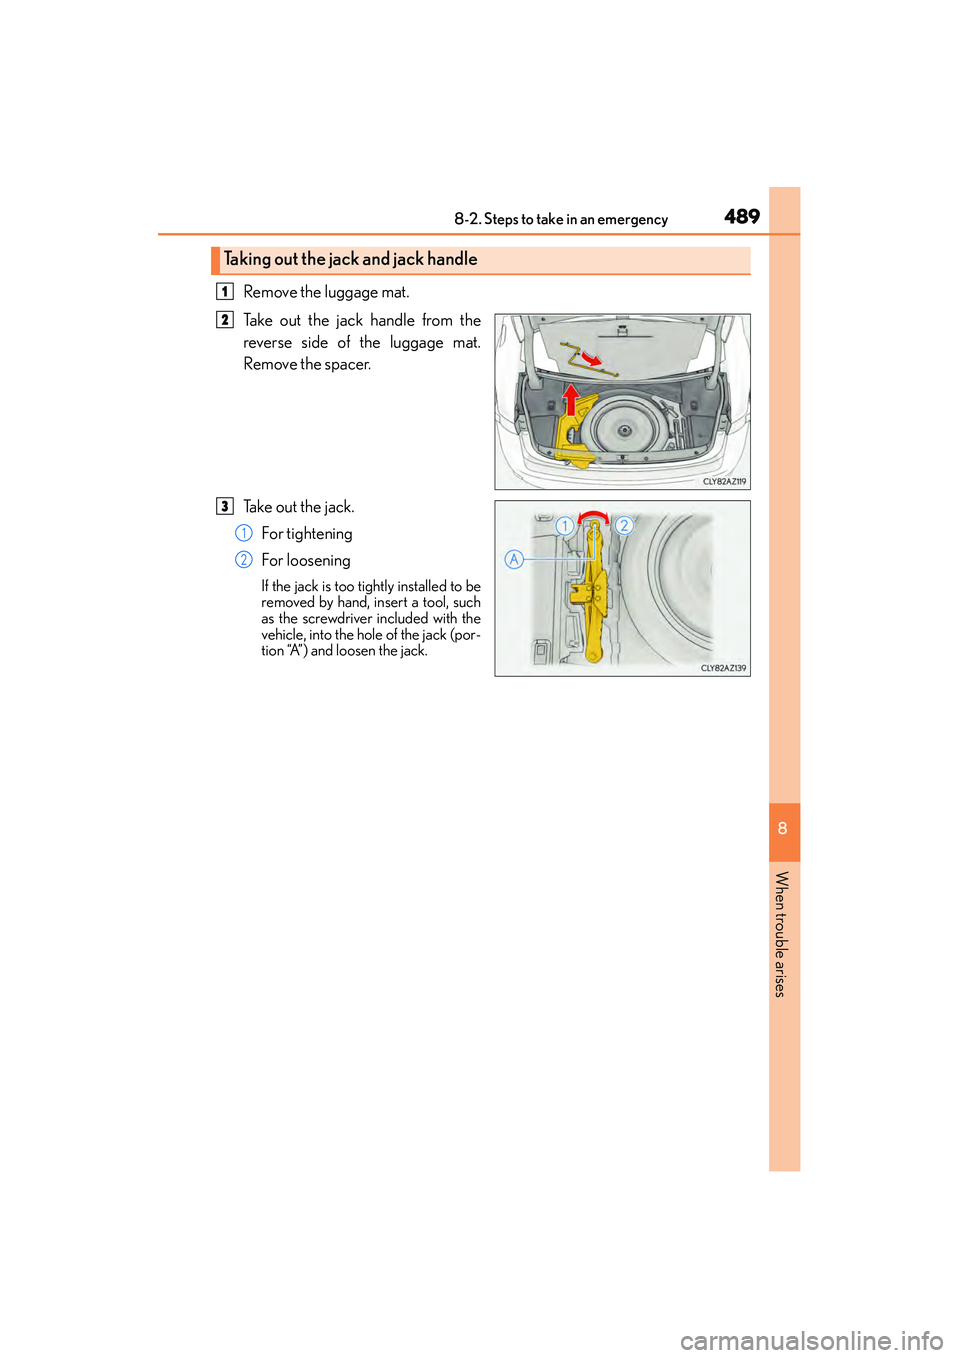
Remove the luggage mat.
Take out the jack handle from the
reverse side of the luggage mat.
Remove the spacer.
Take out the jack.For tightening
For loosening
If the jack is too ti ghtly installed to be
removed by hand, insert a tool, such
as the screwdriver included with the
vehicle, into the hole of the jack (por-
tion “A”) and loosen the jack.
Taking out the jack and jack handle
1
2
3
1
2
Page 499 of 586
4988-2. Steps to take in an emergency
IS350/250_U (OM53C50U)
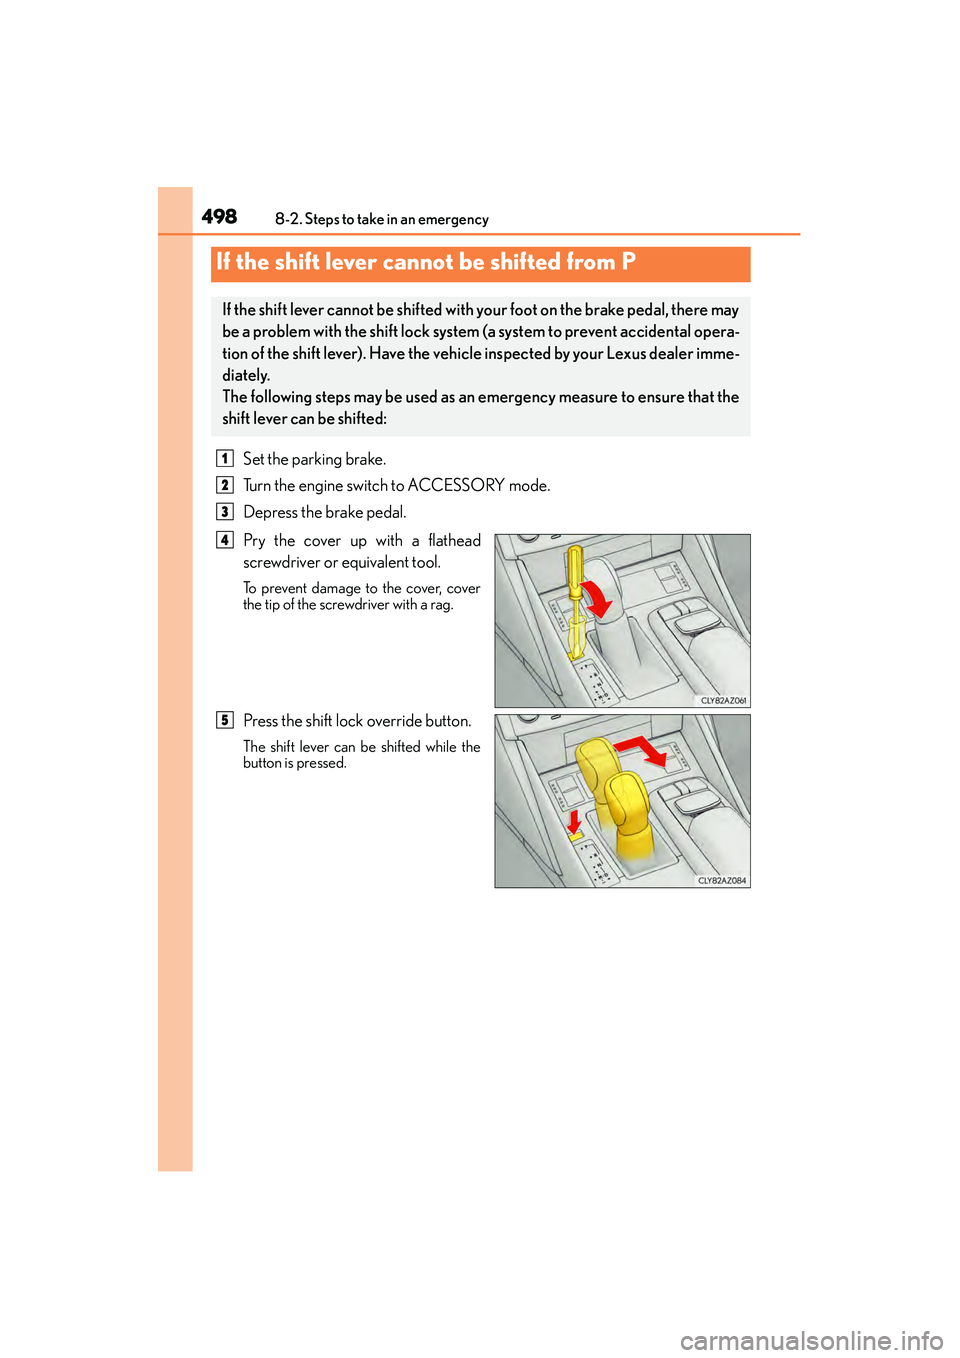
Set the parking brake.
Turn the engine switch to ACCESSORY mode.
Depress the brake pedal.
Pry the cover up with a flathead
screwdriver or equivalent tool.
To prevent damage to the cover, cover
the tip of the screwdriver with a rag.
Press the shift lock override button.
The shift lever can be shifted while the
button is pressed.
If the shift lever cannot be shifted from P
If the shift lever cannot be shifted with your foot on the brake pedal, there may
be a problem with the shift lock system (a system to prevent accidental opera-
tion of the shift lever). Have the vehicle inspected by your Lexus dealer imme-
diately.
The following steps may be used as an emergency measure to ensure that the
shift lever can be shifted:
1
2
3
4
5
Page 504 of 586
5038-2. Steps to take in an emergency
8
When trouble arises
IS350/250_U (OM53C50U)
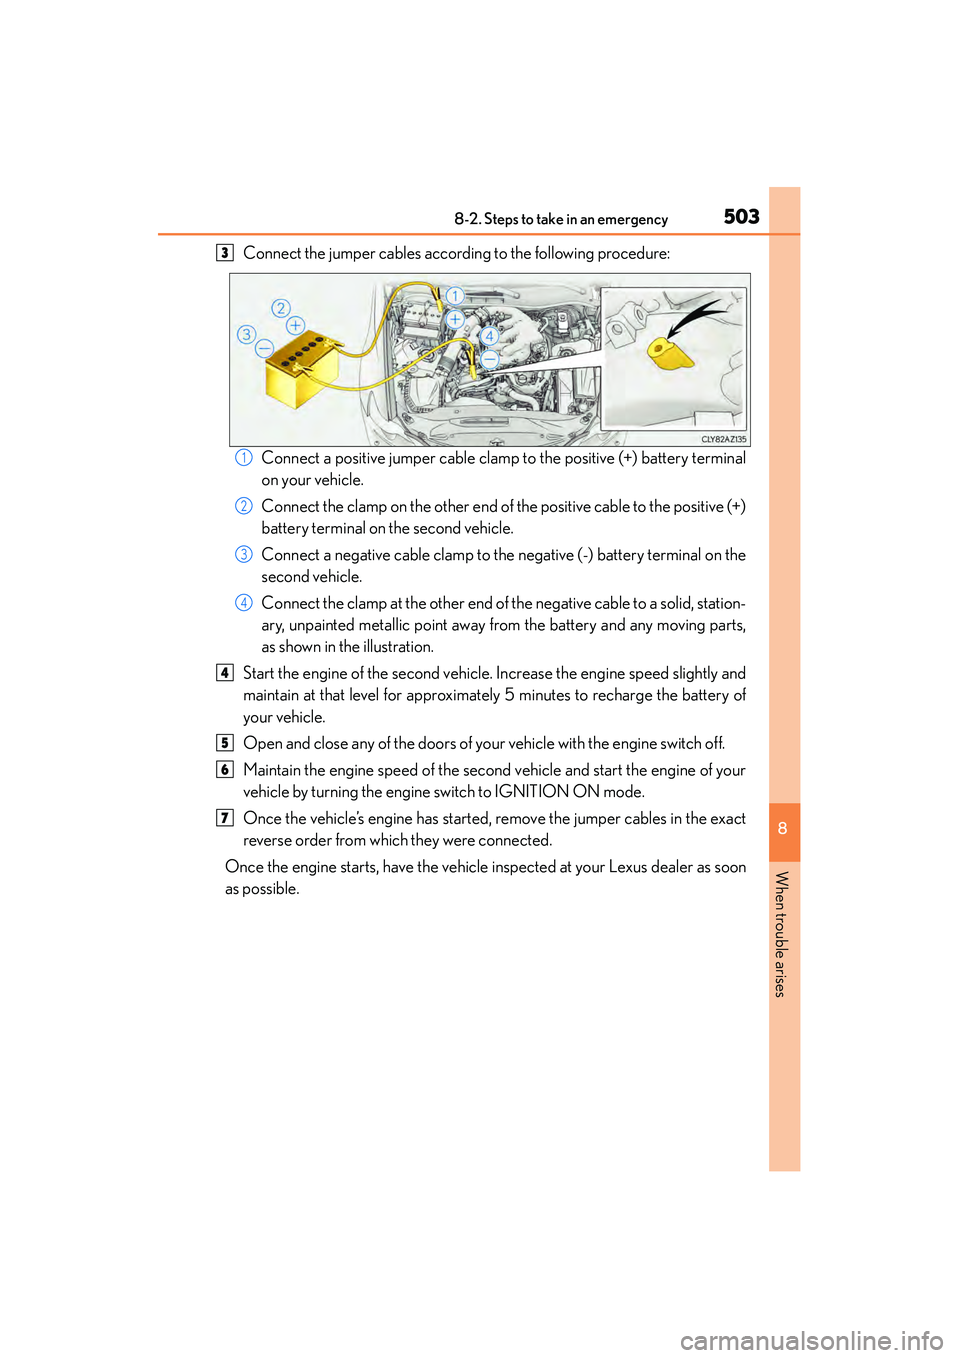
Connect the jumper cables according to the following procedure:Connect a positive jumper cable clamp to the positive (+) battery terminal
on your vehicle.
Connect the clamp on the other end of the positive cable to the positive (+)
battery terminal on the second vehicle.
Connect a negative cable clamp to the negative (-) battery terminal on the
second vehicle.
Connect the clamp at the other end of the negative cable to a solid, station-
ary, unpainted metallic point away from the battery and any moving parts,
as shown in the illustration.
Start the engine of the second vehicle. Increase the engine speed slightly and
maintain at that level for approximately 5 minutes to recharge the battery of
your vehicle.
Open and close any of the doors of your vehicle with the engine switch off.
Maintain the engine speed of the second vehicle and start the engine of your
vehicle by turning the engine switch to IGNITION ON mode.
Once the vehicle’s engine has started, remove the jumper cables in the exact
reverse order from which they were connected.
Once the engine starts, have the vehicle inspected at your Lexus dealer as soon
as possible.3
1
2
3
4
4
5
6
7
Page 505 of 586
5048-2. Steps to take in an emergency
IS350/250_U (OM53C50U)
■Starting the engine when the battery is discharged
The engine cannot be started by push-starting.
■To prevent battery discharge
●Turn off the headlights and the audio system while the engine is off.
●Turn off any unnecessary electrical components when the vehicle is running at a low
speed for an extended period, such as in heavy traffic.
■Charging the battery
The electricity stored in the battery will discharge gradually even when the vehicle is not
in use, due to natural discharge and the draining effects of certain electrical appliances. If
the vehicle is left for a long time, the battery may discharge, and the engine may be
unable to start. (The battery recharges automatically during driving.)
■When recharging or replacing the battery
●Make sure that the key is not inside the vehicle when recharging or replacing the bat-
tery. The key may be locked in the vehicle if the alarm is activated. ( →P. 7 2 )
●In some cases, it may not be possible to unlock the doors using the smart access system
with push-button start when the battery is discharged. Use the wireless remote control
or the mechanical key to lock or unlock the doors.
●The engine may not start on the first attempt after the battery has recharged but will
start normally after the second attempt. This is not a malfunction.
●The engine switch mode is memorized by the vehicle. When the battery is recon-
nected, the system will return to the mode it was in before the battery was discharged.
Before disconnecting the battery, turn the engine switch off.
If you are unsure what mode the engine switch was in before the battery discharged, be
especially careful when reconnecting the battery.
Page 506 of 586
5058-2. Steps to take in an emergency
8
When trouble arises
IS350/250_U (OM53C50U)
CAUTION
■Avoiding battery fires or explosions
Observe the following precautions to prevent accidentally igniting the flammable gas
that may be emitted from the battery:
●Make sure each jumper cable is connected to the correct terminal and that it is not
unintentionally in contact with any other than the intended terminal.
●Do not allow the other end of the jumper cable connected to the “+” terminal to come
into contact with any other parts or metal surfaces in the area, such as brackets or
unpainted metal.
●Do not allow the + and - clamps of the jumper cables to come into contact with each
other.
●Do not smoke, use matches, cigarette lighters or allow open flame near the battery.
■Battery precautions
The battery contains poisonous and corrosive acidic electrolyte, while related parts
contain lead and lead compounds. Observe the following precautions when handling
the battery:
●When working with the battery, always wear safety glasses and take care not to allow
any battery fluids (acid) to come into contact with skin, clothing or the vehicle body.
●Do not lean over the battery.
●In the event that battery fluid comes into contact with the skin or eyes, immediately
wash the affected area with water and seek medical attention.
Place a wet sponge or cloth over the affected area until medical attention can be
received.
●Always wash your hands after handling the battery support, terminals, and other bat-
tery-related parts.
●Do not allow children near the battery.
NOTICE
■When handling jumper cables
When connecting the jumper cables, ensure that they do not become entangled in the
cooling fans or engine drive belt.