light Lexus IS250C 2010 Do-It-Yourself Maintenance / LEXUS 2010 IS350C/250C QUICK GUIDE (OM53738U) User Guide
[x] Cancel search | Manufacturer: LEXUS, Model Year: 2010, Model line: IS250C, Model: Lexus IS250C 2010Pages: 98, PDF Size: 5.93 MB
Page 33 of 98
Topic 4
Rain and Night Driving
33
Headlights
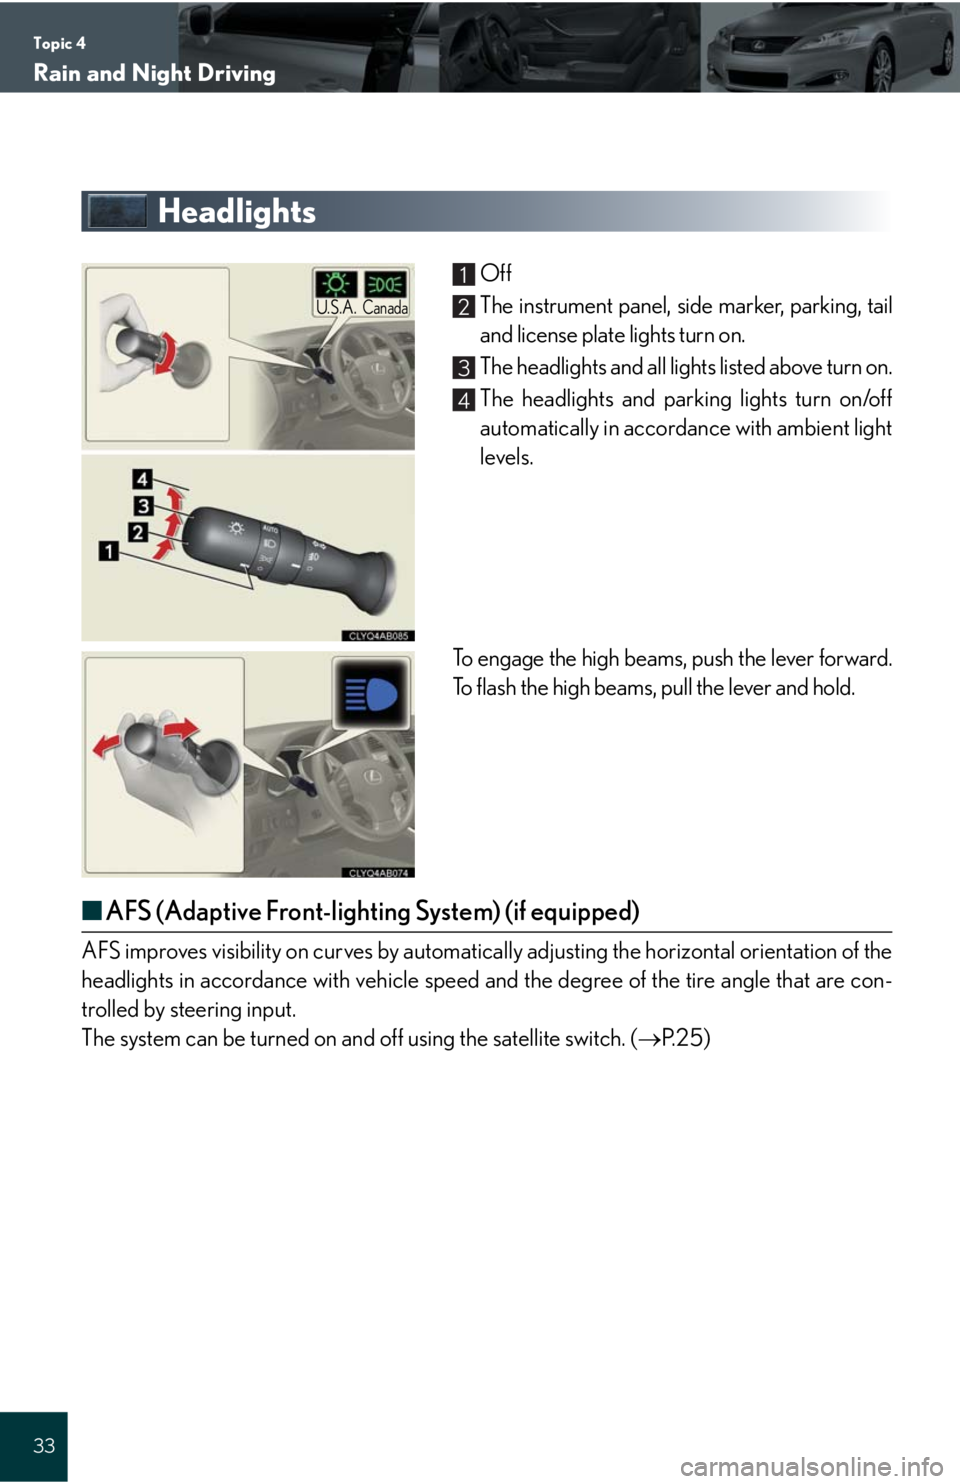
Off
The instrument panel, side marker, parking, tail
and license plate lights turn on.
The headlights and all lights listed above turn on.
The headlights and parking lights turn on/off
automatically in accordance with ambient light
levels.
To engage the high beams, push the lever forward.
To flash the high beams, pull the lever and hold.
■AFS (Adaptive Front-lighting System) (if equipped)
AFS improves visibility on curves by automatically adjusting the horizontal orientation of the
headlights in accordance with vehicle speed and the degree of the tire angle that are con-
trolled by steering input.
The system can be turned on and off using the satellite switch. (P. 2 5 )
U.S.A.Canada
1
2
3
4
Page 34 of 98
Topic 4
Rain and Night Driving
34
Entering and Exiting
Before DrivingBefore Driving
When Driving
Rain and
Night DrivingRain and
Night Driving
Driving Comfort
Opening and Closing
What to do if ...
Customizing
Yo u r L e x u s
Fog Lights
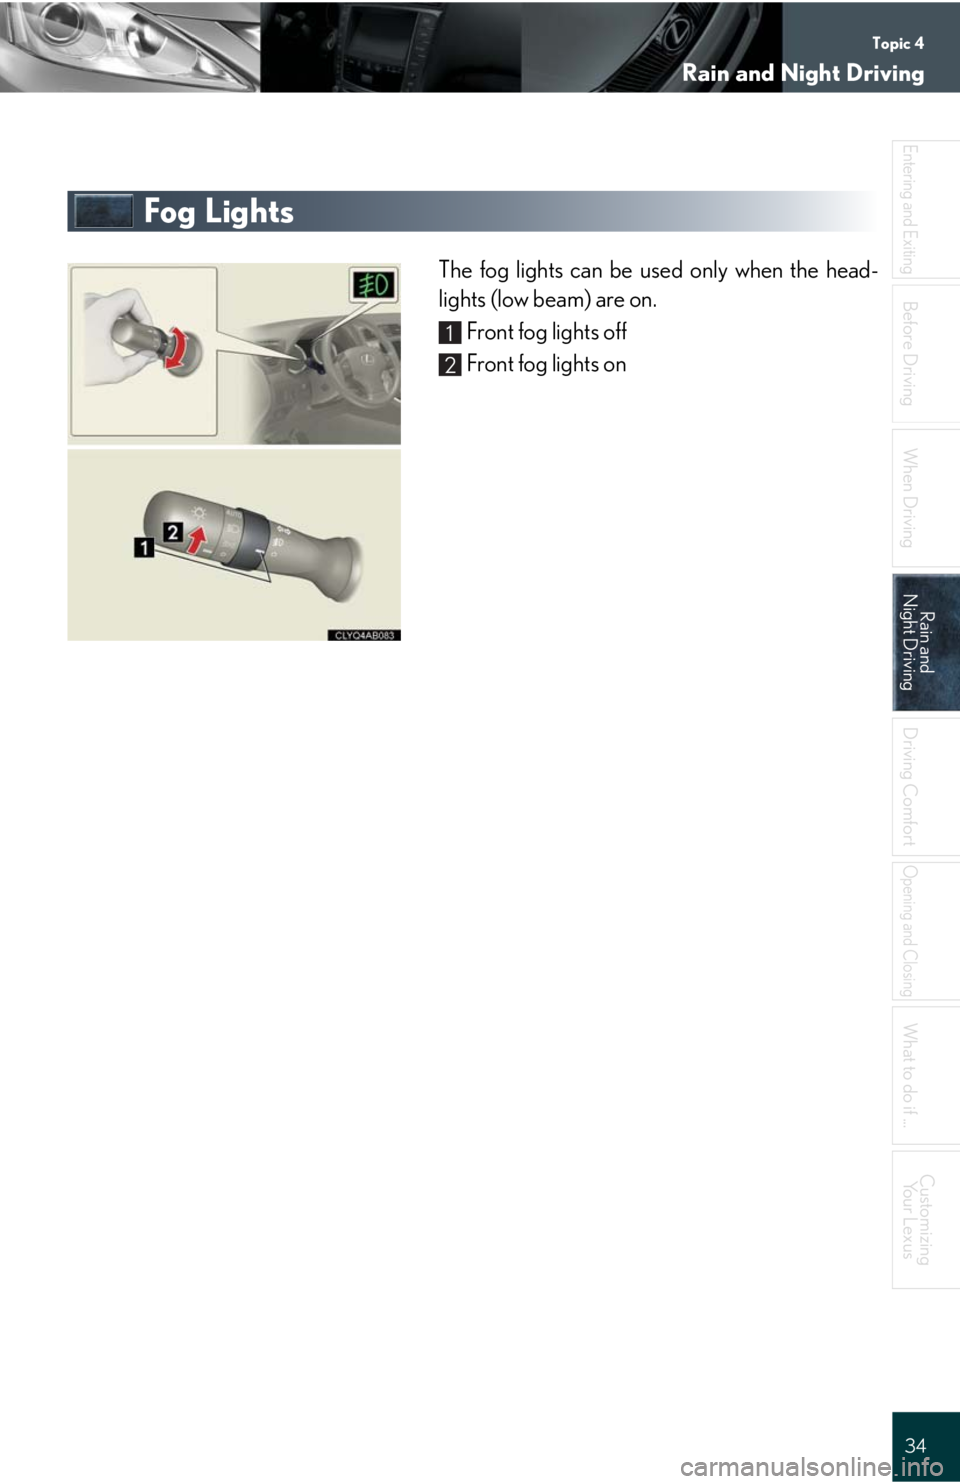
The fog lights can be used only when the head-
lights (low beam) are on.
Front fog lights off
Front fog lights on
1
2
Page 37 of 98
Topic 4
Rain and Night Driving
37
Headlight Cleaner (If Equipped)
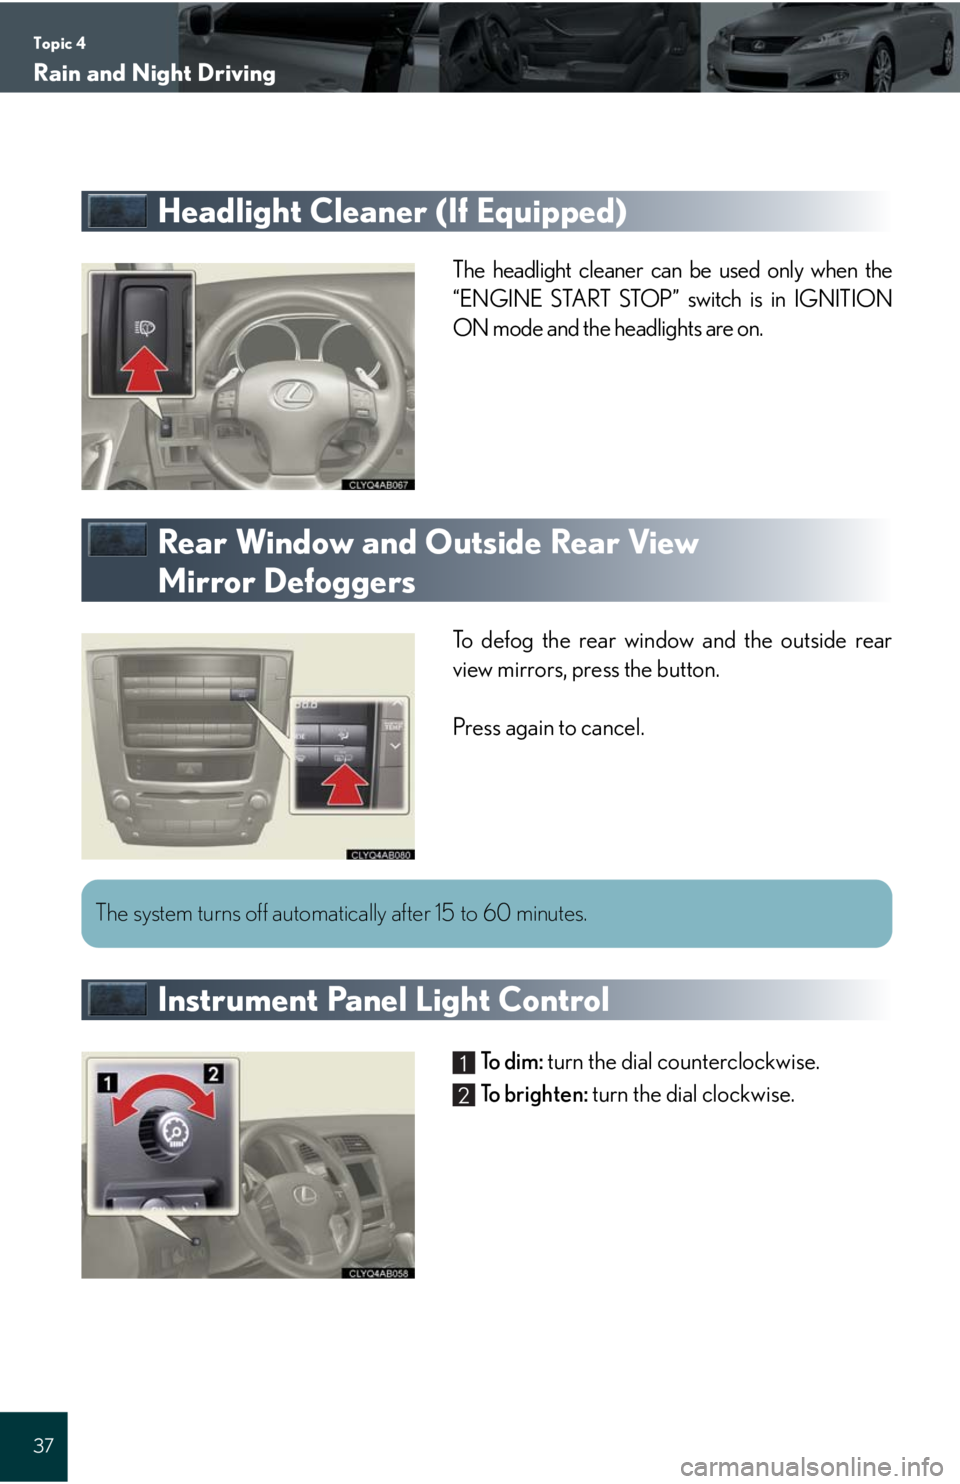
The headlight cleaner can be used only when the
“ENGINE START STOP” switch is in IGNITION
ON mode and the headlights are on.
Rear Window and Outside Rear View
Mirror Defoggers
To defog the rear window and the outside rear
view mirrors, press the button.
Press again to cancel.
Instrument Panel Light Control
To d i m : turn the dial counterclockwise.
To b r i g h t e n : turn the dial clockwise.
The system turns off automatically after 15 to 60 minutes.
1
2
Page 39 of 98
Topic 5
Driving Comfort
39
Touch Screen (with navigation system)
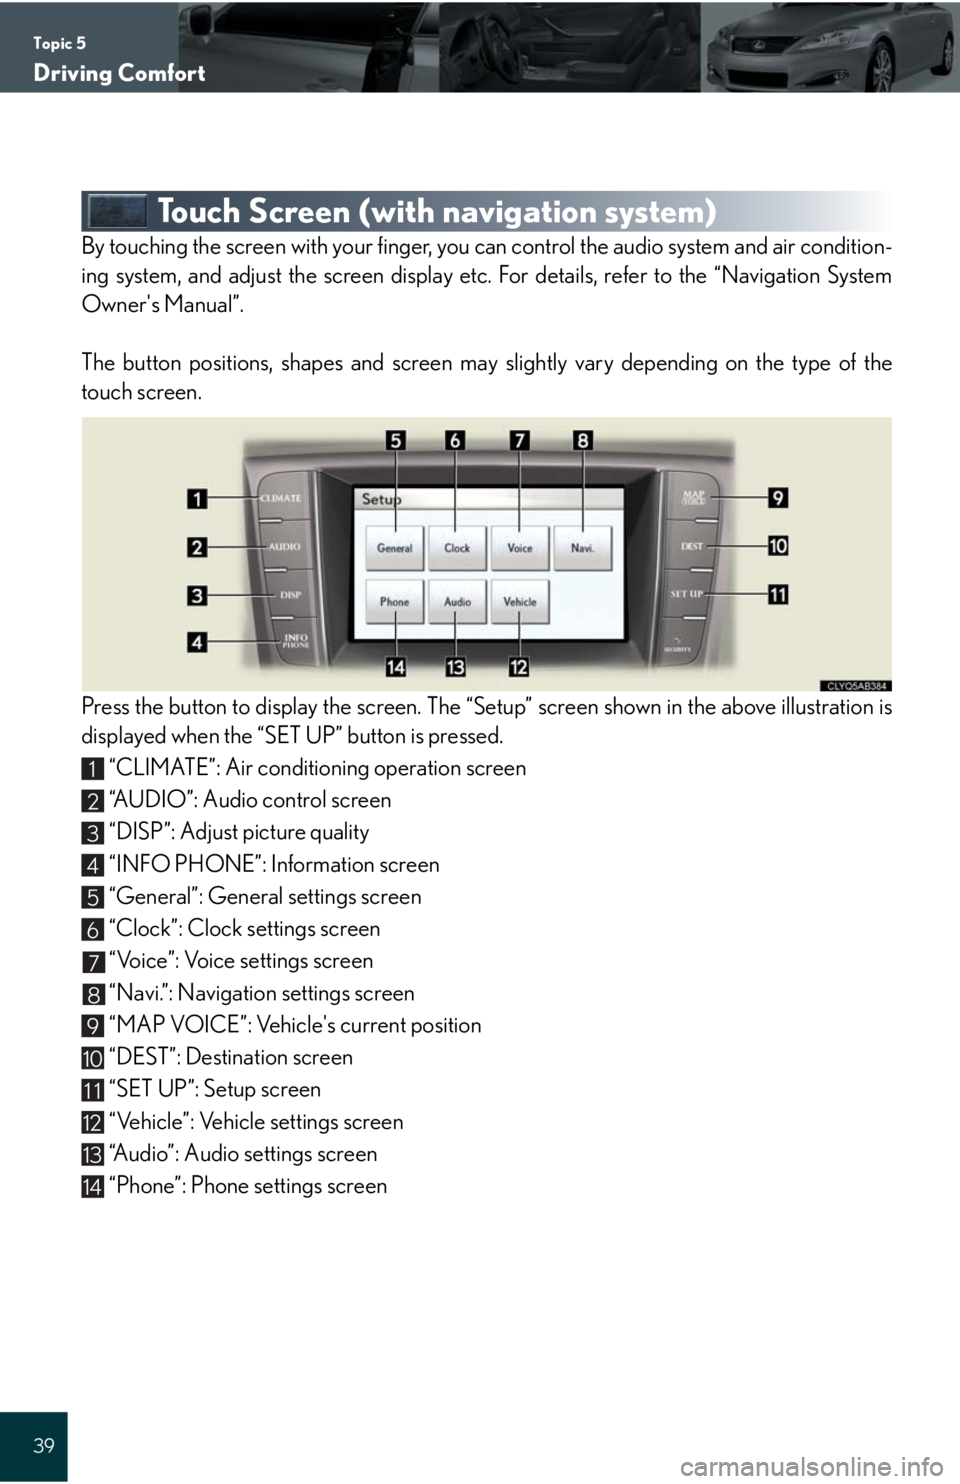
By touching the screen with your finger, you can control the audio system and air condition-
ing system, and adjust the screen display etc. For details, refer to the “Navigation System
Owner's Manual”.
The button positions, shapes and screen may slightly vary depending on the type of the
touch screen.
Press the button to display the screen. The “Setup” screen shown in the above illustration is
displayed when the “SET UP” button is pressed.
“CLIMATE”: Air conditioning operation screen
“AUDIO”: Audio control screen
“DISP”: Adjust picture quality
“INFO PHONE”: Information screen
“General”: General settings screen
“Clock”: Clock settings screen
“Voice”: Voice settings screen
“Navi.”: Navigation settings screen
“MAP VOICE”: Vehicle's current position
“DEST”: Destination screen
“SET UP”: Setup screen
“Vehicle”: Vehicle settings screen
“Audio”: Audio settings screen
“Phone”: Phone settings screen
1
2
3
4
5
6
7
8
9
10
11
12
13
14
Page 40 of 98
Topic 5
Driving Comfort
40
Entering and Exiting
When Driving
Rain and
Night Driving
Driving ComfortDriving Comfort
Opening and Closing
What to do if ...
Customizing
Yo u r L e x u s
Before Driving
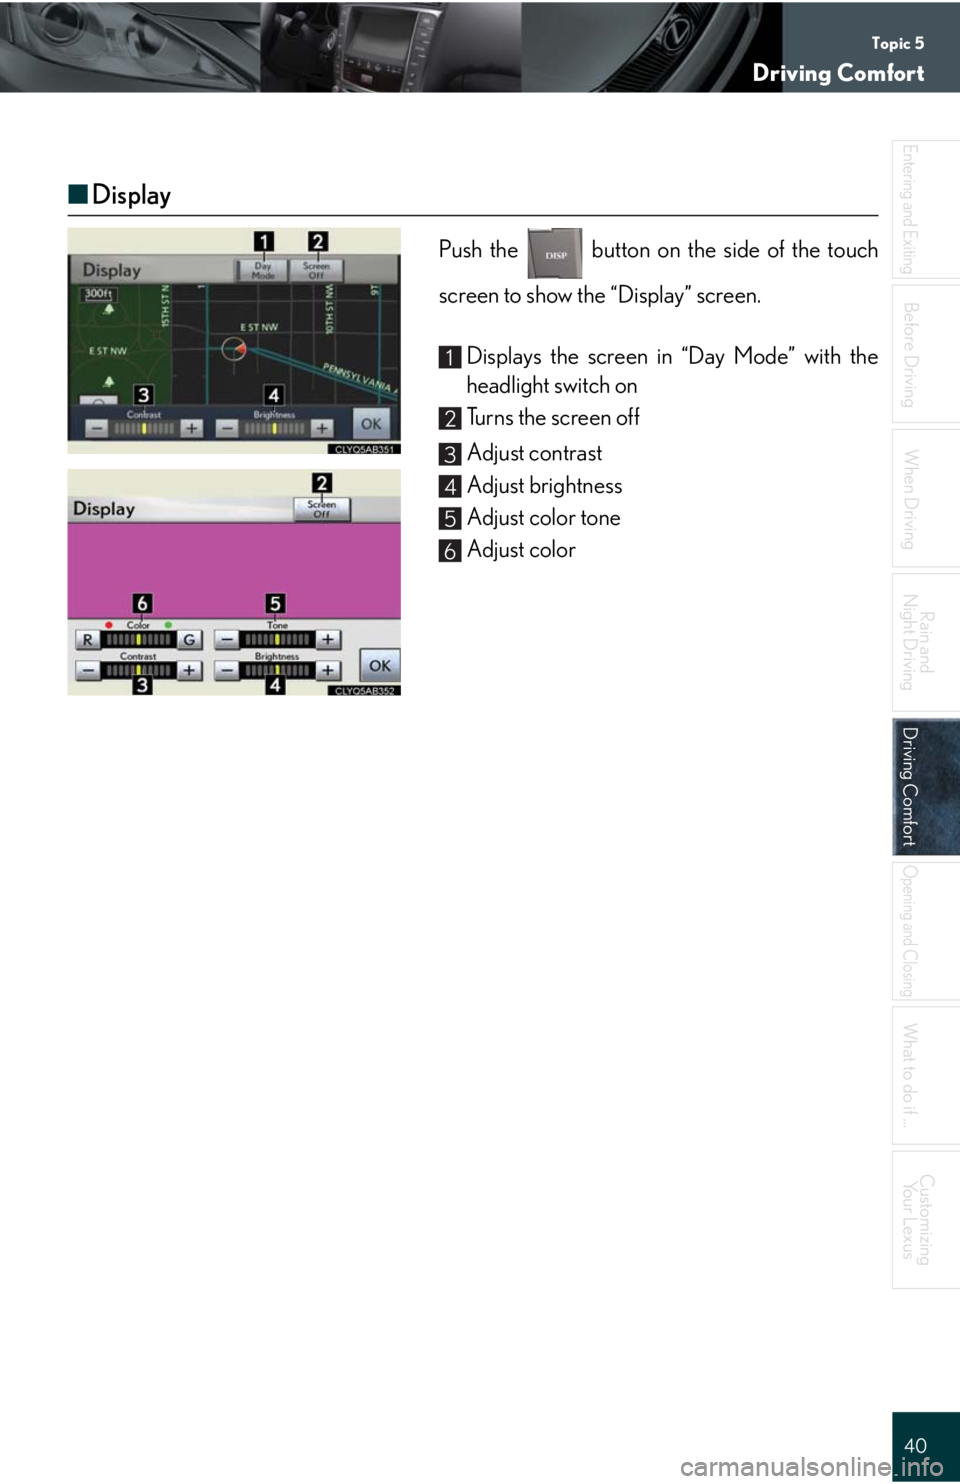
■Display
Push the button on the side of the touch
screen to show the “Display” screen.
Displays the screen in “Day Mode” with the
headlight switch on
Turns the screen off
Adjust contrast
Adjust brightness
Adjust color tone
Adjust color
1
2
3
4
5
6
Page 56 of 98
Topic 5
Driving Comfort
56
Entering and Exiting
When Driving
Rain and
Night Driving
Driving ComfortDriving Comfort
Opening and Closing
What to do if ...
Customizing
Yo u r L e x u s
Before Driving
Audio System (with navigation system)
The button positions, shapes and screen may slightly vary depending on the type of the
audio system.
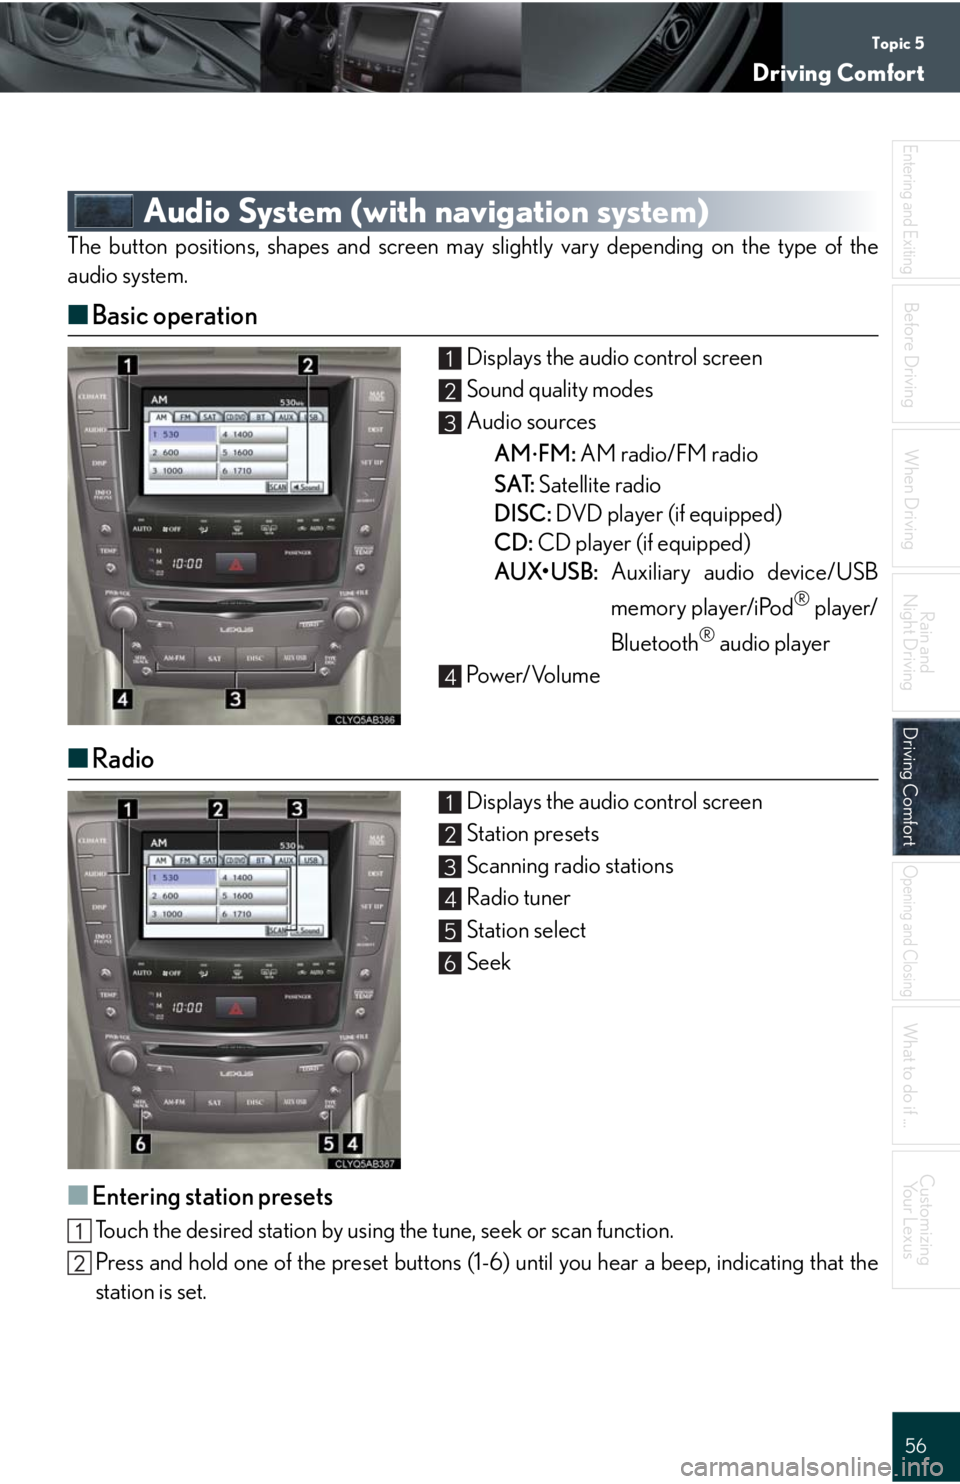
■Basic operation
Displays the audio control screen
Sound quality modes
Audio sources
AM
FM: AM radio/FM radio
SAT: Satellite radio
DISC: DVD player (if equipped)
CD: CD player (if equipped)
AUX•USB: Auxiliary audio device/USB
memory player/iPod
® player/
Bluetooth
® audio player
Pow e r/ Vo l u m e
■Radio
Displays the audio control screen
Station presets
Scanning radio stations
Radio tuner
Station select
Seek
■Entering station presets
Touch the desired station by using the tune, seek or scan function.
Press and hold one of the preset buttons (1-6) until you hear a beep, indicating that the
station is set.
1
2
3
4
1
2
3
4
5
6
Page 79 of 98
Topic 5
Driving Comfort
79
Garage Door Opener
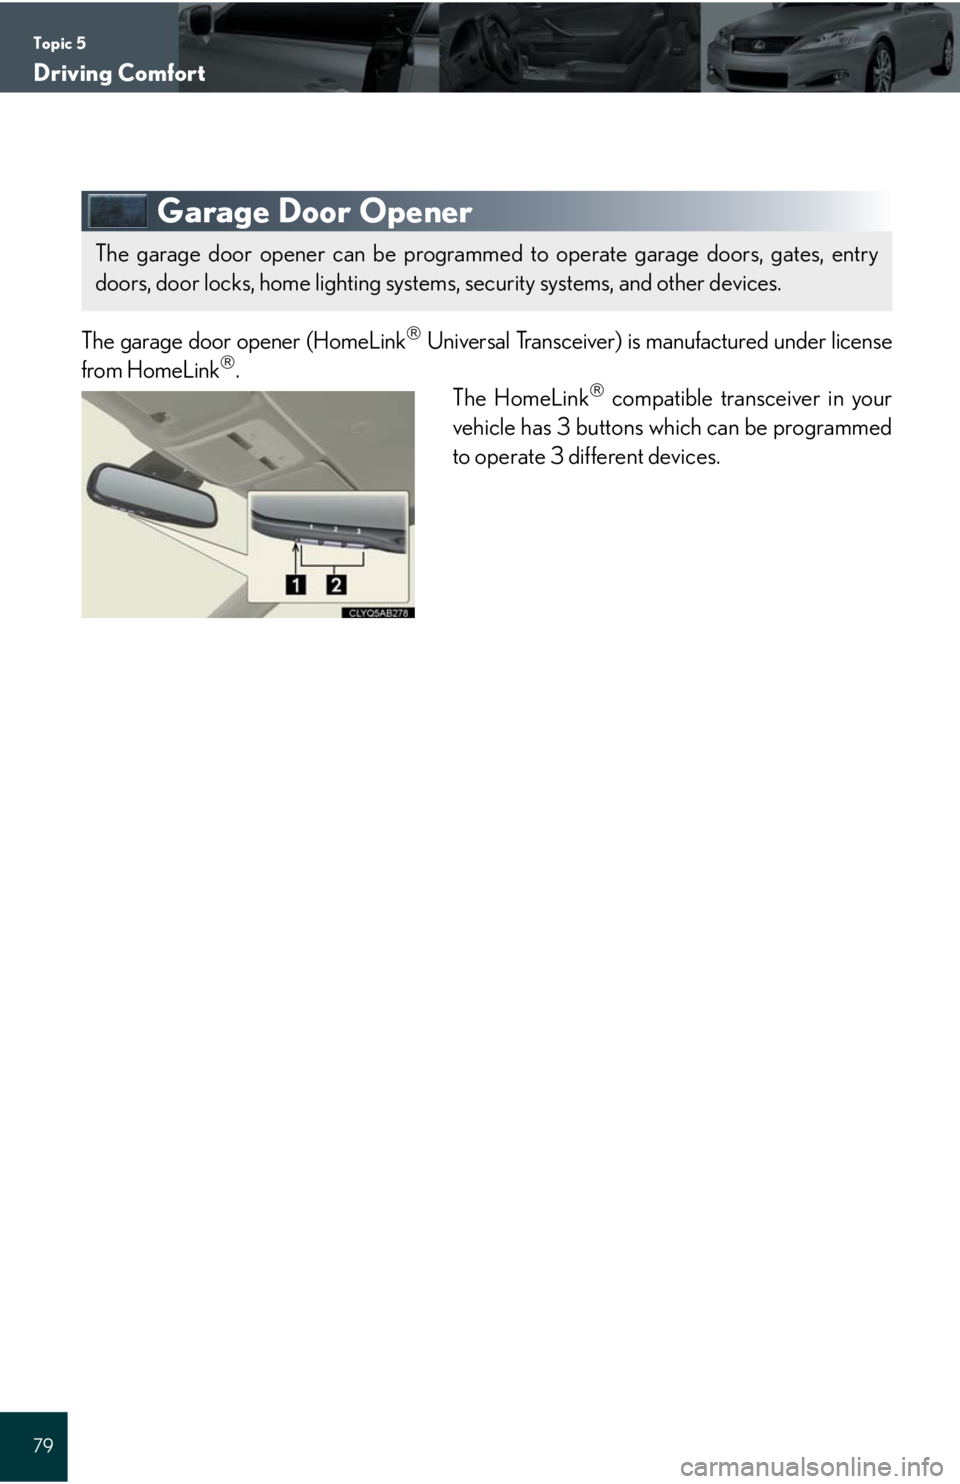
The garage door opener (HomeLink Universal Transceiver) is manufactured under license
from HomeLink.
The HomeLink compatible transceiver in your
vehicle has 3 buttons which can be programmed
to operate 3 different devices.
The garage door opener can be programmed to operate garage doors, gates, entry
doors, door locks, home lighting systems, security systems, and other devices.
Page 80 of 98
Topic 5
Driving Comfort
80
Entering and Exiting
When Driving
Rain and
Night Driving
Driving ComfortDriving Comfort
Opening and Closing
What to do if ...
Customizing
Yo u r L e x u s
Before Driving
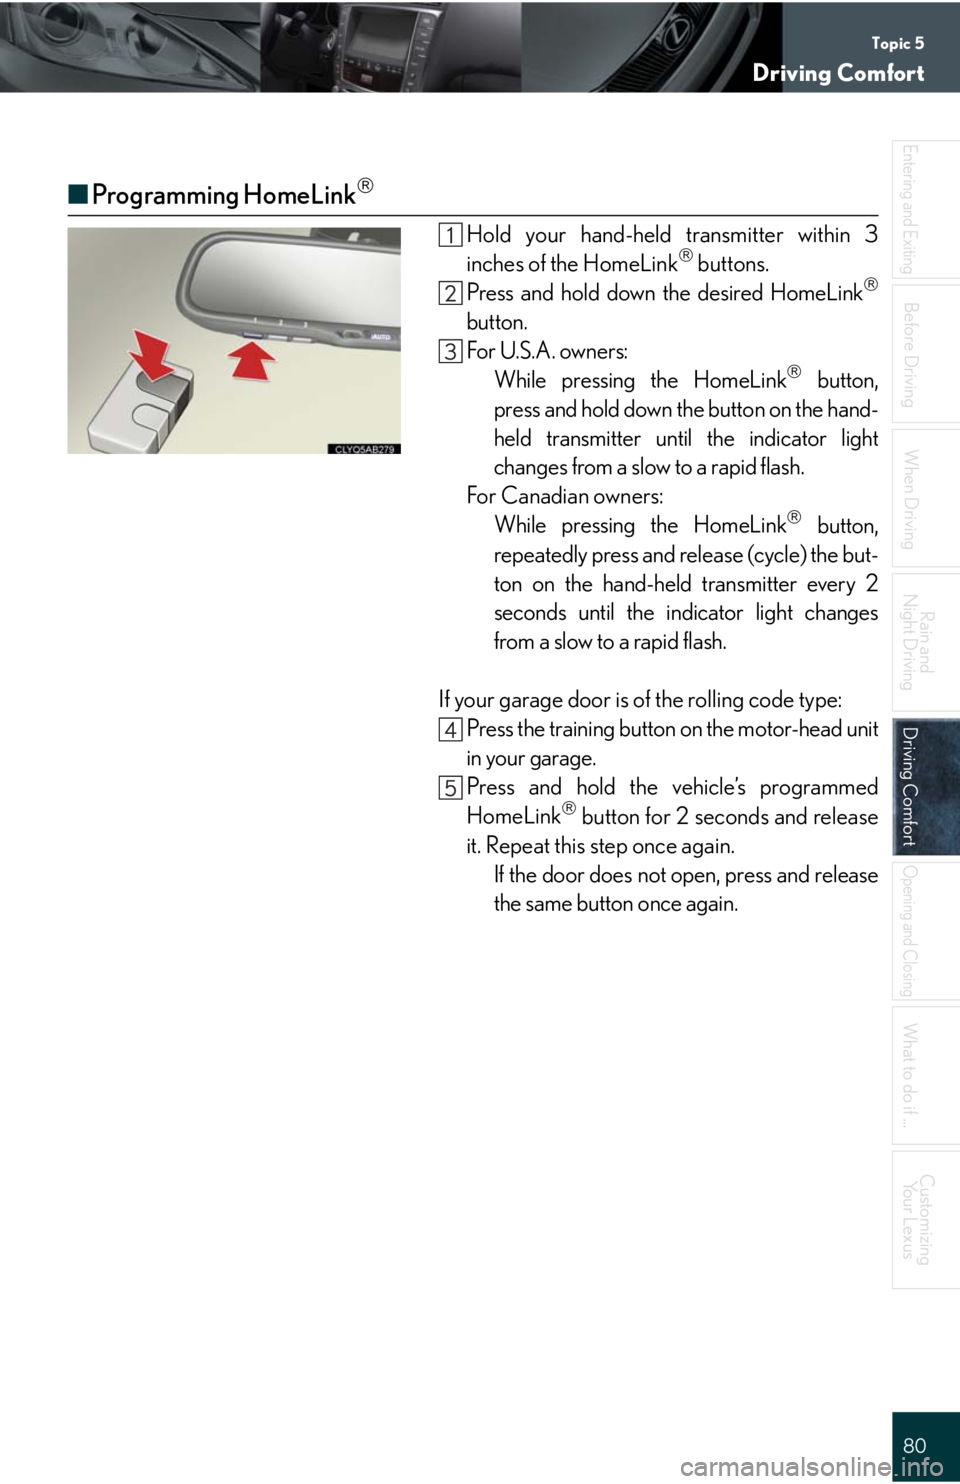
■Programming HomeLink
Hold your hand-held transmitter within 3
inches of the HomeLink buttons.
Press and hold down the desired HomeLink
button.
For U.S.A. owners:
While pressing the HomeLink
button,
press and hold down the button on the hand-
held transmitter until the indicator light
changes from a slow to a rapid flash.
For Canadian owners:
While pressing the HomeLink
button,
repeatedly press and release (cycle) the but-
ton on the hand-held transmitter every 2
seconds until the indicator light changes
from a slow to a rapid flash.
If your garage door is of the rolling code type:
Press the training button on the motor-head unit
in your garage.
Press and hold the vehicle’s programmed
HomeLink
button for 2 seconds and release
it. Repeat this step once again.
If the door does not open, press and release
the same button once again.
Page 81 of 98
Topic 5
Driving Comfort
81
■Programming other devices
For U.S.A. owners:
To program an entry gate, see the Owner's Manual.
To program other devices, contact your Lexus dealer.
For Canadian owners:
To program all other devices, follow the same procedure as for garage door programming.
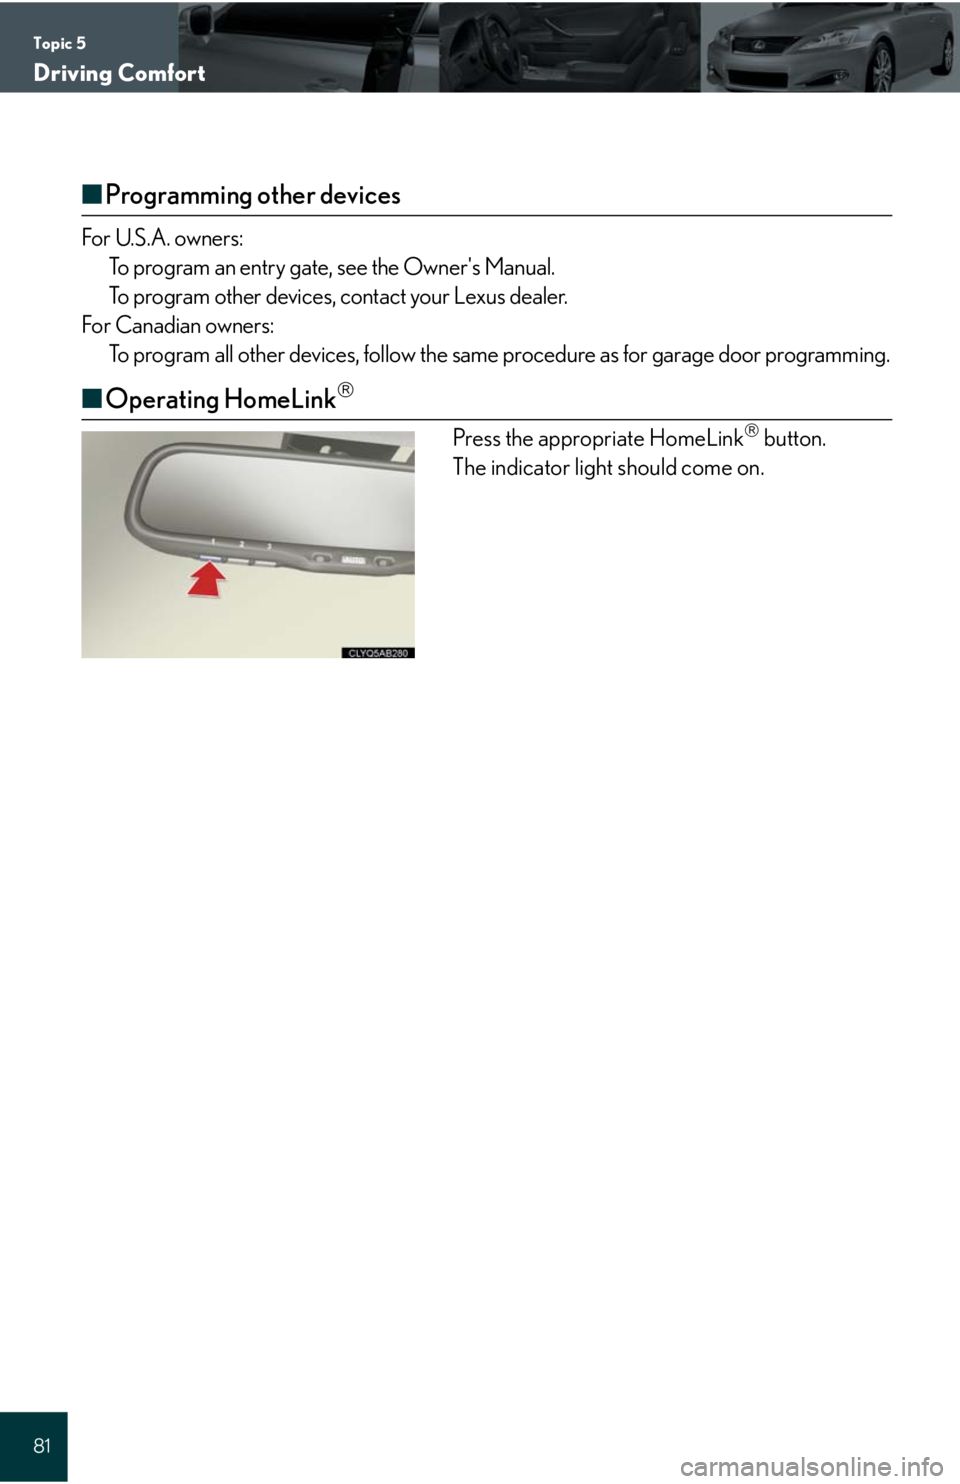
■Operating HomeLink
Press the appropriate HomeLink button.
The indicator light should come on.
Page 89 of 98
What to do if ...
89
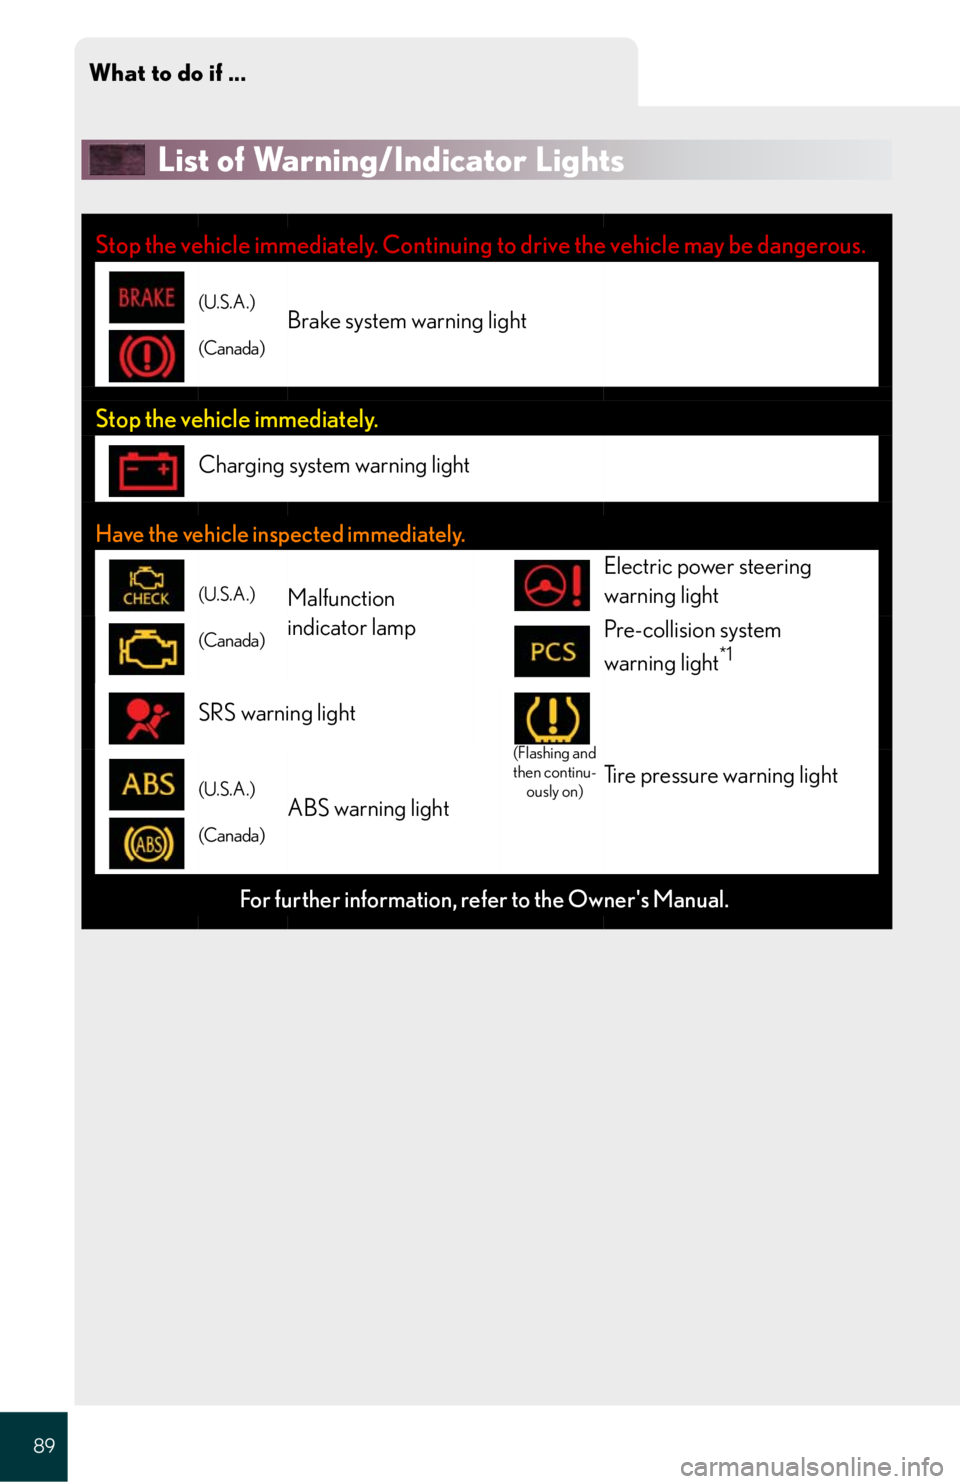
List of Warning/Indicator Lights
Stop the vehicle immediately. Continuing to drive the vehicle may be dangerous.
(U.S.A.)
(Canada)Brake system warning light
Stop the vehicle immediately.
Charging system warning light
Have the vehicle inspected immediately.
(U.S.A.)
(Canada)Malfunction
indicator lamp
Electric power steering
warning light
Pre-collision system
warning light*1
SRS warning light
(Flashing and
then continu-
ously on)
Tire pressure warning light(U.S.A.)
(Canada)ABS warning light
For further information, refer to the Owner's Manual.