audio Lexus IS250C 2010 Do-It-Yourself Maintenance / LEXUS 2010 IS350C/250C QUICK GUIDE OWNERS MANUAL (OM53738U)
[x] Cancel search | Manufacturer: LEXUS, Model Year: 2010, Model line: IS250C, Model: Lexus IS250C 2010Pages: 98, PDF Size: 5.93 MB
Page 2 of 98
Entering and Exiting
Before Driving
When Driving
Rain and
Night Driving
Driving Comfort
Opening and Closing
What to do if ...
Customizing
Yo u r L e x u s
2
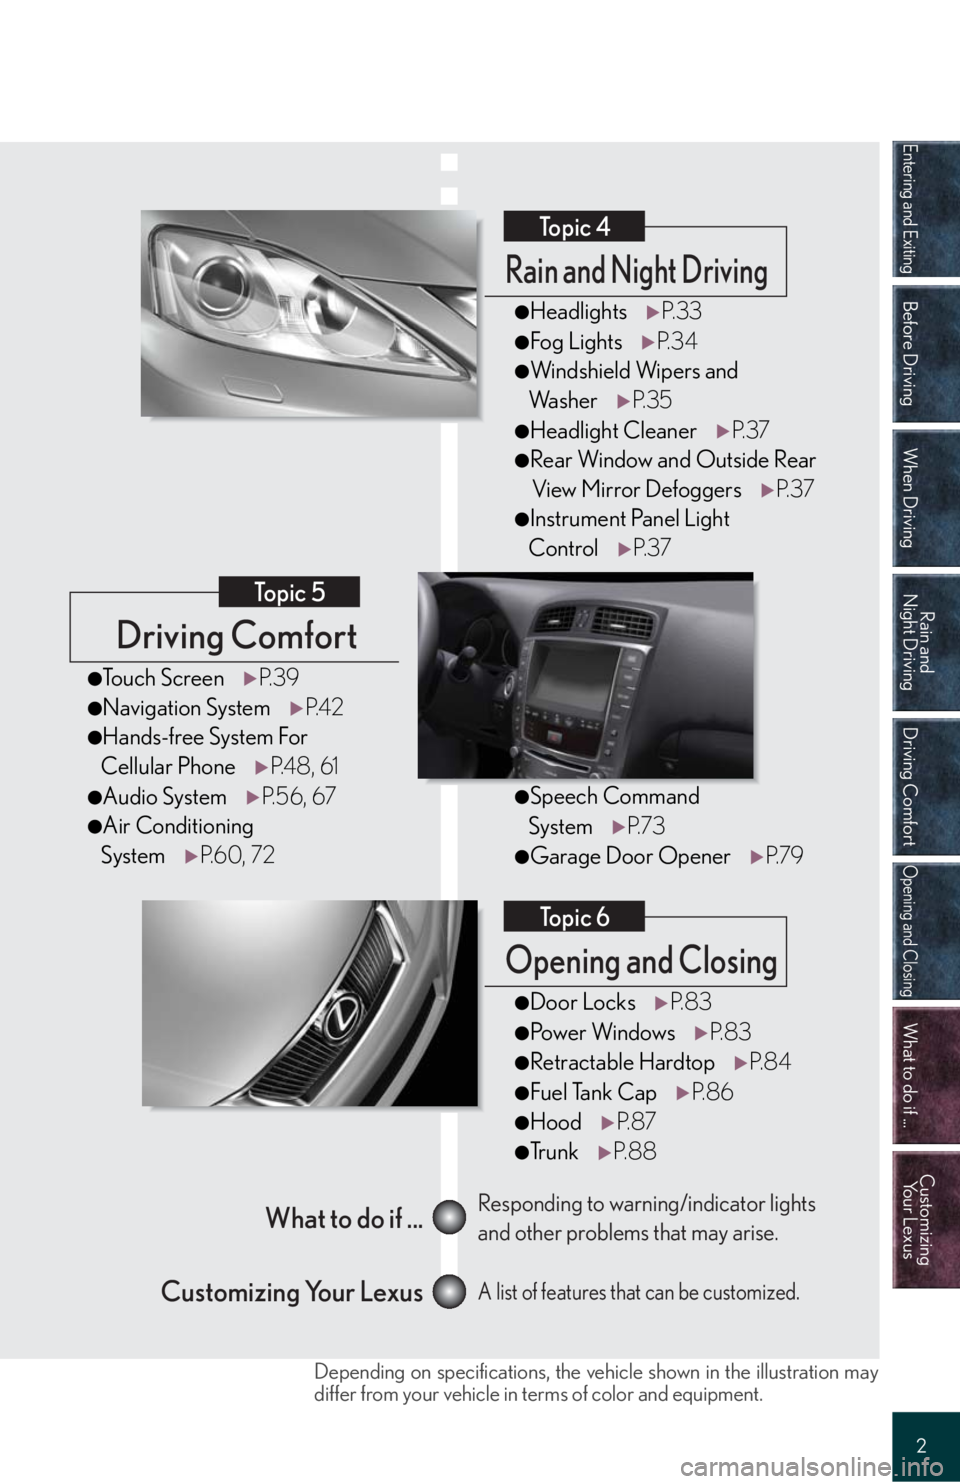
Driving Comfort
Topic 5
Opening and Closing
Topic 6
What to do if ...
Customizing Your LexusResponding to warning/indicator lights
and other problems that may arise.
A list of features that can be customized.
Rain and Night Driving
Topic 4
●HeadlightsP. 3 3
●Fog LightsP. 3 4
●Windshield Wipers and
Wa s h e rP. 3 5
●Headlight CleanerP. 3 7
●Rear Window and Outside Rear
View Mirror DefoggersP. 3 7
●Instrument Panel Light
ControlP. 3 7
●Door LocksP. 8 3
●Po w e r Wi n d o w sP. 8 3
●Retractable HardtopP. 8 4
●Fuel Tank CapP. 8 6
●HoodP. 8 7
●Tr u n kP. 8 8
●Touch ScreenP. 3 9
●Navigation SystemP. 4 2
●Hands-free System For
Cellular PhoneP. 4 8 , 6 1
●Audio SystemP. 5 6 , 6 7
●Air Conditioning
SystemP. 6 0 , 7 2
●Speech Command
SystemP. 7 3
●Garage Door OpenerP. 7 9
Depending on specifications, the vehicle shown in the illustration may
differ from your vehicle in terms of color and equipment.
Page 3 of 98
3
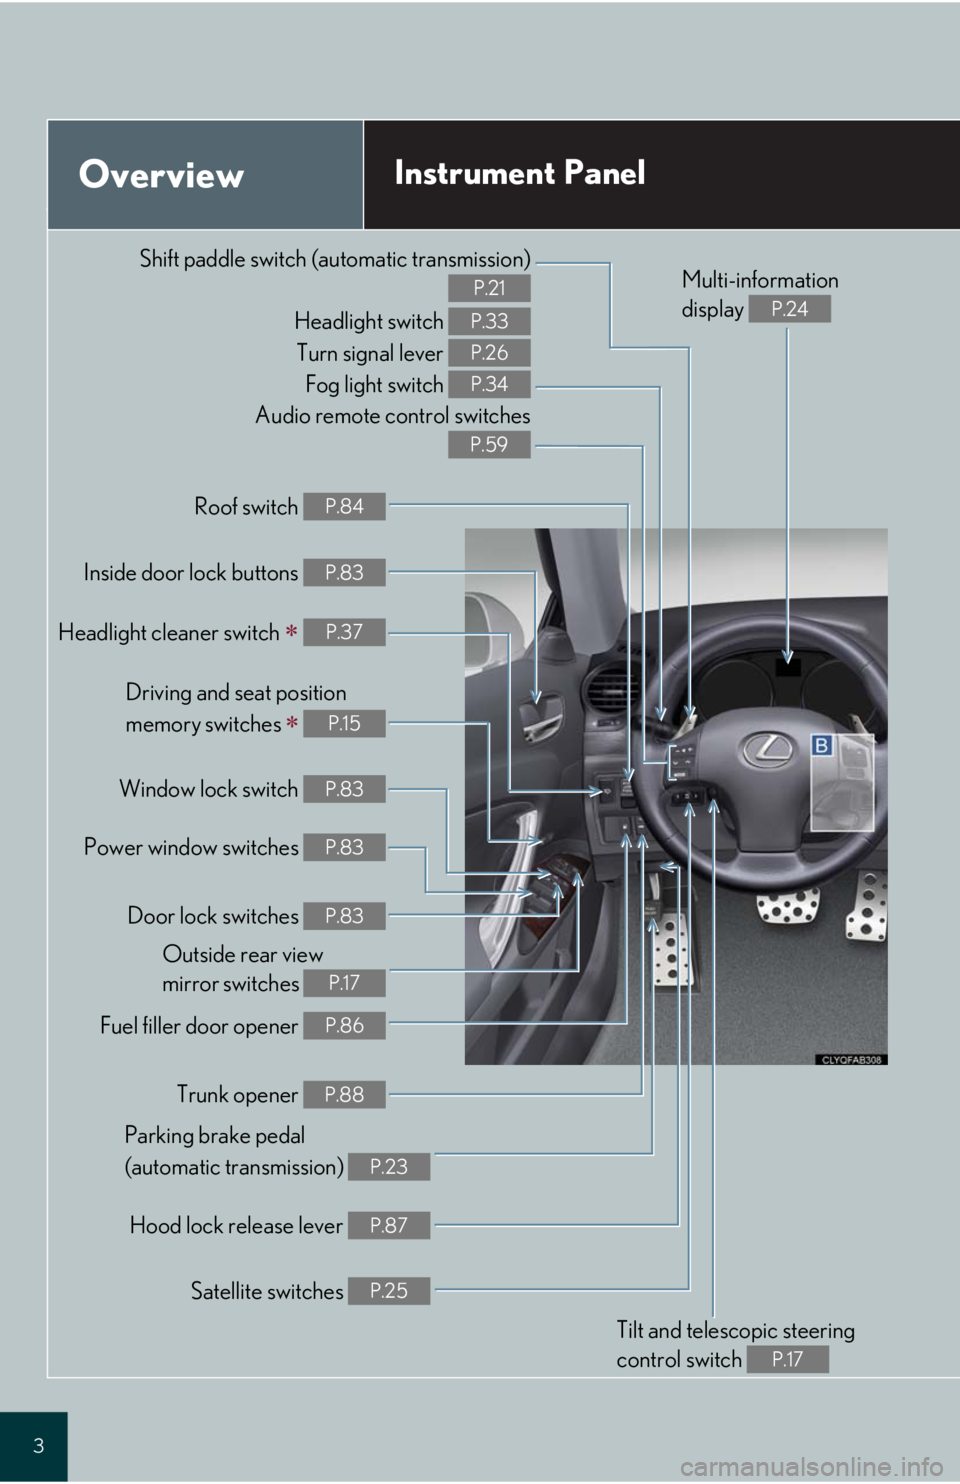
Audio remote control switches
P.59
OverviewInstrument Panel
Shift paddle switch (automatic transmission)
P.21
Headlight switch
Turn signal lever
Fog light switch P.33
P.26
P.34
Headlight cleaner switch P.37
Inside door lock buttons P.83
Fuel filler door opener P.86
Driving and seat position
memory switches
P.15
Power window switches P.83
Window lock switch P.83
Outside rear view
mirror switches
P.17
Trunk opener P.88
Hood lock release lever P.87
Parking brake pedal
(automatic transmission)
P.23
Tilt and telescopic steering
control switch
P.17
Multi-information
display
P.24
Door lock switches P.83
Roof switch P.84
Satellite switches P.25
Page 5 of 98
5
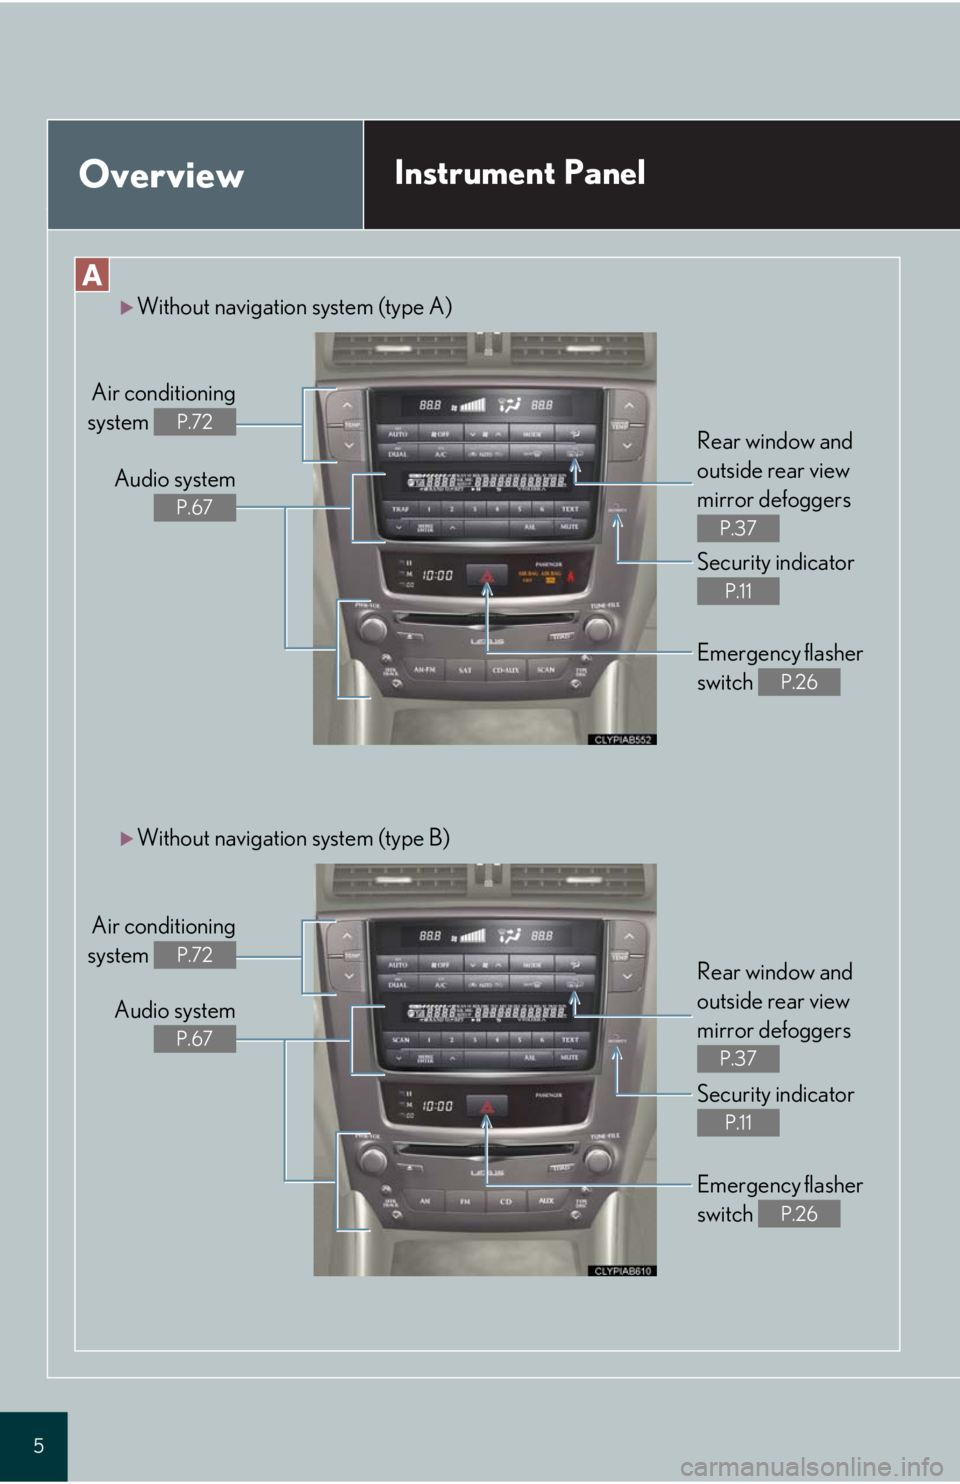
OverviewInstrument Panel
Without navigation system (type A)
Air conditioning
system
P.72
Audio system
P.67
Rear window and
outside rear view
mirror defoggers
P.37
Security indicator
P.11
Emergency flasher
switch
P.26
Rear window and
outside rear view
mirror defoggers
P.37
Security indicator
P.11
Emergency flasher
switch
P.26
Without navigation system (type B)
Air conditioning
system
P.72
Audio system
P.67
Page 6 of 98
6
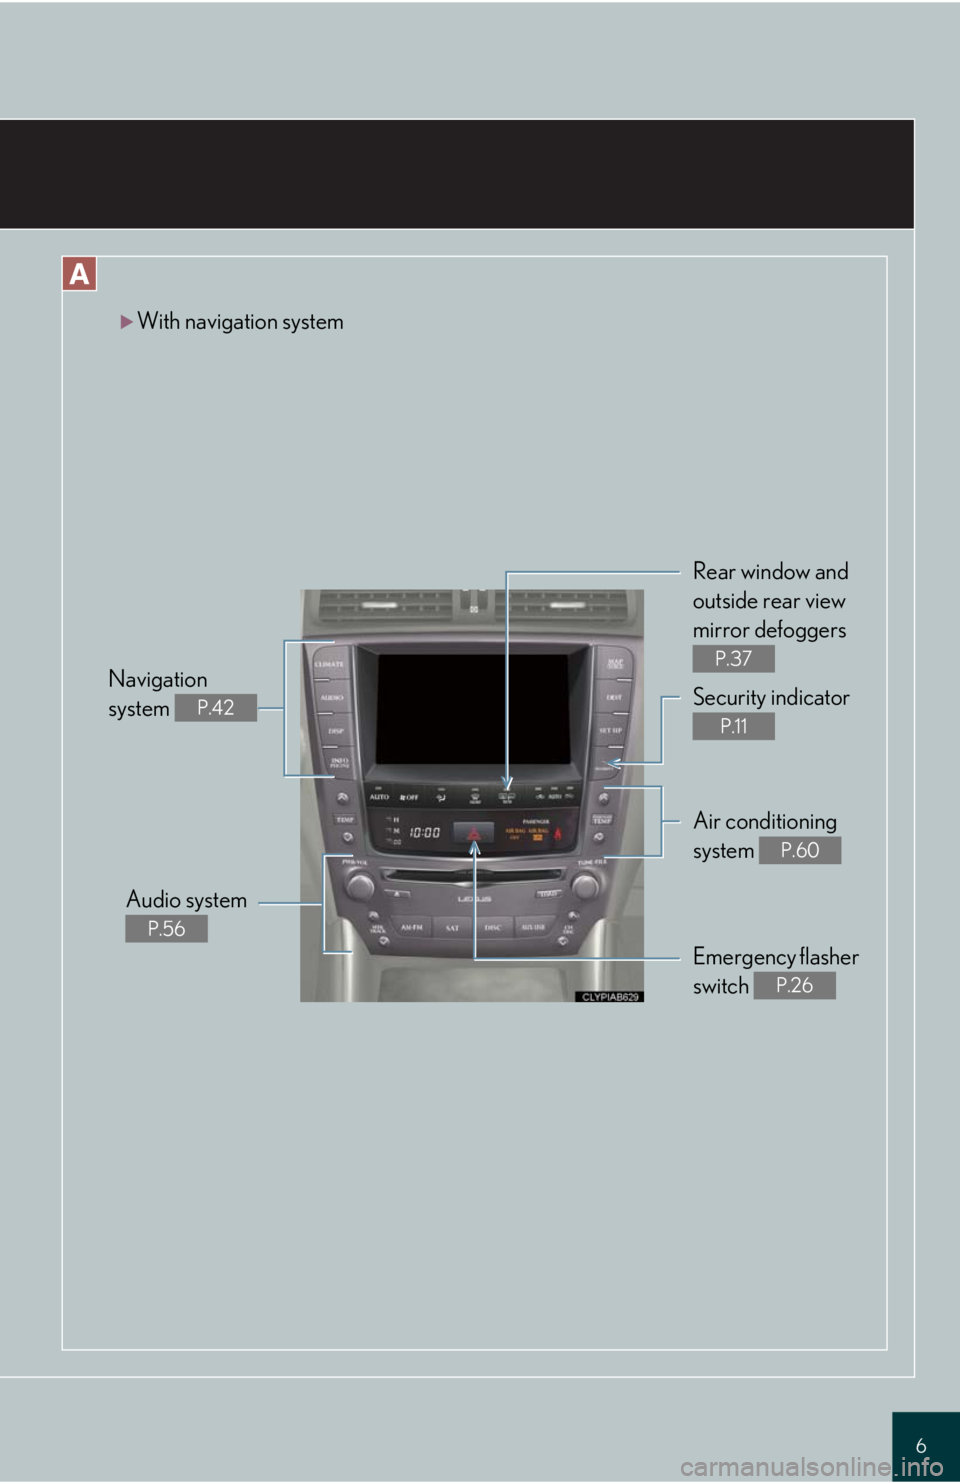
With navigation system
Rear window and
outside rear view
mirror defoggers
P.37
Security indicator
P.11
Air conditioning
system
P.60
Emergency flasher
switch
P.26
Audio system
P.56
Navigation
system
P.42
Page 38 of 98
Driving ComfortTopic 5
Touch Screen ......................................................... 39
Navigation System ............................................... 42
Hands-free System For Cellular Phone
(with navigation system) ..................................... 48
Audio System (with navigation system) ......... 56
Air Conditioning System
(with navigation system) ..................................... 60
Hands-free System For Cellular Phone
(without navigation system) ................................ 61
Audio System
(without navigation system) ............................... 67
Air Conditioning System
(without navigation system) ............................... 72
Speech Command System ................................ 73
Garage Door Opener ........................................ 79
Page 39 of 98
Topic 5
Driving Comfort
39
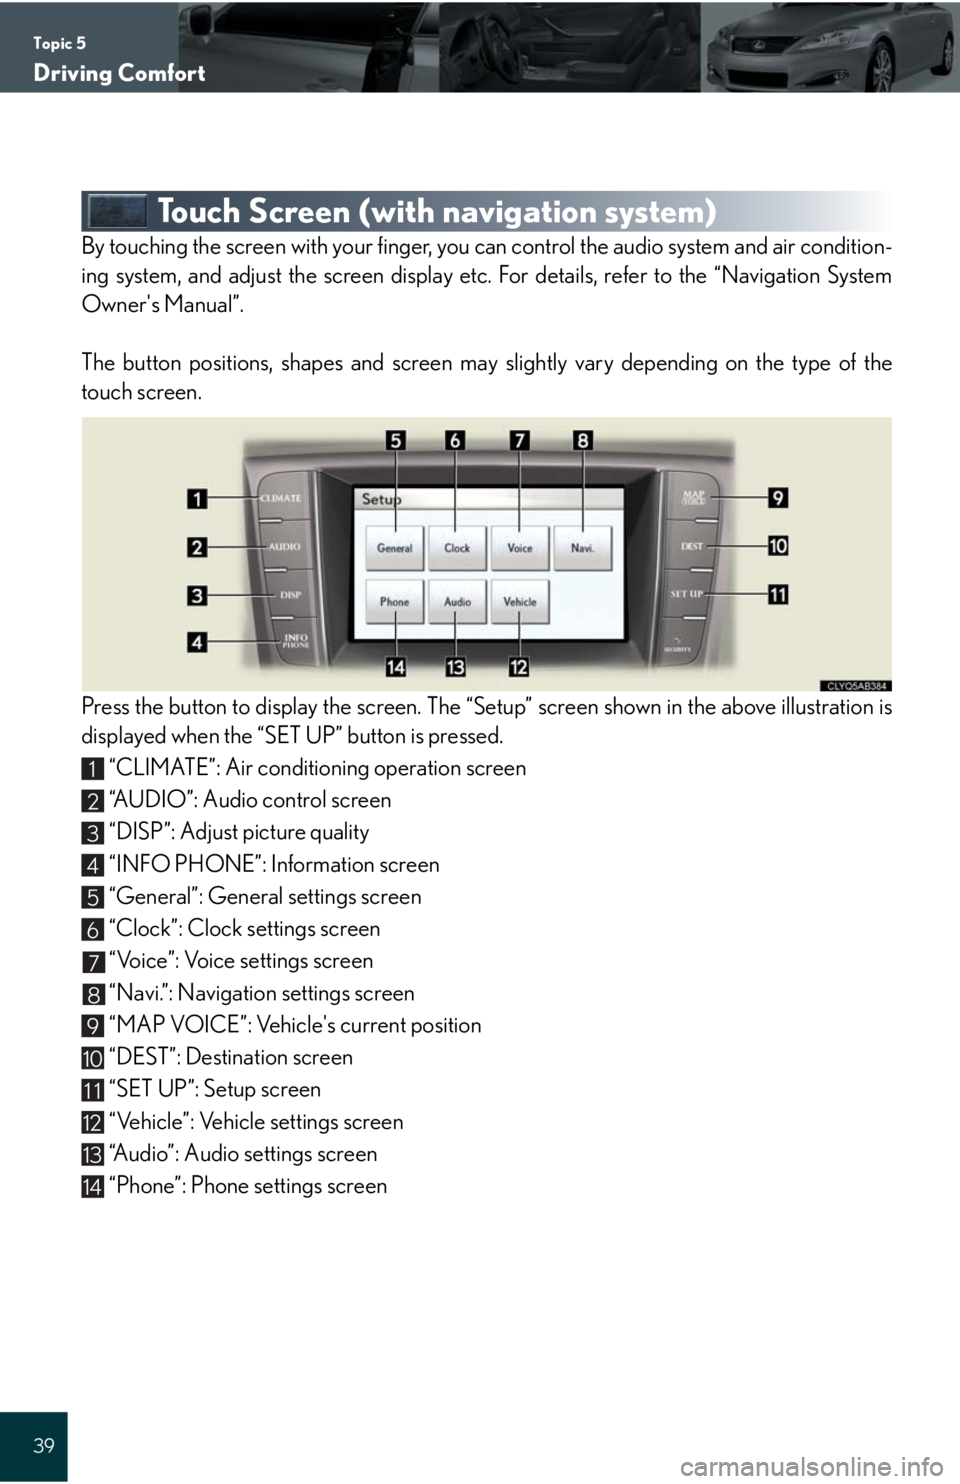
Touch Screen (with navigation system)
By touching the screen with your finger, you can control the audio system and air condition-
ing system, and adjust the screen display etc. For details, refer to the “Navigation System
Owner's Manual”.
The button positions, shapes and screen may slightly vary depending on the type of the
touch screen.
Press the button to display the screen. The “Setup” screen shown in the above illustration is
displayed when the “SET UP” button is pressed.
“CLIMATE”: Air conditioning operation screen
“AUDIO”: Audio control screen
“DISP”: Adjust picture quality
“INFO PHONE”: Information screen
“General”: General settings screen
“Clock”: Clock settings screen
“Voice”: Voice settings screen
“Navi.”: Navigation settings screen
“MAP VOICE”: Vehicle's current position
“DEST”: Destination screen
“SET UP”: Setup screen
“Vehicle”: Vehicle settings screen
“Audio”: Audio settings screen
“Phone”: Phone settings screen
1
2
3
4
5
6
7
8
9
10
11
12
13
14
Page 56 of 98
Topic 5
Driving Comfort
56
Entering and Exiting
When Driving
Rain and
Night Driving
Driving ComfortDriving Comfort
Opening and Closing
What to do if ...
Customizing
Yo u r L e x u s
Before Driving
Audio System (with navigation system)
The button positions, shapes and screen may slightly vary depending on the type of the
audio system.
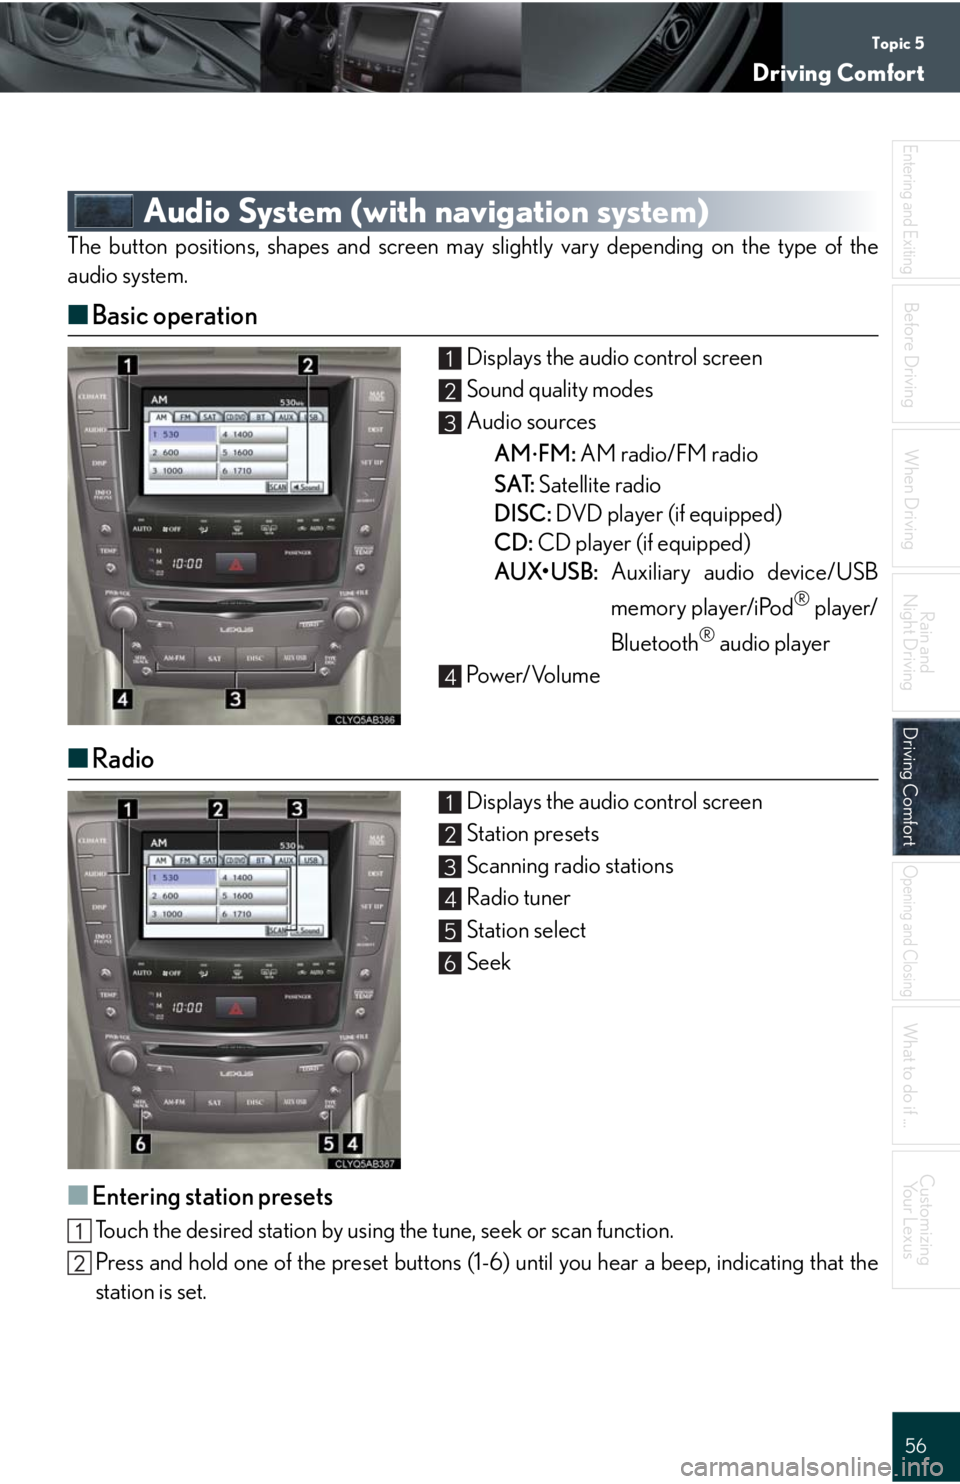
■Basic operation
Displays the audio control screen
Sound quality modes
Audio sources
AM
FM: AM radio/FM radio
SAT: Satellite radio
DISC: DVD player (if equipped)
CD: CD player (if equipped)
AUX•USB: Auxiliary audio device/USB
memory player/iPod
® player/
Bluetooth
® audio player
Pow e r/ Vo l u m e
■Radio
Displays the audio control screen
Station presets
Scanning radio stations
Radio tuner
Station select
Seek
■Entering station presets
Touch the desired station by using the tune, seek or scan function.
Press and hold one of the preset buttons (1-6) until you hear a beep, indicating that the
station is set.
1
2
3
4
1
2
3
4
5
6
Page 57 of 98
Topic 5
Driving Comfort
57
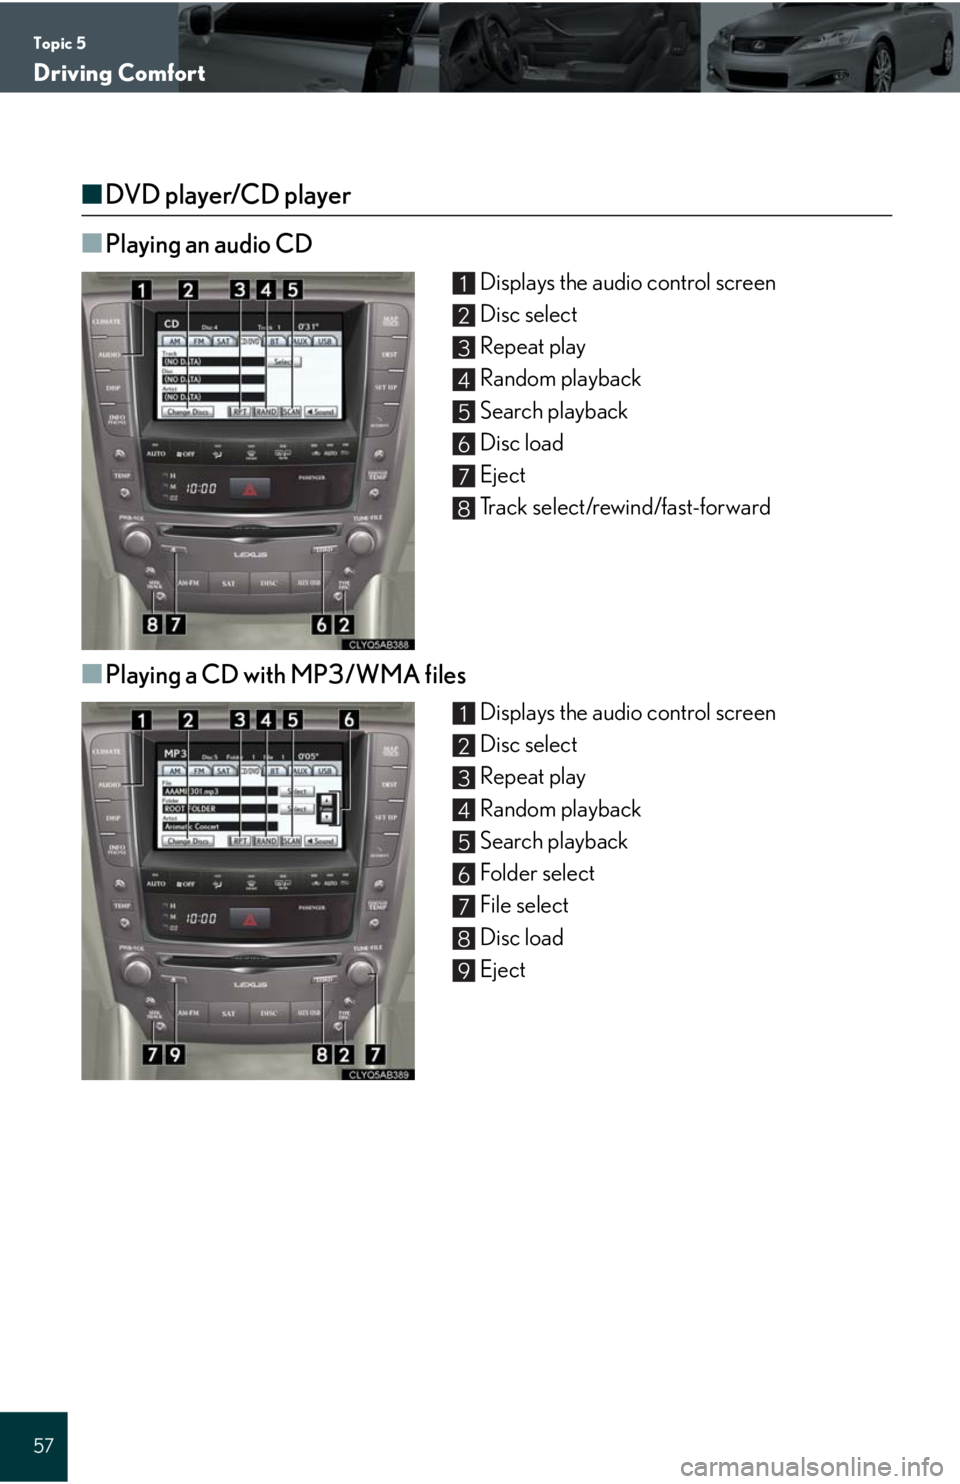
■DVD player/CD player
■
Playing an audio CD
Displays the audio control screen
Disc select
Repeat play
Random playback
Search playback
Disc load
Eject
Track select/rewind/fast-forward
■Playing a CD with MP3/WMA files
Displays the audio control screen
Disc select
Repeat play
Random playback
Search playback
Folder select
File select
Disc load
Eject
1
2
3
4
5
6
7
8
1
2
3
4
5
6
7
8
9
Page 58 of 98
Topic 5
Driving Comfort
58
Entering and Exiting
When Driving
Rain and
Night Driving
Driving ComfortDriving Comfort
Opening and Closing
What to do if ...
Customizing
Yo u r L e x u s
Before Driving
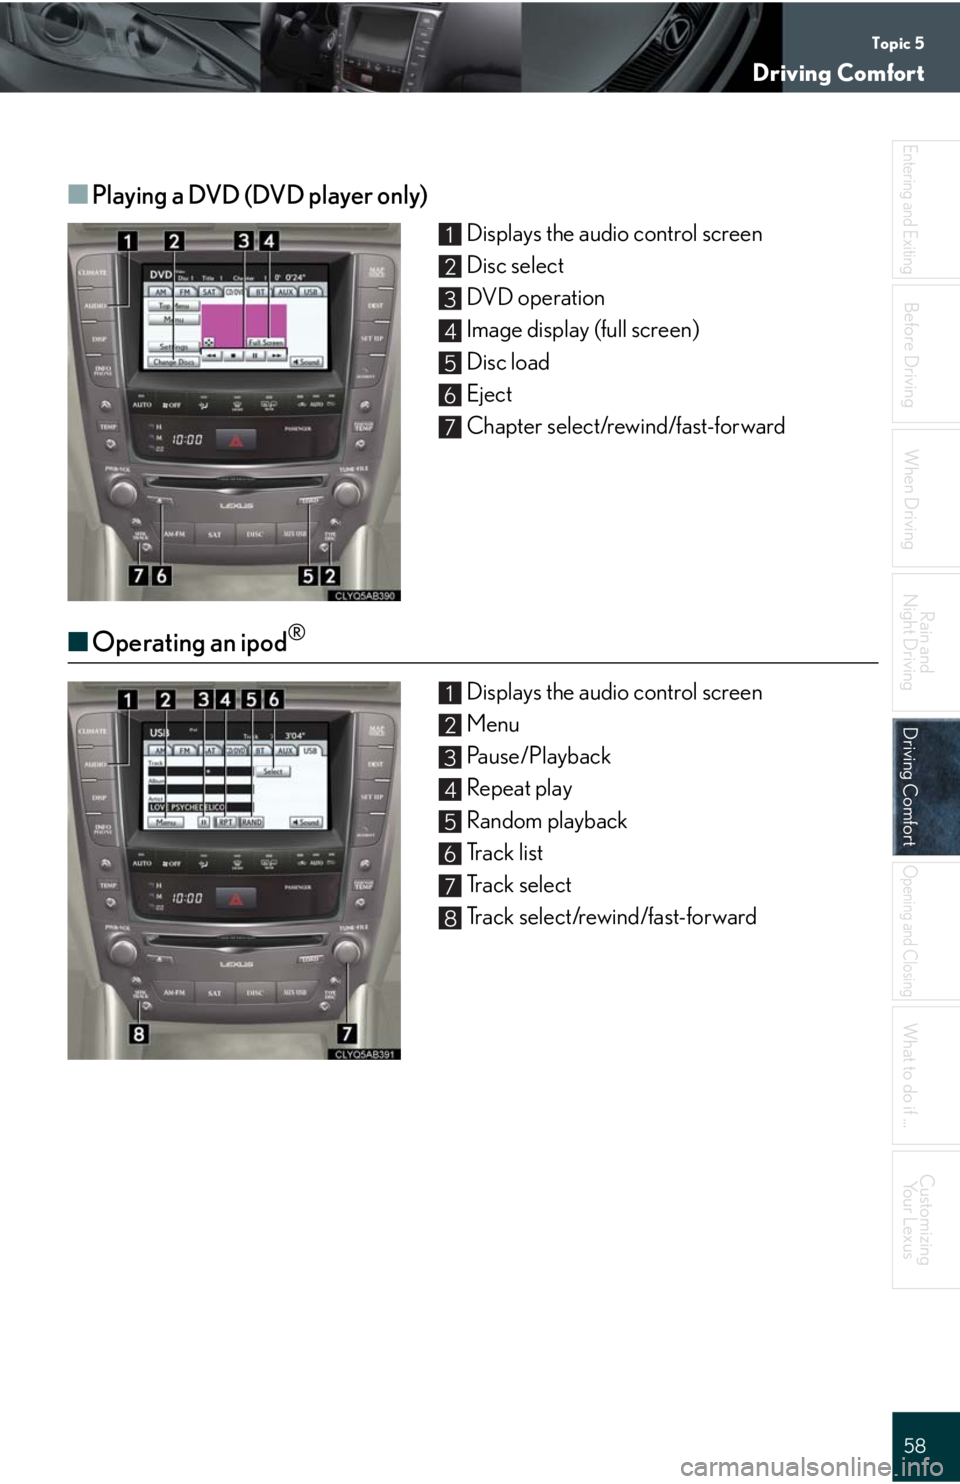
■Playing a DVD (DVD player only)
Displays the audio control screen
Disc select
DVD operation
Image display (full screen)
Disc load
Eject
Chapter select/rewind/fast-forward
■Operating an ipod®
Displays the audio control screen
Menu
Pause/Playback
Repeat play
Random playback
Track list
Track select
Track select/rewind/fast-forward
1
2
3
4
5
6
7
1
2
3
4
5
6
7
8
Page 59 of 98
Topic 5
Driving Comfort
59
■Loading a disc
Press the “LOAD” button.
When the indicator changes from flashing amber to green, insert a disc after the disc slot
door opens.
■Loading multiple discs
Press and hold the “LOAD” button until you hear a beep.
When the indicator changes from flashing amber to green, insert a disc after the disc slot
door opens.
After inserting a disc, wait until the indicator changes from flashing amber to green, then
insert the next disc after the disc slot door has opened.
Repeat and until you have inserted all discs.
To cancel the operation, press the “LOAD” button. If you do not insert a disc within 15 sec-
onds, loading will be canceled automatically.
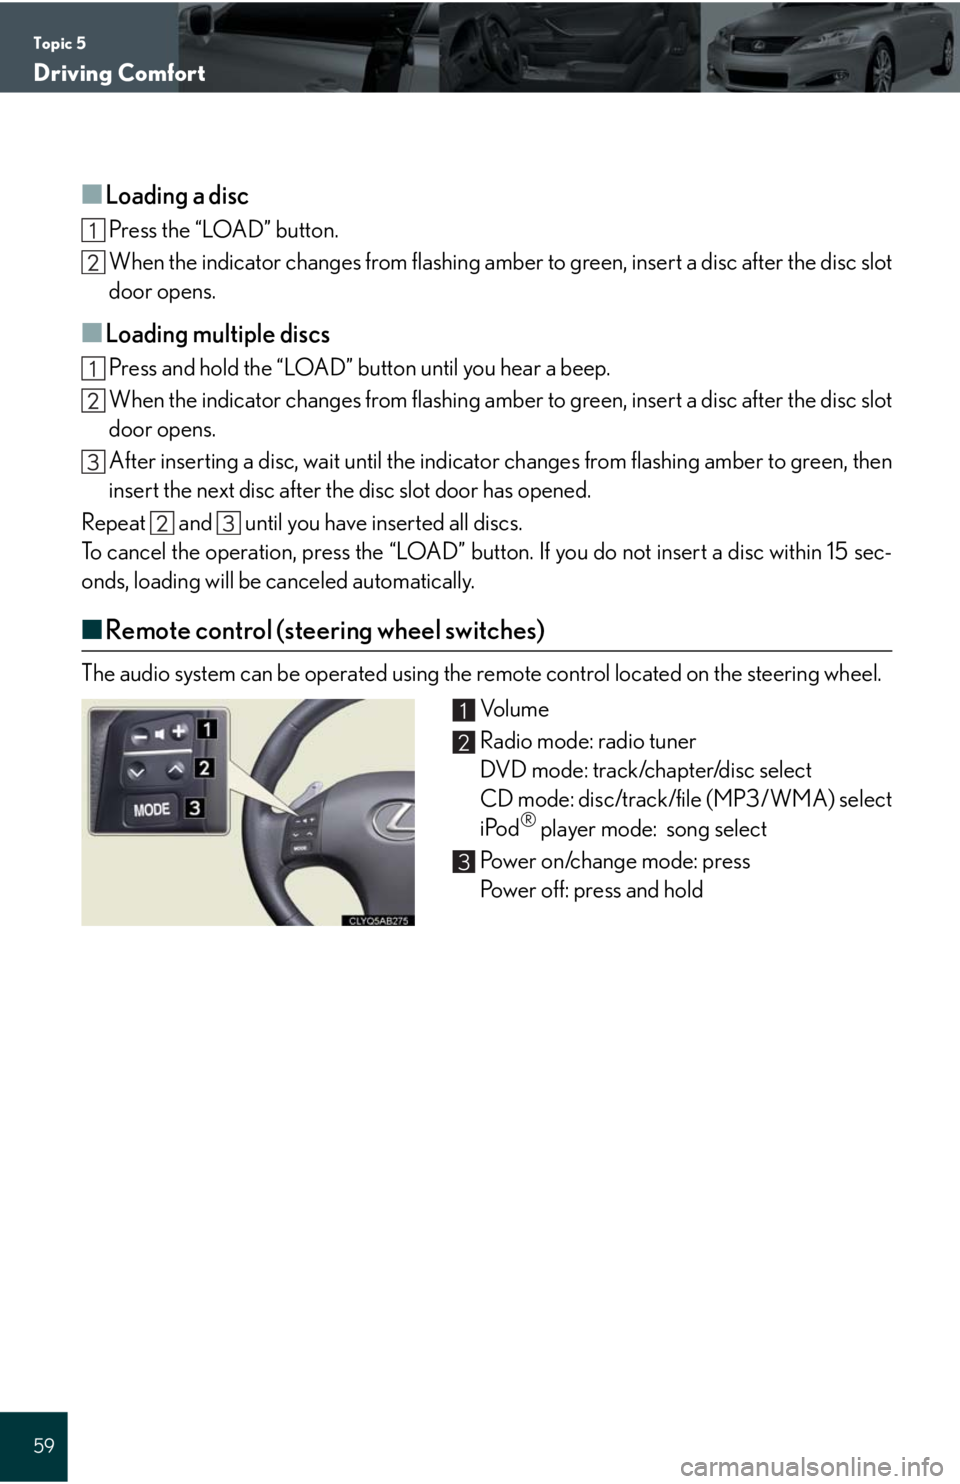
■Remote control (steering wheel switches)
The audio system can be operated using the remote control located on the steering wheel.
Vo l u m e
Radio mode: radio tuner
DVD mode: track/chapter/disc select
CD mode: disc/track/file (MP3/WMA) select
iPod
® player mode: song select
Power on/change mode: press
Power off: press and hold
1
2
3