Lexus IS250C 2010 Do-It-Yourself Maintenance / LEXUS 2010 IS350C IS250C OWNERS MANUAL (OM53A24U)
Manufacturer: LEXUS, Model Year: 2010,
Model line: IS250C,
Model: Lexus IS250C 2010
Pages: 594, PDF Size: 7.19 MB
Lexus IS250C 2010 Do-It-Yourself Maintenance / LEXUS 2010 IS350C IS250C OWNERS MANUAL (OM53A24U)
IS250C 2010
Lexus
Lexus
https://www.carmanualsonline.info/img/36/29964/w960_29964-0.png
Lexus IS250C 2010 Do-It-Yourself Maintenance / LEXUS 2010 IS350C IS250C OWNERS MANUAL (OM53A24U)
Trending: oil, fuel cap release, wiring, jump start, diagram, immobilizer, oil change
Page 521 of 594
5
When trouble arises
519
5-2. Steps to take in an emergency
NOTICE
■To avoid damaging the transmission and other components
●Avoid spinning the wheels and do not rev the engine.
●If the vehicle remains stuck after trying these procedures, the vehicle may require
towing to be freed.
Page 522 of 594

520
5-2. Steps to take in an emergency
If the retractable hardtop does not close
Unlock the trunk. (P. 4 7 )
Open the trunk fully.
If the retractable hardtop does not clos e when the switch is pressed, check
that all operating conditions are met. ( P. 8 6 )
If the retractable hardtop will not cl ose even though all operating condi-
tions have been met, there may be a malfunction. Immediately have the
vehicle inspected by your Lexus dealer.
As a temporary measure, the following procedure can be performed to
manually close the retractable hardtop.
■ Notes for manually closing the retractable hardtop
●This procedure requires 2 people.
● There is some risk of damage to the vehicle during the procedure,
such as when applying consi derable force or removing and
installing various parts. If you are unsure of how to perform this
procedure properly, it is recommended that you contact your
Lexus dealer.
● Protect your hands with gloves etc. when placing them in narrow
spaces.
● Before starting the procedure, turn the “ENGINE START STOP”
switch off.
STEP1
STEP2
Page 523 of 594
5
When trouble arises
521
5-2. Steps to take in an emergency
Pulling the yellow rings attached to
the left and right sides of the trunk,
raise the front end of the trunk lid.
Holding the parts in the same
places as those shown in the illus-
trations, lift the trunk lid and move
it as far as possible toward the rear
of the vehicle.
Performing this procedure by hold-
ing parts other than those indi-
cated may result in damage to the
vehicle or serious injury.
STEP3
STEP4
Page 524 of 594
522
5-2. Steps to take in an emergency
Remove the 2 screws and cover
from each trunk lid hinge.
Remove the bolts and brackets.STEP5
STEP6
Page 525 of 594
5
When trouble arises
523
5-2. Steps to take in an emergency
Detach the connector on each
trunk lid hinge.
Remove the bolts and connector
brackets.
Remove the 2 bolts and side pack-
age tray from each trunk lid hinge.
Support each side package tray by
hand to prevent it from falling
down.
STEP7
STEP8
STEP9
Page 526 of 594
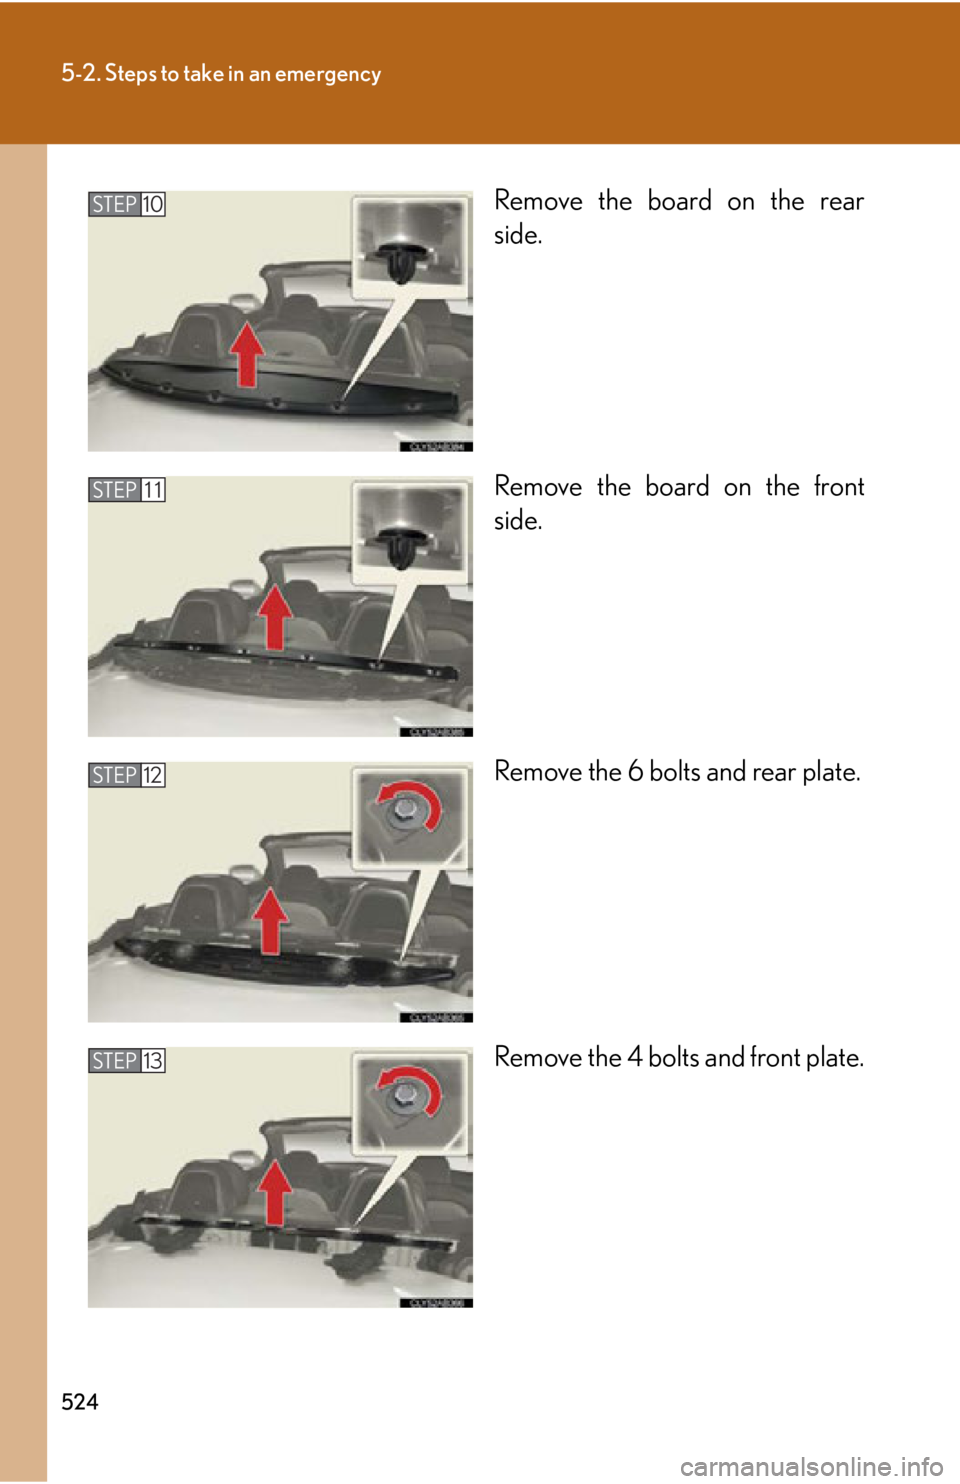
524
5-2. Steps to take in an emergency
Remove the board on the rear
side.
Remove the board on the front
side.
Remove the 6 bolts and rear plate.
Remove the 4 bolts and front plate.STEP10
STEP 11
STEP 12
STEP 13
Page 527 of 594
5
When trouble arises
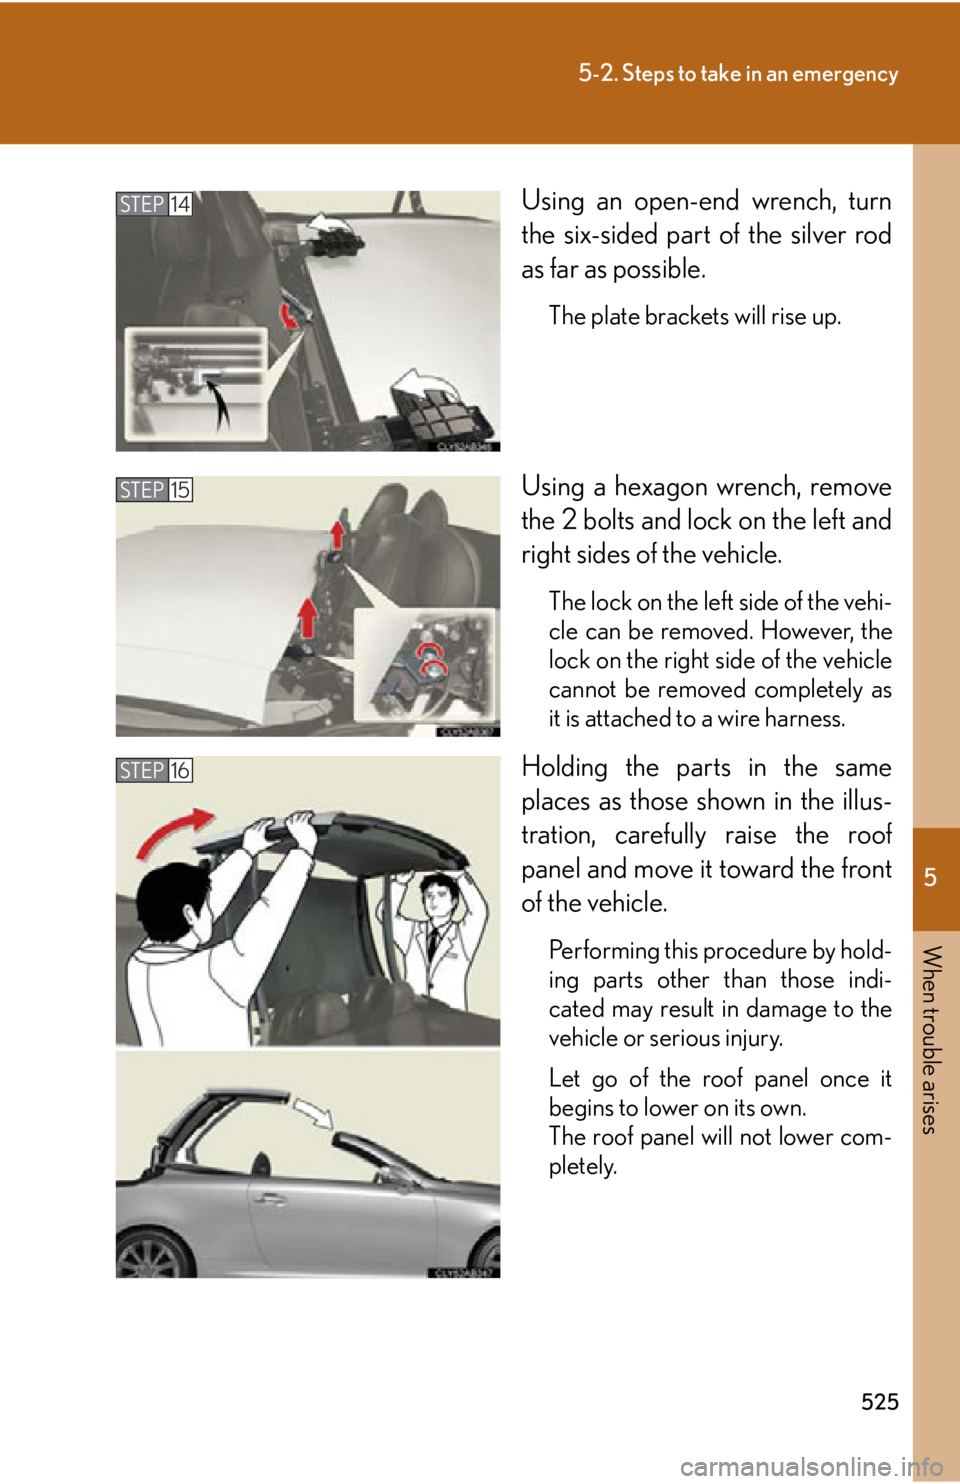
525
5-2. Steps to take in an emergency
Using an open-end wrench, turn
the six-sided part of the silver rod
as far as possible.
The plate brackets will rise up.
Using a hexagon wrench, remove
the 2 bolts and lock on the left and
right sides of the vehicle.
The lock on the left side of the vehi-
cle can be removed. However, the
lock on the right side of the vehicle
cannot be removed completely as
it is attached to a wire harness.
Holding the parts in the same
places as those shown in the illus-
tration, carefully raise the roof
panel and move it toward the front
of the vehicle.
Performing this procedure by hold-
ing parts other than those indi-
cated may result in damage to the
vehicle or serious injury.
Let go of the roof panel once it
begins to lower on its own.
The roof panel will not lower com-
pletely.
STEP 14
STEP 15
STEP 16
Page 528 of 594
526
5-2. Steps to take in an emergency
Remove the forward lock cover
located on the ceiling.
Insert the end of the hexagon
wrench and turn it counterclock-
wise as far as possible to release
the forward lock.
The roof panel will be fully lowered.
Be careful not to catch your hands
or fingers between the roof panel
and vehicle body when releasing
the lock.
Turn the hexagon wrench clock-
wise as far as possible to lock the
roof panel.
Do not forcibly turn the wrench
beyond the stopping point.
STEP 17
STEP 18
STEP 19
Page 529 of 594
5
When trouble arises
527
5-2. Steps to take in an emergency
Holding the parts in the same
places as those shown in the illus-
trations, carefully raise the rear
window panel until it comes into
contact with the roof panel.
Performing this procedure by hold-
ing parts other than those indi-
cated may result in damage to the
vehicle or serious injury.
If the rear window panel cannot be
raised, move it lightly up and down
2 or 3 times.
Be careful not to catch your hand
or fingers between the roof panel
and rear window panel.
Remove the rearward lock cover
located on the ceiling.
Insert the end of the hexagon
wrench and turn it clockwise as far
as possible to lock the rear window
panel and the roof panel.
Do not forcibly turn the wrench
beyond the stopping point.
STEP 20
STEP21
STEP22
Page 530 of 594
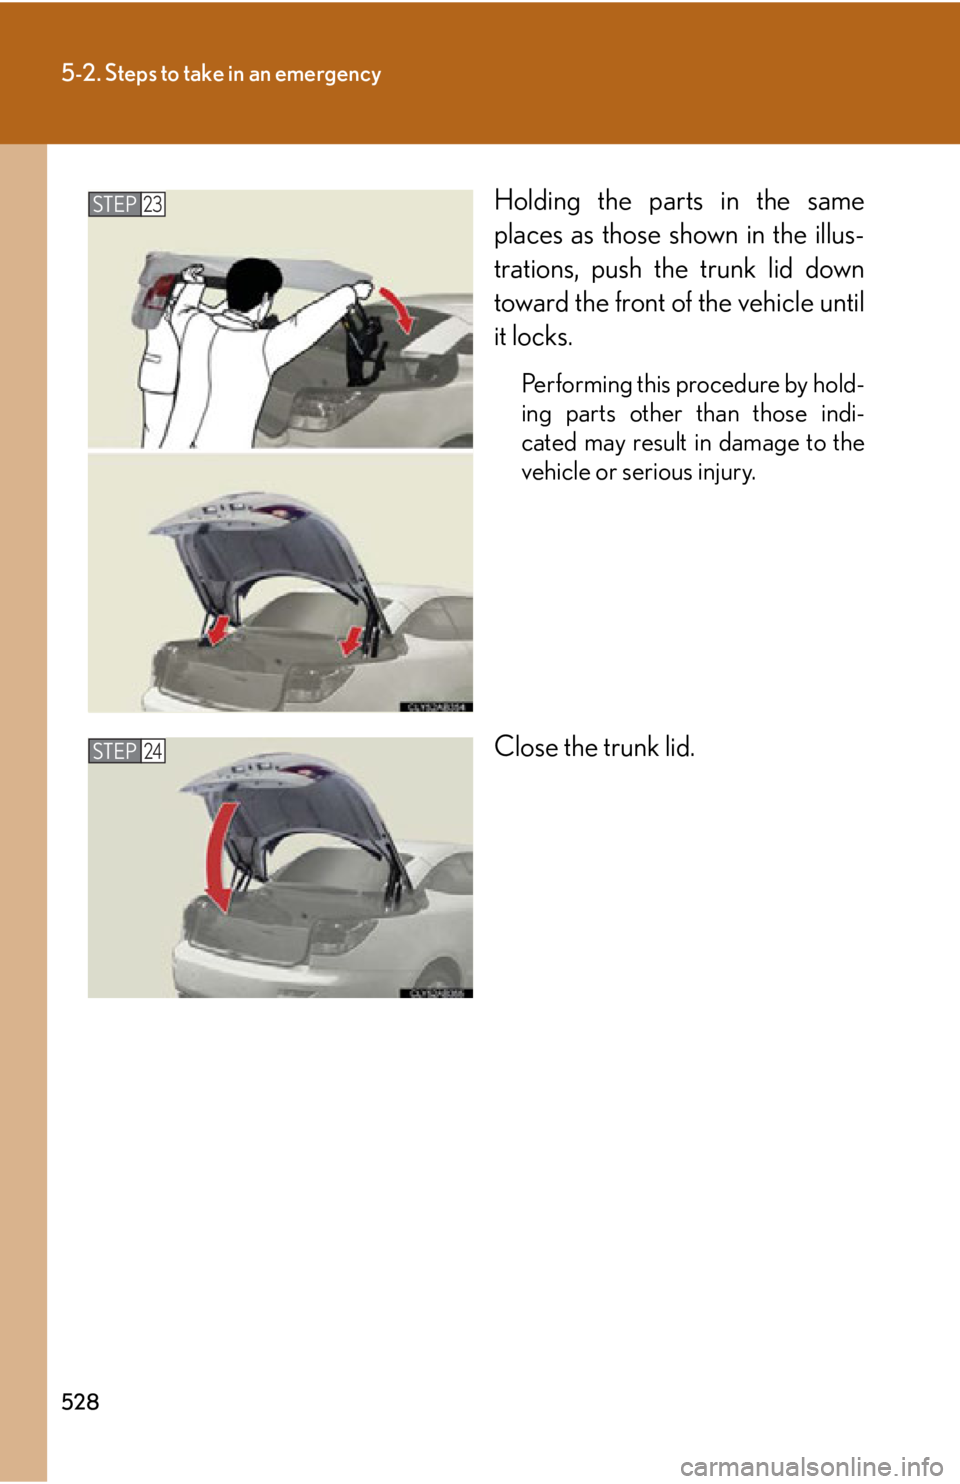
528
5-2. Steps to take in an emergency
Holding the parts in the same
places as those shown in the illus-
trations, push the trunk lid down
toward the front of the vehicle until
it locks.
Performing this procedure by hold-
ing parts other than those indi-
cated may result in damage to the
vehicle or serious injury.
Close the trunk lid.
STEP23
STEP24
Trending: seat memory, mirror, odometer, navigation, immobilizer, TPMS, belt


