Lexus IS250C 2010 Do-It-Yourself Maintenance / LEXUS 2010 IS350C IS250C (OM53A24U) Workshop Manual
IS250C 2010
Lexus
Lexus
https://www.carmanualsonline.info/img/36/29964/w960_29964-0.png
Lexus IS250C 2010 Do-It-Yourself Maintenance / LEXUS 2010 IS350C IS250C (OM53A24U) Workshop Manual
Page 455 of 594
453
4-3. Do-it-yourself maintenance
4
Maintenance and care
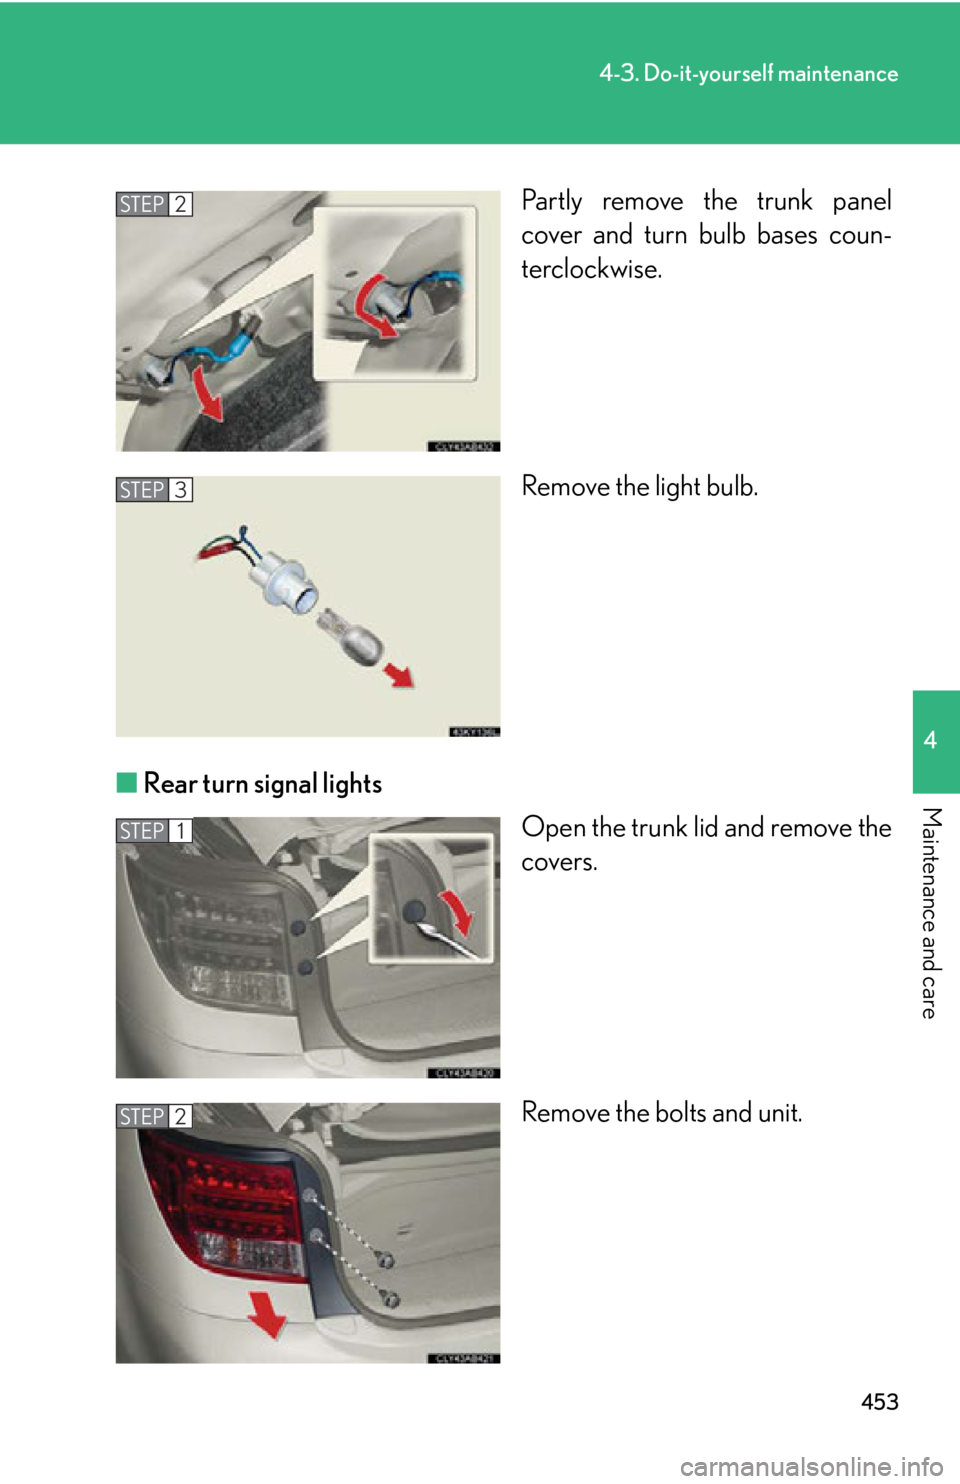
Partly remove the trunk panel
cover and turn bulb bases coun-
terclockwise.
Remove the light bulb.
■ Rear turn signal lights
Open the trunk lid and remove the
covers.
Remove the bolts and unit.STEP2
STEP3
STEP1
STEP2
Page 473 of 594

5
When trouble arises
471
5-2. Steps to take in an emergency
Follow the correction procedures.After taking the specified steps to co rrect the suspected problem, check
that the warning light turns off.
Warning lightWarning light/DetailsCorrection procedure
Open door warning light
(warning buzzer)
*1
Indicates that a door or the
trunk is not fully closed.
Check that both side doors
and the trunk are closed.
Low fuel level warning light
Remaining fuel
(Approximately 2.9 gal. [11 L,
2.4 Imp. gal.] or less)
Refuel the vehicle.
(On the instru-ment cluster)
Driver’s seat belt reminder
light (warning buzzer)
*2
Warns the driver to fasten
his/her seat belt.Fasten the seat belt.
(On the center panel)
Front passenger’s seat belt
reminder light
(warning buzzer)
*2
Warns the front passenger to
fasten his/her seat belt.
Fasten the seat belt.
Tire pressure warning light
When the light comes on:
Low tire inflation pressureAdjust the tire inflation pres-
sure.
When the light comes on after
blinking for 1 minute:
Malfunction in the tire pres-
sure warning system
Have the system checked by
your Lexus dealer.
Page 484 of 594
482
5-2. Steps to take in an emergency
Indicates that the trunk is
not fully closed. flashes and a
buzzer sounds to indi-
cate that trunk is not fully
closed (with the vehicle
having reached a speed
of 3 mph [5 km/h]).
Close the trunk.
The vehicle was driven
with the retractable hard-
top partially open.
When the vehicle speed
exceeds 1.6 mph
(3 km/h), flashes
and a buzzer will sound.
Stop the vehicle in a safe
place and open or close
the retractable hardtop
completely. ( P. 8 1 )
(Flashing)
The “ENGINE START
STOP” switch was turned
off while the retractable
hardtop was partially
open.
Open or close the retract-
able hardtop completely.
( P. 8 1 )
MessageDetailsCorrection procedure
Page 485 of 594
5
When trouble arises
483
5-2. Steps to take in an emergency
•The roof switch was operated when there
was an obstacle behind
the vehicle.
• Operation of the retractable hardtop was
suspended due to an
obstacle being detected
behind the vehicle.
When the roof switch is
pressed again within two
seconds of message
being displayed, message will be displayed.
( P. 8 1 )
The roof switch was
pressed while the trunk lid
was open.
Close the trunk lid.
The roof switch was
pressed while the trunk lid
opener main switch was
turned off.
Turn the trunk lid opener
main switch on. ( P. 4 7 )
The roof switch was
pressed while the vehicle
was moving.
( P. 8 1 )
The roof switch was
pressed while there was
not enough power.
Start the engine
MessageDetailsCorrection procedure
Page 495 of 594
5
When trouble arises
493
5-2. Steps to take in an emergency
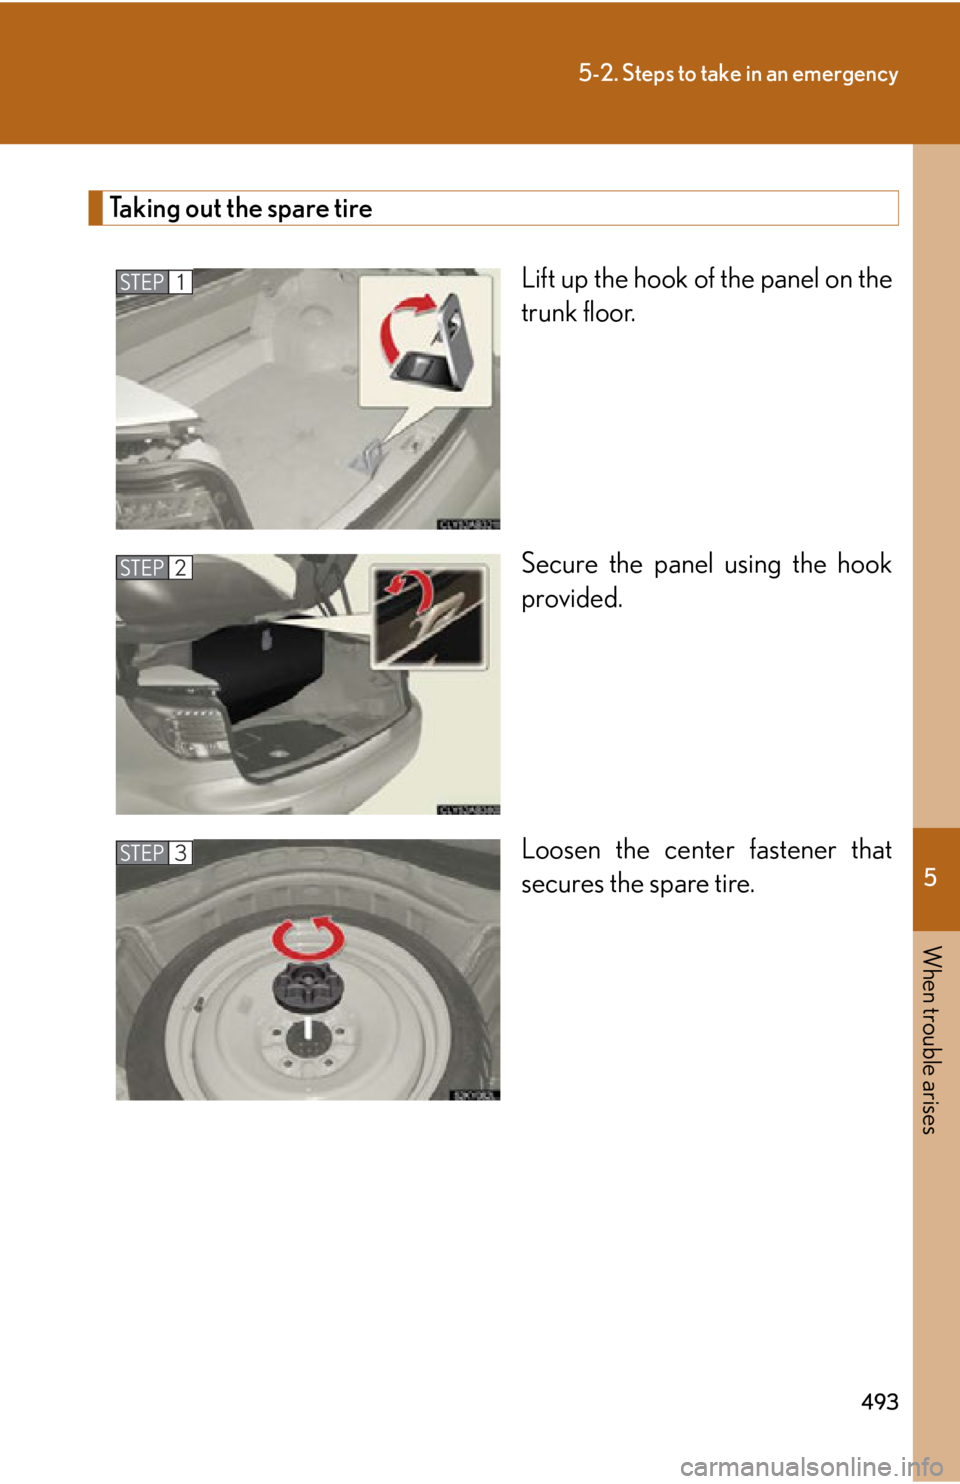
Taking out the spare tireLift up the hook of the panel on the
trunk floor.
Secure the panel using the hook
provided.
Loosen the center fastener that
secures the spare tire.
STEP1
STEP2
STEP3
Page 509 of 594
5
When trouble arises
507
5-2. Steps to take in an emergency
If the electronic key does not operate properly
Locking and unlocking the doors, unlocking the trunk and key linked functions
Doors
Remove the cover on the driver’s
door handle using the mechanical
key (P. 25) in order to perform
the following operations.
Locks both side doors
Unlocks the door
Turning the key rearward unlocks
the driver's door. Turning the key
once again unlocks the passenger’s
door.
Return the cover to the original
position after use.
If communication between the electron ic key and vehicle is interrupted
( P. 32) or the electronic key cann ot be used because the battery is
depleted, the smart access system with push-button start and wireless
remote control cannot be used. In su ch cases, the doors and trunk can be
opened or the engine can be started by following the procedure below.
Page 522 of 594

520
5-2. Steps to take in an emergency
If the retractable hardtop does not close
Unlock the trunk. (P. 4 7 )
Open the trunk fully.
If the retractable hardtop does not clos e when the switch is pressed, check
that all operating conditions are met. ( P. 8 6 )
If the retractable hardtop will not cl ose even though all operating condi-
tions have been met, there may be a malfunction. Immediately have the
vehicle inspected by your Lexus dealer.
As a temporary measure, the following procedure can be performed to
manually close the retractable hardtop.
■ Notes for manually closing the retractable hardtop
●This procedure requires 2 people.
● There is some risk of damage to the vehicle during the procedure,
such as when applying consi derable force or removing and
installing various parts. If you are unsure of how to perform this
procedure properly, it is recommended that you contact your
Lexus dealer.
● Protect your hands with gloves etc. when placing them in narrow
spaces.
● Before starting the procedure, turn the “ENGINE START STOP”
switch off.
STEP1
STEP2
Page 523 of 594
5
When trouble arises
521
5-2. Steps to take in an emergency
Pulling the yellow rings attached to
the left and right sides of the trunk,
raise the front end of the trunk lid.
Holding the parts in the same
places as those shown in the illus-
trations, lift the trunk lid and move
it as far as possible toward the rear
of the vehicle.
Performing this procedure by hold-
ing parts other than those indi-
cated may result in damage to the
vehicle or serious injury.
STEP3
STEP4
Page 524 of 594
522
5-2. Steps to take in an emergency
Remove the 2 screws and cover
from each trunk lid hinge.
Remove the bolts and brackets.STEP5
STEP6
Page 525 of 594
5
When trouble arises
523
5-2. Steps to take in an emergency
Detach the connector on each
trunk lid hinge.
Remove the bolts and connector
brackets.
Remove the 2 bolts and side pack-
age tray from each trunk lid hinge.
Support each side package tray by
hand to prevent it from falling
down.
STEP7
STEP8
STEP9


