start Lexus IS250C 2010 Manual PDF
[x] Cancel search | Manufacturer: LEXUS, Model Year: 2010, Model line: IS250C, Model: Lexus IS250C 2010Pages: 586, PDF Size: 31.62 MB
Page 315 of 586

314
3-4. Using the hands-free phone system (for mobile phones)
10_IS250C/350C_U
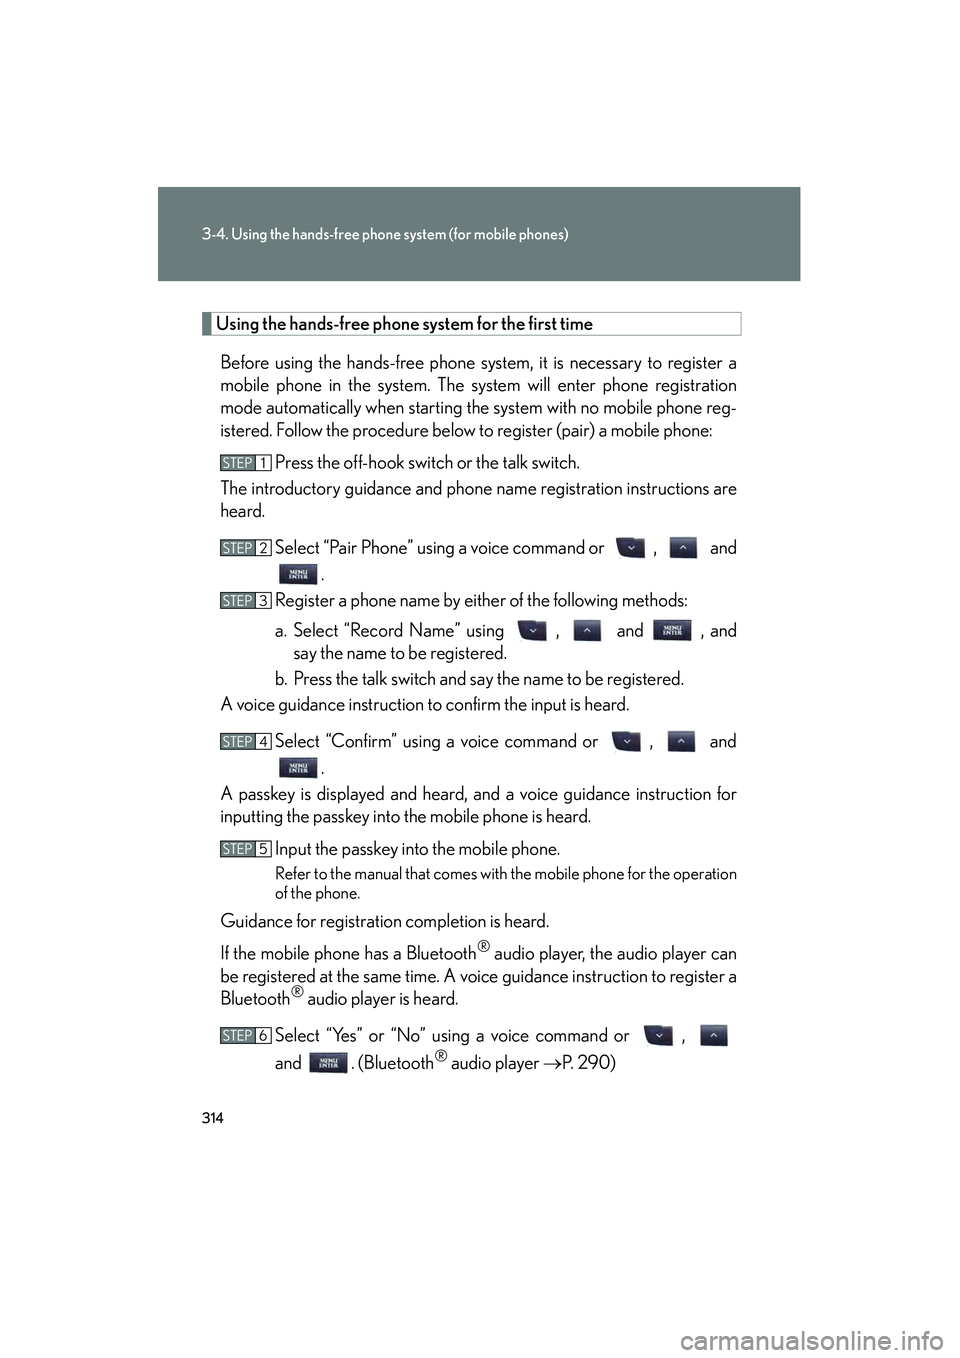
Using the hands-free phone system for the first timeBefore using the hands-free phone system, it is necessary to register a
mobile phone in the system. The system will enter phone registration
mode automatically when starting the system with no mobile phone reg-
istered. Follow the procedure below to register (pair) a mobile phone: Press the off-hook switch or the talk switch.
The introductory guidance and phone name registration instructions are
heard.
Select “Pair Phone” using a voice command or , and.
Register a phone name by either of the following methods:
a. Select “Record Name” using , and , and say the name to be registered.
b. Press the talk switch and say the name to be registered.
A voice guidance instruction to confirm the input is heard.
Select “Confirm” using a voice command or , and.
A passkey is displayed and heard, and a voice guidance instruction for
inputting the passkey into the mobile phone is heard.
Input the passkey into the mobile phone.
Refer to the manual that comes with the mobile phone for the operation
of the phone.
Guidance for registration completion is heard.
If the mobile phone has a Bluetooth
® audio player, the audio player can
be registered at the same time. A voice guidance instruction to register a
Bluetooth
® audio player is heard.
Select “Yes” or “No” using a voice command or ,
and . (Bluetooth
® audio player →P. 2 9 0 )
STEP1
STEP2
STEP3
STEP4
STEP5
STEP6
Page 339 of 586

338
10_IS250C/350C_U
3-5. Using the interior lights
Interior lights list
Your Lexus is equipped with the illuminated entry system to assist in enter-
ing the vehicle. Owing to the function of the system, the lights shown in the
following illustration automatically turn on/off according to the presence of
the electronic key, whether the door s are locked/unlocked, whether the
doors are opened/closed, and the “ENGINE START STOP” switch mode.
Personal lights (→P. 3 3 9 )
Interior light ( →P. 3 3 9 )
Shift lever light (when “ENGINE START STOP” switch is in
ACCESSORY or IGNITION ON mode)
Door courtesy lights
Scuff lights (if equipped)
Front foot well lights
Outer foot lights
Turning the instrument panel light control knob fully to the left disables the
shift lever light and front foot well lights.
Page 342 of 586

341
3-6. Using the storage features
3
Interior features
10_IS250C/350C_U
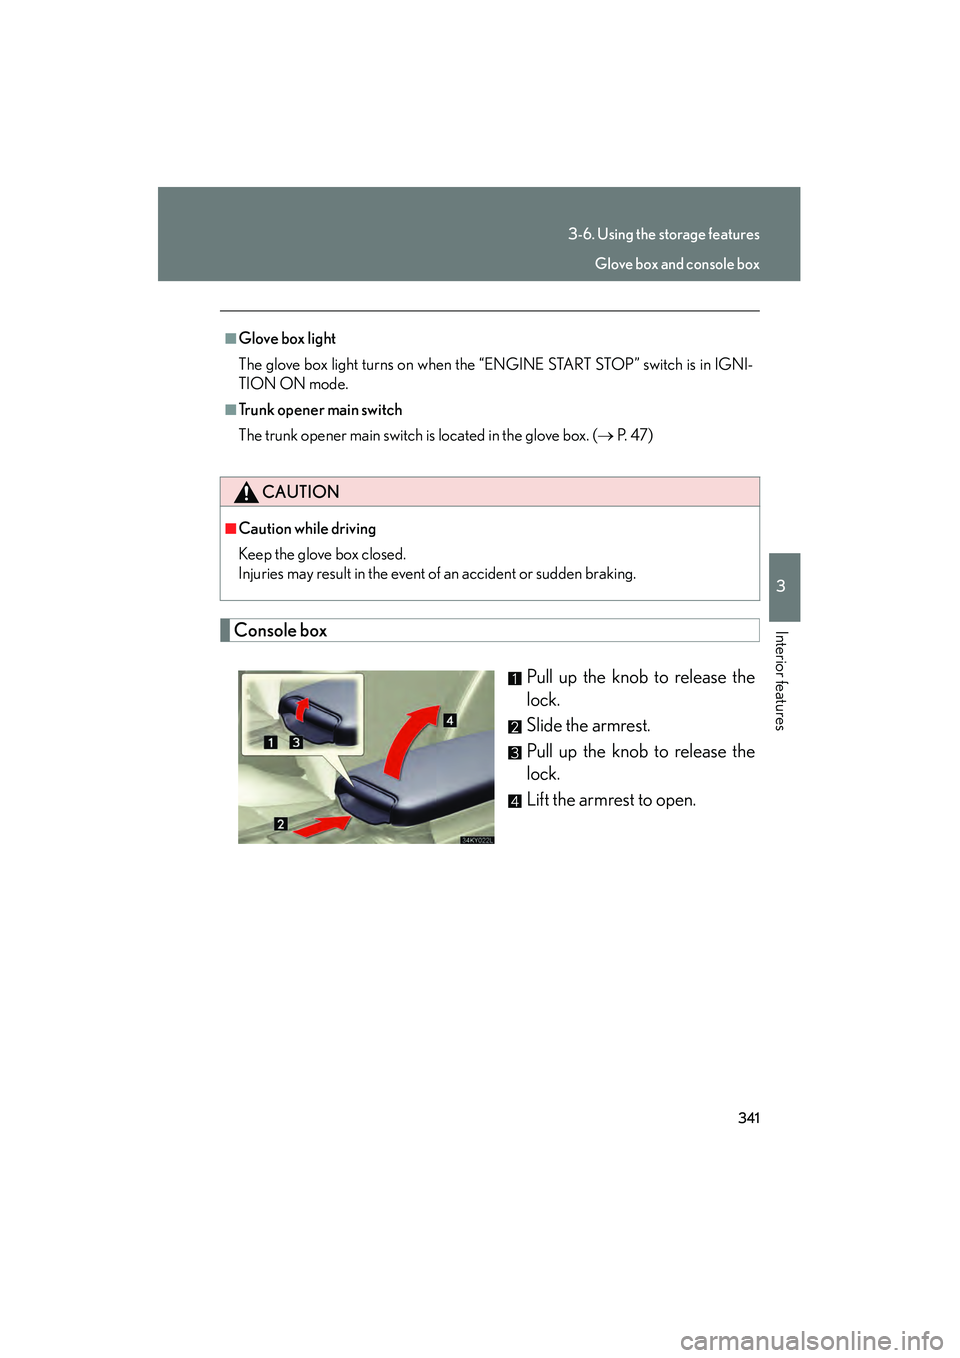
Console boxPull up the knob to release the
lock.
Slide the armrest.
Pull up the knob to release the
lock.
Lift the armrest to open.
■Glove box light
The glove box light turns on when the “ENGINE START STOP” switch is in IGNI-
TION ON mode.
■Trunk opener main switch
The trunk opener main switch is located in the glove box. ( → P. 4 7 )
CAUTION
■Caution while driving
Keep the glove box closed.
Injuries may result in the event of an accident or sudden braking.
Glove box and console box
Page 343 of 586

342
3-6. Using the storage features
10_IS250C/350C_U
■Console box light
The console box light turn on when the “ENGINE START STOP” switch is in IGNI-
TION ON mode.
■Using the console box to store CD cases
CAUTION
■Caution while driving
Keep the console box closed.
Injuries may result in the event of an accident or sudden braking.
Store a CD case with the hinged portion fac-
ing either the front or back of the console
box.
Console box
Page 349 of 586

348
3-7. Other interior features
10_IS250C/350C_U
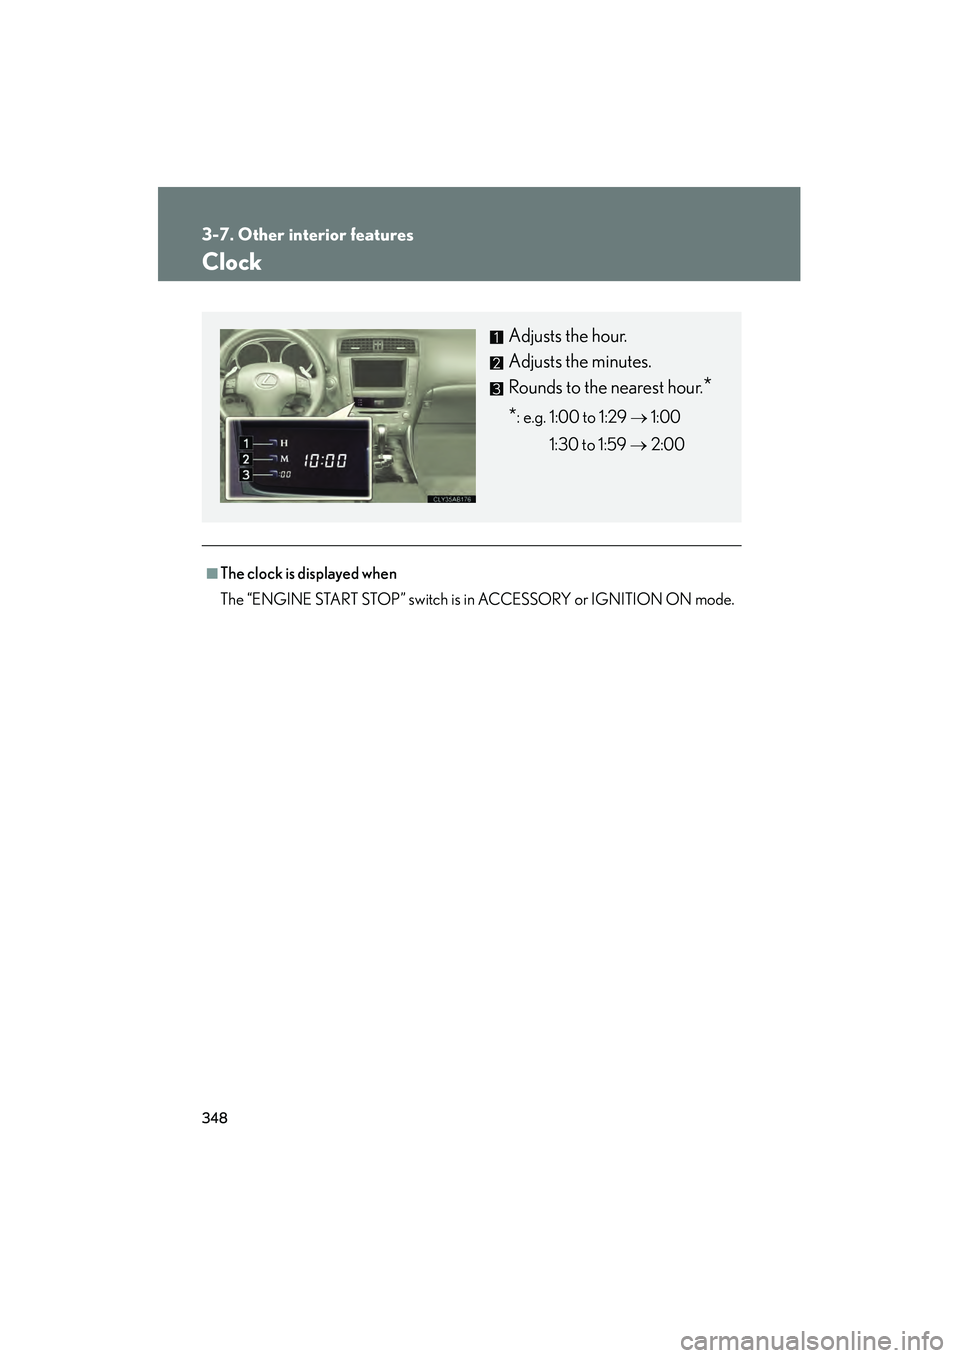
Clock
■The clock is displayed when
The “ENGINE START STOP” switch is in ACCESSORY or IGNITION ON mode.
Adjusts the hour.
Adjusts the minutes.
Rounds to the nearest hour.
*
*: e.g. 1:00 to 1:29 → 1:00
1:30 to 1:59 → 2:00
Page 352 of 586

351
3-7. Other interior features
3
Interior features
10_IS250C/350C_U
■Changing the settings
Each item is displayed and its setting can be changed only in the following condi-
tions:
●Intuitive parking assist: When the “ENGINE START STOP” switch is in IGNI-
TION ON mode.
●Items other than the above: When the “ENGINE START STOP” switch is in
IGNITION ON mode and the vehicle is stopped.
■Display
The display will return to the original display if the satellite switches are not oper-
ated for an extended period.
Even if the display is in satellite switch mode, it will switch in the event of a warning
or when the radar cruise control (if equipped) is used. If this occurs, press any of the
satellite switches or “DISP” switch on the steering wheel to return the display to sat-
ellite switch mode.
Page 354 of 586

353
3-7. Other interior features
3
Interior features
10_IS250C/350C_U
Cigarette lighter
■The cigarette lighter can be used when
The “ENGINE START STOP” switch is in ACCESSORY or IGNITION ON mode.
CAUTION
■When not in use
Keep the lid closed.
Injuries may result in the event of an accident or sudden braking.
■To avoid burns or fires
●Do not touch the metal parts of the cigarette lighter.
●Do not hold the cigarette lighter down. It could overheat and cause a fire.
●Do not insert anything other than the cigarette lighter into the outlet.
Push the back part of the lid to
open, and push the cigarette
lighter down.
The cigarette lighter will pop up
when it is ready for use.
Page 355 of 586

354
3-7. Other interior features
10_IS250C/350C_U
Power outlet
■The power outlet can be used when
The “ENGINE START STOP” switch is in ACCESSORY or IGNITION ON mode.
NOTICE
■To avoid damaging the power outlet
Close the power outlet lid when the power outlet is not in use.
Foreign objects or liquids that enter the power outlet may cause a short circuit.
■To prevent the fuse from being blown
Do not use an accessory that uses more than 12 V 10 A.
■To prevent the battery from being discharged
Do not use the power outlet longer than necessary when the engine is off.
The power outlet can be used for 12 V accessories that run on less than 10
A.
Page 357 of 586

356
3-7. Other interior features
10_IS250C/350C_U
■The seat heaters and ventilators can be used when
The “ENGINE START STOP” switch is in IGNITION ON mode.
■When not in use
Set the dial to “0”. The indicator light turns off.
Vehicles with a manual transmissionHeats the seats
The indicator light (amber)
comes on.
The higher the number, the
warmer the seats become.
Blows air from the seats
The indicator light (green)
comes on.
The higher the number, the
stronger the airflow becomes.
Driver’s
seatFront
passenger’s
seat
Page 365 of 586

364
3-7. Other interior features
10_IS250C/350C_U■
Programming a Rolling Code system (for U.S.A. owners)
If your device is Rolling Code equipped, follow the steps under the
heading “Programming the HomeLink
” before proceeding with the
steps listed below.
Locate the training button on the ceiling mounted garage door
opener motor. The exact location and color of the button may
vary by brand of garage door opener motor.
Refer to the operation manual supplied with the garage door opener
motor for the location of the training button.
Press the training button.
Following this step, you have 30 seconds in which to initiate step 3
below.
Press and hold the vehicle's programmed HomeLink button for
2 seconds and release it. Repeat this step once again. The garage
door may open.
If the garage door opens, the programming process is complete. If the
door does not open, press and release the button a third time. This third
press and release will complete the programming process by opening
the garage door.
The ceiling mounted garage door op ener motor should now recognize
the HomeLink
signal and operate the garage door.
Repeat the steps above to program another rolling code system
for any of the remaining HomeLink buttons.
■ Programming an entry gate (for U.S.A. owners)/Programming all
devices in the Canadian market
Place your transmitter 1 to 3 in. (25 to 75 mm) away from the sur-
face of the HomeLink
.
Keep the HomeLink indicator light in view while programming.
Press and hold the selected HomeLink button.
Repeatedly press and release (cycle) the device’s remote control
button for two seconds each until step 4 is complete.
When the indicator light on the HomeLink
compatible trans-
ceiver start to flashing rapidly, release the buttons.
STEP1
STEP2
STEP3
STEP4
STEP1
STEP2
STEP3
STEP4