remote control Lexus IS250C 2012 Instrument cluster / LEXUS 2012 IS250C,IS350C (OM53A62U) User Guide
[x] Cancel search | Manufacturer: LEXUS, Model Year: 2012, Model line: IS250C, Model: Lexus IS250C 2012Pages: 632, PDF Size: 6.77 MB
Page 47 of 632
47
1
1-2. Opening, closing and locking the doors and trunk
Before driving
Doors
The vehicle can be locked and unlocked using the entry function, wireless
remote control or door lock switch.
■Entry function
P. 3 3
■ Wireless remote control
P. 4 4
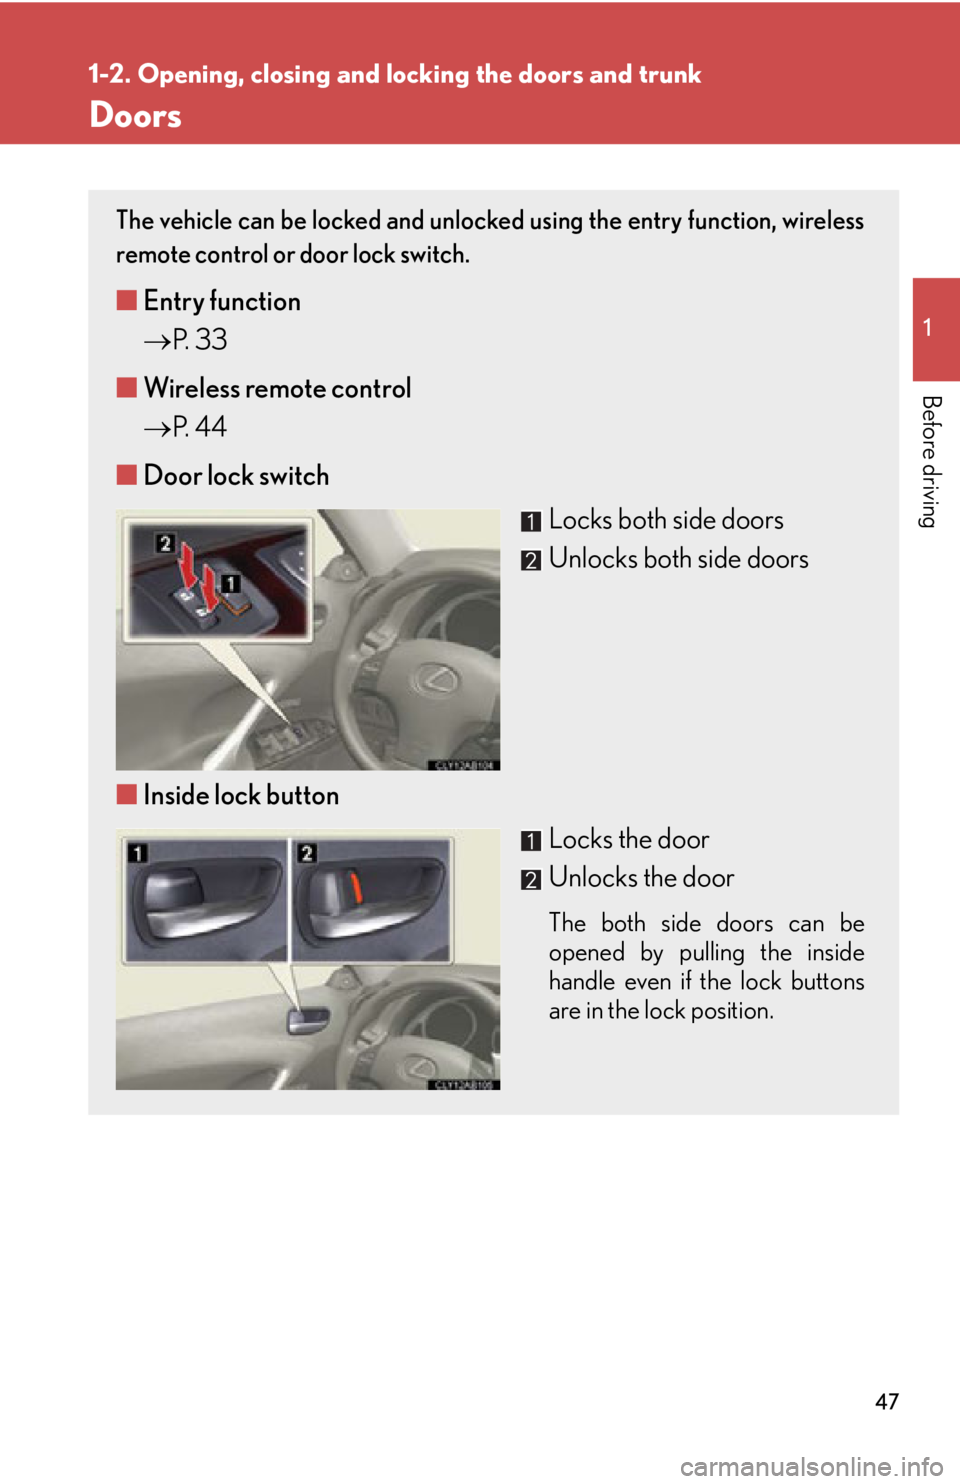
■ Door lock switch
Locks both side doors
Unlocks both side doors
■ Inside lock button
Locks the door
Unlocks the door
The both side doors can be
opened by pulling the inside
handle even if the lock buttons
are in the lock position.
Page 51 of 632

51
1
1-2. Opening, closing and locking the doors and trunk
Before driving
Tr u n k
Locking the trunk opener feature
Turn the trunk opener main switch
in the glove box off to disable the
trunk opener.On
Off
The trunk lid cannot be opened
even with the wireless remote con-
trol or the entry function.
The trunk can be opened using the trun k opener, entry function or wireless
remote control.
■ Opening the trunk from inside the vehicle
Press the opener switch.
■ Opening the trunk from outside the vehicle
Entry function
P. 3 3
Wireless remote control
P. 4 4
Page 62 of 632
62
1-3. Adjustable components (seats, mirrors, steering wheel)
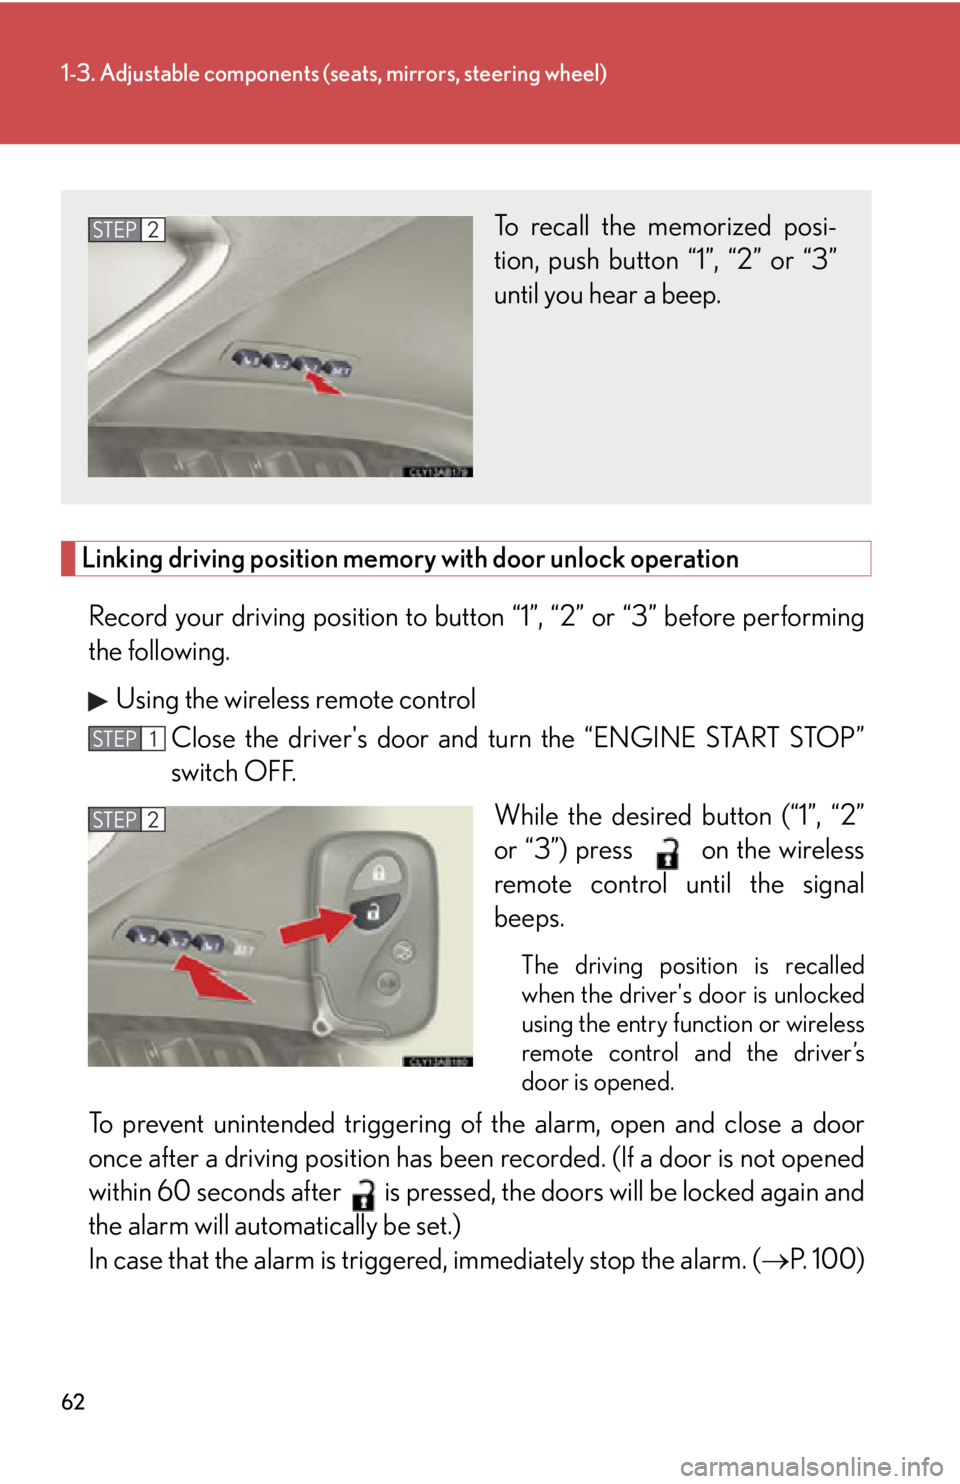
Linking driving position memory with door unlock operation
Record your driving position to butto n “1”, “2” or “3” before performing
the following.
Using the wireless remote control Close the driver's door and turn the “ENGINE START STOP”
switch OFF.
While the desired button (“1”, “2”
or “3”) press on the wireless
remote control until the signal
beeps.
The driving position is recalled
when the driver's door is unlocked
using the entry function or wireless
remote control and the driver’s
door is opened.
To prevent unintended triggering of the alarm, open and close a door
once after a driving posit ion has been recorded. (If a door is not opened
within 60 seconds after is pressed, th e doors will be locked again and
the alarm will automatically be set.)
In case that the alarm is triggered , immediately stop the alarm. (P. 100)
To recall the memorized posi-
tion, push button “1”, “2” or “3”
until you hear a beep. STEP2
STEP1
STEP2
Page 63 of 632

63
1-3. Adjustable components (seats, mirrors, steering wheel)
1
Before driving
Using the door lock switch
Carry only the key (including the card key
) to which you want to link
the driving position. If 2 or more keys are in the vehicle, the driving
position cannot be linked properly.
Close the driver's door and turn the “ENGINE START STOP”
switch OFF. While pressing the desired button
(“1”, “2” or “3”), press the lock or
unlock side on the driver’s door
lock switch until the signal beeps.
The driving position is recalled
when the driver's door is unlocked
using the entry function or wireless
remote control and the driver's
door is opened.
: If equipped
STEP1
STEP2
Page 64 of 632

64
1-3. Adjustable components (seats, mirrors, steering wheel)
■Canceling the linked door unlock operation
Close the driver's door and turn the “ENGINE START STOP” switch
OFF.
Using the wireless remote control: While pushing the “SET” button, press
on the wireless remote control until the signal beeps.
Using the door lock switch: While pressing the “SET” button, press the
lock or unlock side on the door lock switch until the signal beeps.
■Operating the driving position memory after turning the “ENGINE START
STOP” switch OFF
Memorized positions (except for the steering wheel positions) can be activated up
to 180 seconds after the driver's door is opened and another 60 seconds after it is
closed again, even after turning the “ENGINE START STOP” switch OFF.
■To cancel seat position recall
Perform any of the following operations.
●Push the “SET” button.
●Push button “1”, “2” or “3”.
●Adjust the seat using the switches (only cancels seat position recall).
■If the battery is disconnected
The memorized positions are erased when the battery is disconnected.
CAUTION
■Seat adjustment caution
Take care during seat adjustment that the seat does not strike the rear passenger or
child restraint system, or squeeze your body against the steering wheel.
STEP1
STEP2
Page 83 of 632

83
1-4. Opening and closing the windows and retractable hardtop
1
Before driving
Lock switchPress the switch down to lock the
passenger window switches.
Use this switch to prevent children
from accidentally opening or clos-
ing a passenger window.
■The power windows can be operated when
The “ENGINE START STOP” switch is in IGNITION ON mode.
■Door lock linked window operation
The power windows can be opened using the wireless remote control. ( P. 44)
■Front side window open/close function linked to rear side window operation
When a rear side window is opened, the adjacent front side window will also open
slightly. The front side window cannot be closed completely while the rear side win-
dow is open.
■Operating the power windows after turning the “ENGINE START STOP” switch
OFF
The power windows can be operated for ap proximately 45 seconds even after the
“ENGINE START STOP” switch is switched to ACCESSORY mode or turned
OFF. They cannot, however, be operated once either side door is opened.
■Jam protection function (front windows)
If an object becomes caught between the window and the body, window travel is
stopped and the window is opened slightly.
Page 310 of 632
310
3-3. Using the Bluetooth® audio system
■When transferring ownership of the vehicle
Be sure to initialize the system to prevent personal data from being improperly
accessed. ( P. 3 5 1 )
■About Bluetooth®
■Compatible models
●Bluetooth® specifications:
Ver. 1.1, or higher (Recommended: Ver. 1.2 or higher)
●Following profiles:
• A2DP (Advanced Audio Distribution Profil e) Ver. 1.0, or higher (Conformed:
Ve r. 1 . 2 )
• AVRCP (Audio/Video Remote Control Profile) Ver. 1.0 or higher (Con-
formed: Ver. 1.3)
Portable players must correspond to the above specifications in order to be con-
nected to the Bluetooth
® audio system. However, please note that some functions
may be limited depending on the type of portable player.
■Certification for the Bluetooth® audio system
FCC ID: AJDK018
IC ID: 775E-K018
MADE IN JAPAN
This device complies with Part 15 of the FCC Rules and RSS-Gen and RSS-210 of
IC Rules. Operation is subject to the following two conditions: (1) This device may
not cause harmful interference, and (2) This device must accept any interference
received, including interference th at may cause undesired operation.
Bluetooth is a registered trademark of
Bluetooth SIG. Inc.
Page 384 of 632
384
3-7. Other interior features
Garage door opener
The garage door opener (HomeLink Universal Transceiver) is manufactured
under license from HomeLink.
Programming the HomeLink (for U.S.A. owners)
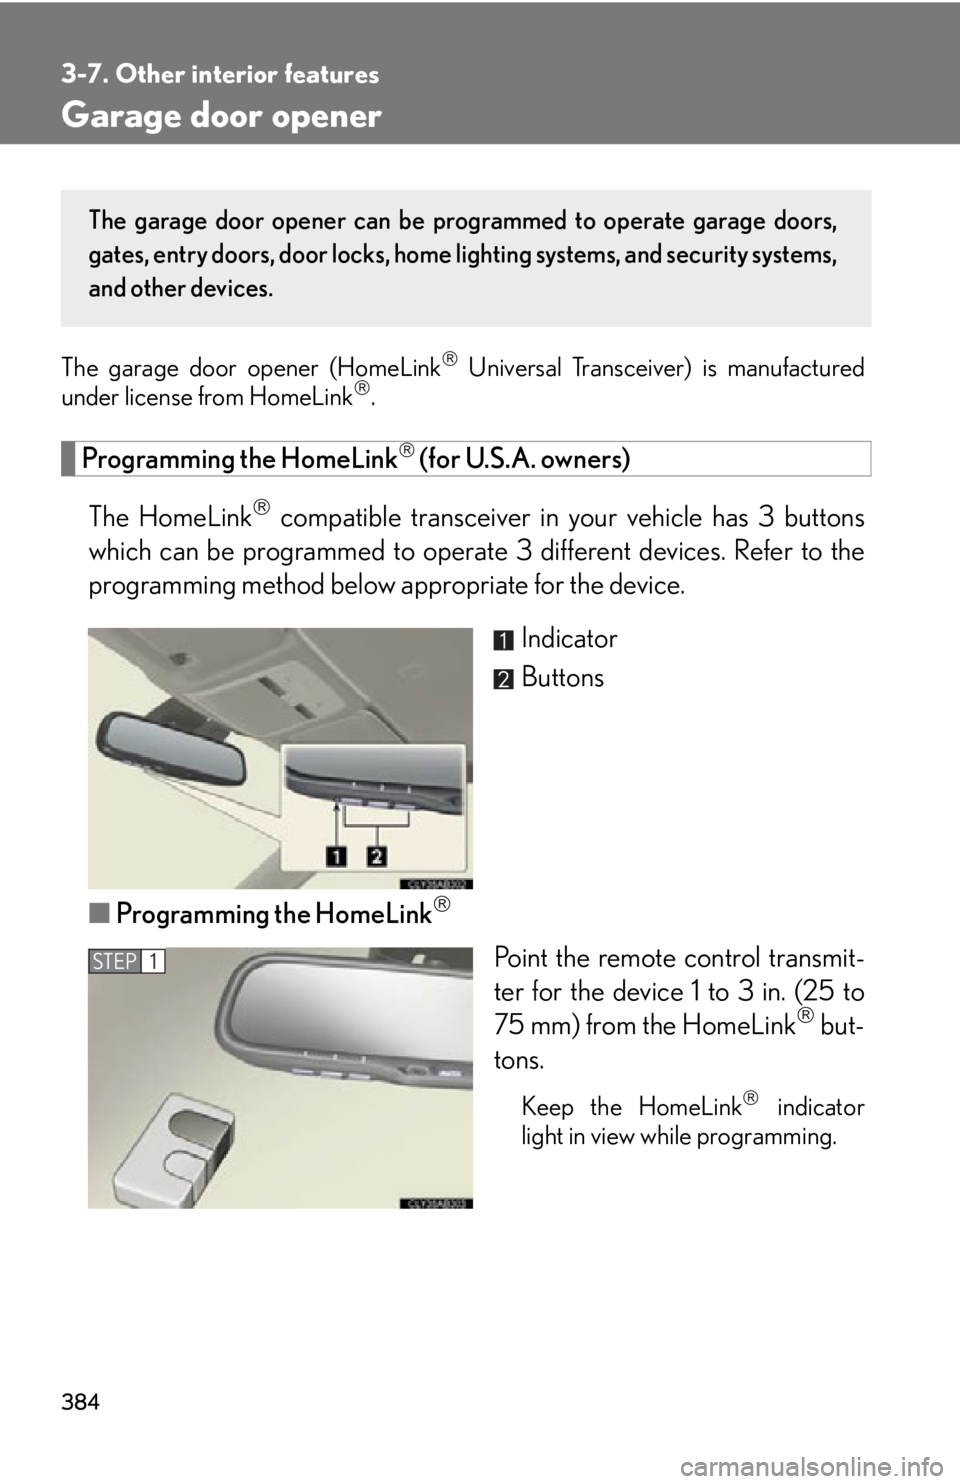
The HomeLink
compatible transceiver in your vehicle has 3 buttons
which can be programmed to operate 3 different devices. Refer to the
programming method below appropriate for the device.
Indicator
Buttons
■ Programming the HomeLink
Point the remote control transmit-
ter for the device 1 to 3 in. (25 to
75 mm) from the HomeLink
but-
tons.
Keep the HomeLinkindicator
light in view while programming.
The garage door opener can be pr ogrammed to operate garage doors,
gates, entry doors, door locks, home lighting systems, and security systems,
and other devices.
STEP1
Page 385 of 632
385
3-7. Other interior features
3
Interior features
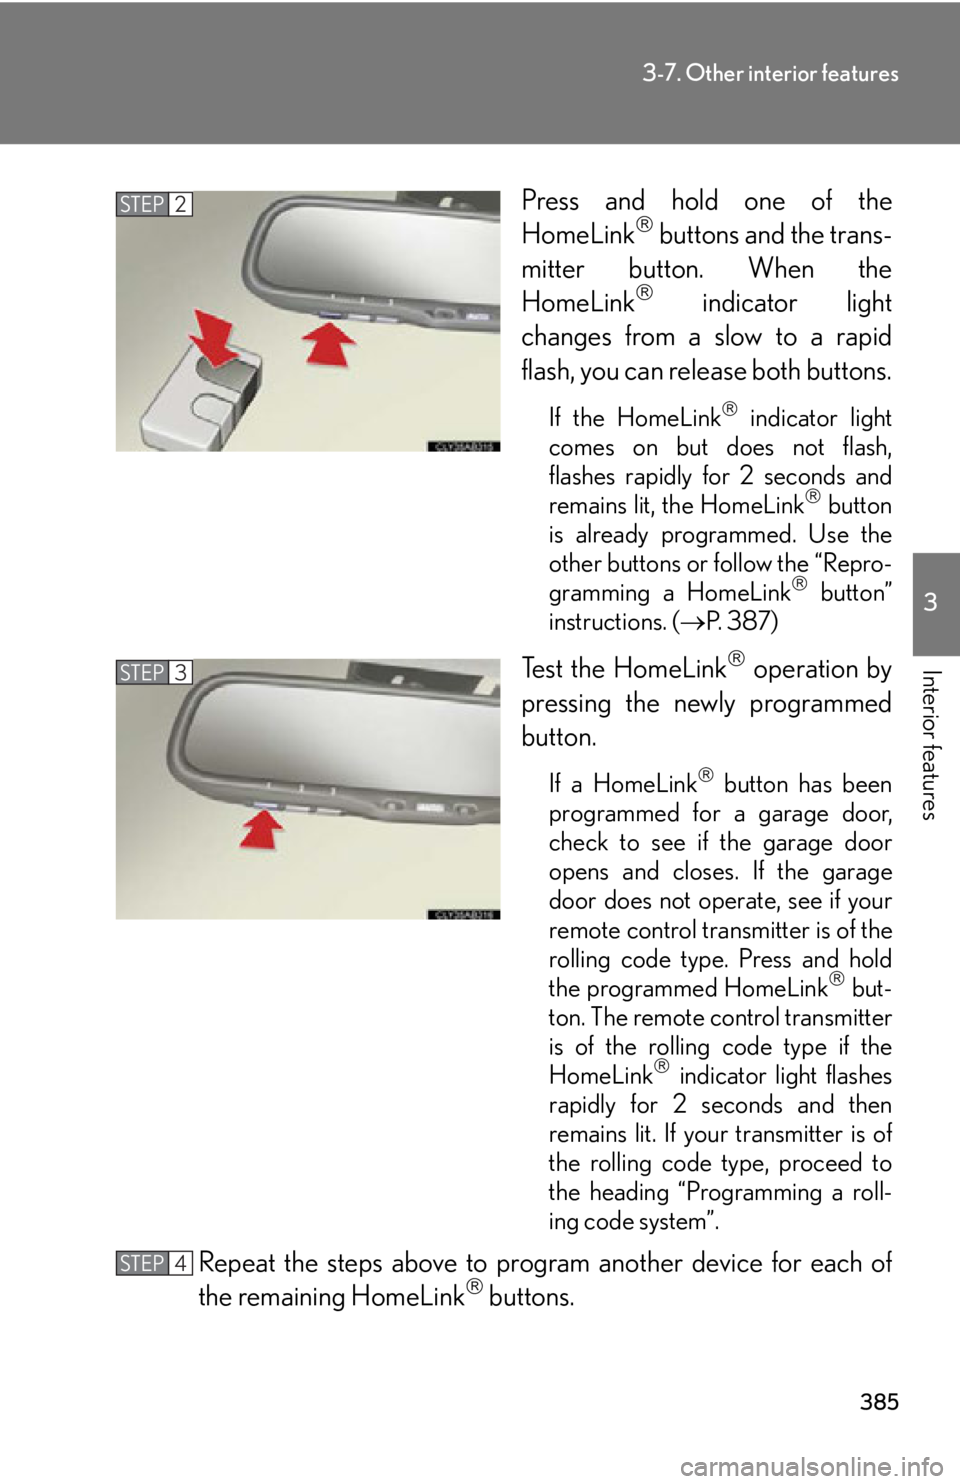
Press and hold one of the
HomeLink buttons and the trans-
mitter button. When the
HomeLink
indicator light
changes from a slow to a rapid
flash, you can release both buttons.
If the HomeLink indicator light
comes on but does not flash,
flashes rapidly for 2 seconds and
remains lit, the HomeLink
button
is already programmed. Use the
other buttons or follow the “Repro-
gramming a HomeLink
button”
instructions. ( P. 3 8 7 )
Test the HomeLink operation by
pressing the newly programmed
button.
If a HomeLink button has been
programmed for a garage door,
check to see if the garage door
opens and closes. If the garage
door does not operate, see if your
remote control transmitter is of the
rolling code type. Press and hold
the programmed HomeLink
but-
ton. The remote control transmitter
is of the rolling code type if the
HomeLink
indicator light flashes
rapidly for 2 seconds and then
remains lit. If your transmitter is of
the rolling code type, proceed to
the heading “Programming a roll-
ing code system”.
Repeat the steps above to program another device for each of
the remaining HomeLink buttons.
STEP2
STEP3
STEP4
Page 386 of 632

386
3-7. Other interior features
■Programming a Rolling Code system (for U.S.A. owners)
If your device is Rolling Code eq uipped, follow the steps under the
heading “Programming the HomeLink
” before proceeding with the
steps listed below.
Locate the learn button on th e ceiling mounted garage door
opener motor. The exact location and color of the button may
vary by brand of garage door opener motor.
Refer to the operation manual supplied with the garage door opener
motor for the location of the learn button.
Press the learn button.
Following this step, you have 30 se conds in which to initiate step 3
below.
Press and hold the vehicle's programmed HomeLink button for
2 seconds and release it. Repeat this step once again. The garage
door may open.
If the garage door opens, the programming process is complete. If the
door does not open, press and release the button a third time. This third
press and release will complete the programming process by opening
the garage door.
The ceiling mounted garage door op ener motor should now recognize
the HomeLink
signal and operate the garage door.
Repeat the steps above to prog ram another rolling code system
for any of the remaining HomeLink buttons.
■ Programming an entry gate (for U .S.A. owners)/Programming all
devices in the Canadian market
Place your transmitter 1 to 3 in. (25 to 75 mm) away from the sur-
face of the HomeLink
.
Keep the HomeLink indicator light in view while programming.
Press and hold the selected HomeLink button.
Repeatedly press and release (cyc le) the device’s remote control
button for two seconds each until step 4 is complete.
When the indicator light on the HomeLink
compatible trans-
ceiver start to flashing rapidly, release the buttons.
STEP1
STEP2
STEP3
STEP4
STEP1
STEP2
STEP3
STEP4