ESP Lexus IS250C 2012 Instrument cluster / LEXUS 2012 IS250C,IS350C (OM53A62U) Service Manual
[x] Cancel search | Manufacturer: LEXUS, Model Year: 2012, Model line: IS250C, Model: Lexus IS250C 2012Pages: 632, PDF Size: 6.77 MB
Page 511 of 632

5
When trouble arises
511
5-2. Steps to take in an emergency
(U.S.A. only)
Indicates that all mainte-
nance according to the
driven distance on the
maintenance schedule*
should be performed
soon.
If necessary, perform
maintenance.
Comes on approximately
4500 miles (7200 km)
after the maintenance
data has been reset.
(U.S.A. only)
Indicates that all mainte-
nance is required to cor-
respond to the driven
distance on the mainte-
nance schedule*.
Perform the necessary
maintenance. Please reset
the maintenance data
after the maintenance is
performed (P. 411)
Comes on approximately
5000 miles (8000 km)
after the maintenance
data has been reset.
(The indicator will not
work properly unless the
maintenance data has
been reset.)
(Flashing)
(If equipped)
Indicates that the pre-
collision system is not
currently functional.• Clean the grille and the sensor.
• Wait until the pre-colli- sion system cools down.
MessageDetailsCorrection procedure
Page 588 of 632

588
6-1. Specifications
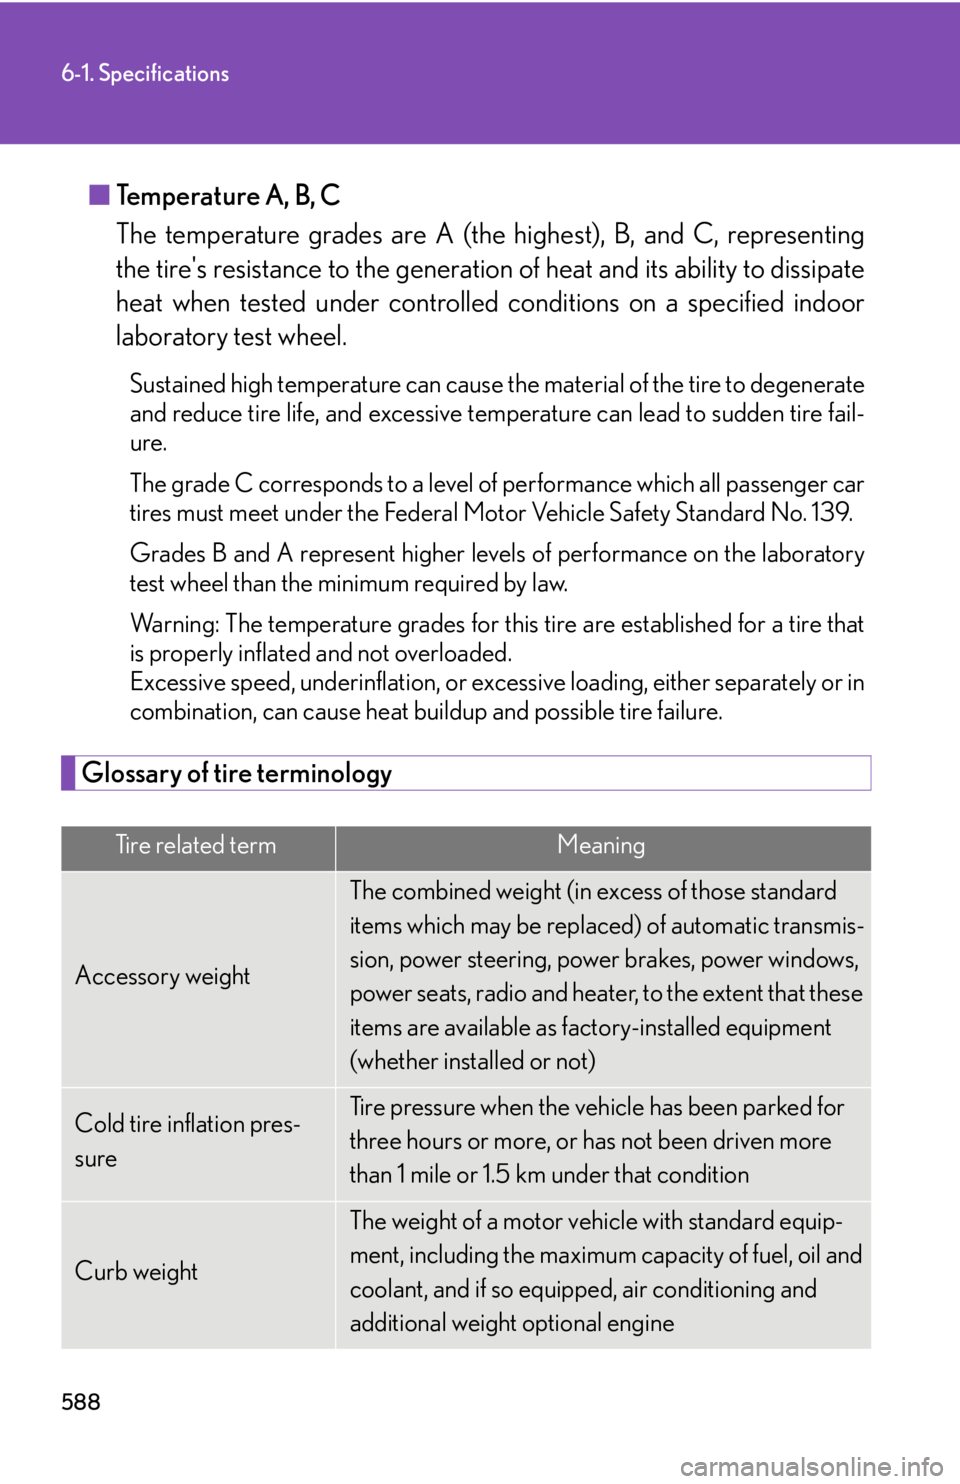
■Temperature A, B, C
The temperature grades are A (the highest), B, and C, representing
the tire's resistance to the generation of heat and its ability to dissipate
heat when tested under controlled conditions on a specified indoor
laboratory test wheel.
Sustained high temperature can cause the material of the tire to degenerate
and reduce tire life, and excessive temperature can lead to sudden tire fail-
ure.
The grade C corresponds to a level of performance which all passenger car
tires must meet under the Federal Mo tor Vehicle Safety Standard No. 139.
Grades B and A represent higher levels of performance on the laboratory
test wheel than the minimum required by law.
Warning: The temperature grades for this tire are established for a tire that
is properly inflated and not overloaded.
Excessive speed, underinflation, or excess ive loading, either separately or in
combination, can cause heat buildup and possible tire failure.
Glossary of tire terminology
Tire related termMeaning
Accessory weight
The combined weight (in excess of those standard
items which may be replaced) of automatic transmis-
sion, power steering, power brakes, power windows,
power seats, radio and heater, to the extent that these
items are available as factory-installed equipment
(whether installed or not)
Cold tire inflation pres-
sureTire pressure when the vehicle has been parked for
three hours or more, or has not been driven more
than 1 mile or 1.5 km under that condition
Curb weight
The weight of a motor vehicle with standard equip-
ment, including the maximum capacity of fuel, oil and
coolant, and if so equipp ed, air conditioning and
additional weight optional engine
Page 591 of 632

591
6-1. Specifications
6
Vehicle specifications
Bead
The part of the tire that is made of steel wires,
wrapped or reinforced by ply cords and that is
shaped to fit the rim
Bead separationA breakdown of the bond between components in
the bead
Bias ply tire
A pneumatic tire in which the ply cords that extend to
the beads are laid at alternate angles substantially
less than 90 degrees to the centerline of the tread
CarcassThe tire structure, except tread and sidewall rubber
which, when inflated, bears the load
ChunkingThe breaking away of pieces of the tread or sidewall
CordThe strands forming the plies in the tire
Cord separationThe parting of cords from adjacent rubber com-
pounds
CrackingAny parting within the tread, sidewall, or innerliner of
the tire extending to cord material
CT
A pneumatic tire with an inverted flange tire and rim
system in which the rim is designed with rim flanges
pointed radially inward and the tire is designed to fit
on the underside of the rim in a manner that encloses
the rim flanges inside the air cavity of the tire
Extra load tire
A tire designed to operate at higher loads and at
higher inflation pressures than the corresponding
standard tire
GrooveThe space between two adjacent tread ribs
InnerlinerThe layer(s) forming the inside surface of a tubeless
tire that contains the inflating medium within the tire
Innerliner separationThe parting of the innerliner from cord material in the
carcass
Tire related termMeaning
Page 593 of 632

593
6-1. Specifications
6
Vehicle specifications
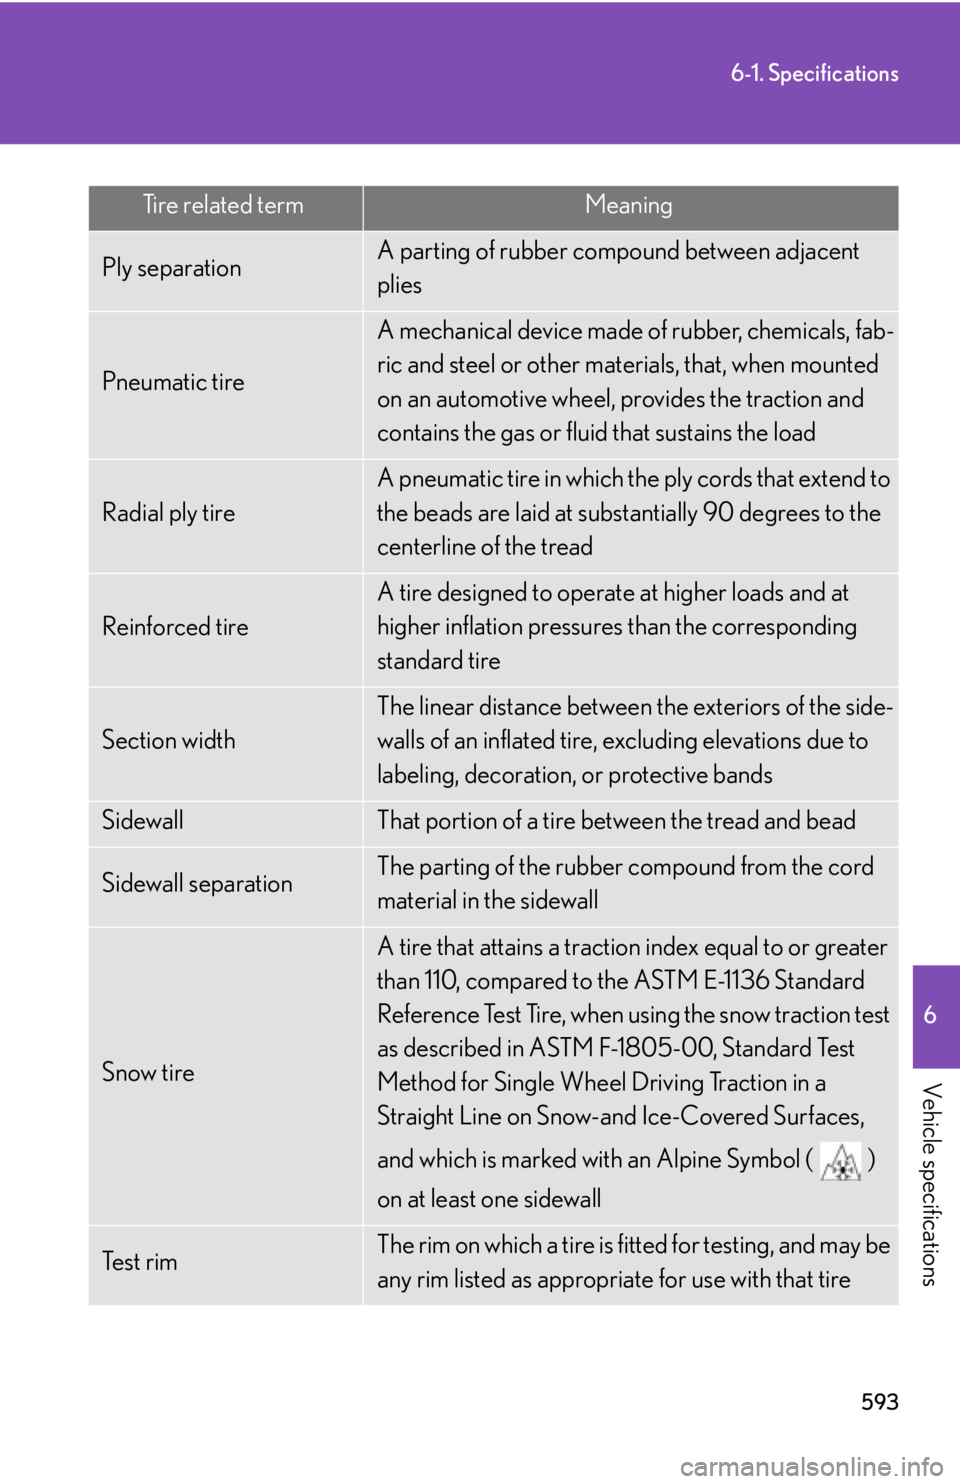
Ply separationA parting of rubber compound between adjacent
plies
Pneumatic tire
A mechanical device made of rubber, chemicals, fab-
ric and steel or other mate rials, that, when mounted
on an automotive wheel, provides the traction and
contains the gas or fluid that sustains the load
Radial ply tire
A pneumatic tire in which the ply cords that extend to
the beads are laid at substantially 90 degrees to the
centerline of the tread
Reinforced tire
A tire designed to operate at higher loads and at
higher inflation pressures than the corresponding
standard tire
Section width
The linear distance between the exteriors of the side-
walls of an inflated tire, excluding elevations due to
labeling, decoration, or protective bands
SidewallThat portion of a tire between the tread and bead
Sidewall separationThe parting of the rubber compound from the cord
material in the sidewall
Snow tire
A tire that attains a traction index equal to or greater
than 110, compared to the ASTM E-1136 Standard
Reference Test Tire, when using the snow traction test
as described in ASTM F-1805-00, Standard Test
Method for Single Wheel Driving Traction in a
Straight Line on Snow-and Ice-Covered Surfaces,
and which is marked with an Alpine Symbol (
)
on at least one sidewall
Te s t r i mThe rim on which a tire is fitted for testing, and may be
any rim listed as appropriate for use with that tire
Tire related termMeaning
Page 609 of 632

609
7
For owners
ATTENTION
■Précautions à observer avec les sacs de sécurité gonflables SRS
Respectez les précautions suivantes avec les sacs de sécurité gonflables.
À défaut, des blessures graves, voire mortelles, pourraient s'ensuivre.
●Le conducteur et tous les passagers à bord du véhicule doivent porter leur
ceinture de sécurité correctement.
Les sacs de sécurité gonflables SRS sont des dispositifs de protection
complémentaires aux ceintures de sécurité.
●Le sac de sécurité gonflable SRS conducteur se déploie avec une violence
considérable, qui peut être très dangereuse voire mortelle si le conducteur se
trouve très près du sac de sécurité gonflable. L'autorité fédérale chargée de la
sécurité routière aux États-Unis, la “NHTSA” (National Highway Traffic Safety
Administration) conseille:
La zone à risque du sac de sécurité gonflable conducteur se situant dans les
premiers 2 à 3 in. (50 - 75 mm) de déploiement, vous disposez d'une marge de
sécurité confortable en vous plaçant à 10 in. (250 mm) de votre sac de sécurité
gonflable conducteur. Cette distance est à mesurer entre le moyeu du volant de
direction et le sternum. Si vous êtes assis à moins de 10 in. (250 mm), vous
pouvez changer votre position de conduite de plusieurs façons:
Reculez votre siège le plus possible, tout en continuant à pouvoir atteindreconfortablement les pédales.
Inclinez légèrement le dossier du siège. Bien que les véhicules puissent être différents les uns des autres, la plupart
des conducteurs peuvent s'asseoir à une distance de 10 in. (250 mm), même
avec le siège conducteur complètement avancé, simplement en inclinant un
peu le dossier de siège. Si vous avez des difficultés à voir la route après avoir
incliné votre siège, utilisez un coussin ferme et antidérapant pour vous
rehausser ou, si votre véhicule est équipé du réglage en hauteur du siège,
remontez-le.
Si votre volant de direction est réglable, inclinez-le vers le bas. Cela a pour effet d'orienter le sac de sécurité gonflable en direction de votre poitrine
plutôt que de votre tête et de votre cou.
Réglez votre siège selon ces recommandations de la NHTSA, tout en conservant le
contrôle des pédales, du volant de direction et la vue des commandes du tableau
de bord.
Page 612 of 632

612
ATTENTION
■Précautions à observer avec les sacs de sécurité gonflables SRS
●Si le cache en vinyle recouvre la partie où le sac de sécurité gonflable SRS de
genoux se déploie, veillez à l'enlever.
●N'utilisez aucun accessoire de siège venant recouvrir les zones de déploiement
des sacs de sécurité gonflables SRS latéraux, car il risquerait d'en gêner le
déploiement.
●Ne pas faire subir de chocs ou de pressions excessives aux parties renfermant les
composants des sacs de sécurité gonflables SRS, illustrées P. 593.
En effet, cela pourrait entraîner un fonctionnement anormal des sacs de sécurité
gonflables SRS.
●Ne touchez aucun composant du système immédiatement après le
déclenchement (déploiement) des sacs de sécurité gonflables SRS, car ils sont
alors encore très chauds.
●Si vous avez des difficultés à respirer après le déploiement d'un sac de sécurité
gonflable SRS, ouvrez une porte ou une vitre pour faire entrer de l'air frais, ou
bien descendez du véhicule si cela ne présente pas de danger. Essuyez tout
résidu dès que possible afin d'éviter d'éventuelles irritations de la peau.
●Ne fixez ni ne posez aucun objet sur la
planche de bord, la garniture centrale du
moyeu de volant de direction et la partie
inférieure du tableau de bord.
Au déploiement des sacs de sécurité
gonflables SRS conducteur, passager avant
et genoux, tout objet risque de se
transformer en projectile.
●Ne rien fixer aux parties telles que les
portes.
Page 630 of 632

630
What to do if...
What to do if...
A tire puncturesP. 5 1 8
P. 5 2 7If you have a flat tire
The engine does not start
P. 5 2 9If the engine will not start
P. 9 8Engine immobilizer system
P. 5 3 8If the vehicle battery is discharged
The shift lever cannot be
moved outP. 5 3 1If the shift lever cannot be shifted
from P
The engine coolant temperature
gauge enters the red zone
Steam can be seen coming
from under the hood
P. 5 4 2If your vehicle overheats
The key is lostP. 5 3 2If you lose your keys
The battery runs outP. 5 3 8If the vehicle battery is discharged
The doors cannot be lockedP. 4 7Doors
The horn begins to soundP. 1 0 0Alarm
The vehicle is stuck in mud or
sandP. 5 4 5If the vehicle becomes stuck
A warning message is displayedP. 5 0 4If a warning message is displayed