Engine Lexus IS300 2017 Owner's Manual / LEXUS 2017 IS200T,IS300,IS350 OWNERS MANUAL QUICK GUIDE (OM53E12U)
[x] Cancel search | Manufacturer: LEXUS, Model Year: 2017, Model line: IS300, Model: Lexus IS300 2017Pages: 74, PDF Size: 1.78 MB
Page 6 of 74
6
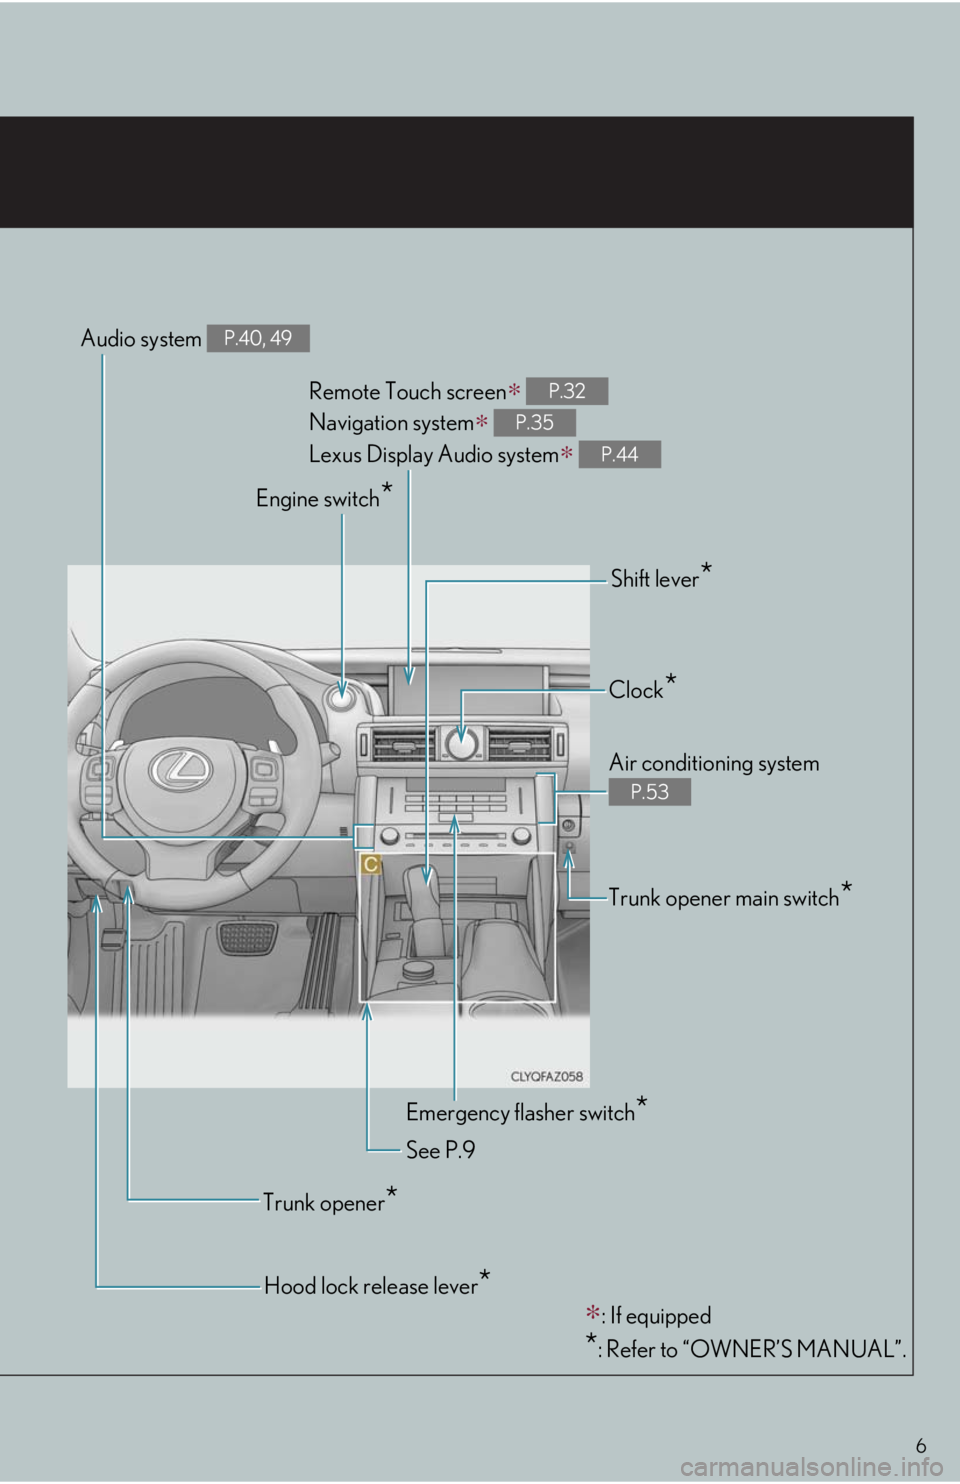
Remote Touch screen∗
Navigation system
∗
Lexus Display Audio system
∗
P.32
P.35
P.44
Emergency flasher switch*
See P.9
Engine switch
*
∗: If equipped
*: Refer to “OWNER’S MANUAL”.
Trunk opener*
Clock*
Trunk opener main switch*
Audio system P.40, 49
Shift lever*
Hood lock release lever*
Air conditioning system
P.53
Page 12 of 74
12
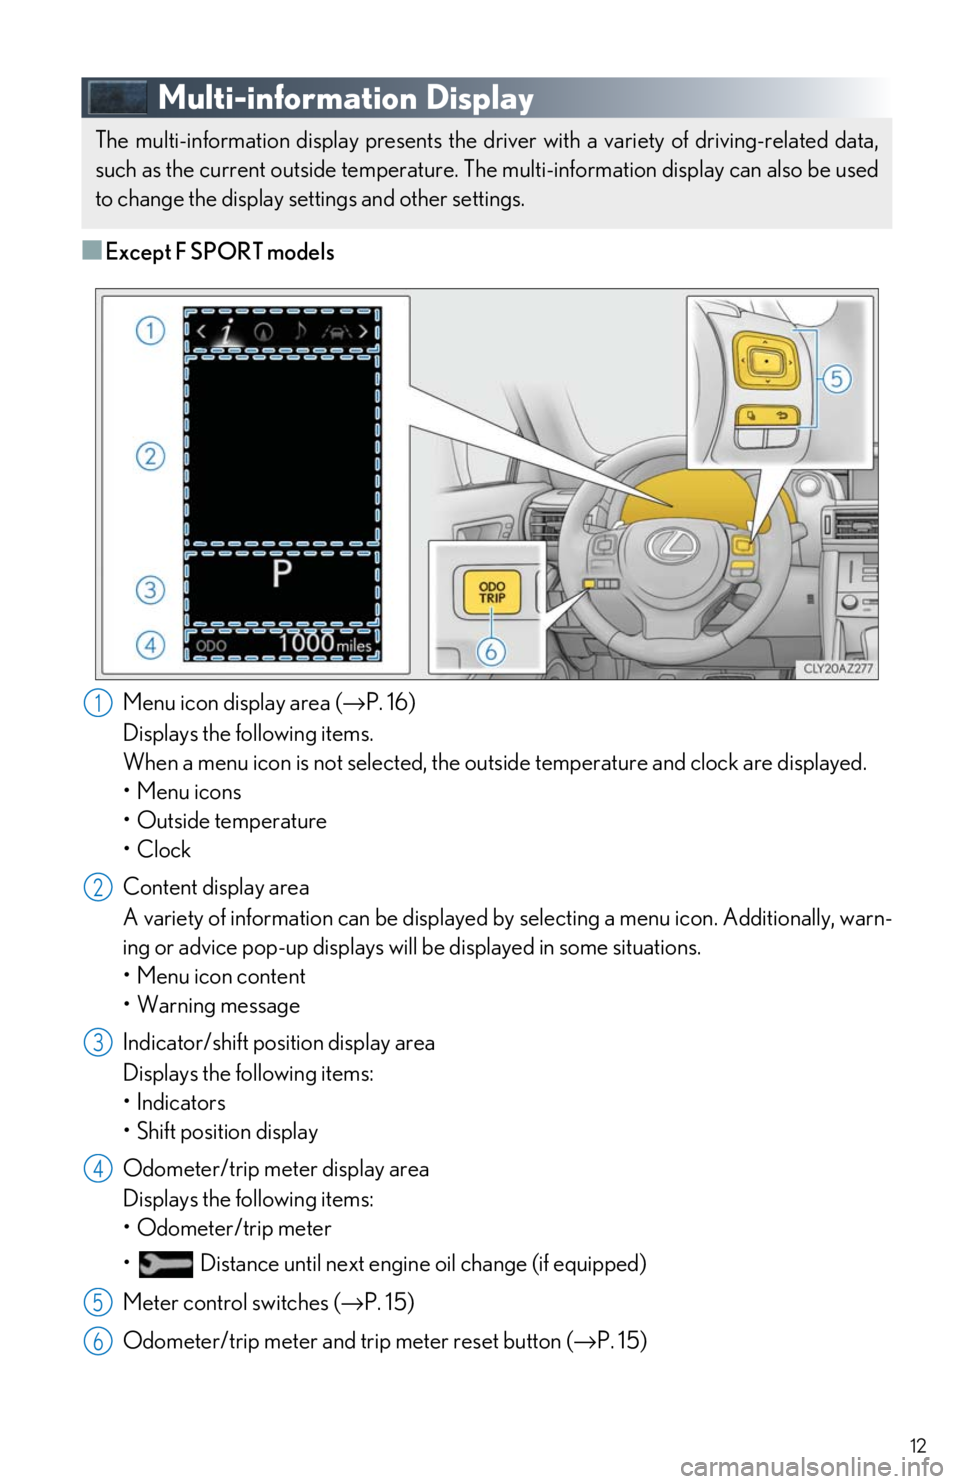
Multi-information Display
■Except F SPORT modelsMenu icon display area ( →P. 16)
Displays the following items.
When a menu icon is not selected, the outside temperature and clock are displayed.
•Menu icons
• Outside temperature
•Clock
Content display area
A variety of information can be displayed by selecting a menu icon. Additionally, warn-
ing or advice pop-up displays will be displayed in some situations.
• Menu icon content
• Warning message
Indicator/shift position display area
Displays the following items:
•Indicators
• Shift position display
Odometer/trip meter display area
Displays the following items:
• Odometer/trip meter
• Distance until next engine oil change (if equipped)
Meter control switches ( →P. 15)
Odometer/trip meter and tr ip meter reset button (→P. 15)
The multi-information display presents the driv er with a variety of driving-related data,
such as the current outside temperature. Th e multi-information display can also be used
to change the display settings and other settings.
1
2
3
4
5
6
Page 14 of 74

14
Clock
Outside temperature
Indicator/shift position display area
Displays the following items:
•Indicators
• Shift position display
Content display area
Main meter in center position:
Displays various drive information on the main meter. Additionally, warning or advice
pop-up displays will be disp layed in some situations.
• Drive information
• Warning message
Main meter moved to the right:
A variety of information can be displayed by selecting a menu icon. Additionally, warn-
ing or advice pop-up displays will be displayed in some situations.
• Menu icon content
• Warning message
Odometer/trip meter display area
Displays the following items:
• Odometer/trip meter
• Distance until next engine oil change (if equipped)
Menu icons ( →P. 16)
Meter control switches ( →P. 15)
Odometer/trip meter and tr ip meter reset button (→P. 15)1
2
3
4
5
6
7
8
Page 17 of 74
17
Headlights
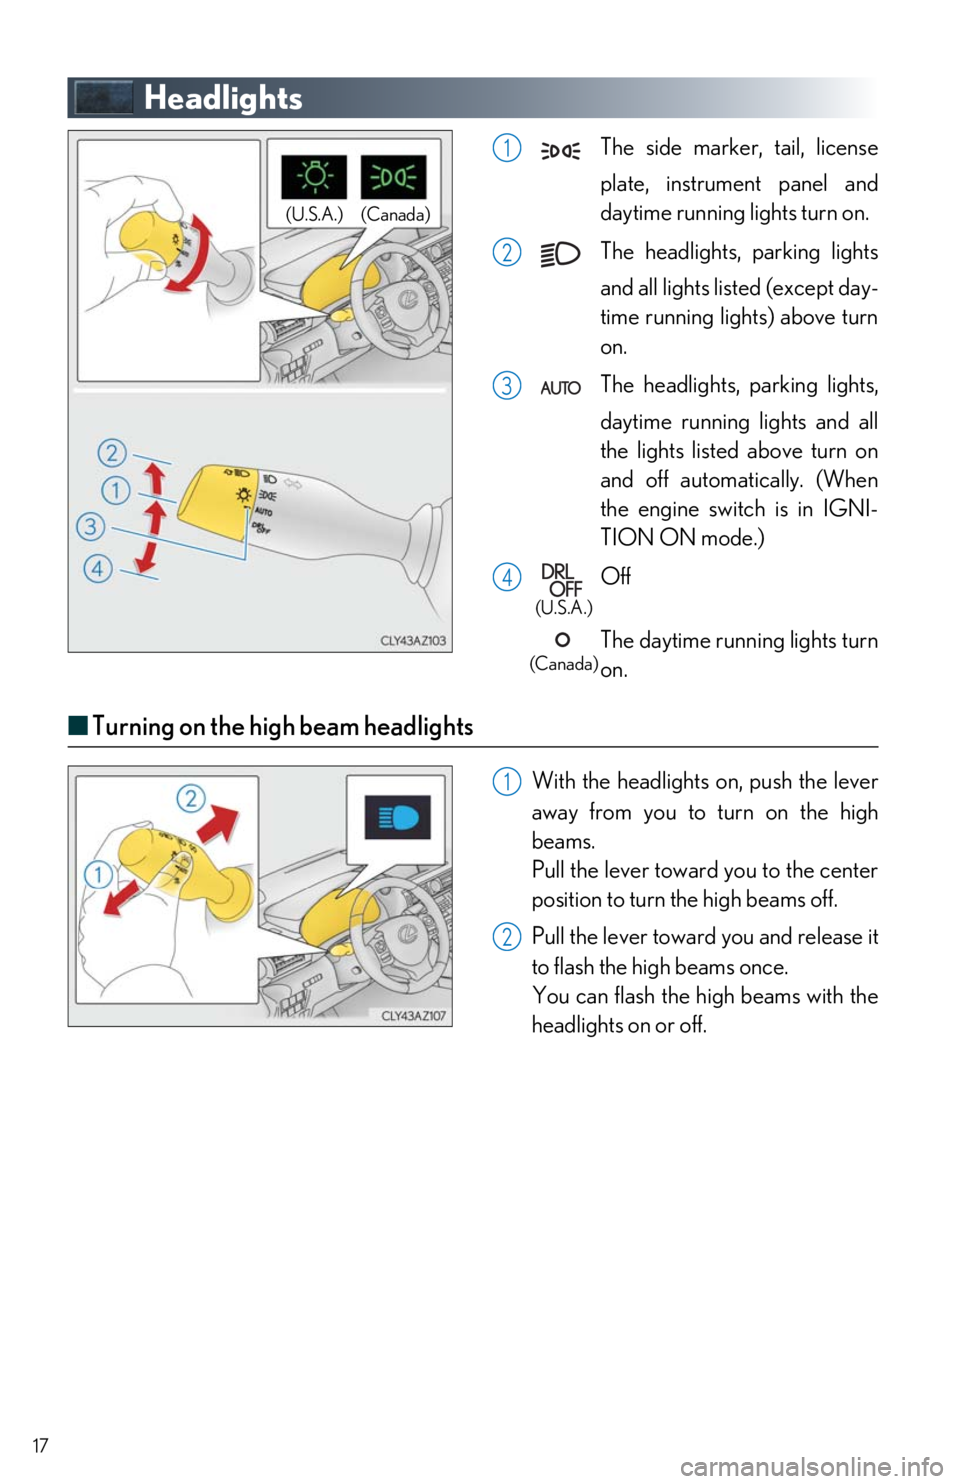
The side marker, tail, license
plate, instrument panel and
daytime running lights turn on.
The headlights, parking lights
and all lights list ed (except day-
time running lights) above turn
on.
The headlights, parking lights, daytime running lights and all
the lights listed above turn on
and off automatically. (When
the engine switch is in IGNI-
TION ON mode.)
Off
The daytime running lights turn
on.
■ Turning on the high beam headlights
With the headlights on, push the lever
away from you to turn on the high
beams.
Pull the lever toward you to the center
position to turn the high beams off.
Pull the lever toward you and release it
to flash the high beams once.
You can flash the high beams with the
headlights on or off.
(Canada)
(U.S.A.)
1
2
3
4
(U.S.A.)
(Canada)
1
2
Page 21 of 74
21
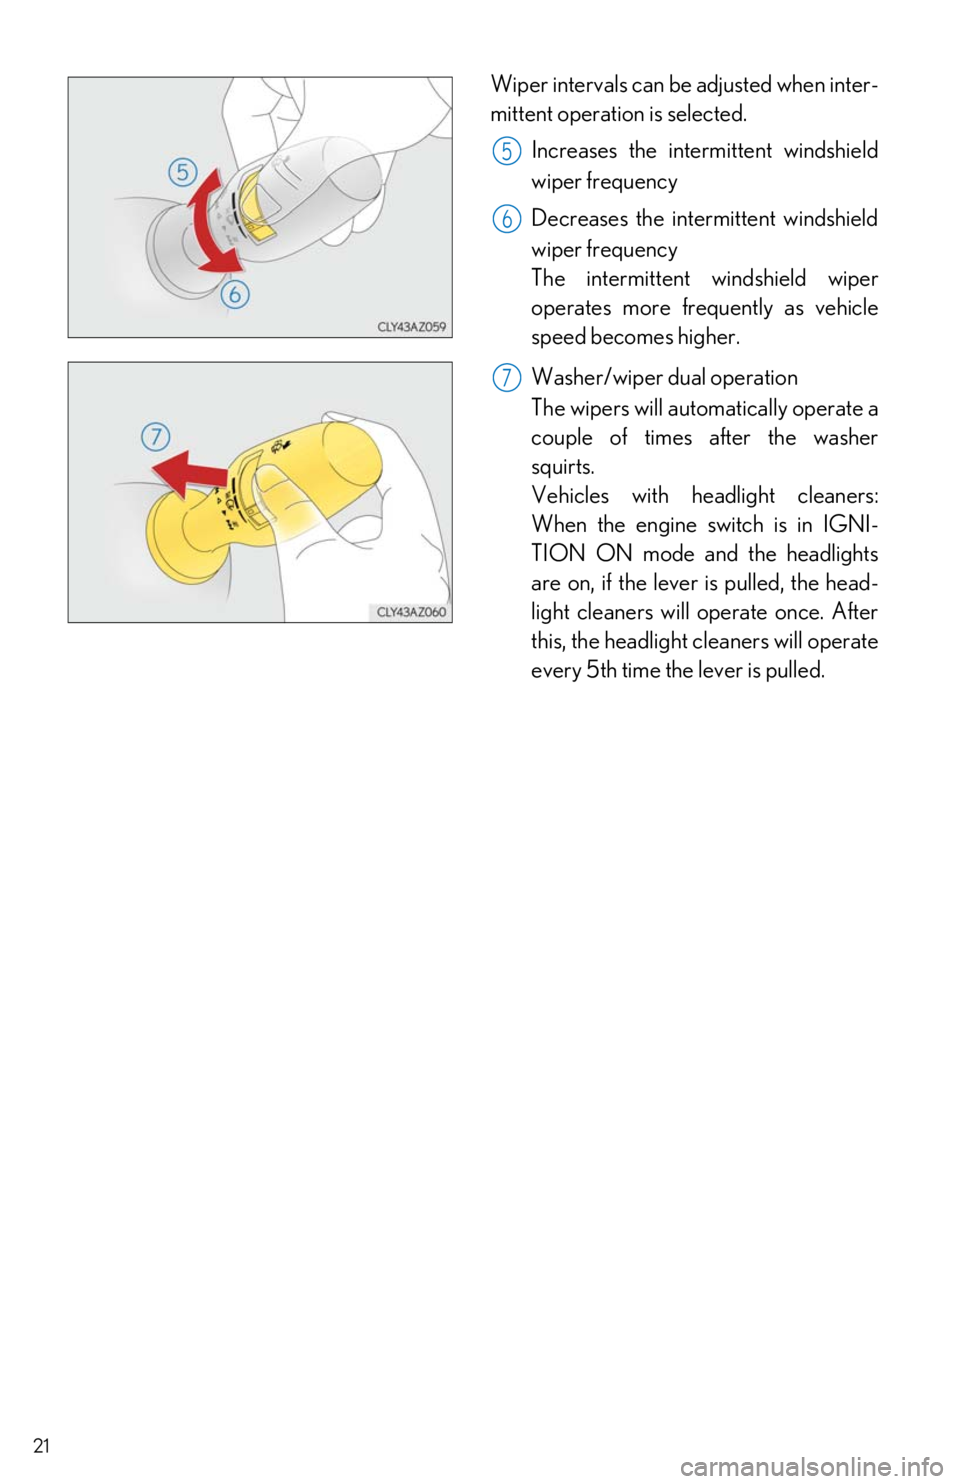
Wiper intervals can be adjusted when inter-
mittent operation is selected.Increases the interm ittent windshield
wiper frequency
Decreases the intermittent windshield
wiper frequency
The intermittent windshield wiper
operates more frequently as vehicle
speed becomes higher.
Washer/wiper dual operation
The wipers will automatically operate a
couple of times after the washer
squirts.
Vehicles with headlight cleaners:
When the engine switch is in IGNI-
TION ON mode and the headlights
are on, if the lever is pulled, the head-
light cleaners will operate once. After
this, the headlight cleaners will operate
every 5th time the lever is pulled.
5
6
7
Page 23 of 74
23
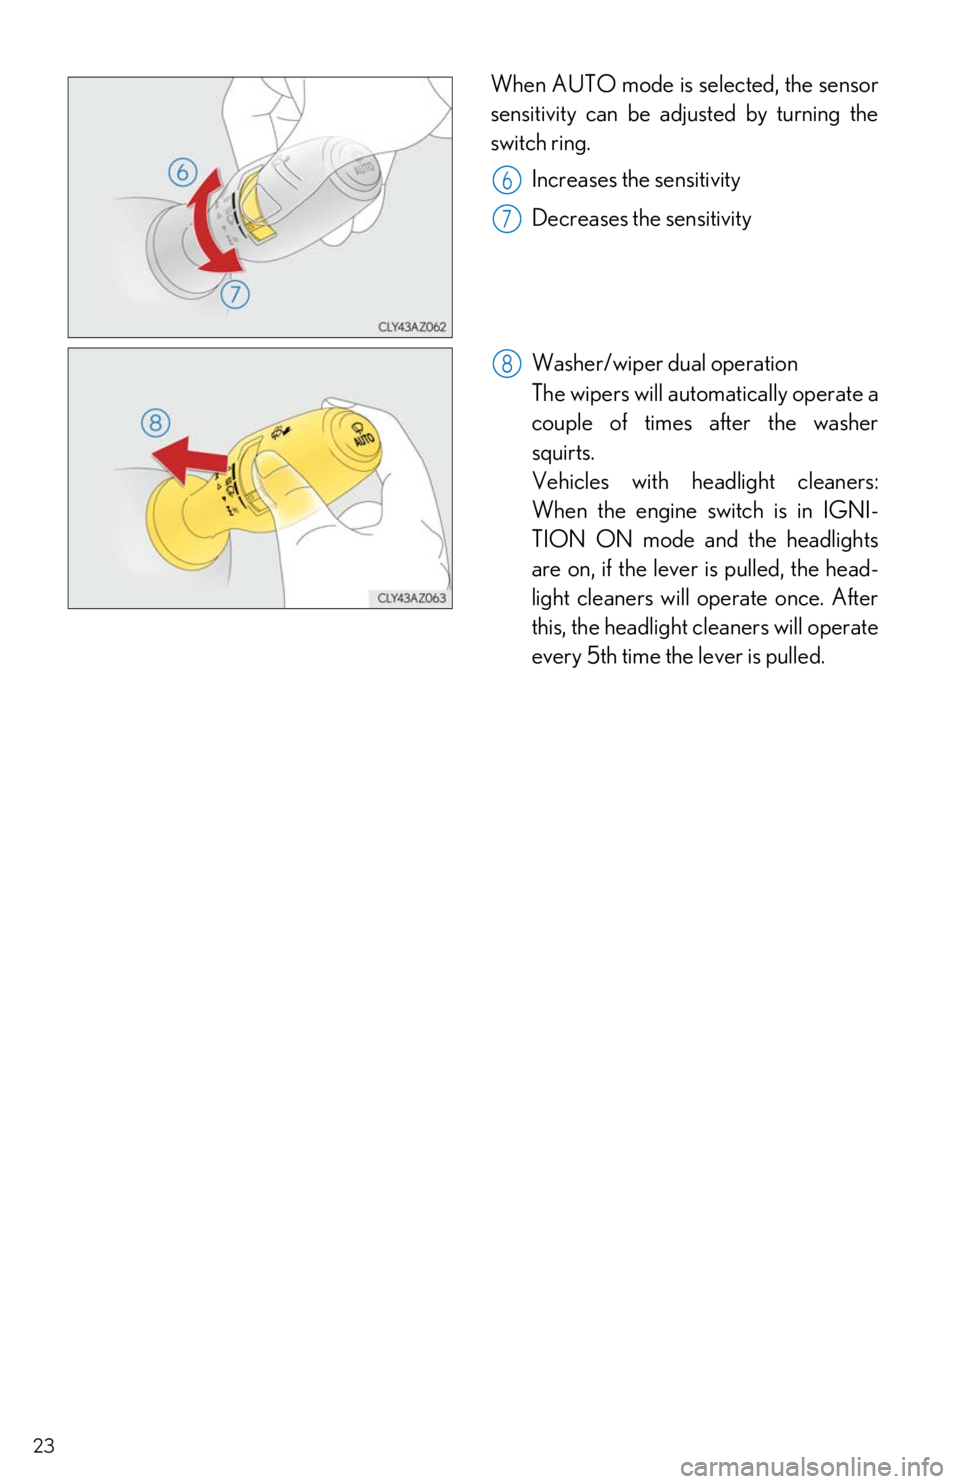
When AUTO mode is selected, the sensor
sensitivity can be adjusted by turning the
switch ring.
Increases the sensitivity
Decreases the sensitivity
Washer/wiper dual operation
The wipers will automatically operate a
couple of times after the washer
squirts.
Vehicles with headlight cleaners:
When the engine switch is in IGNI-
TION ON mode and the headlights
are on, if the lever is pulled, the head-
light cleaners will operate once. After
this, the headlight cleaners will operate
every 5th time the lever is pulled.
6
7
8
Page 26 of 74

26
■Adjusting the set speed
Increases the speed
Decreases the speed
Fine adjustment: Momentarily move the
lever in the desired direction.
Large adjustment: Hold the lever up or
down to change the speed, and release
when the desired speed is reached.
■ Changing the vehicle-to-vehicle distan ce (vehicle-to-vehicle distance con-
trol mode)
Pressing the button changes the vehicle-to-
vehicle distance as follows:
Long
Medium
Short
The vehicle-to-vehicle distance is set
automatically to long mode when the
engine switch is turned to IGNITION
ON mode.
If a vehicle is running ahead of you, the
preceding vehicle mark will also be dis-
played.
1
2
Preceding vehicle mark
1
2
3
The vehicle-to-vehicle distance control mode maintains the preset cruising speed as long
as no vehicle is detected ahead.
Page 28 of 74
28
LDA (Lane Departure Alert
with Steering Control)
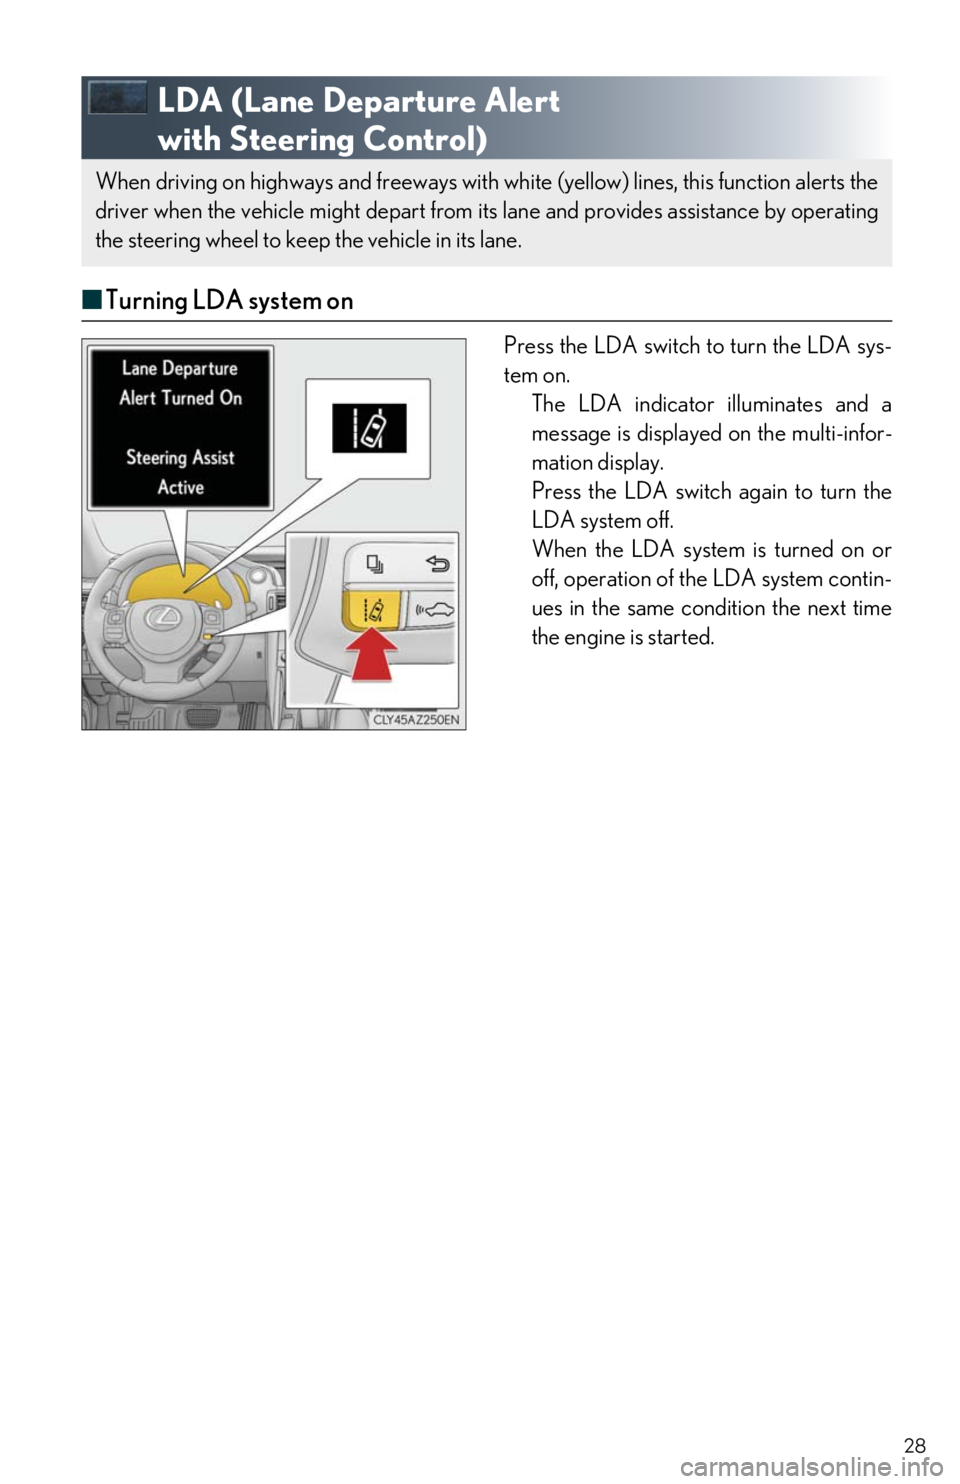
■ Turning LDA system on
Press the LDA switch to turn the LDA sys-
tem on.
The LDA indicator illuminates and a
message is displayed on the multi-infor-
mation display.
Press the LDA switch again to turn the
LDA system off.
When the LDA system is turned on or
off, operation of the LDA system contin-
ues in the same condition the next time
the engine is started.
When driving on highways and freeways with white (yellow) lines, this function alerts the
driver when the vehicle might depart from it s lane and provides assistance by operating
the steering wheel to keep the vehicle in its lane.
Page 71 of 74
What to do if...
71
*1: It also comes on due to natural causes such as natural air leaks and tire inflation pressure
changes caused by temperature. Adjust the tire inflation pressure to the specified level.
The light will turn off after a few minutes. In case the light does not turn off even if the tire
inflation pressure is adju sted, have the system checked by your Lexus dealer.
*2:Except F SPORT models
*3:F SPORT models
If the engine doesn’t start
Make sure that the correct operating procedures have been followed.
Make sure that the brake pedal is firmly
depressed when attempting to start the
engine.
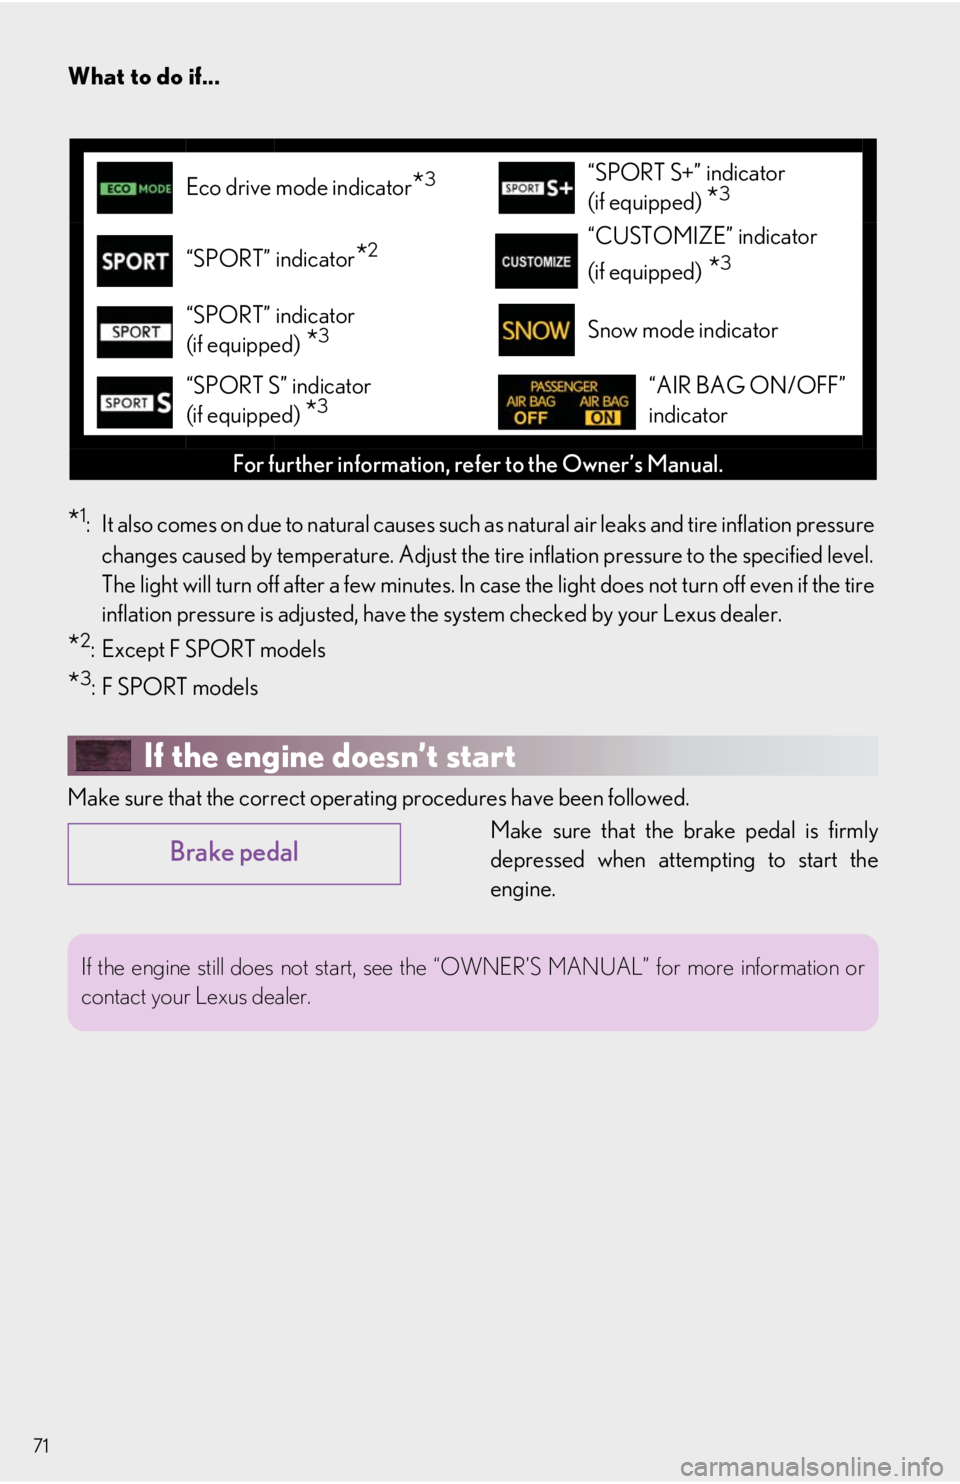
Eco drive mode indicator*3“SPORT S+” indicator
(if equipped)
*3
“SPORT” indicator*2“CUSTOMIZE” indicator
(if equipped)
*3
“SPORT” indicator
(if equipped)
*3Snow mode indicator
“SPORT S” indicator
(if equipped)
*3“AIR BAG ON/OFF”
indicator
For further information, re fer to the Owner’s Manual.
Brake pedal
If the engine still does not start, see the “OWNER’S MA NUAL” for more information or
contact your Lexus dealer.
Page 73 of 74
What to do if...
73
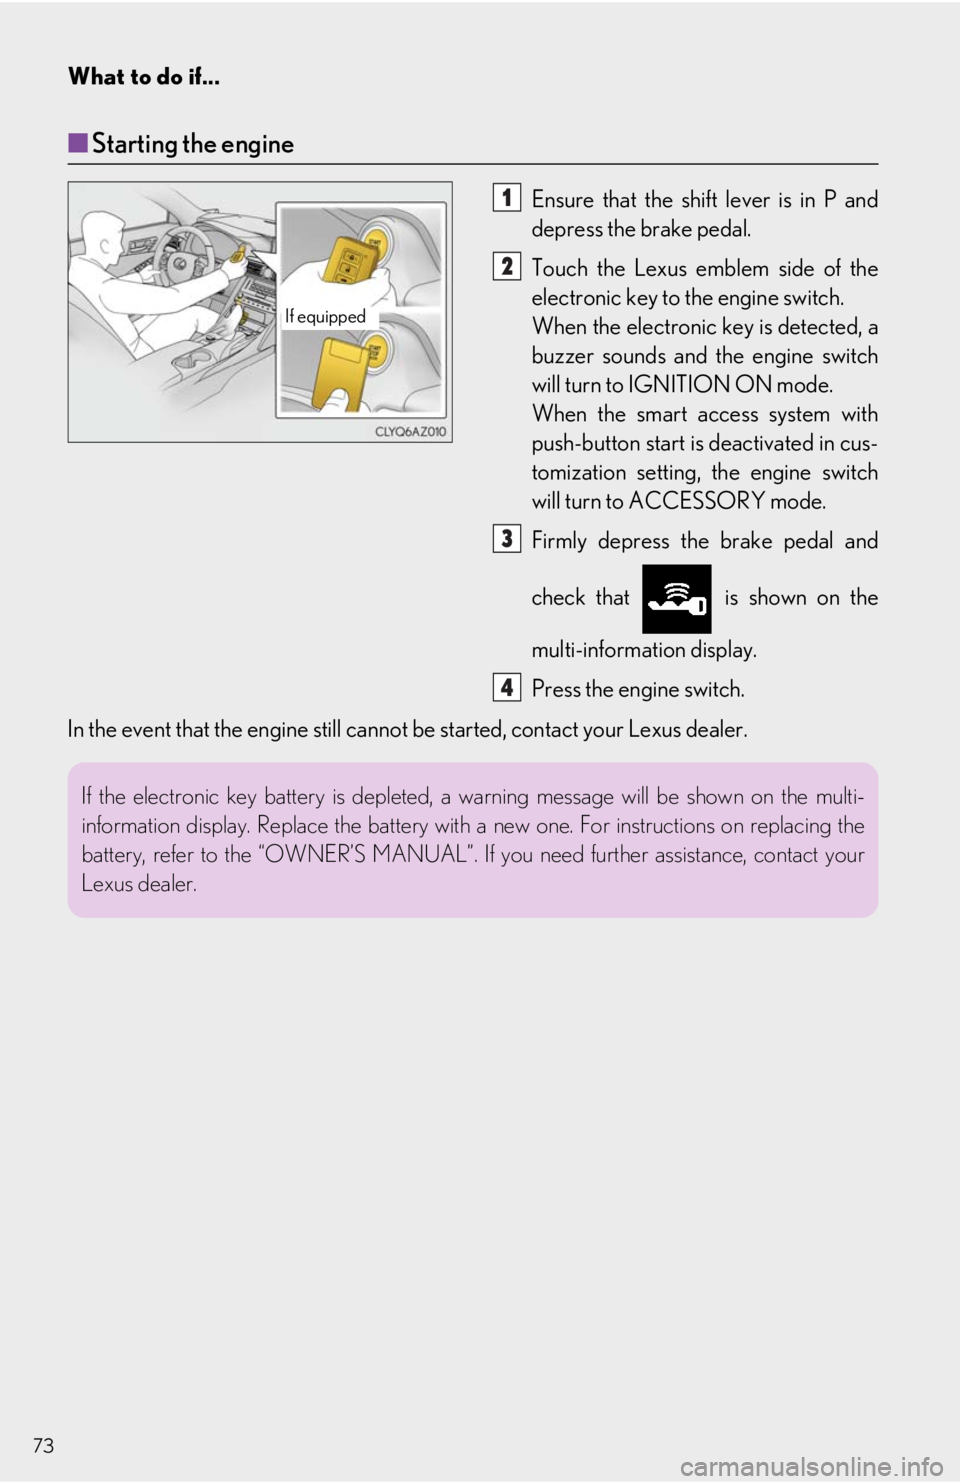
■Starting the engine
Ensure that the shif t lever is in P and
depress the brake pedal.
Touch the Lexus emblem side of the
electronic key to the engine switch.
When the electronic key is detected, a
buzzer sounds and the engine switch
will turn to IGNITION ON mode.
When the smart access system with
push-button start is deactivated in cus-
tomization setting, the engine switch
will turn to ACCESSORY mode.
Firmly depress the brake pedal and
check that is shown on the
multi-information display.
Press the engine switch.
In the event that the engine still cannot be started, contact your Lexus dealer.
If equipped
1
2
3
4
If the electronic key battery is depleted, a warning message will be shown on the multi-
information display. Replace th e battery with a new one. For instructions on replacing the
battery, refer to the “OWNER ’S MANUAL”. If you need further assistance, contact your
Lexus dealer.