display Lexus IS350 2006 Scheduled Maintenance Guide / LEXUS 2006 IS350/250 FROM MAY 2006 PROD. OWNER'S MANUAL (OM53619U)
[x] Cancel search | Manufacturer: LEXUS, Model Year: 2006, Model line: IS350, Model: Lexus IS350 2006Pages: 437, PDF Size: 11.01 MB
Page 2 of 437
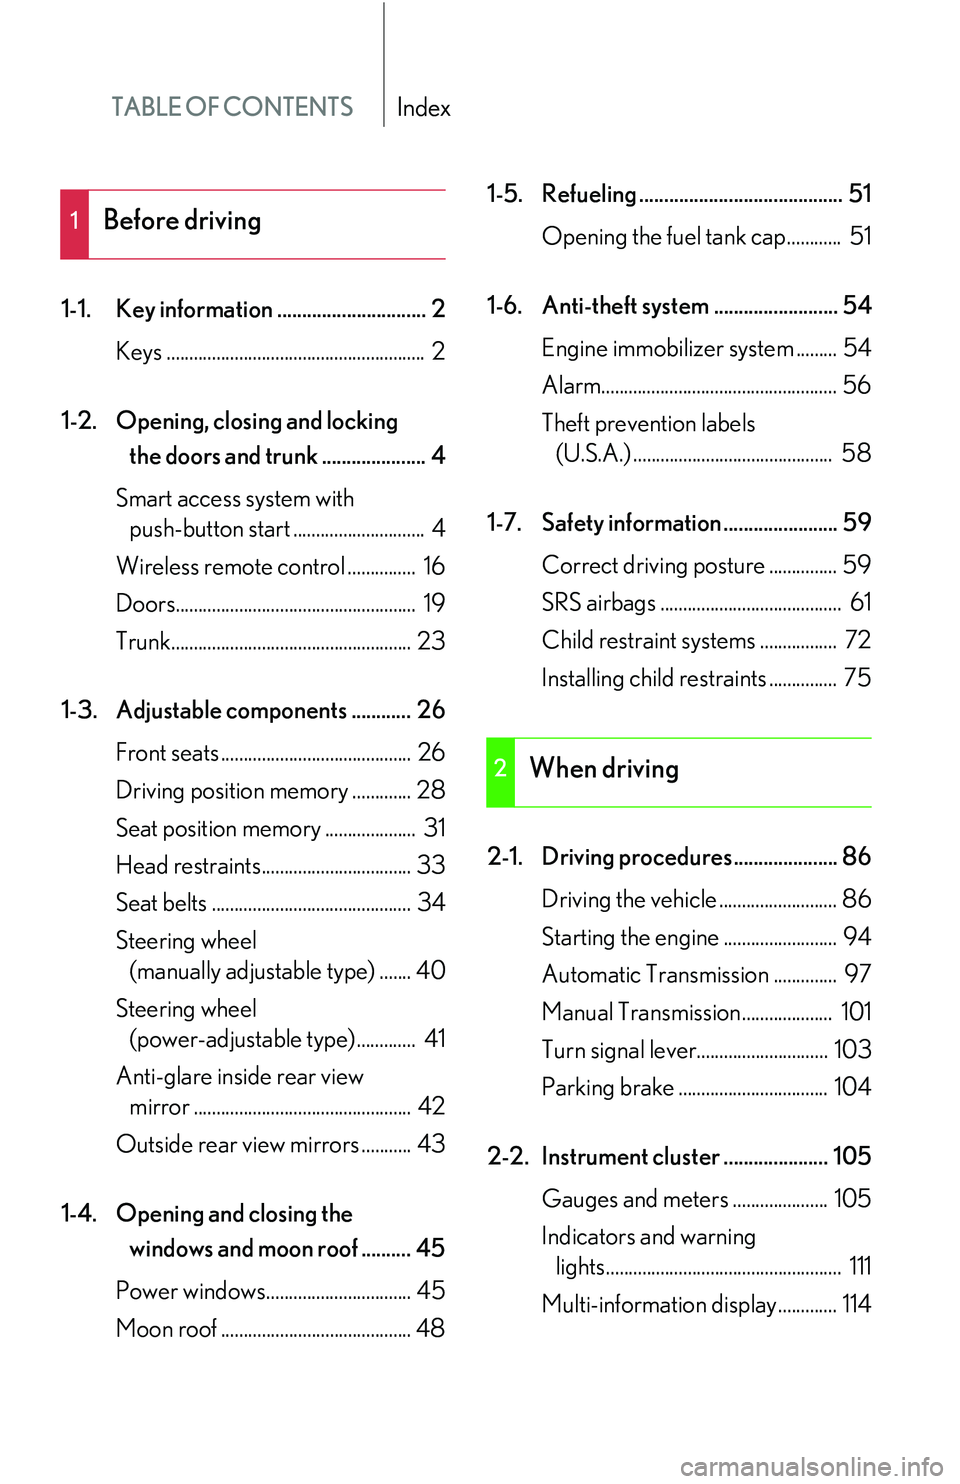
TABLE OF CONTENTSIndex
1-1. Key information .............................. 2Keys ......................................................... 2
1-2. Opening, closing and locking the doors and trunk ..................... 4
Smart access system with push-button start ............................. 4
Wireless remote control ............... 16
Doors..................................................... 19
Trunk..................................................... 23
1-3. Adjustable components ............ 26 Front seats .......................................... 26
Driving position memory ............. 28
Seat position memory .................... 31
Head restraints................................. 33
Seat belts ............................................ 34
Steering wheel (manually adjustable type) ....... 40
Steering wheel (power-adjustable type)............. 41
Anti-glare inside rear view mirror ................................................ 42
Outside rear view mirrors ........... 43
1-4. Opening and closing the windows and moon roof .......... 45
Power windows................................ 45
Moon roof .......................................... 48 1-5. Refueling ......................................... 51
Opening the fuel tank cap............ 51
1-6. Anti-theft system ......................... 54 Engine immobilizer system ......... 54
Alarm.................................................... 56
Theft prevention labels (U.S.A.) ............................................ 58
1-7. Safety information ....................... 59 Correct driving posture ............... 59
SRS airbags ........................................ 61
Child restraint sy stems ................. 72
Installing child restraints ............... 75
2-1. Driving procedures..................... 86 Driving the vehicle .......................... 86
Starting the engine ......................... 94
Automatic Transmission .............. 97
Manual Transmission.................... 101
Turn signal lever............................. 103
Parking brake ................................. 104
2-2. Instrument cluster ..................... 105 Gauges and meters ..................... 105
Indicators and warning lights.................................................... 111
Multi-information display............. 114
1Before driving
2When driving
Page 5 of 437
1
2
3
4
5
6
7
Fuel pump shut off system ....... 330
Event data recorder ..................... 331
5-2. Steps to take in an emergency .............................. 333
If a warning light turns on or a warning buzzer sounds... .... 333
If a warning message is displayed ...................................... 338
If you have a flat tire..................... 352
If the engine will not start ......... 360
If the shift lever cannot be shifted from P ............................... 361
If you lose your keys .................... 362
When the electronic key battery is discharged ............... 363
If the vehicle battery is discharged ................................... 366
If your vehicle overheats ........... 369
If the vehicle becomes stuck................................................. 371
6-1. Specifications............................. 374 Maintenance data ........................ 374
Fuel information ........................... 389
Tire information............................. 392
6-2. Customization .......................... 400 Customizable features ............. 400 6-3. Initialization ............................... 404
Items to initialize ........................... 404
Reporting safety defects for U.S.A. owners ...................... 406
Alphabetical index...............................408
What to do if... ......................................... 417
6Vehicle specifications
7For US owners
Index
Page 12 of 437
Pictorial indexInstrument panel
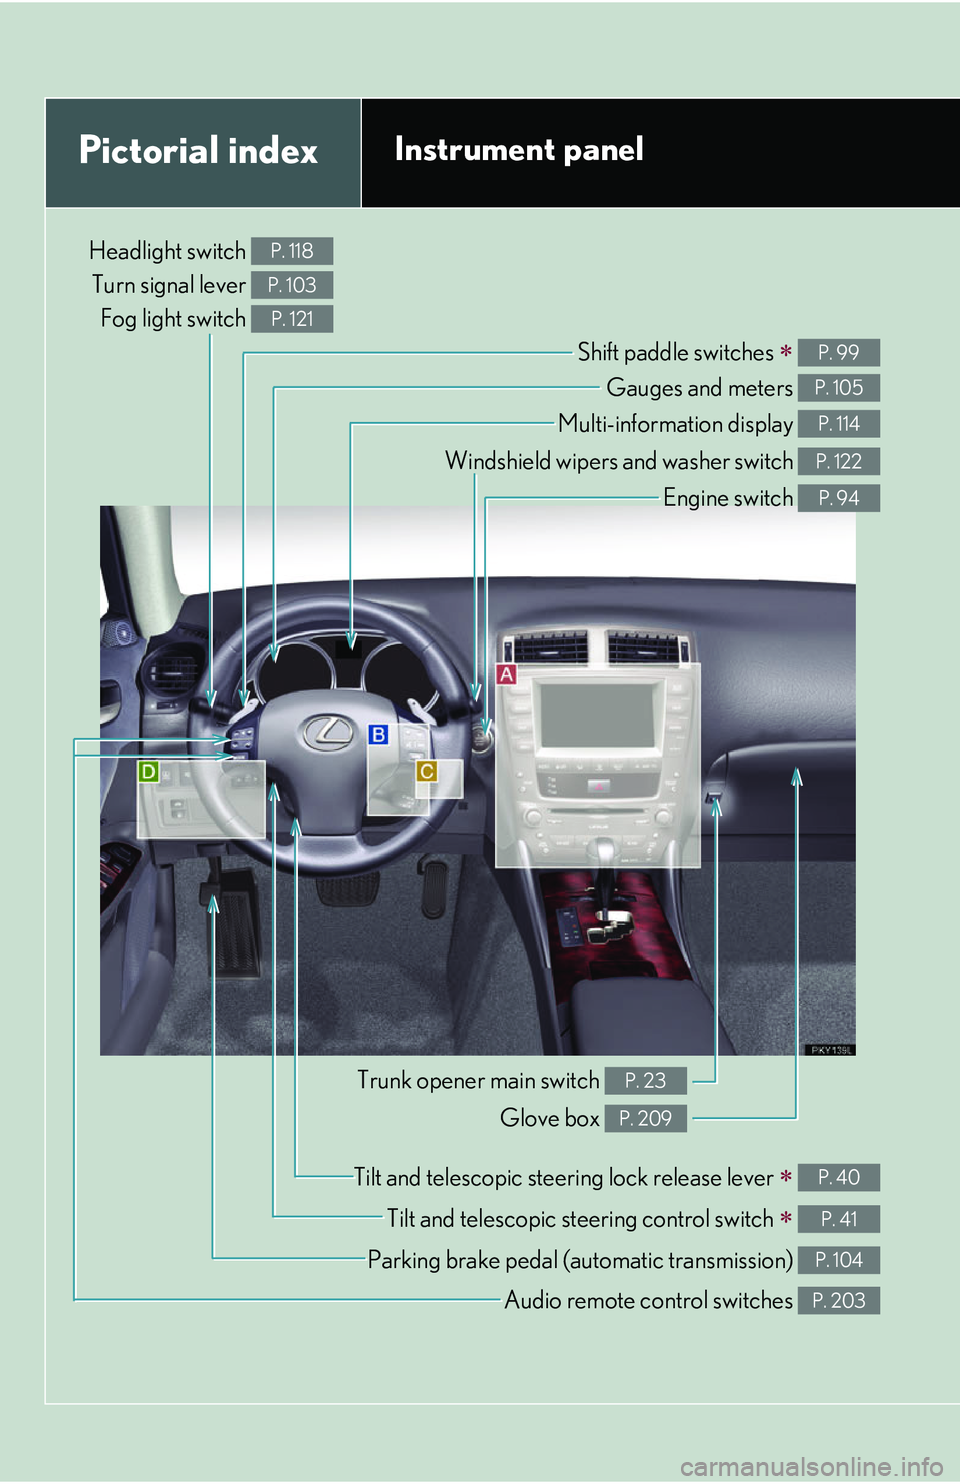
Headlight switch Turn signal lever
Fog light switch P. 118
P. 103
P. 121
Shift paddle switches P. 99
Gauges and meters P. 105
Multi-information display P. 114
Windshield wipers and washer switch P. 122
Engine switch P. 94
Trunk opener main switch P. 23
Glove box P. 209
Tilt and telescopic steering lock release lever P. 40
Tilt and telescopic steering control switch P. 41
Parking brake pedal (automatic transmission) P. 104
Audio remote co ntrol switches P. 203
Page 27 of 437
9
1-2. Opening, closing and locking the doors and trunk
1
Before driving
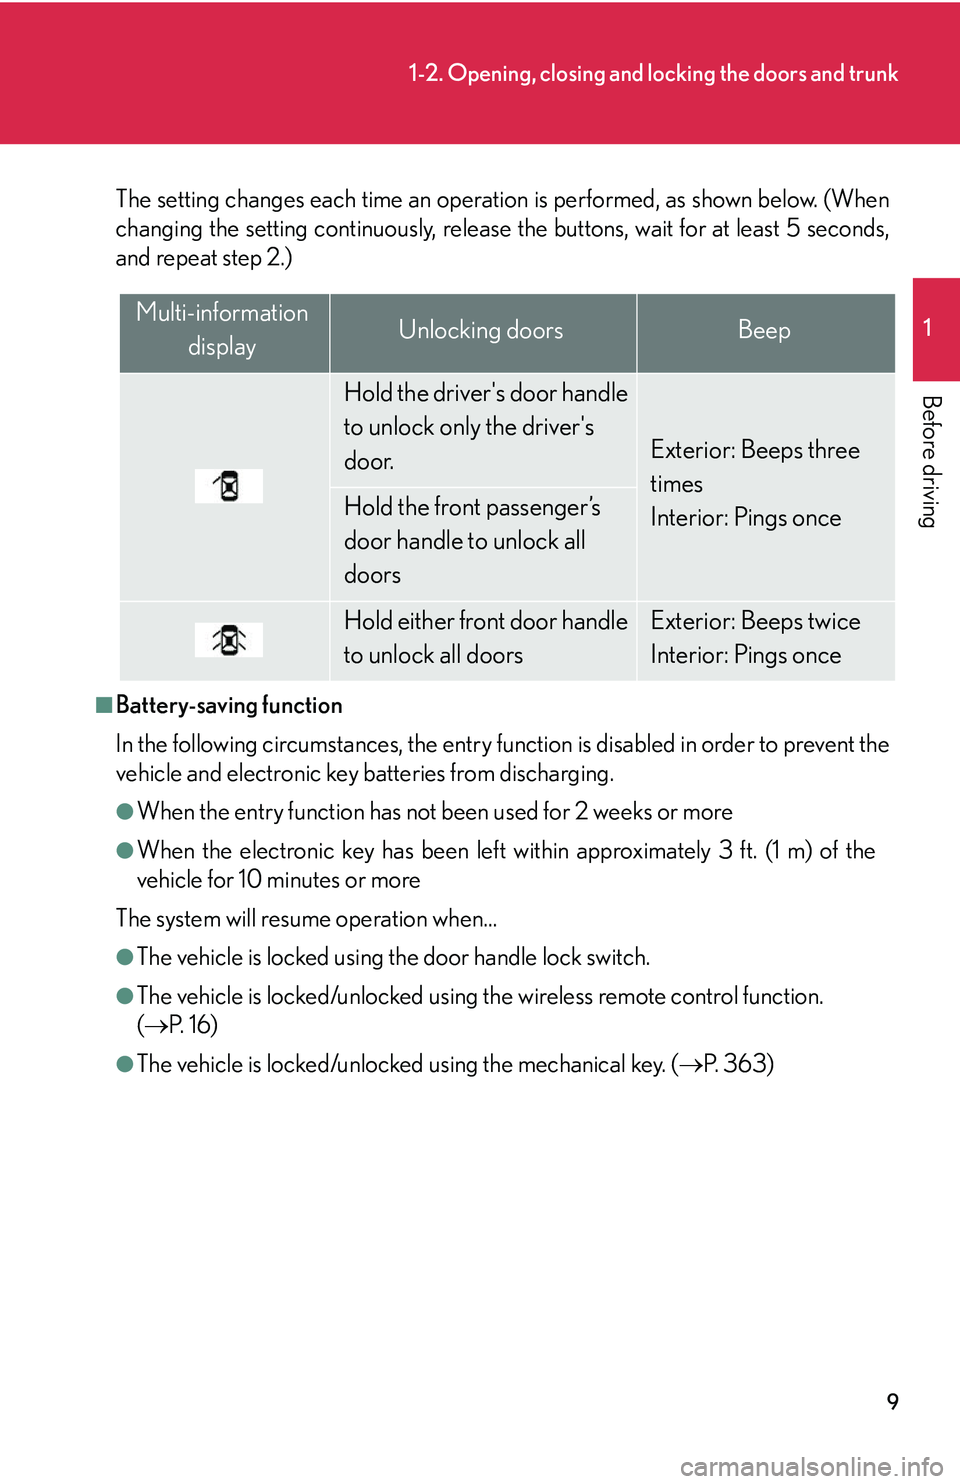
The setting changes each time an operation is performed, as shown below. (When
changing the setting continuously, release the buttons, wait for at least 5 seconds,
and repeat step 2.)
■Battery-saving function
In the following circumstances, the entry func tion is disabled in order to prevent the
vehicle and electronic key batteries from discharging.
●When the entry function has not been used for 2 weeks or more
●When the electronic key has been left within approximately 3 ft. (1 m) of the
vehicle for 10 minutes or more
The system will resume operation when...
●The vehicle is locked using th e door handle lock switch.
●The vehicle is locked/unlocked using the wireless remote control function.
( P. 1 6 )
●The vehicle is locked/unlocked using the mechanical key. ( P. 3 6 3 )
Multi-information
displayUnlocking doorsBeep
Hold the driver's door handle
to unlock only the driver's
door.
Exterior: Beeps three
times
Interior: Pings once
Hold the front passenger’s
door handle to unlock all
doors
Hold either front door handle
to unlock all doorsExterior: Beeps twice
Interior: Pings once
Page 30 of 437
12
1-2. Opening, closing and locking the doors and trunk
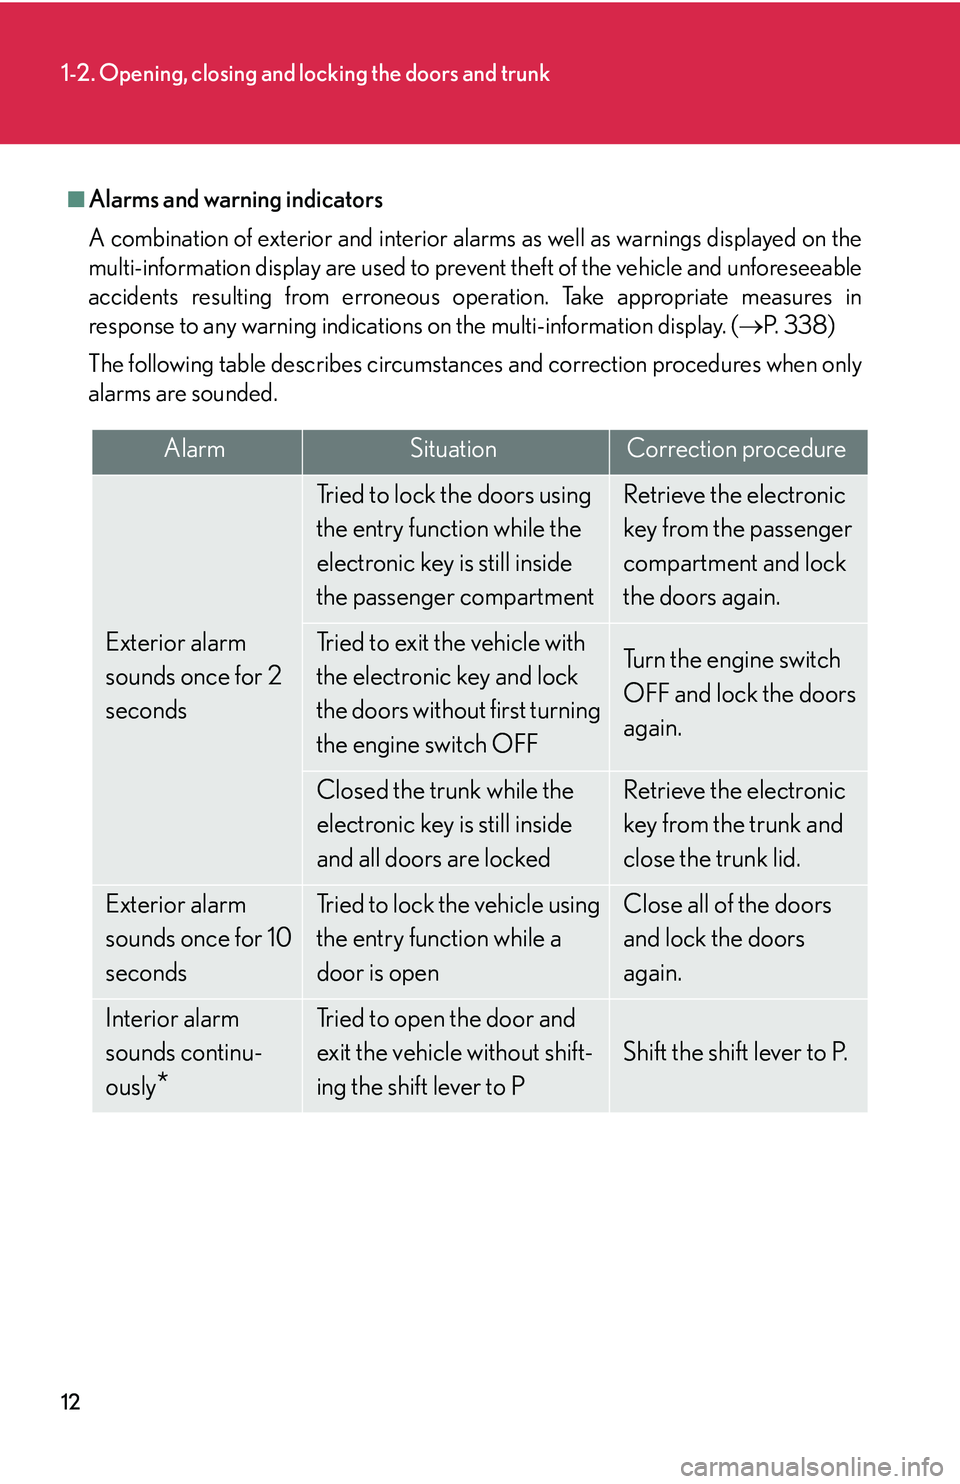
■Alarms and warning indicators
A combination of exterior and interior alarms as well as warnings displayed on the
multi-information display are used to prevent theft of the vehicle and unforeseeable
accidents resulting from erroneous operation. Take appropriate measures in
response to any warning indications on the multi-information display. (P. 3 3 8 )
The following table describes circumstances and correction procedures when only
alarms are sounded.
AlarmSituationCorrection procedure
Exterior alarm
sounds once for 2
seconds
Tried to lock the doors using
the entry function while the
electronic key is still inside
the passenger compartmentRetrieve the electronic
key from the passenger
compartment and lock
the doors again.
Tried to exit the vehicle with
the electronic key and lock
the doors without first turning
the engine switch OFFTurn the engine switch
OFF and lock the doors
again.
Closed the trunk while the
electronic key is still inside
and all doors are lockedRetrieve the electronic
key from the trunk and
close the trunk lid.
Exterior alarm
sounds once for 10
secondsTried to lock the vehicle using
the entry function while a
door is openClose all of the doors
and lock the doors
again.
Interior alarm
sounds continu-
ously
*
Tried to open the door and
exit the vehicle without shift-
ing the shift lever to P
Shift the shift lever to P.
Page 93 of 437
75
1
1-7. Safety information
Before driving
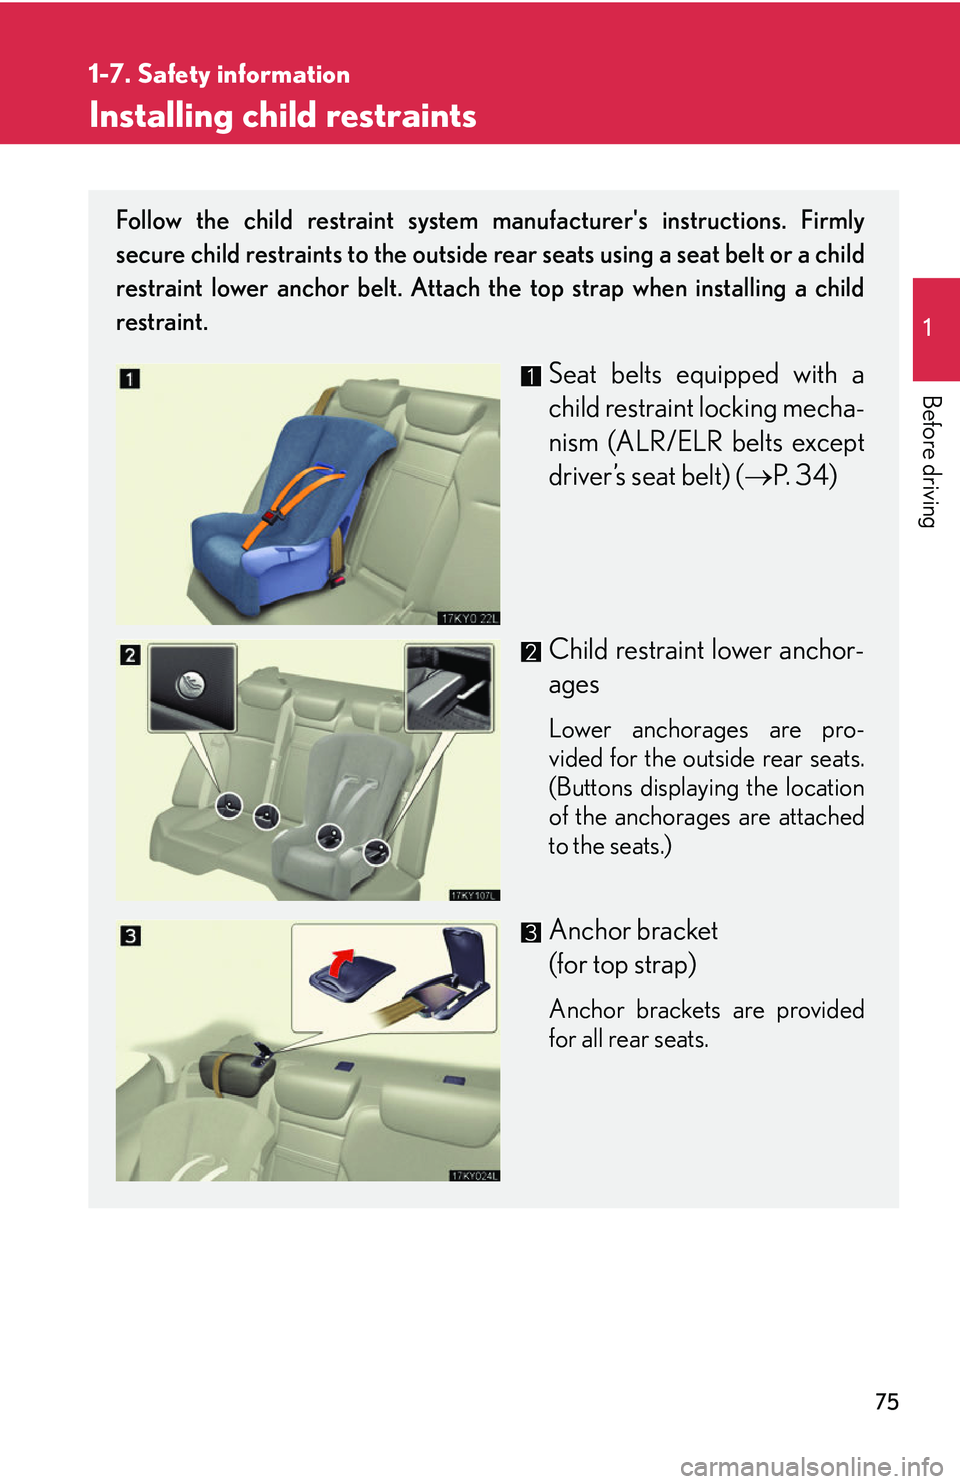
Installing child restraints
Follow the child restraint system manufacturer's instructions. Firmly
secure child restraints to the outside rear seats using a seat belt or a child
restraint lower anchor belt. Attach the top strap when installing a child
restraint.
Seat belts equipped with a
child restraint locking mecha-
nism (ALR/ELR belts except
driver’s seat belt) ( P. 3 4 )
Child restraint lower anchor-
ages
Lower anchorages are pro-
vided for the outside rear seats.
(Buttons displaying the location
of the anchorages are attached
to the seats.)
Anchor bracket
(for top strap)
Anchor brackets are provided
for all rear seats.
Page 103 of 437
When driving2
85
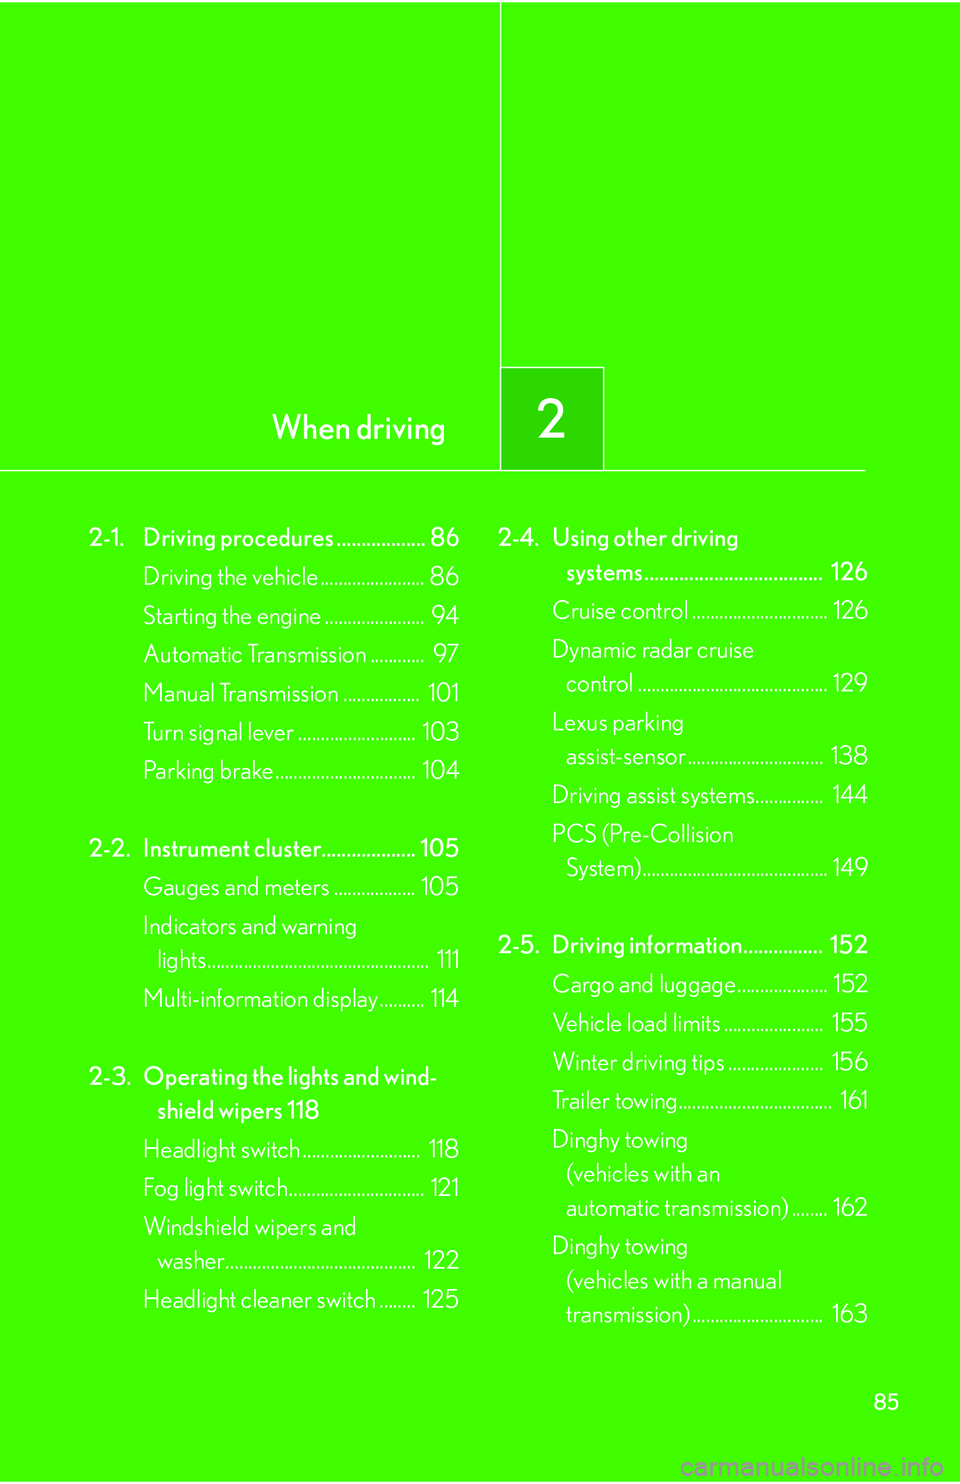
2-1. Driving procedures .................. 86Driving the vehicle ....................... 86
Starting the engine ...................... 94
Automatic Transmission ............ 97
Manual Transmission ................. 101
Turn signal lever .......................... 103
Parking brake ............................... 104
2-2. Instrument cluster................... 105 Gauges and meters .................. 105
Indicators and warning lights................................................. 111
Multi-information display.......... 114
2-3. Operating the lights and wind- shield wipers 118
Headlight switch .......................... 118
Fog light switch.............................. 121
Windshield wipers and washer.......................................... 122
Headlight cleaner switch ........ 125 2-4. Using other driving
systems .................................... 126
Cruise control .............................. 126
Dynamic radar cruise control .......................................... 129
Lexus parking assist-sensor .............................. 138
Driving assist systems............... 144
PCS (Pre-Collision System)......................................... 149
2-5. Driving information................ 152 Cargo and luggage.................... 152
Vehicle load limits ...................... 155
Winter driving tips ..................... 156
Trailer towing.................................. 161
Dinghy towing (vehicles with an
automatic transmission) ........ 162
Dinghy towing (vehicles with a manual
transmission) ............................. 163
Page 118 of 437
100
2-1. Driving procedures
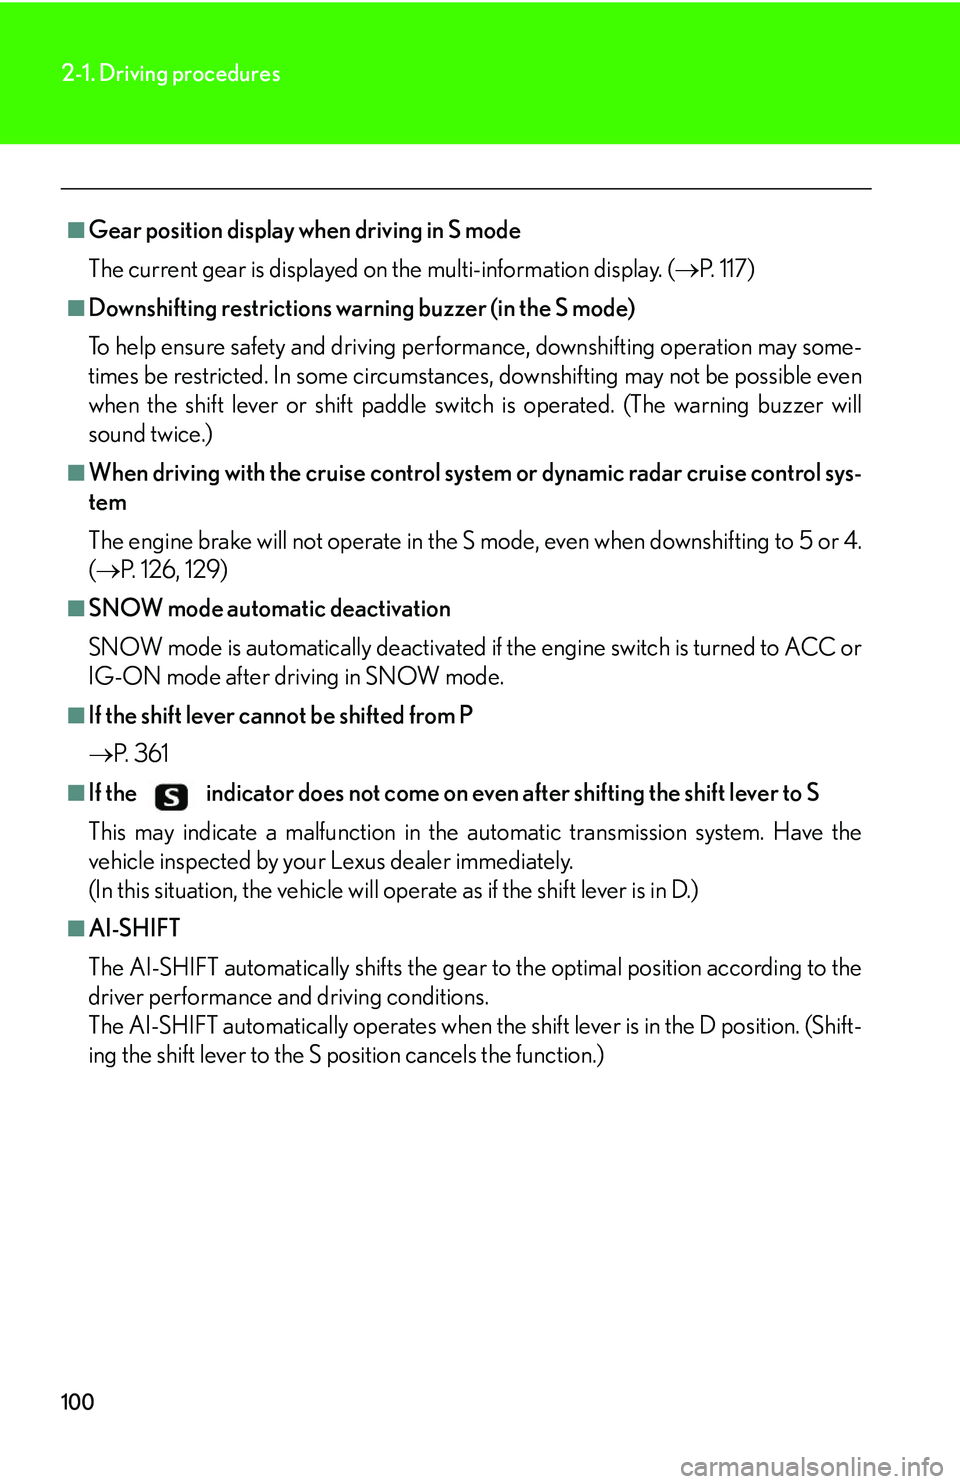
■Gear position display when driving in S mode
The current gear is displayed on the multi-information display. ( P. 117)
■Downshifting restrictions warning buzzer (in the S mode)
To help ensure safety and driving perfor mance, downshifting operation may some-
times be restricted. In some circumstance s, downshifting may not be possible even
when the shift lever or shift paddle switch is operated. (The warning buzzer will
sound twice.)
■When driving with the cruise control syst em or dynamic radar cruise control sys-
tem
The engine brake will not operate in the S mode, even when downshifting to 5 or 4.
( P. 1 2 6 , 1 2 9 )
■SNOW mode automatic deactivation
SNOW mode is automatically deactivated if the engine switch is turned to ACC or
IG-ON mode after driving in SNOW mode.
■If the shift lever cannot be shifted from P
P. 3 6 1
■If the indicator does not come on even after shifting the shift lever to S
This may indicate a malfunction in the automatic transmission system. Have the
vehicle inspected by your Lexus dealer immediately.
(In this situation, the vehicle will operate as if the shift lever is in D.)
■AI-SHIFT
The AI-SHIFT automatically sh ifts the gear to the optimal position according to the
driver performance and driving conditions.
The AI-SHIFT automatically operates when th e shift lever is in the D position. (Shift-
ing the shift lever to the S position cancels the function.)
Page 123 of 437
105
2
When driving
2-2. Instrument cluster
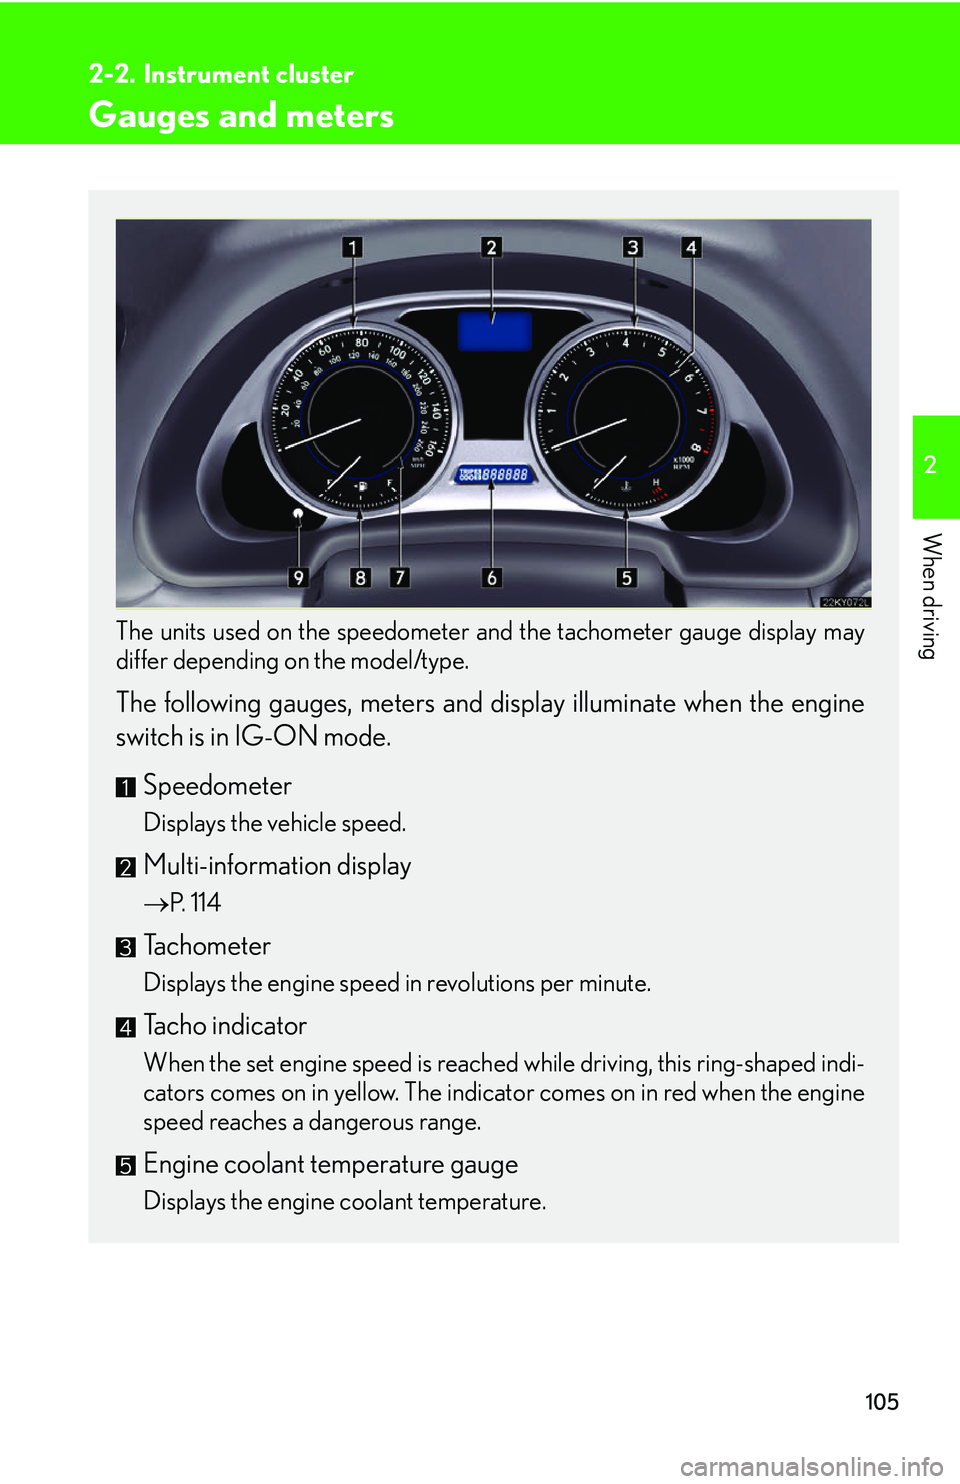
Gauges and meters
The units used on the speedometer and the tachometer gauge display may
differ depending on the model/type.
The following gauges, meters and display illuminate when the engine
switch is in IG-ON mode.
Speedometer
Displays the vehicle speed.
Multi-information display
P. 114
Tachometer
Displays the engine speed in revolutions per minute.
Tacho indicator
When the set engine speed is reached while driving, this ring-shaped indi-
cators comes on in yellow. The indicator comes on in red when the engine
speed reaches a dangerous range.
Engine coolant temperature gauge
Displays the engine coolant temperature.
Page 124 of 437
106
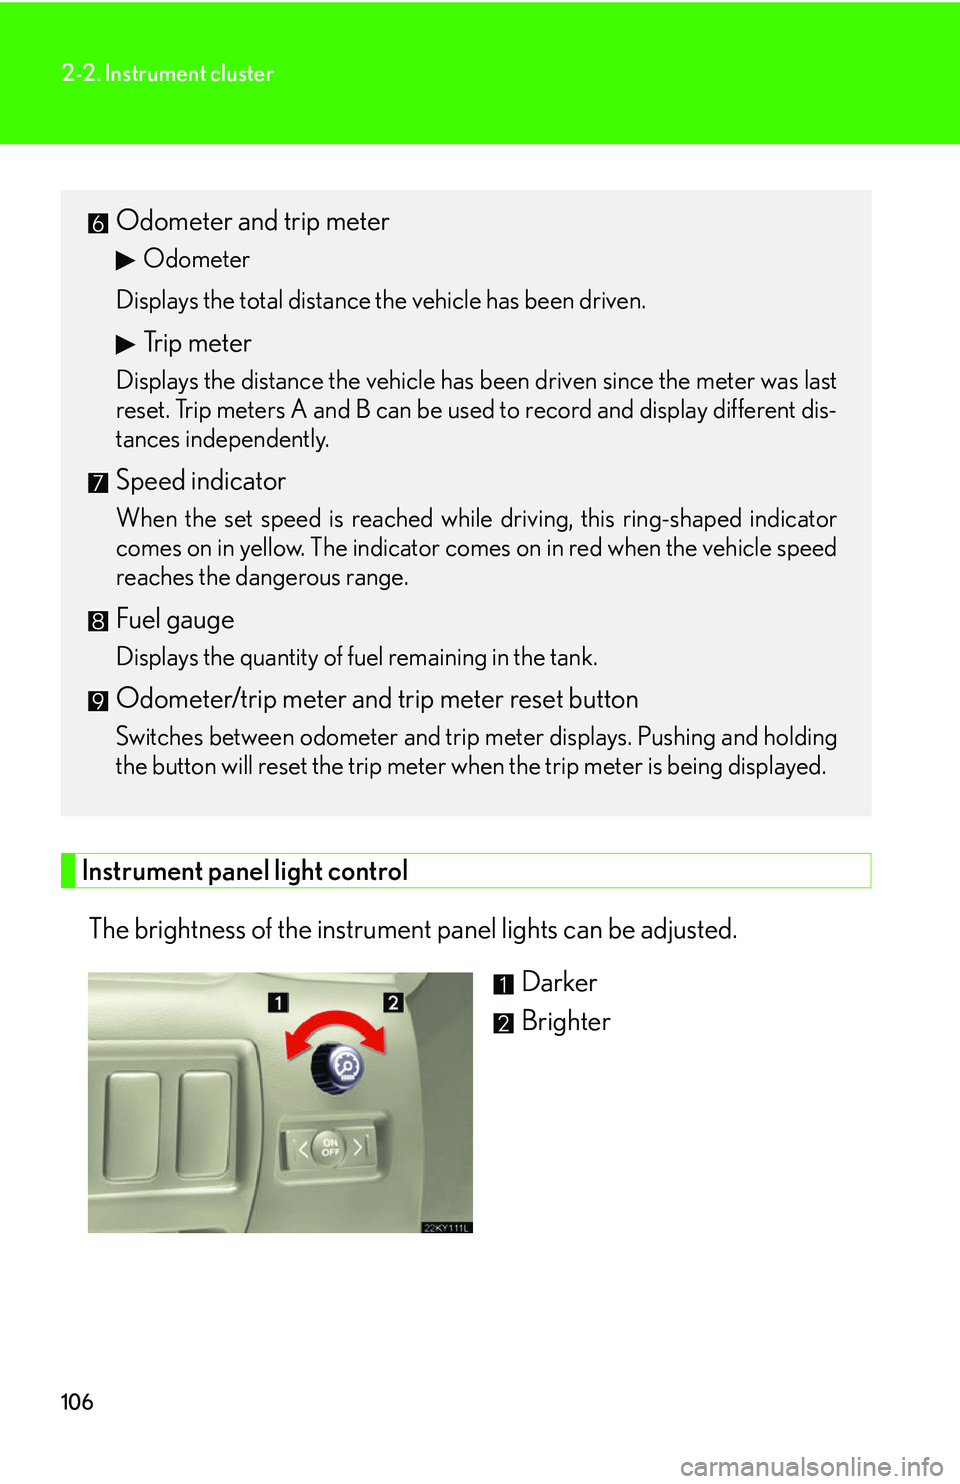
2-2. Instrument cluster
Instrument panel light controlThe brightness of the instrument panel lights can be adjusted. Darker
Brighter
Odometer and trip meter
Odometer
Displays the total distance the vehicle has been driven.
Trip meter
Displays the distance the vehicle has been driven since the meter was last
reset. Trip meters A and B can be used to record and display different dis-
tances independently.
Speed indicator
When the set speed is reached while driving, this ring-shaped indicator
comes on in yellow. The indicator comes on in red when the vehicle speed
reaches the dangerous range.
Fuel gauge
Displays the quantity of fuel remaining in the tank.
Odometer/trip meter and trip meter reset button
Switches between odometer and trip meter displays. Pushing and holding
the button will reset the trip meter when the trip meter is being displayed.