check system Lexus IS350 2008 Do-it-yourself maintenance / LEXUS 2008 IS350 (OM53699U350) Owner's Guide
[x] Cancel search | Manufacturer: LEXUS, Model Year: 2008, Model line: IS350, Model: Lexus IS350 2008Pages: 464, PDF Size: 6.61 MB
Page 285 of 464
285
4-2. Maintenance
4
Maintenance and care
Emission inspection and maintenance (I/M) programs
Some states have vehicle emission inspection programs which include
OBD (On Board Diagnostics) checks. The OBD system monitors the oper-
ation of the emission control system.
■ If the malfunction indicator lamp comes on
The OBD system determines that a problem exists somewhere in
the emission control system. Your vehicle may not pass the I/M test
and may need to be repaired. Contact your Lexus dealer to service
the vehicle.
■ Your vehicle may not pass the I/M test:
●When the battery is disconnected or discharged
Readiness codes that are set during ordinary driving are erased.
Also, depending on your driving habits, the readiness codes may
not be completely set.
● When the fuel tank cap is loose
The malfunction indicator lamp comes on as a temporary mal-
function and your vehicle may not pass the I/M test.
■ When the malfunction indicator la mp goes off after several driv-
ing trips
The error code in the OBD system will not be cleared unless the
vehicle is driven 40 or more times.
■ If your vehicle does not pass the I/M test
Contact your Lexus dealer to prep are the vehicle for re-testing.
Page 300 of 464
300
4-3. Do-it-yourself maintenance
■If the coolant level drops within a short time after replenishing
Visually check the radiator, hoses, engine coolant filler cap, radiator cap, drain cock
and water pump.
If you cannot find a leak, have your Lexus dealer pressure test the cap and check for
leaks in the cooling system.
■Coolant selection
Only use “Toyota Super Long Life Coolant” or similar high-quality ethylene glycol-
based non-silicate, non-amine, non-nitrite, and non-borate coolant with long-life
hybrid organic acid technology.
U.S.A.: “Toyota Super Long Life Coolant” is a mixture of 50% coolant and 50%
deionized water. (Enabled: -31F [-35 C])
Canada: “Toyota Super Long Life Coolant” is a mixture of 55% coolant and 45% deionized water. (Enabled: -44 F [-42C])
For more details about engine coolant, contact your Lexus dealer.
CAUTION
■When the engine is hot
Do not remove the radiator cap.
The cooling system may be under pressure and may spray hot coolant if the cap is
removed, causing burns or other injuries.
NOTICE
■When adding engine coolant
Coolant is neither plain water nor straight antifreeze. The correct mixture of water
and antifreeze must be used to provide proper lubrication, corrosion protection
and cooling. Be sure to read the antifreeze or coolant label.
■If you spill coolant
Be sure to wash it off with water to prevent it damaging parts or paint.
Page 303 of 464
303
4-3. Do-it-yourself maintenance
4
Maintenance and care
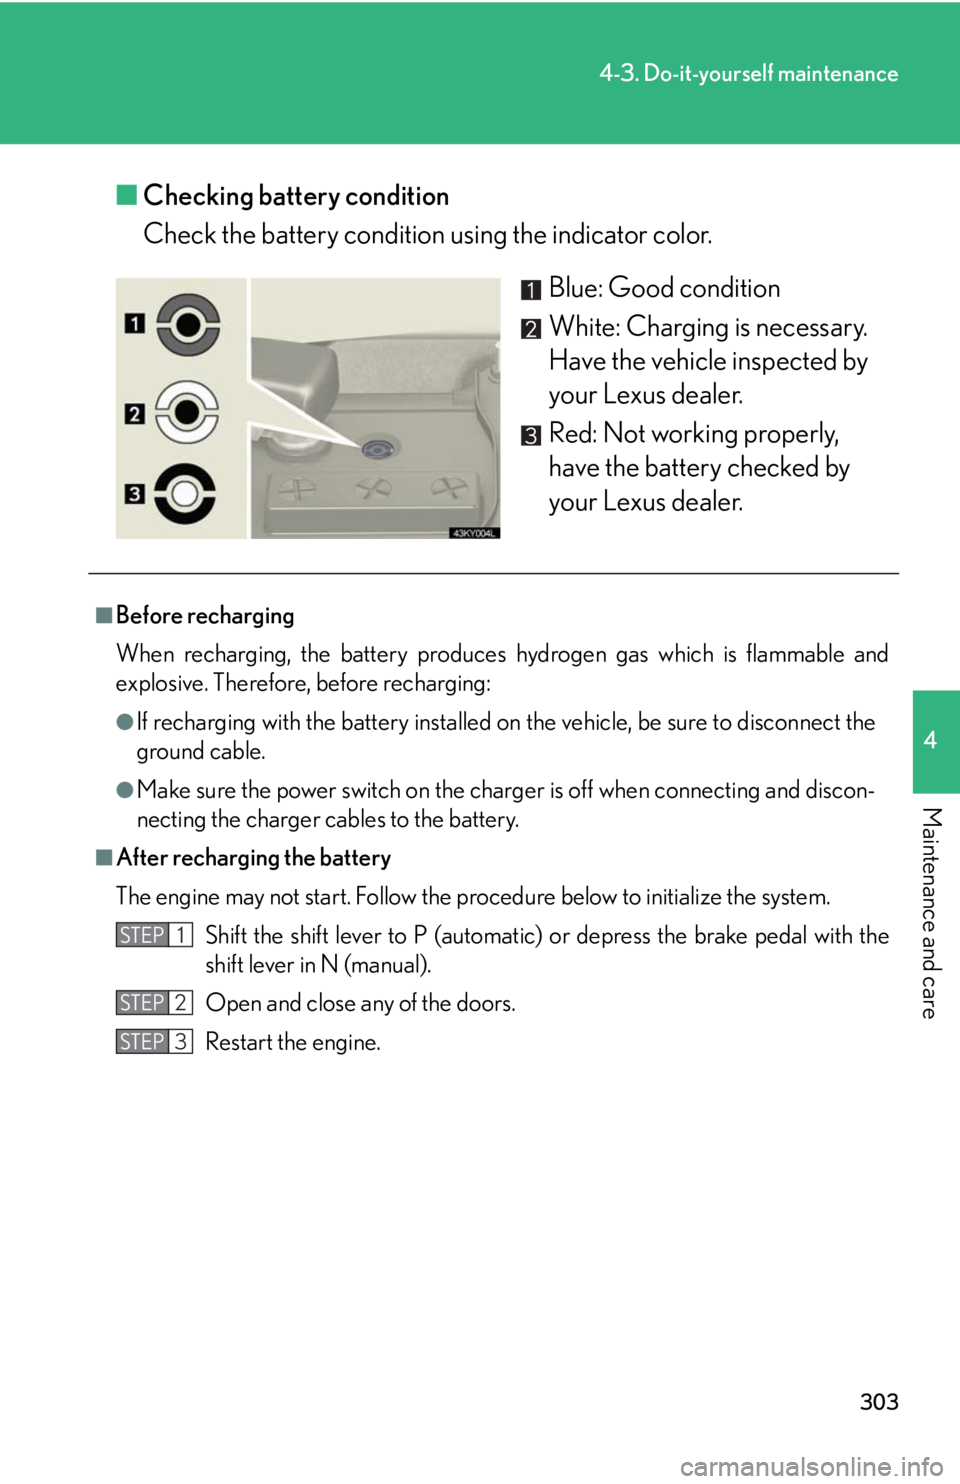
■Checking battery condition
Check the battery condition using the indicator color.
Blue: Good condition
White: Charging is necessary.
Have the vehicle inspected by
your Lexus dealer.
Red: Not working properly,
have the battery checked by
your Lexus dealer.
■Before recharging
When recharging, the battery produces hydrogen gas which is flammable and
explosive. Therefore, before recharging:
●If recharging with the battery installed on the vehicle, be sure to disconnect the
ground cable.
●Make sure the power switch on the charger is off when connecting and discon-
necting the charger cables to the battery.
■After recharging the battery
The engine may not start. Follow the procedure below to initialize the system.
Shift the shift lever to P (automatic) or depress the brake pedal with the
shift lever in N (manual).
Open and close any of the doors.
Restart the engine.
STEP1
STEP2
STEP3
Page 306 of 464
306
4-3. Do-it-yourself maintenance
Tires
Replace or rotate tires in accordance with maintenance schedules and
treadwear.
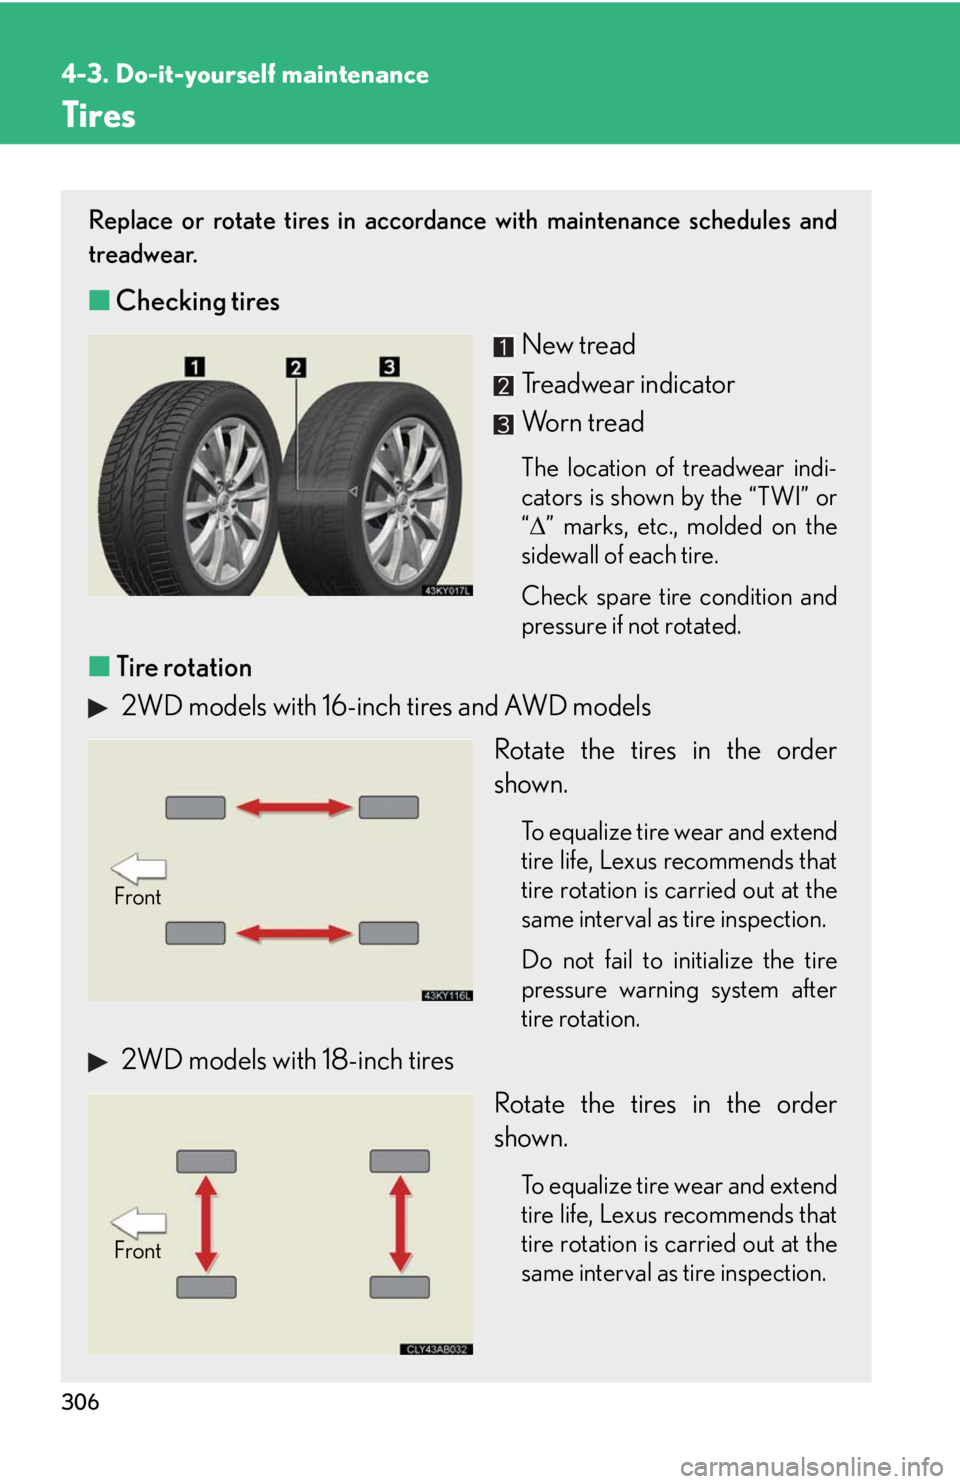
■Checking tires
New tread
Treadwear indicator
Worn tread
The location of treadwear indi-
cators is shown by the “TWI” or
“” marks, etc., molded on the
sidewall of each tire.
Check spare tire condition and
pressure if not rotated.
■ Tire rotation
2WD models with 16-inch tires and AWD models
Rotate the tires in the order
shown.
To equalize tire wear and extend
tire life, Lexus recommends that
tire rotation is carried out at the
same interval as tire inspection.
Do not fail to initialize the tire
pressure warning system after
tire rotation.
2WD models with 18-inch tiresRotate the tires in the order
shown.
To equalize tire wear and extend
tire life, Lexus recommends that
tire rotation is carried out at the
same interval as tire inspection.
Front
Front
Page 311 of 464

311
4-3. Do-it-yourself maintenance
4
Maintenance and care
■When to replace your vehicle’s tires
Tires should be replaced if:
●You have tire damage such as cuts, splits, cracks deep enough to expose the
fabric or bulges indicating internal damage
●A tire goes flat repeatedly or cannot be properly repaired due to the size or
location of a cut or other damage
If you are not sure, consult with your Lexus dealer.
■Replacing tires and wheels
If the ID code of the tire pressure warn ing valve and transmitter is not registered,
the tire pressure warning system will not work properly. After driving for about 20
minutes, the tire pressure warning light comes on after blinking for 1 minute to indi-
cate a system malfunction.
■Tire life
Any tire over 6 years old must be checked by a qualified technician even if they
have seldom or never been used or damage is not obvious.
■If the tread wears down below 0.16 in. (4 mm) on snow tires
The effectiveness of snow tires is lost.
■Low profile tires (models not equipped with 16-inch tires)
Generally, low profile tires will wear more rapidly and tire grip performance will be
reduced on snowy and/or icy roads when co mpared to standard tires. Be sure to
use snow tires or tire chains
* on snowy and/or icy roads and drive carefully at a
speed appropriate for road and weather conditions.
*: Tire chains cannot be mounted on 18-inch tires.
■Maximum load of tire
Check that the maximum load of the replaced tire is greater than 1 /2 of the Gross
Axle Weight Ratings (GAWR) of either the front axle or the rear axle, whichever is
greater.
As for the maximum load of the tire, see the load limit at maximum cold tire inflation
pressure mentioned on the sidewall of the tire, and as for the Gross Axle Weight
Ratings (GAWR), see the Certification Label. (
P. 3 1 6 , 4 2 4 ) .
Page 312 of 464

312
4-3. Do-it-yourself maintenance
■Tire types
1 Summer tiresSummer tires are high-speed performance tires best suited to highway driving
under dry conditions. Since summer tires do not have the same traction perfor-
mance as snow tires, summer tires are inadequate for driving on snow-covered
or icy roads. For driving on snow-covered roads or icy roads, the use of snow tires
is recommended. When installing snow tires, be sure to replace all four tires.
2 All season tires All season tires are designed to provide better traction in snow and to be ade-
quate for driving in most winter conditions , as well as for use year round. All sea-
son tires, however, do not have adequa te traction performance compared with
snow tires in heavy or loos e snow. Also, all season tires fall short in acceleration
and handling performance compared with summer tires in highway driving.
3Snow tires For driving on snow-covered roads or ic y roads, we recommend using snow tires.
If you need snow tires, select tires of the same size, construction and load capac-
ity as the originally installed tires. Since your vehicle has radial tires as original
equipment, make sure your snow tires also have radial construction. Do not install
studded tires without first checking loca l regulations for possible restriction.
Snow tires should be installed on all wheels. ( P. 1 8 3 )
■Initializing the tire pressure warning system
Initialize the tires with the tire inflatio n pressure adjusted to the specified level.
■When the initialization of the tire pressure warning system has failed
Initialization can be completed in a few minutes. However, in the following cases,
the settings have not been recorded and the system will not operate properly. If
repeated attempts to record tire inflation pressure settings are unsuccessful, have
the vehicle inspected by your Lexus dealer.
●When operating the tire pressure warnin g reset switch, the tire pressure warn-
ing light does not flash 3 times and the setting message does not appear on the
multi-information display.
●After carrying out the initialization proc edure, the tire pressure warning light
blinks for 1 minute then stays on after driving for about 20 minutes.
Page 313 of 464

313
4-3. Do-it-yourself maintenance
4
Maintenance and care
■Routine tire inflation pressure checks
The tire pressure warning system does not replace routine tire inflation pressure
checks. Make sure to check tire inflation pressure as part of your routine of daily
vehicle checks.
■Tire pressure warning system certificationFor vehicles sold in the U.S.A.
This device complies with Part 15 of the FCC Rules. Operation is subject to the fol-
lowing two conditions: (1) this device may not cause harmful interference, and (2)
this device must accept any interference received, including interference that may
cause undesired operation.
NOTICE:
This equipment has been tested and found to comply with the limits for a Class B
digital device, pursuant to Part 15 of the FCC Rules. These limits are designed to
provide reasonable protection against harmful interference in a residential installa-
tion. This equipment generate s, uses and can radiate radio frequency energy and, if
not installed and used in accordance with the instructions, may cause harmful inter-
ference to radio communications. However, there is no guarantee that interference
will not occur in a particular installation. If this equipment does cause harmful inter-
ference to radio or television reception, which can be determined by turning the
equipment off and on, the user is encouraged to try to correct the interference by
one or more of the following measures:
●Reorient or relocate the receiving antenna.
●Increase the separation between the equipment and receiver.
●Connect the equipment into an outlet on a circuit different from that to which
the receiver is connected.
●Consult the dealer or an experienced radio/TV technician for help.
FCC WARNING:
Changes or modifications not expressly approved by the party responsible for
compliance could void the user's authority to operate the equipment.
For vehicles sold in Canada
Operation is subject to the following two conditions: (1) this device may not cause
interference, and (2) this device must a ccept any interference, including interfer-
ence that may cause undesired operation of the device.
Page 320 of 464
320
4-3. Do-it-yourself maintenance
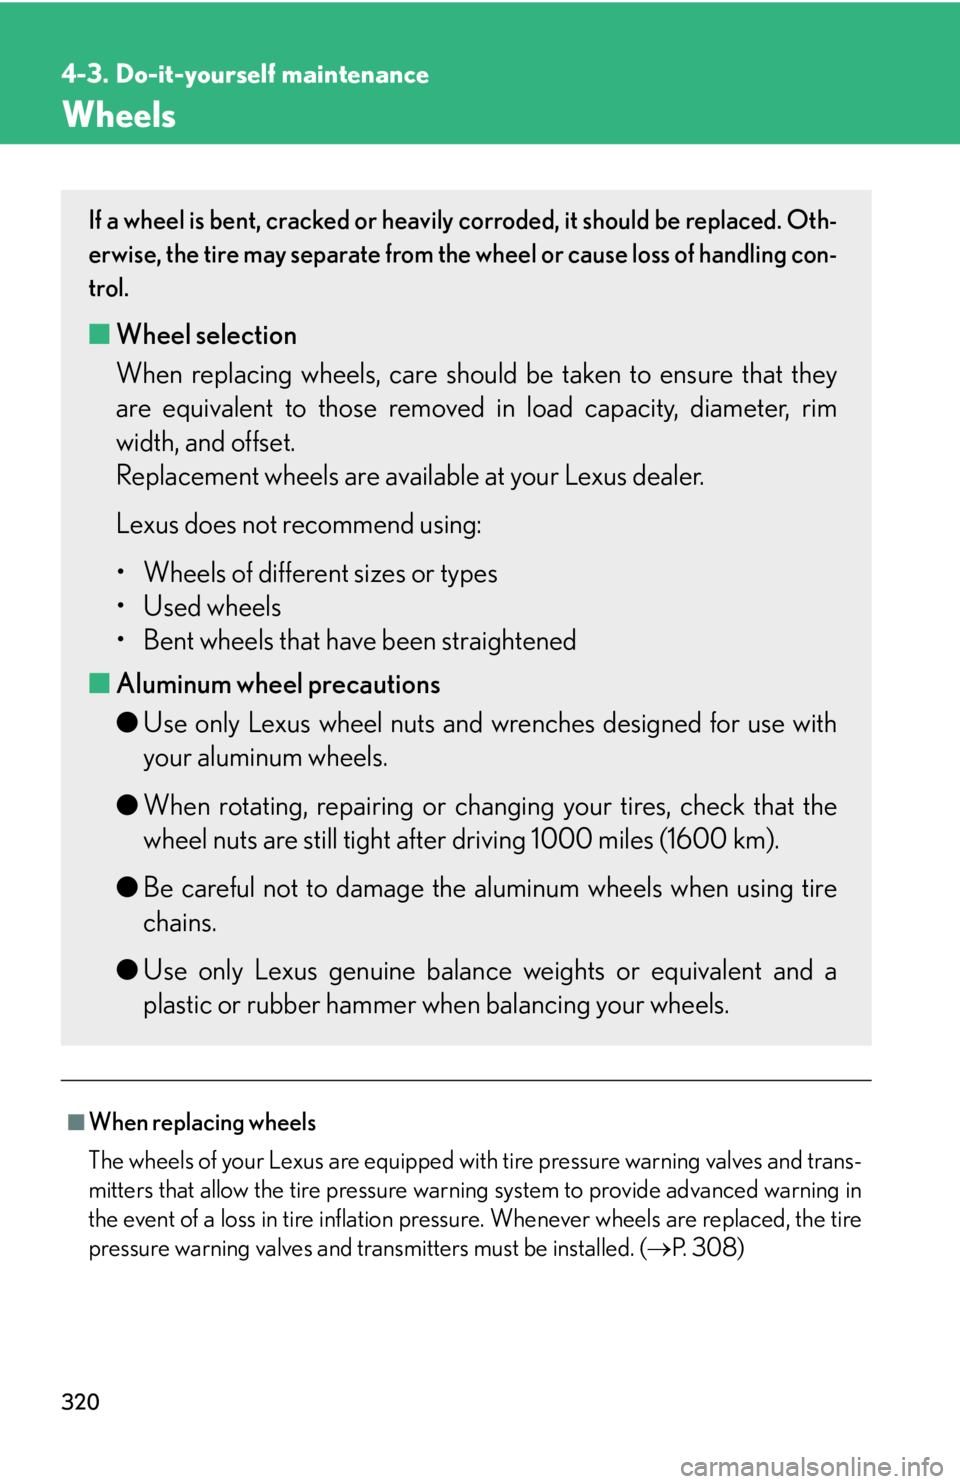
Wheels
■When replacing wheels
The wheels of your Lexus are equipped with tire pressure warning valves and trans-
mitters that allow the tire pressure warning system to provide advanced warning in
the event of a loss in tire inflation pressure. Whenever wheels are replaced, the tire
pressure warning valves and transmitters must be installed. ( P. 3 0 8 )
If a wheel is bent, cracked or heavily corroded, it should be replaced. Oth-
erwise, the tire may separate from the wheel or cause loss of handling con-
trol.
■ Wheel selection
When replacing wheels, care should be taken to ensure that they
are equivalent to those removed in load capacity, diameter, rim
width, and offset.
Replacement wheels are available at your Lexus dealer.
Lexus does not recommend using:
• Wheels of different sizes or types
• Used wheels
• Bent wheels that have been straightened
■ Aluminum wheel precautions
●Use only Lexus wheel nuts and wrenches designed for use with
your aluminum wheels.
● When rotating, repairing or changi ng your tires, check that the
wheel nuts are still tight after driving 1000 miles (1600 km).
● Be careful not to damage the aluminum wheels when using tire
chains.
● Use only Lexus genuine balance weights or equivalent and a
plastic or rubber hammer when balancing your wheels.
Page 328 of 464
328
4-3. Do-it-yourself maintenance
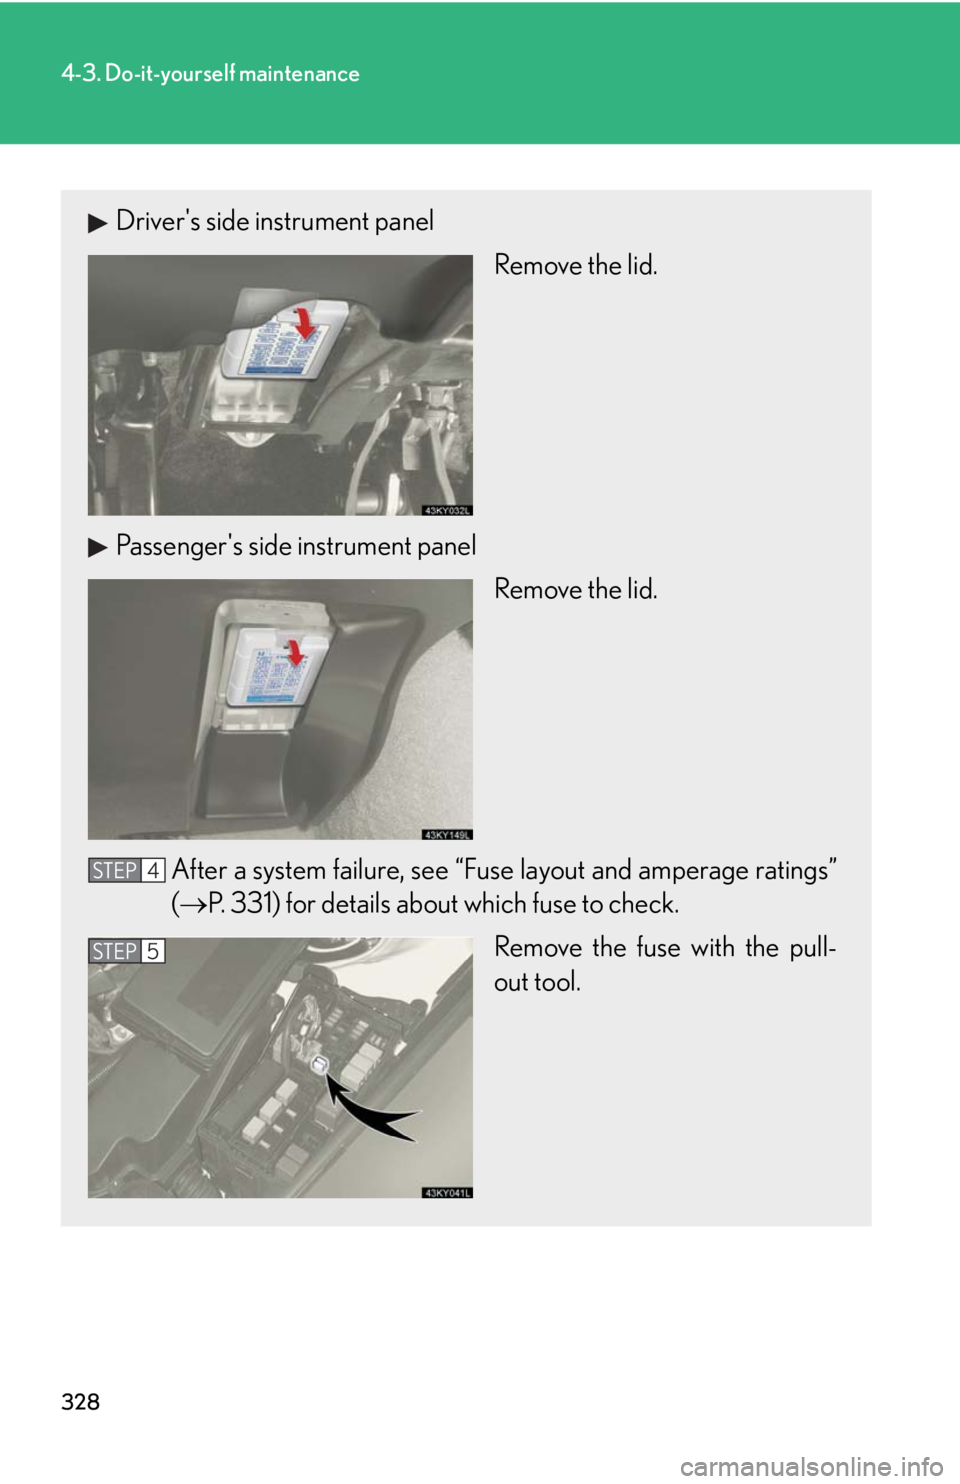
Driver's side instrument panelRemove the lid.
Passenger's side instrument panel Remove the lid.
After a system failure, see “Fuse layout and amperage ratings”
( P. 331) for details about which fuse to check.
Remove the fuse with the pull-
out tool.
STEP4
STEP5
Page 362 of 464
362
5-2. Steps to take in an emergency
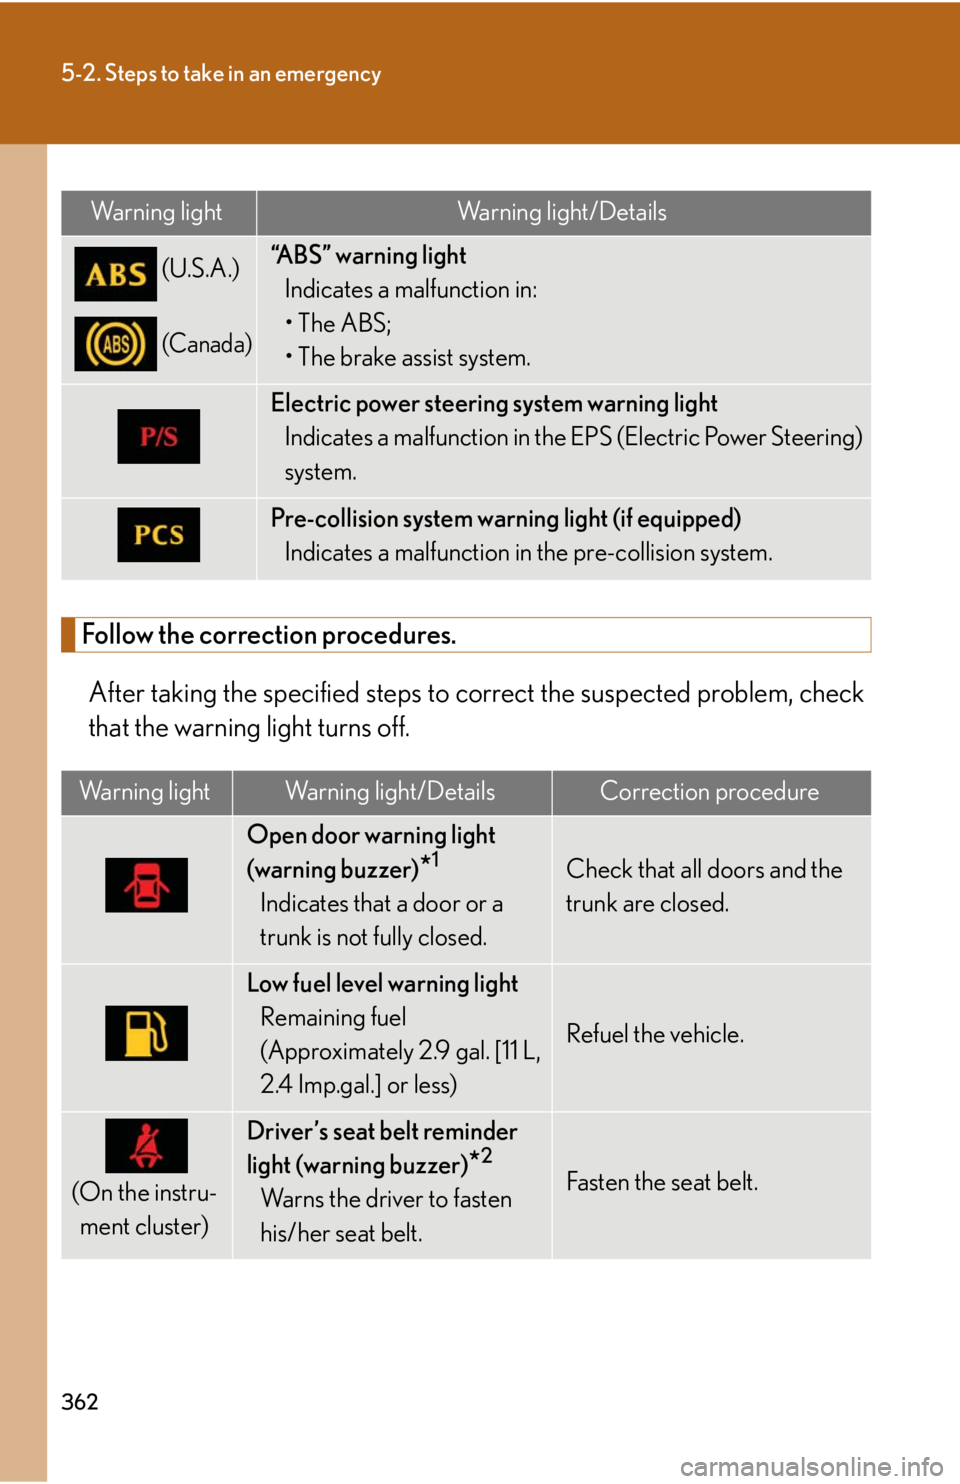
Follow the correction procedures.After taking the specified steps to co rrect the suspected problem, check
that the warning light turns off.
Warning lightWarning light/Details
(U.S.A.)
(Canada)
“ABS” warning light
Indicates a malfunction in:
•The ABS;
• The brake assist system.
Electric power steering system warning lightIndicates a malfunction in the EPS (Electric Power Steering)
system.
Pre-collision system warning light (if equipped)Indicates a malfunction in the pre-collision system.
Warning lightWarning light/DetailsCorrection procedure
Open door warning light
(warning buzzer)
*1
Indicates that a door or a
trunk is not fully closed.
Check that all doors and the
trunk are closed.
Low fuel level warning lightRemaining fuel
(Approximately 2.9 gal. [11 L,
2.4 Imp.gal.] or less)
Refuel the vehicle.
(On the instru-ment cluster)
Driver’s seat belt reminder
light (warning buzzer)
*2
Warns the driver to fasten
his/her seat belt.Fasten the seat belt.