lift Lexus IS350 2011 Owner's Manual / LEXUS 2011 IS250/IS350 OWNERS MANUAL (OM53839U)
[x] Cancel search | Manufacturer: LEXUS, Model Year: 2011, Model line: IS350, Model: Lexus IS350 2011Pages: 576, PDF Size: 7.16 MB
Page 107 of 576
107
1-7. Safety information
1
Before driving
*4: Never install a rear-facing child restraint system on the front passen-
ger seat. A forward-facing child restraint system should only be
installed on the front passenger seat when it is unavoidable.
( P. 1 0 9 )
*
5: In case the indicator is not illum inated, consult this manual as for
installing the child restraint system properly. ( P. 113)
CAUTION
■Front passenger occupant classi fication system precautions
Observe the following precautions regarding the front passenger occupant classifi-
cation system.
Failure to do so may cause death or serious injury.
●Wear the seat belt properly.
●Make sure the front passenge r’s seat belt tab has not been left inserted into the
buckle before someone sits in the front passenger seat.
●Make sure the “AIR BAG OFF” indicator light is not illuminated when using the
seat belt extender for the front passen ger seat. If the “AIR BAG OFF” indicator
light is illuminated, disconnect the extender tongue from the seat belt buckle,
then reconnect the seat belt. Reconnect the seat belt extender after making sure
the “AIR BAG ON” indicator light is illuminated. If you use the seat belt extender
while the “AIR BAG OFF” indicator light is illuminated, the front passenger air-
bag, side airbag on the front passenger side and front passenger knee airbag may
not activate correctly, which could cause death or serious injury in the event of
collision.
●Do not put weight on the front passenger seat by putting your hands or feet on
the front passenger seat seatback from the rear passenger seat.
●Do not let a rear passenger lift the front passenger seat with their feet or press on
the seatback with their legs.
●Do not put objects under the front passenger seat.
Page 145 of 576
145
2-1. Driving procedures
2
When driving
Manual transmission
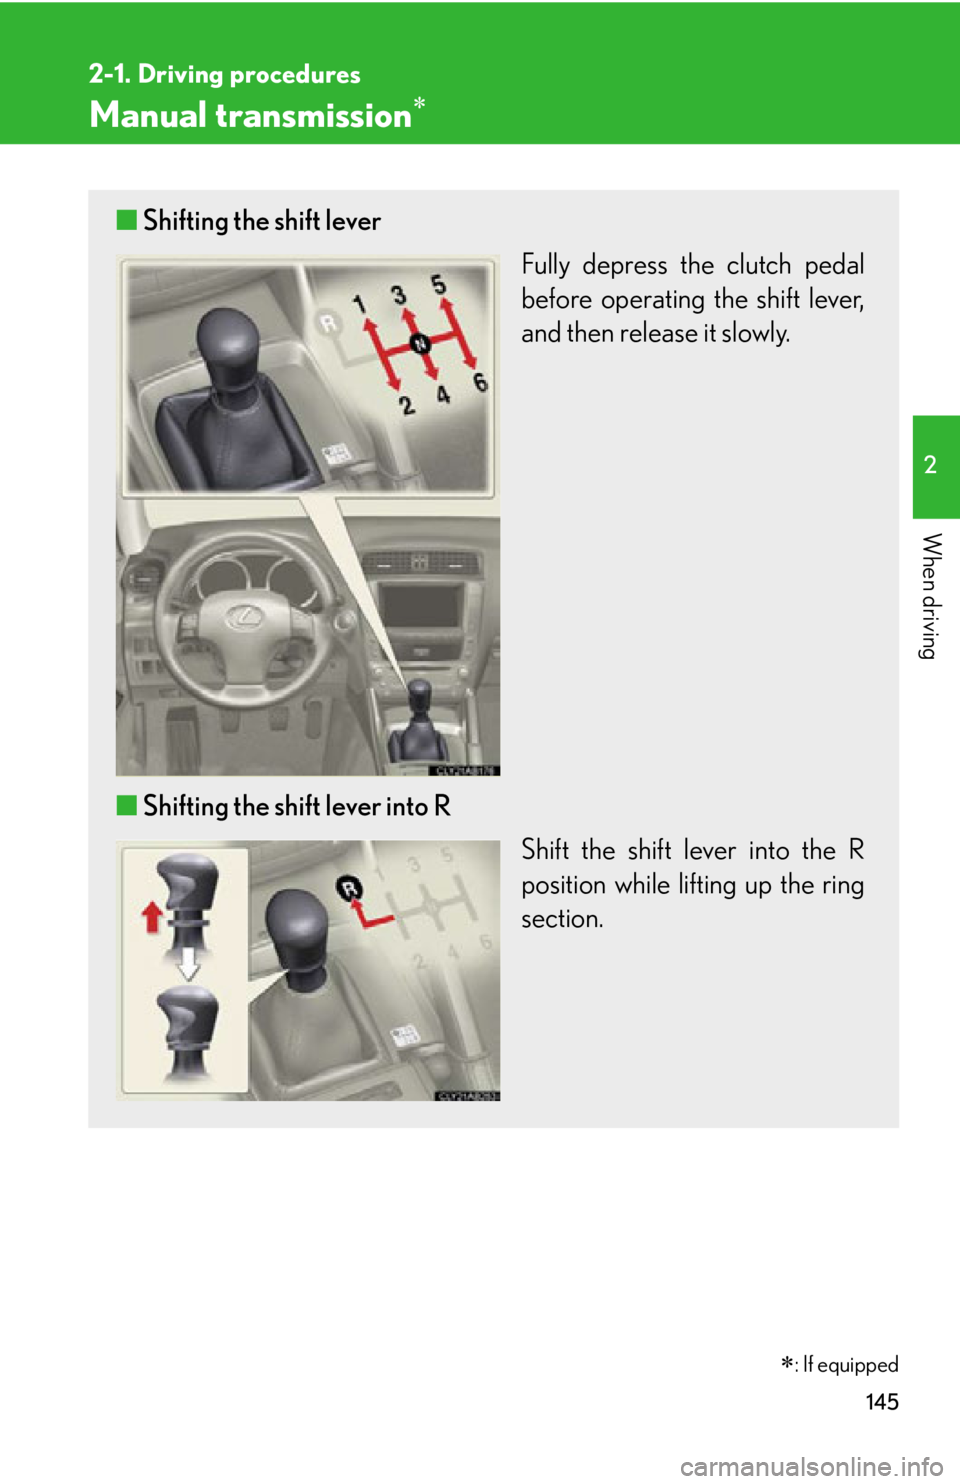
■Shifting the shift lever
Fully depress the clutch pedal
before operating the shift lever,
and then release it slowly.
■ Shifting the shift lever into R
Shift the shift lever into the R
position while lifting up the ring
section.
: If equipped
Page 320 of 576
320
3-6. Using the storage features
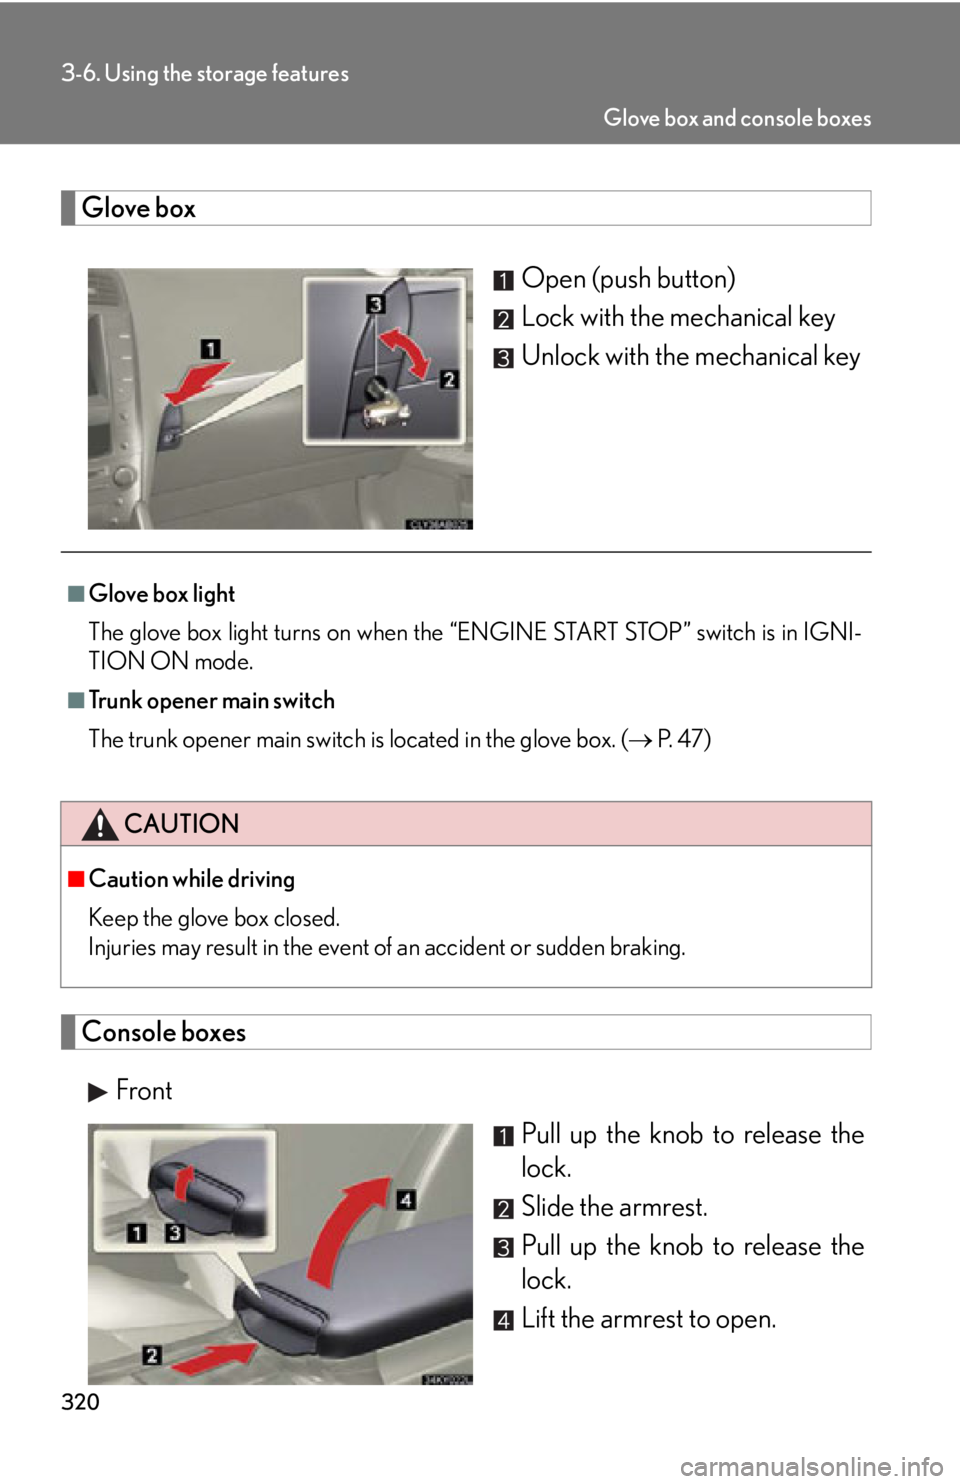
Glove boxOpen (push button)
Lock with the mechanical key
Unlock with the mechanical key
Console boxesFront Pull up the knob to release the
lock.
Slide the armrest.
Pull up the knob to release the
lock.
Lift the armrest to open.
■Glove box light
The glove box light turns on when the “ENGINE START STOP” switch is in IGNI-
TION ON mode.
■Trunk opener main switch
The trunk opener main switch is located in the glove box. ( P. 4 7 )
CAUTION
■Caution while driving
Keep the glove box closed.
Injuries may result in the event of an accident or sudden braking.
Glove box and console boxes
Page 321 of 576
321
3-6. Using the storage features
3
Interior features
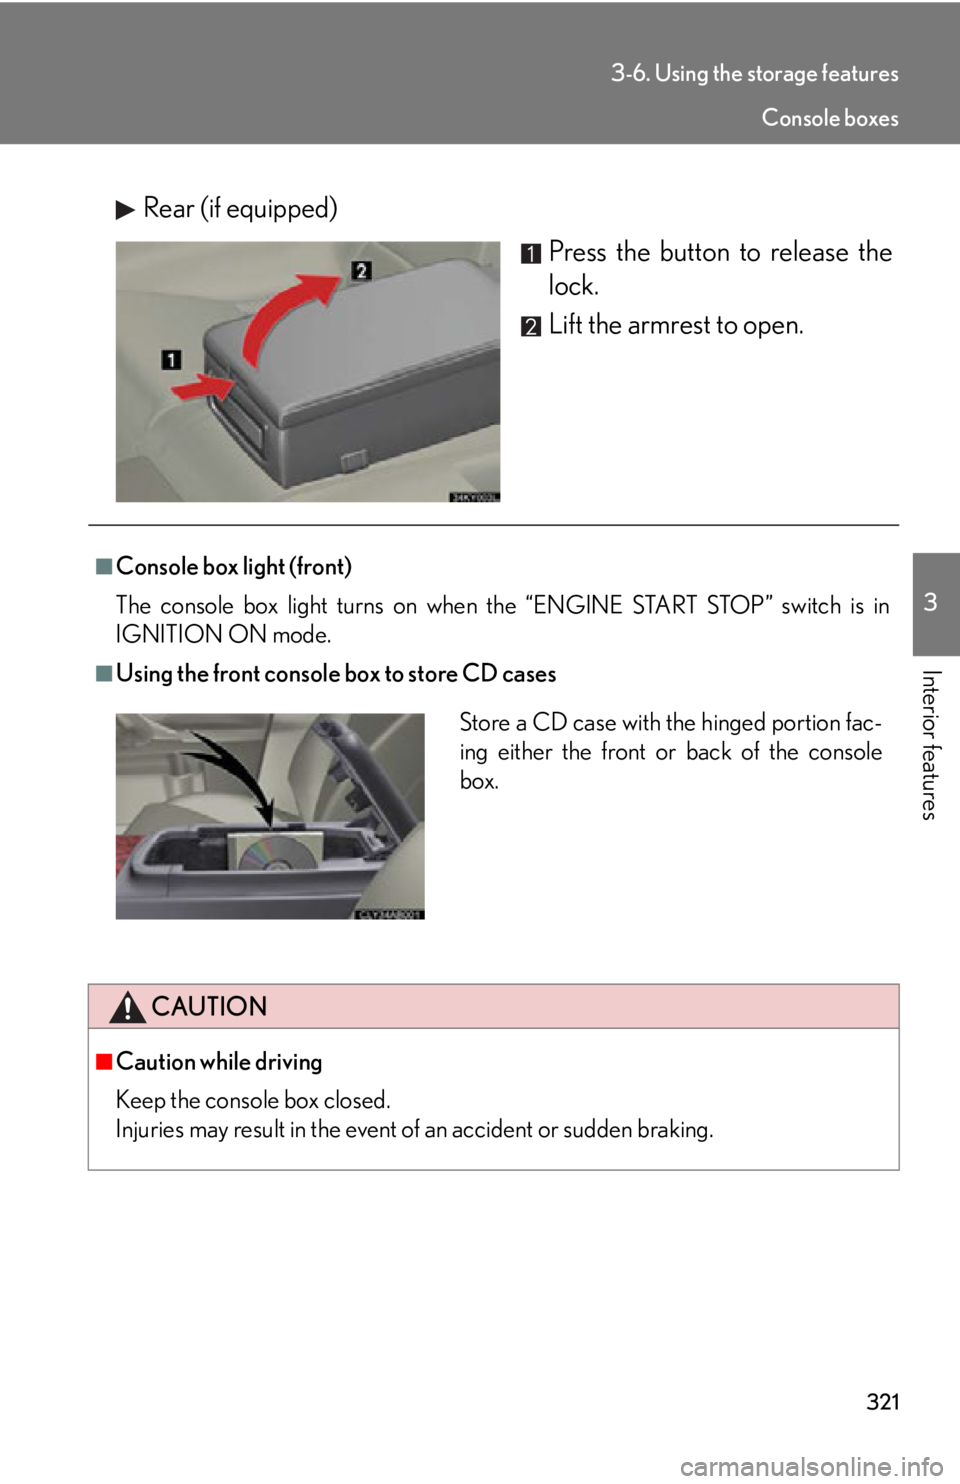
Rear (if equipped)Press the button to release the
lock.
Lift the armrest to open.
■Console box light (front)
The console box light turns on when the “ENGINE START STOP” switch is in
IGNITION ON mode.
■Using the front console box to store CD cases
CAUTION
■Caution while driving
Keep the console box closed.
Injuries may result in the event of an accident or sudden braking.
Store a CD case with the hinged portion fac-
ing either the front or back of the console
box.
Console boxes
Page 348 of 576
348
3-7. Other interior features
CAUTION
■When the cargo hooks are not in use
To avoid injury, always return the cargo hooks to their positions when they are not in
use.
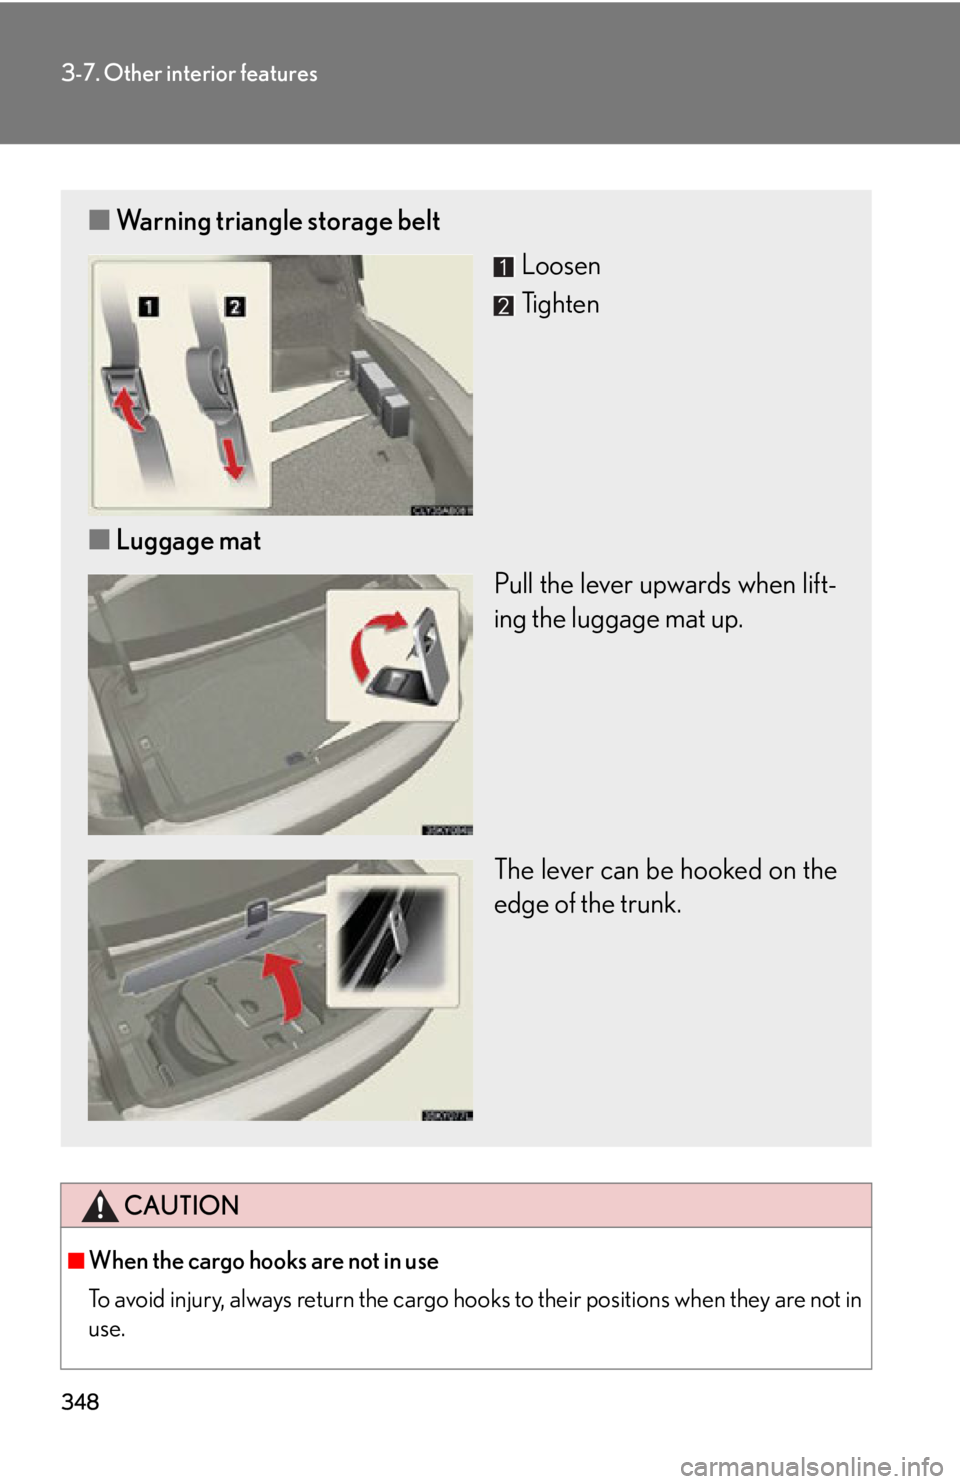
■ Warning triangle storage belt
Loosen
Tighten
■ Luggage mat
Pull the lever upwards when lift-
ing the luggage mat up.
The lever can be hooked on the
edge of the trunk.
Page 370 of 576
370
4-1. Maintenance and care
NOTICE
■To prevent paint deterioration and corrosion on the body and components (alu-
minum wheels etc.)
●Wash the vehicle immediately in the following cases:
• After driving near the sea coast
• After driving on salted roads
• If you see coal tar or tree sap on the paint surface
• If you see dead in sects, insect droppings or bird droppings on the paint
• After driving in an area contaminated with soot, oily smoke, mine dust, iron
powder or chemical substances
• If the vehicle becomes heavily soiled in dust or mud
• If liquids such as benzene and gasoline are spilled on the paint surface
●If the paint is chipped or scratched, have it repaired immediately.
●To prevent the wheels from corroding, remove any dirt and store in a place with
low humidity when storing the wheels.
■Cleaning the exterior lights
●Wash carefully. Do not use organic substances or scrub with a hard brush.
This may damage the surfaces of the lights.
●Do not apply wax on the surfaces of the lights.
Wax may cause damage to the lenses.
■To prevent damage to the windshield wiper arms
When lifting the wiper arms away from th e windshield, pull the driver side wiper
arm upward first, and repeat for the passenger side. When returning the wipers to
their original position, do so from the passenger side first.
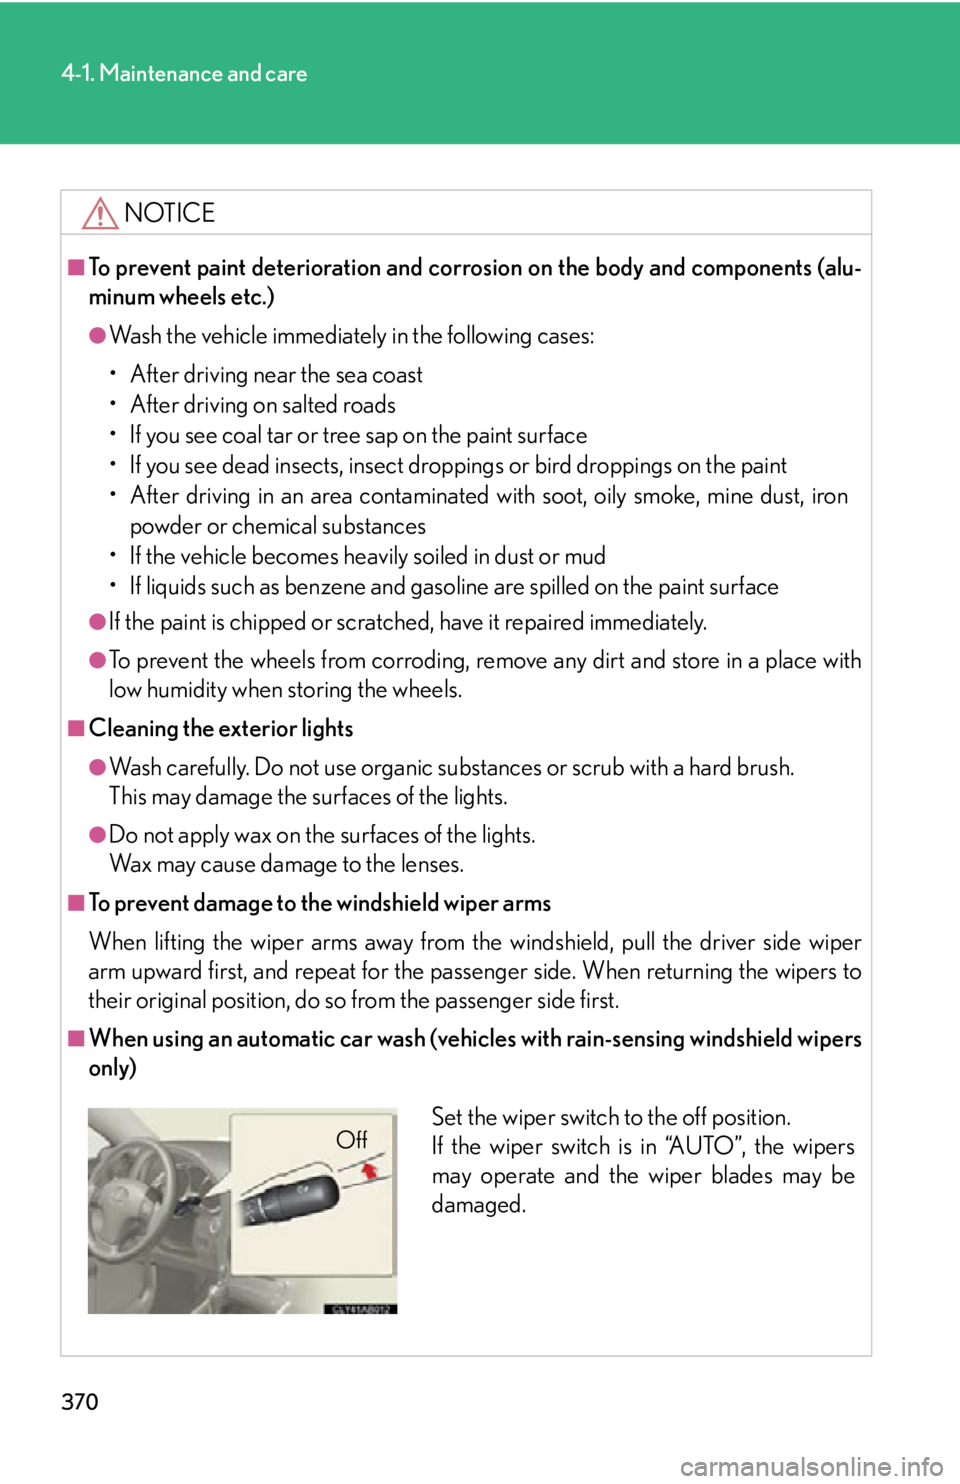
■When using an automatic car wash (vehicles with rain-sensing windshield wipers
only)
Set the wiper switch to the off position.
If the wiper switch is in “AUTO”, the wipers
may operate and the wiper blades may be
damaged.Off
Page 383 of 576
383
4-3. Do-it-yourself maintenance
4
Maintenance and care
Hood
CAUTION
■Pre-driving check
Check that the hood is fully closed and locked.
If the hood is not locked properly it may open while the vehicle is in motion and
cause an accident, which may result in death or serious injury.
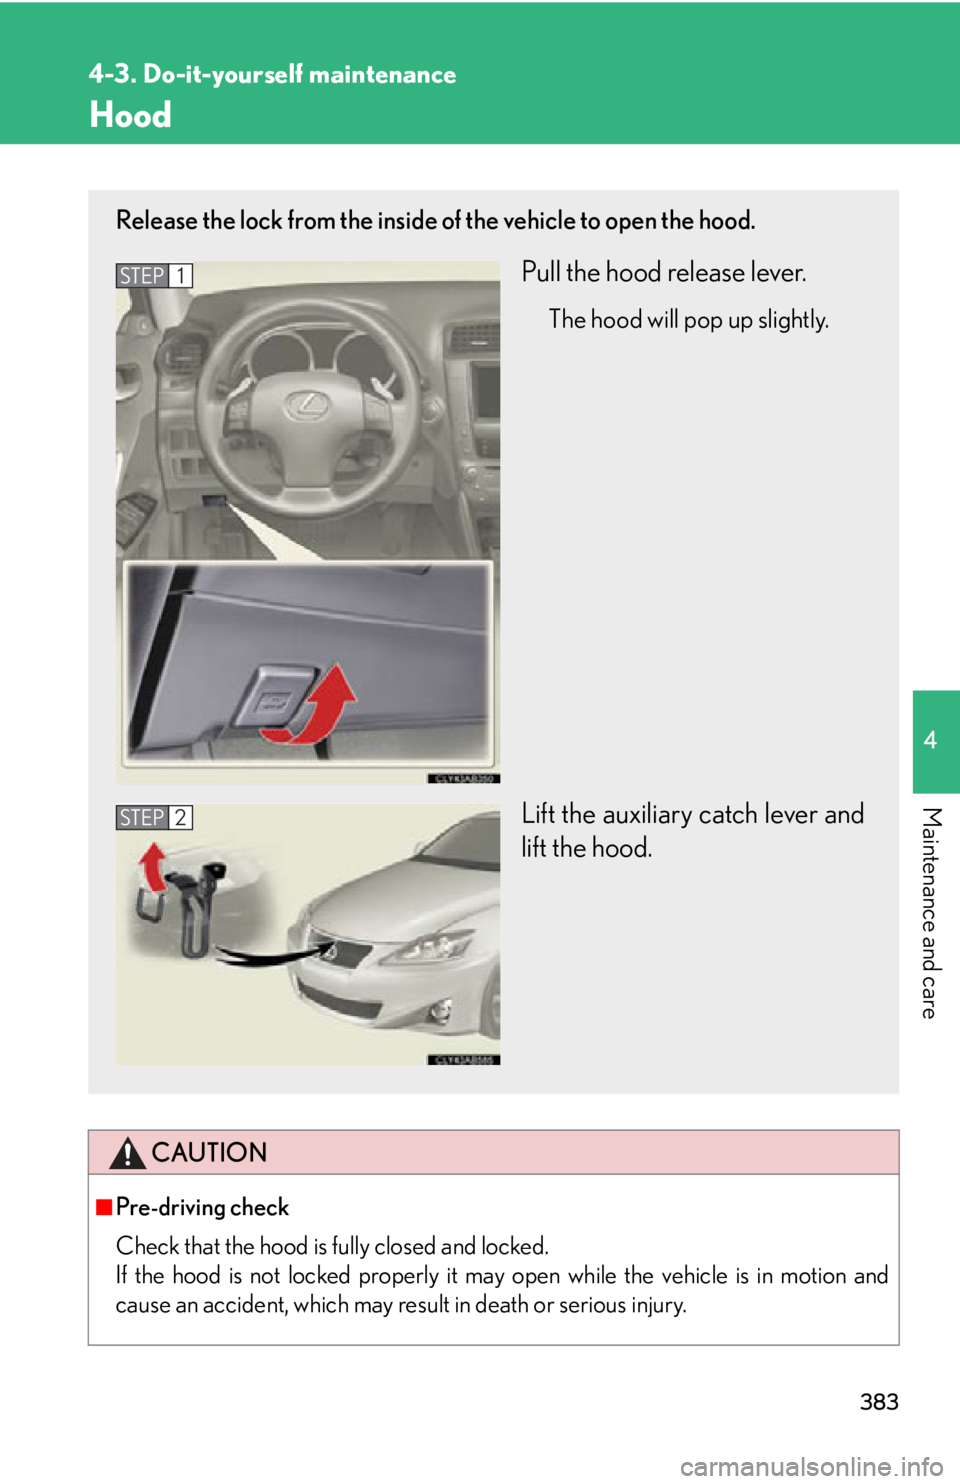
Release the lock from the inside of the vehicle to open the hood.
Pull the hood release lever.
The hood will pop up slightly.
Lift the auxiliary catch lever and
lift the hood.
STEP1
STEP2
Page 385 of 576
385
4-3. Do-it-yourself maintenance
4
Maintenance and care
CAUTION
■When raising your vehicle
Make sure to observe the following to reduce the possibility of death or serious
injury.
●When using a floor jack, follow the instructions of the manual provided with the
jack.
●Do not use the jack that was supplied with your vehicle.
●Do not put any part of your body or get underneath the vehicle supported only by
the floor jack.
●Always use floor jack and/or automotive jack stands on a solid, flat, level surface.
●Do not start the engine while the vehicle is supported by the floor jack.
●Stop the vehicle on level firm ground, firmly set the parking brake and put the shift
lever in P (automatic) or R (manual).
●Make sure to set the floor jack properly at the jack point.
Raising the vehicle with an improperly positioned floor jack will damage the vehi-
cle and may cause the vehicle to fall off the floor jack.
●Do not raise the vehicle while someone is in the vehicle.
●When raising the vehicle, do not place any objects on top of or underneath the
floor jack.
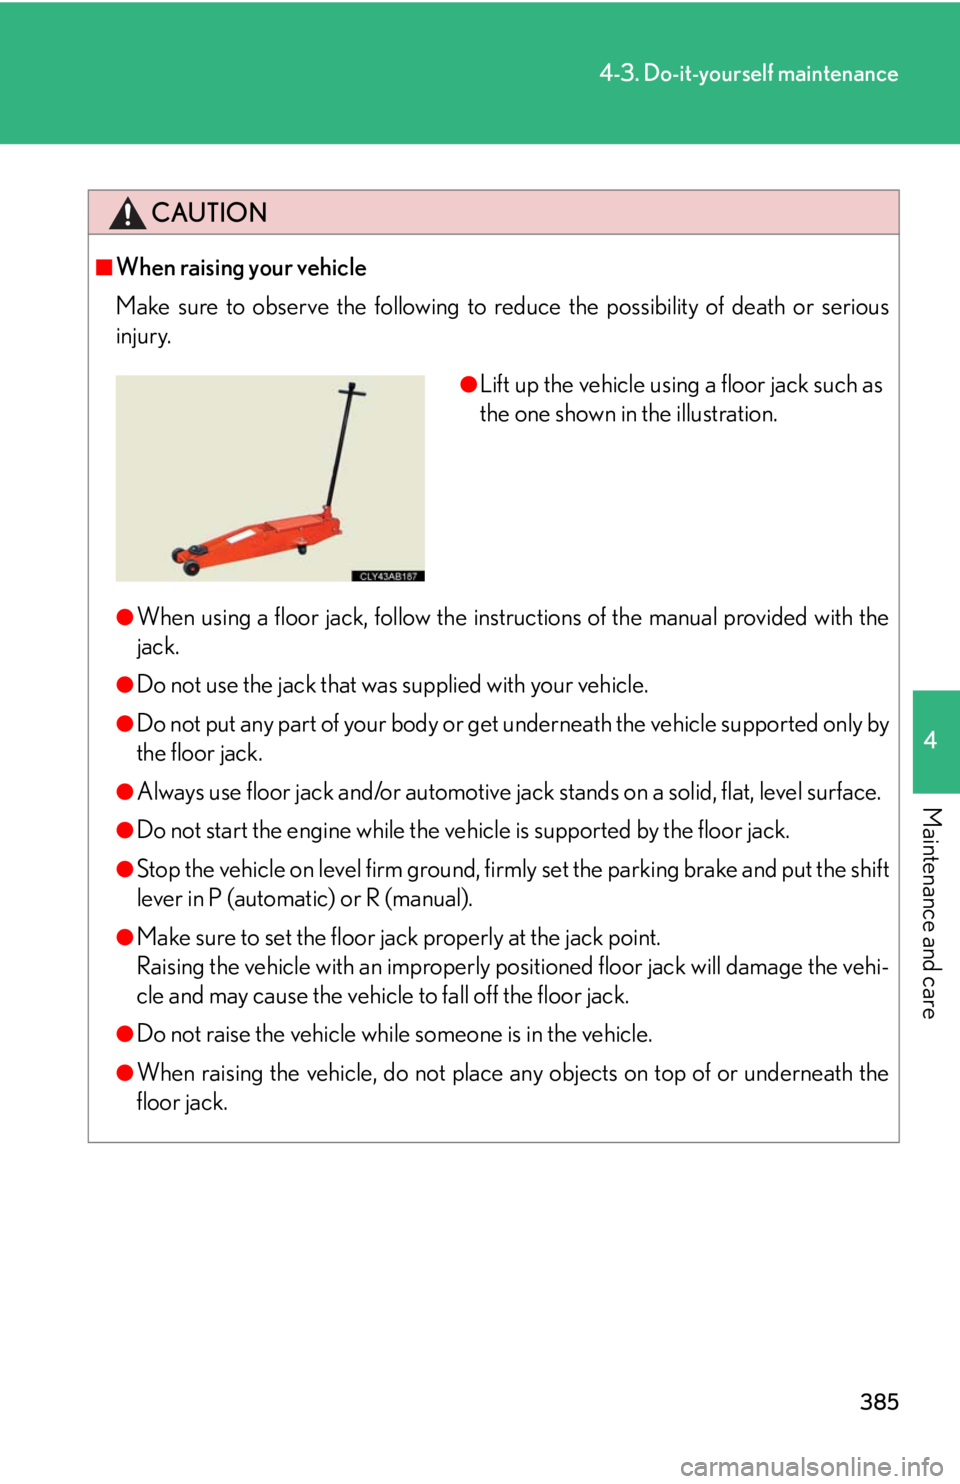
●Lift up the vehicle using a floor jack such as
the one shown in the illustration.
Page 418 of 576
418
4-3. Do-it-yourself maintenance
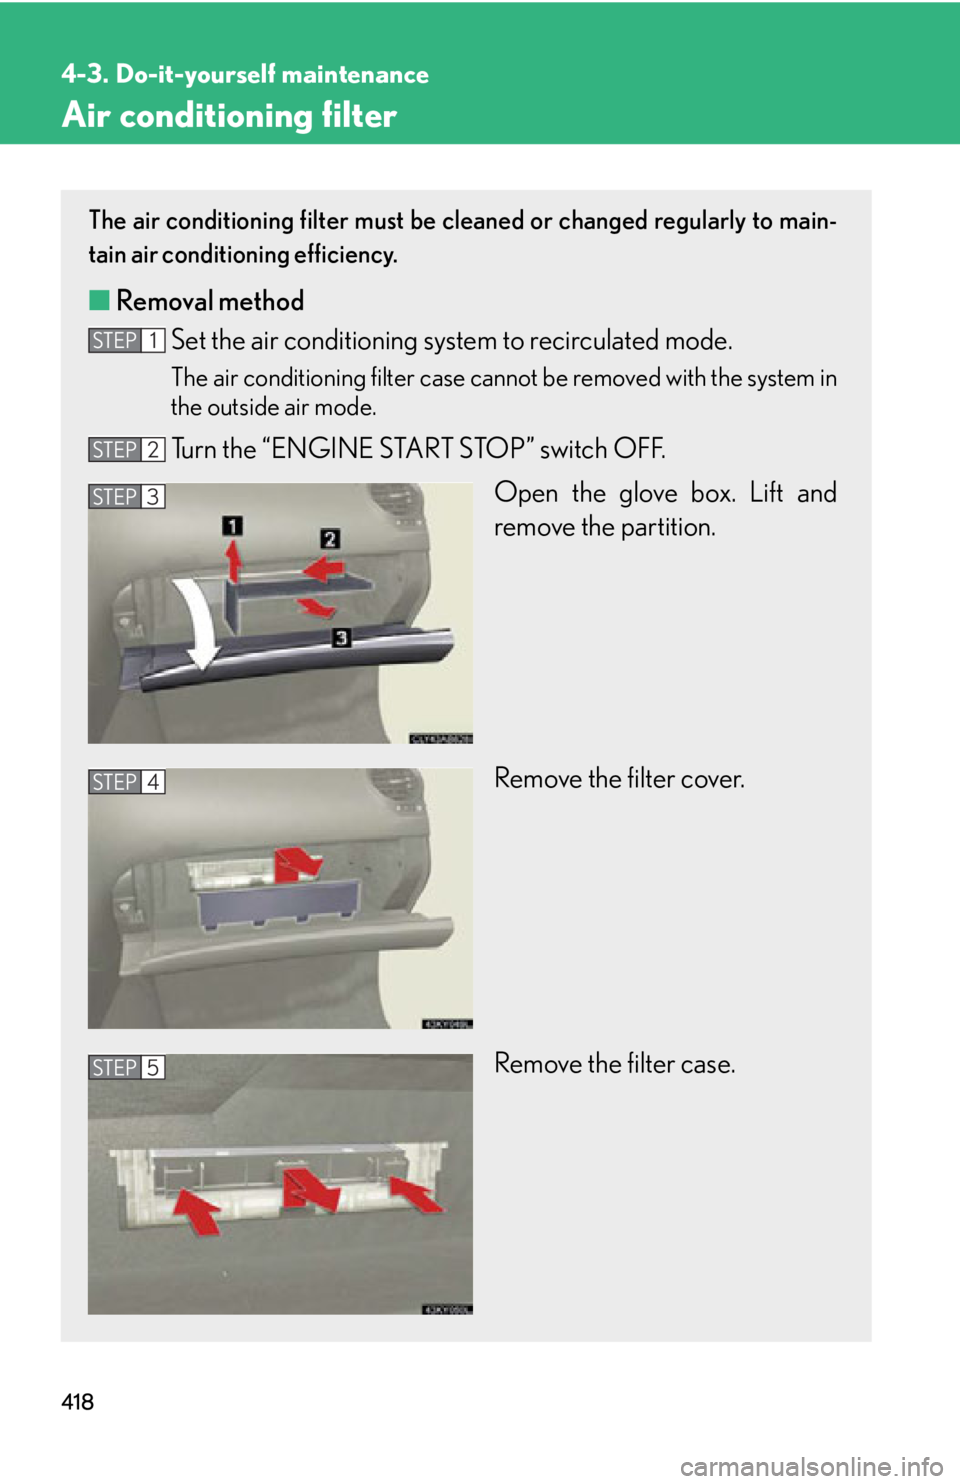
Air conditioning filter
The air conditioning filter must be cleaned or changed regularly to main-
tain air conditioning efficiency.
■ Removal method
Set the air conditio ning system to recirculated mode.
The air conditioning filter case cannot be removed with the system in
the outside air mode.
Turn the “ENGINE START STOP” switch OFF.
Open the glove box. Lift and
remove the partition.
Remove the filter cover.
Remove the filter case.
STEP1
STEP2
STEP3
STEP4
STEP5
Page 423 of 576
423
4-3. Do-it-yourself maintenance
4
Maintenance and care
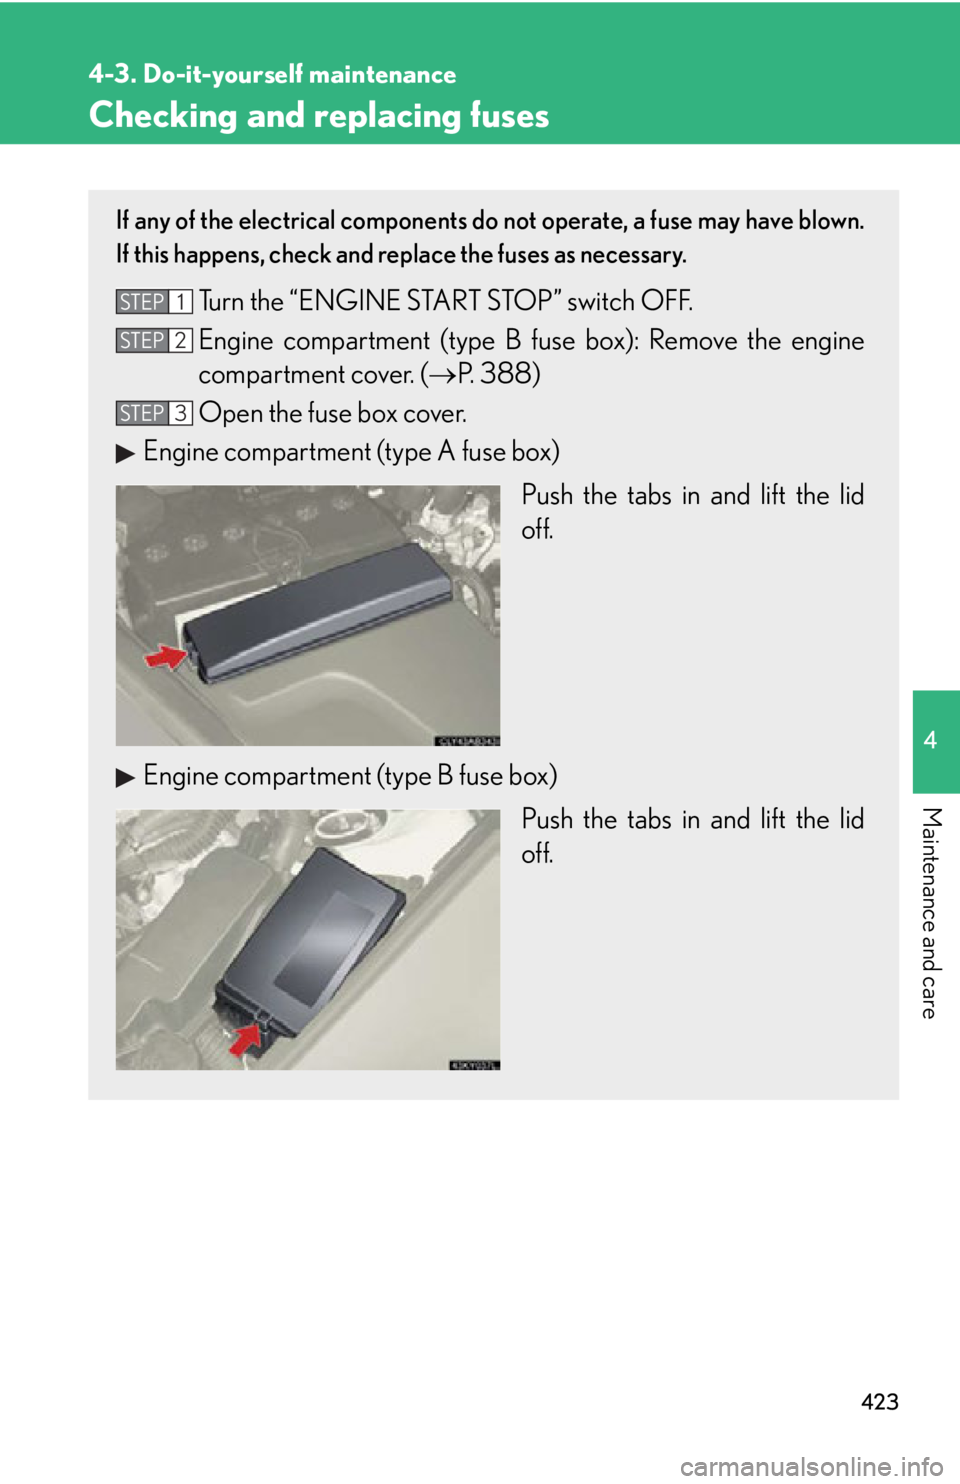
Checking and replacing fuses
If any of the electrical components do not operate, a fuse may have blown.
If this happens, check and replace the fuses as necessary.
Turn the “ENGINE START STOP” switch OFF.
Engine compartment (type B fu se box): Remove the engine
compartment cover. ( P. 388)
Open the fuse box cover.
Engine compartment (type A fuse box)
Push the tabs in and lift the lid
off.
Engine compartment (type B fuse box)
Push the tabs in and lift the lid
off.STEP1
STEP2
STEP3