tires Lexus IS350 2013 Owner's Manual / LEXUS 2013 IS250,IS350 (OM53B64U) Owner's Guide
[x] Cancel search | Manufacturer: LEXUS, Model Year: 2013, Model line: IS350, Model: Lexus IS350 2013Pages: 584, PDF Size: 5.99 MB
Page 485 of 584
5
When trouble arises
485
5-2. Steps to take in an emergency
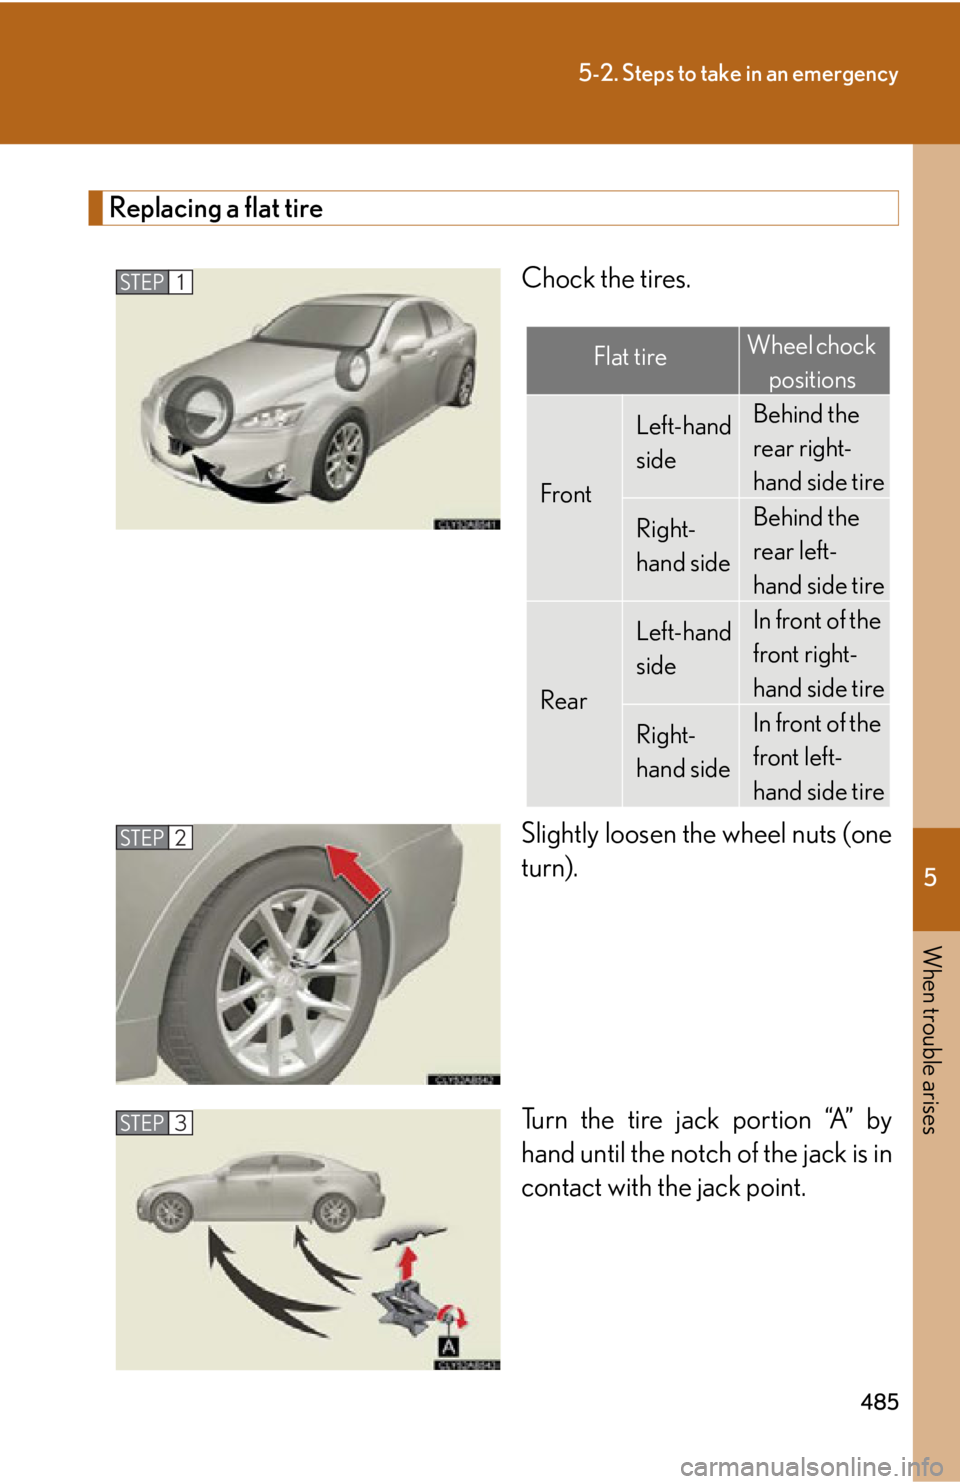
Replacing a flat tireChock the tires.
Slightly loosen the wheel nuts (one
turn).
Turn the tire jack portion “A” by
hand until the notch of the jack is in
contact with the jack point.
STEP1
Flat tireWheel chock positions
Front
Left-hand
sideBehind the
rear right-
hand side tire
Right-
hand sideBehind the
rear left-
hand side tire
Rear
Left-hand
sideIn front of the
front right-
hand side tire
Right-
hand sideIn front of the
front left-
hand side tire
STEP2
STEP3
Page 488 of 584
488
5-2. Steps to take in an emergency
■When using the compact spare tire
As the compact spare tire is not equipped with the tire pressure warning valve and
transmitter, low inflation pressure of the spare tire will not be indicated. Also, if you
replace the compact spare tire after the tire pressure warning light comes on, the
light remains on.
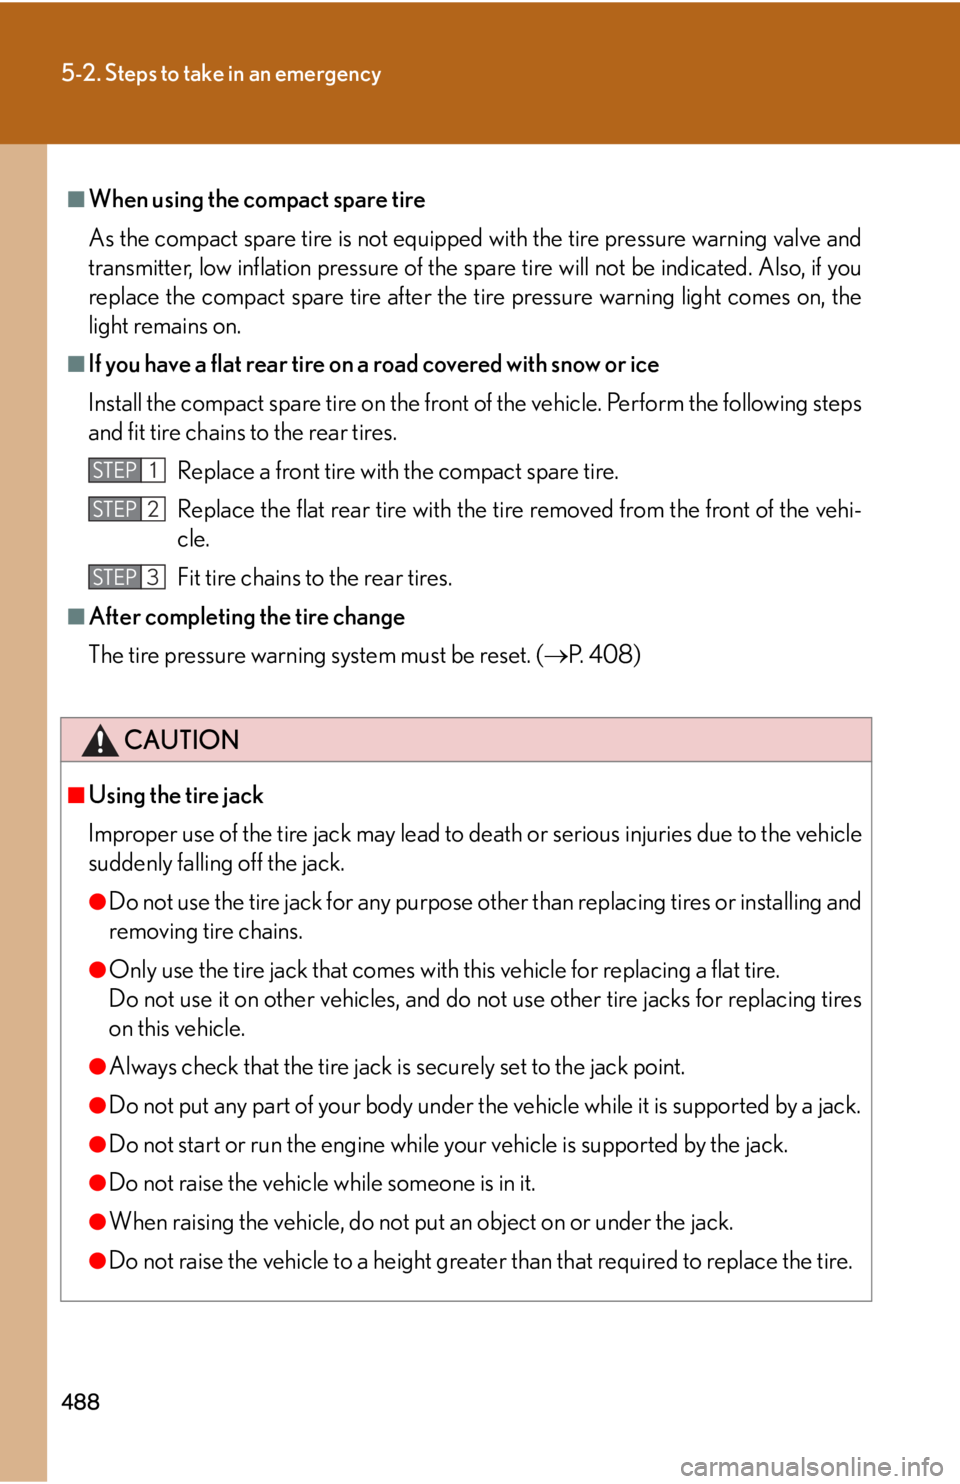
■If you have a flat rear tire on a road covered with snow or ice
Install the compact spare tire on the front of the vehicle. Perform the following steps
and fit tire chains to the rear tires.
Replace a front tire with the compact spare tire.
Replace the flat rear tire with the tire removed from the front of the vehi-
cle.
Fit tire chains to the rear tires.
■After completing the tire change
The tire pressure warning system must be reset. ( P. 4 0 8 )
CAUTION
■Using the tire jack
Improper use of the tire jack may lead to death or serious injuries due to the vehicle
suddenly falling off the jack.
●Do not use the tire jack for any purpose other than replacing tires or installing and
removing tire chains.
●Only use the tire jack that comes with this vehicle for replacing a flat tire.
Do not use it on other vehicles, and do no t use other tire jacks for replacing tires
on this vehicle.
●Always check that the tire jack is securely set to the jack point.
●Do not put any part of your body under the vehicle while it is supported by a jack.
●Do not start or run the engine while your vehicle is supported by the jack.
●Do not raise the vehicle while someone is in it.
●When raising the vehicle, do not put an object on or under the jack.
●Do not raise the vehicle to a height greate r than that required to replace the tire.
STEP1
STEP2
STEP3
Page 489 of 584
5
When trouble arises
489
5-2. Steps to take in an emergency
CAUTION
●Use a jack stand if it is necessary to get under the vehicle.
Take particular care when lowering the vehicle to ensure that no one working on or
near the vehicle may be injured.
■Replacing a flat tire
●Do not attach a heavily damaged wheel orna ment, as it may fly off the wheel while
the vehicle is moving.
●Failure to follow these precautions could cause the wheel nuts to loosen and the
tire to fall off, resulting in death or serious injury.
• Never use oil or grease on the wheel bolts or wheel nuts.
Oil and grease may cause the wheel nuts to be excessively tightened, leading
to bolt or disc wheel damage. In addition, the oil or grease can cause the
wheel nuts to loosen and the wheel may fall off, causing a serious accident.
Remove any oil or grease from the wheel bolts or wheel nuts.
• Have the wheel nuts tightened with a to rque wrench to 76 ft•lbf (103 N•m,
10.5 kgf•m) as soon as possible after changing wheels.
■When using the spare tire
●Remember that your compact spare tire is specifically designed for use with your
vehicle. Do not use your compact spare tire on another vehicle.
●Do not use two compact spare tires simultaneously.
●Replace the compact spare tire with a standard tire as soon as possible.
●Avoid sudden acceleration, deceleration an d braking, as well as sharp cornering.
■Speed limit when using the spare tire
Do not drive at speeds in excess of 50 mph (80 km/h) when a compact spare tire is
installed on the vehicle.
The compact spare tire is not designed for driving at high speeds. Failing to observe
this precaution may lead to an accident causing death or serious injury.
Page 491 of 584

5
When trouble arises
491
5-2. Steps to take in an emergency
NOTICE
■Do not drive the vehicle with a flat tire.
Do not continue driving with a flat tire.
Driving even a short distance with a flat tire can damage the tire and the wheel
beyond repair.
■Be careful when driving over bumps with the compact spare tire installed on the
vehicle.
The vehicle becomes lower when driving with the compact spare tire compared to
when driving with standard tires. Be careful when driving over uneven road sur-
faces.
■Driving with tire chains and the compact spare tire
Do not fit tire chains to the compact spare tire.
Tire chains may damage the vehicle body and adversely affect driving performance.
■When replacing the tires
When removing or fitting the wheels, tire s or the tire pressure warning valve and
transmitter, contact your Lexus dealer as the tire pressure warning valve and trans-
mitter may be damaged if not handled correctly.
■To avoid damage to the tire pressure warning valves and transmitters
When a tire is repaired with liquid seal ants, the tire pressure warning valve and
transmitter may not operate properly. If a liquid sealant is used, contact your Lexus
dealer or other qualified service shop as so on as possible. Make sure to replace the
tire pressure warning valve and transmitter when replacing the tire. ( P. 4 0 8 )
Page 507 of 584
5
When trouble arises
507
5-2. Steps to take in an emergency
If the vehicle becomes stuck
CAUTION
■When attempting to free a stuck vehicle
If you choose to rock the vehicle back and forth to free it, make sure the surround-
ing area is clear, to avoid striking other vehicles, objects or persons. The vehicle
may also lunge forward or lunge back suddenly as it becomes free. Use extreme
caution.
■When shifting the shift lever
Be careful not to shift the shift lever with the accelerator pedal depressed.
This may lead to unexpected rapid acceleration of the vehicle that may cause an
accident and result in death or serious injury.
NOTICE
■To avoid damaging the transmission and other components
●Avoid spinning the wheels and do not rev the engine.
●If the vehicle remains stuck after trying these procedures, the vehicle may require
towing to be freed.
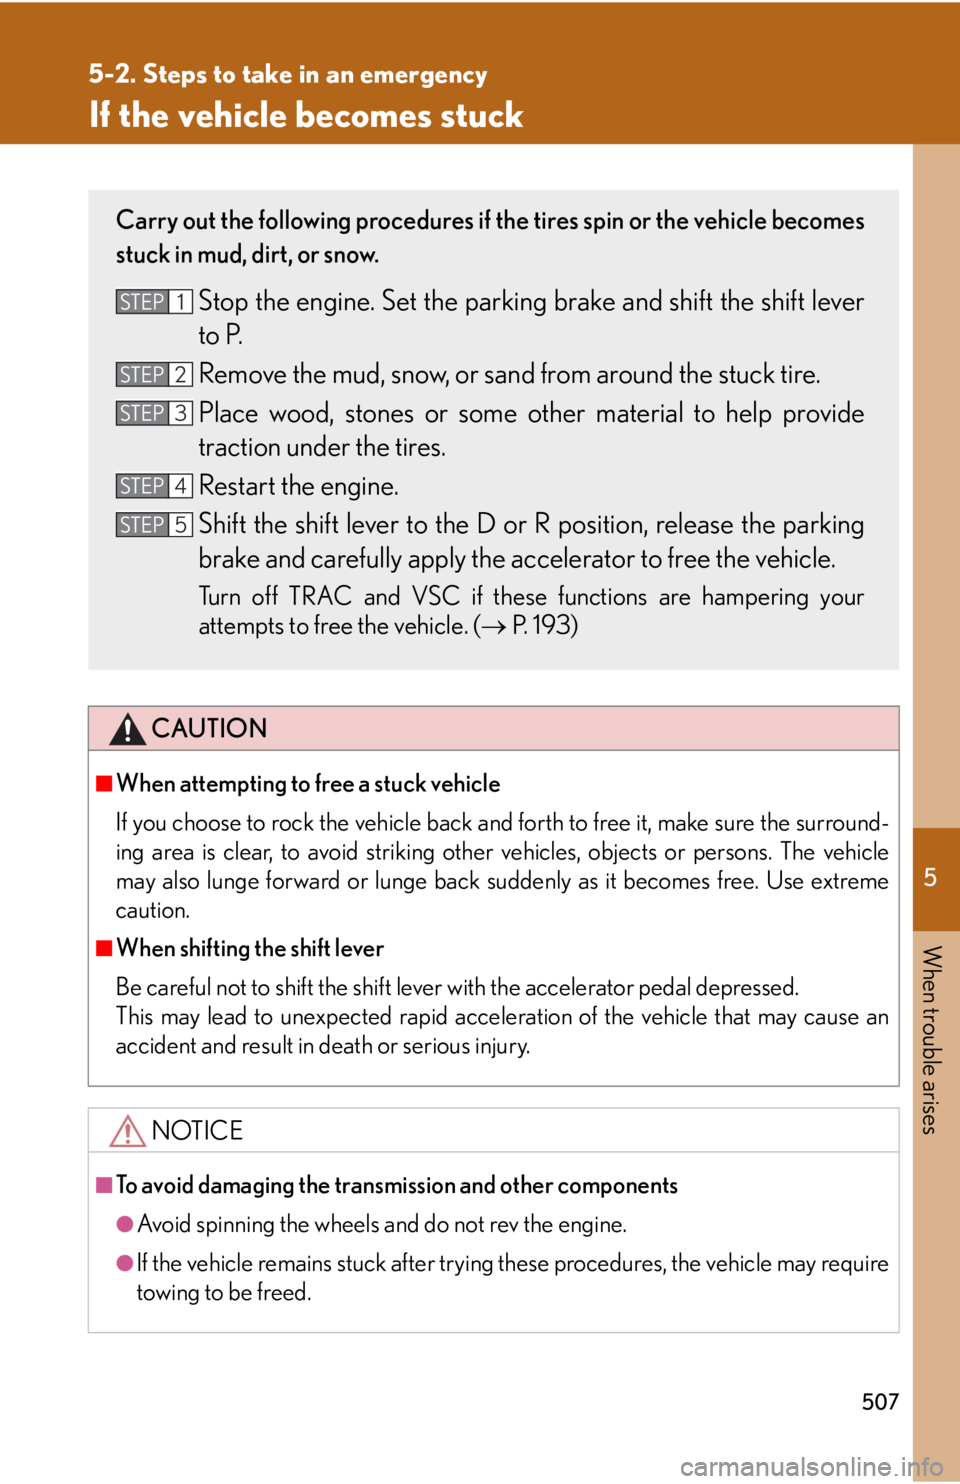
Carry out the following procedures if the tires spin or the vehicle becomes
stuck in mud, dirt, or snow.
Stop the engine. Set the parking brake and shift the shift lever
to P.
Remove the mud, snow, or sand from around the stuck tire.
Place wood, stones or some ot her material to help provide
traction under the tires.
Restart the engine.
Shift the shift lever to the D or R position, release the parking
brake and carefully apply the accelerator to free the vehicle.
Turn off TRAC and VSC if these functions are hampering your
attempts to free the vehicle. ( P. 1 9 3 )
STEP1
STEP2
STEP3
STEP4
STEP5
Page 510 of 584
510
6-1. Specifications
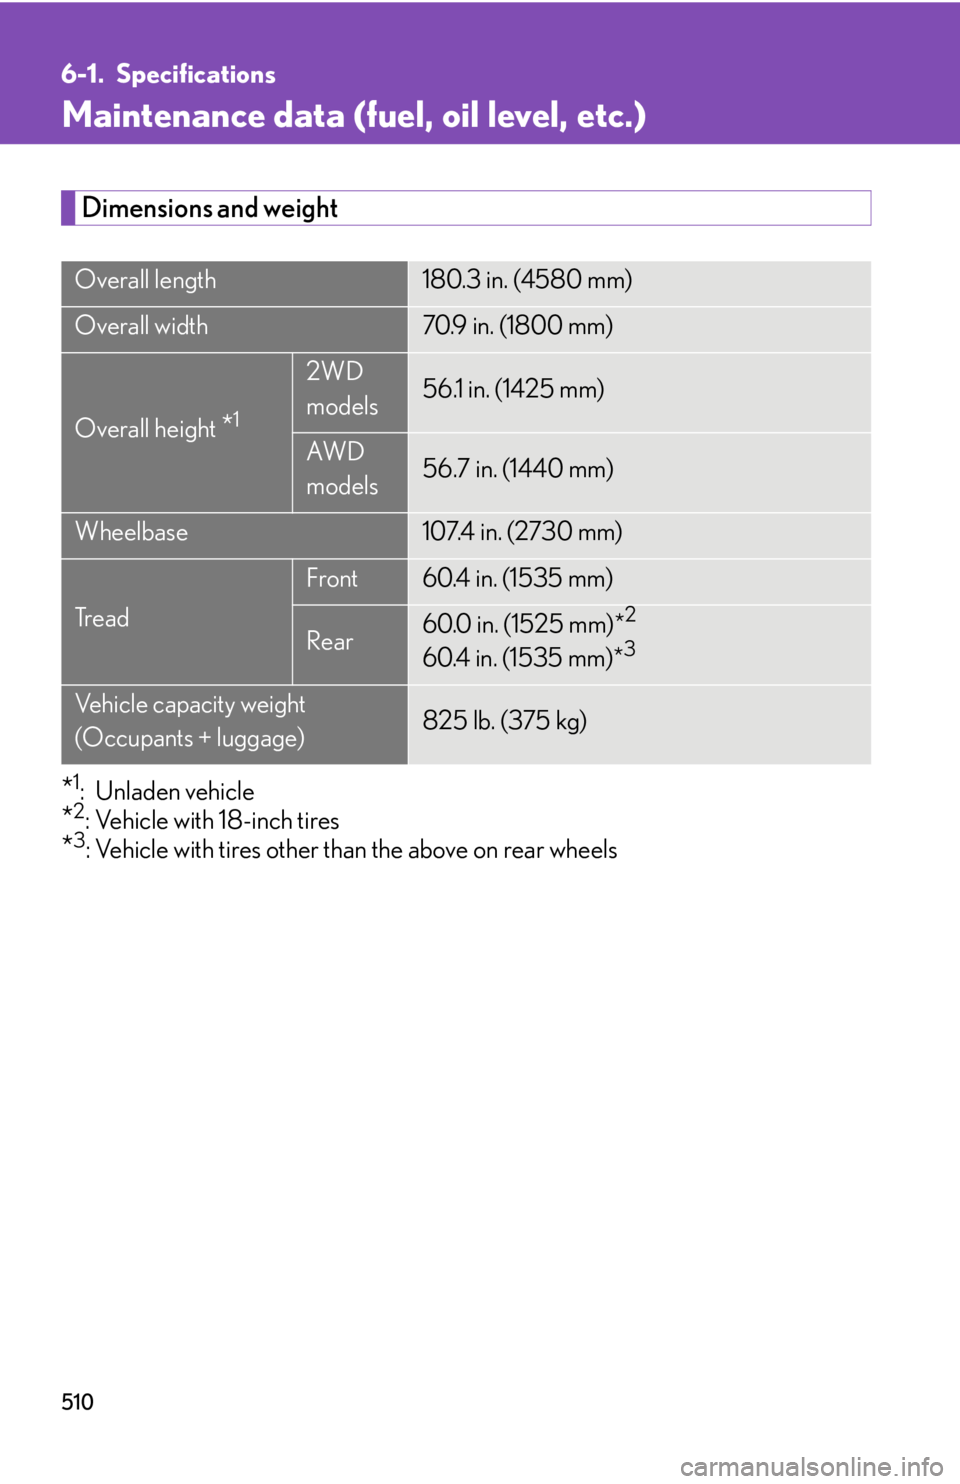
Maintenance data (fuel, oil level, etc.)
Dimensions and weight
*1: Unladen vehicle
*2: Vehicle with 18-inch tires
*3: Vehicle with tires other than the above on rear wheels
Overall length180.3 in. (4580 mm)
Overall width70.9 in. (1800 mm)
Overall height *1
2WD
models56.1 in. (1425 mm)
AW D
models56.7 in. (1440 mm)
Wheelbase107.4 in. (2730 mm)
Tr e a d
Front60.4 in. (1535 mm)
Rear60.0 in. (1525 mm)*2
60.4 in. (1535 mm)*3
Vehicle capacity weight
(Occupants + luggage)825 lb. (375 kg)
Page 520 of 584
520
6-1. Specifications
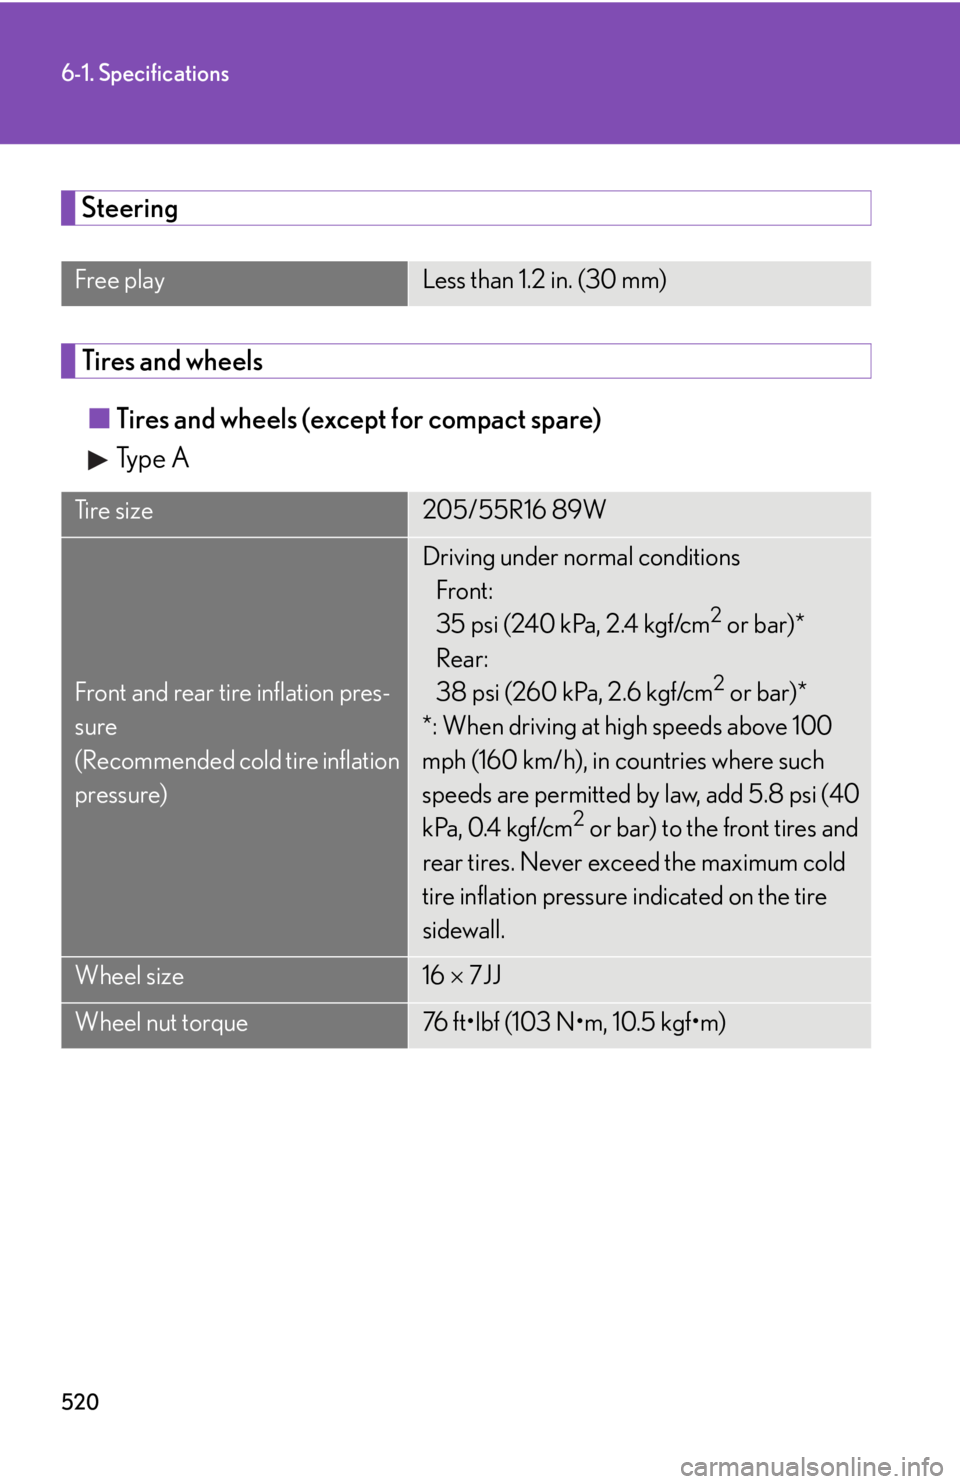
Steering
Tires and wheels■ Tires and wheels (except for compact spare)
Type A
Free playLess than 1.2 in. (30 mm)
Ti r e s i z e205/55R16 89W
Front and rear tire inflation pres-
sure
(Recommended cold tire inflation
pressure)
Driving under normal conditions Front:
35 psi (240 kPa, 2.4 kgf/cm
2 or bar)*
Rear:
38 psi (260 kPa, 2.6 kgf/cm
2 or bar)*
*: When driving at high speeds above 100
mph (160 km/h), in countries where such
speeds are permitted by law, add 5.8 psi (40
kPa, 0.4 kgf/cm
2 or bar) to the front tires and
rear tires. Never exceed the maximum cold
tire inflation pressure indicated on the tire
sidewall.
Wheel size16 7JJ
Wheel nut torque76 ft•lbf (103 N•m, 10.5 kgf•m)
Page 521 of 584
521
6-1. Specifications
6
Vehicle specifications
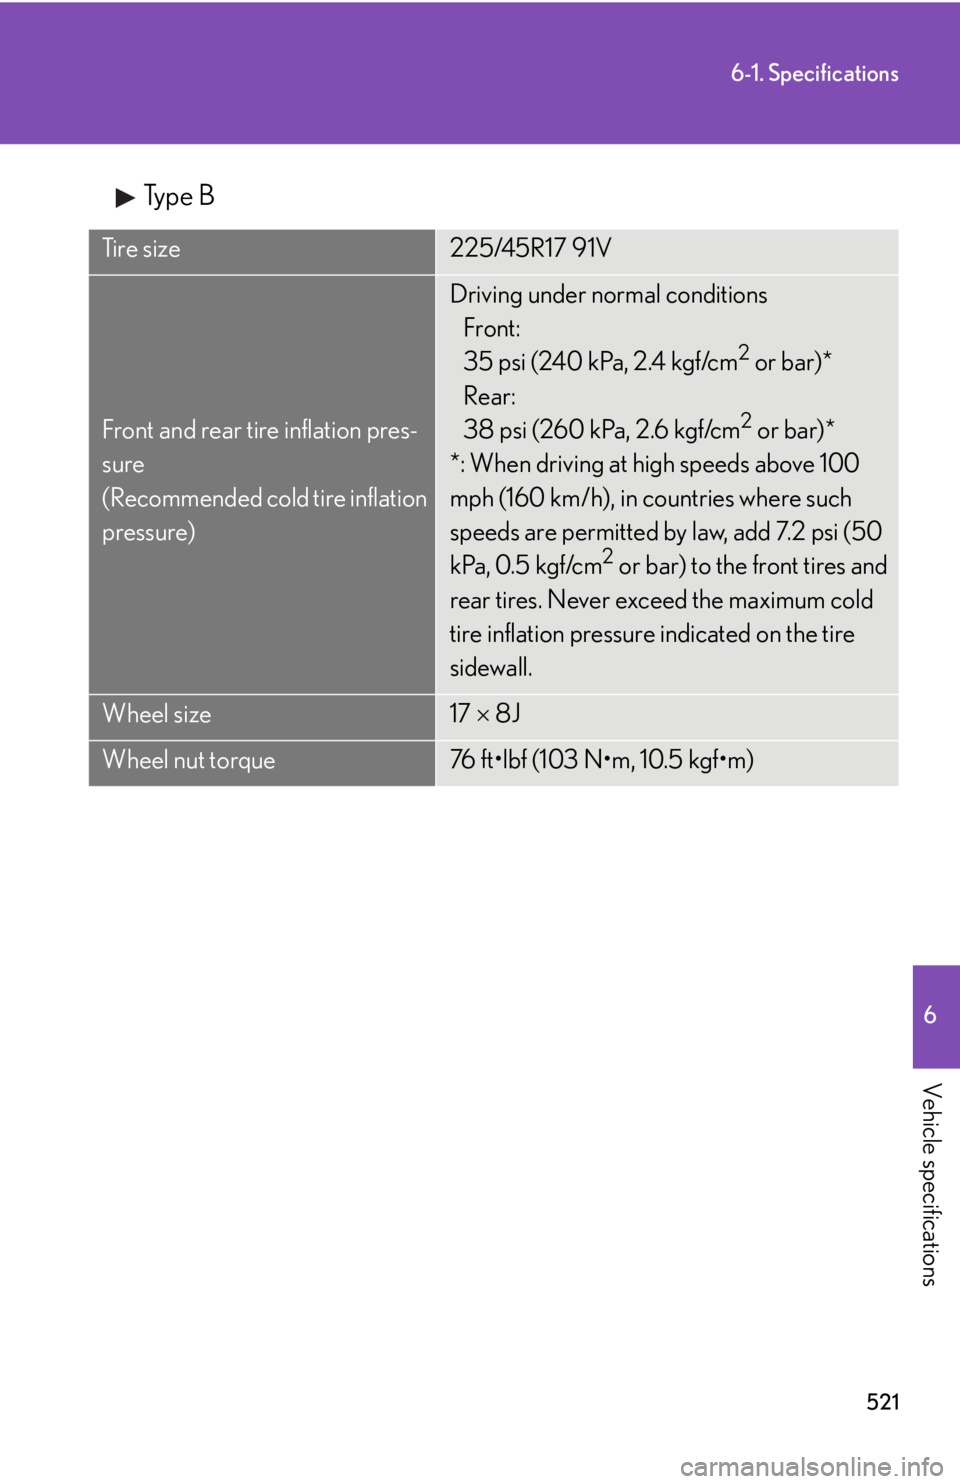
Type B
Ti r e s i z e225/45R17 91V
Front and rear tire inflation pres-
sure
(Recommended cold tire inflation
pressure)
Driving under normal conditionsFront:
35 psi (240 kPa, 2.4 kgf/cm
2 or bar)*
Rear:
38 psi (260 kPa, 2.6 kgf/cm
2 or bar)*
*: When driving at high speeds above 100
mph (160 km/h), in countries where such
speeds are permitted by law, add 7.2 psi (50
kPa, 0.5 kgf/cm
2 or bar) to the front tires and
rear tires. Never exceed the maximum cold
tire inflation pressure indicated on the tire
sidewall.
Wheel size17 8J
Wheel nut torque76 ft•lbf (103 N•m, 10.5 kgf•m)
Page 522 of 584
522
6-1. Specifications
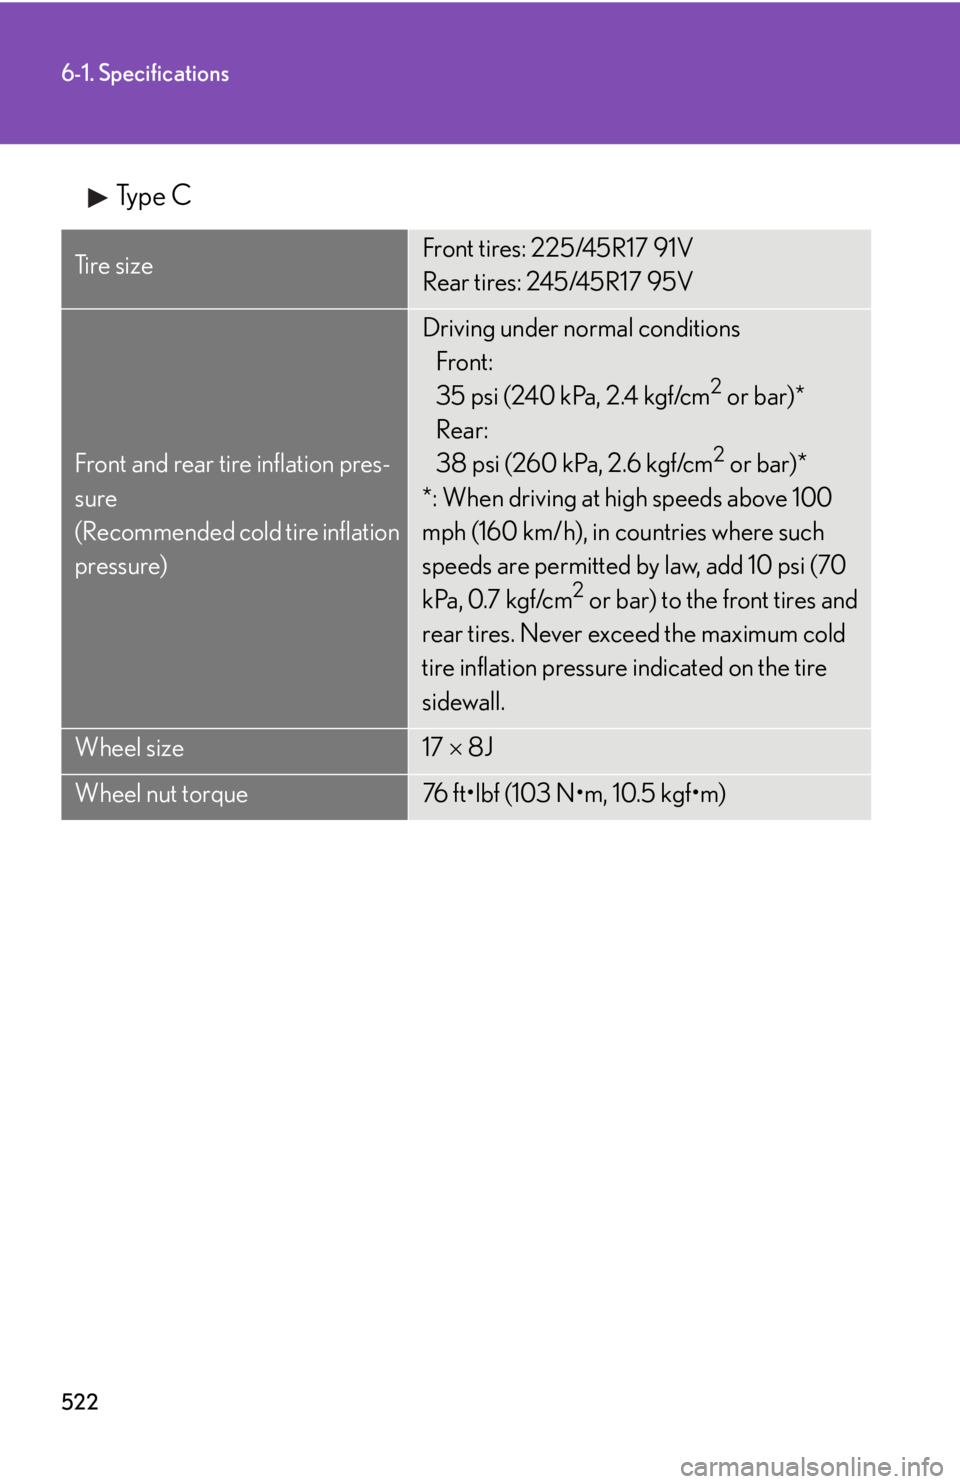
Type C
Ti r e s i z eFront tires: 225/45R17 91V
Rear tires: 245/45R17 95V
Front and rear tire inflation pres-
sure
(Recommended cold tire inflation
pressure)
Driving under normal conditions Front:
35 psi (240 kPa, 2.4 kgf/cm
2 or bar)*
Rear:
38 psi (260 kPa, 2.6 kgf/cm
2 or bar)*
*: When driving at high speeds above 100
mph (160 km/h), in countries where such
speeds are permitted by law, add 10 psi (70
kPa, 0.7 kgf/cm
2 or bar) to the front tires and
rear tires. Never exceed the maximum cold
tire inflation pressure indicated on the tire
sidewall.
Wheel size17 8J
Wheel nut torque76 ft•lbf (103 N•m, 10.5 kgf•m)
Page 523 of 584
523
6-1. Specifications
6
Vehicle specifications
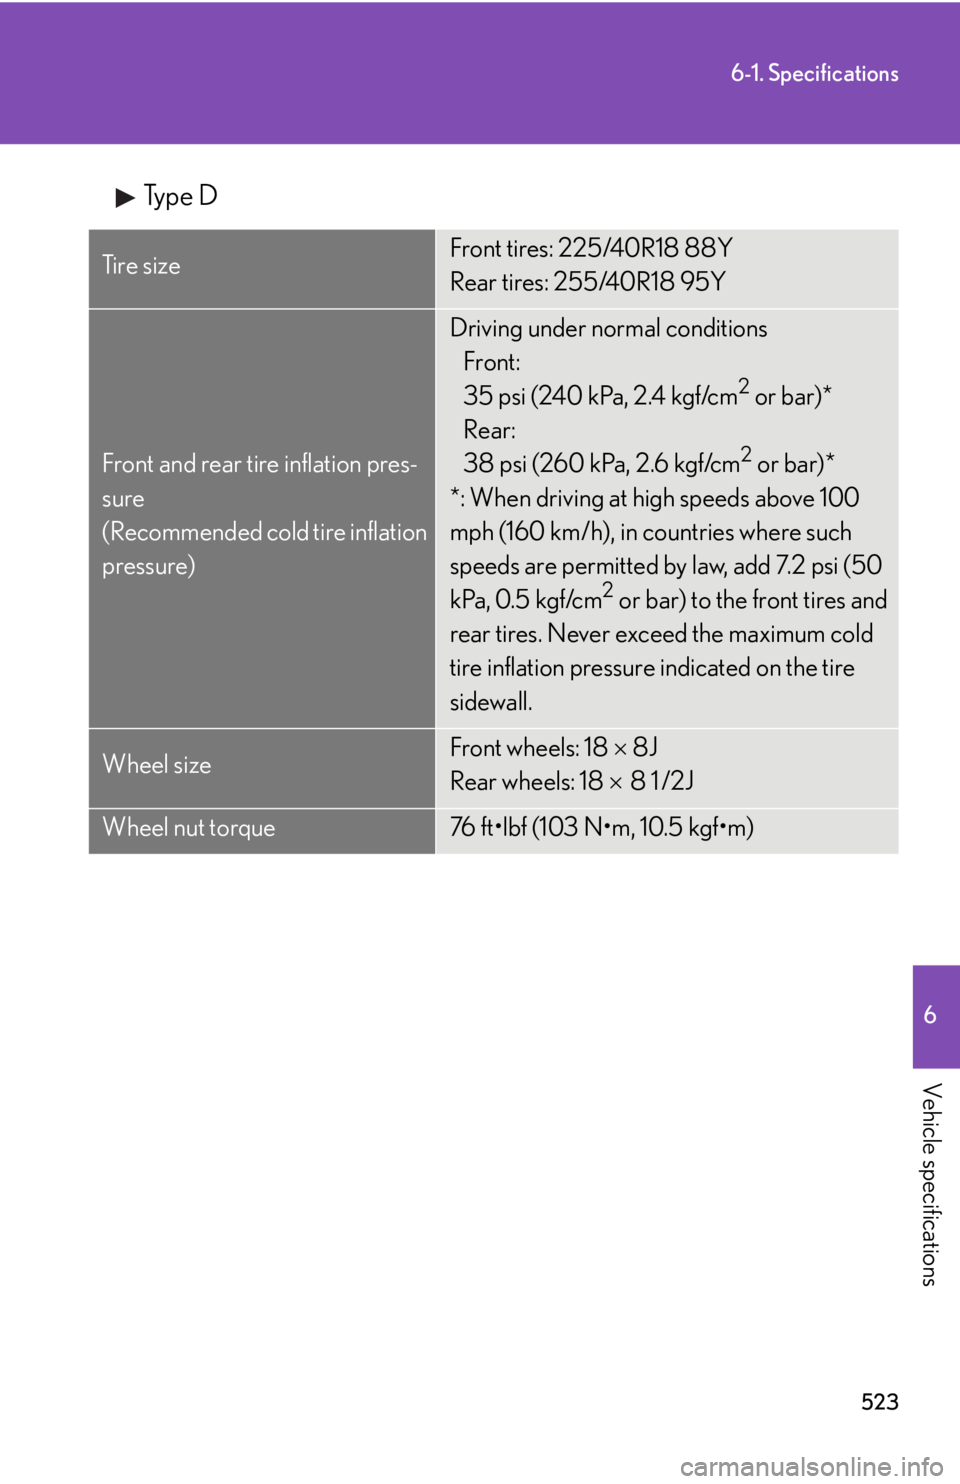
Type D
Ti r e s i z eFront tires: 225/40R18 88Y
Rear tires: 255/40R18 95Y
Front and rear tire inflation pres-
sure
(Recommended cold tire inflation
pressure)
Driving under normal conditionsFront:
35 psi (240 kPa, 2.4 kgf/cm
2 or bar)*
Rear:
38 psi (260 kPa, 2.6 kgf/cm
2 or bar)*
*: When driving at high speeds above 100
mph (160 km/h), in countries where such
speeds are permitted by law, add 7.2 psi (50
kPa, 0.5 kgf/cm
2 or bar) to the front tires and
rear tires. Never exceed the maximum cold
tire inflation pressure indicated on the tire
sidewall.
Wheel sizeFront wheels: 18 8J
Rear wheels: 18 8 1 /2J
Wheel nut torque76 ft•lbf (103 N•m, 10.5 kgf•m)