front Lexus IS350 2016 Owner's Manual / LEXUS 2016 IS200T,IS300,IS350 (OM53D18U) Owner's Guide
[x] Cancel search | Manufacturer: LEXUS, Model Year: 2016, Model line: IS350, Model: Lexus IS350 2016Pages: 600, PDF Size: 7.94 MB
Page 106 of 600
1063-2. Opening, closing and locking the doors and trunk
IS350/300/200t_U (OM53D18U)
■Operation signals
A buzzer sounds and the emergency flashers flash to indicate that the doors have been
locked/unlocked. (Locked: once; Unlocked: twice)
A buzzer sounds to indicate that the windows and moon roof are operating.
■Security feature
If a door is not opened within approximately 60 seconds after the vehicle is unlocked, the
security feature automatically locks the vehicle again.
■Welcome light illumination control
The front position, tail and license plate lights automatically turn on at night when the
doors are unlocked using the entry function or wireless remote control if the light switch
is in the “AUTO” position.
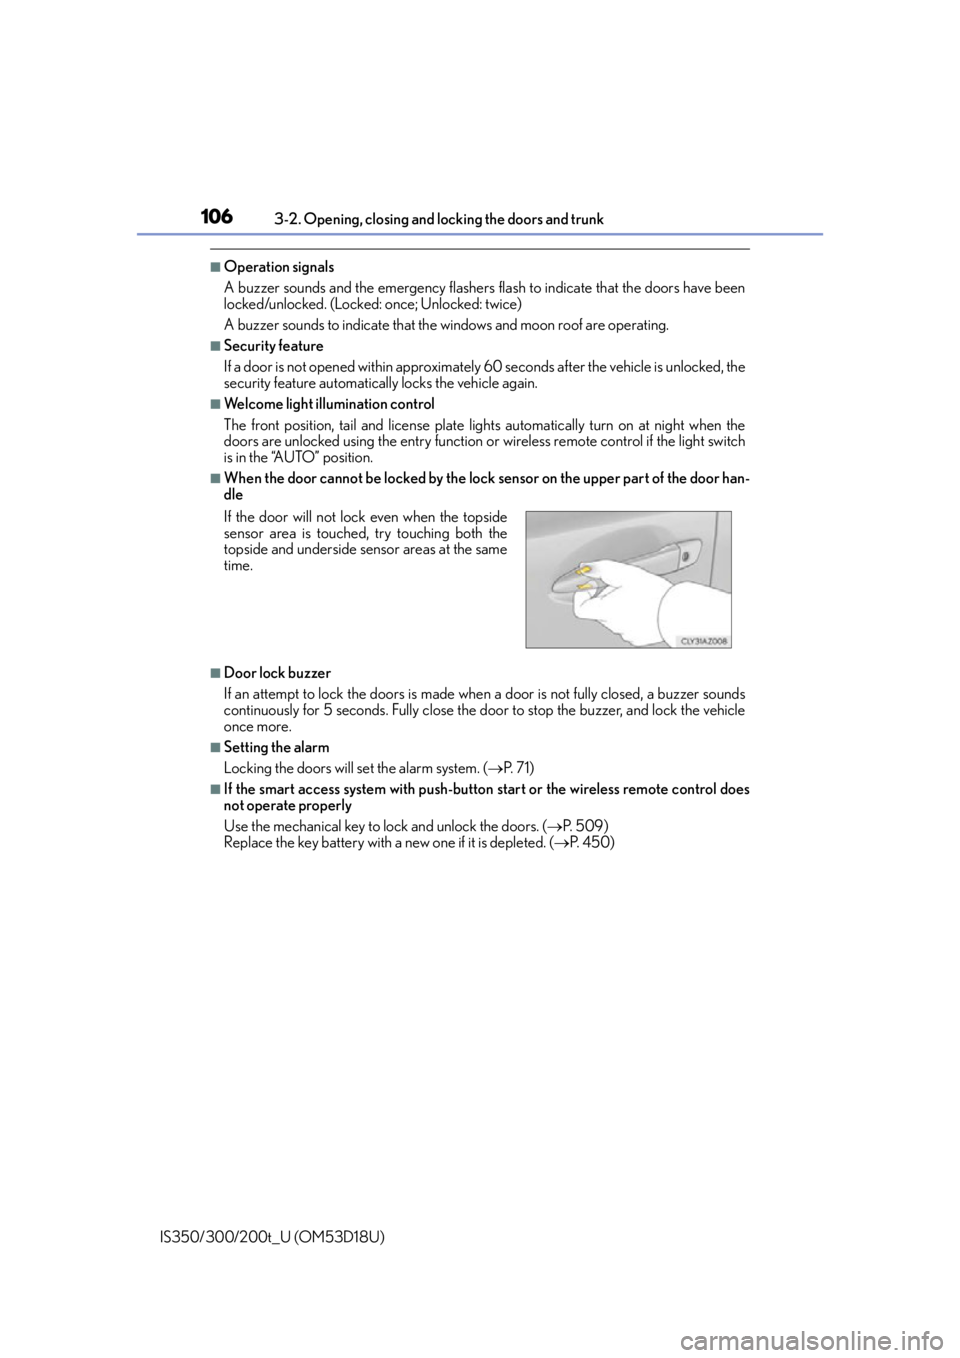
■When the door cannot be locked by the lock sensor on the upper part of the door han-
dle
■Door lock buzzer
If an attempt to lock the doors is made when a door is not fully closed, a buzzer sounds
continuously for 5 seconds. Fully close the door to stop the buzzer, and lock the vehicle
once more.
■Setting the alarm
Locking the doors will set the alarm system. ( P. 7 1 )
■If the smart access system with push-butto n start or the wireless remote control does
not operate properly
Use the mechanical key to lock and unlock the doors. ( P. 5 0 9 )
Replace the key battery with a new one if it is depleted. ( P. 4 5 0 )
If the door will not lock even when the topside
sensor area is touched, try touching both the
topside and underside sensor areas at the same
time.
Page 107 of 600
1073-2. Opening, closing and locking the doors and trunk
3
Operation of each component
IS350/300/200t_U (OM53D18U)
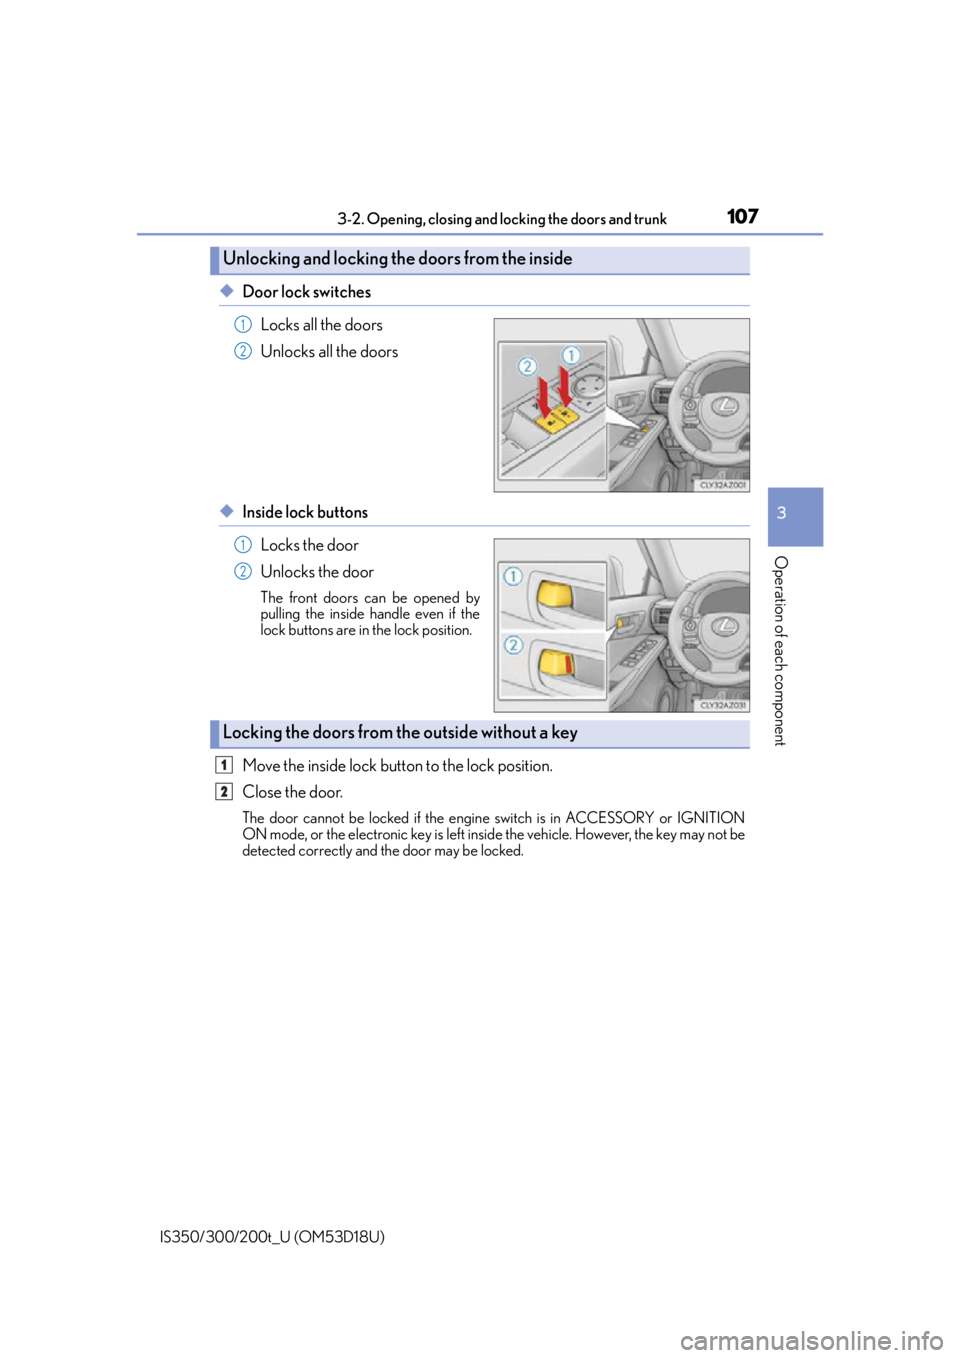
◆Door lock switchesLocks all the doors
Unlocks all the doors
◆Inside lock buttonsLocks the door
Unlocks the door
The front doors can be opened by
pulling the inside handle even if the
lock buttons are in the lock position.
Move the inside lock button to the lock position.
Close the door.
The door cannot be locked if the engine switch is in ACCESSORY or IGNITION
ON mode, or the electronic ke y is left inside the vehicle. However, the key may not be
detected correctly and the door may be locked.
Unlocking and locking the doors from the inside
1
2
1
2
Locking the doors from the outside without a key
1
2
Page 109 of 600
1093-2. Opening, closing and locking the doors and trunk
3
Operation of each component
IS350/300/200t_U (OM53D18U)
■Switching the door unlock function
It is possible to set which doors the entry function unlocks using the wireless remote con-
trol.
Turn the engine switch off.
When the indicator light on the key su rface is not on, press and hold , or
for approximately 5 seconds while pressing and holding .
The setting changes each time an operatio n is performed, as shown below. (When
changing the setting continuously, release the buttons, wait for at least 5 seconds, and
repeat step .)
To prevent unintended triggering of the alarm, unlock the doors using the wireless
remote control and open and close a door once after the settings have been changed. (If
a door is not opened within 60 seconds af ter is pressed, the doors will be locked
again and the alarm will automatically be set.)
In a case that the alarm is triggered, immediately stop the alarm. ( P. 7 1 )
■Impact detection door lock release system
In the event that the vehicle is subject to a strong impact, all the doors are unlocked.
Depending on the force of the impact or the type of accident, however, the system may
not operate.
■Using the mechanical key
The doors can also be locked and unlocked with the mechanical key. ( P. 5 0 9 )
■Conditions affecting the operation of the sm art access system with push-button start
or wireless remote control
P. 118
■Customization
Settings (e.g. unlocking function using a key) can be changed.
(Customizable features: P. 5 5 2 )
1
2
2
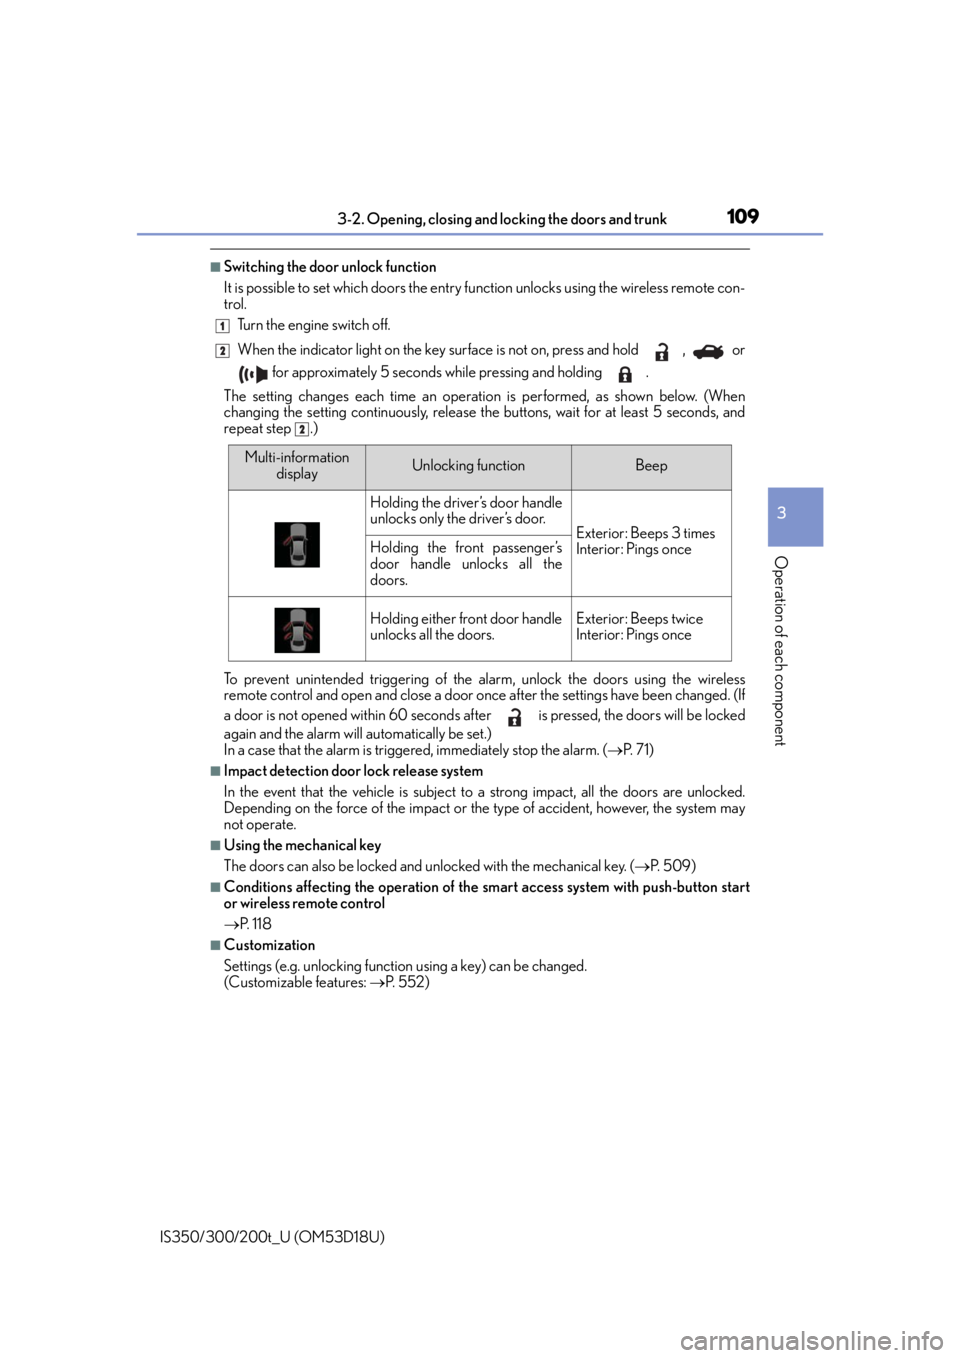
Multi-information
displayUnlocking functionBeep
Holding the driver’s door handle
unlocks only the driver’s door.
Exterior: Beeps 3 times
Interior: Pings onceHolding the front passenger’s
door handle unlocks all the
doors.
Holding either front door handle
unlocks all the doors.Exterior: Beeps twice
Interior: Pings once
Page 110 of 600

1103-2. Opening, closing and locking the doors and trunk
IS350/300/200t_U (OM53D18U)
CAUTION
■To prevent an accident
Observe the following precautions while driving the vehicle.
Failure to do so may result in a door open ing and an occupant being thrown out of the
vehicle, resulting in death or serious injury.
●Ensure that all doors are properly closed and locked.
●Do not pull the inside handle of the doors while driving.
Be especially careful with the front doors, as the doors may be opened even if the
inside lock buttons ar e in locked position.
●Set the rear door child-protector locks when children are seated in the rear seats.
Page 123 of 600
123
3
Operation of each component
IS350/300/200t_U (OM53D18U)3-3. Adjusting the seats
■Power easy access system (if equipped)
The driver’s seat and steering wheel move in
accordance with engine switch mode and
the driver’s seat belt condition. ( P. 1 2 6 )
■When adjusting the seat
●Take care when adjusting the seat so that the head restraint does not touch the ceiling.
●When folding down a rear seatback, if it inte rferes with a front seatback, adjust the front
seat position so that the seats no longer interfere with each other. However, if adjusting
the front seat position causes the correct driving posture to not be maintained, return
the rear seatback to its original position. ( P. 1 2 4 )
Front seats
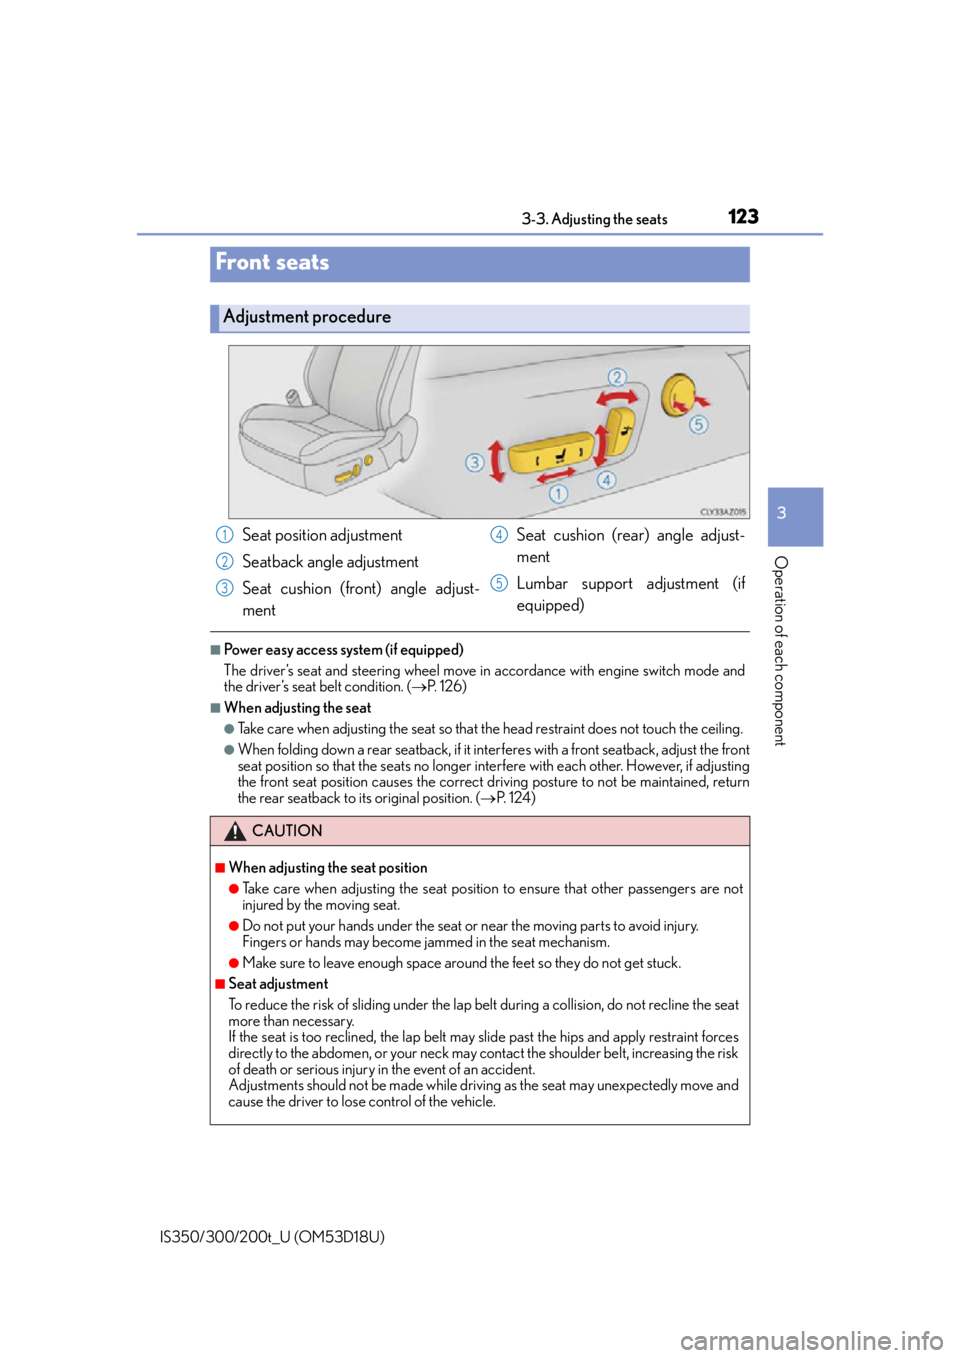
Adjustment procedure
Seat position adjustment
Seatback angle adjustment
Seat cushion (front) angle adjust-
ment Seat cushion (rear) angle adjust-
ment
Lumbar support adjustment (if
equipped)
CAUTION
■When adjusting the seat position
●Take care when adjusting the seat position to ensure that other passengers are not
injured by the moving seat.
●Do not put your hands under the seat or near the moving parts to avoid injury.
Fingers or hands may become jammed in the se
at mechanism.
●Make sure to leave enough space around the feet so they do not get stuck.
■Seat adjustment
To reduce the risk of sliding under the lap belt during a collision, do not recline the seat
more than necessary.
If the seat is too rec lined, the lap belt may slide past the hips and apply restraint forces
directly to the abdomen, or your neck may contact the shoulder belt, increasing the risk
of death or serious injury in the event of an accident.
Adjustments should not be ma de while driving as the seat may unexpectedly move and
cause the driver to lose control of the vehicle.
1
2
3
4
5
Page 131 of 600
1313-3. Adjusting the seats
3
Operation of each component
IS350/300/200t_U (OM53D18U)
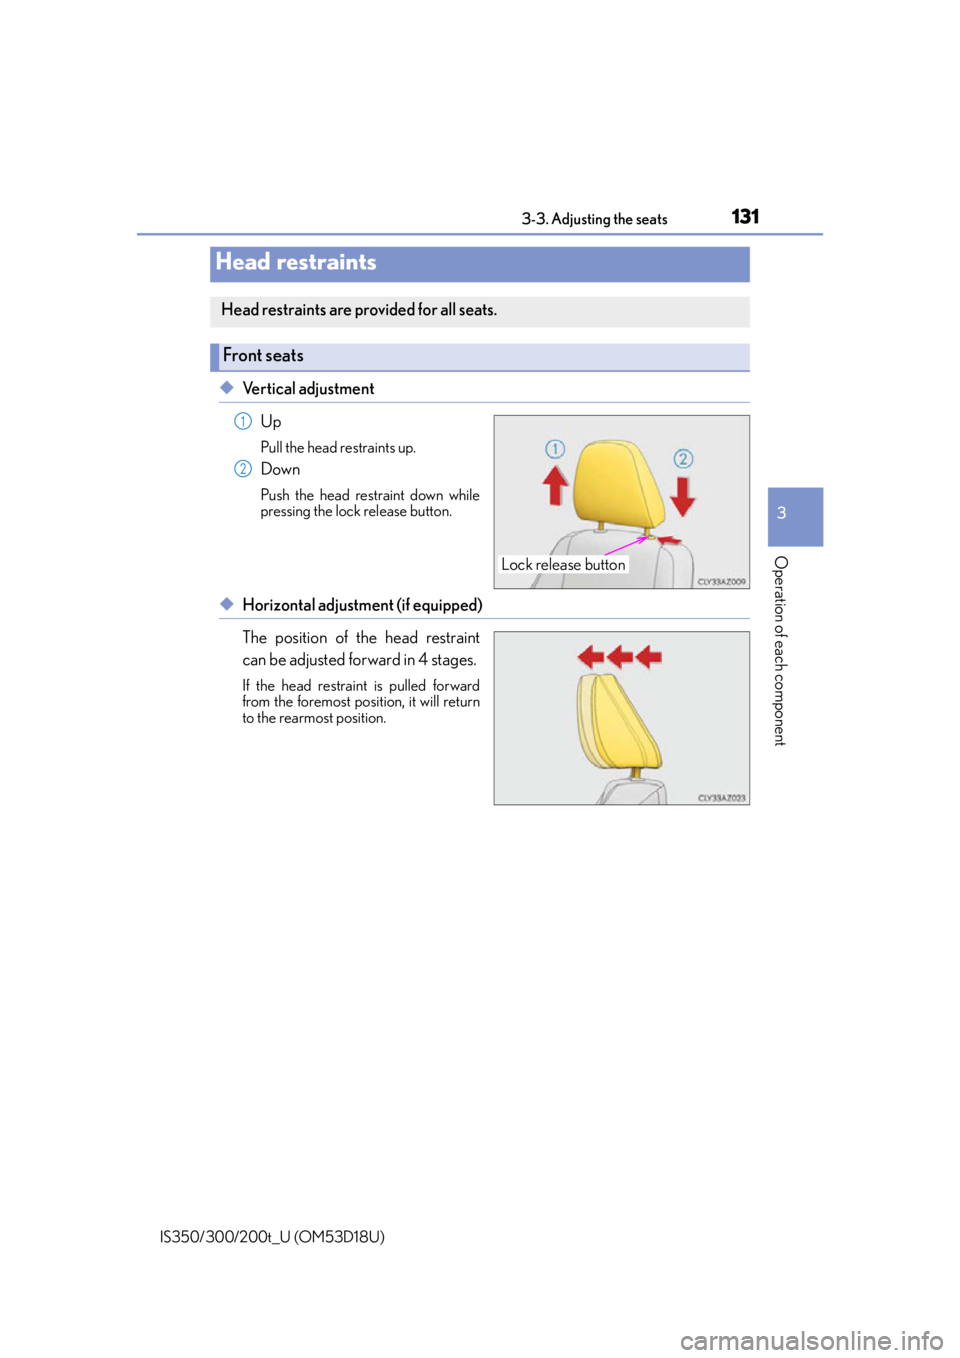
◆Vertical adjustmentUp
Pull the head restraints up.
Down
Push the head restraint down while
pressing the lock release button.
◆Horizontal adjustment (if equipped)
The position of the head restraint
can be adjusted forward in 4 stages.
If the head restraint is pulled forward
from the foremost position, it will return
to the rearmost position.
Head restraints
Head restraints are provided for all seats.
Front seats
Lock release button
1
2
Page 132 of 600
1323-3. Adjusting the seats
IS350/300/200t_U (OM53D18U)
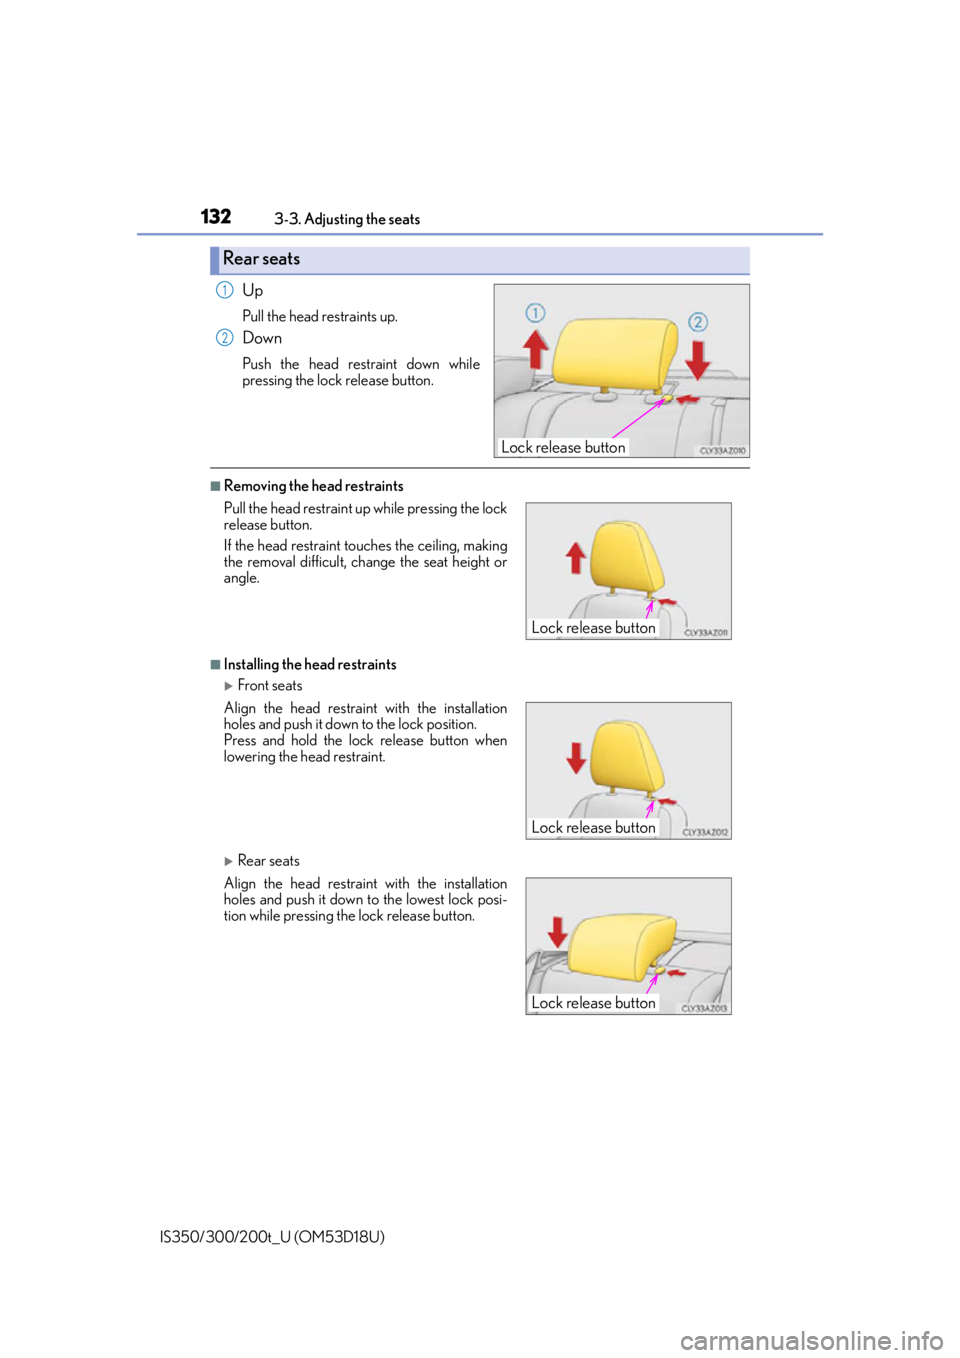
Up
Pull the head restraints up.
Down
Push the head restraint down while
pressing the lock release button.
■Removing the head restraints
■Installing the head restraints
Front seats
Rear seats
Rear seats
Lock release button
1
2
Pull the head restraint up while pressing the lock
release button.
If the head restraint to uches the ceiling, making
the removal difficult, change the seat height or
angle.
Align the head restrain t with the installation
holes and push it down to the lock position.
Press and hold the lock release button when
lowering the head restraint.
Align the head restrain t with the installation
holes and push it down to the lowest lock posi-
tion while pressing the lock release button.
Lock release button
Lock release button
Lock release button
Page 142 of 600

1423-5. Opening, closing the windows and moon roof
IS350/300/200t_U (OM53D18U)
■The power windows can be operated when
The engine switch is in IGNITION ON mode.
■Operating the power windows after turning the engine off
The power windows can be operated for approximately 45 seconds after the engine
switch is turned to ACCESSORY mode or turned off. They cannot, however, be oper-
ated once either front door is opened.
■Jam protection function
If an object becomes caught between the window and the window frame, window travel
is stopped and the window is opened slightly.
■If the power window does not operate normally
When operating the power window, if the power window stops and then operates in the
opposite direction, perform the following op erations using the power window switch of
the relevant door:
With the vehicle stopped and the engine sw itch in IGNITION ON mode, within 4 sec-
onds after the power window stops and operates in the opposite direction, pull and hold
the power window switch in the one-touch closing position. When the window is com-
pletely closed, release the switch.
If the power window still canno t be operated even though the above operations have
been carried out, perform the following initialization procedure.
Turn the engine switch to IGNITION ON mode.
Pull and hold the power window switch in the one-touch closing position.
When the window is closed completely, release the power window switch. Pull and
hold the switch in the one-touch closing position again for approximately 4 seconds.
Press and hold the power window switch in the one-touch opening position. Continue
pressing the switch for 1 second after the window has opened completely.
Pull and hold the power window switch in the one-touch closing position. Continue
pulling the switch for 1 second after the window has closed.
If you release the switch while the window is moving, perform the procedure again from
the beginning.
If, after performing the above procedure correctly, the power window cannot be oper-
ated normally, have the vehicle inspected by your Lexus dealer.
1
2
3
4
5
Page 145 of 600

1453-5. Opening, closing the windows and moon roof
3
Operation of each component
IS350/300/200t_U (OM53D18U)
■The moon roof can be operated when
The engine switch is in IGNITION ON mode.
■Operating the moon roof after turning the engine off
The moon roof can be operated for approximately 45 seconds after the engine switch is
turned to ACCESSORY mode or turned off. It cannot, however, be operated once either
front door is opened.
■Jam protection function
If an object is detected between the moon roof and the frame while the moon roof is clos-
ing or tilting down, travel is stoppe d and the moon roof opens slightly.
■Sunshade
The sunshade can be opened and closed manually. However, the sunshade will open
automatically when the moon roof is opened.
■Door lock linked moon roof operation
●The moon roof can be opened and closed using the mechanical key.* ( P. 5 0 9 )
●The moon roof can be opened using the wireless remote control.* ( P. 1 0 5 )
*: These settings must be customized at your Lexus dealer.
Page 154 of 600

1544-1. Before driving
IS350/300/200t_U (OM53D18U)
CAUTION
Observe the following precautions.
Failure to do so may result in death or serious injury.
■When driving on slippery road surfaces
●Sudden braking, acceleration and steering may cause tire slippage and reduce your
ability to control the vehicle.
●Sudden acceleration, engine braking due to shifting, or changes in engine speed
could cause the vehicle to skid.
●After driving through a puddle , lightly depress the brake pedal to make sure that the
brakes are functioning properly. Wet brake pads may prevent the brakes from func-
tioning properly. If the brakes on only on e side are wet and not functioning properly,
steering control may be affected.
■When shifting the shift lever
●Do not let the vehicle roll backward while the shift lever is in a driving position, or roll
forward while the shift lever is in R.
Doing so may cause the engine to stall or lead to poor brake and steering perfor-
mance, resulting in an acciden t or damage to the vehicle.
●Do not shift the shift lever to P while the vehicle is moving.
Doing so can damage the transmission and may result in a loss of vehicle control.
●Do not shift the shift lever to R while the vehicle is moving forward.
Doing so can damage the transmission and may result in a loss of vehicle control.
●Do not shift the shift lever to a driving position while the vehicle is moving backward.
Doing so can damage the transmission and may result in a loss of vehicle control.
●Shifting the shift lever to N while the vehicle is moving will disengage the engine from
the transmission. Engine braking is not available when N is selected.
●Be careful not to shift the shift lever with the accelerator pedal depressed. Shifting the
shift lever to a gear other than P or N may lead to unexpected rapid acceleration of
the vehicle that may cause an accident and result in death or serious injury.
■If you hear a squealing or scraping noise (brake pad wear limit indicators)
Have the brake pads checked and replaced by your Lexus dealer as soon as possible.
Rotor damage may result if the pads are not replaced when needed.
Front brakes only: Moderate levels of brake pad and disc wear allow enhanced front
braking power. As a result, the discs may wear more quickly than conventional brake
discs. Therefore, when replacing the brake pads, Lexus recommends that you also
have the thickness of the discs measured.
It is dangerous to drive the vehicle when the wear limits of the brake pads and/or those
of the brake discs are exceeded.