ECO mode Lexus IS350 2017 / LEXUS 2017 IS200T,IS300,IS350 (OM53D76U) User Guide
[x] Cancel search | Manufacturer: LEXUS, Model Year: 2017, Model line: IS350, Model: Lexus IS350 2017Pages: 648, PDF Size: 10.73 MB
Page 94 of 648
942. Instrument cluster
IS350/300/200t_U (OM53D76U)
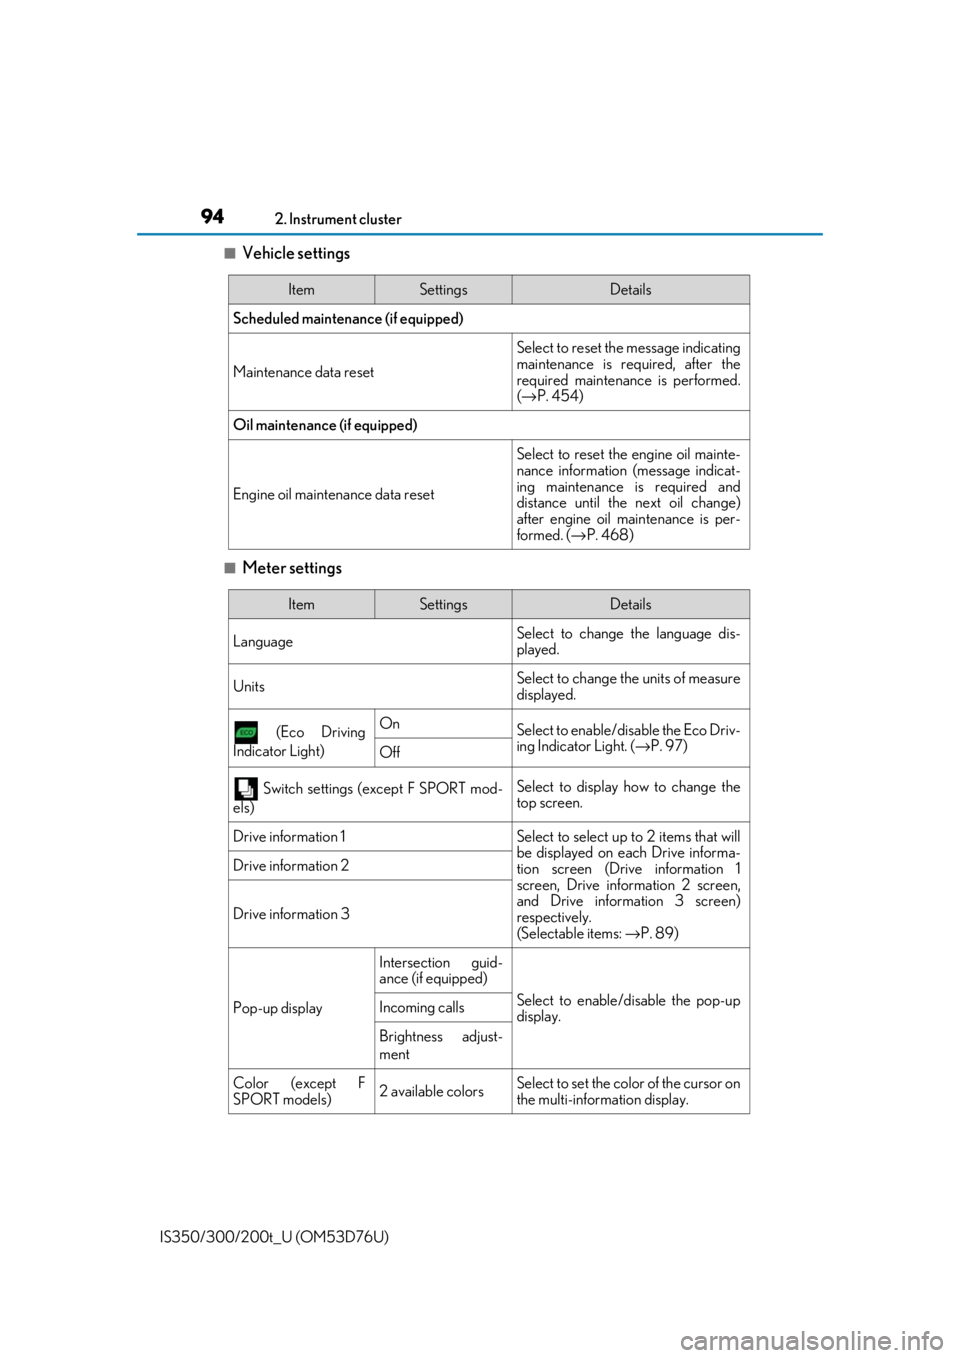
■Vehicle settings
■Meter settings
ItemSettingsDetails
Scheduled maintenance (if equipped)
Maintenance data reset
Select to reset the message indicating
maintenance is re quired, after the
required maintenance is performed.
( → P. 454)
Oil maintenance (if equipped)
Engine oil maintenance data reset
Select to reset the engine oil mainte-
nance information (message indicat-
ing maintenance is required and
distance until the next oil change)
after engine oil maintenance is per-
formed. (→ P. 468)
ItemSettingsDetails
Language Select to change the language dis-
played.
UnitsSelect to change the units of measure
displayed.
(Eco Driving
Indicator Light)OnSelect to enable/dis able the Eco Driv-
ing Indicator Light. ( →P. 97)
Off
Switch settings (except F SPORT mod-
els)Select to display how to change the
top screen.
Drive information 1Select to select up to 2 items that will
be displayed on ea ch Drive informa-
tion screen (Drive information 1
screen, Drive information 2 screen,
and Drive inform ation 3 screen)
respectively.
(Selectable items: → P. 89)
Drive information 2
Drive information 3
Pop-up display
Intersection guid-
ance (if equipped)
Select to enable/disable the pop-up
display.Incoming calls
Brightness adjust-
ment
Color (except F
SPORT models)2 available colorsSelect to set the color of the cursor on
the multi-information display.
Page 96 of 648

962. Instrument cluster
IS350/300/200t_U (OM53D76U)
◆Display items
■Odometer
Displays the total distance the vehicle has been driven.
■Trip meter A/trip meter B
Displays the distance the vehicle has been driven since the meter was last
reset. Trip meters A and B can be used to record and display different dis-
tances independently.
To reset, display the desired trip meter and press and hold the odometer/trip meter
and trip meter reset button.
■ Distance until next engine oil change (if equipped)
Displays the distance the vehicle can be driven until an oil change is neces-
sary.
◆Pop-up display
In some situations the following will be temporarily displayed:
■ Distance until next engine oil change (if equipped)
Displays the distance until the next engi ne oil change. This display will be dis-
played in the following situations:
• When the engine switch is tu rned to IGNITION ON mode.
• When a warning message indicating that oil maintenance should be performed
soon or is required is displayed.
Odometer/trip meter display area
Page 97 of 648
972. Instrument cluster
2
Instrument cluster
IS350/300/200t_U (OM53D76U)
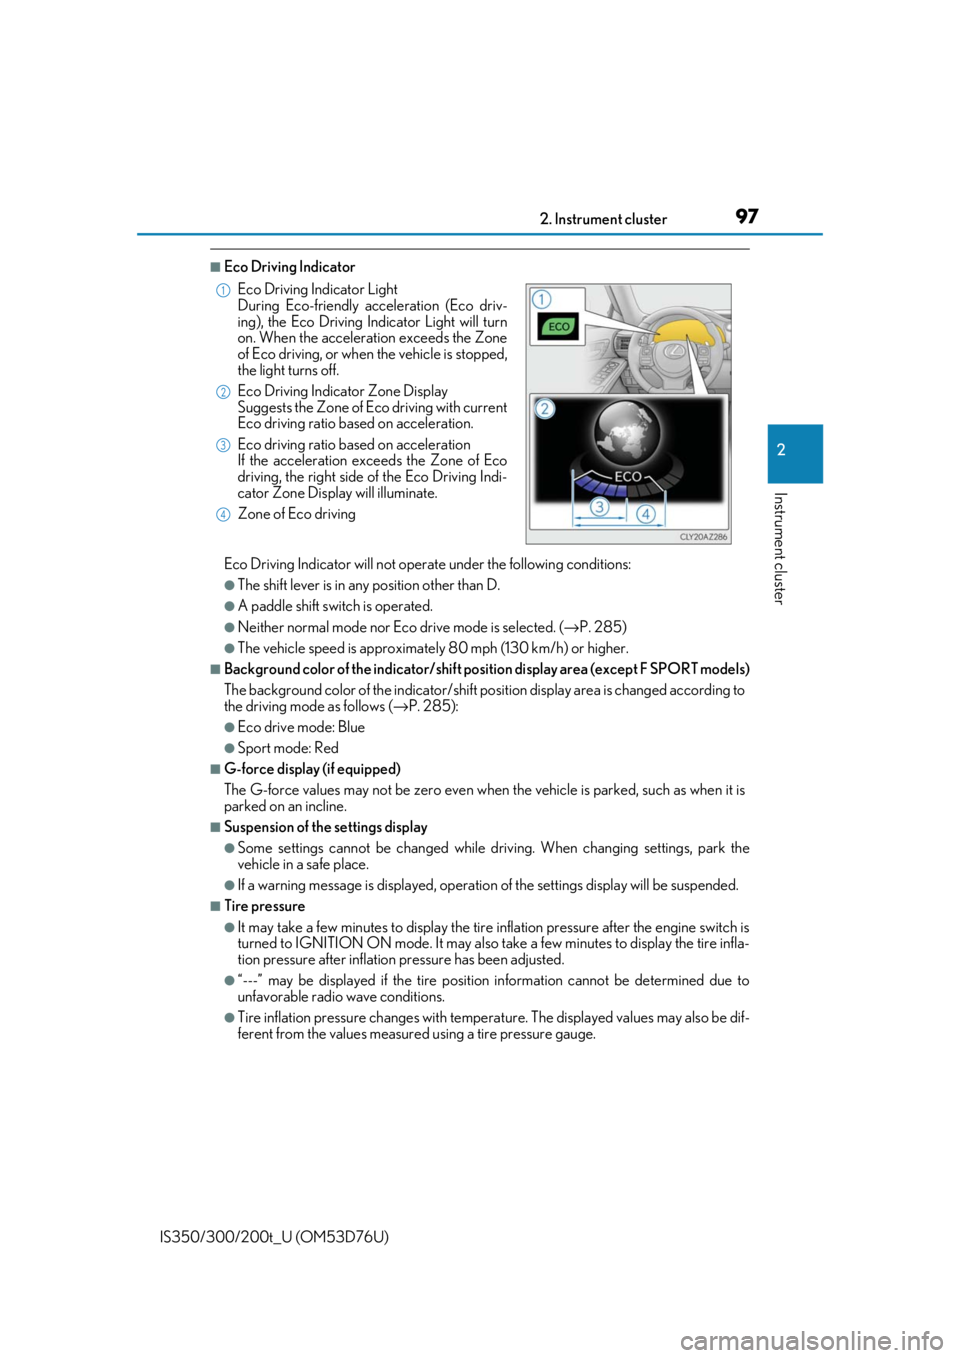
■Eco Driving Indicator
Eco Driving Indicator will not operate under the following conditions:
●The shift lever is in any position other than D.
●A paddle shift switch is operated.
●Neither normal mode nor Eco drive mode is selected. ( →P. 285)
●The vehicle speed is approximately 80 mph (130 km/h) or higher.
■Background color of the indicator/shift posi tion display area (except F SPORT models)
The background color of the indicator/shift position display area is changed according to
the driving mode as follows ( →P. 285):
●Eco drive mode: Blue
●Sport mode: Red
■G-force display (if equipped)
The G-force values may not be zero even when the vehicle is parked, such as when it is
parked on an incline.
■Suspension of the settings display
●Some settings cannot be changed while driv ing. When changing settings, park the
vehicle in a safe place.
●If a warning message is displa yed, operation of the settings display will be suspended.
■Tire pressure
●It may take a few minutes to display the tire inflation pressure after the engine switch is
turned to IGNITION ON mode. It may also take a few minutes to display the tire infla-
tion pressure after inflation pressure has been adjusted.
●“---” may be displayed if the tire position information cannot be determined due to
unfavorable radio wave conditions.
●Tire inflation pressure changes with temperat ure. The displayed values may also be dif-
ferent from the values measured using a tire pressure gauge. Eco Driving Indicator Light
During Eco-friendly acceleration (Eco driv-
ing), the Eco Driving Indicator Light will turn
on. When the acceleration exceeds the Zone
of Eco driving, or when the vehicle is stopped,
the light turns off.
Eco Driving Indicator Zone Display
Suggests the Zone of Eco driving with current
Eco driving ratio based on acceleration.
Eco driving ratio based on acceleration
If the acceleration exceeds the Zone of Eco
driving, the right side of the Eco Driving Indi-
cator Zone Display will illuminate.
Zone of Eco driving
1
2
3
4
Page 100 of 648
1002. Instrument cluster
IS350/300/200t_U (OM53D76U)
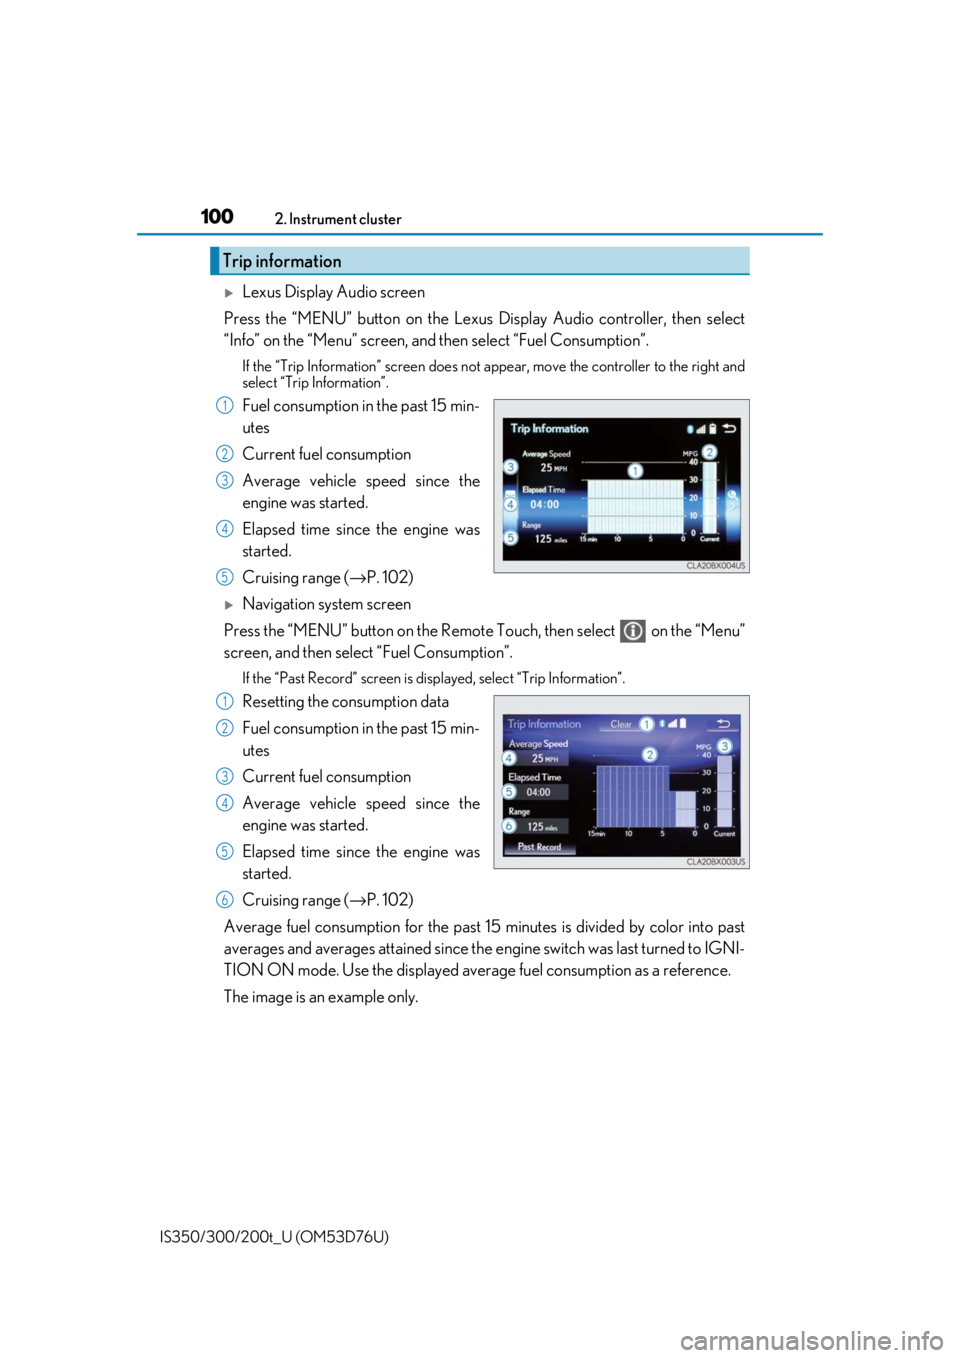
Lexus Display Audio screen
Press the “MENU” button on the Lexus Display Audio controller, then select
“Info” on the “Menu” screen, and then select “Fuel Consumption”.
If the “Trip Information” screen does not appear, move the controller to the right and
select “Trip Information”.
Fuel consumption in the past 15 min-
utes
Current fuel consumption
Average vehicle speed since the
engine was started.
Elapsed time since the engine was
started.
Cruising range (→P. 102)
Navigation system screen
Press the “MENU” button on the Remote Touch, then select on the “Menu”
screen, and then select “Fuel Consumption”.
If the “Past Record” screen is disp layed, select “Trip Information”.
Resetting the consumption data
Fuel consumption in the past 15 min-
utes
Current fuel consumption
Average vehicle speed since the
engine was started.
Elapsed time since the engine was
started.
Cruising range (→P. 102)
Average fuel consumption for the past 15 minutes is divided by color into past
averages and averages attained since the engine switch was last turned to IGNI-
TION ON mode. Use the displayed average fuel consumption as a reference.
The image is an example only.
Trip information
1
2
3
4
5
1
2
3
4
5
6
Page 107 of 648
1073-1. Key information
3
Operation of each component
IS350/300/200t_U (OM53D76U)
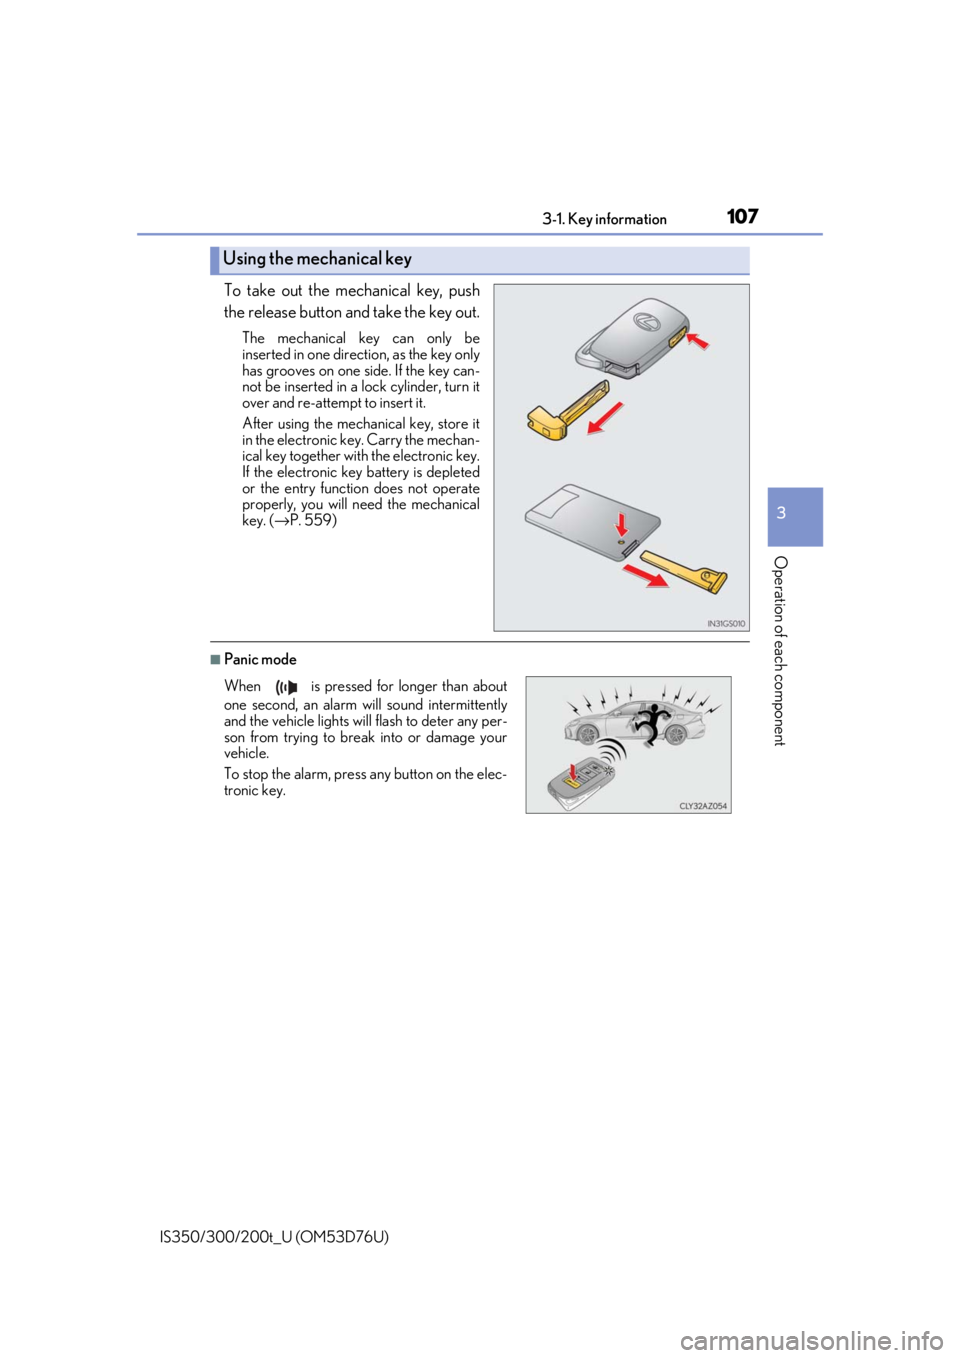
To take out the mechanical key, push
the release button and take the key out.
The mechanical key can only be
inserted in one direction, as the key only
has grooves on one side. If the key can-
not be inserted in a lock cylinder, turn it
over and re-attempt to insert it.
After using the mechanical key, store it
in the electronic key. Carry the mechan-
ical key together with the electronic key.
If the electronic key battery is depleted
or the entry function does not operate
properly, you will need the mechanical
key. ( →P. 559)
■Panic mode
Using the mechanical key
When is pressed for longer than about
one second, an alarm will sound intermittently
and the vehicle lights will flash to deter any per-
son from trying to break into or damage your
vehicle.
To stop the alarm, press any button on the elec-
tronic key.
Page 125 of 648

1253-2. Opening, closing and locking the doors and trunk
3
Operation of each component
IS350/300/200t_U (OM53D76U)
■Note for the entry function
●Even when the electronic key is within the effective range (detection areas), the system
may not operate properly in the following cases:
• The electronic key is too close to the window or outside door handle, near the ground, or in a high place when the doors are locked or unlocked.
• The electronic key is near the ground or in a high place, or too close to the rear
bumper center when the trunk is opened.
• The electronic key is on th e instrument panel, rear pack age tray or floor, or in the
door pockets or glove box when the engine is started or engine switch modes are
changed.
●Do not leave the electronic key on top of th e instrument panel or near the door pockets
when exiting the vehicle. Depending on the radio wave reception conditions, it may be
detected by the antenna outside the cabin an d the doors will become lockable from the
outside, possibly trapping the electronic key inside the vehicle.
●As long as the electronic key is within th e effective range, the doors may be locked or
unlocked by anyone. However, only the door s detecting the electronic key can be used
to unlock the vehicle.
●Even if the electronic key is not inside the vehicle, it may be possible to start the engine
if the electronic key is near the window.
●The doors may unlock or lock if a large amou nt of water splashes on the door handle,
such as in the rain or in a car wash, when th e electronic key is within the effective range.
(The doors will automatically be locked after approximately 30 seconds if the doors
are not opened and closed.)
●If the wireless remote control is used to lo ck the doors when the electronic key is near
the vehicle, there is a possibility that the d oor may not be unlocked by the entry func-
tion. (Use the wireless remote control to unlock the doors.)
●Touching the door lock or unlock sensor while wearing gloves may prevent lock or
unlock operation.
●When the lock operation is performed using the lock sensor, recognition signals will be
shown up to two consecutive times. After this, no recognition signals will be given.
●If the door handle becomes wet while the el ectronic key is within the effective range,
the door may lock and unlock repeatedly. In this case, follow the following correction
procedures to wash the vehicle:
• Place the electronic key in a location 6 ft. (2 m) or more away from the vehicle. (Take care to ensure that the key is not stolen.)
• Set the electronic key to battery-saving mode to disable the smart access system with push-button start. ( →P. 123)
●If the electronic key is inside the vehicle and a door handle becomes wet during a car
wash, a message may be shown on the mult i-information display and a buzzer will
sound outside the vehicle. To turn off the alarm, lock all the doors.
●The lock sensor may not work properly if it comes into contact with ice, snow, mud, etc.
Clean the lock sensor and attempt to operate it again, or use the lock sensor on the
lower part of the door handle.
●A sudden handle operation or a handle operation immediately after entering the effec-
tive range may prevent the doors from bein g unlocked. Touch the door unlock sensor
and check that the doors are unlocked before pulling the door handle again.
●Unlocking the vehicle may take more time if another electronic key is within the effec-
tive range.
Page 135 of 648
1353-3. Adjusting the seats
3
Operation of each component
IS350/300/200t_U (OM53D76U)
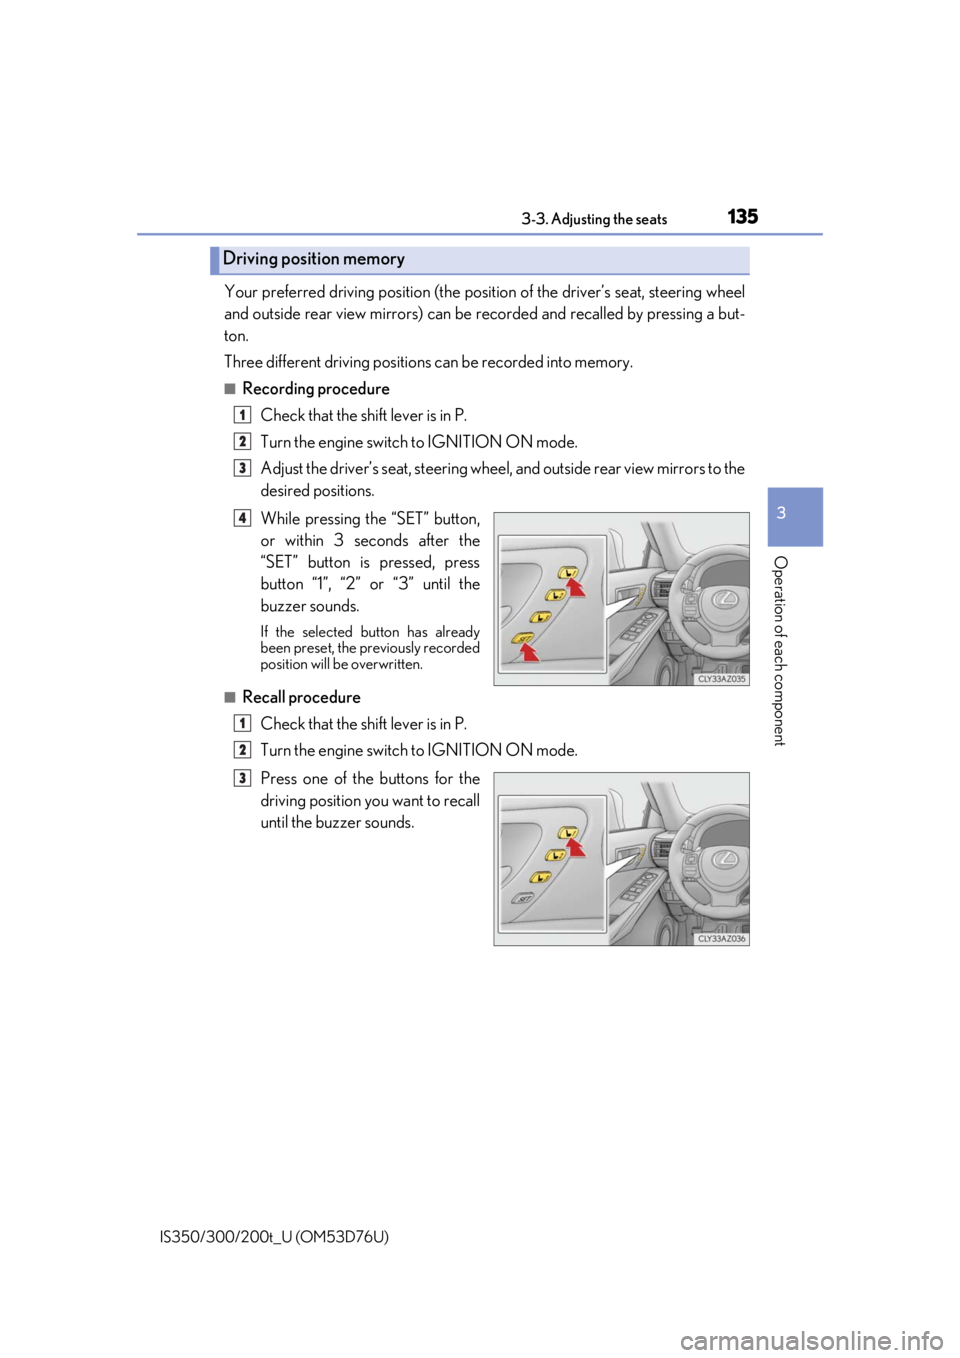
Your preferred driving position (the position of the driver’s seat, steering wheel
and outside rear view mirrors) can be recorded and recalled by pressing a but-
ton.
Three different driving positions can be recorded into memory.
■Recording procedure
Check that the shift lever is in P.
Turn the engine switch to IGNITION ON mode.
Adjust the driver’s seat, steering wheel, and outside rear view mirrors to the
desired positions.
While pressing the “SET” button,
or within 3 seconds after the
“SET” button is pressed, press
button “1”, “2” or “3” until the
buzzer sounds.
If the selected button has already
been preset, the previously recorded
position will be overwritten.
■Recall procedureCheck that the shift lever is in P.
Turn the engine switch to IGNITION ON mode.
Press one of the buttons for the
driving position you want to recall
until the buzzer sounds.
Driving position memory
1
2
3
4
1
2
3
Page 137 of 648
1373-3. Adjusting the seats
3
Operation of each component
IS350/300/200t_U (OM53D76U)
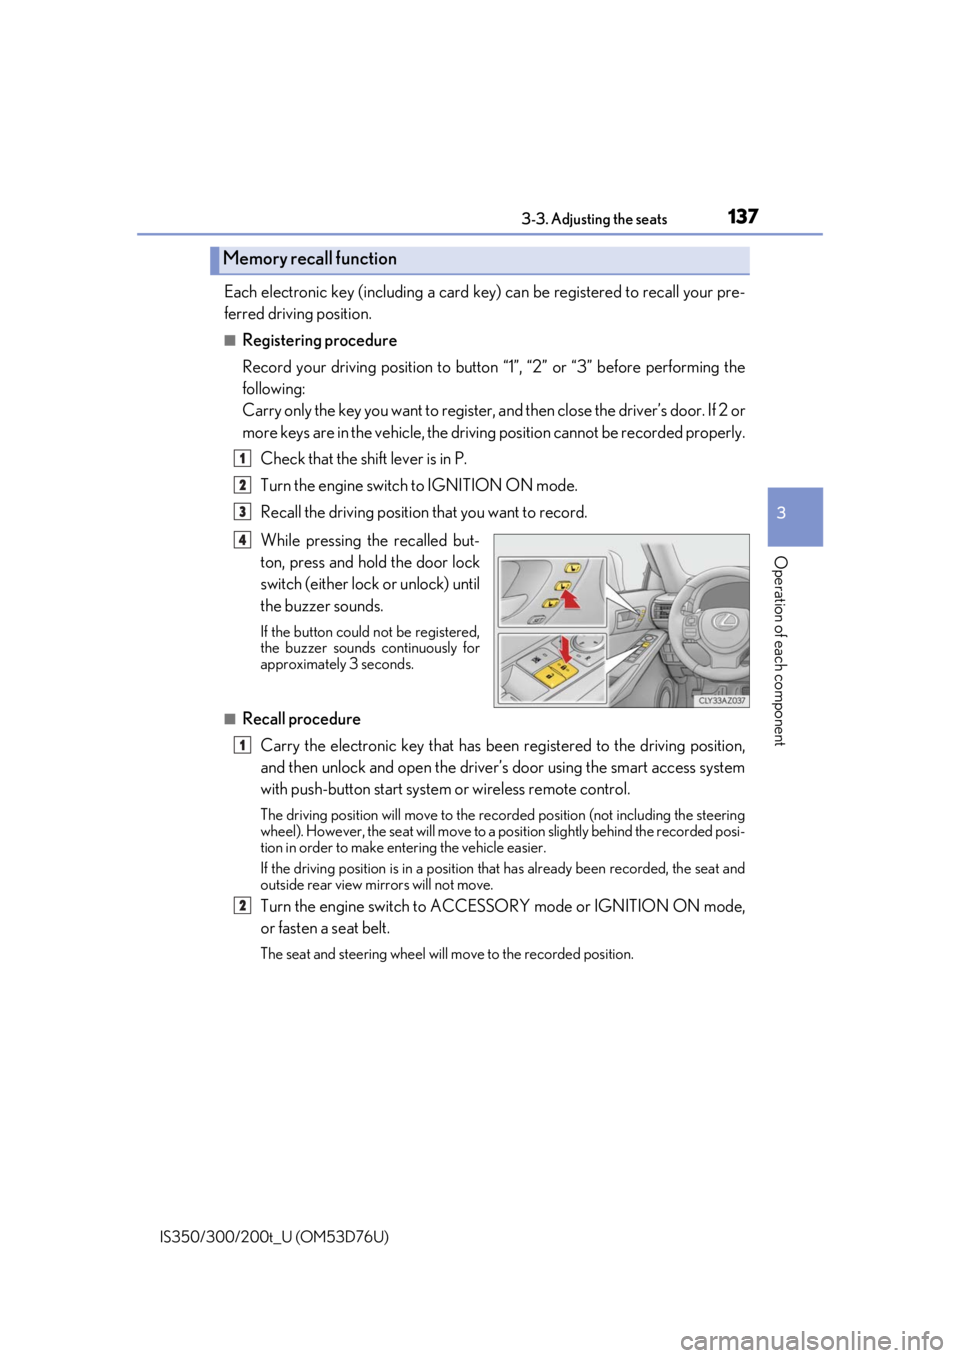
Each electronic key (including a card key) can be registered to recall your pre-
ferred driving position.
■Registering procedure
Record your driving position to button “1”, “2” or “3” before performing the
following:
Carry only the key you want to register, and then close the driver’s door. If 2 or
more keys are in the vehicle, the driving position cannot be recorded properly.
Check that the shift lever is in P.
Turn the engine switch to IGNITION ON mode.
Recall the driving position that you want to record.
While pressing the recalled but-
ton, press and hold the door lock
switch (either lock or unlock) until
the buzzer sounds.
If the button could not be registered,
the buzzer sounds continuously for
approximately 3 seconds.
■Recall procedureCarry the electronic key that has been registered to the driving position,
and then unlock and open the driver’s door using the smart access system
with push-button start system or wireless remote control.
The driving position will move to the recorded position (not including the steering
wheel). However, the seat will move to a position slightly behind the recorded posi-
tion in order to make entering the vehicle easier.
If the driving position is in a position th at has already been recorded, the seat and
outside rear view mirrors will not move.
Turn the engine switch to ACCESS ORY mode or IGNITION ON mode,
or fasten a seat belt.
The seat and steering wheel will move to the recorded position.
Memory recall function
1
2
3
4
1
2
Page 138 of 648

1383-3. Adjusting the seats
IS350/300/200t_U (OM53D76U)
■Cancelation procedure
Carry only the key you want to cancel an d then close the driver’s door. If 2 or
more keys are in the vehicle, the driv ing position cannot be canceled properly.
Turn the engine switch to IGNITION ON mode.
While pressing the “SET” button, pr ess and hold the door lock switch
(either lock or unlock) un til the buzzer sounds twice.
If the button could not be canceled, the buzzer sounds continuously for approxi-
mately 3 seconds.
■Recalling the driving position using the memory recall function
●Different driving positions can be registered for each electronic key. Therefore, the
driving position that is recalled may be di fferent depending on the key being carried.
●If a door other than the driver’s door is unlocked with the smart access system with
push-button start system, the driving position cannot be recalled. In this case, press the
driving position button which has been set.
■Customization
The unlock door settings of the memo ry recall function can be customized.
(Customizable features: →P. 602)
WARNING
■Seat adjustment caution
Take care during seat adjustment so that th e seat does not strike the rear passenger or
squeeze your body against the steering wheel.
1
2
Page 150 of 648

1503-5. Opening, closing the windows and moon roof
IS350/300/200t_U (OM53D76U)
■The power windows can be operated when
The engine switch is in IGNITION ON mode.
■Operating the power windows after turning the engine off
The power windows can be operated for ap proximately 45 seconds after the engine
switch is turned to ACCESSORY mode or turned off. They cannot, however, be oper-
ated once either front door is opened.
■Jam protection function
If an object becomes jammed between the window and the window frame while the win-
dow is closing, window movement is stop ped and the window is opened slightly.
■Catch protection function
If an object becomes caught between the door and window while the window is opening,
window movement is stopped.
■When the window cannot be opened or closed
When the jam protection functi on or catch protection function operates unusually and
the door window cannot be opened or closed, perform the following operations with the
power window switch of that door.
●Stop the vehicle. With the engine switch in IGNITION ON mode, within 4 seconds of
the jam protection function or catch protecti on function activating, continuously oper-
ate the power window switch in the one-to uch closing direction or one-touch opening
direction so that the door wind ow can be opened and closed.
●If the door window cannot be opened and closed even when performing the above
operations, perform the following procedure for function initialization.
Turn the engine switch to IGNITION ON mode.
Pull and hold the power window switch in the one-touch closing direction and com-
pletely close the door window.
Release the power window sw itch for a moment, resume pulling the switch in the
one-touch closing direction, and hold it there for approximately 6 seconds or more.
Press and hold the power window switch in the one-touch opening direction. After
the door window is completely opened, cont inue holding the switch for an additional
1 second or more.
Release the power window switch for a mo ment, resume pushing the switch in the
one-touch opening direction, and hold it there for approximately 4 seconds or
more.
Pull and hold the power window switch in the one-touch closing direction again.
After the door window is completely closed, continue holding the switch for a fur-
ther 1 second or more.
If you release the switch while the window is moving, start again from the beginning.
If the window reverses and cannot be fully cl osed or opened, have the vehicle inspected
by your Lexus dealer.
1
2
3
4
5
6