change time Lexus IS350 2017 Owner's Manual / LEXUS 2017 IS200T,IS300,IS350 OWNER'S MANUAL (OM53D76U)
[x] Cancel search | Manufacturer: LEXUS, Model Year: 2017, Model line: IS350, Model: Lexus IS350 2017Pages: 648, PDF Size: 10.73 MB
Page 8 of 648
8
IS350/300/200t_U (OM53D76U)Please note that this manual applies to all
models and explains all equipment, including
options. Therefore, you may find some expl anations for equipment not installed on your
vehicle.
All specifications provided in this manual are current at the time of printing. However,
because of the Lexus policy of continual pr oduct improvement, we reserve the right to
make changes at any time without notice.
Depending on specifications, th e vehicle shown in the illustrations may differ from your
vehicle in terms of color and equipment.
Approximately five hours after the engine is turned off, you may hear sound coming from
under the vehicle for several minutes. This is the sound of a fuel evaporation leakage
check and, it does not indicate a malfunction.
A wide variety of non-genuine spare parts and accessories for Lexus vehicles are cur-
rently available in the market. You should kn ow that Toyota does not warrant these prod-
ucts and is not responsible fo r their performance, repair, or replacement, or for any
damage they may cause to, or adverse effect they may have on, your Lexus vehicle.
This vehicle should not be modified with non-genuine Lexus products. Modification with
non-genuine Lexus products could affect its performance, safety or durability, and may
even violate governmental regulations. In addition, damage or performance problems
resulting from the modification may not be covered under warranty.
The installation of a mobile two-way radio system in your vehicle could affect electronic
systems such as:
●Multiport fuel injection system/seque ntial multiport fuel injection system
●Dynamic radar cruise control system
●Anti-lock brake system
●Vehicle dynamics integrated management
●SRS airbag system
●Seat belt pretensioner system
Be sure to check with your Lexus dealer for precautionary measures or special instruc-
tions regarding installation of a mobile two-way radio system.
For your information
Main Owner’s Manual
Noise from under vehicle after turning off the engine
Accessories, spare parts and modification of your Lexus
Installation of a mobile two-way radio system
Page 80 of 648
802. Instrument cluster
IS350/300/200t_U (OM53D76U)
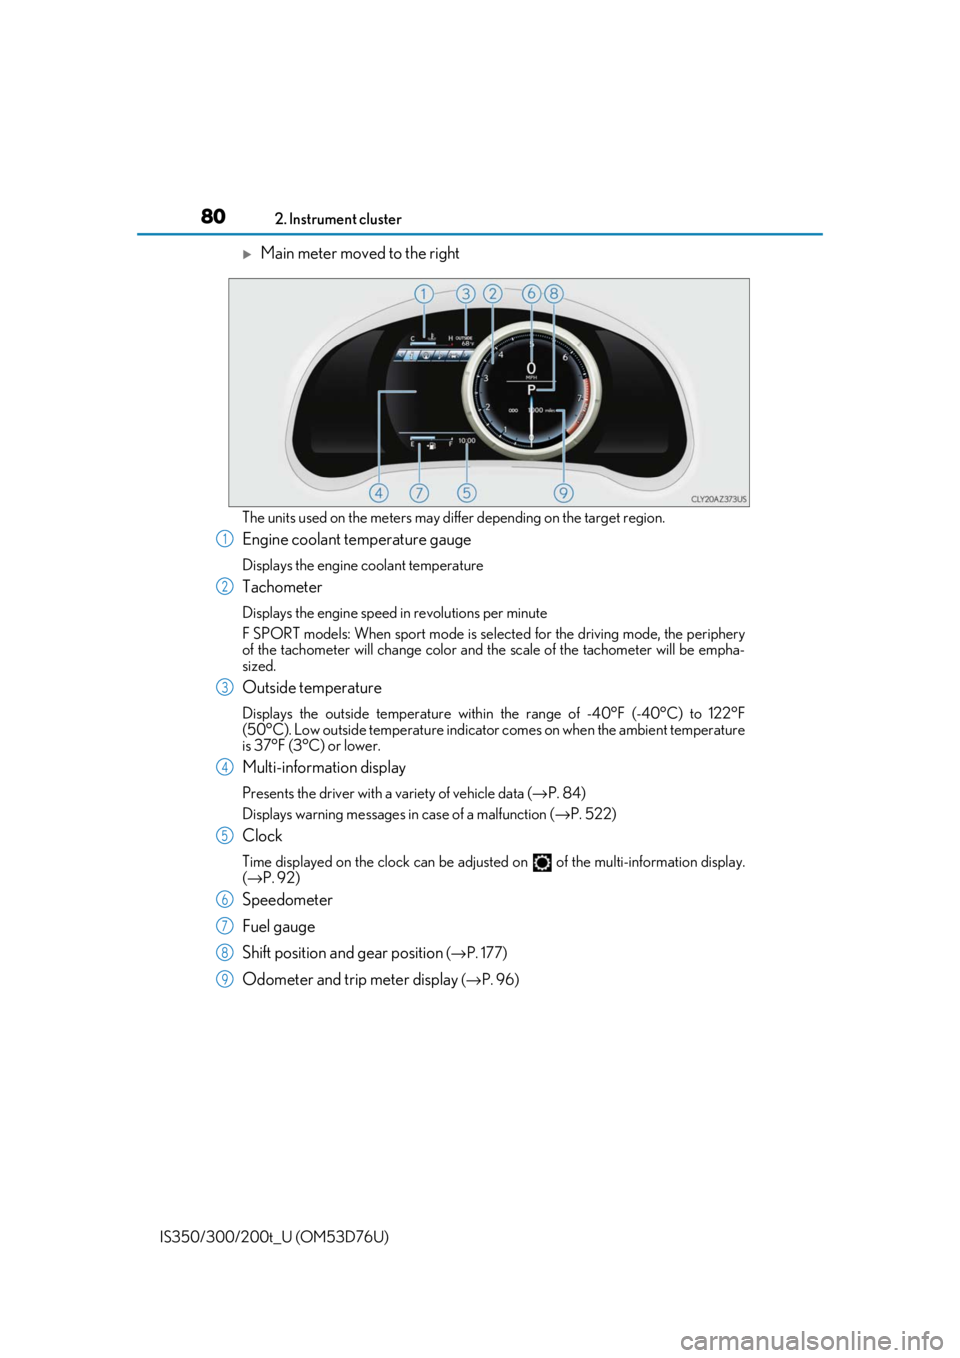
Main meter moved to the right
The units used on the meters may differ depending on the target region.
Engine coolant temperature gauge
Displays the engine coolant temperature
Tachometer
Displays the engine speed in revolutions per minute
F SPORT models: When sport mode is select ed for the driving mode, the periphery
of the tachometer will change color and th e scale of the tachometer will be empha-
sized.
Outside temperature
Displays the outside temperature within the range of -40°F (-40°C) to 122°F
(50°C). Low outside temperature indicator comes on when the ambient temperature
is 37°F (3°C) or lower.
Multi-information display
Presents the driver with a variety of vehicle data ( →P. 84)
Displays warning me ssages in case of a malfunction ( →P. 522)
Clock
Time displayed on the clock can be adjust ed on of the multi-information display.
( → P. 92)
Speedometer
Fuel gauge
Shift position and gear position
(→ P. 177)
Odometer and trip meter display (→ P. 96)
1
2
3
4
5
6
7
8
9
Page 83 of 648

832. Instrument cluster
2
Instrument cluster
IS350/300/200t_U (OM53D76U)
■The meters and display illuminate when
The engine switch is in IGNITION ON mode.
■Instrument panel brightness adjustment
The instrument panel brightness levels when the tail lights are on and off can be adjusted
individually. However, when the surroundings are bright (daytime, etc.), turning on the tail
lights will not change the inst rument panel brightness. At th is time, any adjustments made
to the instrument panel brightness levels will be applied to both settings at once.
■Outside temperature display
In the following situations, the correct outside temperature may not be displayed, or the
display may take longer than normal to change.
●When stopped, or driving at low speeds (less than 12 mph [20 km/h])
●When the outside temperature has changed suddenly (at the entrance/exit of a garage,
tunnel, etc.)
■Pop-up display
●In some situations, such as when a switch operation is performed, a pop-up display will
be temporarily displayed on the multi-information display or the odometer/trip meter
screen (F SPORT models).
●Some pop-up displays can be set on/off. ( →P. 92)
■Customization
The meter display can be customized on the multi-information display. (→P. 92)
NOTICE
■To prevent damage to the engine and its components
●Do not let the indicator needle of the tachometer enter the red zone, which indicates
the maximum engine speed.
●The engine may be overheating if the engine coolant temperature gauge is in the red
zone (H). In this case, immediately stop the vehicle in a safe place, and check the
engine after it has cooled completely. ( →P. 566)
Page 87 of 648
872. Instrument cluster
2
Instrument cluster
IS350/300/200t_U (OM53D76U)
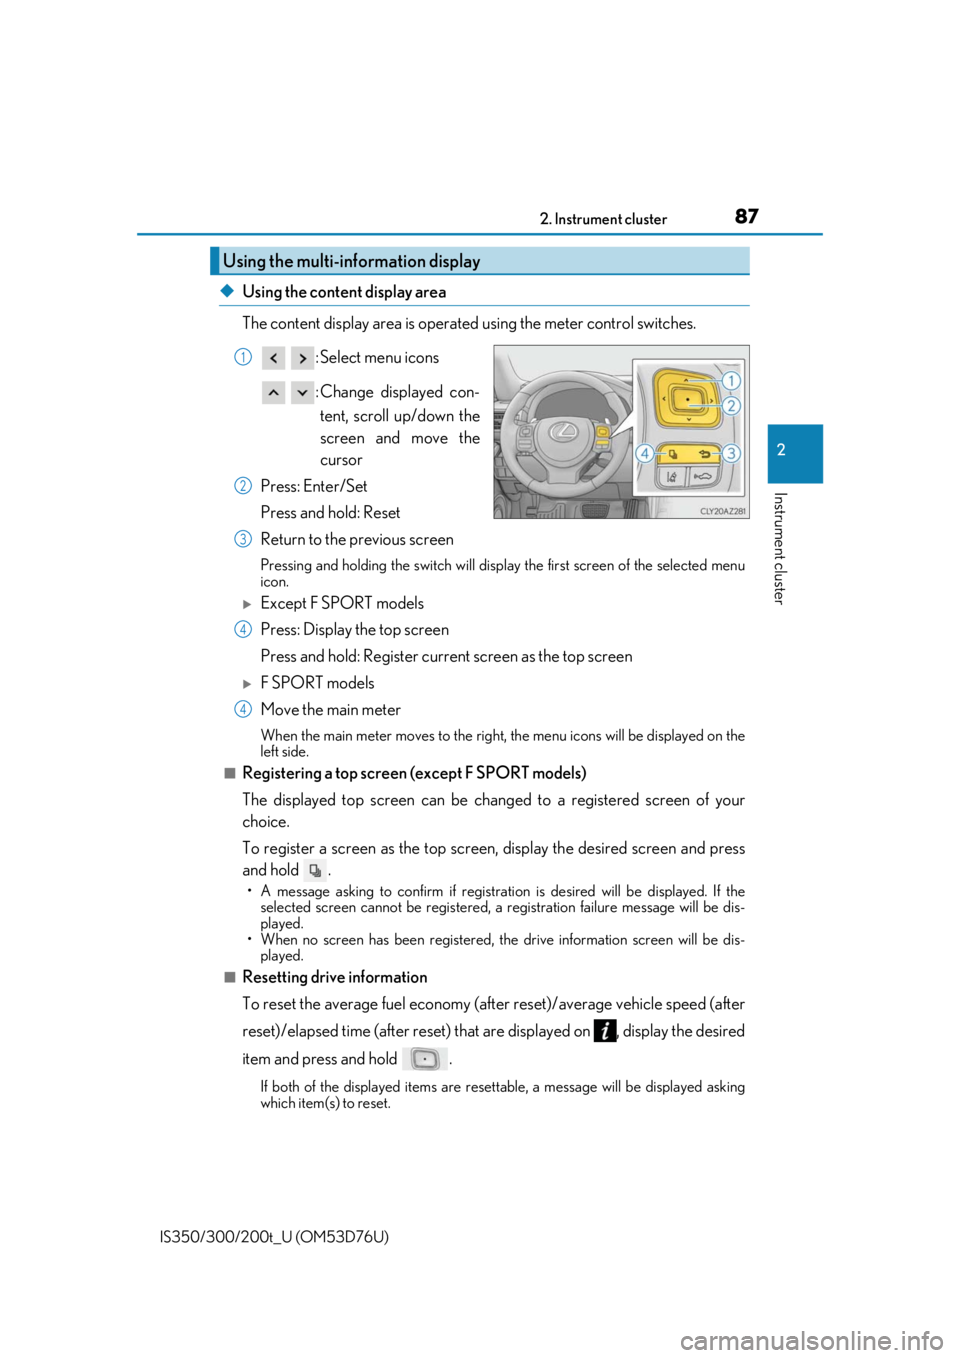
◆Using the content display area
The content display area is operated using the meter control switches. : Select menu icons
: Change displayed con-tent, scroll up/down the
screen and move the
cursor
Press: Enter/Set
Press and hold: Reset
Return to the previous screen
Pressing and holding the swit ch will display the first screen of the selected menu
icon.
Except F SPORT models
Press: Display the top screen
Press and hold: Register current screen as the top screen
F SPORT models
Move the main meter
When the main meter moves to the right, the menu icons will be displayed on the
left side.
■Registering a top screen (except F SPORT models)
The displayed top screen can be chan ged to a registered screen of your
choice.
To register a screen as the top screen, display the desired screen and press
and hold .
• A message asking to confirm if registrati on is desired will be displayed. If the
selected screen canno t be registered, a registration failure message will be dis-
played.
• When no screen has been registered, the drive information screen will be dis-
played.
■Resetting drive information
To reset the average fuel economy (aft er reset)/average vehicle speed (after
reset)/elapsed time (after reset) that are displayed on , display the desired
item and press and hold .
If both of the displayed items are resettable, a messa ge will be displayed asking
which item(s) to reset.
Using the multi-information display
1
2
3
4
4
Page 88 of 648
882. Instrument cluster
IS350/300/200t_U (OM53D76U)
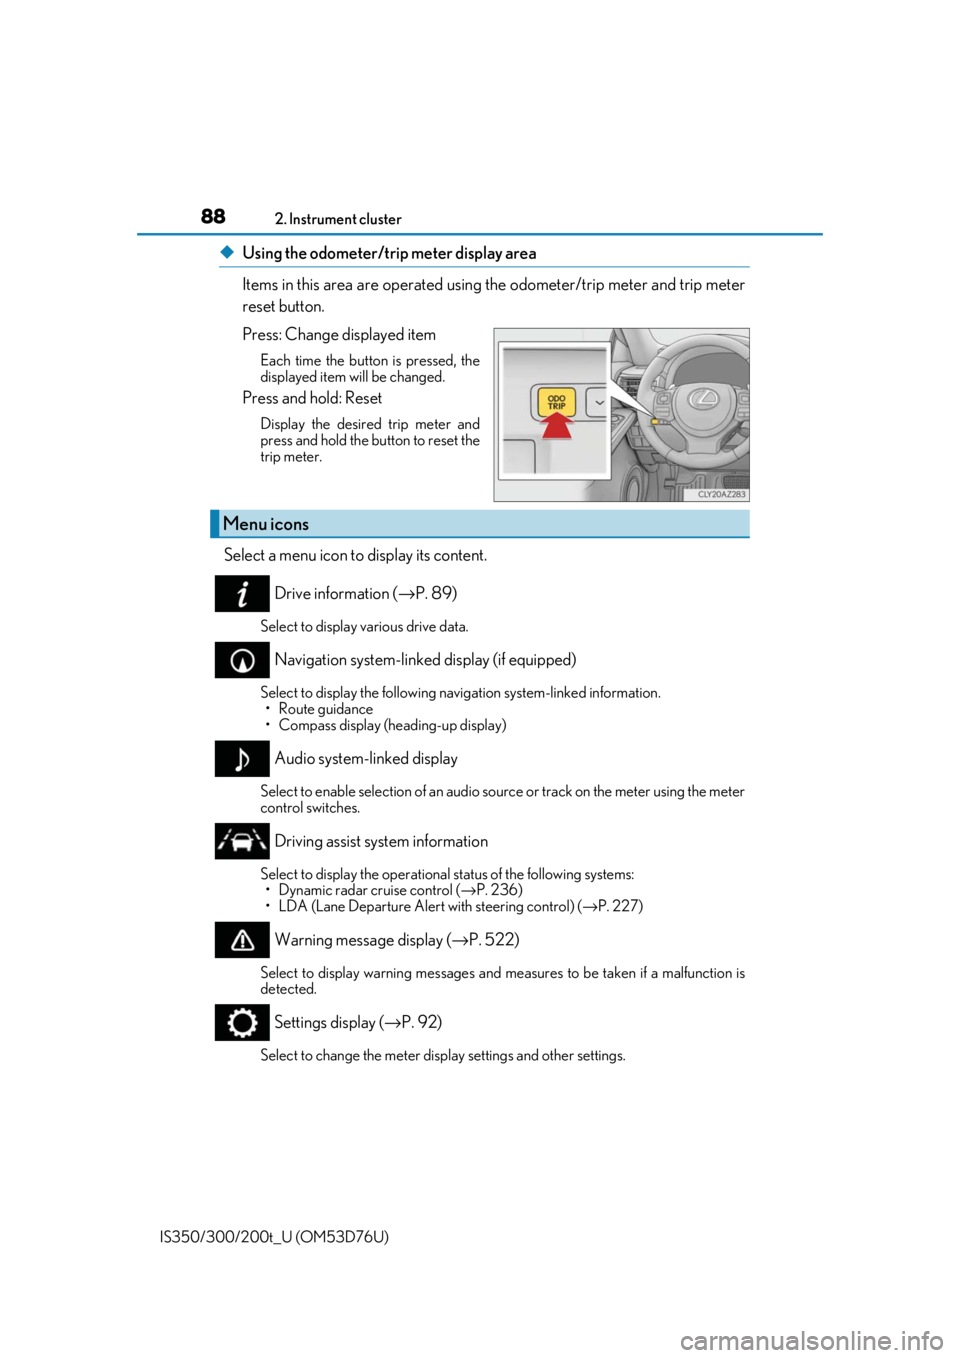
◆Using the odometer/trip meter display area
Items in this area are operated using the odometer/trip meter and trip meter
reset button.
Press: Change displayed item
Each time the button is pressed, the
displayed item will be changed.
Press and hold: Reset
Display the desired trip meter and
press and hold the button to reset the
trip meter.
Select a menu icon to display its content.
Drive information ( →P. 89)
Select to display various drive data.
Navigation system-linked display (if equipped)
Select to display the following na vigation system-linked information.
•Route guidance
• Compass display (heading-up display)
Audio system-linked display
Select to enable selection of an audio source or track on the meter using the meter
control switches.
Driving assist system information
Select to display the operational status of the following systems: • Dynamic radar cruise control ( →P. 236)
• LDA (Lane Departure Alert with steering control) ( →P. 227)
Warning message display ( →P. 522)
Select to display warning messages and me asures to be taken if a malfunction is
detected.
Settings display ( →P. 92)
Select to change the meter display settings and other settings.
Menu icons
Page 89 of 648
892. Instrument cluster
2
Instrument cluster
IS350/300/200t_U (OM53D76U)
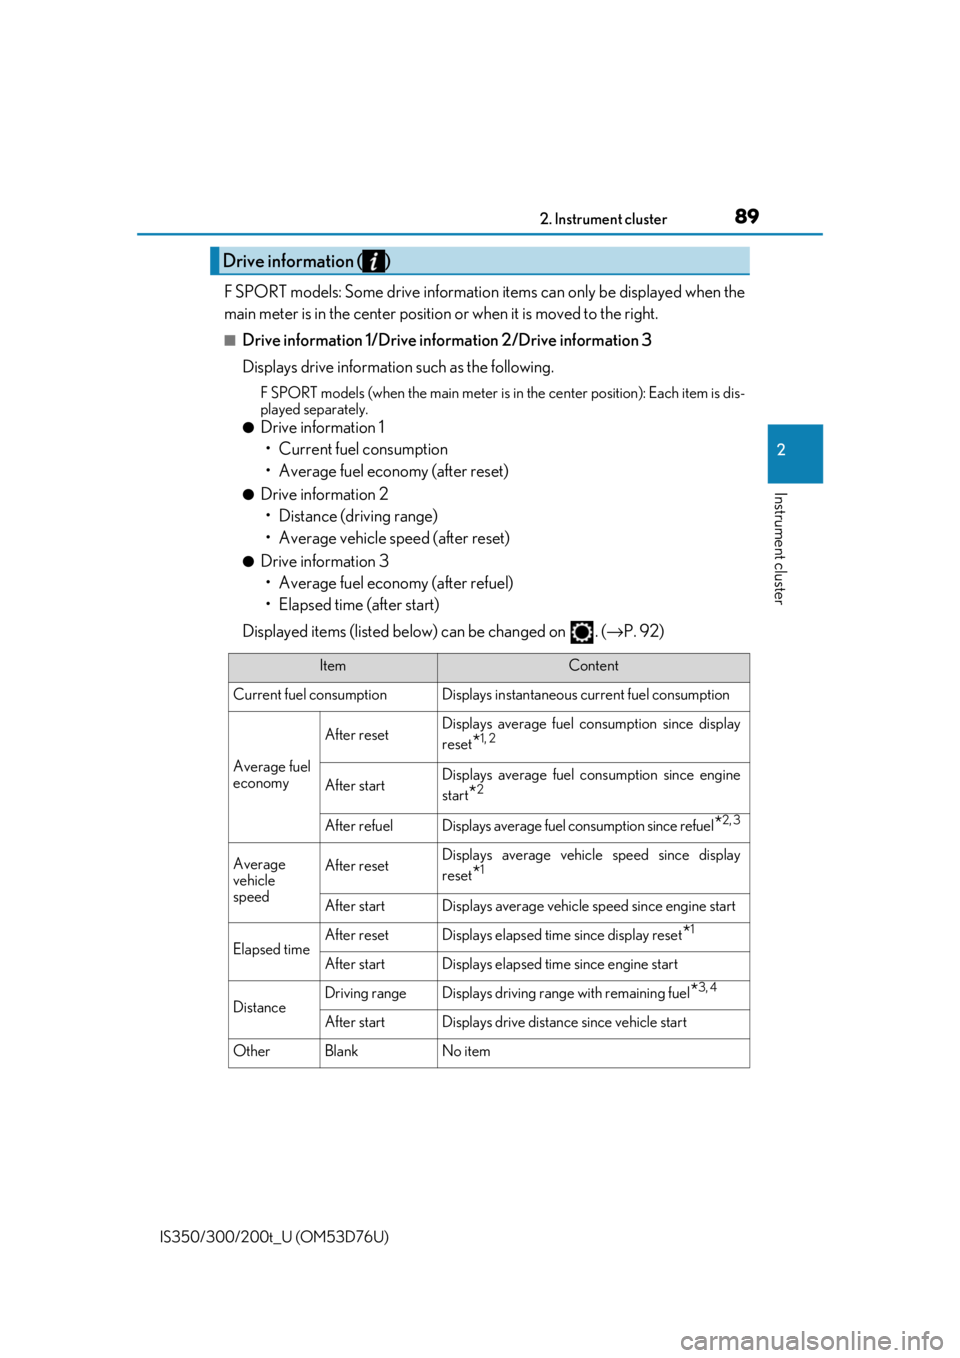
F SPORT models: Some drive information items can only be displayed when the
main meter is in the center position or when it is moved to the right.
■Drive information 1/Drive information 2/Drive information 3
Displays drive information such as the following.
F SPORT models (when the main meter is in the center position): Each item is dis-
played separately.
●Drive information 1
• Current fuel consumption
• Average fuel economy (after reset)
●Drive information 2• Distance (driving range)
• Average vehicle speed (after reset)
●Drive information 3• Average fuel economy (after refuel)
• Elapsed time (after start)
Displayed items (listed below) can be changed on . ( →P. 92)
Drive information ( )
ItemContent
Current fuel consumption Displays in stantaneous current fuel consumption
Average fuel
economy
After resetDisplays average fuel consumption since display
reset
*1, 2
After startDisplays average fuel consumption since engine
start
*2
After refuelDisplays average fuel consumption since refuel*2, 3
Average
vehicle
speedAfter resetDisplays average vehicle speed since display
reset
*1
After startDisplays average vehicle speed since engine start
Elapsed timeAfter resetDisplays elapsed time since display reset*1
After startDisplays elapsed time since engine start
DistanceDriving rangeDisplays driving range with remaining fuel*3, 4
After startDisplays drive distance since vehicle start
OtherBlankNo item
Page 93 of 648
932. Instrument cluster
2
Instrument cluster
IS350/300/200t_U (OM53D76U)
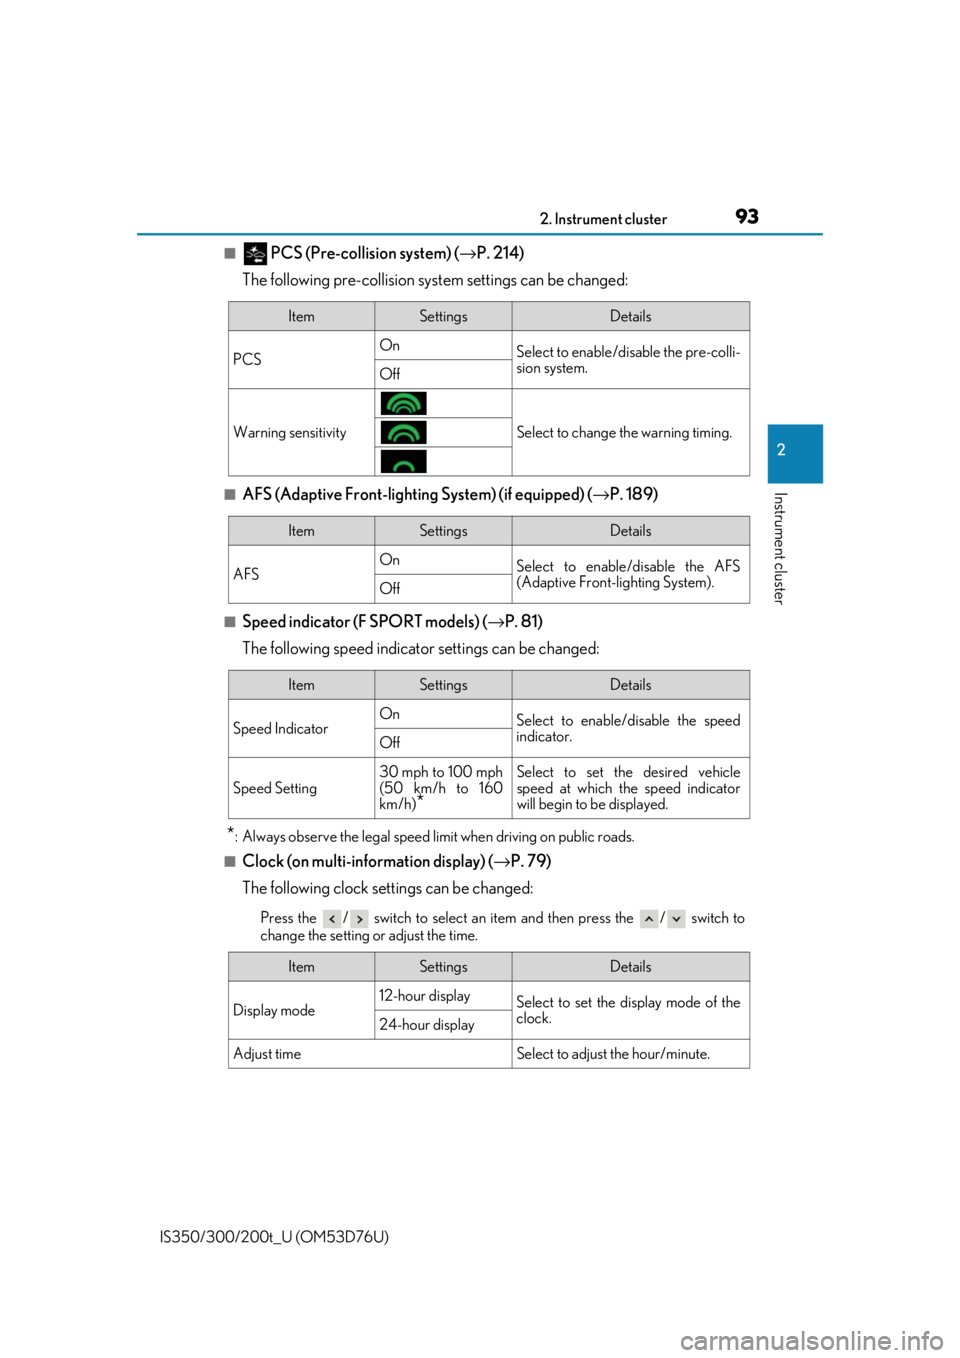
■ PCS (Pre-collision system) (→P. 214)
The following pre-collision syst em settings can be changed:
■AFS (Adaptive Front-lighting System) (if equipped) ( →P. 189)
■Speed indicator (F SPORT models) (→ P. 81)
The following speed indicator settings can be changed:
*: Always observe the legal speed li mit when driving on public roads.
■Clock (on multi-information display) ( →P. 79)
The following clock settings can be changed:
Press the / switch to select an it em and then press the / switch to
change the setting or adjust the time.
ItemSettingsDetails
PCS On
Select to enable/disable the pre-colli-
sion system.
Off
Warning sensitivitySelect to change the warning timing.
ItemSettingsDetails
AFS On
Select to enable/disable the AFS
(Adaptive Front-lighting System).
Off
ItemSettingsDetails
Speed Indicator On
Select to enable/disable the speed
indicator.
Off
Speed Setting30 mph to 100 mph
(50 km/h to 160
km/h)
*
Select to set the desired vehicle
speed at which the speed indicator
will begin to be displayed.
ItemSettingsDetails
Display mode 12-hour display
Select to set the display mode of the
clock.
24-hour display
Adjust timeSelect to adjust the hour/minute.
Page 115 of 648
1153-2. Opening, closing and locking the doors and trunk
3
Operation of each component
IS350/300/200t_U (OM53D76U)
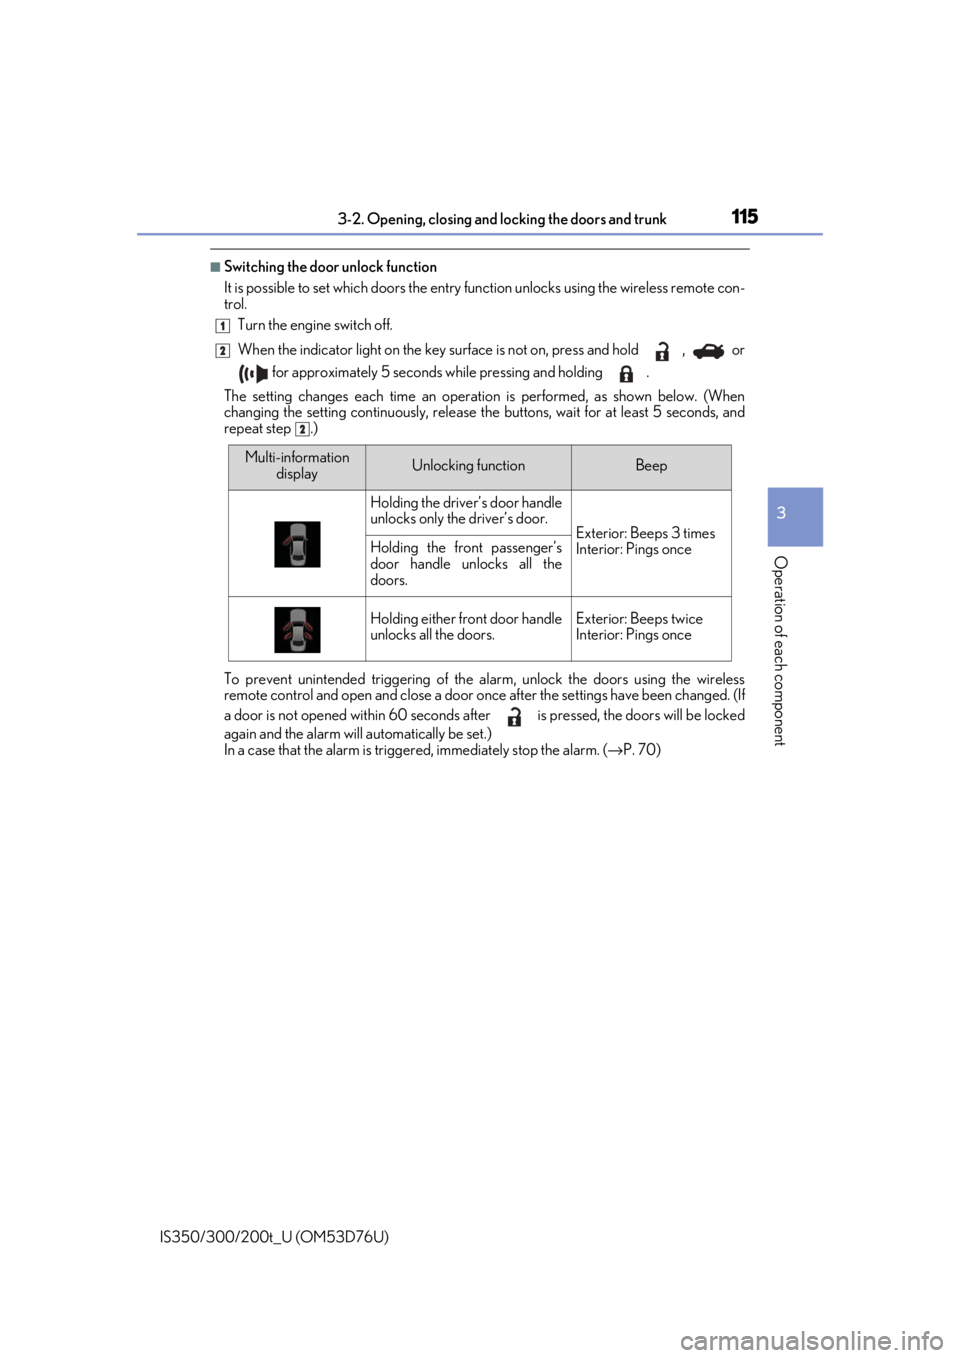
■Switching the door unlock function
It is possible to set which doors the entry function unlock s using the wireless remote con-
trol.
Turn the engine switch off.
When the indicator light on the key surface is not on, press and hold , or
for approximately 5 seconds while pressing and holding .
The setting changes each time an operation is performed, as shown below. (When
changing the setting continuously, release the buttons, wait for at least 5 seconds, and
repeat step .)
To prevent unintended triggering of the alarm, unlock the doors using the wireless
remote control and open and close a door once after the settings have been changed. (If
a door is not opened within 60 seconds af ter is pressed, the doors will be locked
again and the alarm will automatically be set.)
In a case that the alarm is triggered, immediately stop the alarm. ( →P. 70)
1
2
2
Multi-information
displayUnlocking functionBeep
Holding the driver’s door handle
unlocks only the driver’s door.
Exterior: Beeps 3 times
Interior: Pings onceHolding the front passenger’s
door handle unlocks all the
doors.
Holding either front door handle
unlocks all the doors.Exterior: Beeps twice
Interior: Pings once
Page 119 of 648
1193-2. Opening, closing and locking the doors and trunk
3
Operation of each component
IS350/300/200t_U (OM53D76U)
■Trunk light
The trunk light turns on when the trunk is opened.
■Function to prevent the trunk being locked with the electronic key inside
●When all doors are locked, closing the trunk li d with the electronic key left inside the
trunk will sound an alarm.
In this case, the trunk lid can be opened pr essing the trunk release button on the trunk
lid.
●If the spare electronic key is put in the trunk with all the doors locked, the key confine-
ment prevention function is activated so the trunk can be opened. In order to prevent
theft, take all electronic keys with you when leaving the vehicle.
●If the electronic key is put in the trunk with all the doors locked, the key may not be
detected depending on the location of the key and the surrounding radio wave condi-
tions. In this case, the key confinement prevention function cannot be activated, causing
the doors to lock when the trunk is closed. Make sure to check where the key is before
closing the trunk.
●The key confinement prevention function canno t be activated if any one of the doors is
unlocked. In this case, open the trunk using the trunk opener.
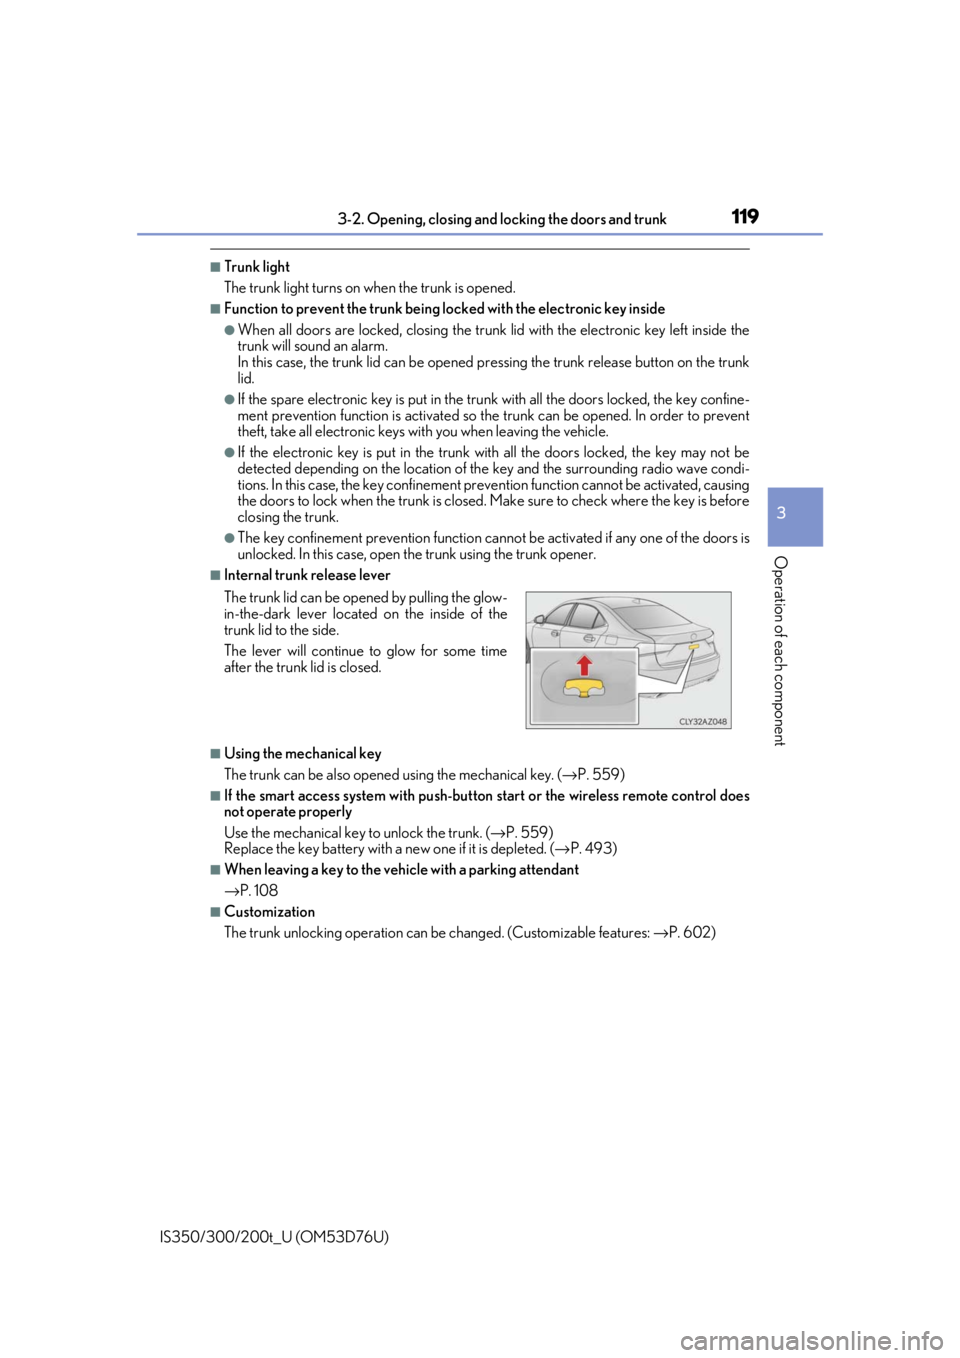
■Internal trunk release lever
■Using the mechanical key
The trunk can be also opened using the mechanical key. ( →P. 559)
■If the smart access system with push-button start or the wireless remote control does
not operate properly
Use the mechanical key to unlock the trunk. (→ P. 559)
Replace the key battery with a new one if it is depleted. ( →P. 493)
■When leaving a key to the vehicle with a parking attendant
→P. 108
■Customization
The trunk unlocking operation can be changed. (Customizable features: → P. 602)
The trunk lid can be open
ed by pulling the glow-
in-the-dark lever located on the inside of the
trunk lid to the side.
The lever will continue to glow for some time
after the trunk lid is closed.
Page 125 of 648

1253-2. Opening, closing and locking the doors and trunk
3
Operation of each component
IS350/300/200t_U (OM53D76U)
■Note for the entry function
●Even when the electronic key is within the effective range (detection areas), the system
may not operate properly in the following cases:
• The electronic key is too close to the window or outside door handle, near the ground, or in a high place when the doors are locked or unlocked.
• The electronic key is near the ground or in a high place, or too close to the rear
bumper center when the trunk is opened.
• The electronic key is on th e instrument panel, rear pack age tray or floor, or in the
door pockets or glove box when the engine is started or engine switch modes are
changed.
●Do not leave the electronic key on top of th e instrument panel or near the door pockets
when exiting the vehicle. Depending on the radio wave reception conditions, it may be
detected by the antenna outside the cabin an d the doors will become lockable from the
outside, possibly trapping the electronic key inside the vehicle.
●As long as the electronic key is within th e effective range, the doors may be locked or
unlocked by anyone. However, only the door s detecting the electronic key can be used
to unlock the vehicle.
●Even if the electronic key is not inside the vehicle, it may be possible to start the engine
if the electronic key is near the window.
●The doors may unlock or lock if a large amou nt of water splashes on the door handle,
such as in the rain or in a car wash, when th e electronic key is within the effective range.
(The doors will automatically be locked after approximately 30 seconds if the doors
are not opened and closed.)
●If the wireless remote control is used to lo ck the doors when the electronic key is near
the vehicle, there is a possibility that the d oor may not be unlocked by the entry func-
tion. (Use the wireless remote control to unlock the doors.)
●Touching the door lock or unlock sensor while wearing gloves may prevent lock or
unlock operation.
●When the lock operation is performed using the lock sensor, recognition signals will be
shown up to two consecutive times. After this, no recognition signals will be given.
●If the door handle becomes wet while the el ectronic key is within the effective range,
the door may lock and unlock repeatedly. In this case, follow the following correction
procedures to wash the vehicle:
• Place the electronic key in a location 6 ft. (2 m) or more away from the vehicle. (Take care to ensure that the key is not stolen.)
• Set the electronic key to battery-saving mode to disable the smart access system with push-button start. ( →P. 123)
●If the electronic key is inside the vehicle and a door handle becomes wet during a car
wash, a message may be shown on the mult i-information display and a buzzer will
sound outside the vehicle. To turn off the alarm, lock all the doors.
●The lock sensor may not work properly if it comes into contact with ice, snow, mud, etc.
Clean the lock sensor and attempt to operate it again, or use the lock sensor on the
lower part of the door handle.
●A sudden handle operation or a handle operation immediately after entering the effec-
tive range may prevent the doors from bein g unlocked. Touch the door unlock sensor
and check that the doors are unlocked before pulling the door handle again.
●Unlocking the vehicle may take more time if another electronic key is within the effec-
tive range.