display Lexus IS350 2018 / LEXUS 2018 IS300,IS350 QUICK GUIDE (OM53E60U) User Guide
[x] Cancel search | Manufacturer: LEXUS, Model Year: 2018, Model line: IS350, Model: Lexus IS350 2018Pages: 74, PDF Size: 1.74 MB
Page 28 of 74
28
LDA (Lane Departure Alert
with Steering Control)
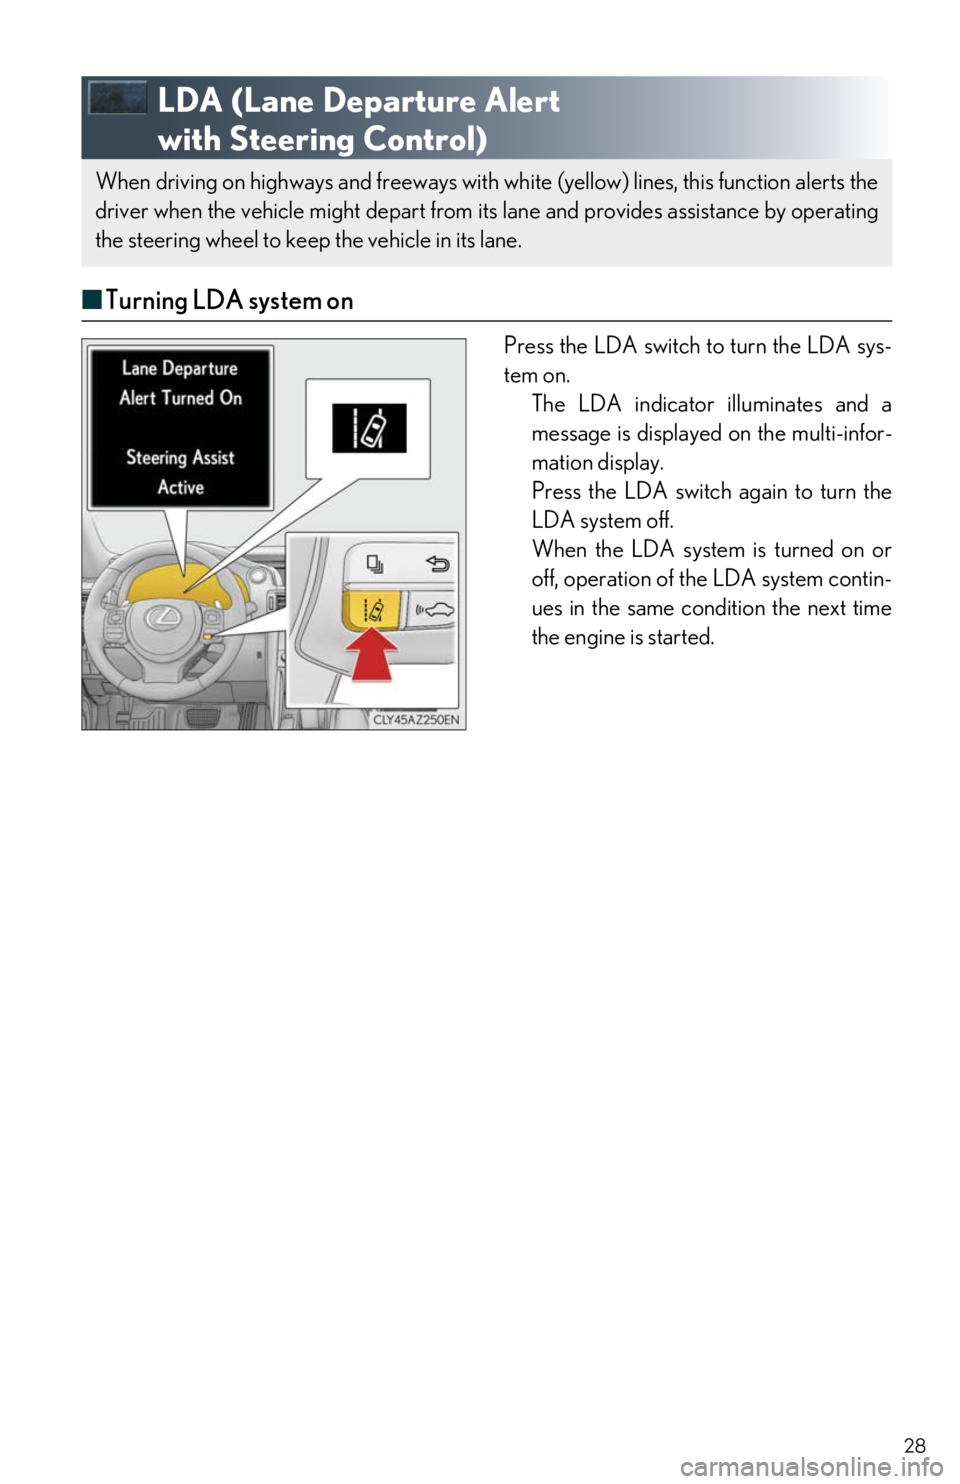
■ Turning LDA system on
Press the LDA switch to turn the LDA sys-
tem on.
The LDA indicator illuminates and a
message is displayed on the multi-infor-
mation display.
Press the LDA switch again to turn the
LDA system off.
When the LDA system is turned on or
off, operation of the LDA system contin-
ues in the same condition the next time
the engine is started.
When driving on highways and freeways with white (yellow) lines, this function alerts the
driver when the vehicle might depart from it s lane and provides assistance by operating
the steering wheel to keep the vehicle in its lane.
Page 29 of 74
29
Intuitive Parking Assist (if equipped)
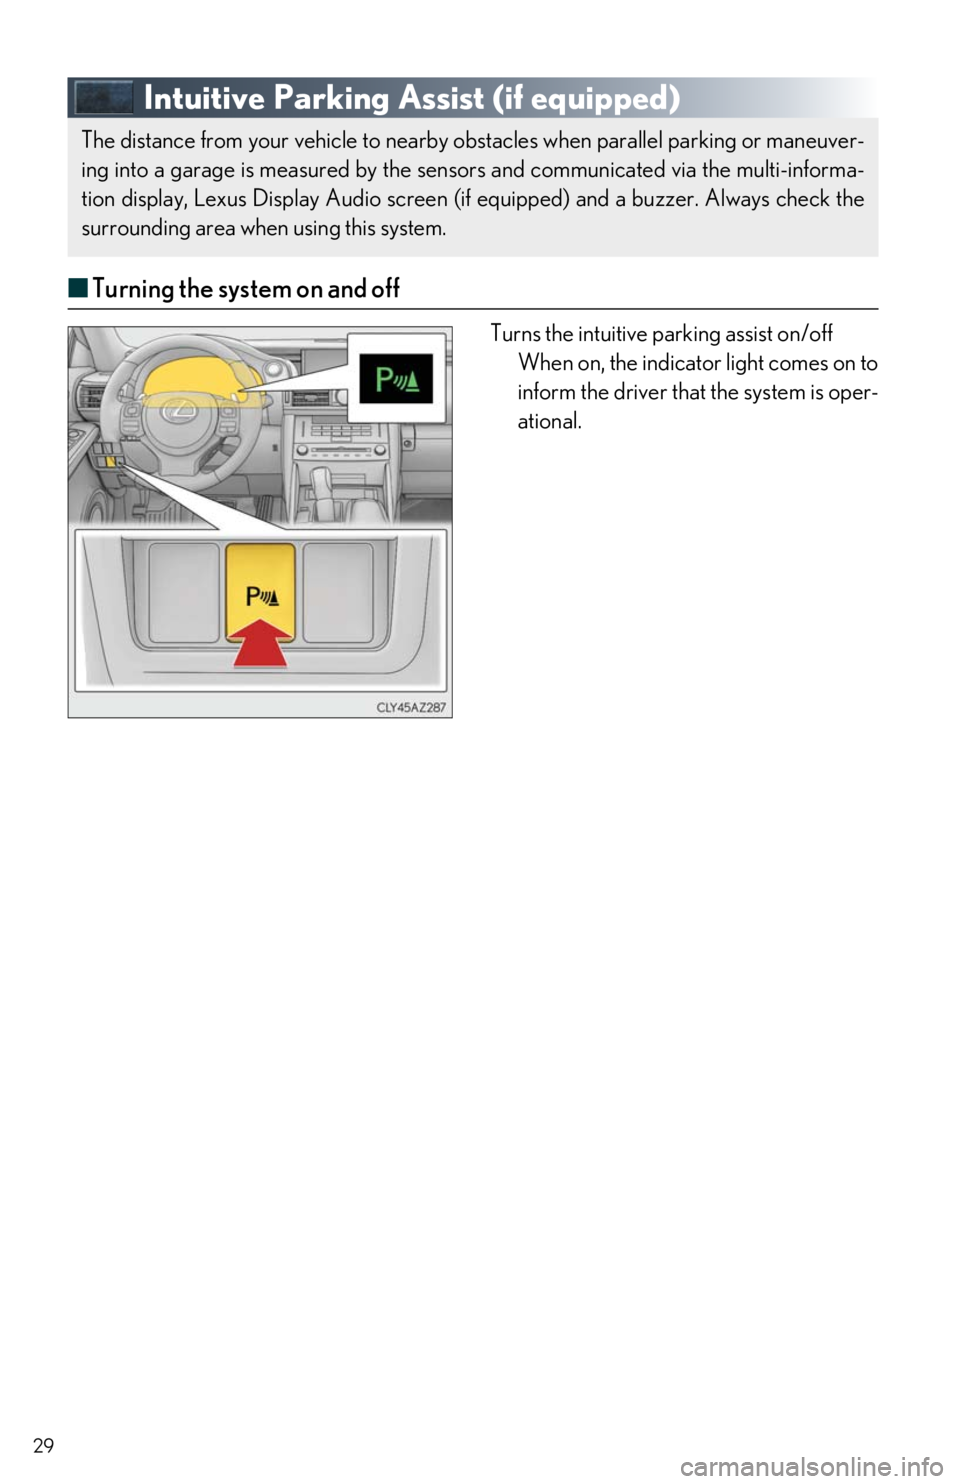
■Turning the system on and off
Turns the intuitive parking assist on/off
When on, the indicator light comes on to
inform the driver that the system is oper-
ational.
The distance from your vehicle to nearby obstacles when parallel parking or maneuver-
ing into a garage is measured by the sensors and communicated via the multi-informa-
tion display, Lexus Display Audio screen (if equipped) and a buzzer. Always check the
surrounding area when using this system.
Page 30 of 74
30
BSM (Blind Spot Monitor) (if equipped)
The Blind Spot Monitor is a system that has 2 functions:
● The BSM (Blind Spot Monitor) function
Assists the driver in making a decision when changing lanes
● The RCTA (Rear Cross Traffic Alert) function
Assists the driver when backing up
These functions use same sensors.
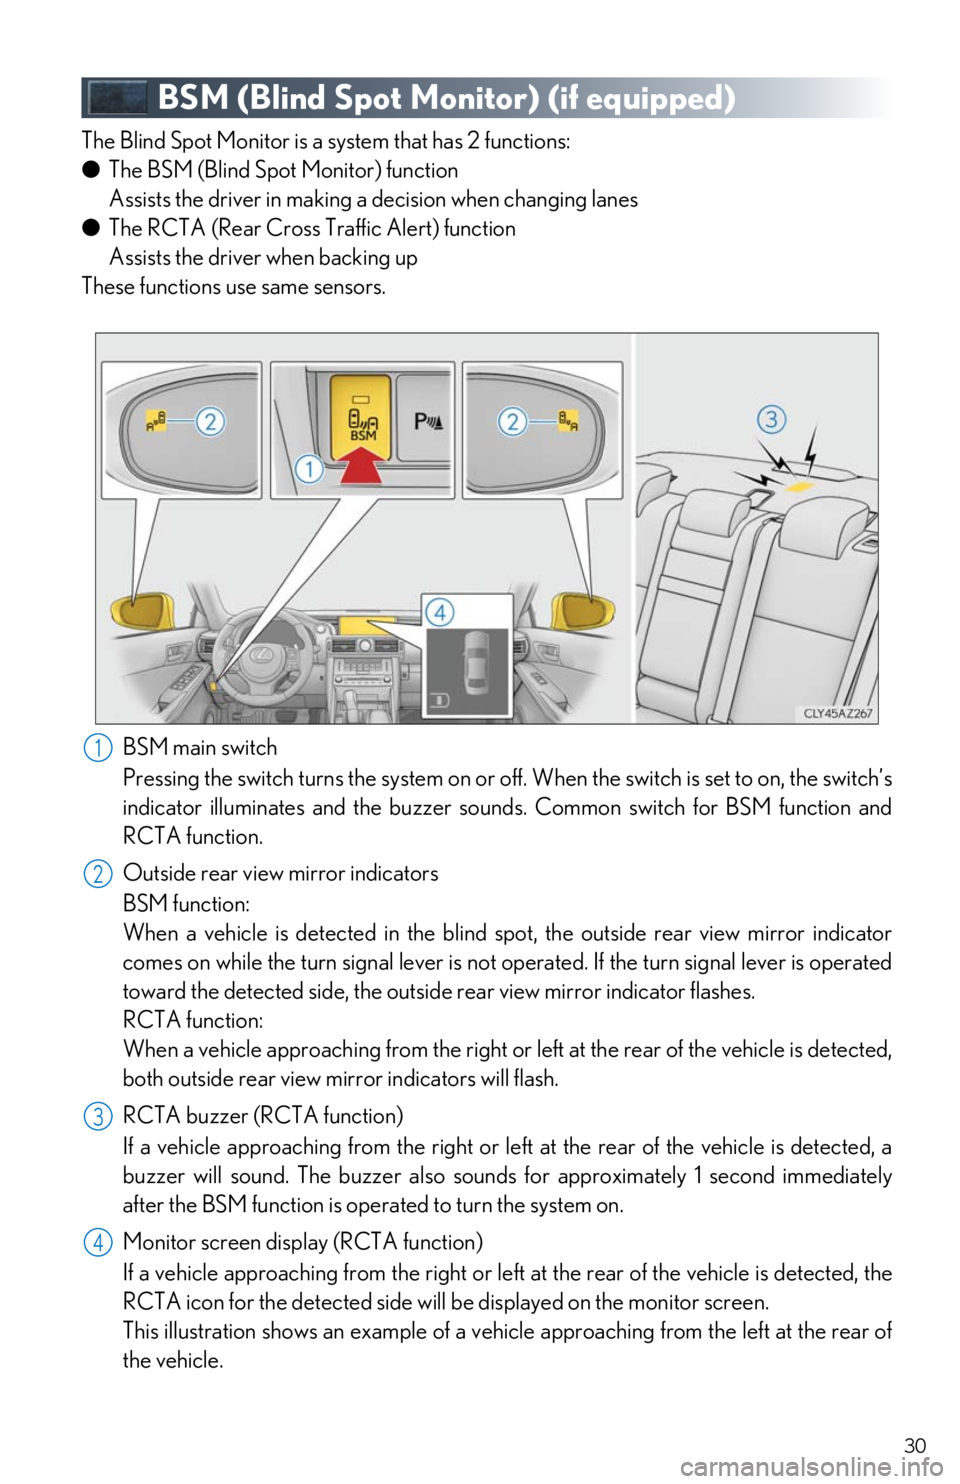
BSM main switch
Pressing the switch turns the sy stem on or off. When the switch is set to on, the switch’s
indicator illuminates and the buzzer sounds. Common switch for BSM function and
RCTA function.
Outside rear view mirror indicators
BSM function:
When a vehicle is detected in the blind spot, the outside rear view mirror indicator
comes on while the turn signal lever is not operated. If the turn signal lever is operated
toward the detected side, the outsid e rear view mirror indicator flashes.
RCTA function:
When a vehicle approaching from the right or le ft at the rear of the vehicle is detected,
both outside rear view mirr or indicators will flash.
RCTA buzzer (RCTA function)
If a vehicle approaching from the right or left at the rear of the vehicle is detected, a
buzzer will sound. The buzzer also sounds for approximately 1 second immediately
after the BSM function is operated to turn the system on.
Monitor screen display (RCTA function)
If a vehicle approaching from the right or left at the rear of the vehicle is detected, the
RCTA icon for the detected side will be displayed on the monitor screen.
This illustration shows an example of a vehicle approaching from the left at the rear of
the vehicle.
1
2
23
44
Page 31 of 74
31
Tire Pressure Warning System
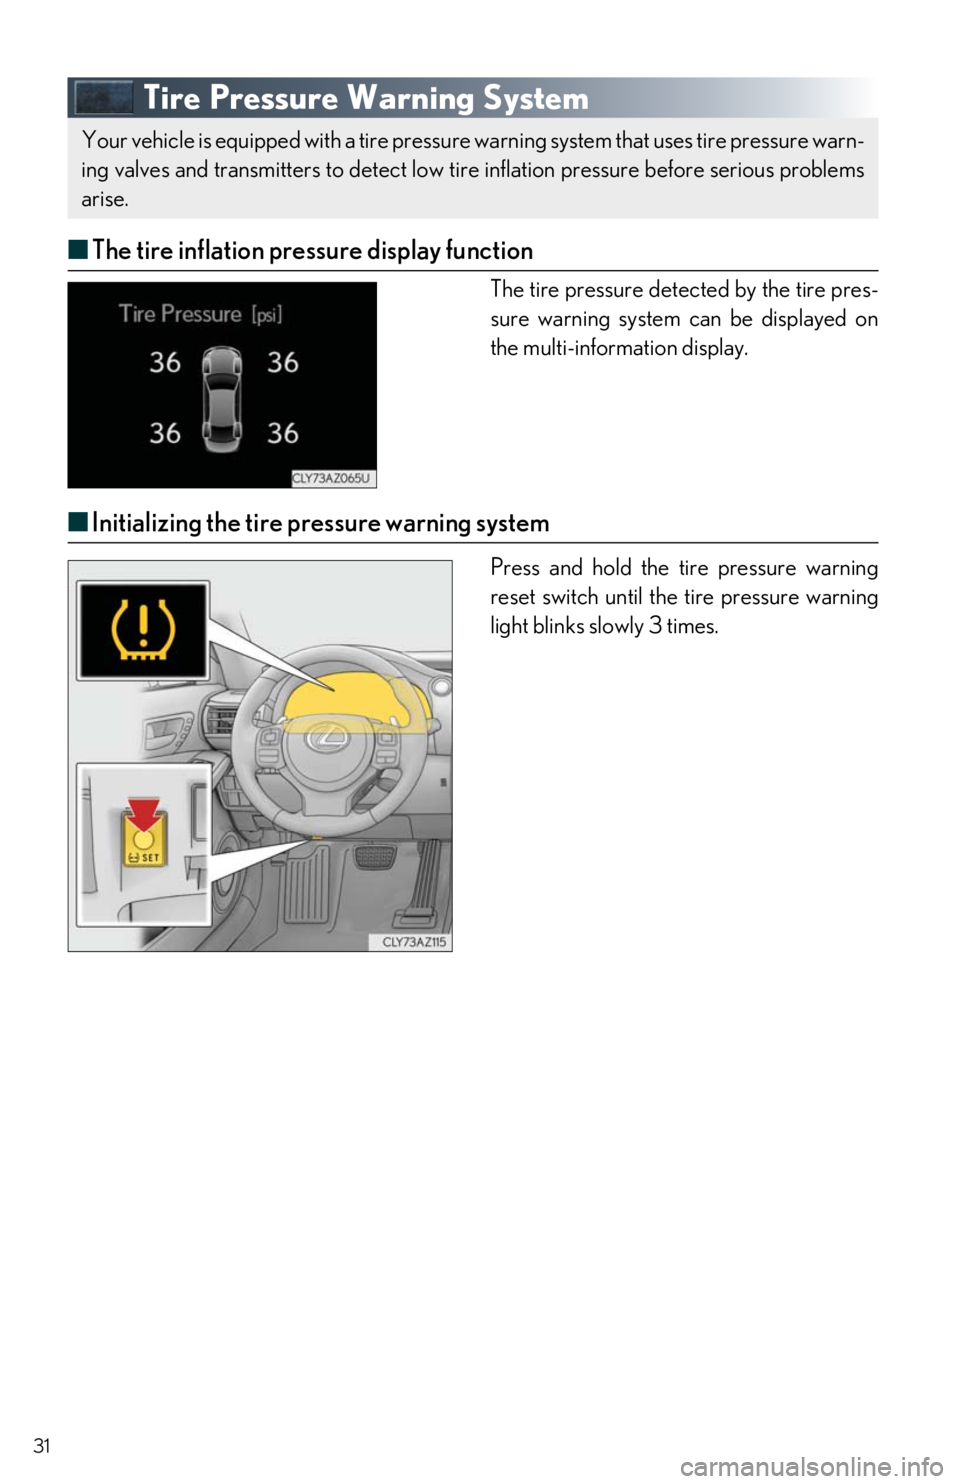
■The tire inflation pressure display function
The tire pressure detected by the tire pres-
sure warning system can be displayed on
the multi-information display.
■ Initializing the tire pressure warning system
Press and hold the ti re pressure warning
reset switch until the tire pressure warning
light blinks slowly 3 times.
Your vehicle is equipped with a tire pressure warning system that uses tire pressure warn-
ing valves and transmitters to detect low ti re inflation pressure before serious problems
arise.
Page 32 of 74
32
Remote Touch (if equipped)
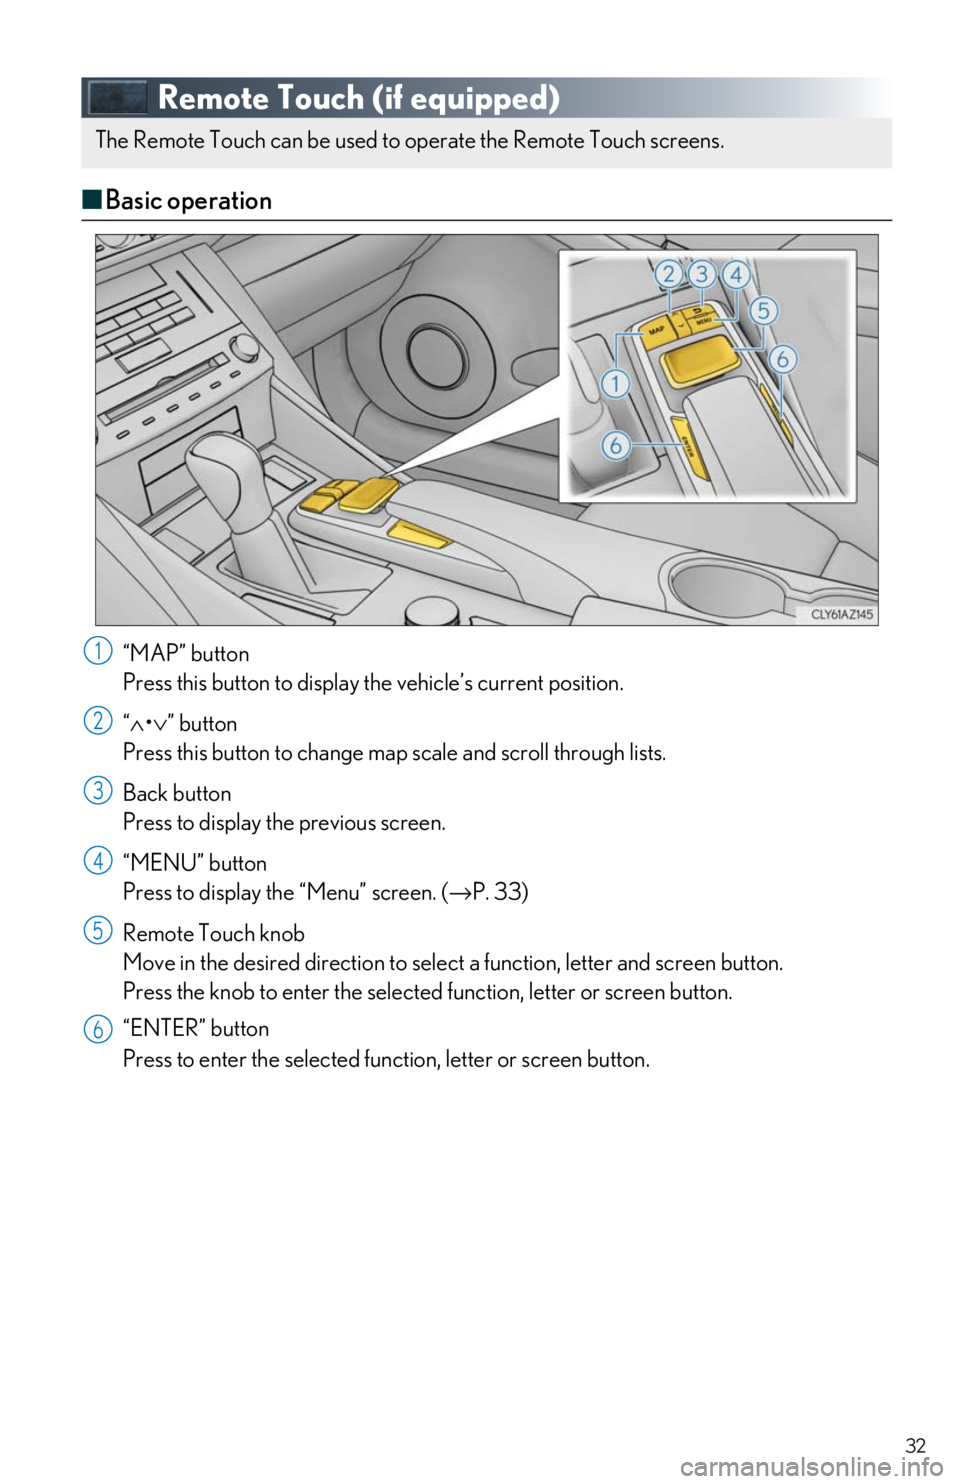
■Basic operation
“MAP” button
Press this button to display the vehicle’s current position.
“∧ •∨ ” button
Press this button to change map scale and scroll through lists.
Back button
Press to display the previous screen.
“MENU” button
Press to display th e “Menu” screen. ( →P. 33)
Remote Touch knob
Move in the desired direction to select a function, letter and screen button.
Press the knob to enter the selected function, letter or screen button.
“ENTER” button
Press to enter the selected function, letter or screen button.
The Remote Touch can be used to operate the Remote Touch screens.
1
2
3
4
5
6
Page 33 of 74
33
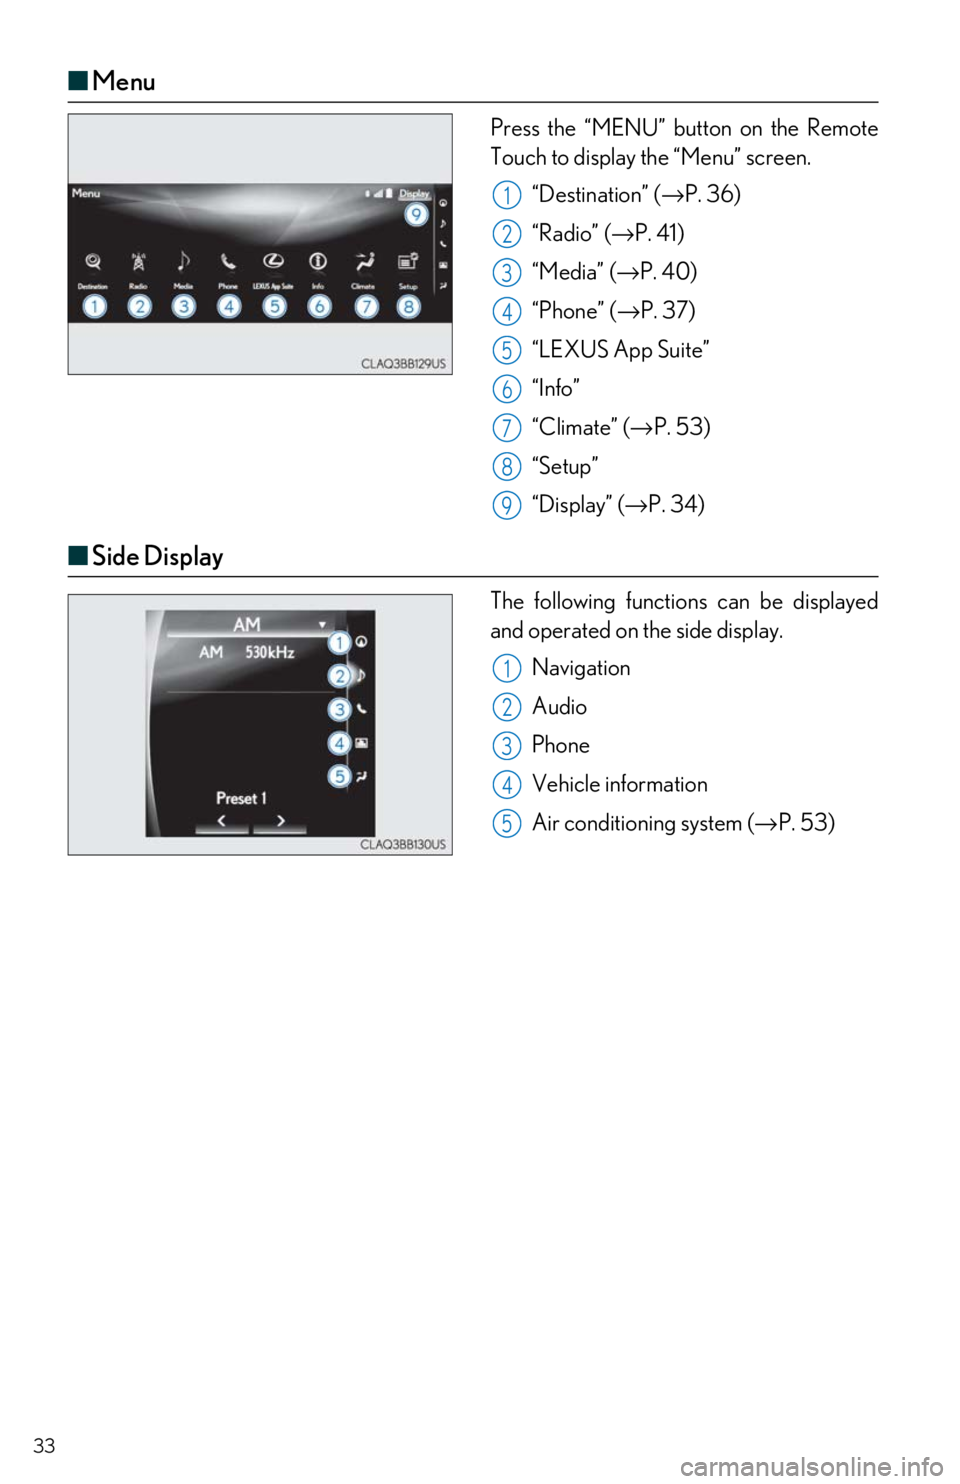
■Menu
Press the “MENU” button on the Remote
Touch to display the “Menu” screen.
“Destination” ( →P. 36)
“Radio” (→ P. 41)
“Media” ( →P. 40)
“Phone” ( →P. 37)
“LEXUS App Suite”
“Info”
“Climate” ( →P. 53)
“Setup”
“Display” ( →P. 34)
■Side Display
The following functions can be displayed
and operated on the side display.
Navigation
Audio
Phone
Vehicle information
Air conditioning system (→ P. 53)
1
2
23
34
45
6
7
8
89
1
2
3
34
45
Page 34 of 74
34
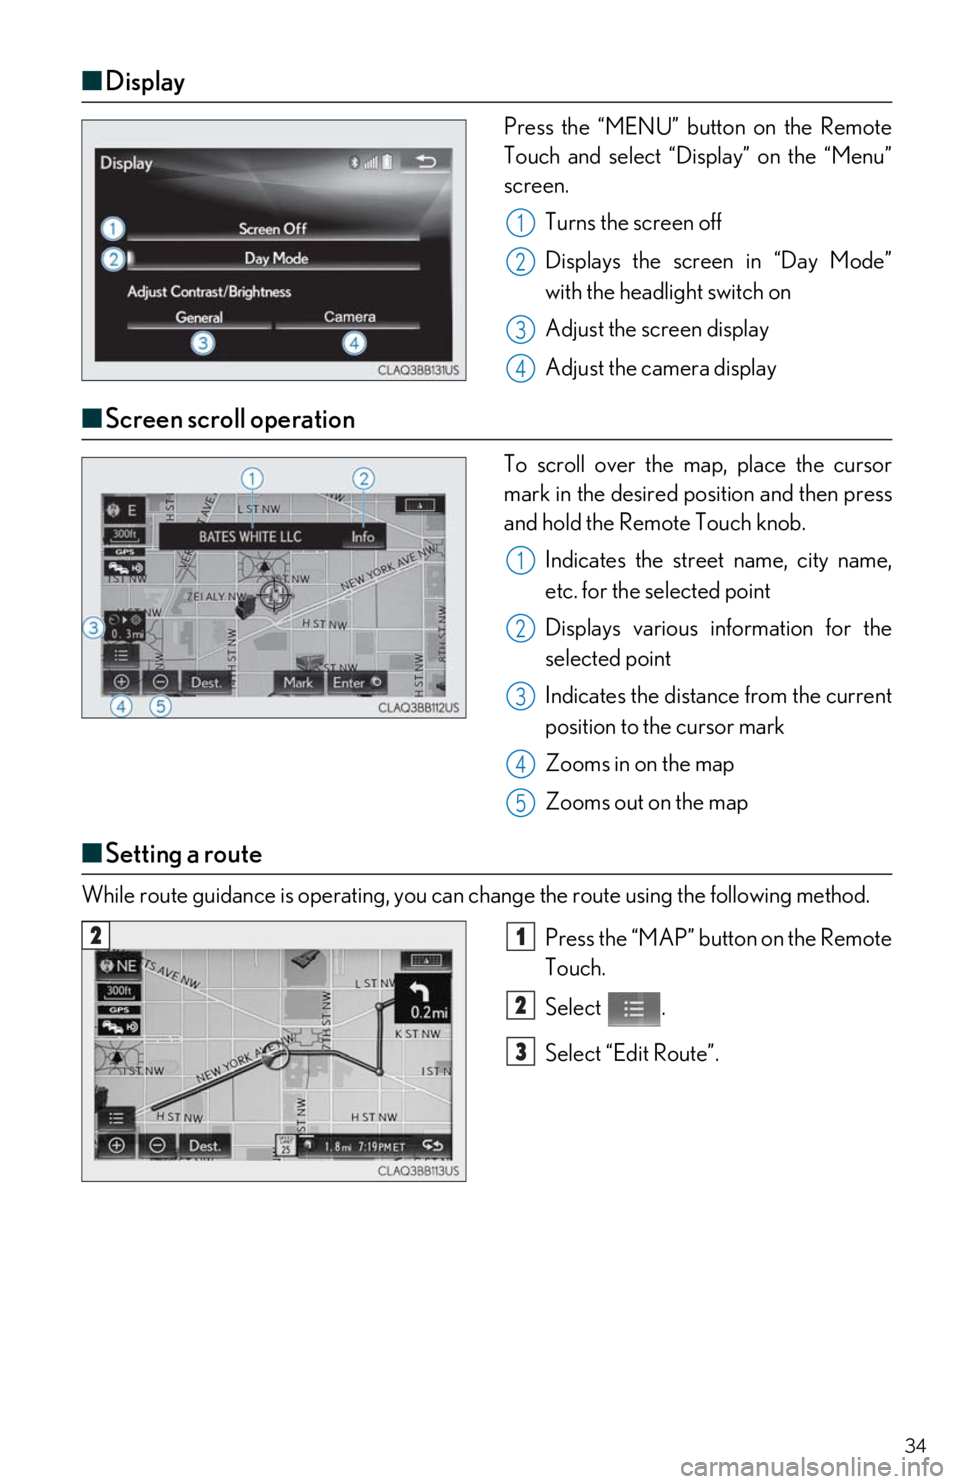
■Display
Press the “MENU” button on the Remote
Touch and select “Display” on the “Menu”
screen.
Turns the screen off
Displays the screen in “Day Mode”
with the headlight switch on
Adjust the screen display
Adjust the camera display
■ Screen scroll operation
To scroll over the map, place the cursor
mark in the desired position and then press
and hold the Remote Touch knob.
Indicates the street name, city name,
etc. for the selected point
Displays various information for the
selected point
Indicates the distance from the current
position to the cursor mark
Zooms in on the map
Zooms out on the map
■ Setting a route
While route guidance is operating, you can change the route using the following method.
Press the “MAP” button on the Remote
Touch.
Select .
Select “Edit Route”.
1
2
3
4
1
2
3
4
5
21
2
3
Page 38 of 74
38
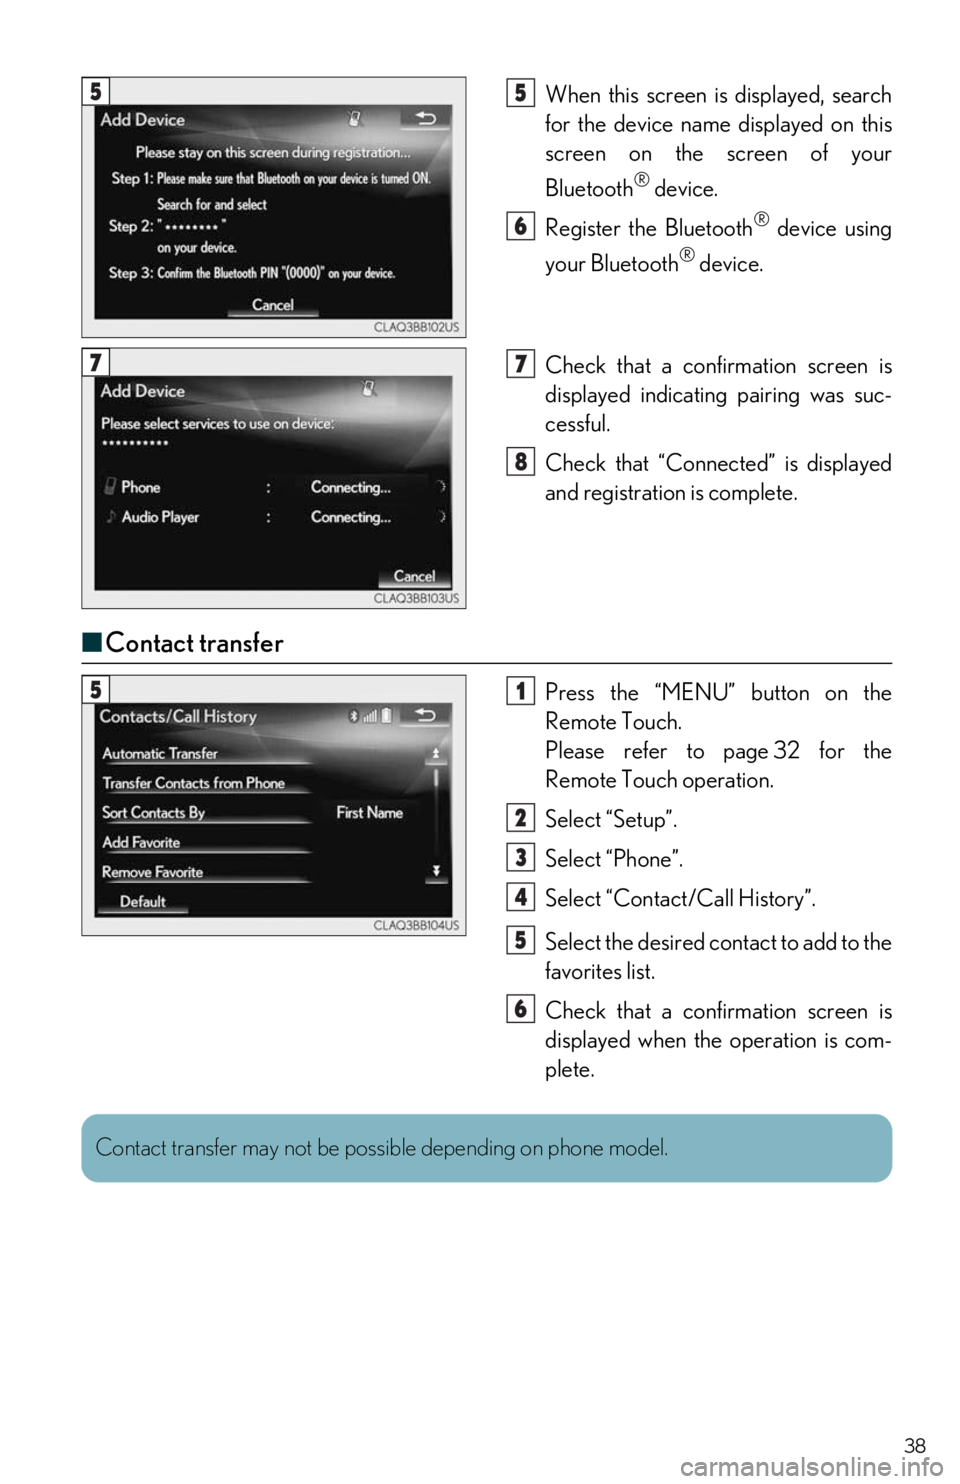
When this screen is displayed, search
for the device name displayed on this
screen on the screen of your
Bluetooth
® device.
Register the Bluetooth
® device using
your Bluetooth
® device.
Check that a confir mation screen is
displayed indicating pairing was suc-
cessful.
Check that “Connect ed” is displayed
and registration is complete.
■ Contact transfer
Press the “MENU” button on the
Remote Touch.
Please refer to page 32 for the
Remote Touch operation.
Select “Setup”.
Select “Phone”.
Select “Contact/Call History”.
Select the desired contact to add to the
favorites list.
Check that a confir mation screen is
displayed when the operation is com-
plete.
55
6
77
8
51
2
3
4
5
6
Contact transfer may not be possible depending on phone model.
Page 39 of 74
39
■Calling by name
You can call by giving a name registered in the contact list. For details, refer to the
“NAVIGATION SYSTEM OWNER’S MANUAL”.
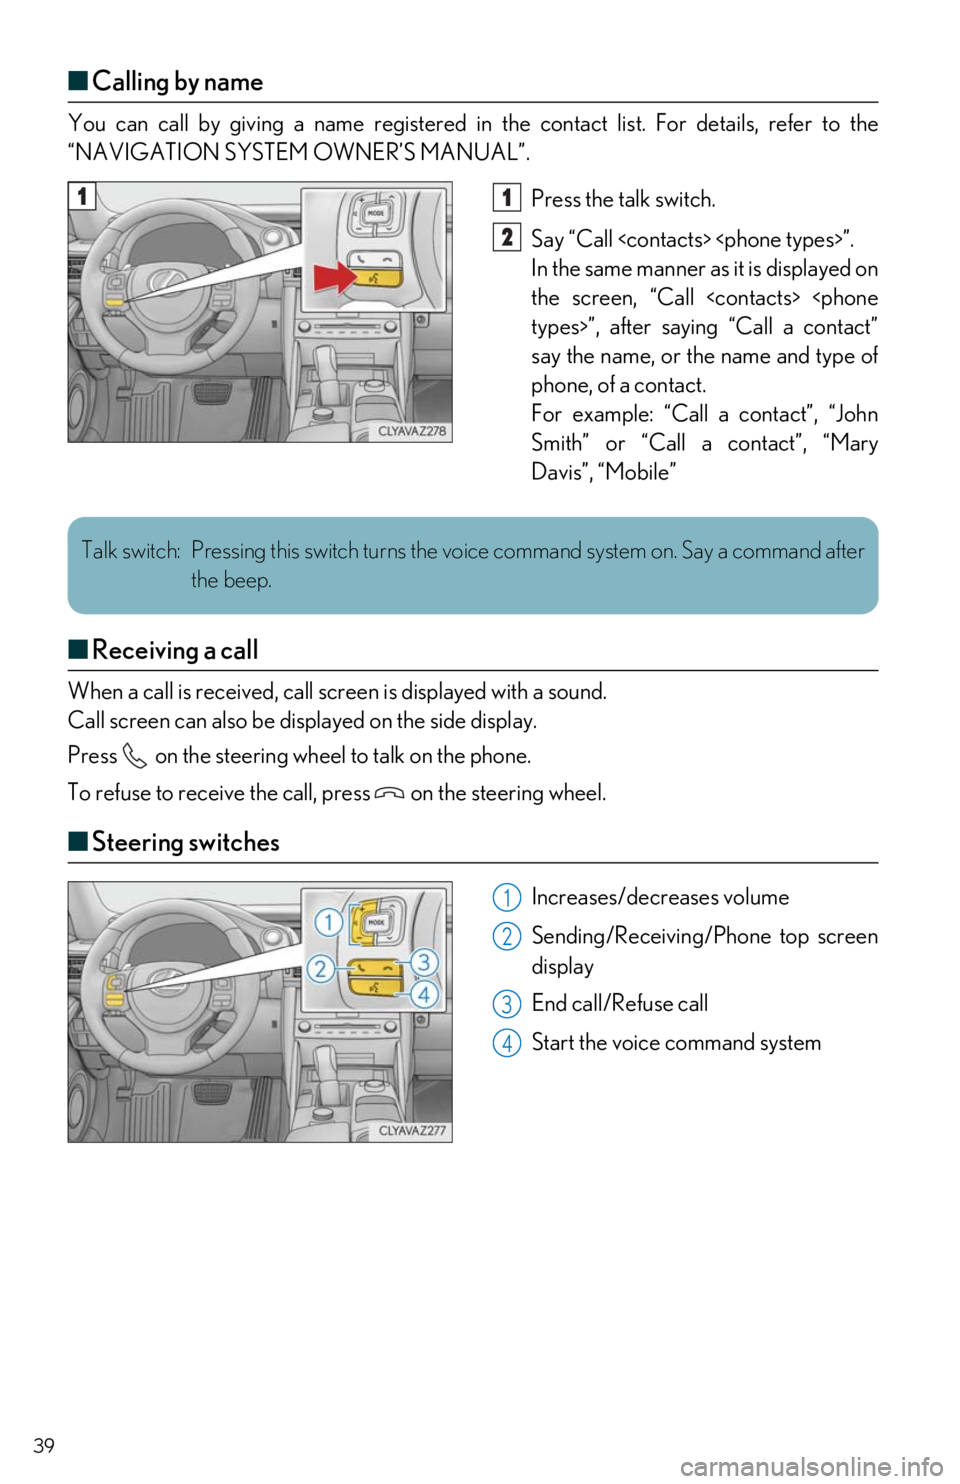
Press the talk switch.
Say “Call
In the same manner as it is displayed on
the screen, “Call
say the name, or the name and type of
phone, of a contact.
For example: “Call a contact”, “John
Smith” or “Call a contact”, “Mary
Davis”, “Mobile”
■ Receiving a call
When a call is received, call scr een is displayed with a sound.
Call screen can also be disp layed on the side display.
Press on the steering wheel to talk on the phone.
To refuse to receive the call, press on the steering wheel.
■Steering switches
Increases/decreases volume
Sending/Receiving/Phone top screen
display
End call/Refuse call
Start the voice command system
11
2
Talk switch: Pressing this switch turns the voice command system on. Say a command after
the beep.
1
2
3
4
Page 40 of 74
40
Audio System (with Navigation System)
■Audio control screen
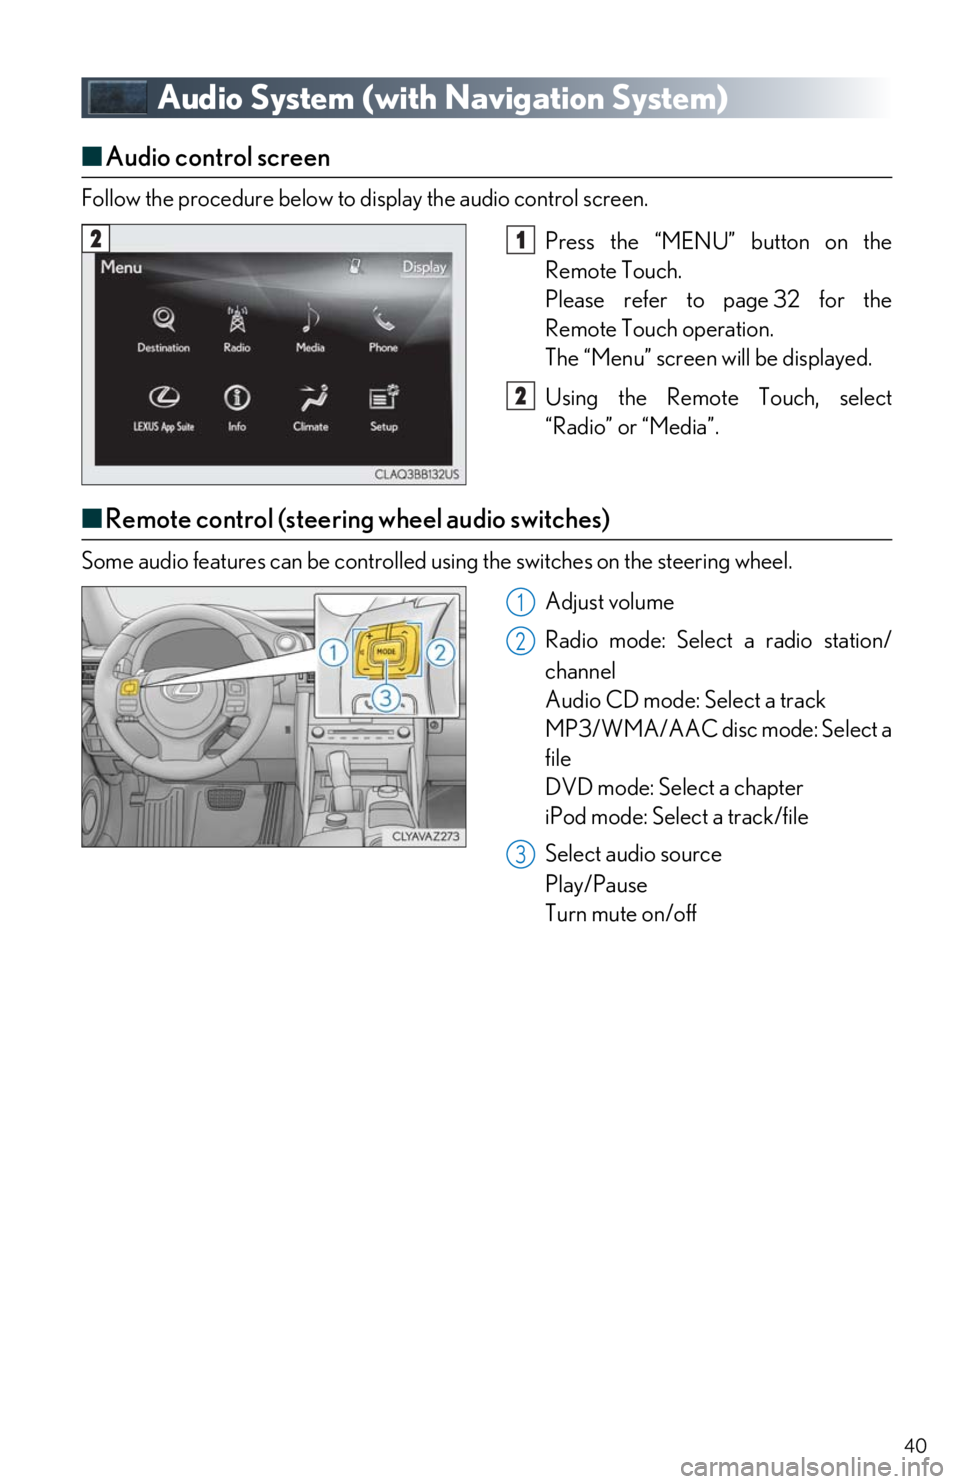
Follow the procedure below to display the audio control screen.
Press the “MENU” button on the
Remote Touch.
Please refer to page 32 for the
Remote Touch operation.
The “Menu” screen will be displayed.
Using the Remote Touch, select
“Radio” or “Media”.
■ Remote control (steering wheel audio switches)
Some audio features can be controlled using the switches on the steering wheel.
Adjust volume
Radio mode: Select a radio station/
channel
Audio CD mode: Select a track
MP3/WMA/AAC disc mode: Select a
file
DVD mode: Select a chapter
iPod mode: Select a track/file
Select audio source
Play/Pause
Turn mute on/off
21
2
1
2
3