tow Lexus IS350 2020 Owner's Manual / LEXUS 2020 IS300,IS350 OWNER'S MANUAL (OM53F29U)
[x] Cancel search | Manufacturer: LEXUS, Model Year: 2020, Model line: IS350, Model: Lexus IS350 2020Pages: 660, PDF Size: 10.84 MB
Page 3 of 660

3
1
9 8
7 5 4
3
2
10
IS350 AWD/IS350/IS300 AWD/IS300_U
6
3-5. Opening, closing the windows and moon roof
Power windows ............................162
Moon roof .......................................166
4-1. Before driving Driving the vehicle ...................... 172
Cargo and luggage ................... 180
Vehicle load limits ...................... 183
Trailer towing ............................... 184
Dinghy towing .............................. 185
4-2. Driving procedures Engine (ign ition) switch ............ 186
Automatic transmission ............. 191
Turn signal lever .......................... 198
Parking brake ..............................200
ASC (Active Sound Control) ........ 201
4-3. Operating the lights and wipers
Headlight switch ........................ 202
Automatic High Beam............. 206
Windshield wipers and washer .......................................... 210 4-4. Refueling
Opening the fuel tank cap ................................................. 218
4-5. Using the driving support systems
Lexus Safety System + ............. 222
PCS (Pre-Collision System) ......... 229
LDA (Lane Departure Alert with steering
control)........................................ 240
Dynamic radar cruise control ......................................... 248
Intuitive parking assist.............. 260
Lexus parking assist monitor........................................ 269
BSM (Blind Spot Monitor) ............. 285
• BSM function......................... 289
• RCTA function...................... 292
Driving mode select switch ........................................... 297
Driving assist systems ............... 301
4-6. Driving tips Winter driving tips..................... 306
4Driving
Page 6 of 660

TABLE OF CONTENTS6
IS350 AWD/IS350/IS300 AWD/IS300_U
7-1. Maintenance and careCleaning and protecting the vehicle exterior ................ 454
Cleaning and protecting the vehicle interior.................. 458
7-2. Maintenance Maintenance requirements ..............................461
General mainte nance.............. 464
Emission inspection and maintenance (I/M)
programs.................................... 467
7-3. Do-it-yourself maintenance
Do-it-yourself service precautions................................ 468
Hood ............................................... 470
Positioning a floor jack .............. 471
Engine compartment ............... 473
Tires ................................................. 485
Tire inflation pressure .............. 495
Wheels ........................................... 498
Air conditioning filter ...............500
Electronic key battery.............. 502
Checking and replacing fuses.............................................. 504
Light bulbs .................................... 507 8-1. Essential information
Emergency flashers ....................514
If your vehicle has to be stopped in an
emergency ................................. 515
If the vehicle is trapped in rising water ..................................516
8-2. Steps to take in an emergency
If your vehicle needs to be towed ............................................. 517
If you think something is wrong........................................... 523
Fuel pump shut off system.......................................... 524
If a warning light turns on or a warning buzzer
sounds ......................................... 525
If a warning message is displayed .................................... 532
If you have a flat tire .................. 559
If the engine will not start ........ 570
If the electronic key does not operate properly ............. 572
If the vehicle battery is discharged................................. 575
If your vehicle overheats......... 579
If the vehicle becomes stuck .............................................583
7Maintenance and care8When trouble arises
Page 16 of 660

16Pictorial index
IS350 AWD/IS350/IS300 AWD/IS300_U
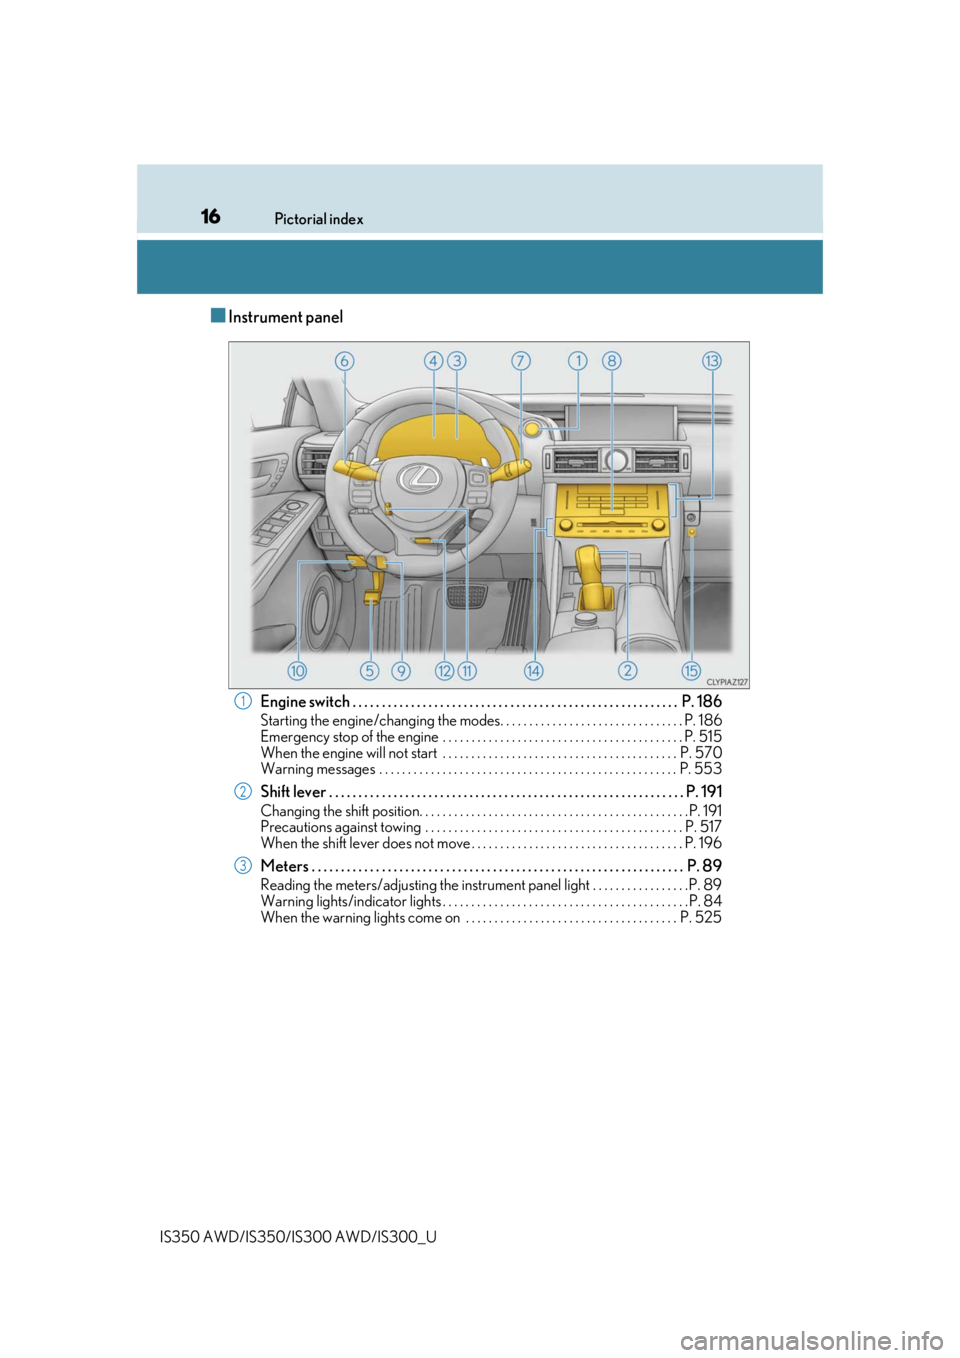
■Instrument panel
Engine switch . . . . . . . . . . . . . . . . . . . . . . . . . . . . . . . . . . . . . . . . . . . . . . . . . . . . . . . . P . 186
Starting the engine/changing the modes. . . . . . . . . . . . . . . . . . . . . . . . . . . . . . . . P. 186
Emergency stop of the engine . . . . . . . . . . . . . . . . . . . . . . . . . . . . . . . . . . . . . . . . . . P. 515
When the engine will not start . . . . . . . . . . . . . . . . . . . . . . . . . . . . . . . . . . . . . . . . . P. 570
Warning messages . . . . . . . . . . . . . . . . . . . . . . . . . . . . . . . . . . . . . . . . . . . . . . . . . . . . P. 553
Shift lever . . . . . . . . . . . . . . . . . . . . . . . . . . . . . . . . . . . . . . . . . . . . . . . . . . . . . . . . . . . . . P. 191
Changing the shift position. . . . . . . . . . . . . . . . . . . . . . . . . . . . . . . . . . . . . . . . . . . . . . . P. 191
Precautions against towing . . . . . . . . . . . . . . . . . . . . . . . . . . . . . . . . . . . . . . . . . . . . . P. 517
When the shift lever does not move . . . . . . . . . . . . . . . . . . . . . . . . . . . . . . . . . . . . . P. 196
Meters . . . . . . . . . . . . . . . . . . . . . . . . . . . . . . . . . . . . . . . . . . . . . . . . . . . . . . . . . . . . . . . . P. 89
Reading the meters/adjusting the instrument panel light . . . . . . . . . . . . . . . . .P. 89
Warning lights/indicator lights . . . . . . . . . . . . . . . . . . . . . . . . . . . . . . . . . . . . . . . . . . . P. 84
When the warning lights come on . . . . . . . . . . . . . . . . . . . . . . . . . . . . . . . . . . . . . P. 525
1
2
3
Page 32 of 660

321-1. For safe use
IS350 AWD/IS350/IS300 AWD/IS300_U
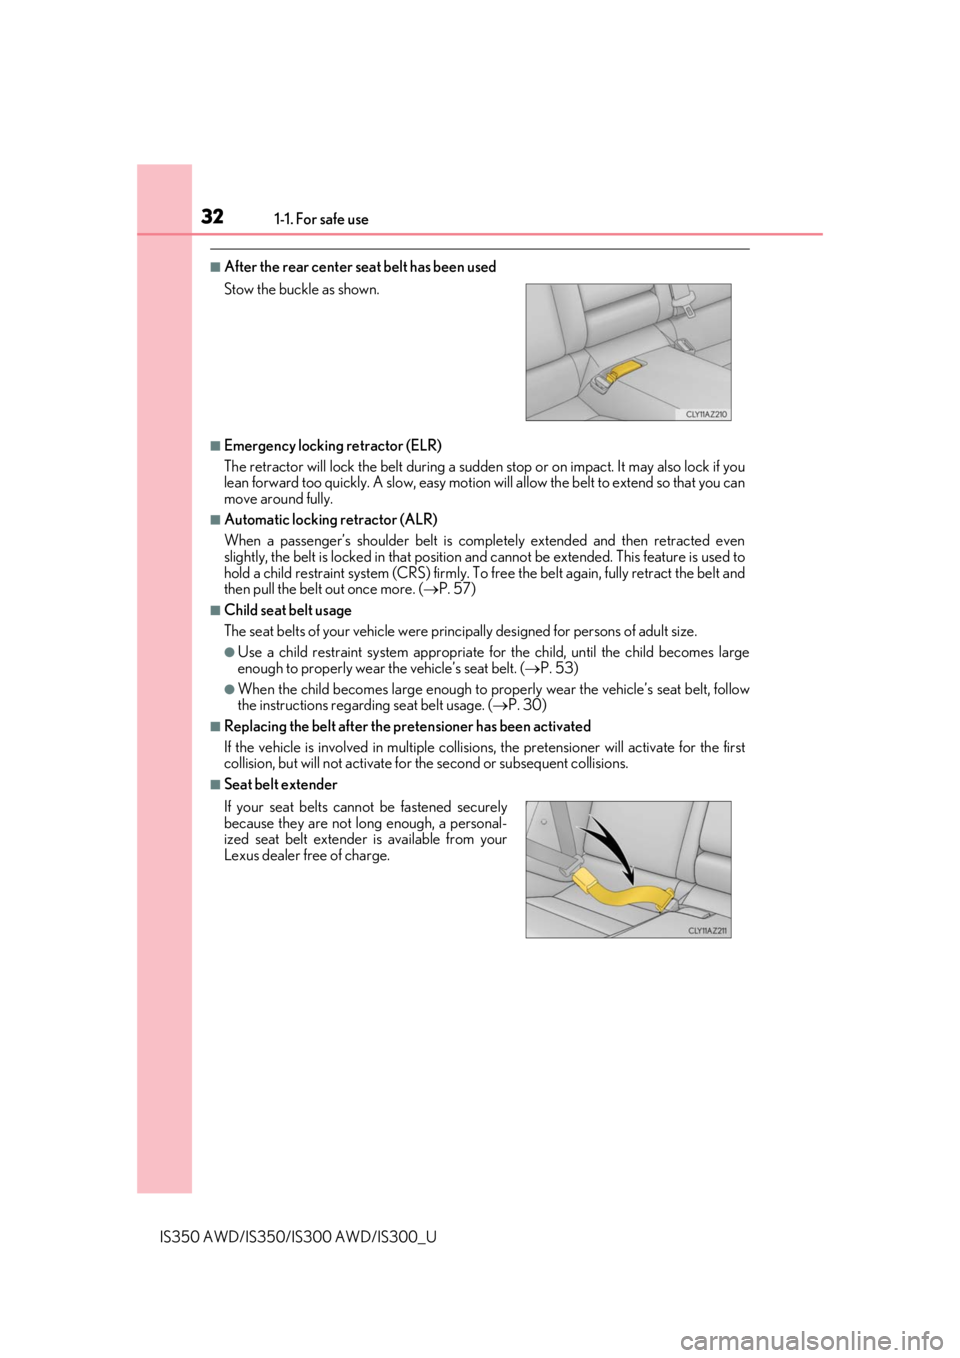
■After the rear center seat belt has been used
■Emergency locking retractor (ELR)
The retractor will lock the belt during a sudden stop or on impact. It may also lock if you
lean forward too quickly. A slow, easy motion w ill allow the belt to extend so that you can
move around fully.
■Automatic locking retractor (ALR)
When a passenger’s shoulder belt is completely extended and then retracted even
slightly, the belt is locked in that position and cannot be extended. This feature is used to
hold a child restraint system (CRS) firmly. To fr ee the belt again, fully retract the belt and
then pull the belt out once more. ( P. 57)
■Child seat belt usage
The seat belts of your vehicle were principally designed for persons of adult size.
●Use a child restraint system appropriate fo r the child, until the child becomes large
enough to properly wear the vehicle’s seat belt. ( P. 53)
●When the child becomes large enough to properly wear the vehicle’s seat belt, follow
the instructions regardin g seat belt usage. (P. 30)
■Replacing the belt after the pr etensioner has been activated
If the vehicle is involved in multiple collisions, the pretensioner will activate for the first
collision, but will not activate for th e second or subsequent collisions.
■Seat belt extender Stow the buckle as shown.
If your seat belts cannot be fastened securely
because they are not long enough, a personal-
ized seat belt extender is available from your
Lexus dealer free of charge.
Page 38 of 660

381-1. For safe use
IS350 AWD/IS350/IS300 AWD/IS300_U
WARNING
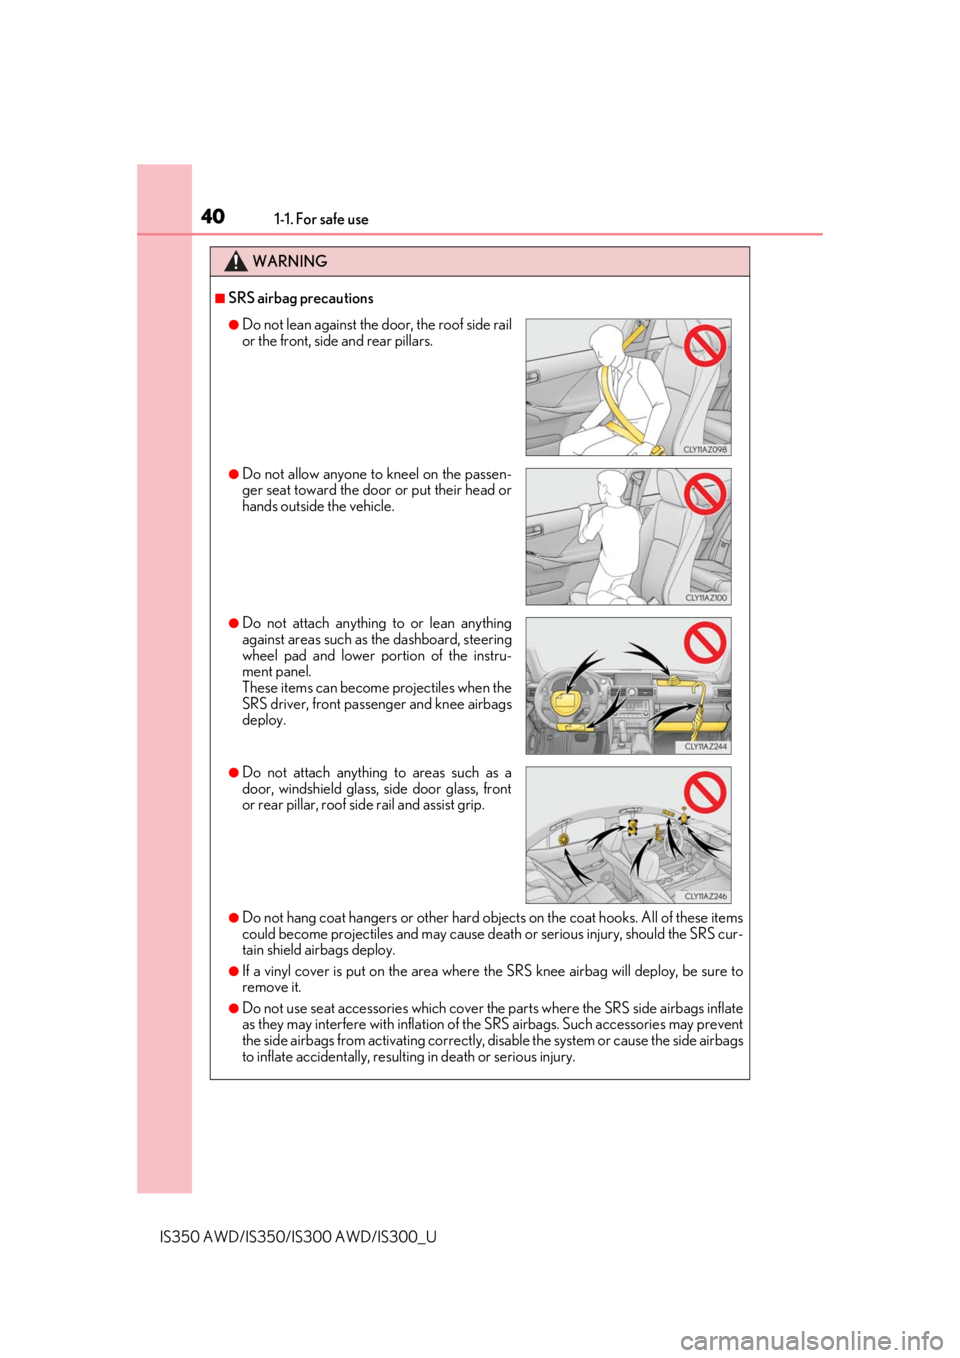
■SRS airbag precautions
Observe the following precautions regarding the SRS airbags.
Failure to do so may cause death or serious injury.
●The driver and all passengers in the vehicle must wear their seat belts properly.
The SRS airbags are supplemental devices to be us ed with the seat belts.
●The SRS driver airbag deploys with considerable force, and can cause death or seri-
ous injury especially if the driver is very close to the airbag. The National Highway
Traffic Safety Administration (NHTSA) advises:
Since the risk zone for the driver’s airbag is the first 2 - 3 in. (50 - 75 mm) of inflation,
placing yourself 10 in. (250 mm) from your driver airbag provides you with a clear
margin of safety. This distance is measured from the center of the steering wheel to
your breastbone. If you sit less than 10 in. (250 mm) away now, you can change your
driving position in several ways:
• Move your seat to the rear as far as you can while still reaching the pedals com- fortably.
• Slightly recline the back of the seat. Although vehicle designs vary, many drivers can achieve the 10 in. (250 mm) dis-
tance, even with the driver seat all the way forward, simply by reclining the back of
the seat somewhat. If reclining the back of your seat makes it hard to see the road,
raise yourself by using a firm , non-slippery cushion, or raise the seat if your vehicle
has that feature.
• If your steering wheel is ad justable, tilt it downward. This points the airbag toward
your chest instead of your head and neck.
The seat should be adjusted as recommended by NHTSA above, while still maintain-
ing control of the foot pedals, steering whee l, and your view of the instrument panel
controls.
Page 40 of 660

401-1. For safe use
IS350 AWD/IS350/IS300 AWD/IS300_U
WARNING
■SRS airbag precautions
●Do not hang coat hangers or other hard objects on the coat hooks. All of these items
could become projectiles and may cause deat h or serious injury, should the SRS cur-
tain shield airbags deploy.
●If a vinyl cover is put on the area where the SRS knee airbag will deploy, be sure to
remove it.
●Do not use seat accessories which cover the parts where the SRS side airbags inflate
as they may interfere with inflation of th e SRS airbags. Such accessories may prevent
the side airbags from activating correctly, disable the system or cause the side airbags
to inflate accidentally, resultin g in death or serious injury.
●Do not lean against the door, the roof side rail
or the front, side and rear pillars.
●Do not allow anyone to kneel on the passen-
ger seat toward the door or put their head or
hands outside the vehicle.
●Do not attach anything to or lean anything
against areas such as the dashboard, steering
wheel pad and lower portion of the instru-
ment panel.
These items can become projectiles when the
SRS driver, front passeng er and knee airbags
deploy.
●Do not attach anything to areas such as a
door, windshield glass, side door glass, front
or rear pillar, roof side rail and assist grip.
Page 72 of 660

721-2. Lexus Enform
IS350 AWD/IS350/IS300 AWD/IS300_U
■Enhanced Roadside Assistance
Enhanced Roadside Assistance adds GPS data to the already included war-
ranty-based Lexus roadside service.
Subscribers can press the “SOS” button to reach a Safety Connect response-
center agent, who can help with a wide range of needs, such as: towing, flat
tire, fuel delivery, etc. For a descript ion of the Roadside Assistance services
and their limitations, please see the Safety Connect Terms and Conditions,
which are available at Lexus.com.
Important! Read this informatio n before using Safety Connect.
■Exposure to radio frequency signals
The Safety Connect system installed in your vehicle is a low-power radio\
transmitter and receiver. It receives and also sends out radio frequency (RF)
signals.
In August 1996, the Federal Commu nications Commission (FCC) adopted
RF exposure guidelines with safety levels for mobile wireless phones. Those
guidelines are consistent with the safe ty standards previously set by the fol-
lowing U.S. and internat ional standards bodies.
●ANSI (American National Stan dards Institute) C95.1 [1992]
●NCRP (National Council on Radiation Protection and Measurement)
Report 86 [1986]
●ICNIRP (International Commission on Non-Ionizing Radiation Protection)
[1996]
Those standards were based on comprehensive and periodic evaluations of
the relevant scientific literature. Over 120 scientists, engineers, and physi-
cians from universities, and governme nt health agencies and industries
reviewed the available body of rese arch to develop the ANSI Standard
(C95.1).
The design of Safety Connect complies wi th the FCC guidelines in addition to
those standards.
Safety information for Safety Connect
Page 137 of 660

1373-2. Opening, closing and locking the doors and trunk
3
Operation of each component
IS350 AWD/IS350/IS300 AWD/IS300_U
■Electronic Key Battery-Saving Function
When battery-saving mode is set, battery depletion is minimized by stopping the elec-
tronic key from receiving radio waves.
■Conditions affecting operation
The smart access system with push-button st art uses weak radio waves. In the following
situations, the communication between the electronic key and the vehicle may be
affected, preventing the smar t access system with push-but ton start, wireless remote
control and engine immobilizer system from operating properly.
(Ways of coping: P. 572)
●When the electronic key battery is depleted
●Near a TV tower, electric power plant, gas st ation, radio station, large display, airport or
other facility that generates strong radio wave s or electrical noise
●When carrying a portable radio, cellular phone, cordless phone or other wireless com-
munication device
●When the electronic key is in contact wi th, or is covered by the following metallic
objects
• Cards to which aluminum foil is attached
• Cigarette boxes that have aluminum foil inside
• Metallic wallets or bags
•Coins
• Hand warmers made of metal
• Media such as CDs and DVDs
●When other wireless keys (that emit radio waves) are being used nearby
●When carrying the electronic key together with the following devices that emit radio
waves
• Another vehicle’s electronic key or a wireless key that emits radio waves
• Personal computers or person al digital assistants (PDAs)
• Digital audio players
• Portable game systems
●If window tint with a metallic content or me tallic objects are attached to the rear win-
dow
Press twice while pressing and holding
. Confirm that the electronic key indica-
tor flashes 4 times.
While the battery-saving mode is set, the smart
access system with push -button start cannot be
used. To cancel the function, press any of the
electronic key buttons.
Page 154 of 660

1543-3. Adjusting the seats
IS350 AWD/IS350/IS300 AWD/IS300_U
■Adjusting the height of the head restraints
■Adjusting the rear seat head restraint
Always raise the head restraint one leve l from the stowed position when using.
Make sure that the head restraints are adjusted
so that the center of the
head restraint is closest
to the top of your ears.
WARNING
■Head restraint precautions
Observe the following precautions regarding th e head restraints. Failure to do so may
result in death or serious injury.
●Use the head restraints design ed for each respective seat.
●Adjust the head restraints to the correct position at all times.
●After adjusting the head restraints, push down on them and make sure they are
locked in position.
●Do not drive with the head restraints removed.
Page 155 of 660

155
3
Operation of each component
IS350 AWD/IS350/IS300 AWD/IS300_U3-4. Adjusting the steering wheel and mirrors
Power type
Operating the switch moves the steerin
g wheel in the following directions:
Up
Down
Toward the driver
Away from the driver
Manual type Hold the steering wheel and push
the lever down.
Adjust to the ideal position by
moving the steering wheel hori-
zontally and vertically.
After adjustment, pull the lever up to
secure the steering wheel.
Steering wheel
Adjustment procedure
1
2
3
4
1
2