lights Lexus IS350 2021 / LEXUS 2021 IS 300, IS 350 (OM53E98U) Repair Manual
[x] Cancel search | Manufacturer: LEXUS, Model Year: 2021, Model line: IS350, Model: Lexus IS350 2021Pages: 436, PDF Size: 13.46 MB
Page 320 of 436
3206-3. Do-it-yourself maintenance
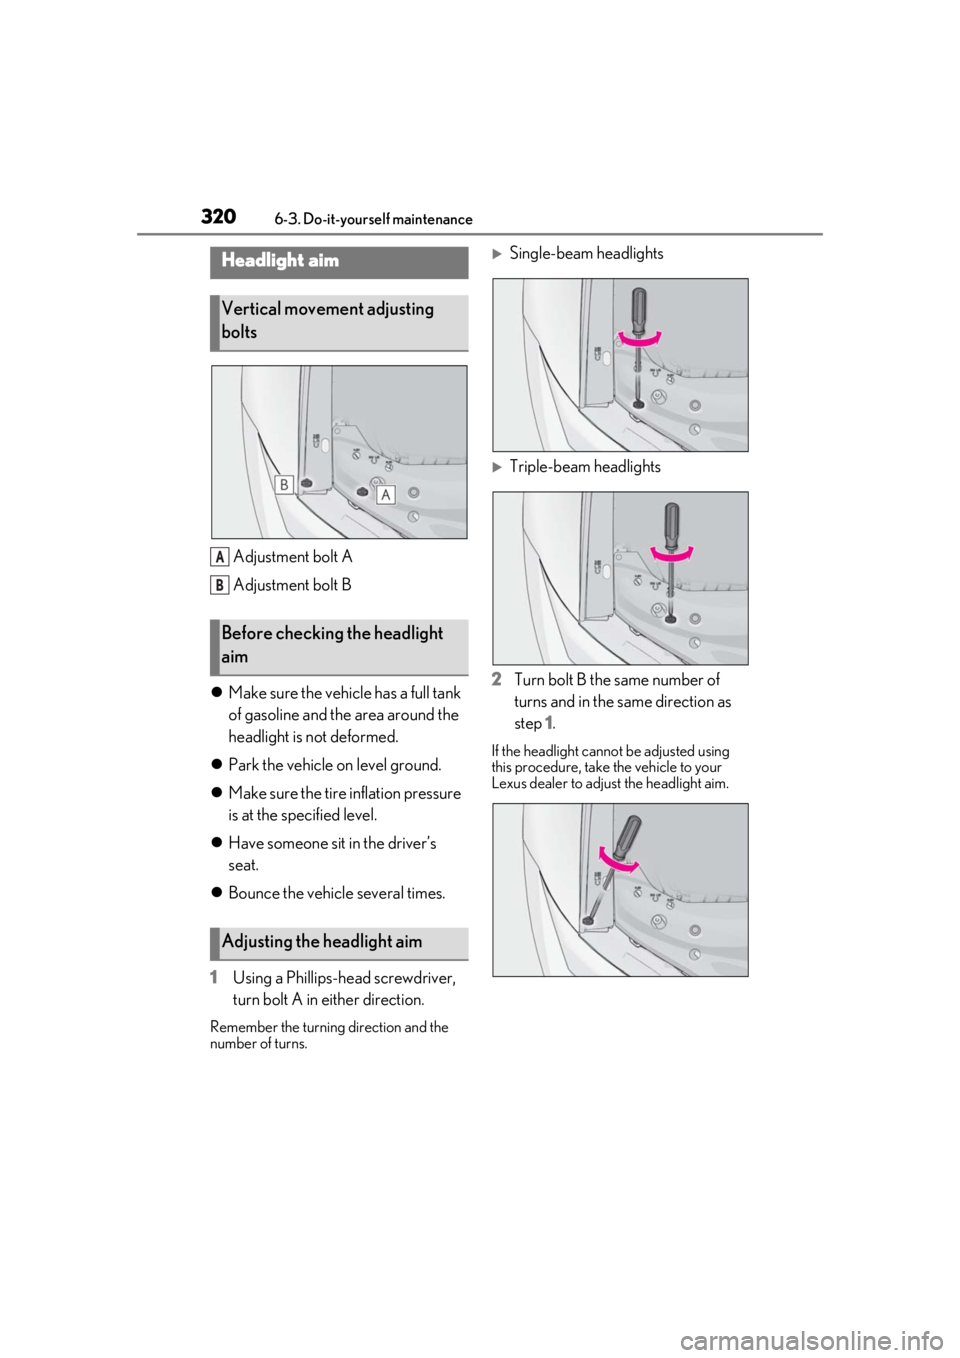
Adjustment bolt A
Adjustment bolt B
Make sure the vehicle has a full tank
of gasoline and the area around the
headlight is not deformed.
Park the vehicle on level ground.
Make sure the tire inflation pressure
is at the specified level.
Have someone sit in the driver’s
seat.
Bounce the vehicle several times.
1 Using a Phillips-head screwdriver,
turn bolt A in either direction.
Remember the turning direction and the
number of turns.
Single-beam headlights
Triple-beam headlights
2 Turn bolt B the same number of
turns and in the same direction as
step 1.
If the headlight cannot be adjusted using
this procedure, take the vehicle to your
Lexus dealer to adjust the headlight aim.
Headlight aim
Vertical movement adjusting
bolts
Before checking the headlight
aim
Adjusting the headlight aim
A
B
Page 322 of 436
3226-3. Do-it-yourself maintenance
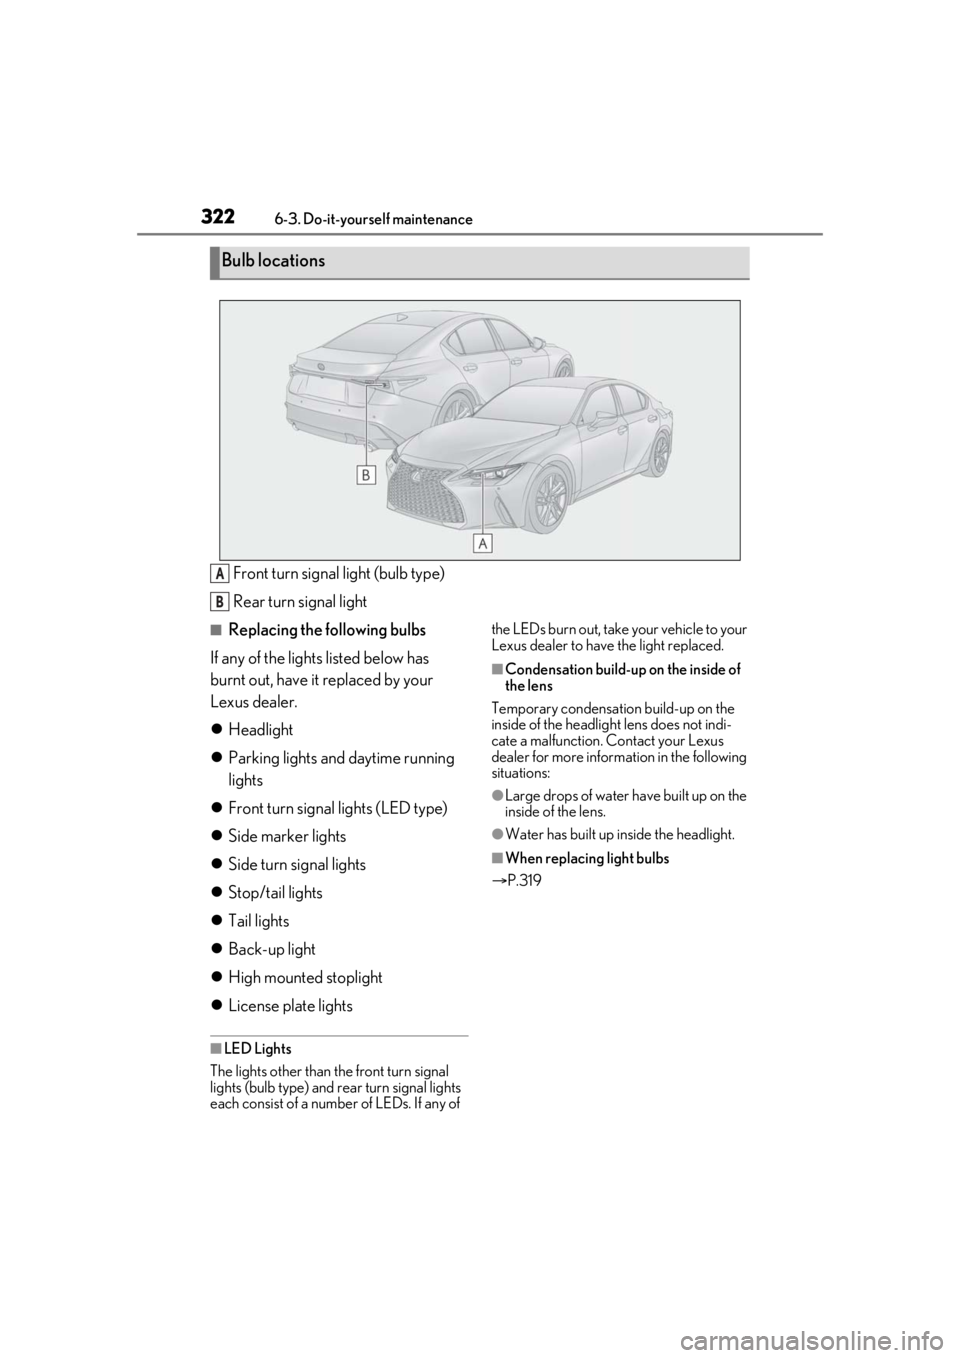
Front turn signal light (bulb type)
Rear turn signal light
■Replacing the following bulbs
If any of the lights listed below has
burnt out, have it replaced by your
Lexus dealer.
Headlight
Parking lights and daytime running
lights
Front turn signal lights (LED type)
Side marker lights
Side turn signal lights
Stop/tail lights
Tail lights
Back-up light
High mounted stoplight
License plate lights
■LED Lights
The lights other than the front turn signal
lights (bulb type) and rear turn signal lights
each consist of a number of LEDs. If any of the LEDs burn out, take your vehicle to your
Lexus dealer to have
the light replaced.
■Condensation build-up on the inside of
the lens
Temporary condensation build-up on the
inside of the headlight lens does not indi-
cate a malfunction. Contact your Lexus
dealer for more information in the following
situations:
●Large drops of water have built up on the
inside of the lens.
●Water has built up inside the headlight.
■When replacing light bulbs
P.319
Bulb locations
A
B
Page 323 of 436
3236-3. Do-it-yourself maintenance
6
Maintenance and care
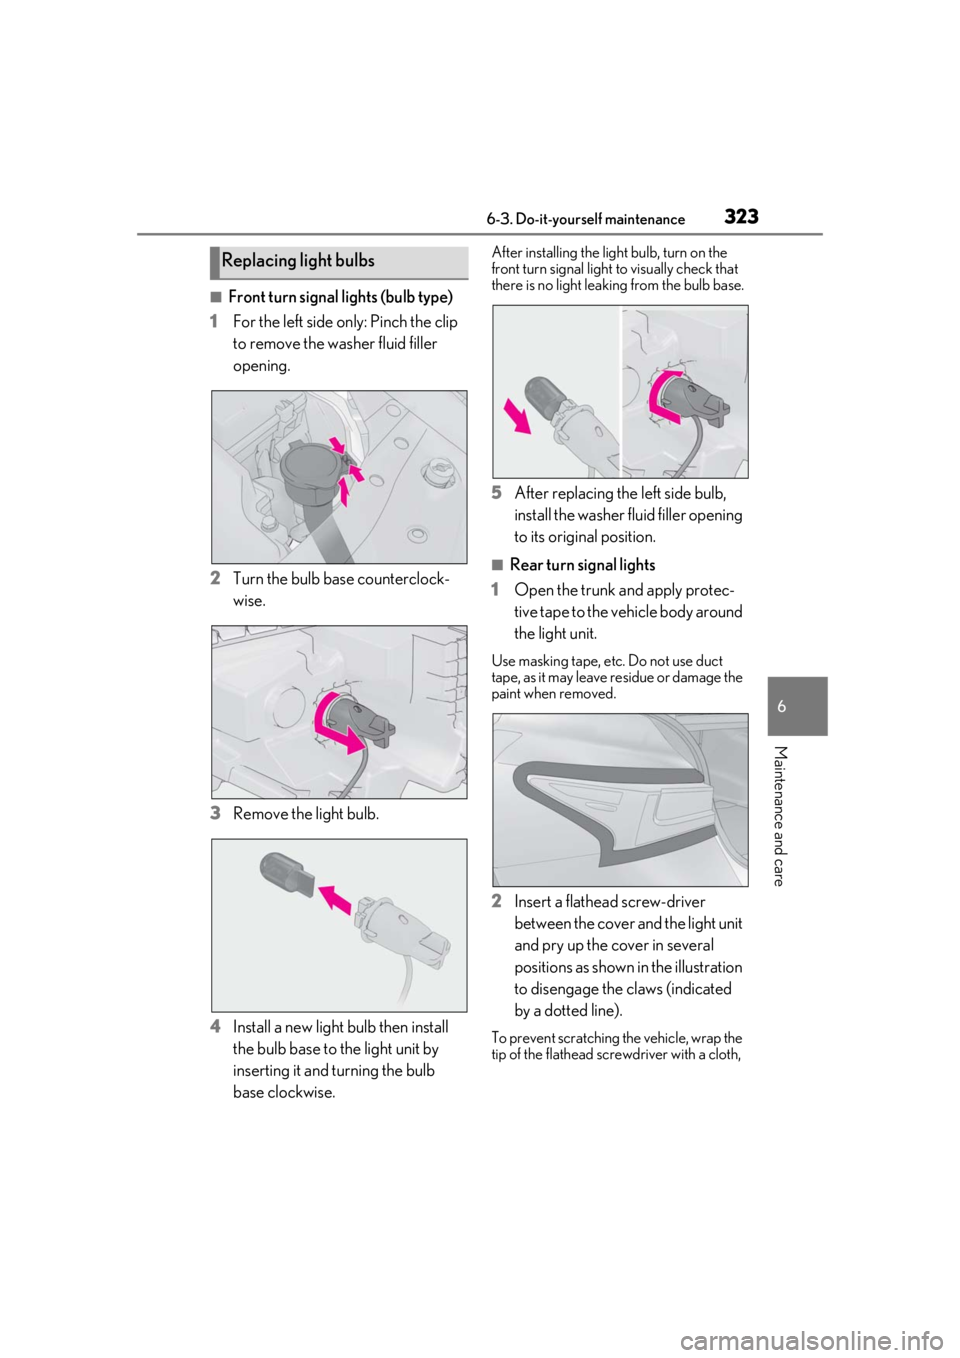
■Front turn signal lights (bulb type)
1 For the left side only: Pinch the clip
to remove the washer fluid filler
opening.
2 Turn the bulb base counterclock-
wise.
3 Remove the light bulb.
4 Install a new light bulb then install
the bulb base to the light unit by
inserting it and turning the bulb
base clockwise.
After installing the light bulb, turn on the
front turn signal light to visually check that
there is no light leaking from the bulb base.
5 After replacing the left side bulb,
install the washer fluid filler opening
to its original position.
■Rear turn signal lights
1 Open the trunk and apply protec-
tive tape to the vehicle body around
the light unit.
Use masking tape, etc. Do not use duct
tape, as it may leave residue or damage the
paint when removed.
2Insert a flathead screw-driver
between the cover and the light unit
and pry up the cover in several
positions as shown in the illustration
to disengage the claws (indicated
by a dotted line).
To prevent scratching the vehicle, wrap the
tip of the flathead scre wdriver with a cloth,
Replacing light bulbs
Page 325 of 436
3256-3. Do-it-yourself maintenance
6
Maintenance and care
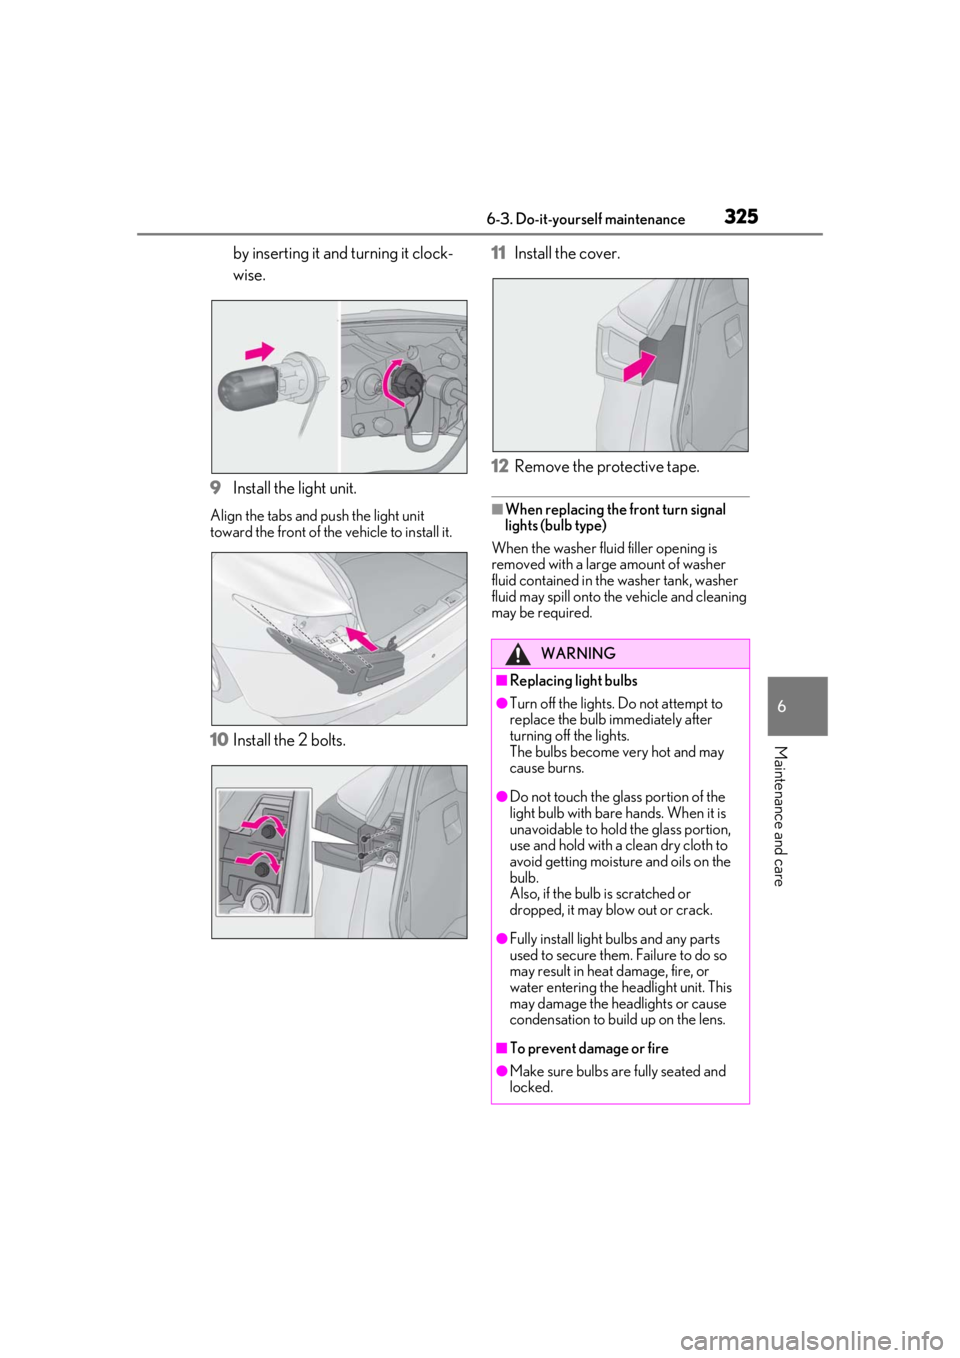
by inserting it and turning it clock-
wise.
9 Install the light unit.
Align the tabs and push the light unit
toward the front of the vehicle to install it.
10Install the 2 bolts. 11
Install the cover.
12 Remove the protective tape.
■When replacing the front turn signal
lights (bulb type)
When the washer fluid filler opening is
removed with a large amount of washer
fluid contained in the washer tank, washer
fluid may spill onto the vehicle and cleaning
may be required.
WARNING
■Replacing light bulbs
●Turn off the lights. Do not attempt to
replace the bulb immediately after
turning off the lights.
The bulbs become very hot and may
cause burns.
●Do not touch the glass portion of the
light bulb with bare hands. When it is
unavoidable to hold the glass portion,
use and hold with a clean dry cloth to
avoid getting moisture and oils on the
bulb.
Also, if the bulb is scratched or
dropped, it may blow out or crack.
●Fully install light bulbs and any parts
used to secure them. Failure to do so
may result in heat damage, fire, or
water entering the he adlight unit. This
may damage the headlights or cause
condensation to build up on the lens.
■To prevent damage or fire
●Make sure bulbs are fully seated and
locked.
Page 328 of 436
3287-1. Essential information
7-1.Essential information
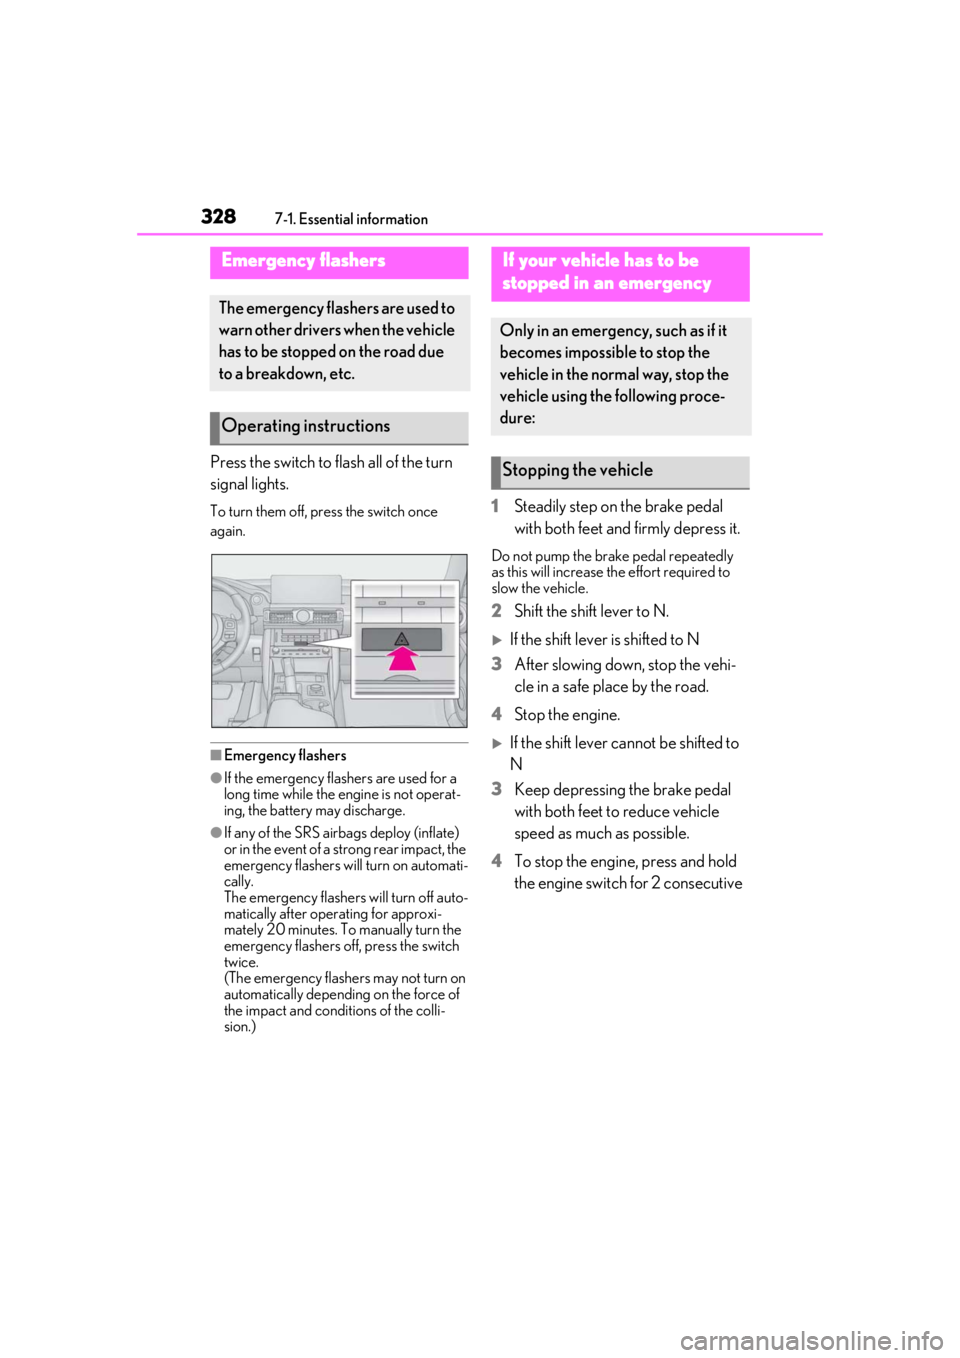
Press the switch to flash all of the turn
signal lights.
To turn them off, press the switch once
again.
■Emergency flashers
●If the emergency flashers are used for a
long time while the engine is not operat-
ing, the battery may discharge.
●If any of the SRS airbags deploy (inflate)
or in the event of a strong rear impact, the
emergency flashers will turn on automati-
cally.
The emergency flashers will turn off auto-
matically after operating for approxi-
mately 20 minutes. To manually turn the
emergency flashers off, press the switch
twice.
(The emergency flashers may not turn on
automatically depending on the force of
the impact and conditions of the colli-
sion.)
1 Steadily step on the brake pedal
with both feet and firmly depress it.
Do not pump the brake pedal repeatedly
as this will increase the effort required to
slow the vehicle.
2Shift the shift lever to N.
If the shift lever is shifted to N
3 After slowing down, stop the vehi-
cle in a safe place by the road.
4 Stop the engine.
If the shift lever cannot be shifted to
N
3 Keep depressing the brake pedal
with both feet to reduce vehicle
speed as much as possible.
4 To stop the engine, press and hold
the engine switch for 2 consecutive
Emergency flashers
The emergency flashers are used to
warn other drivers when the vehicle
has to be stopped on the road due
to a breakdown, etc.
Operating instructions
If your vehicle has to be
stopped in an emergency
Only in an emergency, such as if it
becomes impossible to stop the
vehicle in the normal way, stop the
vehicle using the following proce-
dure:
Stopping the vehicle
Page 337 of 436
3377-2. Steps to take in an emergency
7
When trouble arises
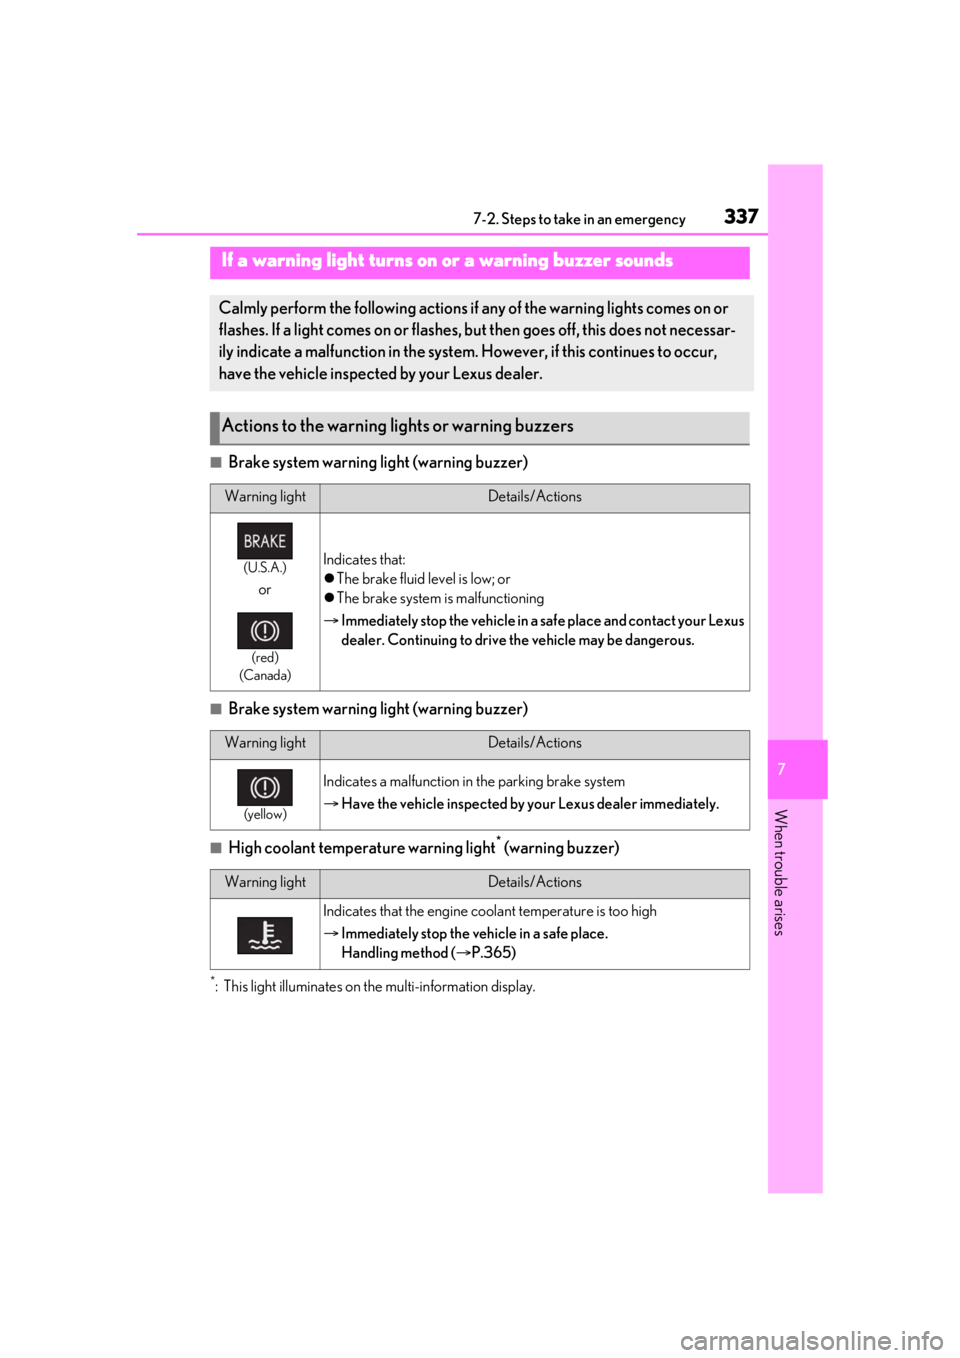
■Brake system warning light (warning buzzer)
■Brake system warning light (warning buzzer)
■High coolant temperature warning light* (warning buzzer)
*: This light illuminates on the multi-information display.
If a warning light turns on or a warning buzzer sounds
Calmly perform the following actions if any of the warning lights comes on or
flashes. If a light comes on or flashes, bu t then goes off, this does not necessar-
ily indicate a malfunction in the system. However, if this continues to occur,
have the vehicle inspected by your Lexus dealer.
Actions to the warning lights or warning buzzers
Warning lightDetails/Actions
(U.S.A.)
or
(red)
(Canada)
Indicates that:
The brake fluid level is low; or
The brake system is malfunctioning
Immediately stop the vehicle in a safe place and contact your Lexus
dealer. Continuing to drive the vehicle may be dangerous.
Warning lightDetails/Actions
(yellow)
Indicates a malfunction in the parking brake system
Have the vehicle inspected by your Lexus dealer immediately.
Warning lightDetails/Actions
Indicates that the engine coolant temperature is too high
Immediately stop the vehicle in a safe place.
Handling method ( P.365)
Page 340 of 436
3407-2. Steps to take in an emergency
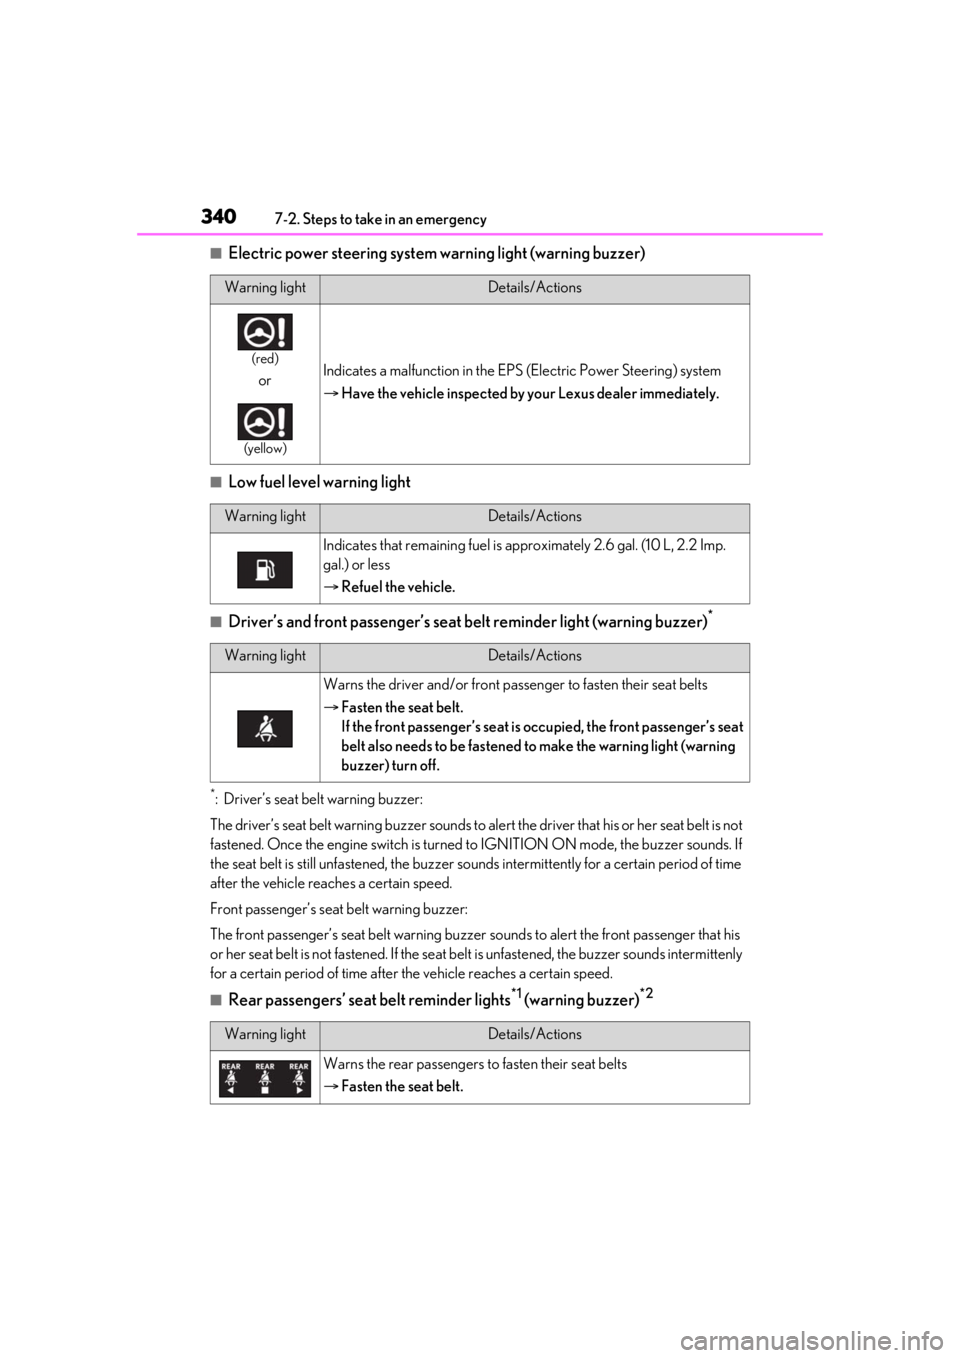
■Electric power steering system warning light (warning buzzer)
■Low fuel level warning light
■Driver’s and front passenger’s seat belt reminder light (warning buzzer)*
*: Driver’s seat belt warning buzzer:
The driver’s seat belt warning buzzer sounds to al ert the driver that his or her seat belt is not
fastened. Once the engine switch is turned to IGNITION ON mode, the buzzer sounds. If
the seat belt is still unfastened, the buzzer sounds intermittently for a certain period of time
after the vehicle reaches a certain speed.
Front passenger’s seat belt warning buzzer:
The front passenger’s seat belt warning buzzer sounds to alert the front passenger that his
or her seat belt is not fastened. If the seat be lt is unfastened, the buzzer sounds intermittenly
for a certain period of time after the vehicle reaches a certain speed.
■Rear passengers’ seat belt reminder lights*1 (warning buzzer)*2
Warning lightDetails/Actions
(red)
or
(yellow)
Indicates a malfunction in the EPS (Electric Power Steering) system
Have the vehicle inspected by your Lexus dealer immediately.
Warning lightDetails/Actions
Indicates that remaining fuel is approximately 2.6 gal. (10 L, 2.2 Imp.
gal.) or less
Refuel the vehicle.
Warning lightDetails/Actions
Warns the driver and/or front pass enger to fasten their seat belts
Fasten the seat belt.
If the front passenger’s seat is occupied, the front passenger’s seat
belt also needs to be fastened to make the warning light (warning
buzzer) turn off.
Warning lightDetails/Actions
Warns the rear passengers to fasten their seat belts
Fasten the seat belt.
Page 344 of 436
3447-2. Steps to take in an emergency
●Is the fuel tank empty?
If it is, fill the fuel tank immediately.
●Is the fuel tank cap loose?
If it is, tighten it securely.
The light will go off after several driving
trips.
If the light does not go off even after several
trips, contact your Lexus dealer as soon as
possible.
■Electric power steering system warning
light (warning buzzer)
When the battery charge becomes insuffi-
cient or the voltage temporarily drops, the
electric power steeri ng system warning
light may come on and the warning buzzer
may sound.
■When the tire pressure warning light
comes on
Inspect the tires to check if a tire is punc-
tured.
If a tire is punctured: P.349
If none of the tires are punctured:
Turn the engine switch off then turn it to
IGNITION ON mode. Check if the tire
pressure warning light comes on or blinks.
If the tire pressure wa rning light blinks for
approximately 1 minute then stays on
There may be a malfunction in the tire
pressure warning syst em. Have the vehicle
inspected by your Lexus dealer immedi-
ately.
If the tire pressure warning light comes
on
1 After the temperature of the tires has
lowered sufficiently, check the inflation
pressure of each tire and adjust them to
the specified level.
2 If the warning light does not turn off
even after several minutes have
elapsed, check that the inflation pres-
sure of each tire is at the specified level
and perform initialization. ( P.308)
■The tire pressure warning light may
come on due to natural causes
The tire pressure wa rning light may come
on due to natural causes such as natural air
leaks and tire inflation pressure changes
caused by temperature. In this case, adjust-ing the tire inflation pressure will turn off the
warning light (after a few minutes).
■When a tire is replaced with the spare
tire
The spare tire is not equipped with a tire
pressure warning valve and transmitter. If a
tire goes flat, the tire pressure warning light
will not turn off even though the flat tire has
been replaced with the spare tire.
■Conditions that the tire pressure warn-
ing system may not function properly
P.306
WARNING
■If both the ABS and the brake system
warning lights remain on
Stop your vehicle in a safe place immedi-
ately and contact your Lexus dealer.
The vehicle will become extremely
unstable during br aking, and the ABS
system may fail, which could cause an
accident resulting in death or serious
injury.
■When the electric power steering
system warning light comes on
When the light comes on yellow, the
assist to the power st eering is restricted.
When the light comes on red, the assist
to the power steering is lost and handling
operations of the steering wheel become
extremely heavy.
When steering wheel operations are
heavier than usual, grip the steering
wheel firmly and operate it using more
force than usual.
■If the tire pressure warning light
comes on
Be sure to observe the following precau-
tions.
Failure to do so could cause a loss of
vehicle control and result in death or
serious injury.
●Decelerate to the lowest appropriate
speed as soon as possible. Do not
drive over 50 mph (80 km/h).
Page 357 of 436
3577-2. Steps to take in an emergency
7
When trouble arises
One of the following may be the cause
of the problem:
There may not be sufficient fuel in
the vehicle’s tank.
Refuel the vehicle.
The engine may be flooded.
Try to restart the engine again fol-
lowing correct starting procedures.
( P.134)
There may be a malfunction in the
engine immobilizer system.
( P.60)
One of the following may be the cause
of the problem:
The battery may be discharged.
( P.361)
The battery terminal connections
may be loose or corroded.
( P.301) The engine starting system may be
malfunctioning due to an electrical
problem such as electronic key battery
depletion or a blown fuse. However, an
interim measure is available to start the
engine. (
P.357)
One of the following may be the cause
of the problem:
One or both of the battery terminals
may be disconnected. ( P.301)
The battery may be discharged.
( P.361)
There may be a malfunction in the
steering lock system.
Contact your Lexus dealer if the problem
cannot be repaired, or if repair procedures
are unknown.
When the engine does not start, the
following steps can be used as an
interim measure to start the engine if
the engine switch is functioning nor-
mally:
1 Push the parking brake switch to
check that the parking brake is set.
(P.143)
Parking brake indicator will come on.
If the engine will not start
If the engine will not start even
though correct starting procedures
are being followed ( P.134), con-
sider each of the following points:
The engine will not start even
though the starter motor oper-
ates normally.
The starter motor turns over
slowly, the interior lights and
headlights are dim, or the horn
does not sound or sounds at a low
volume.
The starter motor does not turn
over
The starter motor does not turn
over, the interior lights and head-
lights do not turn on, or the horn
does not sound.
Starting the engine in an emer-
gency
Page 363 of 436
3637-2. Steps to take in an emergency
7
When trouble arises
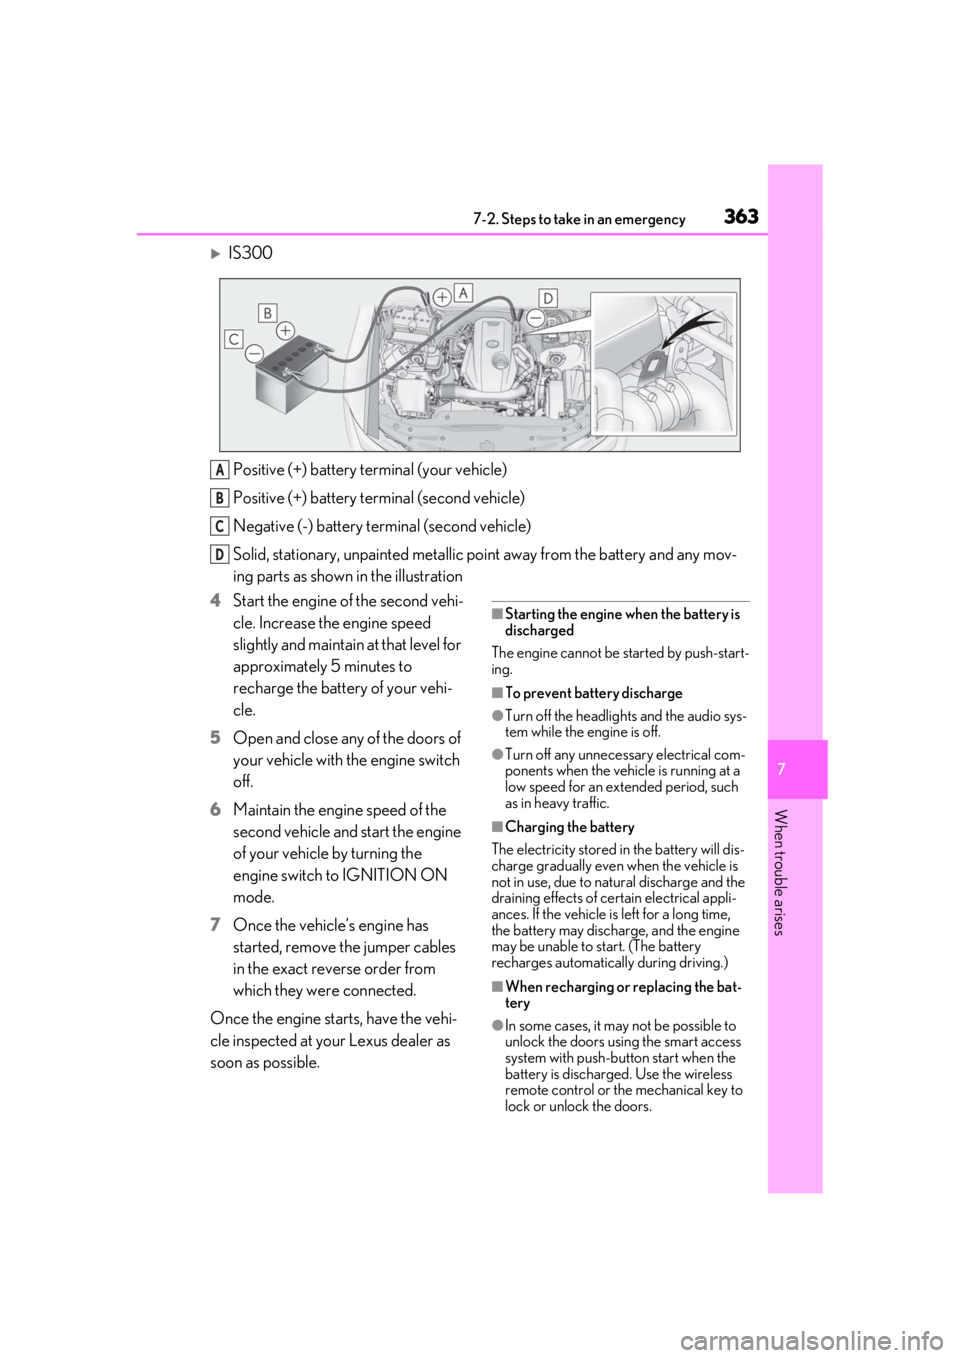
IS300Positive (+) battery terminal (your vehicle)
Positive (+) battery terminal (second vehicle)
Negative (-) battery terminal (second vehicle)
Solid, stationary, unpainted metallic poin t away from the battery and any mov-
ing parts as shown in the illustration
4 Start the engine of the second vehi-
cle. Increase the engine speed
slightly and maintain at that level for
approximately 5 minutes to
recharge the battery of your vehi-
cle.
5 Open and close any of the doors of
your vehicle with the engine switch
off.
6 Maintain the engine speed of the
second vehicle and start the engine
of your vehicle by turning the
engine switch to IGNITION ON
mode.
7 Once the vehicle’s engine has
started, remove the jumper cables
in the exact reverse order from
which they were connected.
Once the engine starts, have the vehi-
cle inspected at your Lexus dealer as
soon as possible.
■Starting the engine when the battery is
discharged
The engine cannot be started by push-start-
ing.
■To prevent battery discharge
●Turn off the headlights and the audio sys-
tem while the engine is off.
●Turn off any unnecessary electrical com-
ponents when the vehicle is running at a
low speed for an extended period, such
as in heavy traffic.
■Charging the battery
The electricity stored in the battery will dis-
charge gradually even when the vehicle is
not in use, due to natural discharge and the
draining effects of certain electrical appli-
ances. If the vehicle is left for a long time,
the battery may discharge, and the engine
may be unable to start. (The battery
recharges automatically during driving.)
■When recharging or replacing the bat-
tery
●In some cases, it may not be possible to
unlock the doors using the smart access
system with push-button start when the
battery is discharged. Use the wireless
remote control or the mechanical key to
lock or unlock the doors.
A
B
C
D