tow LEXUS IS350 2022 User Guide
[x] Cancel search | Manufacturer: LEXUS, Model Year: 2022, Model line: IS350, Model: LEXUS IS350 2022Pages: 440, PDF Size: 22.72 MB
Page 111 of 440
1093-4. Adjusting the steering wheel and mirrors
3
Before driving
3-4.Adjusting the steering wheel and mirrors
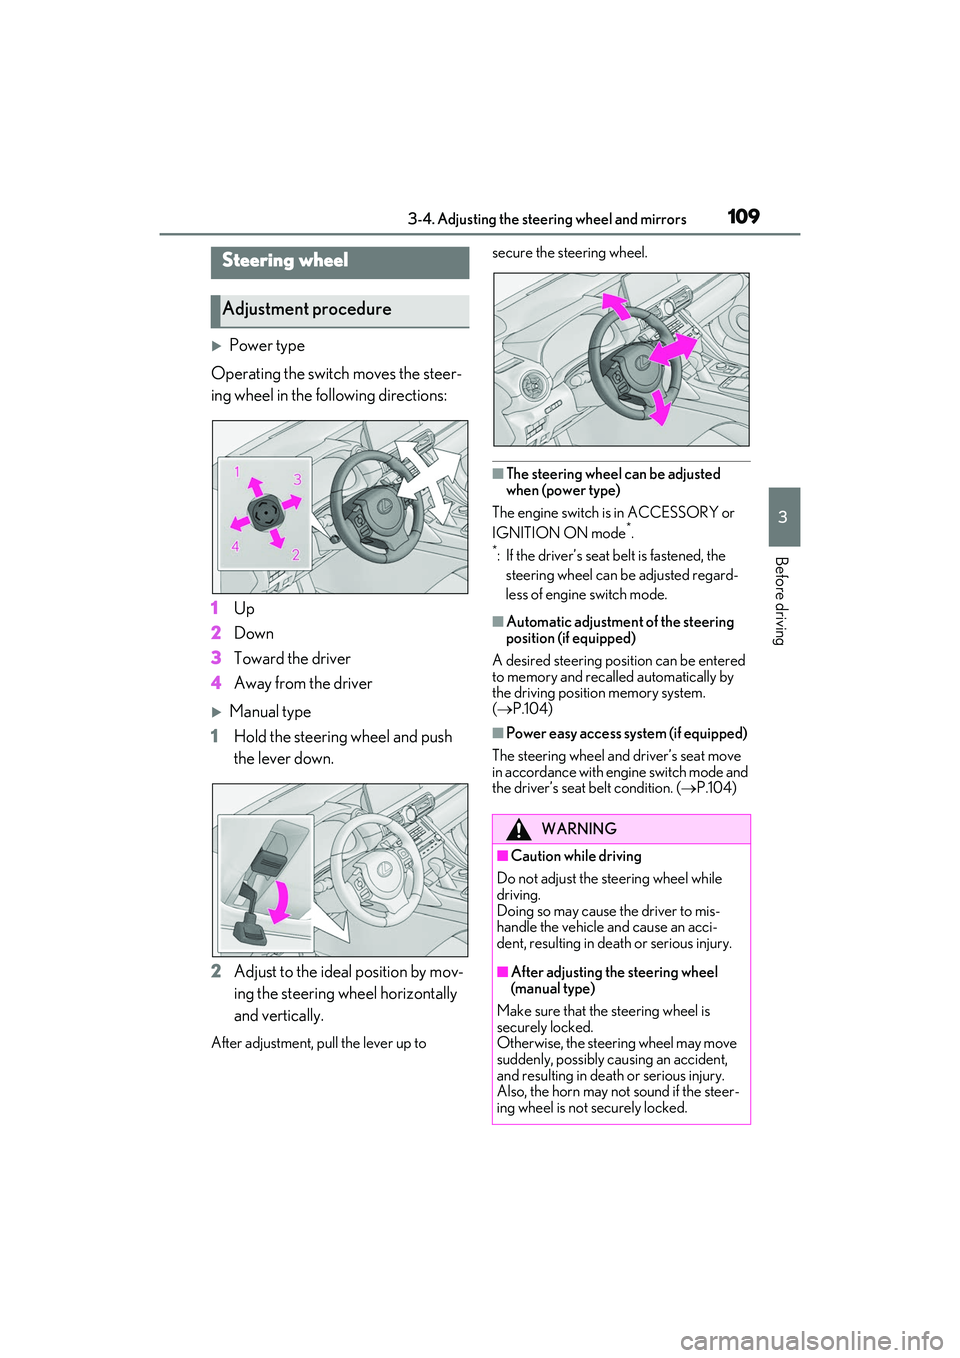
Power type
Operating the switch moves the steer-
ing wheel in the following directions:
1 Up
2 Down
3 Toward the driver
4 Away from the driver
Manual type
1 Hold the steering wheel and push
the lever down.
2 Adjust to the ideal position by mov-
ing the steering wheel horizontally
and vertically.
After adjustment, pull the lever up to secure the steering wheel.
■The steering wheel can be adjusted
when (power type)
The engine switch is in ACCESSORY or
IGNITION ON mode
*.
*: If the driver’s seat belt is fastened, the
steering wheel can be adjusted regard-
less of engine switch mode.
■Automatic adjustment of the steering
position (if equipped)
A desired steering posi tion can be entered
to memory and recalled automatically by
the driving position memory system.
( P.104)
■Power easy access system (if equipped)
The steering wheel and driver’s seat move
in accordance with engine switch mode and
the driver’s seat belt condition. ( P.104)
Steering wheel
Adjustment procedure
WARNING
■Caution while driving
Do not adjust the steering wheel while
driving.
Doing so may cause the driver to mis-
handle the vehicle and cause an acci-
dent, resulting in death or serious injury.
■After adjusting the steering wheel
(manual type)
Make sure that the steering wheel is
securely locked.
Otherwise, the steering wheel may move
suddenly, possibly causing an accident,
and resulting in death or serious injury.
Also, the horn may not sound if the steer-
ing wheel is not securely locked.
Page 121 of 440
119
4
4
Driving
Driving
.4-1. Before drivingDriving the vehicle ..................... 120
Cargo and luggage ................... 126
Vehicle load limits ...................... 128
Trailer towing ............................... 128
Dinghy towing ............................. 129
4-2. Driving procedures Engine (ignition) switch ........... 130
Automatic transmission........... 134
Turn signal lever.......................... 138
Parking brake .............................. 139
Brake Hold.................................... 142
ASC (Active Sound Control) ......................................................... 144
4-3. Operating the lights and wipers Headlight switch ......................... 145
AHB (Automatic High Beam) ......................................................... 147
Windshield wipers and washer ......................................................... 150
4-4. Refueling Opening the fuel tank cap...... 157
4-5. Using the driving support sys- tems
Lexus Safety System + 2.5 ..... 160
PCS (Pre-Collision System) ......................................................... 165
LTA (Lane Tracing Assist)...... 175
RSA (Road Sign Assist) ........... 184Dynamic radar cruise control with
full-speed range....................... 187
BSM (Blind Spot Monitor) ..... 197
PKSA (Parking Support Alert) ........................................................ 201
Intuitive parking assist ............. 203
RCTA (Rear Cross Traffic Alert) function........................................ 210
PKSB (Parking Support Brake) ........................................................ 216
Parking Support Brake function (static objects) .......................... 222
Parking Support Brake function (rear-crossing vehicles) ...... 225
Driving mode select switch ... 227
Driving assist systems.............. 229
4-6. Driving tips Winter driving tips .................... 234
Page 128 of 440
1264-1. Before driving
Cargo capacity depends on the total
weight of the occupants.
(Cargo capacity) = (Total load capac-
ity) — (Total weight of occupants)
Steps for Determining Correct Load
Limit —
(1) Locate the statement “The com-
bined weight of occupants and cargo
should never exceed XXX kg or XXX
lbs.” on your vehicle’s placard.
(2) Determine the combined weight of
the driver and passengers that will be
riding in your vehicle.
(3) Subtract the combined weight of
the driver and passengers from XXX
kg or XXX lbs.
(4) The resulting figure equals the
available amount of cargo and luggage
load capacity.
For example, if the “XXX” amount
equals 1400 lbs. and there will be five
150 lb passengers in your vehicle, the
amount of available cargo and luggage
load capacity is 650 lbs. (1400 − 750
(5 150) = 650 lbs.)
(5) Determine the combined weight of
luggage and cargo being loaded on
the vehicle. That weight may not safely
exceed the available cargo and lug- gage load capacity calculated in Step
4.
(6) If your vehicle will be towing a
trailer, load from your trailer will be
transferred to your vehicle. Consult
this manual to determine how this
reduces the available cargo and lug-
gage load capacity of your vehicle.
(
P.128)
Lexus does not recommend towing a
trailer with your vehicle. Your vehicle is not
designed for trailer towing.
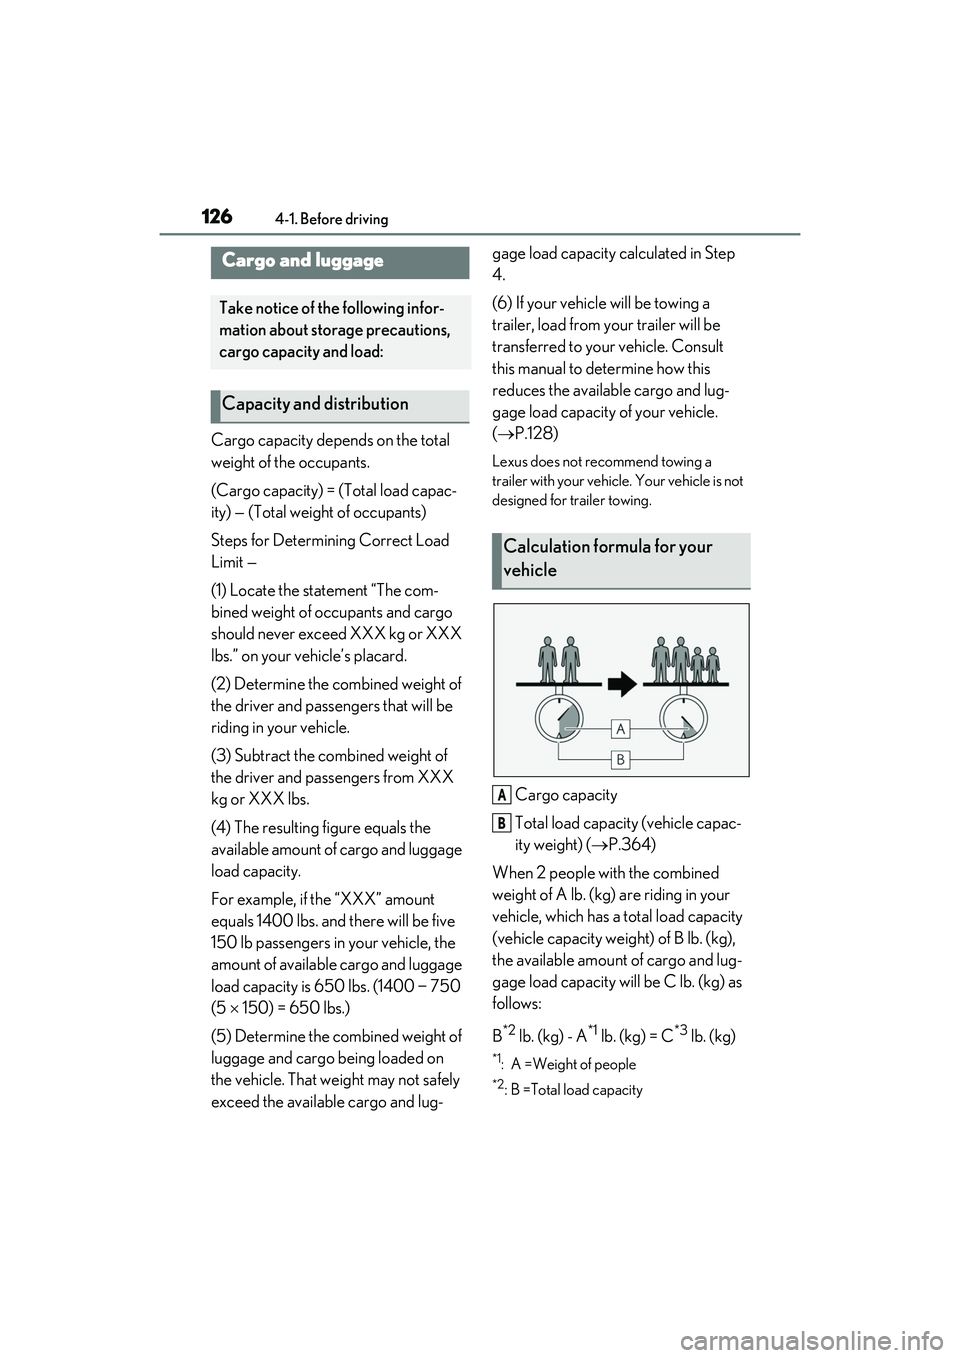
Cargo capacity
Total load capacity (vehicle capac-
ity weight) ( P.364)
When 2 people with the combined
weight of A lb. (kg) are riding in your
vehicle, which has a total load capacity
(vehicle capacity weight) of B lb. (kg),
the available amount of cargo and lug-
gage load capacity will be C lb. (kg) as
follows:
B
*2 lb. (kg) - A*1 lb. (kg) = C*3 lb. (kg)
*1: A =Weight of people
*2: B =Total load capacity
Cargo and luggage
Take notice of the following infor-
mation about storage precautions,
cargo capacity and load:
Capacity and distribution
Calculation formula for your
vehicle
A
B
Page 129 of 440
1274-1. Before driving
4
Driving
*3: C =Available cargo and luggage load
In this condition, if 3 more passengers with
the combined weight of D lb. (kg) get on,
the available cargo and luggage load will
be reduced E lb. (kg) as follows:
C lb. (kg) - D*4 lb. (kg) = E*5 lb. (kg)
*4: D =Additional weight of people
*5: E =Available cargo and luggage load
As shown in the example above, if the
number of occupants increases, the
cargo and luggage load will be
reduced by an amount that equals the
increased weight due to the additional
occupants. In other words, if an
increase in the number of occupants
causes an excess of the total load
capacity (combined weight of occu-
pants plus cargo and luggage load),
you must reduce the cargo and lug-
gage on your vehicle.
WARNING
■Things that must not be carried in the
trunk
The following things may cause a fire if
loaded in the trunk:
●Receptacles containing gasoline
●Aerosol cans
■Storage precautions
Observe the following precautions.
Failure to do so may prevent the pedals
from being depressed properly, may
block the driver’s visi on, or may result in
items hitting the driver or passengers,
possibly causing an accident.
●Stow cargo and luggage in the trunk
whenever possible.
●To prevent cargo and luggage from
sliding forward during braking, do not
stack anything in the enlarged trunk.
Keep cargo and luggage low, as close
to the floor as possible.
●When you fold down the rear seats,
long items should not be placed
directly behind the front seats.
●Never allow anyone to ride in the
enlarged trunk. It is not designed for
passengers. They should ride in their
seats with thei r seat belts properly fas-
tened.
●Do not place cargo or luggage in or on
the following locations.
• At the feet of the driver
• On the front passenger or rear seats (when stacking items)
• On the package tray
• On the instrument panel
•On the dashboard
• In front of the Center Display
●Secure all items in the occupant com-
partment.
■Capacity and distribution
●Do not exceed the maximum axle
weight rating or the total vehicle
weight rating.
●Even if the total load of occupant’s
weight and the cargo load is less than
the total load capacity, do not apply the
load unevenly. Improper loading may
cause deterioration of steering or
braking control which may cause
death or serious injury.
Page 130 of 440

1284-1. Before driving
■Total load capacity and seating capacity
These details are also described on the tire
and loading information label. ( P.304)
Vehicle load limits
Vehicle load limits include total
load capacity, seating capacity,
towing capacity and cargo capac-
ity.
Total load capacity (vehicle
capacity weight): P.364
Total load capacity means the com-
bined weight of occupants, cargo
and luggage.
Seating capacity: P.364
Seating capacity means the maxi-
mum number of occupants whose
estimated average weight is 150 lb.
(68 kg) per person.
Towing capacity
Lexus does not recommend towing
a trailer with your vehicle.
Cargo capacity
Cargo capacity may increase or
decrease depending on the weight
and the number of occupants.
WARNING
■Overloading the vehicle
Do not overload the vehicle.
It may not only cause damage to the tires,
but also degrade steering and braking
ability, resulting in an accident.
Trailer towing
Lexus does not recommend towing
a trailer with your vehicle. Lexus
also does not recommend the
installation of a tow hitch or the use
of a tow hitch carrier for a wheel-
chair, scooter, bicycle, etc. Your
vehicle is not desi gned for trailer
towing or for the use of tow hitch
mounted carriers.
Page 131 of 440
1294-1. Before driving
4
Driving
Dinghy towing
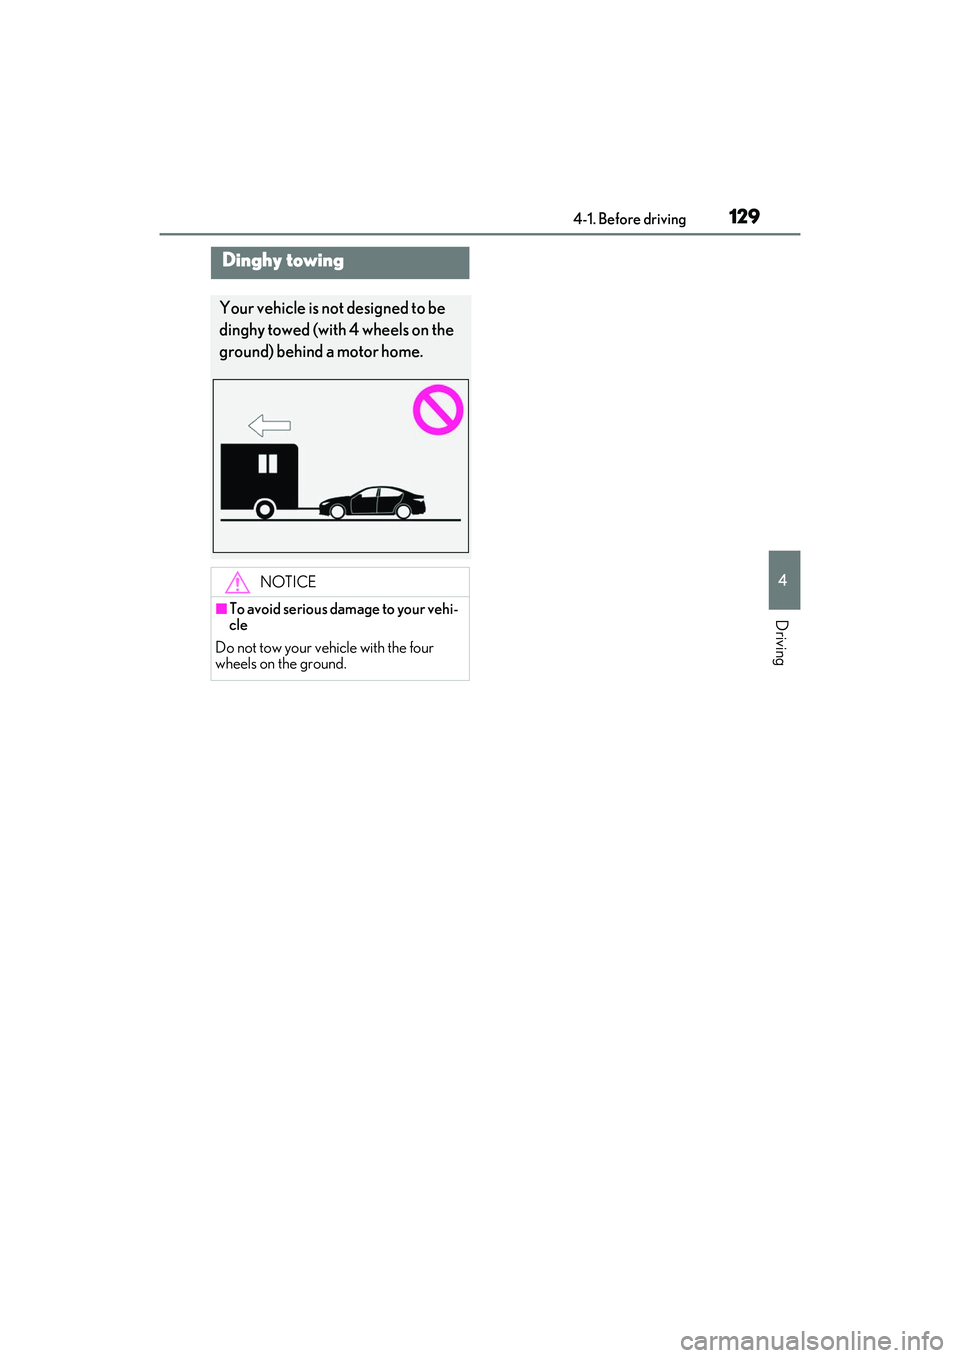
Your vehicle is not designed to be
dinghy towed (with 4 wheels on the
ground) behind a motor home.
NOTICE
■To avoid serious damage to your vehi-
cle
Do not tow your vehicle with the four
wheels on the ground.
Page 148 of 440

1464-3. Operating the lights and wipers
Doing so interferes with the sensor detect-
ing the level of ambient light and may cause
the automatic headlight system to malfunc-
tion.
■Automatic light off system
When the light switch is in , or : The headlights and tail lights turn off
30 seconds after the engine switch is
turned to ACCESSORY mode or turned
off and a door is opened and all of the doors
and trunk are closed. (The lights turn off
immediately if on the key is pressed
twice after all the doors are closed.)
To turn the lights on again, turn the engine
switch to IGNITION ON mode, or turn the
light switch off once and then back to
or .
If any of the doors or trunk lid is left open,
the lights automatically turn off after 20
minutes.
■Light reminder buzzer
A buzzer sounds when the engine switch is
turned off or turned to ACCESSORY
mode and the driver’s door is opened while
the lights are turned on.
■Automatic headlight leveling system (if
equipped)
The level of the headlights is automatically
adjusted according to the number of pas-
sengers and the loading condition of the
vehicle to ensure that the headlights do not
interfere with other road users.
■Customization
Some functions can be customized.
( P.388)
1 With the headlights on, push the
lever away from you to turn on the
high beams.
Pull the lever toward you to the center
position to turn the high beams off.
2Pull the lever toward you and
release it to flash the high beams
once.
You can flash the high beams with the
headlights on or off.
NOTICE
■To prevent battery discharge
Do not leave the lights on longer than
necessary when the engine is not run-
ning.
Turning on the high beam head-
lights
Page 150 of 440

1484-3. Operating the lights and wipers
●The high beams may be turned off if a
vehicle ahead that is using fog lights with-
out its headlights turned on is detected.
●House lights, street lights, traffic signals,
and illuminated billboards or signs and
other reflective objects may cause the
high beams to change to the low beams,
or the low beams to remain on.
●The following factors may affect the
amount of time taken for the high beams
to turn on or off:
• The brightness of the headlights, fog lights, and tail lights of vehicles ahead
• The movement and direction of vehicles ahead
• When a vehicle ahead only has opera-
tional lights on one side
• When a vehicle ahead is a two-wheeled vehicle
• The condition of the road (gradient, curve, condition of th e road surface, etc.)
• The number of passengers and amount of
luggage in the vehicle
●The high beams may turn on or off unex-
pectedly.
●Bicycles or similar vehicles may not be
detected.
●In the following situations the system may
not be able to correctly detect the sur-
rounding brightness level. This may cause
the low beams to remain on or the high
beams to flash or dazzle pedestrians or
vehicles ahead. In such a case, it is neces-
sary to manually switch between the high
and low beams.
• When driving in inclement weather (heavy rain, snow, fo g, sandstorms, etc.)
• When the windshield is obscured by fog, mist, ice, dirt, etc.
• When the windshield is cracked or dam-
aged
• When the camera sensor is deformed or dirty
• When the temperature of the camera sensor is extremely high
• When the surrounding brightness level is equal to that of head lights, tail lights or
fog lights
• When headlights or tail lights of vehicles ahead are turned off, dirty, changing
color, or not aimed properly
• When the vehicle is hit by water, snow, dust, etc. from a preceding vehicle
• When driving through an area of inter- mittently changing brightness and dark-
ness
• When frequently and repeatedly driving
ascending/descending roads, or roads
with rough, bumpy or uneven surfaces
(such as stone-paved roads, gravel roads,
etc.)
• When frequently and repeatedly taking curves or driving on a winding road
• When there is a highly reflective object
ahead of the vehicle, such as a sign or
mirror
• When the back of a preceding vehicle is
highly reflective, such as a container on a
truck
• When the vehicle’s headlights are dam-
aged or dirty, or are not aimed properly
• When the vehicle is listing or titling due to a flat tire, a trailer being towed, etc.
• When the headlights are changed between the high beams and low beams
repeatedly in an abnormal manner
• When the driver believes that the high beams may be flashing or dazzling
pedestrians or other drivers
■Temporarily lowering sensor sensitivity
The sensitivity of the sensor can be tempo-
rarily lowered.
1 Turn the engine switch off while the fol-
lowing conditions are met.
●The headlight switch is in or .
●The headlight switch lever is in the origi-
nal position.
●Automatic High Beam switch is on.
2 Turn the engine switch to IGNITION
ON mode.
3 Within 60 seconds after step 2, repeat
pushing the headlight switch lever to the
high beam position then pulling it to the
original position quickly 10 times, then
leave the lever in the original position.
4 If the sensitivity is changed, the Auto-
matic High Beam indicator is turn on
and off 3 times.
Page 151 of 440
1494-3. Operating the lights and wipers
4
Driving
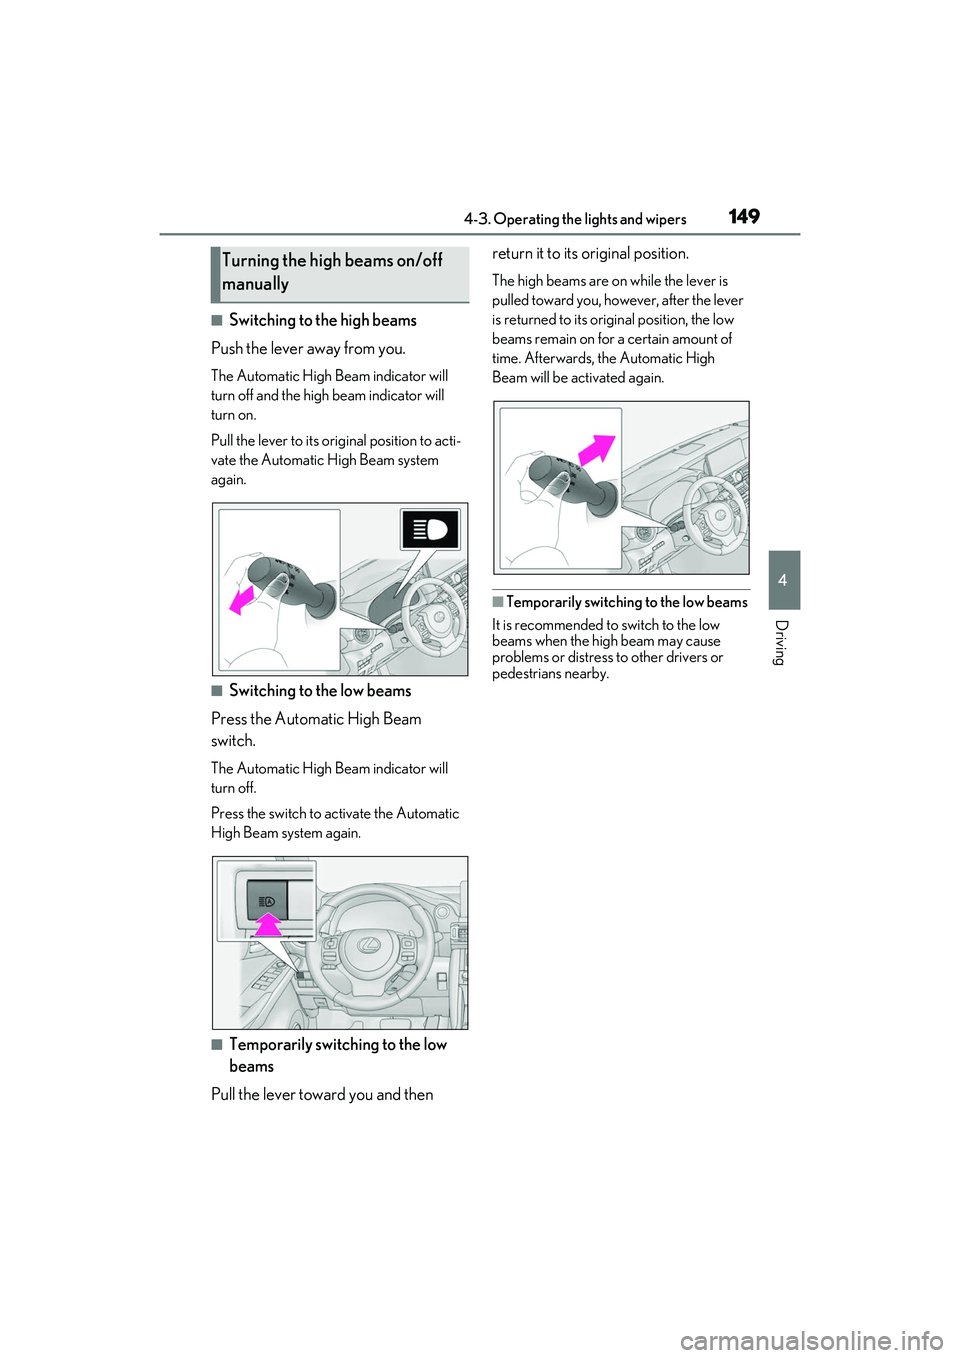
■Switching to the high beams
Push the lever away from you.
The Automatic High Beam indicator will
turn off and the high beam indicator will
turn on.
Pull the lever to its original position to acti-
vate the Automatic High Beam system
again.
■Switching to the low beams
Press the Automatic High Beam
switch.
The Automatic High Beam indicator will
turn off.
Press the switch to activate the Automatic
High Beam system again.
■Temporarily switching to the low
beams
Pull the lever toward you and then return it to its original position.
The high beams are on
while the lever is
pulled toward you, however, after the lever
is returned to its original position, the low
beams remain on for a certain amount of
time. Afterwards, the Automatic High
Beam will be activated again.
■Temporarily switching to the low beams
It is recommended to switch to the low
beams when the high beam may cause
problems or distress to other drivers or
pedestrians nearby.
Turning the high beams on/off
manually
Page 158 of 440

1564-3. Operating the lights and wipers
●If the wiper is turned to AUTO mode
while the engine switch is in IGNITION
ON mode, the wipers will operate once
to show that AUTO mode is activated.
●If the temperature of the raindrop sensor
is 185°F (85°C) or higher, or -22°F
(-30°C) or lower, automatic operation
may not occur. In this case, operate the
wipers in any mode other than AUTO
mode.
■When the windshield wipers are in tem-
porary operation (vehicles with
rain-sensing windshield wipers)
AUTO mode cannot be activated even if is
pressed.
■If no windshield washer fluid sprays
Check that the washer nozzles are not
blocked if there is wash er fluid in the wind-
shield washer fluid reservoir.
WARNING
■Caution regarding the use of wind-
shield wipers in AUTO mode
The windshield wipers may operate
unexpectedly if the sensor is touched or
the windshield is subject to vibration in
AUTO mode. Take care that your fingers
or anything else do not become caught
in the windshield wipers.
■Caution regarding the use of washer
fluid
When it is cold, do not use the washer
fluid until the windshield becomes warm.
The fluid may freeze on the windshield
and cause low visibility. This may lead to
an accident, resulting in death or serious
injury.
NOTICE
■When there is no washer fluid spray
from the nozzle
Damage to the washer fluid pump may
be caused if the lever is pulled toward
you and held continually.
■When a nozzle becomes blocked
In this case, contact your Lexus dealer.
Do not try to clear it with a pin or other
object. The nozzle will be damaged.